Braun BP 6200 User manual

BP 6200
ExactFit™ 5
Upper arm blood pressure monitor
上臂式血壓計

3
12
9
10
11
7
8
BP 6200
Product description
產品說明
Product description
產品說明
AB
Start
AB
A
P
MD
7
5
4
3
2
1
6
9
8
圖1
This product is manufactured by Kaz Europe Sàrl under a license to the ‘Braun’ trademark.
‘Braun’ is a registered trademark of Braun GmbH, Kronberg, Germany.
此產品由歐洲卡舒公司(Kaz Europe Sàrl )以百靈牌商標認可生產, 德國百靈公司
(Braun GmbH, Kronberg, Germany)為百靈牌商標持有人。
© 2014, Kaz Europe Sàrl
Place Chauderon 18, CH-1003 Lausanne, Switzerland
PN: 31IM62AP190
Date: 12AUG14
English............................ 4
中文................................ 16
Fig. 1

45
Warning and precautions
• To ensure accurate measuring results, carefully read the complete use instructions.
• This product is intended for household use only. Keep product and batteries away from
children.
• People suering from cardiac arrhythmia, vascular constriction, arteriosclerosis in
extremities, diabetes or users of cardiac pacemakers should consult their doctor before
measuring their blood pressure themselves, since deviations in blood pressure values may
occur in such cases.
• If you are under medical treatment or taking any medication, please consult your doctor
rst.
• The use of this blood pressure monitor is not intended as a substitute for consultation with
your doctor.
Product description (See page 2-3, Fig. 1)
1. Start button
2. Memory button
M
3. Date / time adjust button
4. Set button
5. Average button
6. User A / B switch
7. LCD display
8. Hose port
9. Connector
10. Arm cu
11. Air hose
12. Battery compartment cover
Inserting batteries (See Fig. 2-3)
• Remove the battery compartment cover at the bottom of the
unit and insert 4 AA LR6 alkaline batteries with correct polarity (see symbol
in the battery compartment).
• Note: always re-set date and time after replacing new batteries
to make sure the measurement results are stored with correct
date and time.
Only discard empty batteries.
They should not be disposed of in the household waste,
but at appropriate collection sites or at your retailer.
Key rules for accurate blood pressure measurement
• Always take readings at the same time of day, ideally in the morning and evening,
under the same conditions.
• Do not measure within 30 minutes after smoking or consuming coee or tea.
• Take o wrist watch and jewelry before tting the cu on the measuring arm.
• While taking a measurement, sit down, relax, keep still, and do not move or speak.
• Wrap the cu snugly around your arm. The cu must be at heart level.
• Do not vibrate the unit during measurement, or the proper measurement
will not be achieved.
• Perform measurement quietly in a relaxed position.
• Sit in a chair with your feet at on the oor.
• Do not wrap the cu over jacket or sweater sleeve or measurement cannot be done.
• Remove tight-tting clothing from your left arm.
Fig. 2
Fig. 3
English
Intended use of Braun ExactFit 5
Braun upper arm blood pressure monitor has been developed for accurate and comfortable blood
pressure measurements. The measuring accuracy of Braun’s upper arm blood pressure monitor was
tested at the time of manufacture and was proven by clinical research in accordance with ESH.
What you should know about blood pressure
Blood pressure constantly changes throughout the day. It rises sharply in the early morning and
declines during the late morning. Blood pressure rises again in the afternoon and nally drops to
a low level at night. Also, it may vary in a short period of time. Therefore, readings from successive
measurements can uctuate.
Blood pressure readings taken from a healthy 31-year -old male, measured at 5-minute intervals
Blood pressure measured in a doctor’s oce only provides a momentary value. Repeated
measurements at home better reect one’s actual blood pressure values under everyday conditions.
Moreover, many people have a dierent blood pressure when they measure at home, because they
tend to be more relaxed than when in the doctor’s oce. Regular blood pressure measurements taken
at home can provide your doctor with valuable information on your normal blood pressure values
under actual «everyday» conditions.
The World Health Organisation (WHO) has set up the following standard blood pressure values when
measured at resting pulse.
Blood pressure Normal Mild Severe
(mmHg) values hypertension hypertension
SYS = systole (upper value) up to 140 140-180 over 180
DIA = diastole (lower value) up to 90 90-110 over 110
Intended use
• This monitor is intended for use in measuring the blood pressure and pulse rate of adults and uses
the oscillometric method.
• This product is intended for household use only.
• This device is not intended as a substitute for regular check-ups by your doctor, please continue to
visit your doctor on a regular basis for a professional reading.

67
Display BP6200
Note: On BP6200, the backlight goes on when the unit is turned on and it will remain on until the
device will be switched o.
AB
A
P
MD
Heart rate symbol
Memory record
Month
Minute
Date
Hour
User A/ user B
symbol
Average symbol
Morning average record
Evening average record
Irregular heart beat
symbol
• Do not in any way twist the arm cu.
• Do not inate the monitor’s cu when it is not wrapped around the arm.
• Do not attempt to disassemble or change any parts of the monitor including the cu.
• Do not drop the product or put it through strong impact.
• The device is not supposed to be used if your arm has any wound or injury.
Choosing the Right Cu
For accurate measurement, it is important to choose the correct size cu which best ts your upper
arm. Choose the cu size according to your arm circumference and make sure the bottom of the cu is
2~3cm above your elbow.
• Small/Medium Cu = 22~32cm arm circumference
• Large/XLarge Cu = 32~42cm arm circumference
Applying the arm cu
1. Insert the connector to the hose port of the device (Fig. 4).
2. Slide the end of arm cu furthest from the tube through the metal ring to a loop.
The smooth cloth should be on the inside of the cu.
3. If the cu is located correctly, the velcro will be on the outside of the cu and the metal ring will
not touch the skin (Fig. 5).
4. Put your left arm through the cu loop. The bottom of the cu should be approximately (2~3 cm)
above elbow. The tube should lie over the brachial artery on the inside of the arm (Fig. 6).
5. Pull the cu so that the top and bottom edges are tightened around your arm (Fig. 7).
6. When the cu is positioned properly, press the Velcro rmly against the pile side of the cu.
7. This cu is suitable for use if the <<index>> mark falls within the <<ok range>> marked by two
arrows when the cu is tightened around your arm (Fig. 8).
8. Sit on a chair and place your arm on the table so that the cu is at the same level as your heart
(Fig. 9).
Low battery indicator
Measuring error display
Ante or Post Meridiem
Deation sign
Morning hypertension
Ination sign
WHO indicator
Fig. 9
Fig. 8
Adult cu
22~32 cm / 32~42 cm
OKOK
Index
Index
Fig. 6
Left arm
Main
arteries
Fig. 4 Fig. 5
Pile side material
Velcro
Smooth
cloth Metal ring
Fig. 7

89
6. LCD Display will show the results and WHO indicator arrow after measurement.
After taking blood pressure measurement, turn o the device by pressing the start button (1) or
automatically after 1 minute.
Memory function
Your blood pressure monitor can store 60 readings for both users each for the BP6200.
Storing measurement data
After each blood pressure measurement, the Systolic pressure, diastolic pressure, pulse rate and the
time & date of specic day will be automatically stored. Memory #01 is always the most recent one.
Once the memory is full, the oldest values will be overwritten.
Press memory button
M
(2) to review the stored data. The last memory data (sys/dia/pul) with
measurement date/time, and WHO indicator will show on LCD. Press memory button
M
(2) again to
show the previous data. Be aware that the correct user A or B is chosen.
Average function
Press the average button (5) to show the full day average of past 7 days on LCD.
Press the average button second to show the morning average of past 7 days on LCD.
If the result is with morning hypertension, the morning hypertension icon will
be shown. Press the average button third time to show the evening average of past
7 days on LCD. Press the average button fourth time to show the full day average of
past 7 days again.
Erasing data
Make sure the Product is in power o mode.
Press and hold memory button
M
(2) for more than 5 seconds,
LCD will blink display “dEL ALL”(if the “slide switch is in User A
side, the user A icon will show ”) or“dEL ALL”(if slide switch is in
User B side, the user B icon will show).
Press memory button
M
(2) again, LCD will display “---” to mean
all the stored data of corresponding user have been deleted.
A
A
A
P
MD
A
Select mode
How to select user A /user B
• Make sure the Product is in power o mode.
• Slide the user switch to user A or user B, the current user mode will ash on the LCD display.
The WHO/ESH indicator to evaluate blood pressure data
This device has a blood pressure level indicator established according to WHO
and the European Hypertension Society Guidelines (ESH) in 2007. For every
measurement displayed on the screen, the cursor will indicate the blood pressure
level with the corresponding color code, from green to red. You can use this
classication daily to guide you to understand your blood pressure level. If you are
really concerned by the classication level, you should consult your doctor.
Setting month, date and time
a. Insert battery.
b. The “year” 20_ _ will blink display, user can press adjust (3)
to adjust year by increase step“1”.
c. User press set button (4) to start the day setting, then the
“day” will blink display, user can press adjust (3) to adjust
day by increase step“1”.
d. User press set button (4) to start the month setting, then
the “month”will blink display, user can press adjust (3) to
adjust month by increase step“1”.
e. User press set button (4) to start the hour setting, then the
“hour” will blink display, user can press adjust (3) to adjust
hour by increase step“1”.
f. User press set button (4) to start the minute setting, then
the “minute”will blink display, user can press adjust (3) to
adjust minute by increase step“1”.
g. User press set button (4) to end all the date/time setting,
all the blink are stopped.
Note: Holding the adjust button will scroll the value.
Taking a measurement
Wrap the cu around the arm (see“applying the arm cu” section above).
1. Sit upright on the chair to have a correct posture.
2. Press and release start button (1), date/time and current user will be displayed.
3. Set user A/B switch (6) to A for user A or B for user B, LCD display will show user A or B symbol.
4. Press and release the start button (1), all icons on display will be shown for 2 seconds. The
device will adjust to zero automatically. The measuring blood pressure symbol will then ash on
the display and the air pressure will automatically pump up to certain pressure level and start
measurement.
Do not move or talk in the midst of taking blood pressure measurement.
5. After the air pressure has increased, the pulse is detected, the heart rate symbol will start
ashing.
RED >
GREEN >
AB
A
P
MD
AB
A
P
MD
A
P
MD c.
A
P
MD d.
A
P
MD e.
A
P
MD f.
A
P
MD g.

10 11
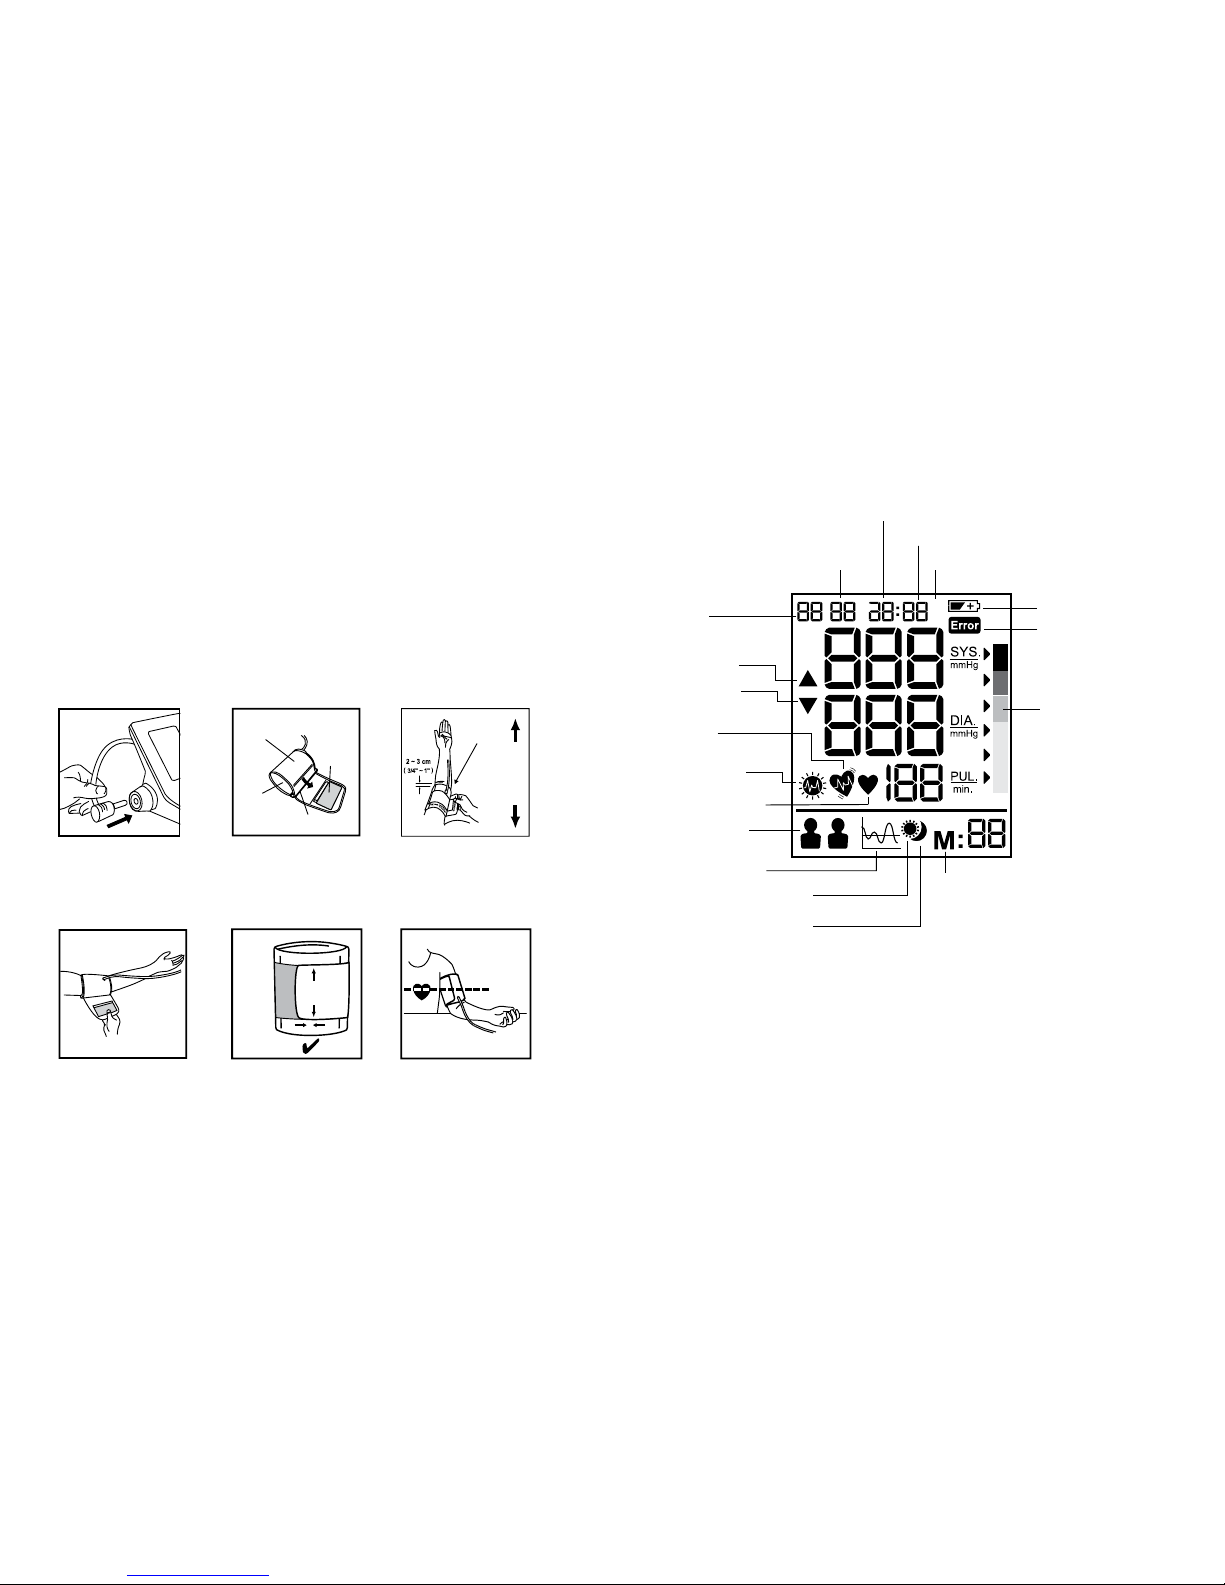
Irregular heart beat detector
The appearance of this symbol signies that a certain pulse irregularity was detected during the
measurement. Talking, moving, shaking or an irregular pulse during the measurement can result in the
appearance of this icon. Usually this is not a cause for concern, however if the symbol appears often,
we recommend you seek medical advice. The device does not replace a cardiac examination, but serve
to detect pulse irregularities at an early stage.
Low battery indicator
When the low battery indicator ashes on the display, it means the battery is low and the four
batteries need to be replaced with alkaline LR6 (AA) batteries.
** After replacing batteries, BPM will go into time-setting mode automatically and show the
last measurement time on screen. Please set the current date / time before taking the next
measurement to get correct average result.
Storage and cleaning
• Always keep the unit in the carrying case after its use.
• Do not put the item directly under the sunlight, in high temperature or humid and dusty places.
• Do not store in extremely low (less than -20°C) or high (more than 60°C) temperature.
• Use a piece of cloth with water or mild cleansing agent to clean the case and then use a piece of dry
cloth to wipe it dry. Use a piece of dry cloth to wipe the cu when it is dirty.
• Do not use any strong cleansers to clean it.
• When the unit is not to be used for a long time, remove the batteries.
(Batteries may leak or cause harm).
• Do not modify the device. NEVER open the device! This will make the manufacturer’s warranty
invalid.
Calibration
This device was designed and manufactured for a long service life, however it is generally
recommended to have the device inspected once a year to ensure correct function and accuracy.
Please contact the authorized service centre located in your country. Note: The calibration checking
is not a free service. Please contact the Authorized Service Centre to get a quotation before you send
out the product.
This device is not intended as a substitute for regular check-ups by your doctor, please continue to
visit your doctor on a regular basis for a professional reading.
Production date is given by the LOT located in the back of the device. The rst 3 numeric digits
after the LOT No represents the day of the year of manufacture. The next 2 numeric digits represent
the last two numbers of the calendar year of manufacture and the letters at the end designate the
manufacturer of the product. E.g. LOT 15614VTN this product was made on the day 156, year 2014 at
manufacturer identier VTN.
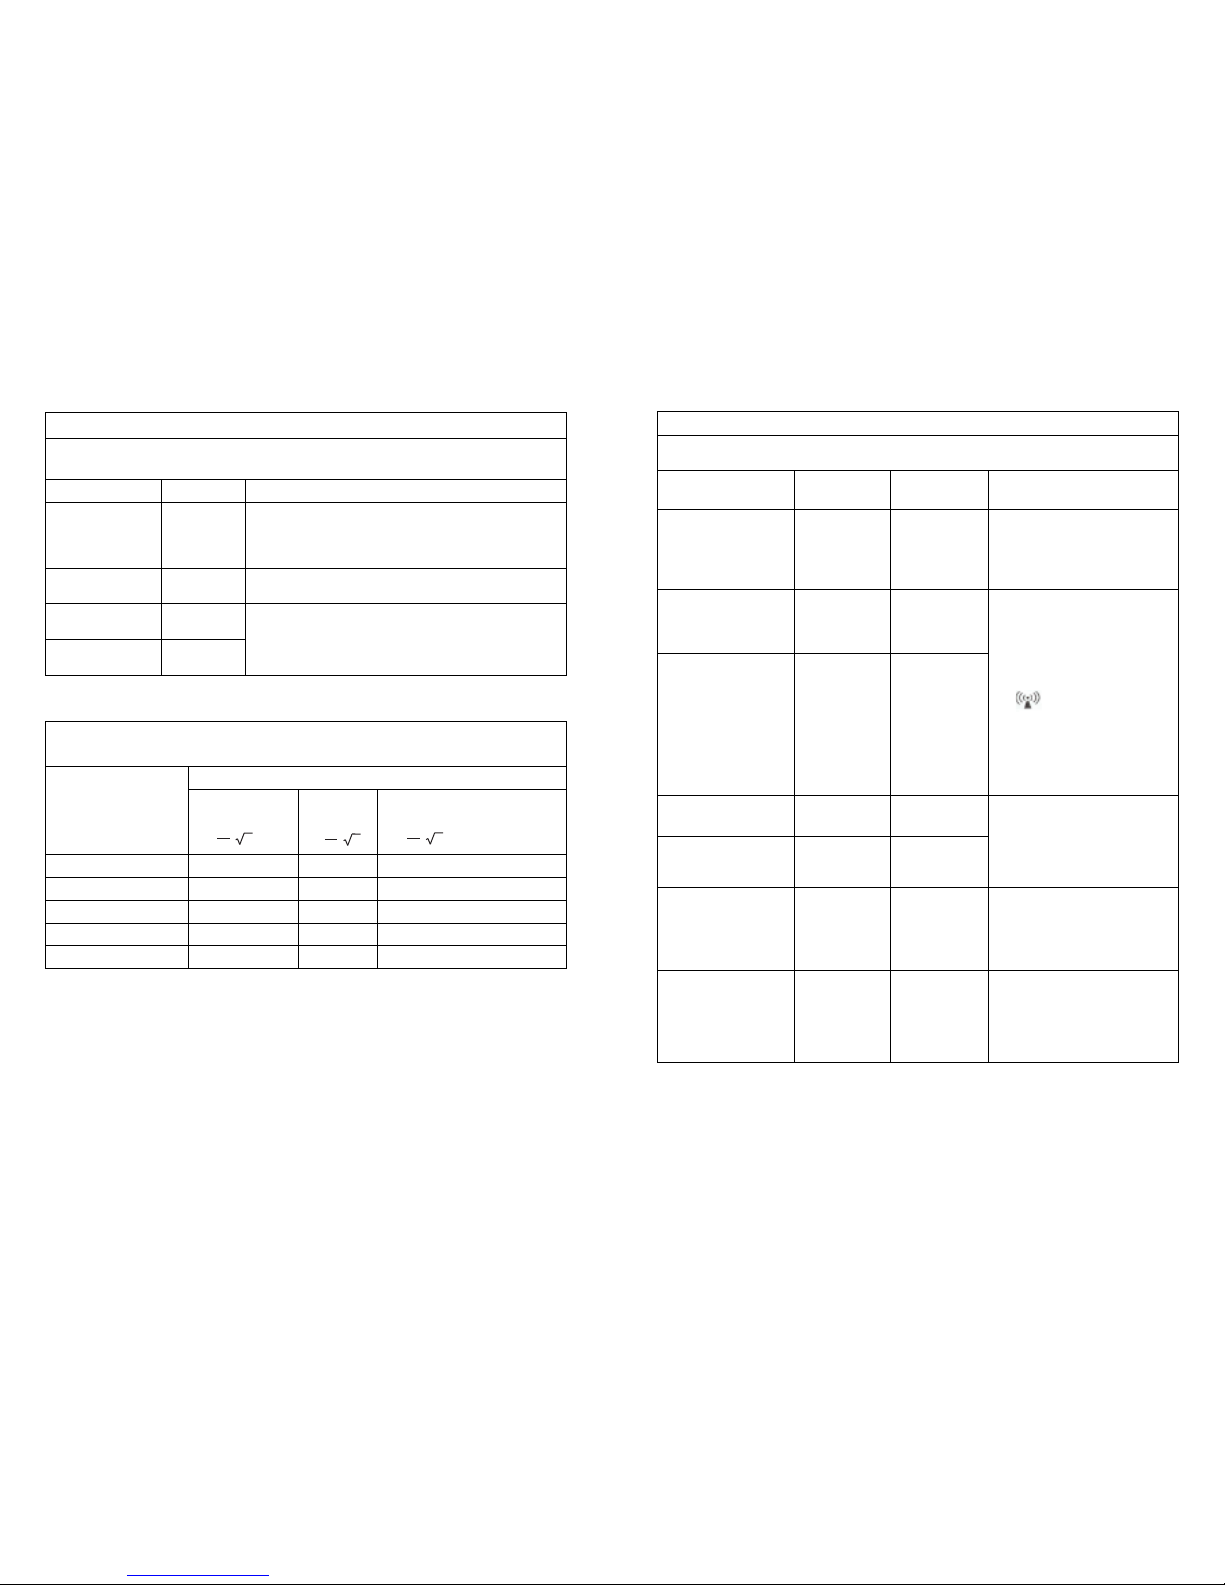
What to do if …..
Problem Reason Solution
Heart rate
symbol
Appears in the measurement
condition and ashes when
pulse is detected.
• Measurement in progress, remain quiet.
Low battery
indicator
Appears when the battery
voltage is excessively low or the
positions of the batteries are
incorrect.
• Replace all four batteries with new ones.
Insert the batteries in the correct
positions. Be aware of +/- positions.
Measuring
error
Appears when the accurate
blood pressure and pulse could
not be obtained.
• Press“start/stop” button again and remeasure.
• Check if cu is wrapped according to instructions.
• Check that there are no kinks in tube.
• Check palm if exerting eort.
• Check if talking or moving during measurement.
• Check if posture is correct.
E1 shows The cu is not secure • Refasten the cu and then measure again.
E2 shows The cu is very tight • Refasten the cu and then measure again.
E10 or
E11 shows
The monitor detected motion,
talking or the pulse is too poor
while measuring.
• Relax for a moment and then measure again.
E20 shows The measurement process does
not detect the pulse signal.
• Loosen the clothing on the arm and then
measure again.
E21 shows Measure incorrectly • Relax for a moment and then measure again.
EE3 - EE15
shows
Error while measuring • Retake the measurement. If the problem
persists, contact the retailer or our customer
service department for further assistance.
Refer to the warranty in page13 for contact
information and return instructions.

12 13
This product conforms to the provisions of the EC directive 93/42/EEC (Medical Device
Directive). This device conforms to the following standards:
• EN 60601-1: 2006 + AC:2010: - General requirements for basic safety and essential
performance
• EN 60601-1-2:2007 - Electromagnetic compatibility requirements and tests
• EN 60601-1-11:2010 - Requirements for medical electrical equipment and medical
electrical systems used in the home healthcare environment
• EN 1060-1:1995 + A2:2009 – Non-invasive sphygmomanometers - general
requirements
• EN 1060-3:1997 + A2:2009 - Non-invasive sphygmomanometers - Supplementary
requirements for electro-mechanical blood pressure measuring systems.
• EN 1060-4:2004 - Non-invasive sphygmomanometers - Test procedures to determine
the overall system accuracy of automated non-invasive sphygmomanometers.
• IEC60601-1-11:2010-General requirements for basic safety and essential performance-
Collateral Standard: Requirements for medical electrical equipment and medical
electrical systems used in the home healthcare environment
Medical electrical equipment needs special precautions regarding EMC.
For detailed description of EMC requirements please contact an authorized local service centre
Portable and mobile RF communications equipment can aect medical electrical equipment.
Please do not dispose of the product in the household waste at the end of its useful life.
Disposal can take place at your local retailer or at appropriate collection points provided
in your country.
Warranty
This product comes with limited warranty commencing on the date of purchase. Within the warranty
period we will eliminate, free of charge, any defects in the appliance resulting from faults in materials
or workmanship, by replacing the complete appliance.
This warranty is applicable only for the appliance supplied by the appointed distributor.
This warranty does not cover: damage due to improper use, normal wear or use as well as defects
that have a negligible eect on the value or operation of the appliance. The warranty becomes void
if repairs are undertaken by unauthorized persons and if original Braun parts are not used. To obtain
service within the warranty period, please contact us.
HK Listing No.: 130467
Specications
Method of measurement Oscillometric
Model number BP 6200
Range of measurement Pressure 0~300 mmHg
Pulse 40~199 beats/minute
Accuracy Pressure +/- 3 mmHg
Pulse +/- 5 % Max.
Ination Deluxe automatic
Display Liquid crystal display – systolic, diastolic, pulse rate
Backlight Display
Sets of memory 60 sets per user
Cu size Small cu = 22-32cm arm circumference
Large cu = 32-42cm arm circumference
Operating temperature +10 °C ~ + 40 °C, less than 85 % R.H.
Storage temperature -20 °C ~ +60 °C, less than 85 % R.H.
Operating atmospheric pressure 860-1060 hPa
Unit weight Approximately 500gr (without batteries)
Power supply Alkaline battery: 4 x AA (LR6) 1.5V
Battery life 300 times measurement
Auto power o Whenever not used for 1 minute
Accessories 4 batteries, 2 arm cus with tube, instruction manual, pouch,
travel bag
Service life 5 years
IMPORTANT
Read the operating instructions.
If device is not used within specied temperature, humidity and atmospheric pressure
ranges the technical accuracy of the measurement cannot not be guaranteed.
Classication:
• Internally powered equipment
• Type BF equipment
• IP22: Protected against solid foreign objects of 12.5 mm diameter and greater.
Protected against vertically falling water drops when the device is tilted up to 15°
• Not suitable for use in the presence of ammable anesthetic mixture with air, oxygen
or nitrous oxide
• Continuous operation with short-time loading
Operating temperature
Storage temperature
Storage humidity
0297

14 15
Guidance and manufacturer’s declaration – electromagnetic emissions
The ME equipment is intended for use in the electromagnetic environment specified below.
The customer or the user of the ME equipment should assure that it is used in such an environment.
Emissions Test Compliance Electromagnetic environment – guidance
RF Emissions
CISPR 11 Group 1
The ME equipment uses RF energy only for it’s internal
function. Therefore, its RF emissions are very low and are not
likely to cause any interference in nearby electronic equipment.
RF Emissions
CISPR 11 Class BF Complies
Harmonic emissions
IEC 61000-3-2 Not Applicable
The ME equipment is solely battery powered.
Voltage fluctuations /
flicker emissions Not Applicable
Non-Life Support Equipment Separation Distance Calculation
(3Vrms / 3V/m compliance)
Rated maximum output
power of transmitter (W)
Separation distance according to frequency of transmitter (m)
150 kHz to 80 MHz
in ISM bands
80 MHz to
800 MHz 800 MHz to 2.5 GHz
0.01 0.12 0.12 0.23
0.1 0.37 0.37 0.74
1 1.17 1.17 2.33
10 3.69 3.69 7.38
100 11.67 11.67 23.33
Guidance and manufacturer’s declaration – electromagnetic immunity
The ME is intended for use in the electromagnetic environment specified below.
The customer or the user of the ME should assure that it is used in such an environment.
Immunity test IEC60601 test
level Compliance level Electromagnetic environment –
guidance
Electrostatic discharge
(ESD)
IEC 61000-4-2
±6kV Contact
±8kV Air Complies
Floors should be wood,concrete, or
ceramic tile. If floors are covered with
synthetic material, the relative humidity
should be at least 30%.
Radiated RF
IEC 61000-4-3
3 V/m 80MHz to
2.5GHz Complies
Field strengths outside the shielded
location from fixed RF transmitters, as
determined by an electromagnetic site
survey, should be less than 3 V/m.
Interference may occur in the vicinity
of equipment marked with the follow-
ing symbol:
Separation distance calculation
provided above. If a known transmitter
is present the specific distance can be
calculated using the equations.
Conducted RF
IEC 61000-4-6
3Vrms 150kHz to
80MHz
Not Applicable
(no electrical
cabling)
Electrical fast transient
IEC 61000-4-4
±2kV power line
±1kV I/O lines Not Applicable
The ME equipment is solely battery
powered.
Surge
IEC 61000-4-5
±1kV differential
±2kV common Not Applicable
Power frequency magnetic
field
IEC 61000-4-8
3 A/m Complies
Power frequency magnetic fields
should be at levels characteristic of a
typical location in a typical commercial
or hospital environment.
Voltage dips, short
interrupts and voltage
variations on power
supply input lines
IEC 61000-4-11
>95% dip 0.5
cycle
60% dip 5 cycles
70% dip 25
cycles
95% dip 5 sec.
Not Applicable The ME equipment is solely battery
powered.
d=[ ]
V1
3.5 P
d=[ ]
E1
3.5 P
d=[ ]
E1
7P
d=[ ]
V1
3.5 P
d=[ ]
E1
3.5 P
d=[ ]
E1
7P
d=[ ]
V1
3.5 P
d=[ ]
E1
3.5 P
d=[ ]
E1
7P

16 17
繁體中文
百靈ExactFit 5上臂式血壓計
百靈上臂式血壓計可精確、舒適地為您量度血壓。血壓計在製造時已通過準確度測試,臨床驗證
亦證實其符合ESH(歐洲高血壓學會)指引。
血壓須知
人體的血壓全天都會變動,例如清晨會明顯上升,上午則會有所下降;下午再次上升,晚間又會
下降到低水平。即使在很短時間內,血壓亦會出現波動。因此每次量度結果都會有所不同。
以一個31歲健康男性, 每隔5分鐘量度一次血壓所得出的血壓讀數。
在診所量度的血壓只反映當時的數值。在家重複量度血壓,更能準確反映日常生活中的實際血壓
狀況。
此外,不少人在家與在診所測量的結果亦有差異,原因在於在家時較為放鬆。在家定期量度血
壓,有助您向醫生提供具參考價值的日常血壓數據。
世界衛生組織(WHO)制定了以下在靜息狀態下量度的標準血壓數據。
血壓 正常數值 輕度高血壓 嚴重高血壓
(mmHg,毫米汞柱)
SYS (systole), 收縮壓(上壓) 不超過140 140-180 超過180
DIA (diastole), 舒張壓(下壓) 不超過90 90-110 超過110
產品用途
• 本血壓計採用示波法量度成年人的血壓和脈搏。
• 本血壓計只適合家居使用。
• 本血壓計並非用於取替定期的醫生檢查。如要獲得專業的血壓數據,應繼續定期求醫。
警告和注意事項
• 為確保能獲得準確的量度結果,請仔細閱讀使用說明書所有內容。
• 本血壓計只適合家居使用。切勿讓兒童接觸本血壓計及電池。
• 心律不齊、血管收縮、肢體動脈硬化、糖尿病或使用心臟起搏器的人士如要自行量度血
壓,應事先徵求醫生的意見。這些症狀可能會導致血壓數值出現偏差。
• 若您正在接受治療或服用藥物,請事先徵求醫生的意見。
• 使用本血壓計不能代替醫生診斷。
產品說明(參閱第2-3頁,圖1)
1. 開關按鈕
2. 記憶功能按鈕
M
3. 日期/時間調整按鈕
4. 設置按鈕
5. 計算平均值功能按鈕
6. 用戶A/B切換按鈕
7. LCD顯示屏
8. 軟管插口
9. 連接頭
10. 臂套
11. 空氣軟管
12. 電池盒蓋
安裝電池(參閱圖2-3)
• 揭開機身底下的電池盒蓋,依照電池盒正負極方向安裝4粒AA LR6鹼性
電池。
• 注意:安裝新電池後,記住要重設日期和時間,以確保能按正確日期和
時間儲存量度結果。
請在電池電量耗盡後才將其棄置。
請將舊電池交還給有關的回收站或零售商,切勿連同家居垃圾
一起丟棄。
量度準確血壓須知
• 請在每天同一時間、在同樣的狀況下量度血壓,理想的量度時間為早上
或晚上。
• 不要在吸煙或飲用咖啡或茶後30分鐘內量度血壓。
• 請先取下手上的腕錶及珠寶首飾,然後再戴上臂套。
• 量度血壓過程中,請坐好、保持放鬆及靜止不動,不要行走或說話。
• 把臂套套於手臂,並與心臟處於同一水平位置。
• 量度過程中,切勿晃動血壓計,否則會影響量度結果。
• 量度時請保持安靜及放鬆姿勢。
• 坐在椅子上,雙腿平放於地板。
• 切勿將臂套套在衣袖上,否則將無法進行量度。
• 脫掉左臂上的緊身衣服。
• 切勿扭動臂套。
圖2
圖3

18 19
• 臂套未套上手臂時,切勿充氣。
• 切勿試圖拆卸或改裝血壓計部件,包括臂套在內。
• 切勿摔跌血壓計或令其受到嚴重衝擊。
• 若手臂受傷或有任何傷口,切勿使用本血壓計。
選擇合適的臂套
選擇適合您手臂的臂套尺寸有助於準確量度血壓。請根據您的手臂圍選擇臂套尺寸,並確保臂套
底部位於手肘以上2-3厘米之處。
• 中小碼臂套=22-32厘米手臂圍
• 大碼/加大碼臂套=32-42厘米手臂圍
如何套上臂套
1. 將連接頭插入機器的軟管插口 (圖4)。
2. 把平滑那一面的臂套套上, 然後把沒有金屬環那一端的臂套穿過金屬環,並捲成一個圓圈形
狀。
3. 若臂套位置正確,魔術貼應位於臂套外面,金屬環亦不會觸及皮膚 (圖5)。
4. 左臂穿過臂套。臂套底端應與手肘距離約3/4-1吋(2-3厘米)。軟管應在手臂內側上動脈的上方
(圖6)。
5. 拉動臂套,令其頂部和底部邊緣套緊手臂 (圖7)。
6. 調整好臂套位置後,把魔術貼貼緊臂套上的絨毛。
7. 把臂套套緊於手臂時,若印有《Index》部份臂套位於臂套內標示《OK》的範圍內,則代表臂
套大小合適 (圖8)。
8. 坐在椅子上,手臂放在桌子上,令臂套與心臟處於同一水平位置 (圖9)。
BP6200顯示屏
注意:BP6200在開機後會亮起背光,並直至關機才會熄滅。
AB
A
P
MD
心律標誌
記憶功能記錄
月
分
日期
時
用戶A/B標誌
平均值功能標誌
早上平均記錄
晚上平均記錄
心律不齊標誌
早上高血壓標誌
電池電量偏低指示
測量錯誤顯示
上午(A)或下午(P)
放氣標誌
充氣標誌
WHO(世衛)指標
圖6
左臂大
動脈
圖5
絨毛
魔術貼
平滑布料
金屬環
圖7
圖4
圖9圖8
成年人臂套
22-32厘米/32-42厘米
OKOK
Index
Index

20 21
選擇A/B用戶模式
如何選擇用戶A/用戶B?
• 確保血壓計已關機。
• 把用戶切換開關撥至A或B,LCD顯示屏會閃爍顯示現用戶模式。
WHO/ESH(世衛/歐洲高血壓學會指南)指標
本血壓計設有一個根據世衛(WHO)及歐洲高血壓學會(ESH)2007年指引提供的
血壓指標。每次量度血壓時,指標都會以相應的顏色(從綠至紅)顯示血壓水平。
您可以此作為日常的血壓狀況分類參考。如您對自己的血壓分類感到不安,可
徵求醫生的意見。
設置月份、日期和時間
a. 安裝電池。
b. 顯示屏閃爍顯示年份數值20_ _。用戶可按調整按鈕 (3)
調整年份。每按一次,數值加一。
c. 按下設置按鈕 (4)設定日期,顯示屏閃爍顯示日期數值。
用戶可按調整按鈕 (3)調整日期。每按一次,數值加一。
d. 按下設置按鈕 (4)設定月份,顯示屏閃爍顯示月份數值。
用戶可按調整按鈕 (3)調整月份。每按一次,數值加一。
e. 按下設置按鈕 (4)設定小時,顯示屏閃爍顯示小時數值。
用戶可按調整按鈕 (3)調整小時。每按一次,數值加一。
f. 按下設置按鈕 (4)設定分鐘,顯示屏閃爍顯示分鐘數值。
用戶可按調整按鈕 (3)調整分鐘。每按一次,數值加一。
g. 按下設置按鈕 (4)結束日期/時間設定,顯示屏停止閃爍。
注意:按住調整按鈕可快速滾動數值。
量度血壓
1. 把臂套套於手臂(參閱上述「套上臂套」部分)。
2. 在椅子上坐直,以保持正確姿勢。
3. 按下開關按鈕 (1),然後鬆開,顯示屏會顯示日期/時間和當前用戶。
4. 按下用戶A/B切換按鈕(6)選擇用戶A或B,顯示屏會顯示相應的A或B標誌。按下開關按鈕 (1),
然後鬆開,顯示屏顯示所有標誌2秒。血壓計會自動置零。其後,顯示屏閃爍顯示量血壓標
誌,並自動將氣壓增加至某個水平,然後開始量度。量度血壓過程中切勿走動或說話。
5. 充氣後,血壓計便能感應到脈搏,心律標誌 開始閃爍。
6. LCD顯示屏顯示量度結果及WHO指標。量度血壓後,按下開關按鈕 (1)關機,或讓其閒置1分
鐘後自動關機。
RED >
紅
GREEN>
綠
AB
A
P
MD
AB
A
P
MD
A
P
MD c.
A
P
MD d.
A
P
MD e.
A
P
MD f.
A
P
MD g.
記憶功能
BP6200可為每位用戶儲存60組量度結果。
儲存數據
每次量度血壓後,收縮壓、舒張壓、脈搏及日期和時間均會自動儲存起來。記憶功能#01代表最
近的一次量度結果。記憶功能存滿資料後,最舊的數據會依次被取代。
按記憶功能按鈕
M
(2)查看儲存的數據,顯示屏顯示最近一次量度結果,包括收縮壓、舒張壓、脈
搏、量度日期和時間,以及WHO指標。再次按記憶功能按鈕
M
(2)可查看之前的數據。請留意是
否選擇了正確的用戶。
計算平均值功能
按計算平均值功能按鈕 (5)可顯示過去七天的全日平均值。
再次按計算平均值功能按鈕可顯示過去七天的上午平均值。
如結果為上午高血壓,顯示屏會顯示上午高血壓標誌 。第三次按下計算平均
值功能按鈕將會顯示過去七天的下午平均值;第四次按下計算平均值功能按鈕
又會顯示過去七天的全日平均值。
刪除數據
請確保血壓計已關機。
按住記憶功能按鈕
M
(2)5秒以上,直至顯示屏閃爍顯示
「dEL ALL」(顯示屏會因應切換開關位置顯示相應的用戶
A或B標誌)。
再次按下記憶功能按鈕
M
(2),顯示屏顯示「---」,代表相
應用戶的記憶功能數據被刪除。
A
A
A
P
MD
A

22 23
心律不齊感應功能
顯示屏出現 標誌代表在量度過程中感應到脈搏跳動不規則。在量度過程中說話、走動、握
手或脈搏不規則都會引致該標誌的出現。若偶爾出現這種情況,用戶毋須擔憂,但如果頻繁發
生,則應求醫。本設備有助於及早發現脈搏不規則狀況,但並不能替代心臟檢查。
電池電量偏低指示
顯示屏閃爍顯示 代表電池電量偏低,須更換4粒AA LR6鹼性電池。
** 更換電池後,血壓計會自動進入設定時間模式,並顯示最後一次量度時間。請先設置日期和時
間,然後才進行下一次量度,這樣才能確保平均值準確。
存放和清潔
• 每次使用後,請將血壓計放入其儲存袋。
• 切勿將本血壓計放置於陽光直射、高溫、潮濕或多塵的地方。
• 切勿將血壓計存放於極度低溫(低於-20°C)或高溫(高於60°C)的地方。
• 使用抹布或溫和的清潔劑清潔機身外殼,然後用乾燥的抹布抹乾。若臂套變髒,可用乾燥抹布
清潔。
• 切勿使用強力清潔劑進行清潔。
• 若血壓計將長時間閒置,請取出電池,以免電池滲漏或引致損傷。
• 若血壓計曾被擅自拆裝或修改,保養即告失效。
校正
本血壓計可供長期使用,但是,建議每年檢查一次,以確保血壓計的功能性和準確度。若你懷疑
測量的準確度,請聯絡售後服務熱線。注意:校正檢查並不是一項免費服務,有關該服務收費,
請聯絡售後服務中心。
本血壓計並不代表能取代醫生的專業意見,故請定期跟醫生作一個詳細的檢查,以了解你的身體
狀況。
製造日期請參見產品背部之產品編號。LOT後第一、二、三碼表示該年份的製造日, 第四、五碼
表示製造年份, 最後的字母是製造商的代號。例如LOT 15614VTN 表示本產品製造於在2014年的
第156天, 製造商代號是VTN。
排除故障…..
問題 原因 解決辦法
心律標誌
會在量度時顯示,並在探測到
脈搏時閃爍。 • 正在量度血壓,請保持安靜。
電池電量偏
低指示
電池電量太低或電池安裝方向
不當。 • 換上4粒新電池。按正確正負極方向裝上電
池。請留意+/-(正/負極)方向。
量度出錯
無法獲得準確血壓及脈搏。 • 再次按開關按鈕並重新量度。
• 檢查有否按指示將臂套套於手臂。
• 檢查軟管有否打結。
• 檢查是否握緊拳頭。
• 檢查是否在量度過程中說話或走動。
• 檢查姿勢是否正確。
顯示E1 臂套太鬆 • 重新套上臂套後再量度。
顯示E2 臂套太緊 • 重新套上臂套後再量度。
顯示E10 或
E11 感應器在量度過程中感應到活
動、說話或脈博太弱。 • 放鬆一段時間後再量度。
顯示E20 量度過程中感應不到脈博訊號。 • 鬆開臂上的衣服,重新量度。
顯示E21 量度方式不當 • 放鬆一段時間後再量度。
顯示EE3 -
EE15 量度方式出錯 • 重新量度。如果問題仍然存在,請向售後
服務中心求助。聯絡資訊及交還產品的方
式請參考第25頁「保用」部份。

24 25
規格
量度模式 示波測定法
型號 BP 6200
量度範圍 壓力0~300 mmHg(毫米汞柱)
脈搏40-199次/分鐘
精確度 壓力+/-3 mmHg(毫米汞柱)
脈搏+/- 5%(最多)
充氣 自動
顯示屏 LCD顯示屏 – 收縮壓、舒張壓、脈搏
背光顯示
記憶數量 每位用戶60組
臂套大小 細碼臂套 = 手臂圍22-32厘米
大碼臂套 =手臂圍32-42厘米
操作溫度 10°C - 40°C,相對濕度不超過85 %
存放溫度 -20°C - 60°C,相對濕度不超過85 %
正常工作環境氣壓 860-1060 hPa
重量 約500克 (不含電池)
電源 鹼性電池:4粒AA電池(LR6) 1.5V
電池壽命 可量度300次
自動關機 閒置1分鐘後
附件 4粒電池、兩個帶軟管的臂套、使用說明書、儲存袋
最佳使用期間 5 年
重要事項
請詳閱本使用說明書
若於超出上述指定的溫度,濕度和操作環境氣壓範圍的環境下使用本血壓計,可能
會影響測量的準確性。
產品分類:
• 內置供電式裝置
• BF類設備
• IP22:本血壓計的外殼能阻止直徑大於12.5毫米的外來固體進入機器。當本血壓計
向上傾斜15度時,垂直落下的水滴不會對血壓計造成損害。
• 不適合在可燃性麻醉劑混合了空氣或氧氣或一氧化二氮氣體的環境下使用。
• 在短時間加負載的情況下連續使用。
操作溫度
存放溫度
存放濕度
本產品符合EC指引93/42/EEC的規定(醫療器械指引),並符合以下標準:
• EN60601-1:2006+AC:2010:-Generalrequirementsforbasicsafetyandessential
performance
• EN60601-1-2:2007-Electromagneticcompatibilityrequirementsandtests
• EN60601-1-11:2010-Requirementsformedicalelectricalequipmentandmedical
electrical systems used in the home healthcare environment
• EN1060-1:1995+A2:2009–Non-invasivesphygmomanometers-general
requirements
• EN1060-3:1997+A2:2009-Non-invasivesphygmomanometers-Supplementary
requirements for electro-mechanical blood pressure measuring systems.
• EN1060-4:2004-Non-invasivesphygmomanometers-Testprocedurestodetermine
the overall system accuracy of automated non-invasive sphygmomanometers.
• IEC60601-1-11:2010-Generalrequirementsforbasicsafetyandessentialperformance-
Collateral Standard: Requirements for medical electrical equipment and medical
electrical systems used in the home healthcare environment
根據EMC的相關規定, 電子醫療儀器在使用上必須要特別的注意。
有關電磁相容性要求的詳情,請致電售後服務中心。
可攜式的電子行動通訊設備會影響電子醫療儀器的測定。
本產品壽命完結後,請將其交還給當地零售商或適當的回收站,切勿連同家居廢物
一起棄置。
保用
本產品保用期設有期限。在產品保用期內,我們會就因產品用料或工藝引致的故障提供免費保
修,並會視情況作出維修或更換。
本保用適用於 授權分銷商銷售本產品的國家。
本保用並不涵蓋:因不當操作、正常磨損或使用造成的損壞,以及對本設備的數值或操作無明顯
影響的瑕疵。若經非授權人士維修,或維修時不使用原廠百靈部件,保用將即時失效。
香港表列號碼: 130467
0297

26 27
指南及製造商聲明 – 電磁輻射
本醫療電子設備適合在以下電磁環境使用。顧客或用戶應確保在此等環境下使用本設備。
輻射測試 遵循 電磁環境 – 指南
射頻輻射
CISPR 11 第1組
本醫療電子設備只利用射頻能量實現其內部功能,因
此其射頻輻射相當輕微,不會對附近的電子設備造成
任何干擾。
射頻輻射
CISPR 11 BF 類 符合
諧波輻射
IEC 61000-3-2 不適用
本醫療電子設備只使用電池供電。
電壓波動 / 閃變
輻射 不適用
非生命支援設備的分隔距離計算
( 遵循 3Vrms / 3V/m )
發射器的額定最大輸出
功率 (W)
按發射器頻率計算的分隔距離 (m)
150 kHz 至80 MHz,
ISM 頻段內
80 MHz 至
800 MHz 800 MHz 至2.5 GHz
0.01 0.12 0.12 0.23
0.1 0.37 0.37 0.74
1 1.17 1.17 2.33
10 3.69 3.69 7.38
100 11.67 11.67 23.33
指南及製造商聲明 – 電磁抗擾性
本醫療電子設備適合在以下電磁環境使用。顧客或用戶應確保在此等環境下使用本醫療電子設備。
抗擾測試 IEC60601 測試
水平 遵循水平 電磁環境 – 指南
靜電放電 (ESD)
IEC 61000-4-2
±6kV 接觸
±8kV 空氣 符合
地板材料應為木、混凝土或瓷磚。
若在地板上鋪上合成材料,相對濕
度至少要達到 30%
射頻輻射耐受性
IEC 61000-4-3
3 V/m 80MHz 至
2.5GHz 符合
以電磁現場勘察測定、來自固定射
頻發射器的遮罩位置外的磁場強度
應低於3 V/m。
若鄰近帶有以下標誌的設備,可能
會產生干擾:
上文列出了分隔距離的計算方法。
若存在已知的發射器,可用這些方
程式計算具體距離。
射頻傳導耐受性
IEC 61000-4-6
3Vrms 150kHz 至
80MHz
不適用(不含
導線)
快速瞬變電
IEC 61000-4-4
±2kV 輸電線
±1kV I/O 線不適用
本醫療電子設備只使用電池供電。
電湧
IEC 61000-4-5
±1kV 差模
±2kV 共模 不適用
工頻磁場
IEC 61000-4-8 3 A/m 符合 工頻磁場水平應為典型商業或醫院
環境場所的水平。
電源輸入線的電壓暫
降、短時中斷和電
壓漸變
IEC 61000-4-11
>95% 暫降 0.5
週期
60% 暫降 5 週期
70% 暫降 25
週期
95% 暫降 5 秒
不適用 本醫療電子設備只使用電池供電。
d=[ ]
V1
3.5 P
d=[ ]
E1
3.5 P
d=[ ]
E1
7P
d=[ ]
V1
3.5 P
d=[ ]
E1
3.5 P
d=[ ]
E1
7P
d=[ ]
V1
3.5 P
d=[ ]
E1
3.5 P
d=[ ]
E1
7P

28
Table of contents
Other Braun Blood Pressure Monitor manuals

Braun
Braun ExactFit 5 User manual

Braun
Braun BP 1650 User manual

Braun
Braun iCheck 7 User manual

Braun
Braun EXACTFIT 1 User manual

Braun
Braun ExactFit ? User manual

Braun
Braun VitalScan Plus BP 1650 User manual

Braun
Braun ActivScan 9 User manual

Braun
Braun SensorControl Easy Click User manual

Braun
Braun EXACTFIT 1 User manual

Braun
Braun ActivScan 9 User manual

Braun
Braun BP 2510 User manual

Braun
Braun ActivScan 9 User manual

Braun
Braun BP4900 User manual

Braun
Braun VitalScan BP1700 User manual

Braun
Braun BP4000 User manual

Braun
Braun iCheck 7 User manual

Braun
Braun ExactFit BP4600 User manual

Braun
Braun EXACTFIT 1 User manual

Braun
Braun ExactFit 3 User manual

Braun
Braun BBP 2000 User manual