manuals.online logo
Brands
  1. Home
  2. •
  3. Brands
  4. •
  5. Bristan
  6. •
  7. Plumbing Product
  8. •
  9. Bristan Z2 DUS 1/2 C Wiring diagram

Bristan Z2 DUS 1/2 C Wiring diagram

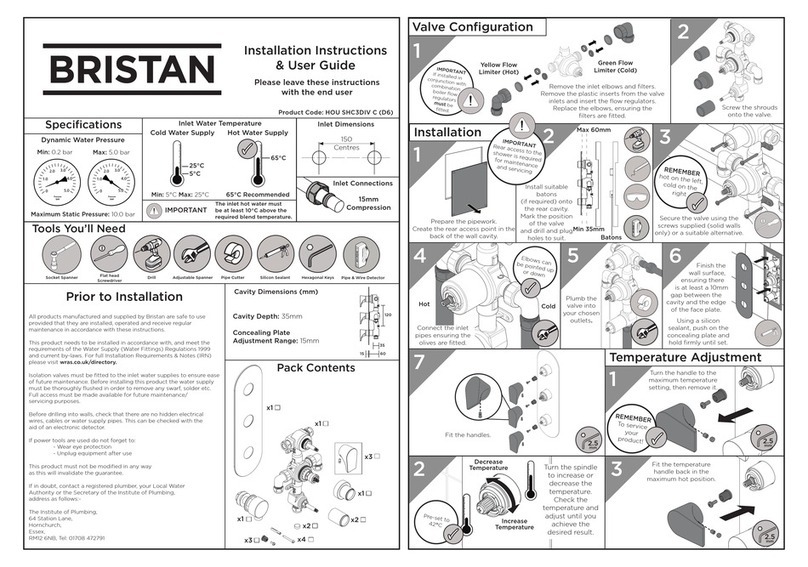
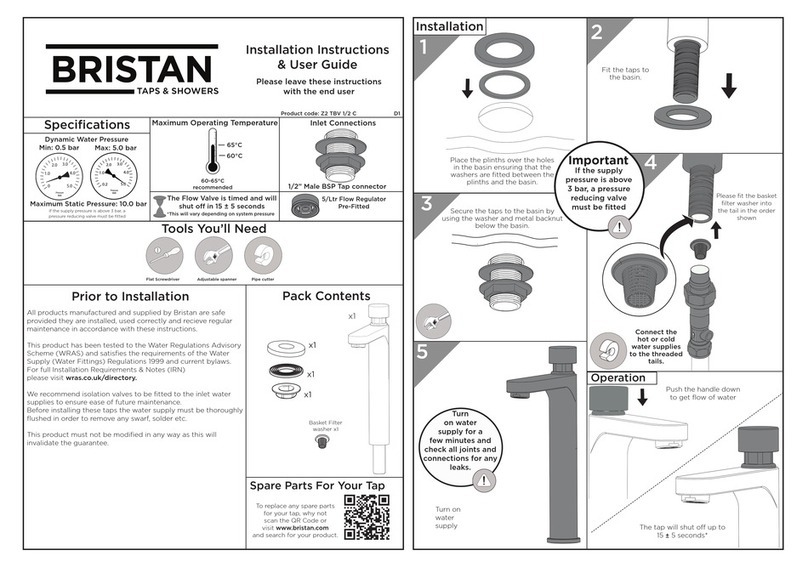
Tools You’ll Need
Secure the taps to the basin by
using the washer and metal backnut
below the basin
3
12
34
Pack Contents
Installation Instructions
& User Guide
Pressure
BAR
1.0
5.0
0.2
4.0
2.0 3.0
60°C
65°C
Specifications
Maximum Static Pressure: 10.0 bar
Inlet Connections
Min: 0.5 bar Max: 5.0 bar
Dynamic Water Pressure
Prior to Installation
Flat screwdriver Adjustable spanner Pipe cutter
Installation
60-65°C
recommended
Please leave these instructions
with the end user
Product code: Z2 DUS 1/2 C D4
All products manufactured and supplied by Bristan are safe
provided they are installed, used correctly and recieve regular
maintenance in accordance with these instructions.
This product has been tested to the Water Regulations Advisory
Scheme (WRAS) and satisfies the requirements of the Water
Supply (Water Fittings) Regulations 1999 and current bylaws.
For full Installation Requirements & Notes (IRN)
please visit wras.co.uk/directory.
We recommend isolation valves to be fitted to the inlet water
supplies to ensure ease of future maintenance.
Before installing these taps the water supply must be thoroughly
flushed in order to remove any swarf, solder etc.
This product must not be modified in any way as this will
invalidate the guarantee.
Spare Parts For Your Tap
1.0
5.0
Pressure
BAR
4.0
2.0 3.0
0
Place the plinths over the holes
in the basin ensuring that the
washers are fitted between the
plinths and the basin.
Fit the taps to
the basin.
Depending
on chosen
hot or cold
water supply,
fit indice
(supplied)
x1
x1
x1
x1
Turn on
water
supply
1/2” Male BSP Tap connector
To replace any spare parts
for your tap, why not
scan the QR Code or
visit www.bristan.com
and search for your product.
Please ensure
that the correct
colour indice is
fitted
Important
5
6Turn
on water
supply for a
few minutes and
check all joints and
connections for any
leaks.
Operation Push down
to get flow of
water
If the supply pressure is above 3 bar, a
pressure reducing valve must be fitted
Cross Screwdriver
The tap will shut o up to
15 ±5 seconds*
Connect the
hot or cold
water supplies
to the threaded
tails.
Please fit the
basket filter
washer into the
tail in the order
shown
If the supply
pressure is above
3 bar a pressure
reducing valve must
be fitted
Important
The Flow Valve is timed and will
shut o in 15 ± 5 seconds
*This will vary depending on system pressure
Basket Filter
washer x1
Maximum Operating Temperature
Indices
x2
Red
Blue
5/Ltr Flow Regulator
Pre-Fitted
At Bristan, we want to make things as easy as possible for our customers. That’s why we oer solid guarantees on
all our products, eective from the date of purchase, to give you peace of mind.
To start your free guarantee simply scan the QR code and register your product. Alternatively visit
www.bristan.com/register to register your product via a computer.
For full guarantee terms and conditions visit www.bristan.com/guarantees.
General Cleaning
Troubleshooting
Notes
Symptom Cause Remedy
No flow or
low flow
rate
Partially closed isolation valve. Open isolation valve.
Instantaneous water heater cycles on
and o as flow rate or pressure is too
low.
Increase water flow rate or
pressure through system.
Head of water is below the
minimum distance required. 5 meters minimum required.
Hot or cold water being drawn o
elsewhere causing pressure changes
or instantaneous boiler temperature
changes.
Do not use other water outlets when using the taps.
Airlock or partial blockage in the supply
pipework.
Flush through pipework to ensure removal of debris
and any airlocks.
Water
dripping
from taps
This is normal for a short time after using
the taps.
This is caused by residual water tension, the build up
of water in the tap body.
If water continues to drip,
possibly due to the ceramic disc valves
Remove valves and clean, refer to 'Maintenance'
section before starting any maintenance.
Taps do not
turn on
Closed isolation valve. Open isolation valve.
Mains water supply turned o. Turn on mains water supply.
3
4
3
2
1
1
Maintenance - Cartridge Cleaning
Unscrew
the grub
screw
in the
hndle.
Remove
handle.
Your fitting has a high quality finish and should be treated with care to preserve the visible surfaces.
All surfaces will wear if not cleaned correctly, the only safe way to clean your mixer tap is to wipe with a
soft damp cloth. Stains can be removed using washing up liquid. All bath cleaning powders and liquids will
damage the surface of your fitting, even the non-scratch cleaners.
Note: Never use abrasive detergents or disinfectants or those containing alcohol, hydrochloric acid or
phosphoric acid.
Please use this space for any notes you or your installer may have regarding the installation/
plumbing of this product.
Prior to doing any
maintenance or
servicing the isolation
valves must be turned
to the
closed/o position.
Important
Pull out
the valve
and soak
in suitable
descaler
Maintenance- Flow Straightener
2
Remove
valve from
the casing
Clean the seal
around the
valve and apply
silicon grease
Check that the groove
is clear of any debris
on the inside of valve
casing.
Using a flat
screw driver,
remove the
spring and
spline.
Rinse and leave to
one side.
Assemble the
valve. apply
grease and
place back into
the tap body.
Replace
handle
Rinse
the flow
straightener
Unscrew
the flow
straightener
Replace
the flow
straightener
into spout
4
456

Other Bristan Plumbing Product manuals
Bristan AR2 SHXVOFF Wiring diagram

Bristan

Bristan AR2 SHXVOFF Wiring diagram

Bristan W SNK6 C User manual

Bristan

Bristan W SNK6 C User manual

Bristan TY2 SDIV C Mounting instructions

Bristan

Bristan TY2 SDIV C Mounting instructions

Bristan QST BAS2 C User manual

Bristan

Bristan QST BAS2 C User manual

Bristan KN2 SHXAR C Mounting instructions

Bristan

Bristan KN2 SHXAR C Mounting instructions

Bristan SOLO SST1000-L User manual

Bristan

Bristan SOLO SST1000-L User manual

Bristan VAX DSM C Wiring diagram

Bristan

Bristan VAX DSM C Wiring diagram

Bristan PM2 SHCDIV C Wiring diagram

Bristan

Bristan PM2 SHCDIV C Wiring diagram

Bristan Pivot Series User manual

Bristan

Bristan Pivot Series User manual

Bristan W BASIN14 C Wiring diagram

Bristan

Bristan W BASIN14 C Wiring diagram

Bristan GLR 1/2 C User manual

Bristan

Bristan GLR 1/2 C User manual

Bristan SOQ2 SHUAR C Mounting instructions
Bristan

Bristan SOQ2 SHUAR C Mounting instructions

Bristan Rio User manual

Bristan

Bristan Rio User manual

Bristan ARM WORD01 C User manual

Bristan

Bristan ARM WORD01 C User manual

Bristan Cinnamon Wiring diagram

Bristan

Bristan Cinnamon Wiring diagram

Bristan PM2 SHCDIV BLK (D2) Wiring diagram

Bristan

Bristan PM2 SHCDIV BLK (D2) Wiring diagram

Bristan ZI SHXSMCT Wiring diagram

Bristan

Bristan ZI SHXSMCT Wiring diagram

Bristan Jute JU BSM C User manual

Bristan

Bristan Jute JU BSM C User manual

Bristan BRG 3HBAS C User manual

Bristan

Bristan BRG 3HBAS C User manual

Bristan JAVA J THBSMVO C Wiring diagram

Bristan

Bristan JAVA J THBSMVO C Wiring diagram

Bristan WASTES W BASIN04 BB Mounting instructions

Bristan

Bristan WASTES W BASIN04 BB Mounting instructions

Bristan Pisa PS2 BAS C Wiring diagram

Bristan

Bristan Pisa PS2 BAS C Wiring diagram

Bristan GLL FLEXSNK C (D1) Wiring diagram

Bristan

Bristan GLL FLEXSNK C (D1) Wiring diagram

Bristan Pear Wiring diagram

Bristan

Bristan Pear Wiring diagram

Popular Plumbing Product manuals by other brands

Elkay PSR Series Specifications

Elkay

Elkay PSR Series Specifications

Nero YSW2519-05E quick start guide

Nero

Nero YSW2519-05E quick start guide

agape CER1062M Assembly instructions

agape

agape CER1062M Assembly instructions

Toto WASHLET A100 installation guide

Toto

Toto WASHLET A100 installation guide

resideo Braukmann NK295C installation instructions

resideo

resideo Braukmann NK295C installation instructions

glass 1989 archimede 100/80 manual

glass 1989

glass 1989 archimede 100/80 manual

Moen TS9041 quick start guide

Moen

Moen TS9041 quick start guide

PEERLESS P299232 installation instructions

PEERLESS

PEERLESS P299232 installation instructions

Zip HydroTap G5 BA60 user guide

Zip

Zip HydroTap G5 BA60 user guide

Glacier bay CONSTRUCTOR HD67099-0B10H Installation and care guide

Glacier bay

Glacier bay CONSTRUCTOR HD67099-0B10H Installation and care guide

Hans Grohe Croma 1jet Series Assembly instructions

Hans Grohe

Hans Grohe Croma 1jet Series Assembly instructions

Hornbach 47608-2008 Building instructions

Hornbach

Hornbach 47608-2008 Building instructions

Sterling ADA Adaptable Bath and Wall Surrounds 7114... Installation and care guide

Sterling

Sterling ADA Adaptable Bath and Wall Surrounds 7114... Installation and care guide

Axor Brushed Nickel 37315821 Specification sheet

Axor

Axor Brushed Nickel 37315821 Specification sheet

PolyJohn Heated Grandstand PSW1-2100 user manual

PolyJohn

PolyJohn Heated Grandstand PSW1-2100 user manual

Interline 42250050 instruction manual

Interline

Interline 42250050 instruction manual

Luxart VELERO VE2418-PU Installation

Luxart

Luxart VELERO VE2418-PU Installation

STIEBEL ELTRON SOL BB Installation

STIEBEL ELTRON

STIEBEL ELTRON SOL BB Installation

manuals.online logo
manuals.online logoBrands
  • About & Mission
  • Contact us
  • Privacy Policy
  • Terms and Conditions

Copyright 2025 Manuals.Online. All Rights Reserved.