MODELS
QTR090C·
QTRE090C· QTR110C· QTRE110C
SERVICE
PARTS
Part No.
Key
No.
Description
97016466 Housing
2
1 97016449 Duct Connector 4" (101.6 mm)
3 98010102 Wiring Plate
4 99170245 Screw, #8-18 X .375 (2 req'd)
5 97016765 Wire Panel/Harness Assembly
6 Blower Wheel
7 99020284
99080577 Motor(QTR090C)
99080569 Motor(QTR110C)
99080576 Motor(QTRE090C)
99080579 Motor(QTRE110C)
8 99100491 Isolator (4 req'd)
9 97016468 MotorPlate
10
99250959 Washer #8 (4 req'd)
11
99260558 Nut, Hex Lock #8-32 (4 req'd)
* 97016733 Blower Assembly (QTR090C)
* 97016771 Blower Assembly (QTR110C)
* 97016732 BlowerAssembly (QTRE090C)
. 97016735 Blower Assembly (QTRE110C)
(includes key nos. 6 thru 11)
12 97016497 Grille Assembly
(includes key no. 13)
13 99140199 Grille Spring (2 req'd)
14 99111293 Spacer (2 supplied)
Order service parts by "Part No."
-not by "Key No."
Page4
14
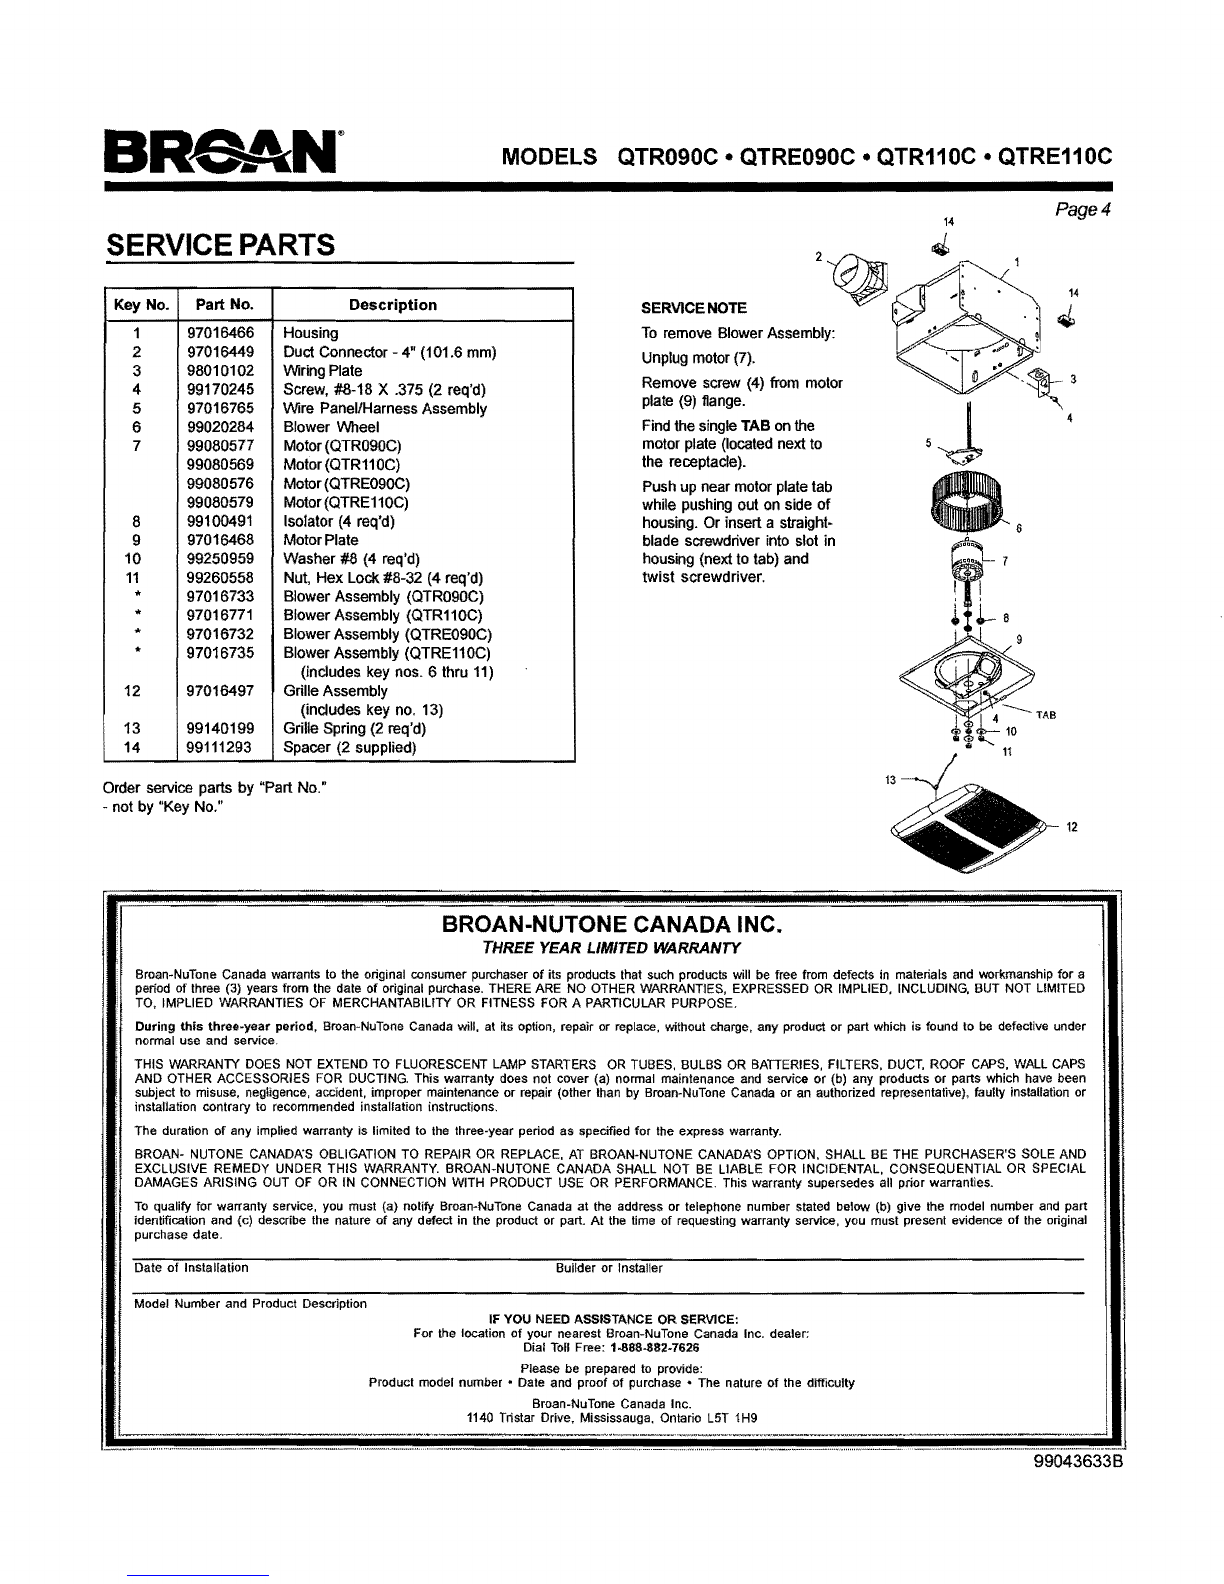
SERVICE
NOTE
To
remove Blower Assembly:
Unplug motor (7).
Remove screw (4) from motor
plate (9) flange.
Find the single TAB on the
motor plate (Ioceted next to
,J
the receptacle).
Push up near motor plate tab
while pushing out on side
of
housing. Or insert a straight-
blade screwdriver into slot in
housing (next to tab) and
twist screwdriver.
12
BROAN-NUTONE CANADA INC.
THREE YEAR LIIlAITED WARRANTY
Broan·NuTone Canada warrants
to
the original consumer purchaser of its products that such products will
be
free from defects
In
materials
and
workmanship for a
period
of
three (3) years from the date
of
original purchase. THERE
ARE
NO OTHER WARRANTIES, EXPRESSED
OR
IMPLIED. INCLUDING.
BUT
NOT
LIMITED
TO, IMPLIED WARRANTIES
OF
MERCHANTABILITY
OR
FITNESS FOR A PARTICULAR PURPOSE.
During
this
three-year period. Broan·NuTone Canada will. at its option, repair or replace. without charge. any product or part which is found to
be
defective under
normal use and service.
THIS WARRANTY
DOES
NOT EXTEND
TO
FLUORESCENT
LAMP
STARTERS
OR
TUBES.
BULBS
OR
BATTERIES. FILTERS.
DUCT,
ROOF
CAPS,
WALL
CAPS
AND OTHER ACCESSORIES FOR DUCTING, This warranty does not cover (a) normal maintenance and service or (b) any products or parts which have been
subject to misuse. negligence. accident. improper maintenance or repair (other than
by
Broan-NuTone Canada or
an
authorized representative), faulty installation or
installation contrary to recommended installation instructions,
The duration
of
any implied warranty is limited to
the
three·year period as specified for the express warranty.
BROAN· NUTONE CANADA'S OBLIGATION
TO
REPAIR
OR
REPLACE,
AT
BROAN-NUTONE CANADA'S OPTION, SHALL
BE
THE PURCHASER'S SOLE AND
EXCLUSIVE REMEDY UNDER THIS WARRANTY. BROAN-NUTONE CANADA SHALL NOT
BE
LIABLE FOR INCIDENTAL, CONSEQUENTIAL
OR
SPECIAL
DAMAGES ARISING OUT
OF
OR
IN
CONNECTION WITH PRODUCT
USE
OR
PERFORMA'NCE. This warranty supersedes all prior warranties.
To
qualify for warranty service. you must (a) notify Broan-NuTone Canada at the address or telephone number stated below (b) give the model number
and
part
identification and (e) describe
the
nature
of
any defect in the product
or
part. At
the
time
of
requesting warranty service. you must present evidence
of
the original
purchase date,
Date
of
Installation
Model Number and Product Description
Builder or Installer
IF
YOU
NEED
ASSISTANCE
OR
SERVICE:
For the location
of
your nearest Broan-NuTone Canada Inc, dealer;
Dial
Toll
Free: 1-886-882-7626
Please be prepared
to
provide:
Product model
number'
Date and proof
of
purchase'
The nature of the difficulty
Broan-NuTone Canada Inc.
1140
TIiSlar Drive, Mississauga. Ontario L5T 1
H9
990436338