Brother ScanNCut DX Series User manual

1
With the Print to Cut function of CanvasWorkspace, registration marks can be added in order to use the scanning function of a
Brother ScanNCut DX series cutting machine to detect the cutting position. By using material printed with images and registration
marks together with cutting data created in CanvasWorkspace, you can efficiently cut the same image with the machine or cut out a
specific part of the image.
This function is an alternative to using the Direct Cut function in the machine to create the cut data only once and directly cut each
material.
This function is available only with the Brother ScanNCut DX cutting machine.
Step 1: Activate the Print to Cut function in CanvasWorkspace.
Step 2: Add registration marks.
Step 3: Import an image into CanvasWorkspace and create cutting data.
Step 4: Save the created data as a PDF file for printing, and print it with a printer.
Step 5: Transfer the FCM file (cutting data) to the cutting machine.
Step 6: Cut the printed material with the cutting machine.
●In order to use the Print to Cut function, make the following preparations in advance.
-It is necessary to update the software of the cutting machine to the latest version. For detailed instructions on updating the
machine, refer to the Operation Manual supplied with it.
- The dedicated application CanvasWorkspace (Windows/Mac) (ver. 2.4.0 or later) must be installed on your computer. The
latest version of the application can be downloaded from the Brother support website (http://s.brother/cuoad/). If it is
already installed, update it to the latest version.
* This feature is not supported by CanvasWorkspace for Web.
- Activate the function on CanvasWorkspace with the included activation card.
●For detailed instructions on using the cutting machine, refer to the Operation Manual supplied with it.
●The contents of this document are subject to change without notice.
●The screens shown in this manual may differ from the actual ones.
Print to Cut
About Print to Cut
Precautions
EN
Version 0

2
Activate the function in CanvasWorkspace.
■Preparation
●In order to use CanvasWorkspace, a CanvasWorkspace login ID is required. If you do not have a free account, click [Create
New Account] in the screen that appears after installation, and then follow the on-screen instructions to create an account.
●If CanvasWorkspace is already installed on your computer and you want to update it to the latest version, select [Check for
CanvasWorkspace Update…] from CanvasWorkspace’s [Help] menu, and then update it according to the on-screen
instructions.
aStart up CanvasWorkspace.
bIn CanvasWorkspace, select [Account Settings...] from the [Help] menu.
cClick [Premium Function Activation].
dType in the activation code on the included activation card, and then click [Activate].
• A connection to the Internet is required for activation.
• The uppercase letters “O” and “I” are not used in the activation code.
• The activation code is valid for only one CanvasWorkspace login ID. The same activation code cannot be used again.
eWhen the activation confirmation message appears, check the information, and then click [Activate] if it is correct.
fClick [OK] to complete the activation.
Activating the Function

3
Use the Print to Cut function in CanvasWorkspace to create print data (containing registration marks) as well as cutting data. Transfer
the cutting data to the cutting machine, and then use it to cut the printed material. Data cannot be edited after it has been transferred
to the cutting machine. Edit the pattern and cutting lines in CanvasWorkspace before transferring it to the cutting machine.
■Preparation
●In order to transfer data via a wireless network connection, the machine must be set up in advance. For details, refer to the
Wireless Network Setup Guide for the cutting machine.
Creating Data
Create alignment data by adding cutting lines and registration marks to an image. For the best results, use images that are simple in
design such as clip art. For real photographs, add a shape from "Shapes" panel to capture the area you want to print and cut.
For this example, we will import an image saved on the computer, and then trace the image by using the Image Tracing function to
create cutting lines.
If the Image Tracing function is not used, the image can be imported by clicking (Import from Your Computer), and cutting
lines can be created by combining built-in patterns available with (Shapes) or by using (Path).
aStart up CanvasWorkspace.
bClick (Artboard) on the right side of the screen.
The Artboard panel appears in the control area.
cUnder [Artboard Size], select the size of material to be printed.
Select an artboard size that does not exceed the maximum scanning area of the machine and is supported by the printer.
For this example, select [A4].
Memo
• If the maximum scanning area of your machine is 12 inches, the alignment data cannot be cut using the 24-inch cutting mat. When
creating data larger than 12 inches, check if 24 inches is supported in “Maximum Scanning Area” under “Machine Information” of the
settings screen on the machine.
Creating Data in CanvasWorkspace

4
dSelect the [Show Registration Mark] check box to add registration marks.
eClick (Image Tracing) to import an image saved on the computer, and then trace the image.
For details on the Image Tracing function, refer to [Online Video Tutorials...] on the [Help] menu in CanvasWorkspace.
fPosition the traced pattern and cutting lines within the red dotted line in the artboard.
Resize the image as necessary, duplicate it and its cutting lines for the number of copies to be cut out, and then arrange them within the
artboard.
gFrom [Export PDF File] on the [File] menu, select what data will be exported with registration marks into the PDF file. Save the
exported PDF file onto the computer.
aImages Only...
Only the displayed images will be exported to the PDF file for printing. Select this option if the cutting lines will not be printed.
bAll Visible Layers...
All layers (including cutting lines) displayed in the Layers panel will be exported to a PDF file for printing.
Note
• Do not edit the pattern after it has been exported to a PDF file. If the pattern has been edited, export it again to a PDF file.
1
2

5
hPrint the saved PDF file with a printer.
• Print on plain white material supported by the printer. If dark or patterned material is used, the machine may not be able to detect the
registration marks.
• When printing, print at the actual size specified for the artboard. If the pattern is printed larger or smaller than the actual size, the machine
may not be able to detect the registration marks.
• Check the condition of the printed registration marks. If any registration mark is smeared or missing, alignment may not be performed
properly. Check the printer, and then print the pattern again.
iClick [Export/Transfer FCM File] on the [File] menu.
jUse the desired method from the screen that appeared to transfer the cutting data to the cutting machine. For details on the
transfer methods, refer to the Brother support website (http://s.brother/cfrab/).
aTransferring using a USB flash drive
Save the FCM file to a USB flash drive, and then transfer the file to the cutting machine.
bTransferring via a wireless network connection
Specify the wireless network settings on the cutting machine, and then transfer the FCM file.
cTransferring using a USB cable (compatible only with 64-bit version of Windows)
Connect the USB cable to the cutting machine and computer, and then directly transfer the FCM file.
Note
• The cutting data for layers that are not visible will not be transferred. Before transferring cutting data, make sure that appears for
the cutting data layer in the Layers panel.
1
2
3

6
Using the material printed with the images and registration marks together with the data transferred to the machine, cut the material
with the machine. For detailed instructions on using the cutting machine, refer to the Operation Manual supplied with it.
■Preparation
●Cutting mat and blade appropriate for the material
For details, refer to the Quick Reference Guide or Operation Manual for the cutting machine.
●Material printed with the images and registration marks
aInstall the blade holder appropriate to the material in the machine.
bTouch the “Retrieve Data” key in the home screen to display the retrieve source selection screen.
cTo use the data from a USB flash drive, insert the USB flash drive into the USB port (for a USB flash drive) on the cutting
machine.
dSelect the location where the data has been saved, and then retrieve the pattern.
aRetrieve a pattern saved on a USB flash drive
If there are folders on the USB flash drive, touch a folder to display the list of patterns that it contains.
Registration marks ( ) appear in alignment data.
bRetrieve a pattern transferred from CanvasWorkspace (via a wireless network connection)
cRetrieve a pattern transferred from CanvasWorkspace (using a USB cable) (compatible only with 64-bit version of Windows)
Note
• Alignment data cannot be retrieved to be added to a built-in pattern being edited. Be sure to use alignment data by itself.
eCheck the retrieved pattern, and then touch the “OK” key.
Memo
• The retrieved data can be saved only on the machine’s memory or a USB flash drive.
Retrieving Alignment Data On the Machine and Cutting
Check the version of the machine’s software. If it is not the latest version, update it.
1 3
2

7
fAttach the material to the appropriate cutting mat, and then touch to load the mat into the machine.
Attach the material to the mat so that the horizontal line of the registration mark is at the top.
The machine will detect the registration marks and automatically correct the alignment of the cutting lines and the material.
gTouch in the preview screen to scan the material in order to check the position of the cutting lines.
The registration marks are detected, and the cutting lines are aligned with the printed image. Recommended for the first cut to verify if the
data is correct for the printed image.
Memo
• When not checking the position of the cutting lines, select “Cut” and continue with step i.
hCheck the position of the cutting lines, and then select “Cut” if the cutting lines and image are not significantly misaligned.
Note
• If the cutting lines and image are significantly misaligned, the retrieved data and printed image may be a wrong combination.
Check that the data retrieved in step band the printed image are the correct combination.
iTouch the “Start” key to start scanning and cutting.
• After the material is scanned to detect the registration marks, cutting starts.
• To perform test cutting, touch the “Test” key. Position the test cutting pattern so that it does not overlap the material or cutting lines. If
scanning was not performed in step g, be sure to touch in the test cutting screen to scan the background, and then check the position
of the pattern.
jWhen cutting is finished, feed out the mat, and then peel the material from the mat.
Memo
• If the cutting position is misaligned, refer to “Troubleshooting” on page 8.
• Depending on type or model of your printer, printed image may be distorted, and that may cause misalignment of the cutting position.

8
If the machine stops operating correctly, check the following possible problems as well as the machine’s Operation Manual or the
Brother support website (http://s.brother/cpoac/) before requesting service. If the problem persists, contact Brother Customer Service
or a Brother authorized service center.
The following table lists some of the messages that may appear while the machine is operating as well as their corresponding
solutions. Perform the necessary operation according to the instructions in the message or the solution described here. If the problem
persists, contact Brother Customer Service or a Brother authorized service center.
Cutting Machine Error Messages
Troubleshooting
Symptom Possible cause (or result) Solution
The cutting position is misaligned.
There is an obstruction around the slot of the
machine.
Maintain space around the slot of the
machine so that the mat can be fed out.
The machine is installed on an uneven
surface.
Place the machine on a level, even surface.
The scanning and cutting positions cannot be
adjusted on the machine.
Refer to “Adjusting the Scanning/Cutting
Position” in the machine’s Operation Manual,
and then adjust the cutting position.
The registration marks were not printed
correctly.
- The mark is smeared.
- The mark is missing.
- The mark has a color other than black.
Print again.
The registration marks were not printed in the
correct positions.
Check the print settings on the printer, and
then print again.
Error Messages
Error Messages Cause/Solution
Failed to recognize the registration marks.
This message appears when the registration marks cannot be
detected by the machine. Check the following.
- Check the condition of the printed registration marks. If it is
smeared, missing or distorted, print again.
- If the pattern was printed on dark-colored material, use light-
colored material and print again.
- If the image was printed on material with a pattern similar to the
registration marks, the marks may not be detected. Use different
material and print again.
- The material may extend from the mat. Correctly attach the
material within the effective area of the mat.
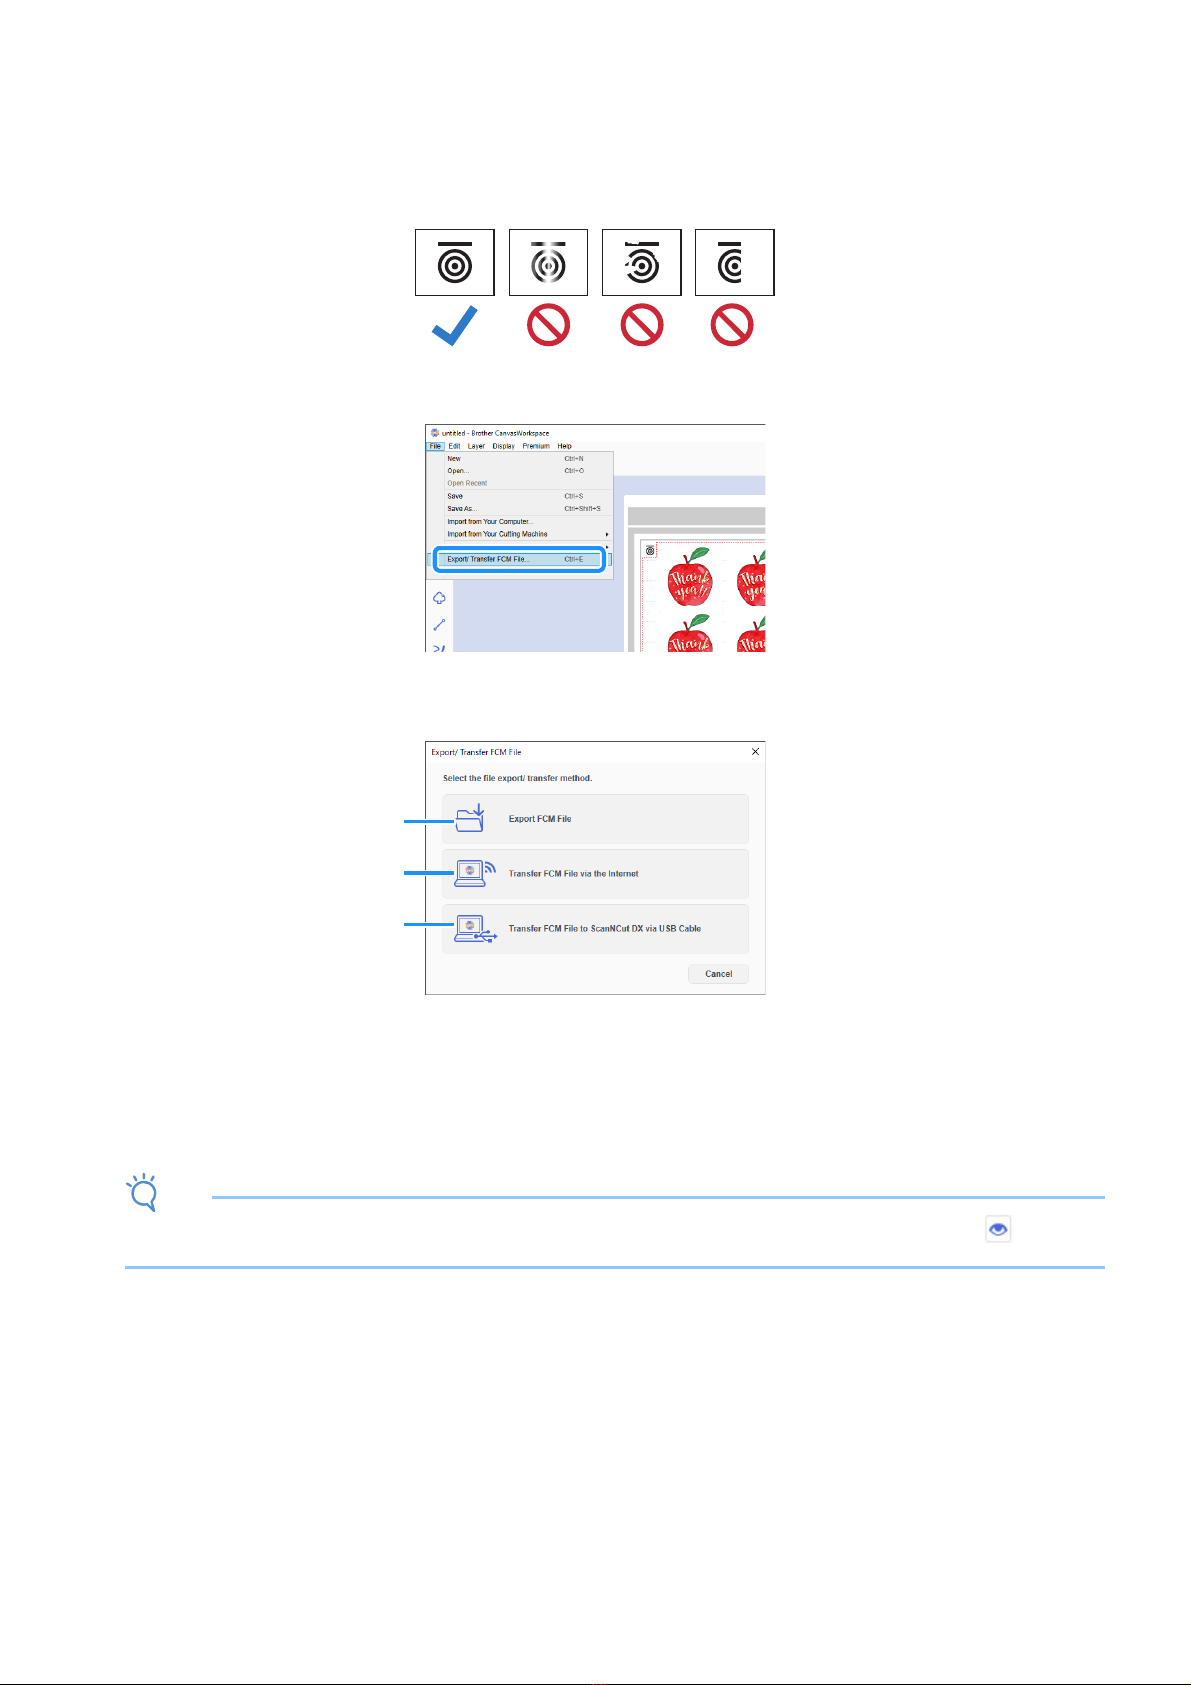
The attached material is rotating.
Please confirm the position of registration marks.
The attached material is either upside down, slightly rotated, or
vertical and the machine can not detect the registration marks
correctly.
Check the orientation of the registration marks, and then attach the
material correctly. (page 7)
Table of contents
Other Brother Cutter manuals

Brother
Brother DesignNCut DC200 User manual

Brother
Brother SDX230DX User manual

Brother
Brother ScanNCut2 User manual

Brother
Brother 891-Z01 Installation and operating instructions

Brother
Brother 891-Z05 User manual

Brother
Brother 891-Z02 User manual

Brother
Brother 891-Z01 User manual

Brother
Brother DesignNCut DC200 Dimensions

Brother
Brother CM100DM User manual

Brother
Brother ScanNCut DX User manual
Popular Cutter manuals by other brands

Huskie Tools
Huskie Tools SP-20 Operating instructions manual

BGS technic
BGS technic 1819 instruction manual

UTILCO
UTILCO BLL-65CU-PS instruction manual

MC Cutter
MC Cutter MC Cable Cutter & Pigtailer instructions

flexbar
flexbar ReproCut 16139 Operation manual

Huskie Tools
Huskie Tools ECO-336B Operation manual