manuals.online logo
Brands
  1. Home
  2. •
  3. Brands
  4. •
  5. Brother
  6. •
  7. Printer
  8. •
  9. Brother MFC-T920DW User manual

Brother MFC-T920DW User manual

Quick Setup Guide

Panduan Cepat
Read the Product Safety Guide first, then read this guide for the correct installation procedure.
Keep this guide next to your machine for quick reference.




Bacalah Panduan Keselamatan Produk (Product Safety Guide) terlebih dahulu, kemudian bacalah panduan ini
untuk langkah-langkah pemasangan yang benar.
Simpanlah panduan ini di dekat mesin Anda untuk referensi cepat.
D01JME001-00
ASA/SAF/THA/IDN
Version//Versi 0
Remove the protective tape
and the film covering the
machine.


Buka pita dan film pelindung
yang menutupi mesin.
en th id
1Unpack the machine and check the components

Mengeluarkan mesin dari kemasan dan memeriksa komponennya
MFC-T920DW / MFC-T925DW
NOTE
• The components may differ depending on your country.
• Save all packing materials and the box in case you must ship your machine.
• We recommend using a USB 2.0 cable (Type A/B) that is no more than
2 metres long (included in some countries).
• Use a straight-through Category 5 (or greater) twisted-pair cable for 10BASE-T
or 100BASE-TX Fast Ethernet Network (not included).

•
•
•
•

CATATAN
• Komponen mungkin berbeda tergantung negara Anda.
• Simpan semua bahan dan kotak kemasan jika sewaktu-waktu Anda harus
mengirimkan mesin Anda.
• Kami merekomendasikan penggunaan kabel USB 2.0 (Jenis A/B) yang
panjangnya tidak lebih dari 2 meter (sudah disertakan di beberapa negara).
• Gunakan kabel pasangan berpilin straight-through Kategori 5 (atau lebih) untuk
Jaringan Ethernet Cepat 10BASE-T atau 100BASE-TX (tidak disertakan).
5Fill the ink tanks with inbox ink

Isi tangki tinta dengan kotak tinta
IMPORTANT
Check the ink bottle model name on the label. Using the
incorrect ink may cause damage to the machine.



PENTING
Periksa nama model botol tinta pada label. Penggunaan
tinta yang tidak benar dapat mengakibatkan kerusakan
pada mesin.
1
2
3
Open the ink tank cover a,
remove the cap b, and place
it on the back of the cover c.
a
b
c
Buka penutup tangki tinta a,
lepaskan tutupnya b, dan
letakkan di bagian belakang
penutup c.
Video setup instructions:

Video petunjuk pengaturan:
support.brother.com/videos
2Load plain A4 paper in the paper tray

Masukkan kertas A4 biasa ke dalam baki kertas
Fan the paper well.

Kibas-kibaskan kertas
dengan sempurna.
Connect the power cord. The machine powers on automatically.

Sambungkan kabel daya. Mesin menyala secara otomatis.
3Connect the power cord

Menyambung kabel daya
You may need to set your country or language (depending on your machine). Follow the
steps on the LCD.


Anda mungkin diminta untuk menetapkan negara atau bahasa (tergantung pada mesin
Anda). Ikuti langkah pada LCD.
4Select your country or language

Pilih negara atau bahasa Anda
BTD60BK
BT5000CMY
BT5001CMY
BT5009CMY
BT6000BK
BT6001BK
BT6009BK
You must follow steps 1to 10 to complete the setup.
   
Anda harus mengikuti tahap 1hingga 10 untuk menyelesaikan pengaturan.
Follow the steps on the LCD to set the date and time.


Ikuti langkah-langkah di LCD untuk mengatur tanggal
dan waktu.
6Set the date and time

Mengatur tanggal dan waktu
When the machine has finished the initial cleaning process, follow the steps on the LCD to configure
the machine settings.


Setelah mesin menyelesaikan proses pembersihan awal, ikuti langkah-langkah di LCD untuk
mengatur pengaturan mesin.
• Set Firmware Update Notice
• Check the print quality
• Configure the paper tray
settings
•
•
•
• Menyetel Pemberitahuan
Pembaruan Firmware
• Periksa kualitas cetakan
• Mengonfigurasi pengaturan
baki kertas
7Machine settings

Pengaturan mesin
1. Press Settings.
2. Press aor bto select [Initial Setup] >
[Local Language] > your language, and
then press OK.
3. Press Stop/Exit.
8Select your language (if needed and only for certain models)

Pilih bahasa Anda (jika perlu dan hanya untuk model tertentu)
1. 
2. ab[Initial Setup
][Local Language
]

3. 
1. Tekan Settings (Pengaturan).
2. Tekan aatau buntuk memilih [Initial
Setup (Pngtrn Awal)] > [Local
Language (Bahasa Lokal)] > bahasa
Anda, dan kemudian tekan OK.
3. Tekan Stop/Exit (Stop/Keluar).
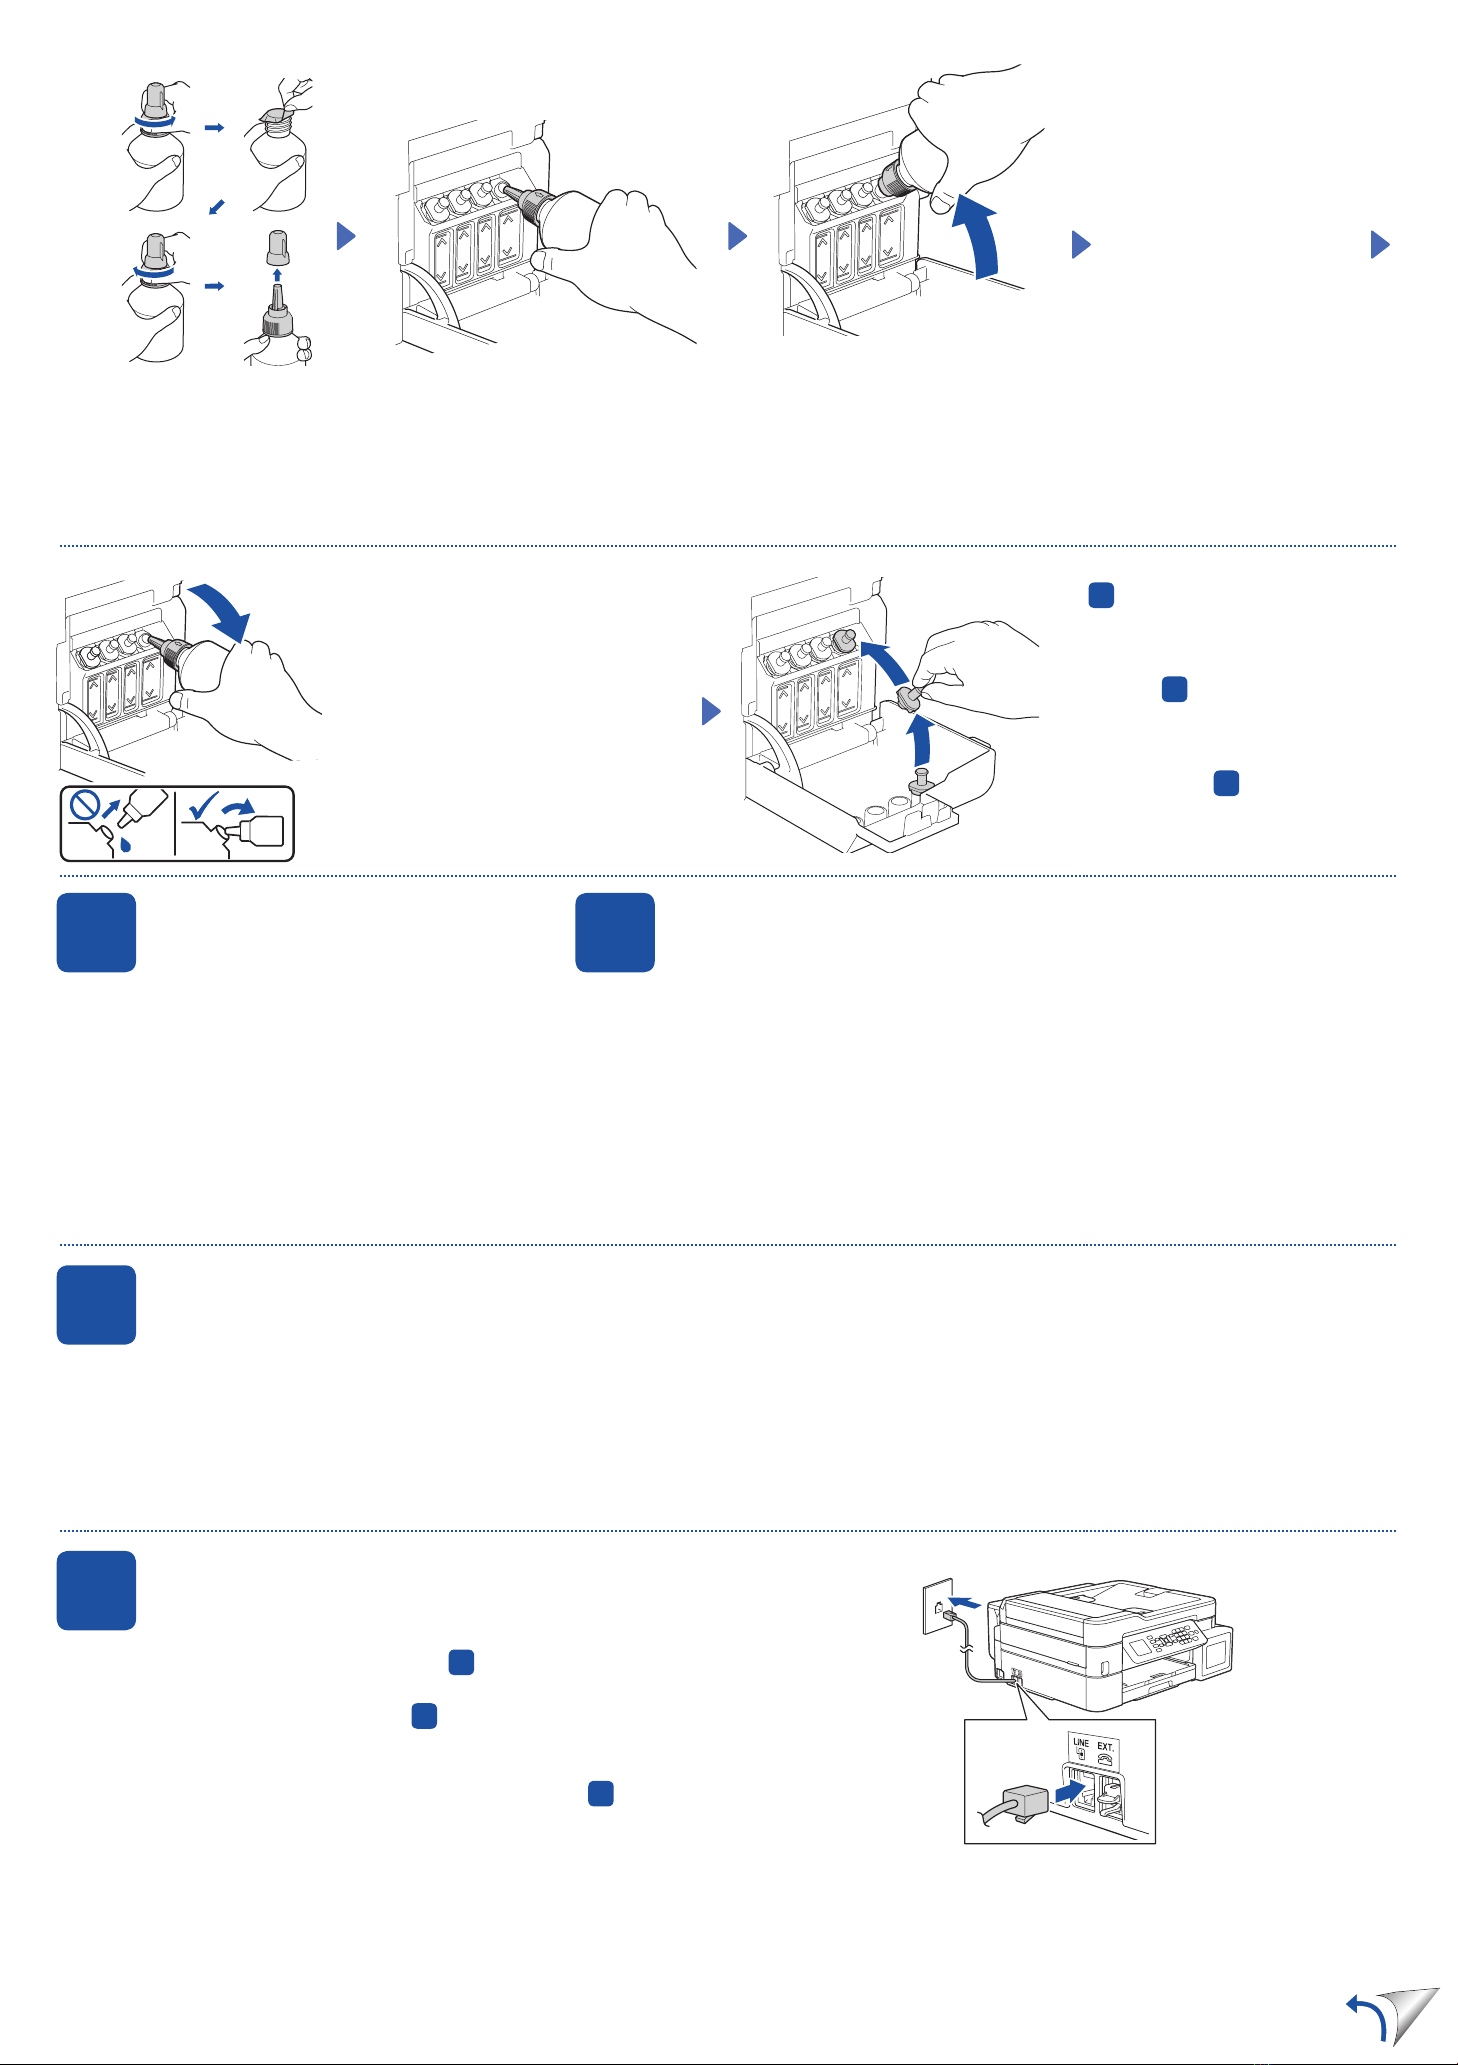
When finished, remove the bottle, pointing
the nozzle upward so the ink does not
spill.


Setelah selesai, keluarkan botol, arahkan
nosel ke atas agar tinta tidak tumpah.
Replace the ink tank cap. Repeat step
5for the other ink tanks, and then
close the ink tank cover.

 5

Pasang kembali tutup tangki tinta.
Ulangi langkah 5untuk tangki-tangki
tinta yang lain, dan kemudian pasang
penutup tangki tinta.
9Connect the telephone line cord

Menyambung kabel saluran telepon
If you are not using your machine as a fax, go to 10 .
For more information on using the fax feature, see the Online User’s Guide.
 10



Jika Anda tidak menggunakan mesin Anda sebagai faksimili, lihat 10 .
Untuk informasi lebih lanjut mengenai penggunaan fitur faks, lihat Panduan
Pengguna Online.
Insert the telephone line cord into the socket marked LINE.
LINE
Masukkan kabel saluran telepon ke dalam soket bertanda LINE.
Remove the film and tighten the cap firmly.

Lepaskan film dan kencangkan tutup
dengan kuat.
The bottle is self-standing and
the ink fills automatically until
the bottle is empty. To fill the
ink tank faster, squeeze the
bottle on both sides.





Botol tinta dapat berdiri sendiri
dan tinta terisi secara otomatis
sampai botol kosong. Untuk
mengisi tangki tinta lebih
cepat, remas kedua sisi botol.
Remove the nozzle cap and insert the bottle nozzle firmly into the ink tank so that
the ink does not spill.

Buka penutup nosel dan masukkan nosel botol dengan kuat ke dalam tangki tinta
agar tinta tidak tumpah.
Setup Complete /  / Pengaturan Selesai
10 Connect your computer or mobile device

Sambungkan komputer atau perangkat bergerak Anda
Connect your Brother machine and computer/mobile device to
the same network.


Sambungkan mesin Brother dan komputer/perangkat bergerak
Anda ke jaringan yang sama.
D01JME001-00
Find the SSID (Network Name) and Network Key
(Password) on your wireless access point/router.


Temukan SSID (Nama Jaringan) dan Kunci
Jaringan (Kata Sandi) di jalur akses nirkabel/
router Anda.
1. Go to your machine and press .
2. Press OK to select [Find Wi-Fi
Network].
The [Enable WLAN?] message
appears on the LCD.
3. Press cto select Yes.
Select the SSID (Network Name) for your access point/
router and enter the Network Key (Password).
For more information, see Enter Text on Your Brother
Machine in the Online User’s Guide.







Pilih SSID (Nama Jaringan) untuk jalur akses/router Anda
dan masukkan Kunci Jaringan (Kata Sandi).
Untuk informasi lainnya, lihat Memasukkan Teks di Printer
Brother Anda di Panduan Pengguna Online.
When the wireless setup is successful, the LCD displays
[Connected].
  
[Connected  ]
Jika pengaturan nirkabel berhasil, LCD akan menunjukkan
[Connected (Tersambung)].
If you cannot find this information, ask your
network administrator or wireless access point/
router manufacturer.



Jika Anda tidak dapat menemukan informasi
ini, hubungi administrator jaringan atau
pabrikan jalur akses nirkabel/router Anda.
1. 
2. [Find
Wi-Fi Network (
)]
[Enable WiFi? (
)]

3. c
1. Pada mesin Anda tekan .
2. Tekan OK untuk memilih [Find
Wi-Fi Network (Temukan
Jaringan Wi-Fi)].
Pesan [Enable WLAN? (Aktifkan
WLAN?)] muncul pada LCD.
3. Tekan cuntuk memilih Ya.
Manual wireless setup (if needed)

Pengaturan nirkabel manual (jika perlu)
SSID: XXXXXXX
Network Key: XXXX
Install Brother software to use your machine. Visit one of the following websites:

Pasang perangkat lunak Brother untuk menggunakan mesin Anda. Kunjungi
salah satu situs web berikut:
For Computers:

Untuk Komputer:
For Windows only, CD installation is also
available (for some countries).



Khusus untuk Windows, pemasangan
melalui CD juga tersedia (untuk beberapa
negara).
For Mobile Devices:

Untuk Perangkat Bergerak:
Follow the on-screen instructions.

Ikuti petunjuk di layar.
For Wired Network Connection and USB Connection:
Use the correct port (based on the cable you are using)
inside the machine, as shown.



Untuk Koneksi Jaringan Berkabel dan Koneksi USB:
Gunakan port yang benar (berdasarkan kabel yang Anda
gunakan) dalam mesin, seperti pada gambar.
Install the Brother iPrint&Scan
application.

iPrint&Scan
Pasang aplikasi Brother
iPrint&Scan.
setup.brother.com brother.com/apps
For FAQs, Troubleshooting, and to download software and manuals, visit support.brother.com.

Untuk T&J, Solusi, serta untuk mengunduh perangkat lunak dan panduan, kunjungi support.brother.com.
© 2020 Brother Industries, Ltd. All rights reserved.

© 2020 Brother Industries, Ltd. Semua hak dilindungi undang-undang.
Improve Print Quality /  / Meningkatkan Kualitas Cetakan
Clean the print head.

Membersihkan print head.
1. Press .
2. Press aor bto select [Print Head
Cleaning] > [Black only], [Colour
only] or [All] > [Normal], [Strong] or
[Strongest], and then press OK.
3. Press c.
1. 
2.

a

b
[Print Head Cleaning
][Black only 
][Colour only ][All
][Normal ][Strong ]
[Strongest ]
3. c
1. Tekan .
2. Tekan aatau buntuk memilih [Print Head
Cleaning (Pembersihan print head)]
> [Black only (Hitam saja)], [Colour
only (Warna saja)] atau [All (Semua)]
> [Normal], [Strong (Kuat)] atau
[Strongest (Paling Kuat)], lalu tekan OK.
3. Tekan c.
Machine Settings /  / Pengaturan Mesin
The machine’s settings are set from the application (Brother iPrint&Scan or Brother Utilities) on your computer or mobile device.
Important Notice for Network Security: The default password to manage this machine’s settings is located on the back of the machine and marked “Pwd”. We
recommend immediately changing the default password to protect your machine from unauthorised access. See the Online User’s Guide.

Pwd”


Pengaturan mesin disetel dari aplikasi (Brother iPrint&Scan atau Brother Utilities) di komputer atau perangkat bergerak Anda.
Pemberitahuan Penting untuk Keamanan Jaringan: Kata sandi standar untuk mengelola pengaturan mesin ini tertera di belakang mesin dan bertanda “Pwd”.
Sebaiknya segera ubah kata sandi standar untuk melindungi mesin Anda dari akses yang tidak sah. Lihat Panduan Pengguna Online.
Check Ink Volume /  / Memeriksa Volume Tinta
DO NOT fill the ink tank past the maximum fill mark.

JANGAN isi tangki tinta melebihi tanda pengisian maksimum.
When the ink level reaches the lower line, refill the ink tank as soon as possible.

Ketika isi tinta mencapai garis bawah, segera isi ulang tangki tinta.
7
32
1548
6
Reference and Troubleshooting /  / Referensi dan Solusi
For detailed machine operation, see the Online User’s Guide:



Untuk pengoperasian mesin yang mendetail, baca Panduan
Pengguna Online:
support.brother.com/manuals
Control Panel Overview /  / Gambaran Umum Panel Kontrol
1. 1.8” (44.9 mm) Liquid Crystal Display (LCD)


1,8” (44,9 mm) Liquid Crystal Display (LCD)
2. Mode buttons

Tombol mode
3. Settings buttons

Tombol Pengaturan
Access the ink menu.

Mengakses menu tinta.
Configure wireless settings.

Mengonfigurasi pengaturan nirkabel.
4. Telephone buttons

Tombol telepon
5. Dial Pad

Papan Tombol
6. Stop/Exit button

Stop/Keluar tombol
7. Mono Start/Colour Start buttons

Mulai MonoTombol/Mulai Berwarna
8. Power On/Off

Daya Aktif/Nonaktif
Turn on the machine: Press
Turn off the machine: Press and hold


Menyalakan mesin: Tekan
Mematikan mesin: Tekan dan tahan

Other manuals for MFC-T920DW

5

This manual suits for next models

1

Other Brother Printer manuals

Brother MFC-J5620DW User manual

Brother

Brother MFC-J5620DW User manual

Brother HL-4040CN User manual

Brother

Brother HL-4040CN User manual

Brother DCP-J562DW Technical manual

Brother

Brother DCP-J562DW Technical manual

Brother HL-820 User manual

Brother

Brother HL-820 User manual

Brother HL-1650 User manual

Brother

Brother HL-1650 User manual

Brother DCP-J572DW Technical manual

Brother

Brother DCP-J572DW Technical manual

Brother HL-L8260CDW Operating and safety instructions

Brother

Brother HL-L8260CDW Operating and safety instructions

Brother HL-4570CDW User manual

Brother

Brother HL-4570CDW User manual

Brother MFC-J285DW Assembly instructions

Brother

Brother MFC-J285DW Assembly instructions

Brother HL 5030 - B/W Laser Printer User manual

Brother

Brother HL 5030 - B/W Laser Printer User manual

Brother HL-5040 User manual

Brother

Brother HL-5040 User manual

Brother RJ-4030Ai User manual

Brother

Brother RJ-4030Ai User manual

Brother HL-5240 User manual

Brother

Brother HL-5240 User manual

Brother TD-4520DN User manual

Brother

Brother TD-4520DN User manual

Brother HL-1660e Series User manual

Brother

Brother HL-1660e Series User manual

Brother MFC-J775DW User manual

Brother

Brother MFC-J775DW User manual

Brother DCP-L3528CDW User manual

Brother

Brother DCP-L3528CDW User manual

Brother MFC-9320CW Instruction Manual

Brother

Brother MFC-9320CW Instruction Manual

Brother PT 1000 - P-Touch 1000 B/W Thermal Transfer... Parts list manual

Brother

Brother PT 1000 - P-Touch 1000 B/W Thermal Transfer... Parts list manual

Brother P-touch E550W User manual

Brother

Brother P-touch E550W User manual

Brother 7050N - HL B/W Laser Printer User manual

Brother

Brother 7050N - HL B/W Laser Printer User manual

Brother HL-5470DW User manual

Brother

Brother HL-5470DW User manual

Brother ADS-2100 User manual

Brother

Brother ADS-2100 User manual

Brother MFC-J3540DW User manual

Brother

Brother MFC-J3540DW User manual

Popular Printer manuals by other brands

Lexmark C950 Series Service manual

Lexmark

Lexmark C950 Series Service manual

MGI JETVARNISH 3DS user manual

MGI

MGI JETVARNISH 3DS user manual

Epson TM-T20 Quick reference guide

Epson

Epson TM-T20 Quick reference guide

Printronix SMARTLINE SL4M Programmer's reference manual

Printronix

Printronix SMARTLINE SL4M Programmer's reference manual

BIXOLON SRP-352plusV user manual

BIXOLON

BIXOLON SRP-352plusV user manual

Canon PIXMA MX432 Setting up

Canon

Canon PIXMA MX432 Setting up

Datamax-ONeil RL3 user guide

Datamax-ONeil

Datamax-ONeil RL3 user guide

Lexmark E350d Setup & installation

Lexmark

Lexmark E350d Setup & installation

Ricoh SP204SF user guide

Ricoh

Ricoh SP204SF user guide

Cashino KMP-II user manual

Cashino

Cashino KMP-II user manual

Kyocera KM-4530 Operation guide

Kyocera

Kyocera KM-4530 Operation guide

Canon BJC-4000 Service manual

Canon

Canon BJC-4000 Service manual

Dascom DP-520 Quick setup instructions

Dascom

Dascom DP-520 Quick setup instructions

Boca Systems Micro Plus user manual

Boca Systems

Boca Systems Micro Plus user manual

Canon PIXMA MP510 Service manual

Canon

Canon PIXMA MP510 Service manual

Konica Minolta magicolor 3730DN Firmware update guide

Konica Minolta

Konica Minolta magicolor 3730DN Firmware update guide

Epson Stylus C110 Service manual

Epson

Epson Stylus C110 Service manual

Epson PLQ-22CS quick reference

Epson

Epson PLQ-22CS quick reference

manuals.online logo
manuals.online logoBrands
  • About & Mission
  • Contact us
  • Privacy Policy
  • Terms and Conditions

Copyright 2025 Manuals.Online. All Rights Reserved.