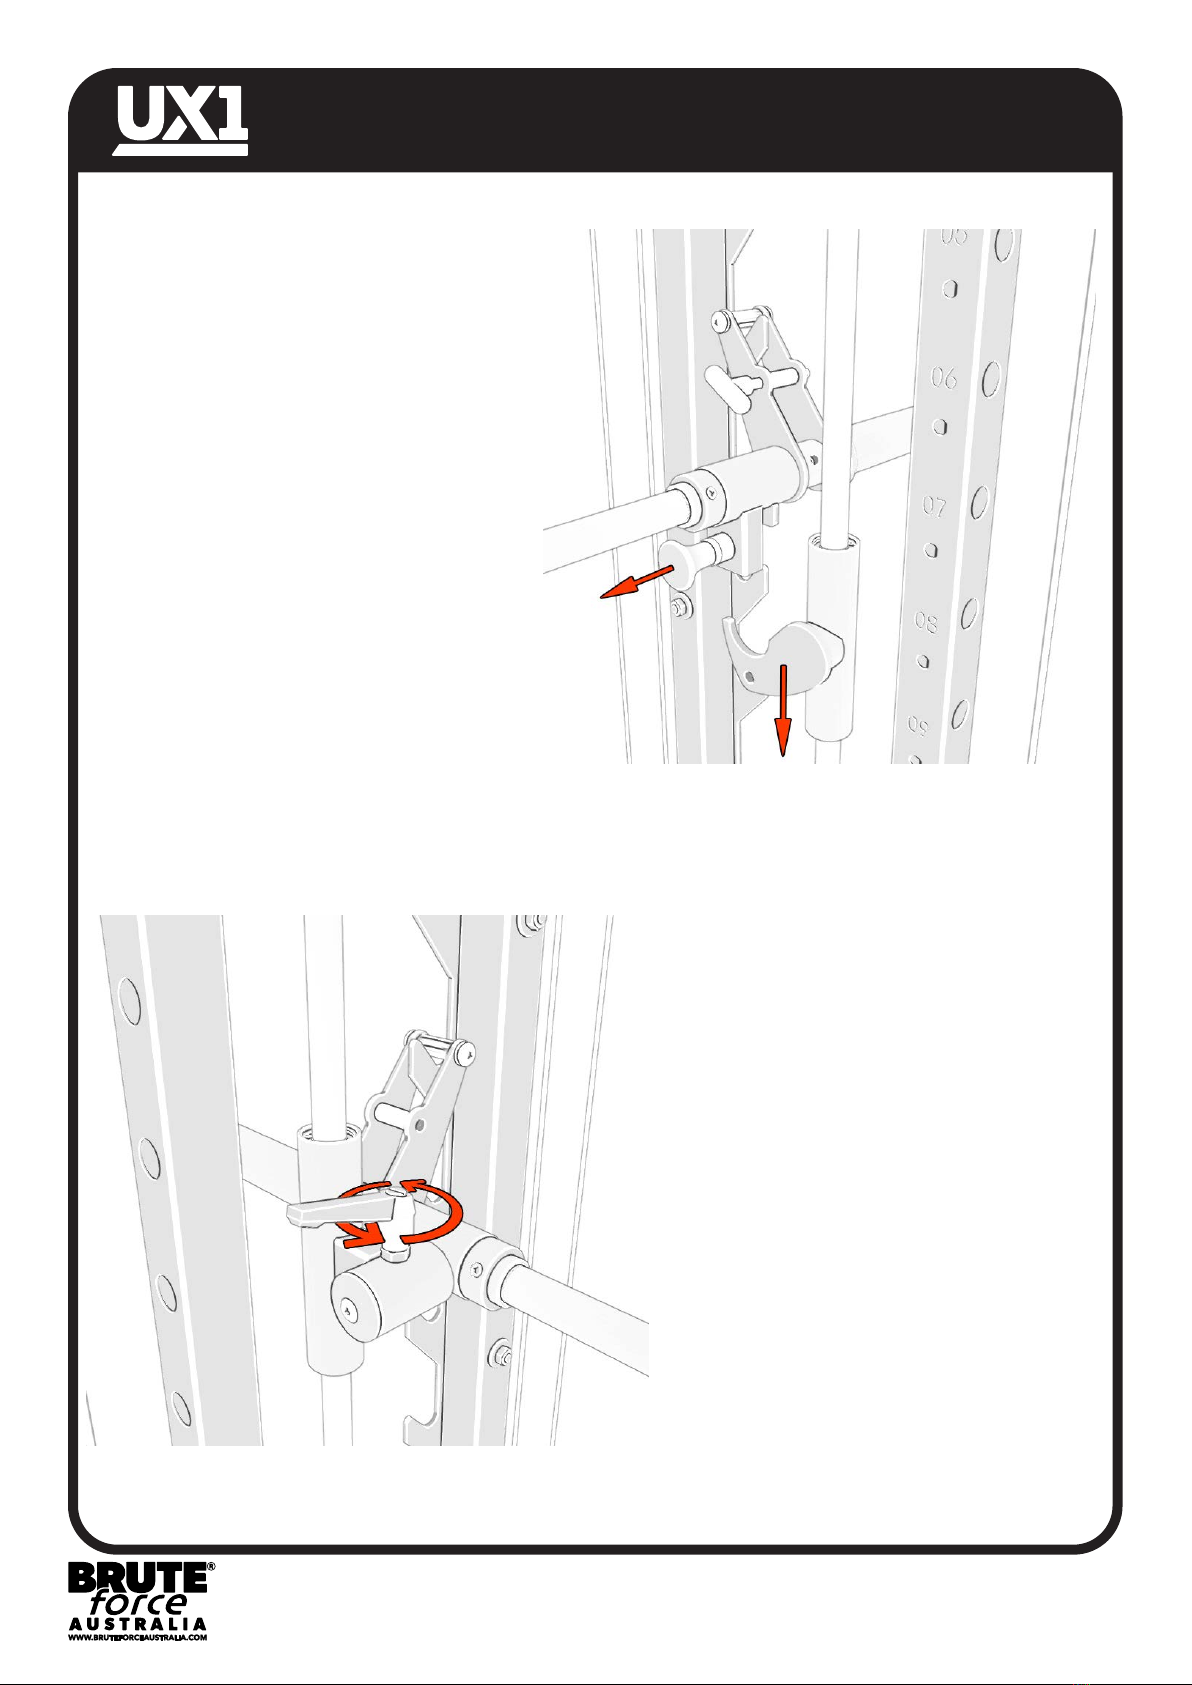
manuals.online logo
Brands
  1. Home
  2. •
  3. Brands
  4. •
  5. Brute Force
  6. •
  7. Fitness Equipment
  8. •
  9. Brute Force UX1 User manual

Brute Force UX1 User manual

Other manuals for UX1

1

Other Brute Force Fitness Equipment manuals

Brute Force UX1 User manual

Brute Force

Brute Force UX1 User manual

Brute Force RAPTOR User manual

Brute Force

Brute Force RAPTOR User manual

Brute Force SUPA808-L User manual

Brute Force

Brute Force SUPA808-L User manual

Popular Fitness Equipment manuals by other brands

Revitive Arthritis-Knee user manual

Revitive

Revitive Arthritis-Knee user manual

Domyos BM100 operating instructions

Domyos

Domyos BM100 operating instructions

Movement EDGE PUXADA ALTA Assembly manual

Movement

Movement EDGE PUXADA ALTA Assembly manual

Lifeline LLUWB-BLK owner's manual

Lifeline

Lifeline LLUWB-BLK owner's manual

Precor CW-816 Assembly guide

Precor

Precor CW-816 Assembly guide

Balanced Body Precision Rotator Discs manual

Balanced Body

Balanced Body Precision Rotator Discs manual

G-FITNESS AIR ROWER user manual

G-FITNESS

G-FITNESS AIR ROWER user manual

CAPITAL SPORTS Dominate Edition 10028796 manual

CAPITAL SPORTS

CAPITAL SPORTS Dominate Edition 10028796 manual

Martin System TT4FK user guide

Martin System

Martin System TT4FK user guide

CIRCLE FITNESS E7 owner's manual

CIRCLE FITNESS

CIRCLE FITNESS E7 owner's manual

G-FITNESS TZ-6017 user manual

G-FITNESS

G-FITNESS TZ-6017 user manual

Accelerated Care Plus OMNISTIM FX2 CYCLE/WALK user manual

Accelerated Care Plus

Accelerated Care Plus OMNISTIM FX2 CYCLE/WALK user manual

pedalo 20230165 manual

pedalo

pedalo 20230165 manual

Saebo SaeboStim Pro Instructions for use

Saebo

Saebo SaeboStim Pro Instructions for use

Performance HyperVibe User instructions

Performance

Performance HyperVibe User instructions

Scalamobil S27 Operator's manual

Scalamobil

Scalamobil S27 Operator's manual

Precor Experience Series Service manual

Precor

Precor Experience Series Service manual

FYTTER RedMIUM BENCH BE-T6R manual

FYTTER

FYTTER RedMIUM BENCH BE-T6R manual

manuals.online logo
manuals.online logoBrands
  • About & Mission
  • Contact us
  • Privacy Policy
  • Terms and Conditions

Copyright 2025 Manuals.Online. All Rights Reserved.

- 1 -
FOLDING GUIDE
FOLDING GUIDE
Ensure the machine has been installed on a completely flat surface to aid in the folding process.
- 2 -
FOLDING GUIDE
!!! WARNING !!!
You MUST always hold the top cross
bar when removing the pin. Failing
to do so will cause the cross bar to
fall which can cause serious injury.
STEP 1:
While holding the cross bar, remove pin.
STEP 2:
Lower the cross bar and rest it on the front post.
!
STOP
HOLD CHIN UP HANDLES
WHILE REMOVING PIN TO
AVOID CROSS BAR FROM
FALLING.
- 3 -
FOLDING GUIDE
STEP 3:
On the right side of the Smith Machine,
pull the pin to release the securing
slider. Lower the slider to the very
bottom of the smith machine guide rod.
STEP 4:
On the left side of the Smith Machine,
unscrew the locking pin. This must be
loose enough to allow the smith bar to
rotate freely.
Note: By lifting the handle of this
locking pin, you can rotate it freely
without engaging the screw. This will
need to be done to allow the screw to
be loosened or tightened fully.
Tighten this fully when using the
smith machine. Loosen this fully
when folding the machine.
- 4 -
FOLDING GUIDE
STEP 5:
Unhook the smith bar. Rotate the bar by
sliding the left side up and lowering the
right side. Continue this until the smith
bar is vertical.
STEP 6:
Lift and then lower the bottom end of
the smith bar into the bar holder at the
base of the machine.
- 5 -
FOLDING GUIDE
STEP 7:
Once the top cross bar and smith bar are disconnected and placed into their folded
positions, unlock the two front sides of the machine. Press the small tab to unlock.
To lock the feet, press the larger tab down until it clicks into place.
HELPFUL TIP:
When unfolding the machine, secure the top cross bar pin first before locking the feet.
- 6 -
FOLDING GUIDE
STEP 8:
With both feet unlocked, begin to fold in
both sides of the machine.
HELPFUL TIP:
Fold in the right side first to allow room
for the cross bar to clear the left side.
STEP 10:
Once both sides are folded, lock both
feet in place to secure the machine.