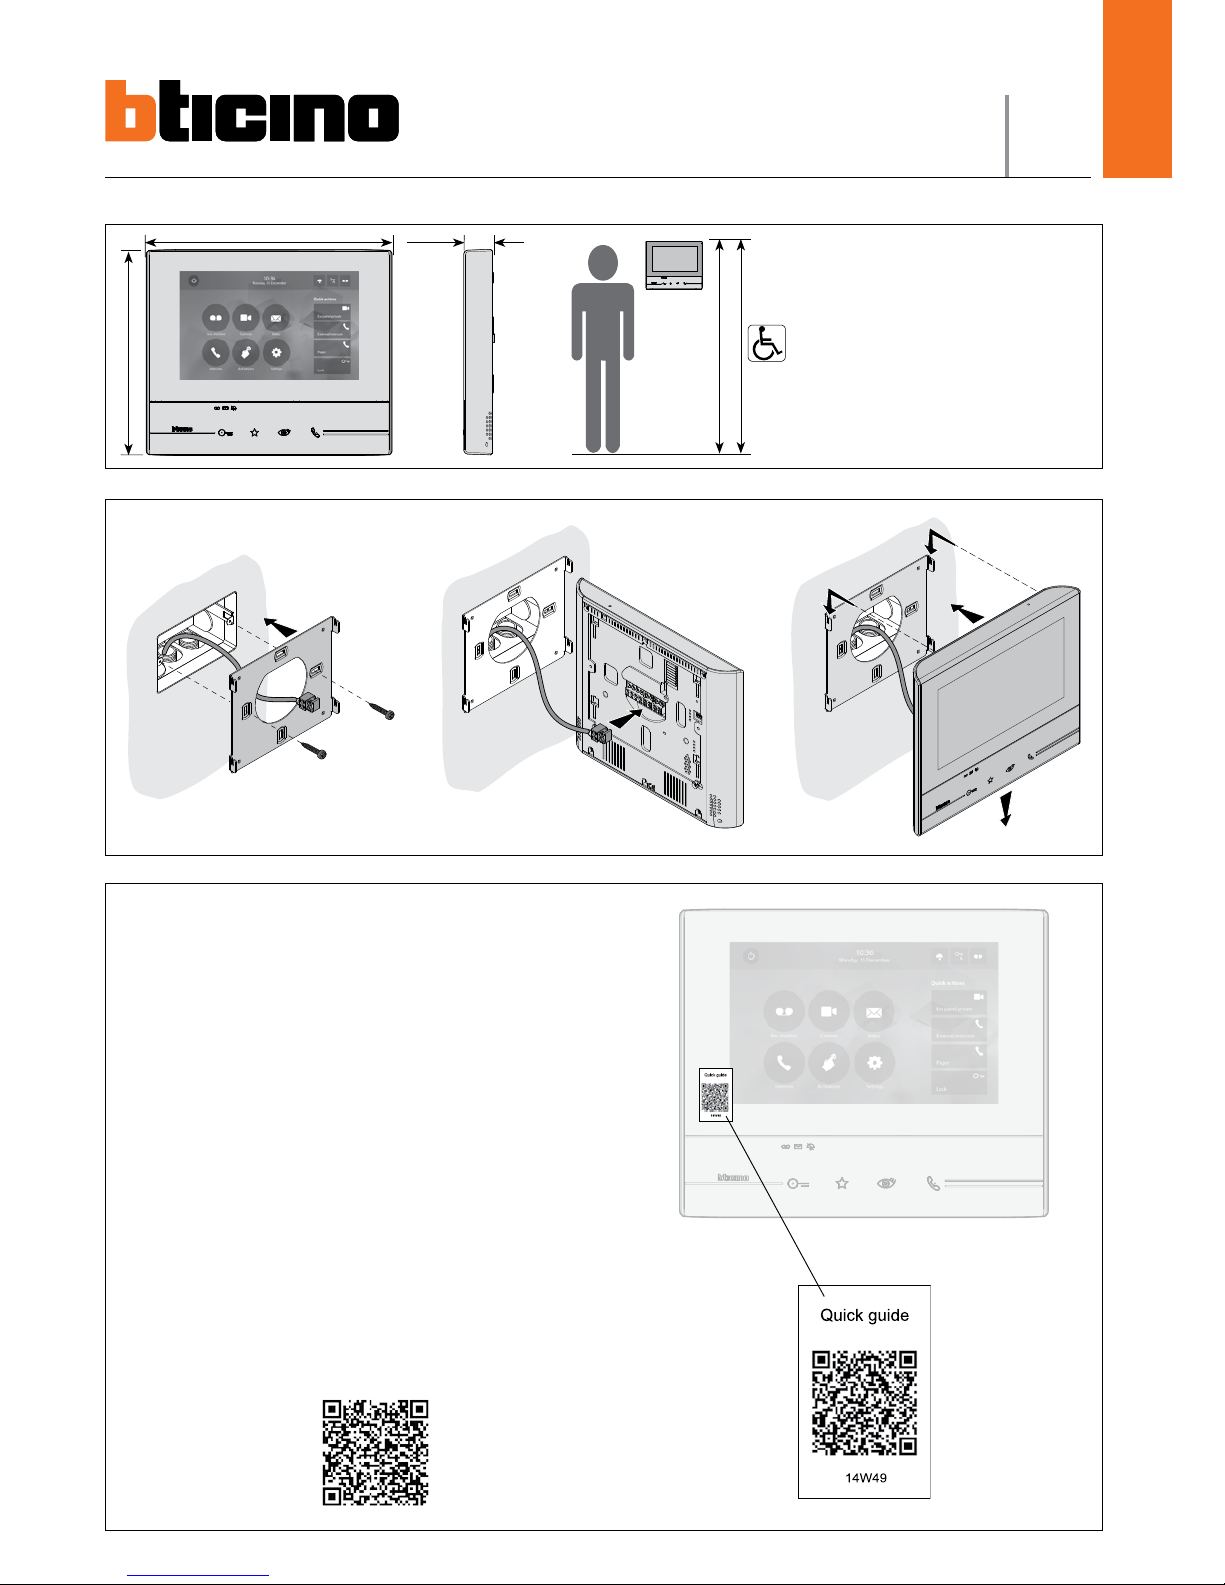
3
18
21
22
2323
19
20
24252627
L’image représente le dispositif avec toutes les fonctions activées.
Vérifier dans le Manuel Installateur le mode d’activation des fonctions.
Das Bild stellt eine Vorrichtung mit allen aktivierten Funktionen dar.
Sehen Sie im Installationshandbuch nach, wie die Funktionen aktiviert
werden.
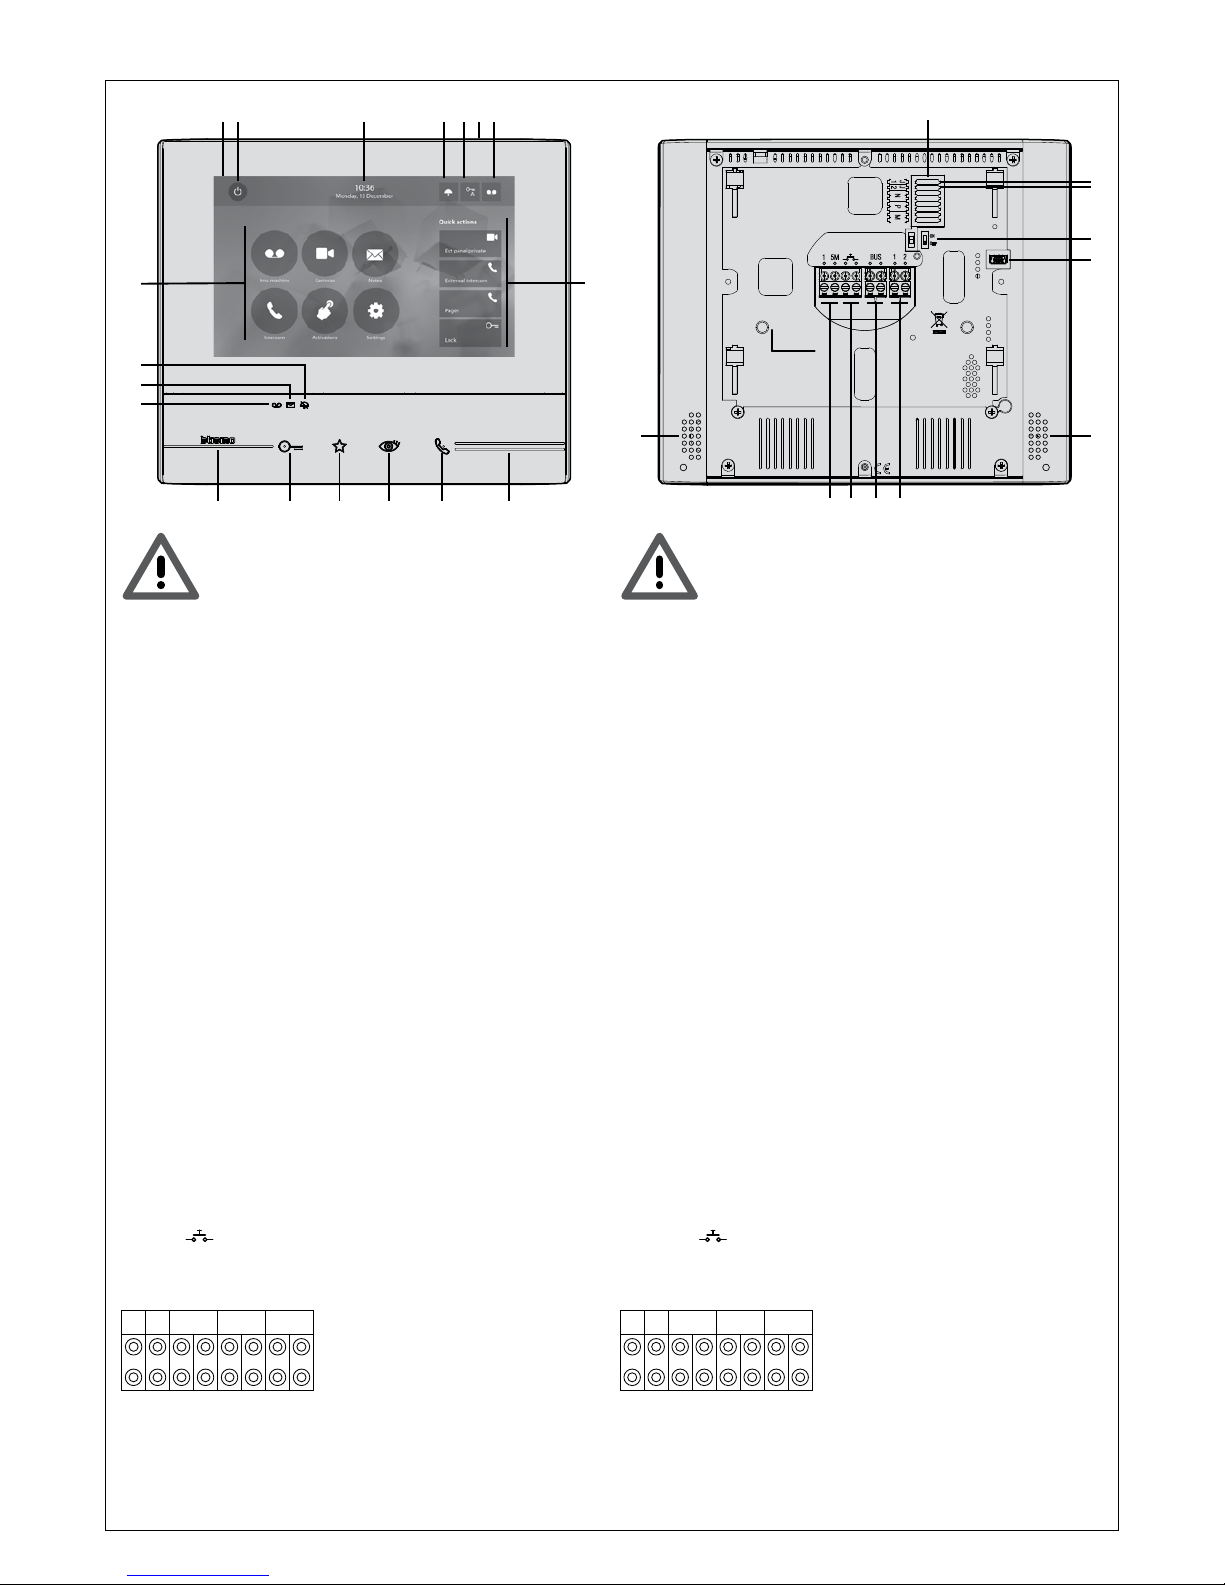
1. Écran 7”(16:9)
2. Touche d’extinction
3. Date et heure
4. Exclusion sonneries
5. Activation Bureau
6. Micro
7. Activation Répondeur (uniquement sur le modèle 344622)
8. Actions rapides
9. Guides tactiles pour non-voyants
10.Touche connexion :
l’allumage du voyant vert clignotant indique la présence d’un appel entrant
l’allumage du voyant vert fixe indique la communication en cours
11.Auto-allumage/Cyclage :
à la pression sur la touche le VOYANT rouge s’allume
12.Touche Favoris :
à la pression sur la touche le VOYANT rouge s’allume
(Configuration de base = LUMIÈRE ESCALIER. Pour une configuration différente, faire
référence au tableau de la configuration physique dans les pages suivantes.)
13.Touche d’ouverture serrure:
à la pression sur la touche le VOYANT rouge s’allume
14.État Répondeur (uniquement sur le modèle 344622):
Voyant rouge fixe = répondeur activé
Voyant rouge clignotant = présence enregistrement(s) non visionné(s)
15.État présence notes :
Voyant rouge clignotant = nouvelle(s) note(s) non lue(s)
16.État Exclusion sonnerie:
Voyant rouge allumé = Sonnerie appel désactivée
17.Fonctions (seules les icônes des fonctions configurées s’affichent)
18.Logement configurateurs
19.Configurateur J1 : extraire pour alimentation supplémentaire
20.Configurateur J2: Master/Slave, extraire pour Slave
21.Microinterrupteur ON/OFF de terminaison de ligne
22.Prise miniUSB de mise à jour Firmware dispositif
23.Haut-parleur
24.Bornes (1 – 2) d’alimentation supplémentaire
25.Bornes de branchement au BUS SCS 2 FILS
26.Bornes ( ) de branchement d’un bouton externe d’appel à l’étage
27.Bornes (1 - 5M) de branchement d’une sonnerie supplémentaire Le branchement
doit être effectué point - point sur les bornes des sonneries supplémentaires
Fonctions configurateurs
J1 J2 N P M
J1 = Extraire en présence de l’alimentation supplémentaire (bornes 1 et 2)
J2 = Master/Slave (extraire pour Slave)
NN = Adresse du dispositif
PP = Adresse du PE dont la serrure est ouverte avec PI au repos et auquel est adressé
l’auto-allumage
MM = Modalité de fonctionnement conformément aux tableaux des pages suivantes
M unité = Configuration de la touche capacitive FAVORIS
M dizaines = Configuration des ACTIONS RAPIDES sur Page d’accueil
1. Display 7” (16 : 9)
2. Ausschalttaste
3. Datum und Uhrzeit
4. Ausschluss des Läutwerks
5. Freigabe Büro-Funktion
6. Mikrofon
7. Freigabe Anrufbeantworter (nur Modelle 344622)
8. Schnellfunktionen
9. Taktile Hilfe für Sehbehinderte
10.Anschlusstaste:
Das Blinken der grünen Led meldet einen eintreffenden Anruf
Das Aufleuchten der grünen Led meldet Gespräch im Gang
11.Selbstschaltung/Taktierung:
Durch Drücken der Taste, leuchtet die rote LED auf
12.Taste Favoriten:
Durch Drücken der Taste, leuchtet die rote LED auf
(Basis-Konfiguration = TREPPENLICHT. Um die Konfiguration zu ändern, siehe Tabelle
der physischen Konfiguration auf der nachfolgenden Seite.)
13.Taste Schlossöffner:
Durch Drücken der Taste, leuchtet die rote LED auf
14.Status Anrufbeantworter (nur Modelle 344622):
Rote Led leuchtet = Anrufbeantworter aktiv
Rote Led blinkt = nicht abgehörte Nachricht/en vorhanden
15.Status Nachrichten vorhanden:
Rote Led blinkt = neue nicht gelesene Nachricht/en
16.Ausschluss-Status des Läutwerks:
Rote Led leuchtet = Anrufklingel deaktiviert
17.Funktionen (es werden nur die Symbole der konfigurierten Funktionen angezeigt)
18.Sitz der Konfiguratoren
19.Konfigurator J1: für eine zusätzliche Stromversorgung abziehen
20.Konfigurator J2: Master/Slave, abziehen für Slave
21.Mikroschalter ON/OFF fur den Streckenabschluss
22.Mini-USB-Steckbuchse zur Aktualisierung der Firmware der Vorrichtung
23.Lautsprecher
24.Klemmen (1 -2) für eine zusätzliche Stromversorgung
25.Klemmen zum Anschluss an BUS, SCS, 2-DRAHT
26.Klemmen ( ) zum Anschluss an eine externe Etagenruftaste
27.Klemmen (1 - 5M) zum Anschluss an ein zusätzliches Läutwerk Der Anschluss muss
Punkt zu Punkt an den Klemmen des zusätzlichen Läutwerks erfolgen
Funktion der Konfiguratoren
J1 J2 N P M
J1 = Abziehen, wenn ein zusätzliche Stromversorgung vorhanden ist (Klemme 1&2)
J2 = Master/Slave (abziehen für Slave)
NN = Adresse der Vorrichtung
PP = Adresse der TS mit dem zu öffnenden Schloss, mit HS im Ruhestand, der die
Selbstschaltung bestimmt ist
MM = Funktionsmodus laut Tabellen in den nachfolgenden Seiten
M Einheit = Konfiguration der kapazitiven Taste FAVORITEN
M Zehner = Konfiguration der SCHNELLFUNKTIONEN in Homepage
1 2 3 4 5 76
16
15
14
17
9101112139
8