Bticino Terraneo 335022 User manual

Terraneo
Pivot Telephones
335032
335033
10/02- NC
Instructions for use
PART. T5844A /GB
®335022
335023


Pivot Telephones 2
BASIC FUNCTIONS
To answer a call
1. Lift the receiver.
To make a call
1. Lift the receiver.
2. If the line is free, dial the number.
3. If the line is busy, hang up.
Calling a number in the phone book
1. Lift the receiver.
2. Press the key (PHONE BOOK).
3. Press a key from 0to 9.
Calling the emergency number
1. Lift the receiver.
2. Press the
M1
key (EMERGENCY No.).
13
2
46
5
79
8
0
RP
R
M1
1..............
2..............
3..............
4..............
5..............
6..............
7..............
8..............
9..............
To save numbers in the phone book as well as the emergency number see the “Saving
telephone numbers” section.
RP
1 32
4 65
7 98
0
R
M1
13
2
46
5
79
8
0
RP
R
M1
1..............
2..............
3..............
4..............
5..............
6..............
7..............
8..............
9..............
13
2
46
5
79
8
0
RP
R
M1
1..............
2..............
3..............
4..............
5..............
6..............
7..............
8..............
9..............
13
2
46
5
79
8
0
RP
R
M1
1..............
2..............
3..............
4..............
5..............
6..............
7..............
8..............
9..............
M1

Terraneo 3
Repeating the last number called
1. Lift the receiver.
2. Press the
RP
key (REPEAT).
Opening the door lock
Warning: only with telephones in systems
with Terraneo telephone exchange.
1. Press the (DOOR LOCK) key.
Self-switching on the outdoor station
Switching on the staircase light
Warning: only with telephones in systems
with Terraneo telephone exchange.
1. Press the (STAIRCASE LIGHT) key.
Warning: only with telephones in systems
with Terraneo telephone exchange.
1. Press the (SELF-SWITCHING ON) key.
13
2
46
5
79
8
0
RP
R
M1
1..............
2..............
3..............
4..............
5..............
6..............
7..............
8..............
9..............
13
2
46
5
79
8
0
RP
R
M1
1..............
2..............
3..............
4..............
5..............
6..............
7..............
8..............
9..............
RP
13
2
46
5
79
8
0
RP
R
M1
1..............
2..............
3..............
4..............
5..............
6..............
7..............
8..............
9..............
13
2
46
5
79
8
0
RP
R
M1
1..............
2..............
3..............
4..............
5..............
6..............
7..............
8..............
9..............

Pivot Telephones 4

Terraneo 5
INDICE
INTRODUCTION.............................................................................................................6
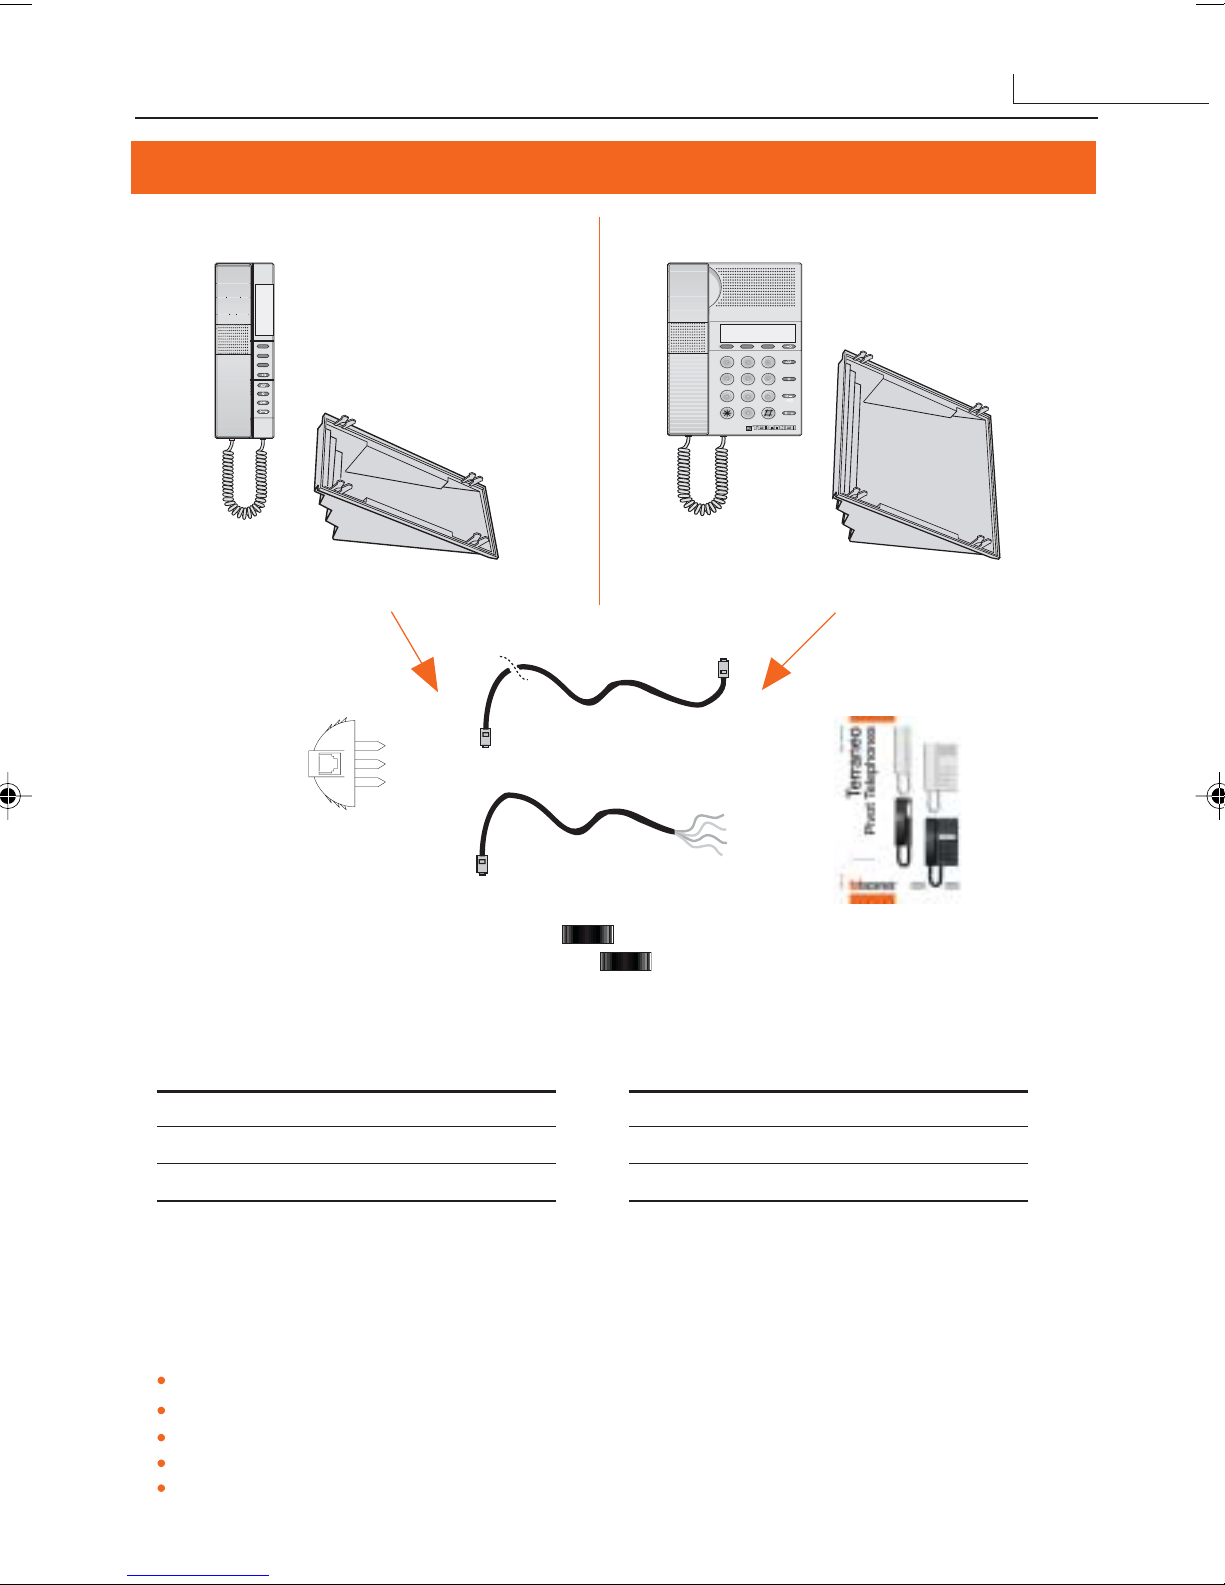
PACKAGE CONTENTS..................................................................................................7
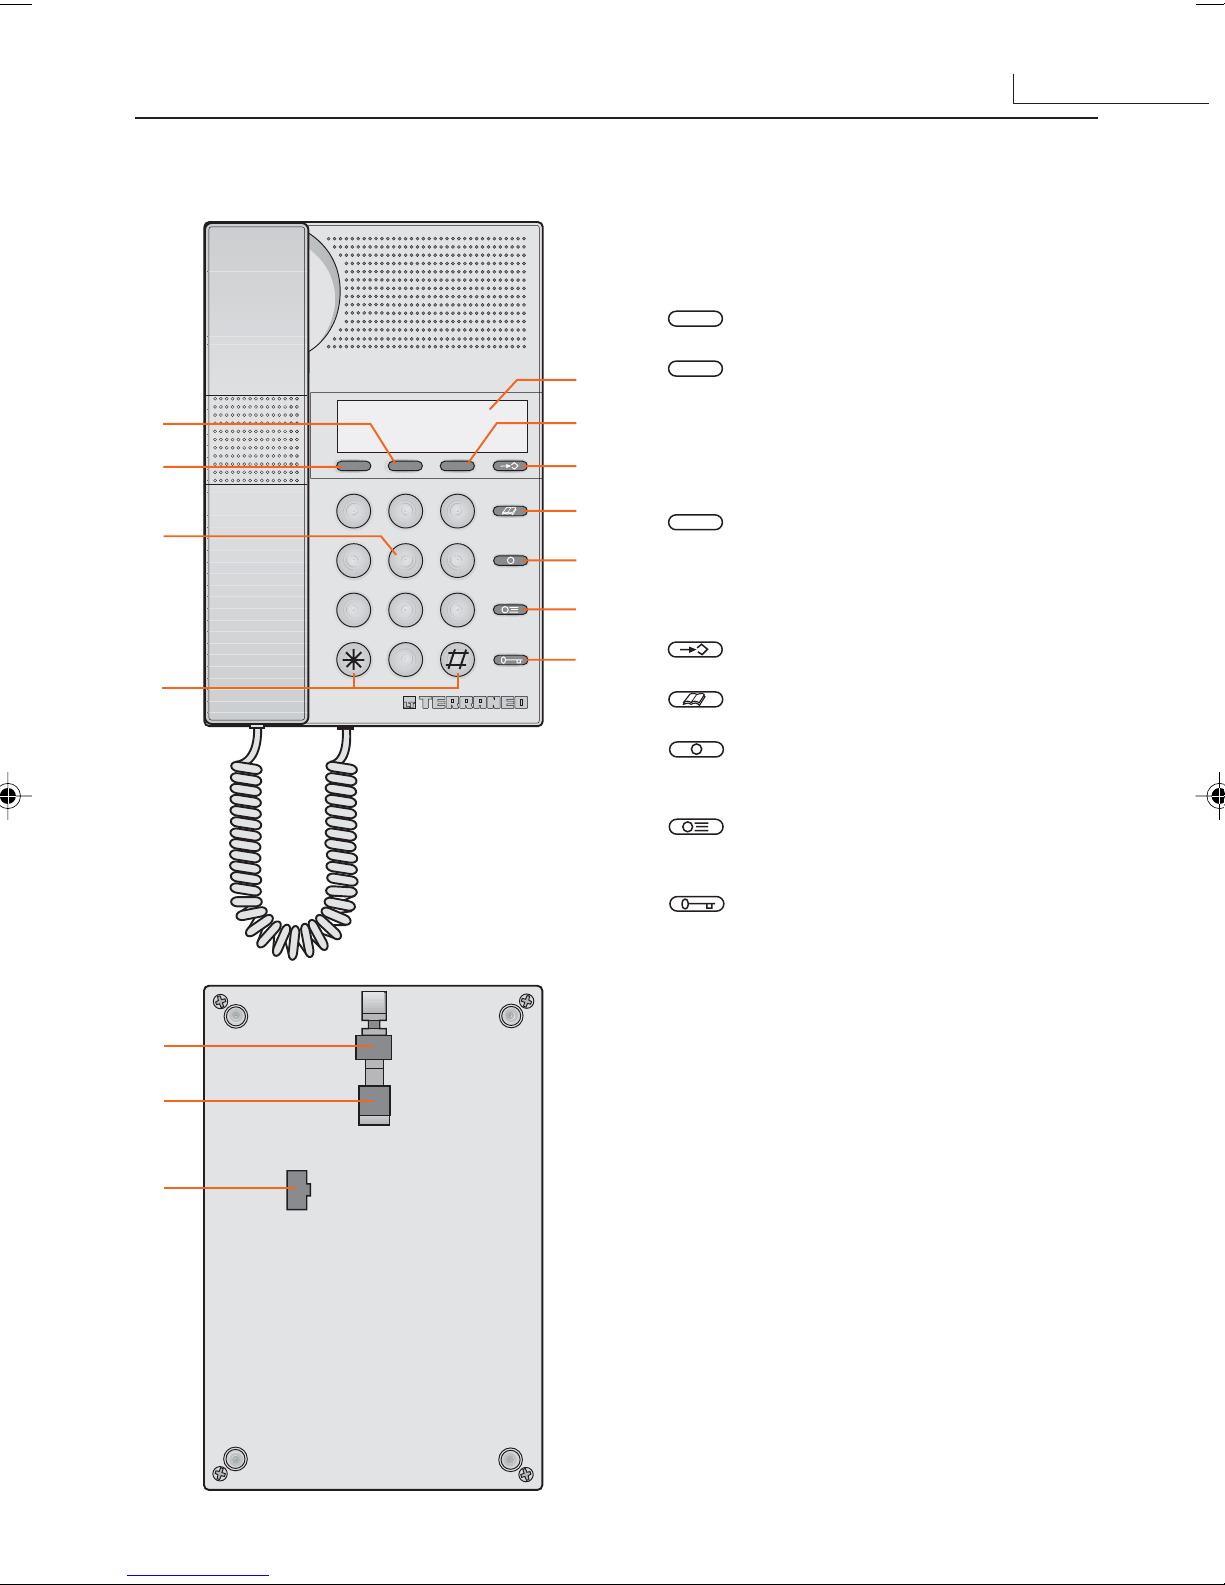
GENERAL VIEW COMPACT TELEPHONE (335022 - 335023) ....................................8
GENERAL VIEW STANDARD TELEPHONE (335032 - 335033)..................................9
USING THE MAIN FUNCTIONS .................................................................................. 10
•HOW TO ANSWER A CALL 10
•HOW TO MAKE A CALL 10
•CALLING A NUMBER IN THE PHONE BOOK 10
•CALLING THE EMERGENCY NUMBER (M1) 10
•REPEATING THE LAST NUMBER CALLED 11
•MIXED PULSE-DIAL/TOUCH-TONE DIALLING 11
•FLASH KEY (R) 11
CONFIGURATION ........................................................................................................ 12
•BASIC CONFIGURATION 12
•RESETTING THE BASIC CONFIGURATION 12
TELEPHONE SETTING ..................................................................................... 13
•ADJUSTING THE BELL VOLUME 13
•ADJUSTING THE VOLUME ON THE RECEIVER 13
•SELECTING THE BELL TUNE 14
•SELECTING LOCAL LINE MODE PULSE-DIAL/TOUCH-TONE 14
•SELECTING OL/EXT CONNECTION 15
•SELECTING THE LENGTH OF THE “ FLASH (R KEY)” PULSE 15
SAVING TELEPHONE NUMBERS ...................................................................... 16
•SAVING NUMBERS IN THE PHONE BOOK 16
•CANCELLING A NUMBER SAVED IN THE PHONE BOOK 16
•SAVING THE EMERGENCY NUMBERS (M1) 17
•CANCELLING THE EMERGENCY NUMBER (M1) 17
EXTRA FUNCTIONS WITH THE TELEPHONE CONNECTED
TO THE TELEPHONE EXCHANGE............................................................................. 18
•OPENING THE DOOR LOCK 18
•SWITCHING ON THE STAIRCASE LIGHT 18
•SELF-SWITCHING ON THE OUTDOOR STATION 18
•ACTIVATING THE ACTUATOR RELAYS 19
INSTALLATION ............................................................................................................ 21
•SET UPAND CONNECTION 21
•INSTALLATION WITH BASE SUPPLIED 22
•INSTALLATION ON THE WALL WITH BRACKET ITEM 337140 OR ITEM 337150 23
•FLUSH INSTALLATION WITH MULTIBOX SERIES FOR COMPACT AND STANDARD TELEPHONE 24
TECHNICAL DATA ....................................................................................................... 26
•STANDARDS REFERENCES 26
•DIMENSION AND WEIGHT 26
•OPERATING TEMPERATURE 26

Pivot Telephones 6
Telephones items 335022, 335023, 335032 and 335033 are mainly intended for setting up
anintegratedhomesystemwhichsupportstelephone,doorentryandvideodoorentryservices.
The system is normally formed of:
Terraneo PABX telephone exchange to perform the telephone functions and to interface
the telephones with the door entry and video door entry systems;
Terraneo door entry and video door entry system;
Pivot series telephones;
video sections items 335102 and 335103 to be used together with Pivot telephones for
video door entry functions.
These systems are also compatible with all the main types of telephones, cordless phones,
answering machines and faxes, which can be used as an alternative to Pivot telephones.
Naturally Pivot telephones can also be used as normal two-standard telephones in home
telephone systems either connected to the telephone network, or as extensions of a non-
Terraneo exchange. In both cases the video door entry function keys will not be usable.
INTRODUCTION

Terraneo 7
PACKAGE CONTENTS
Item No. Colour
335022 white
335023 anthracite grey
Item No. Colour
335032 white
335033 anthracite grey
Complete with:
RJ-RJ cable for table installation (2 m long),
plaited RJ cable for wall installation (20 cm long),
Telecom plug with RJ adapter,
inclined support,
2 receiver hooking pins.
Compact Standard
Compact Standard
RP
1 32
4 65
7 98
0
R
M1
1..............
2..............
3..............
4..............
5..............
6..............
7..............
8..............
9..............
1..............
2..............
3..............
RPRM1
4..............
5..............
6..............
7..............
8..............
9..............
1
6
7 8 9
0
23
45
Receiver fastening pins
Plaited cable
Plug
2 m cable
Inclined support Inclined support
Instructions

Pivot Telephones 8
1. Short number list.
2. 12-key dialling keypad.
3.
M1
key for emergency number.
4.
R
“FLASH” key;
•put on hold with Terraneo telephone
exchange;
•activate supplementary telephone
services (STS).
5.
RP
Key to repeat the last number dialled:
•programming the pauses in the
numberssavedin thephonebook (the
pause lasts for 2 seconds).
6. Key to access programming.
7. Key to call the phone book numbers.
8. Keytoself-switchonthe outdoor station.
9. Key to switch on staircase lights or
activate devices.
10. Key to open the door lock.
11. Keys to:
•activate supplementary telephone services
(STS);
•temporarily change dialling from PULSE-DIAL
to TOUCH-TONE.
12. RJ45 socket to connect the telephone to the
video door entry unit and the Terraneo
telephoneexchange, ifthere isa videosection.
13. RJ11, RJ12 socket to connect the telephone
directly to the telephone network or to the
telephone exchange.
14. Socket to connect the telephone to the Video
section item 335012 or item 335103.
GENERAL VIEW COMPACT TELEPHONE (335022 - 335023)
RP
1 32
4 65
7 98
0
R
M1
1..............
2..............
3..............
4..............
5..............
6..............
7..............
8..............
9..............
1
7
5
4
3
8
10
9
2
6
11
13
12
14

Terraneo 9
1. Short number list.
2. 12-key dialling keypad.
3.
M1
key for emergency number.
4.
R
“FLASH” key;
•put on hold with Terraneo telephone
exchange;
•activate supplementary telephone
services (STS).
5.
RP
Key to repeat the last number dialled:
•programming the pauses in the
numberssavedin the phonebook(the
pause lasts for 2 seconds).
6. Key to access programming.
7. Key to call the phone book numbers.
8. Key to self-switch on the outdoor
station.
9. Key to switch on staircase lights or
activate devices.
10. Key to open the door lock.
11. Keys to:
•activate supplementary telephone services
(STS);
•temporarily change dialling from PULSE-DIAL
to TOUCH-TONE.
12. RJ45 socket to connect the telephone to the
video door entry unit and the Terraneo
telephoneexchange, ifthere isa videosection.
13. RJ11, RJ12 socket to connect the telephone
directly to the telephone network or to the
telephone exchange.
14. Socket to connect the telephone to the Video
section item 335102 or item 335103.
GENERAL VIEW STANDARD TELEPHONE (335032 - 335033)
1 2 3
45 6
7 8 9
0
1..............
2..............
3..............
RPRM1
4..............
5..............
6..............
7..............
8..............
9..............
1
7
8
9
5
4
3
2
6
10
11
12
13
14

Pivot Telephones 10
USING THE MAIN FUNCTIONS
HOW TO ANSWER A CALL
The bell rings to signal a call:
Lift the receiver to answer.
HOW TO MAKE A CALL
Lift the receiver
Wait for the dialling tone
Dial the number required
Hang up at the end of the conversation.
CALLING A NUMBER IN THE PHONE BOOK
Thephone bookcan save up to 10 telephone numbers,maximum
length 24 digits including pauses.
To call any saved number proceed as follows:
Lift the receiver
Wait for the dialling tone
Press the (PHONE BOOK) key
Press a number key between 0and 9corresponding to the
position in the phone book where the number was saved.
Hang up at the end of the conversation.
CALLING THE EMERGENCY NUMBER (M1)
An emergency number of up to 24 digits including the pauses can be
saved, associating it with the
M1
key (EMERGENCY No.).
To dial the emergency number proceed as follows:
Lift the receiver
Wait for the dialling tone
Press the
M1
(EMERGENCY) key
Hang up at the end of the conversation.
dialling tone
telephone No.
dialling tone
0 9
from to
dialling tone
M1

Terraneo 11
REPEATING THE LAST NUMBER CALLED
The last number dialled manually, maximum length 31 digits
including pauses, can be dialled automatically. To dial the last
number again proceed as follows:
Lift the receiver
Wait for the dialling tone
Press the RP
RP
(REPEAT) key
Hang up at the end of the conversation.
The function is also possible if the telephone is in EXT mode and
is connected to a Terraneo telephone exchange.
Note: when saving the phone book numbers or the emergency
number the
RP
(REPEAT) key has the function of entering
one or more pauses inside the number. The pause lasts for 2
seconds.
FLASH KEY (R)
If the telephone is connected to a telephone exchange, to use certain services (such as putting through
calls to other extensions) you sometimes need to press the flash key (
R
) after lifting the receiver or
while talking.
Similarlyyou mayneedto pressthe flashkey (
R
)to usesomeSupplementary Telecom Italia Services
suchasthe“three-way conversation”. Todo thisyoumustpressthe flashkey(
R
)duringaconversation
to call the third user and have a three-way conversation.
MIXED PULSE-DIAL/TOUCH-TONE DIALLING
With the telephone in pulse dial one can dial a telephone number whose first numbers are dialled in the
pulse-dial system and the last in the touch-tone system.
The dialling mode is changed by pressing the *(ASTERISK) key and #(HASH) at the right time.
The numbers dialled after this will be sent in line in touch-tone mode.
This procedures allows access to telecommunication services and can also be used to check answering
machines remotely, avoiding using the beeper.
On hanging up, the telephone goes back to pulse dialling.
dialling tone
RP

Pivot Telephones 12
RESETTING THE BASIC CONFIGURATION
The telephone’s basic configuration can be reset at any time by
performing the following procedure:
Lift the receiver
Press the (PROGRAM) key
Dial the number 0000
Press the (PROGRAM) key to confirm
Wait for the confirmation tone (3 beeps) and hang up.
Note:“Resettingthe basicconfiguration”does notalterthe content
of the phone book or the emergency number.
CONFIGURATION
BASIC CONFIGURATION
When the telephone is installed it is set with the following basic
configuration:
Bell volume level = max (3)
Receiver volume level = max (9)
Call tune = 0 (0)
Dialling mode = TOUCH TONE (9)
Operating mode = EXT (0)
FLASH (R) impulse time = 100 ms (1)
Telephone book = empty
Emergency number = empty
To change the functions refer to the relevant sections.
beep
0-0-0-0

Terraneo 13
TELEPHONE SETTING
The following functions can be programmed and personalised by dialling the correct sequences of keys:
ADJUSTING THE VOLUME ON THE
RECEIVER
The receiver volume can be set on 2 different levels:
Lift the receiver
Press the (PROGRAM) key
Press key 1
Press key 0to select the MINIMUM level or key 9to select
the MAXIMUM level
Press the (PROGRAM) key to confirm the selection
Wait for the confirmation tone (3 beeps) and hang up.
0 1 2 3
beep - beep - beep
---
0
1
beep - beep - beep
9
or
ADJUSTING THE BELL VOLUME
The bell sound level can be set on 4 levels:
Lift the receiver
Press the (PROGRAM) key
Press the * (ASTERISK) key
Press one of the following keys:
0= bell off
1= soft
2= medium
3= loud
Press the (PROGRAM) key to end the programming
Wait for the confirmation tone (3 beeps) and hang up.

Pivot Telephones 14
SELECTING THE BELL TUNE
There is a choice of 4 different bell tunes:
Lift the receiver
Press the (PROGRAM) key
Press the # (HASH) key
Press the 0,1,2or 3to select the tune
Press the (PROGRAM) key to confirm the selection
Wait for the confirmation tone (3 beeps) and hang up.
SELECTING LOCAL LINE MODE
PULSE-DIAL/TOUCH-TONE
You can choose between pulse dialling (PULSE-DIAL) or touch-
tone dialling (TOUCH-TONE). To alter the mode proceed as
follows:
Lift the receiver
Press the (PROGRAM) key
Press the 2
Press the 0to set the PULSE-DIAL mode or key 9to select the
TOUCH-TONE mode
Press the (PROGRAM) key to confirm the selection
Wait for the confirmation tone (3 beeps) and hang up.
0 1 2 3
beep - beep - beep
---
beep - beep - beep
2
0 9
or

Terraneo 15
SELECTING OL/EXT CONNECTION
When installed the telephone is set up for connection to the
telephone exchange (EXT mode). If the telephone is connected
directly to the outside line it must be programmed with the OL
mode. To alter the mode proceed as follows:
Lift the receiver
Press the (PROGRAM) key
Press the 3
Press the 0to set the EXT mode or key 9to set the OL mode
Press the (PROGRAM) key to confirm the selection
Wait for the confirmation tone (3 beeps) and hang up.
SELECTING THE LENGTH OF THE “FLASH
(R KEY)” PULSE
3 different times can be associated with the flash key (
R
) as
follows:
Lift the receiver
Press the (PROGRAM) key
Press the
R
(FLASH) key
Press the between 1- 3to select the appropriate time:
1 = 100 ms
2 = 250 ms
3 = 500 ms
Press the (PROGRAM) key to confirm the selection
Wait for the confirmation tone (3 beeps) and hang up.
Note: the pulse time to be selected depends on the country
where the telephone is installed and is the password to the
exchange or STS functions (see “Using the main functions”
chapter).
0
3
beep - beep - beep
9
or
1 2 3
beep - beep - beep
R
--

Pivot Telephones 16
SAVING NUMBERS IN THE PHONE BOOK
The phone book can save up to 10 telephone numbers, which
can be called by pressing the number keys from 0 to 9. Each
telephone number saved can contain up to 24 digits including:
numbers from 0 to 9, characters such as *, #and Rand one or
more pauses. Use the
RP
(REPEAT) key to enter the pauses.
To save a number proceed as follows:
1. Lift the receiver
2. Press the (PROGRAM) key
3. Press the (PHONE BOOK) key
4. Press a number between 0- 9corresponding to the number
inthe phone book where the telephone numberwill be saved.
5. Dial the telephone number to be saved.
6. Press the (PROGRAM) key to confirm the selection
7. Wait for the confirmation tone (3 beeps) and start again from
point 2 to save a new number or hang up to finish.
SAVING TELEPHONE NUMBERS
To save a telephone number in the book or in the emergency number (
M1
), dial the sequence of keys
described in the section on this.At the end of the programming, if the sequence is correct, the telephone
gives a confirmation tone (3 beeps). If the programming is not correct the telephone gives the error tone
(continuous sequence of beeps) and the saving procedure is continued after hanging up.
CANCELLING A NUMBER SAVED IN THE
PHONE BOOK
A telephone number in the phone book can be cancelled.
To cancel proceed as follows:
Lift the receiver
Press the (PROGRAM) key
Press the (PHONE BOOK) key
Press the Press a number between 0-9corresponding to the
number in the phone book where the telephone number is
saved.
Pressthe (PROGRAM) key toconfirm the cancellation
Wait for the confirmation tone (3 beeps) and hang up.
beep - beep - beep
0 9
from to
beep - beep - beep
telephone No.
0 9
from to

Terraneo 17
SAVING THE EMERGENCY NUMBERS (M1)
An emergency number can be programmed and associated with
the dedicated key (
M1
). The telephone number saved can
contain up to 24 digits including: numbers from 0 to 9, characters
such as *, #and Rand one or more pauses. Use the
RP
(REPEAT) key to enter the pauses. To save a number proceed as
follows:
Lift the receiver
Press the (PROGRAM) key
Press the
M1
(EMERGENCY) key
Dial the telephone number to be saved
Press the (PROGRAM) key to confirm the saving
Wait for the confirmation tone (3 beeps) and hang up.
Note: The number associated with the
M1
(EMERGENCY)
key does not have to be the emergency number, but can be the
most frequently used number or a carrier prefix.
CANCELLING THE EMERGENCY NUMBER (M1)
To cancel the emergency number proceed as follows:
Lift the receiver
Press the (PROGRAM) key
Press the
M1
(EMERGENCY) key
Pressthe (PROGRAM) key toconfirm the cancellation
Wait for the confirmation tone (3 beeps) and hang up.
beep - beep - beep
telephone No.
M1
beep - beep - beep
M1

Pivot Telephones 18
EXTRA FUNCTIONS WITH THE TELEPHONE CONNECTED TO
THE TELEPHONE EXCHANGE
OPENING THE DOOR LOCK
(Service available if the telephone is connected to the
telephoneexchange ina Terraneo door entry orvideo door
entry system).
Press the dedicated (DOOR LOCK) key to activate
thedoorlockonthe outdoor station.Toperformthe function:
With the receiver lifted or in place
Press the dedicated (DOOR LOCK) key
Wait for about 2 seconds
Door lock activated.
SWITCHING ON THE STAIRCASE LIGHT
(Service available if the telephone is connected to the
telephoneexchange in a Terraneo doorentry or videodoor
entry system).
Press the dedicated (STAIRCASE LIGHT) key to
activate the door lock on the outdoor station. To perform
the function:
With the receiver lifted or in place
Press the dedicated (STAIRCASE LIGHT) key
Wait for about 2 seconds
Door lock activated.
SELF-SWITCHING ON THE OUTDOOR
STATION
(Service available if the telephone is connected to the
telephoneexchange inaTerraneodoor entryor videodoor
entry system).
Press the dedicated (SELF-SWITCH ON) key to
display the image taken by the outdoor station camera on
the monitor.
A – for just CCTV:
With the receiver in place
Press the dedicated (SELF-SWITCH ON) key
Wait for about 2 seconds. Just the video is connected
with the outdoor station.
B– to connect both video and audio:
With the receiver in place
Press the dedicated (SELF-SWITCH ON) key
Wait for about 2 seconds. The video and audio are
connected to the outdoor station.
1..............
2..............
3..............
RPRM1
4..............
5..............
6..............
7..............
8..............
9..............
1
6
7 8 9
0
23
45
RP
1 32
4 65
7 98
0
R
M1
1..............
2..............
3..............
4..............
5..............
6..............
7..............
8..............
9..............
1..............
2..............
3..............
RPRM1
4..............
5..............
6..............
7..............
8..............
9..............
1 2 3
45 6
7 8 9
0
A
RP
1 32
4 65
7 98
0
R
M1
1..............
2..............
3..............
4..............
5..............
6..............
7..............
8..............
9..............
B
B
1..............
2..............
3..............
RPRM1
4..............
5..............
6..............
7..............
8..............
9..............
45 6
7 8 9
0
45 6
12 3
A
RP
1 32
4 65
7 98
0
R
M1
1..............
2..............
3..............
4..............
5..............
6..............
7..............
8..............
9..............

Terraneo 19
ACTIVATING THE ACTUATOR RELAYS
If the telephone is connected to an exchange item 335818 or
item 335828, using the dedicated staircase light key ( ) and
a sequence of appropriate keys, the other actuator relays (1 - 8)
can be activated individually if the extra expansion modules item
335916 are installed.
(for more informationon theuseof item 335916 seethetelephone
exchange manuals).
The activation procedure is described below:
1. Lift the receiver
2. Press the (STAIRCASE LIGHT) key
3. Press key 0to deactivate the relay or key 1to activate it
4. Press the key corresponding to the relay to be activated
between 0 - 8
5. Wait for the continuous exchange tone
6. Start from point 2 again to activate another relay or hang up
to finish.
Note:Atpoint 3 theactivation ordeactivation keymust be pressed
within 3 seconds after pressing the ( ) (STAIRCASE LIGHT)
key. If the key is pressed after 3 seconds the staircase light relay
is activated.
EXAMPLE 1: ACTIVATING RELAY 1 (garden light)
Lift the receiver
Press the (STAIRCASE LIGHT) key
Press the 1(to activate)
Press the 1(relay 1 on extra module)
Wait for the continuous exchange tone and hang up.
We have activated relay 1 on the extra module, switching on the
garden light.
continuous tone
0 1
0 8
from to
continuous tone
1
1
This manual suits for next models
3
Table of contents
Other Bticino Telephone manuals

Bticino
Bticino Classe 300X User manual

Bticino
Bticino Classe 300X User manual

Bticino
Bticino 365711 User manual

Bticino
Bticino 323001 User manual

Bticino
Bticino Classe 300X User manual

Bticino
Bticino 363911 User manual

Bticino
Bticino 344612 User manual

Bticino
Bticino BTI-366511 User manual

Bticino
Bticino 344682 User manual