manuals.online logo
Brands
  1. Home
  2. •
  3. Brands
  4. •
  5. Bulova
  6. •
  7. Watch
  8. •
  9. Bulova Time Zone Service manual

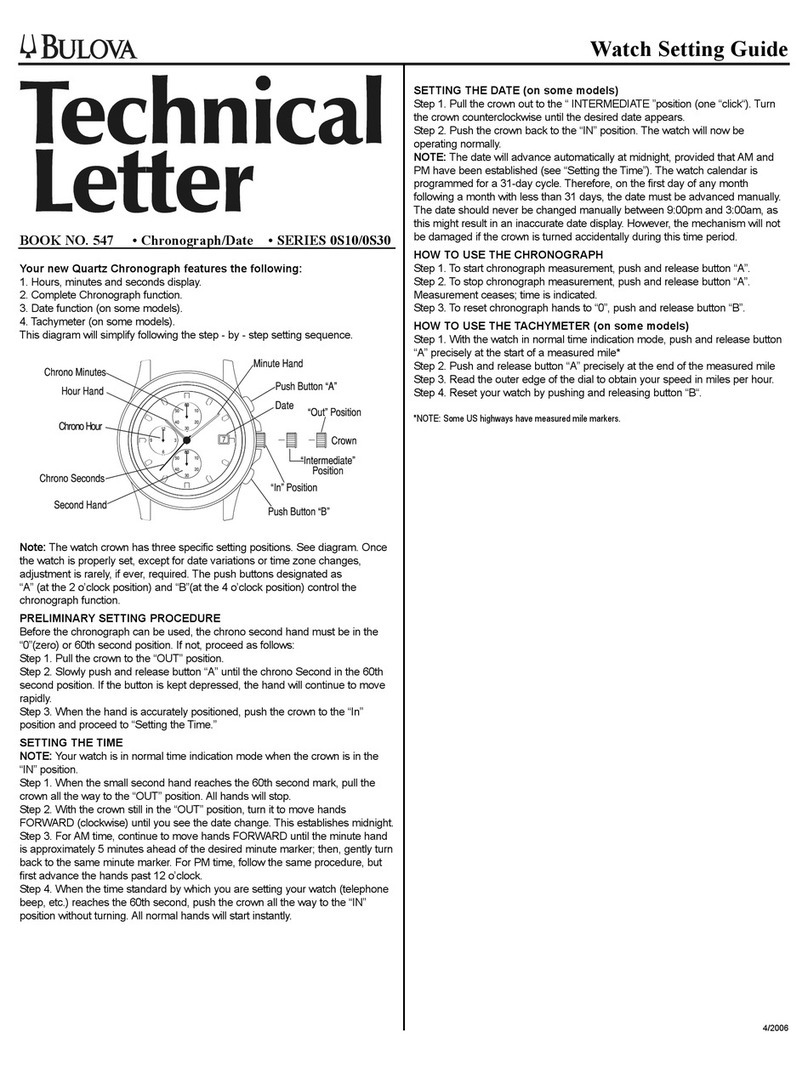
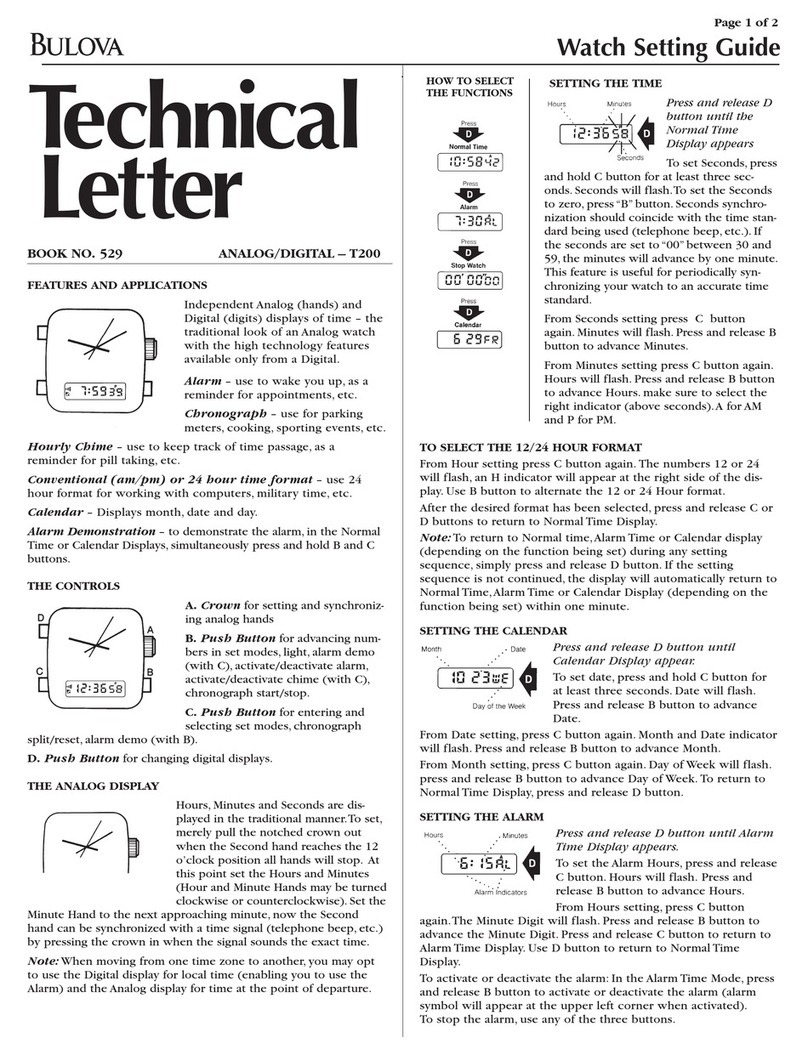
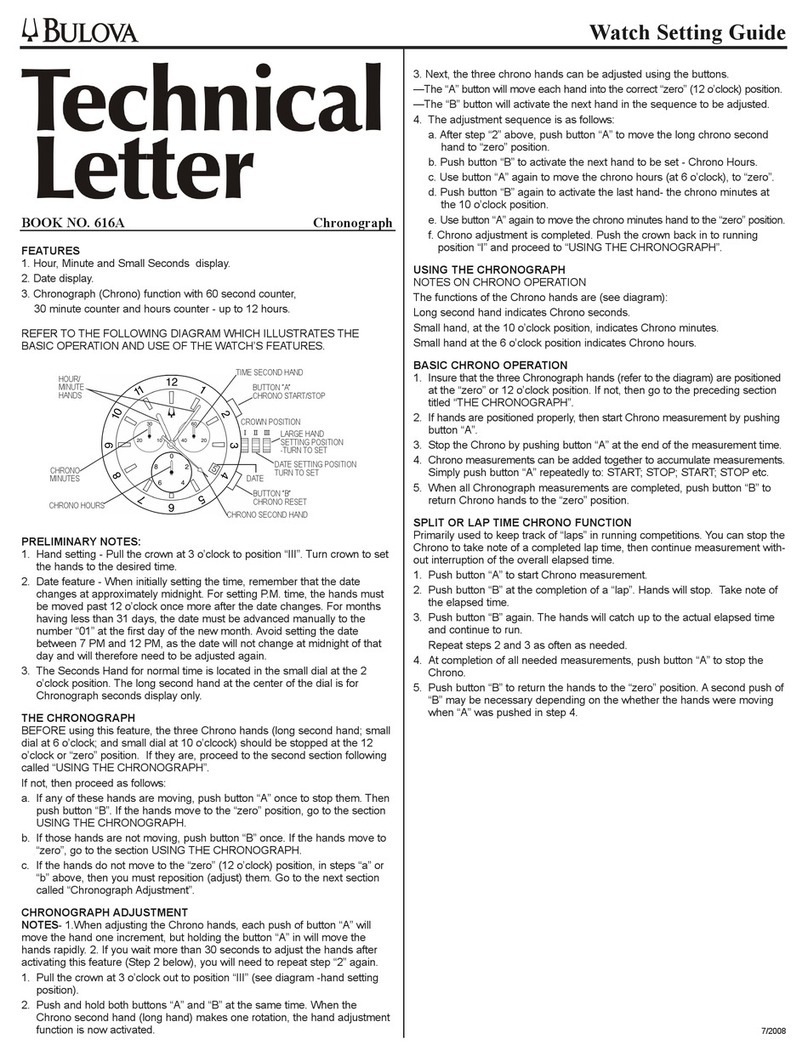
Bulova Time Zone Service manual

FUNCTIONS:
1. Hour, Minute and Second Hand display with Date (12 hour base).
2. Adjustable 12 hour hand for time zone function
3. 24 Hour hand (not adjustable).
4. 24 Hour adjustable top ring works with 24 hour hand to give 2nd
time zone function.
NORMAL TIME SETTING
1. Pull the crown out to position "3" as shown in the diagram.
2. Turn the crown to advance the hands to the correct time. If setting to
PM time advance the hands past 12 o'clock once more after the date
changes (midnight).
3. Return the crown to position "1" when hand setting is completed
DATE SETTING
1. Pull the crown out to position "2". Turn the crown towards you until
the correct date is displayed.
Note:If the date is set between the hours of 9:00 PM and 1:00 AM the
date may become incorrect the next day and will need readjustment.
2. Push the crown back to position "1".
12 HOUR HAND ADJUSTMENT
For Time Zone change, adjust the 12 hour hand to the desired hour as
follows:
1. Pull the crown to position "2".
2. Turn the crown away from you (opposite to the date adjust above) to
position the hour hand to the desired hour. The hour hand will jump
one half hour at a time during this adjustment. The 24 hour hand can
then be used to keep track of your original, home time.
Note: the midnight date change is always activated by the 12 hour
hands.
3. Push the crown back to position "1".
24 HOUR TOP RING ADJUSTMENT
To keep track of a third time zone, the 24 hour ring can be manually
turned until the 24 hour hand is positioned at the desired hour.
FUNCTIES:
1. Wijzerplaat met uren-, minuten- en secon-denwijzer en datum (12-
uursindeling).
2. Verstelbare 12-uurswijzer voor de tijdzonefunctie.
3. 24-uurswijzer (niet verstelbaar).
4. De bovenste 24-uursring is verstelbaar en zorgt samen met de 24-
uurswijzer voor een 2e tijdzonefunctie.
NORMALE TIJDSINSTELLING
1. Trek het kroontje naar buiten naar stand "3" zoals in het schema
aangegeven.
2. Zet de wijzers vooruit naar de juiste tijd door aan het kroontje te
draaien. Als u de PM-instelling gebruikt (13.00 uur is 1.00 PM), draait u
de wijzers nogmaals langs 12 uur nadat de datum verandert
(middernacht).
3. Zet het kroontje weer op "1" als de wijzers op de gewenste tijd
staan.
DATUMINSTELLING
1. Trek het kroontje uit naar stand "2". Draai het kroontje naar u toe tot
de juiste datum wordt weergegeven.
NB: als de datum tussen 9 uur's avonds (21.00 uur) en 1 uur's nachts
wordt ingesteld, kan het gebeuren dat de datum de volgende dag
onjuist blijkt en moet worden bijgesteld.
2. Duw het kroontje terug naar stand "1".
VERSTELLING 12-UURSWIJZER
Voor het veranderen van de tijdzone zet u de 12-uurswijzer als volgt op
het gewenste uur:
1. Trek het kroontje uit naar stand "2".
2. Draai het kroontje van u af (tegengesteld aan de richting voor de
datum zoals hierboven vermeld) en zet zo de urenwijzer op het
gewenste uur. De urenwijzer verspringt bij deze aanpassing met een
half uur tegelijk. U kunt vervolgens met de 24-uurswijzer de originele
tijd van uw woonplaats bijhouden.
NB: de datumverandering om middernacht wordt altijd door de 12-
uurswijzer geactiveerd.
3. Duw het kroontje terug naar stand "1".
VERSTELLING BOVENSTE 24-UURSRING
Als u een derde tijdzone wilt bijhouden, kan de 24-uursring handmatig
worden gedraaid tot de 24-uurswijzer op het gewenste uur staat.
BOOK NO. 610 Time Zone
Watch Setting Guide
Page 1 of 4
Watch Setting Guide
FUNKTIONEN:
1. Stunden-, Minuten- und Sekundenzeigeranzeige mit Datum (12-
Stunden-Format).
2. Einstellbarer 12-Stunden-Zeiger für die Zeitzonenfunktion.
3. 24-Stunden-Zeiger (nicht einstellbar).
4. Oberer einstellbarer 24-Stunden-Ring bietet im Zusammenhang mit
dem 24-Stunden-Zeiger eine zweite Zeitzonenfunktion.
EINSTELLEN DER NORMALUHRZEIT
1. Ziehen Sie die Krone in die Stellung "3" heraus (siehe Diagramm).
2. Stellen Sie die Zeiger durch Drehen der Krone auf die richtige
Uhrzeit vor. Wenn die gewünschte Uhrzeit zwischen 12 Uhr mittags
und Mitternacht liegt, rücken Sie die Zeiger nochmals über die 12-Uhr-
Stellung hinaus, nachdem das Datum umspringt (Mitternacht).
3. Drücken Sie die Krone wieder in die Stellung "1", wenn Sie mit dem
Einstellen der Uhrzeit fertig sind.
EINSTELLEN DES DATUMS
1. Ziehen Sie die Krone in die Stellung "2" heraus. Drehen Sie die
Krone zu sich hin, bis das richtige Datum erscheint.
Anmerkung: Wird das Datum zwischen 21 Uhr und 1 Uhr
eingestellt, kann es am nächsten Tag eventuell nicht stimmen und
muss möglicherweise erneut eingestellt werden.
2. Drücken Sie die Krone wieder in die Stellung "1" ein.
EINSTELLEN DES 12-STUNDEN-ZEIGERS
Zur Änderung der Zeitzone müssen Sie den 12-Stunden-Zeiger wie
folgt auf die gewünschte Uhrzeit stellen:
1. Ziehen Sie die Krone in die Stellung "2" heraus.
2. Drehen Sie die Krone von sich weg (umgekehrt wie bei der oben
beschriebenen Einstellung des Datums), um den Stundenzeiger auf die
gewünschte Stunde zu setzen. Der Stundenzeiger springt bei diesem
Prozess um jeweils eine halbe Stunde weiter. Anschließend können Sie
mithilfe des 24-Stunden-Zeigers die ursprüngliche Uhrzeit an Ihrem
Heimatort verfolgen.
Anmerkung: Die Datumsänderung um Mitternacht wird immer mithilfe
des 12-Stunden-Zeigers vorgenommen.
3. Drücken Sie die Krone wieder in die Stellung "1" ein.
EINSTELLEN DES OBEREN 24-STUNDEN-RINGS
Wenn Sie auch noch eine dritte Zeitzone verfolgen möchten, können
Sie den 24-Stunden-Ring manuell drehen, bis sich der 24-Stunden-
Zeiger auf der gewünschten Stunde befindet.
FONCTIONS :
1. Les aiguilles des heures, des minutes et des secondes s'affichent
avec la date (format de 12 heures)
2. Aiguille de 12 heures réglable pour la fonction du fuseau horaire.
3. Aiguille de format 24 heures (non réglable).
4. L'anneau supérieur réglable de 24 heures fonctionne avec l'aiguille
de 24 heures pour procurer une seconde fonction de fuseau horaire.
RÉGLAGE NORMAL DE L'HEURE
1. Sortez la couronne en position " 3 ", comme le montre le schéma.
2. Faites tourner la couronne du remontoir pour avancer les aiguilles
jusqu'à la bonne heure. Pour régler l'heure pour l'après-midi ou la
soirée, faites avancer les aiguilles après 12 heures une autre fois
après le changement de date (minuit).
RÉGLAGE DE LA DATE
1. Sortez la couronne en position " 2 ". Faites tourner le remontoir
vers vous jusqu'à ce que la bonne date s'affiche.
Remarque: Si la date est réglée entre 21 heures et 1 heure, la date
pourrait se révéler inexacte lors de la journée suivante et devra
donc être réglée de nouveau.
2. Retournez la couronne en position " 1 ".
RÉGLAGE DE L'AIGUILLE DE 12 HEURES
Pour un changement de fuseau horaire, réglez l'aiguille de 12 heures à
l'heure voulue de la manière suivante :
1. Sortez la couronne en position " 2 ".
2. Tourner la couronne dans la direction opposée à vous (opposée à la
date ci-dessus) pour positionner l'aiguille de l'heure à l'heure voulue.
L'aiguille de l'heure sautera une demi-heure à la fois pendant ce
réglage. L'aiguille de 24 heures peut ensuite être utilisée pour vous
rappeler l'heure qu'il est chez vous.
Remarque: le changement de date à minuit est toujours activé par
l'aiguille de 12 heures.
3. Retournez la couronne en position " 1 ".
RÉGLAGE DE L'ANNEAU SUPÉRIEUR DE 24 HEURES
Pour pouvoir suivre un troisième fuseau horaire, l'anneau de 24 heures
peut être tourné manuellement jusqu'à ce que l'aiguille de 24 heures
soit à l'heure voulue.
Page 2 of 4
BOOK NO. 610 Time Zone
Watch Setting Guide
FUNZIONI:
1. Quadrante ore, minuti e secondi con data (base 12 ore).
2. Lancetta 12 ore regolabile per la funzione fuso orario.
3. Lancetta oraria 24 ore (non regolabile).
4. L'anello superiore di 24 ore funziona con la lancetta 24 ore per
attivare la funzione 2o fuso orario.
IMPOSTAZIONE ORARIO NORMALE
1. Tirare in fuori la corona e portarla nella posizione "3" come mostrato
nello Schema.
2. Girare la corona per far avanzare le lancette fino all'orario corretto.
Se l'impostazione si trova sull'orario pomeridiano, far avanzare le
lancette oltre le 12 una volta ancora dopo il cambio di data
(mezzanotte).
3. Riportare la corona in posizione "1" quando l'impostazione manuale
è stata completata.
IMPOSTAZIONE DELLA DATA
1. Tirare in fuori la corona fino a portarla in posizione "2". Girare la
corona verso di sé fino a quando viene visualizzata la data corretta.
Nota: Se la data viene impostata tra le 21 e l'1 del mattino potrebbe
rivelarsi non corretta il giorno dopo, e dovrà essere nuovamente
regolata.
2. Riportare la corona in posizione "1".
REGOLAZIONE 12 ORE
Per il cambio di Fuso orario, regolare la lancetta 12 ore sull'ora
desiderata nel modo seguente:
1. Tirare la corona fino a portarla in posizione "2".
2. Spingere la corona lontano da sé (nel senso opposto alla
regolazione data indicata sopra)e collocare la lancetta delle ore
sull'orario desiderato. La lancetta delle ore salterà mezz'ora per volta
durante questa regolazione. La lancetta 24 ore può quindi essere
utilizzata per tenere presente l'orario originale di partenza.
Nota: Il cambio di data a mezzanotte sarà sempre attivato dalla
lancetta 12 ore.
3. Riportare la corona nella posizione "1".
REGOLAZIONE DELL'ANELLO SUPERIORE DA 24 ORE
Per tenere presente un terzo fuso orario, l'anello da 24 ore può essere
girato manualmente fino a quando la lancetta delle 24 ore viene portata
sull'orario desiderato.
Page 3 of 4
BOOK NO. 610 Time Zone
Watch Setting Guide
FUNCIONES:
1. Presentación de la hora, los minutos y los segundos con fecha
(basados en 12 horas).
2. Manecilla ajustable de 12 horas para la función de huso horario.
3. Manecilla de las 24 horas (no ajustable).
4. Anillo ajustable de 24 horas funciona en conjunto con la manecilla
de 24 horas para proporcionar una segunda función de huso horario.
AJUSTE NORMAL DE LAS HORAS
1. Saque la corona a la posición "3" según descrito en el gráfico.
2. Gire la corona para avanzar las manecillas a la hora correcta. De
realizar el ajuste de las horas del PM, avance las manecillas para que
pasen las 12 horas una vez más después de que cambie la fecha
(pasando medianoche).
3. Regrese la corona a la posición "1" al terminar el ajuste de la
manecilla.
AJUSTE DE LA FECHA
1. Saque la corona hasta la posición "2". Gire la corona hacia su
persona hasta que aparezca la fecha correcta.
Nota: Si ajusta la fecha entre las horas de 9 PM y la 1 AM es
posible que la fecha del próximo día sea incorrecta y necesitará
reajustarse.
2. Regrese la corona a la posición "1".
AJUSTE DE LA MANECILLA DE 12 HORAS
Para un cambio de Huso Horario, ajuste la manecilla de 12 horas a la
hora deseada según las instrucciones a continuación:
1. Saque la corona a la posición "2".
2. Gire la corona hacia afuera de su persona (en el sentido opuesto al
del ajuste de fecha anteriormente dado) para posicionar la manecilla
de horas en la hora deseada. La manecilla de las horas saltará media
hora a la vez durante este ajuste. Podrá entonces usar la manecilla de
24 horas para mantenerse informado de la hora original de su casa.
Nota: el cambio de la fecha a medianoche siempre se activa por las
manecillas de las 12 horas.
3. Regrese la corona a la posición "1".
AJUSTE DEL ANILLO DE 24 HORAS SUPERIOR
Para mantenerse informado de un tercer huso horario, podrá girar el
anillo de 24 horas hasta que la manecilla de 24 horas esté posicionada
en la hora deseada
FUNÇÕES:
1. Mostrador com ponteiros de horas, minutos e segundos e com data
(de 12 horas).
2. Ponteiro de 12 horas ajustável para a função de fuso horário.
3. Ponteiro de 24 horas (não ajustável).
4. O anel externo ajustável de 24 horas funciona com o ponteiro de 24
horas para dar uma segunda função de fuso horário.
AJUSTE DO HORÁRIO NORMAL
1. Puxar a coroa para fora para a posição "3" conforme mostra o
diagrama.
2. Gire a coroa para avançar os ponteiros para o horário correto. Se
estiver fazendo o ajuste para um horário PM, avance os ponteiros para
depois das 12 horas uma vez mais depois que a data mudar (meia-
noite).
3. Volte a coroa para a posição "1" ao terminar o ajuste do ponteiro.
AJUSTE DA DATA
1. Puxe a coroa para fora para a posição "2". Gire a coroa para
frente até que a data correta apareça no mostrador.
Observação: se a data for ajustada entre 9 PM e 1 AM pode estar
incorreta no dia seguinte e será preciso fazer um reajuste da data.
2. Empurre a coroa de volta para a posição "1".
AJUSTE DO PONTEIRO DE 12 HORAS
Para modificar o fuso horário, ajuste o ponteiro de 12 horas para a
hora desejada da seguinte forma:
1. Puxe a coroa para a posição "2".
2. Gire a coroa para longe de você (oposto ao ajuste da data acima
descrito) para posicionar o ponteiro de horas na hora desejada. O
ponteiro de hora irá pular meia hora durante este ajuste. O ponteiro de
24 horas pode ser usado para controlar o horário original da cidade em
que você reside. Observação: a mudança da data a meia-noite é
sempre ativada pelos ponteiros de 12 horas.
3. Empurre a coroa de volta para a posição "1".
AJUSTE DO ANEL EXTERNO DE 24 HORAS
Para controlar um terceiro fuso horário, o anel de 24 horas pode ser
girado manualmente até que o ponteiro de 24 horas esteja posicionado
no horário desejado.
9/2007
Page 4 of 4
BOOK NO. 610 Time Zone

Other Bulova Watch manuals

Bulova Chronograph Service manual

Bulova

Bulova Chronograph Service manual

Bulova 98A179 User manual

Bulova

Bulova 98A179 User manual

Bulova 540S Service manual

Bulova

Bulova 540S Service manual

Bulova MARINE STAR Series User manual

Bulova

Bulova MARINE STAR Series User manual

Bulova 98B267 User manual

Bulova

Bulova 98B267 User manual

Bulova Accuquartz 224 Series Service manual

Bulova

Bulova Accuquartz 224 Series Service manual

Bulova Series 218 User manual

Bulova

Bulova Series 218 User manual

Bulova 100 Meter 98U13 User manual

Bulova

Bulova 100 Meter 98U13 User manual

Bulova MARINE STAR Series User manual

Bulova

Bulova MARINE STAR Series User manual

Bulova 96B358 User manual

Bulova

Bulova 96B358 User manual

Bulova 11 ANAC Service manual

Bulova

Bulova 11 ANAC Service manual

Bulova PRECISIONIST CHRONO Service manual

Bulova

Bulova PRECISIONIST CHRONO Service manual

Bulova 0S20 series Service manual

Bulova

Bulova 0S20 series Service manual

Bulova VD53 Service manual

Bulova

Bulova VD53 Service manual

Bulova Accu-Swiss series User manual

Bulova

Bulova Accu-Swiss series User manual

Bulova 43C32 Service manual

Bulova

Bulova 43C32 Service manual

Bulova CHRONO G10 Service manual

Bulova

Bulova CHRONO G10 Service manual

Bulova BVA-SERIES 100 Operating and maintenance manual

Bulova

Bulova BVA-SERIES 100 Operating and maintenance manual

Bulova OS20 Series Service manual

Bulova

Bulova OS20 Series Service manual

Bulova ANALOG T200 Service manual

Bulova

Bulova ANALOG T200 Service manual

Bulova 98B118 Service manual

Bulova

Bulova 98B118 Service manual

Bulova COMPUTRON 96C139 User manual

Bulova

Bulova COMPUTRON 96C139 User manual

Bulova Chrono FS00 Service manual

Bulova

Bulova Chrono FS00 Service manual

Bulova Maquina 98A177 User manual

Bulova

Bulova Maquina 98A177 User manual

Popular Watch manuals by other brands

Pulsar V33J user manual

Pulsar

Pulsar V33J user manual

Ingenieur chronograph SPORT operating instructions

Ingenieur chronograph

Ingenieur chronograph SPORT operating instructions

SPC SMARTEE WATCH CIRCLE 2 user manual

SPC

SPC SMARTEE WATCH CIRCLE 2 user manual

CanMore TW-402 user manual

CanMore

CanMore TW-402 user manual

Auriol 2-LD4517 Usage and safety instructions

Auriol

Auriol 2-LD4517 Usage and safety instructions

Citizen 9100 manual

Citizen

Citizen 9100 manual

Tissot CHRONOGRAPH WITH ALARM user manual

Tissot

Tissot CHRONOGRAPH WITH ALARM user manual

Bremont WATERMAN LIMITED EDITION Technical notes

Bremont

Bremont WATERMAN LIMITED EDITION Technical notes

Casio 5171 Operation guide

Casio

Casio 5171 Operation guide

Coleman 40-929 operating instructions

Coleman

Coleman 40-929 operating instructions

Armitron ProFit Guide

Armitron

Armitron ProFit Guide

Long Boom Electronics LMW12 user manual

Long Boom Electronics

Long Boom Electronics LMW12 user manual

HORAGE TOURBILLON 1 user manual

HORAGE

HORAGE TOURBILLON 1 user manual

Citizen 6P25 instruction manual

Citizen

Citizen 6P25 instruction manual

Rado Anatom 10.366.76.1 instruction manual

Rado

Rado Anatom 10.366.76.1 instruction manual

Casio 3144 Operation guide

Casio

Casio 3144 Operation guide

Fossil STARCK CROSS DIGITAL instructions

Fossil

Fossil STARCK CROSS DIGITAL instructions

Master Time MTGA-10718-22M operating manual

Master Time

Master Time MTGA-10718-22M operating manual

manuals.online logo
manuals.online logoBrands
  • About & Mission
  • Contact us
  • Privacy Policy
  • Terms and Conditions

Copyright 2025 Manuals.Online. All Rights Reserved.