Busch+Müller Mu E 332ALK User manual

012356
738916
5
6193856 !
"533856 #
"53$313653"5338562355
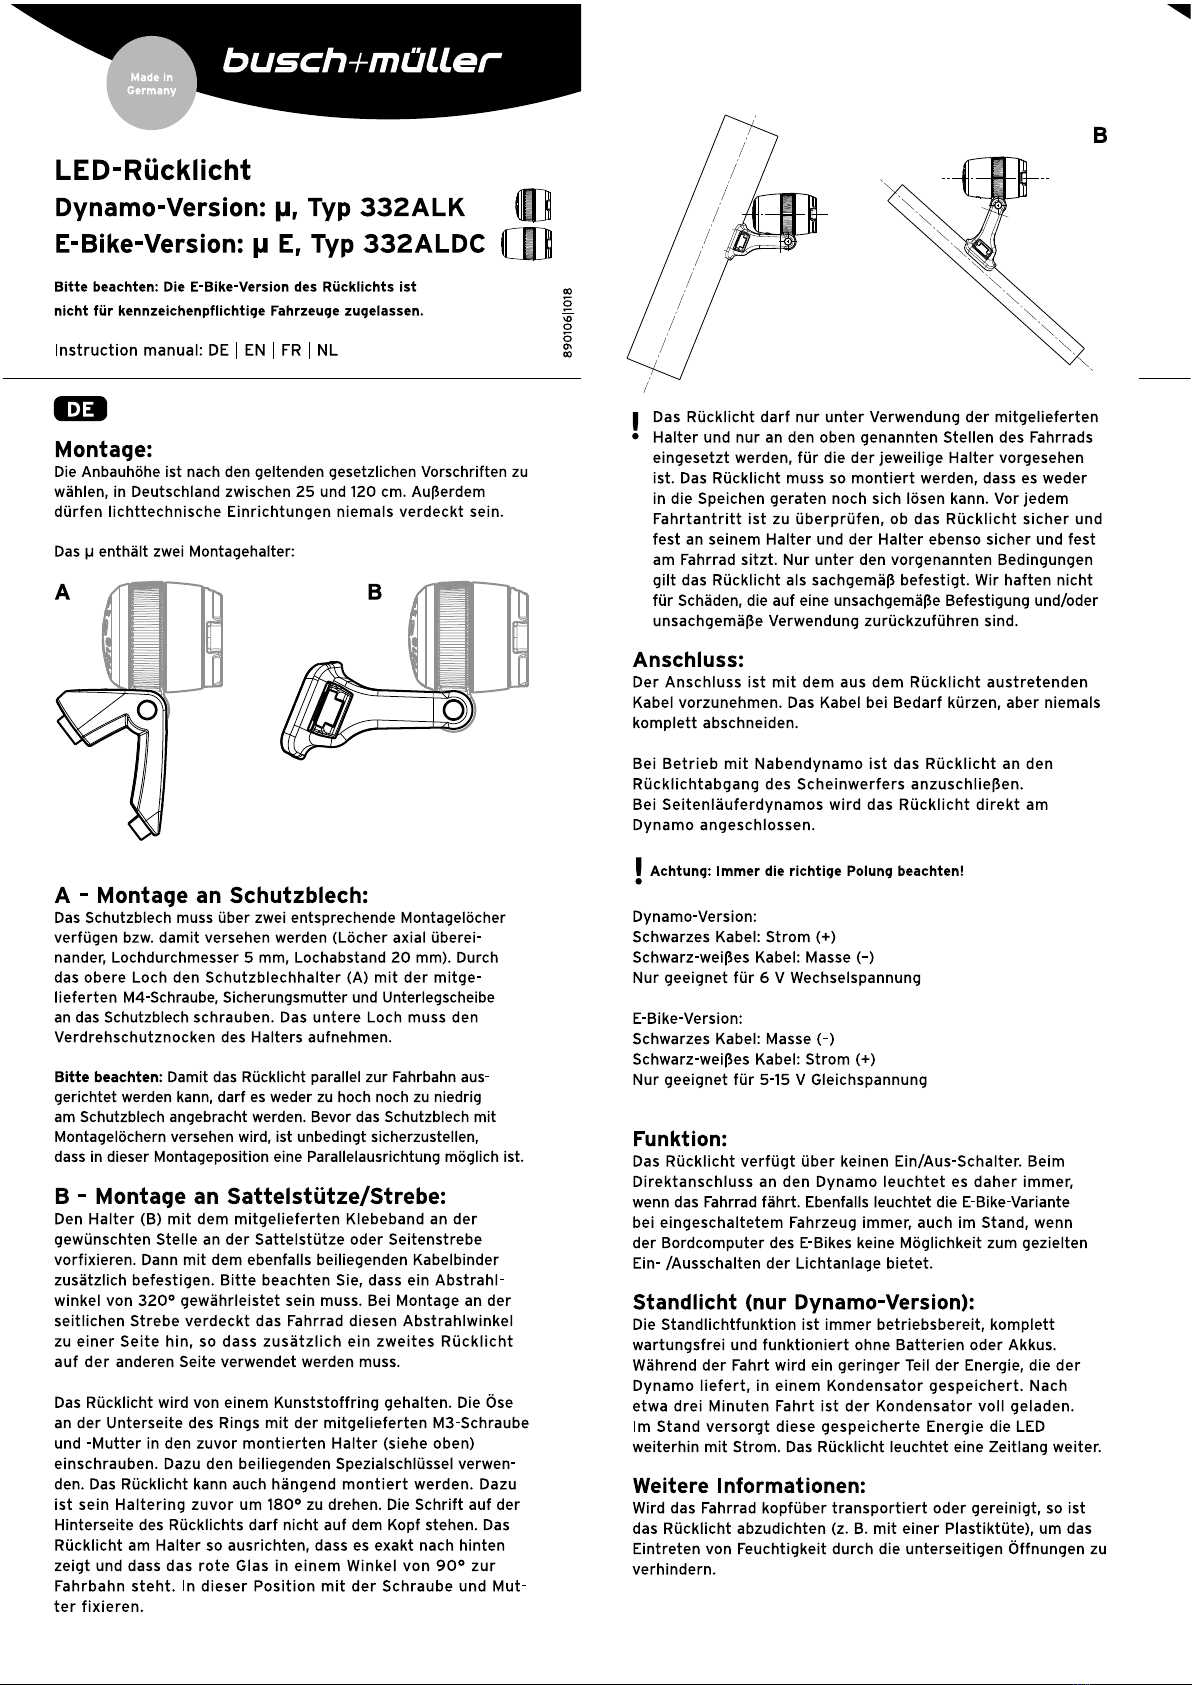
65%8366&3536%55'3(18&3)'3&)'3136*
+,-./01.23,456,067849:4;4:<4;4=>4;4<?
061'3
92@4A,B60CDC@42-.4,61C4E@,4F@7.@,E@,4F@-@.G721C@,4H3/-1C/2I.@,4G04
JKC7@,L42,49@0.-1C76,E4GJ2-1C@,4MN40,E4OMP415Q4A0R@/E@544
ES/I@,4721C..@1C,2-1C@4:2,/21C.0,F@,4,2@567-4T@/E@1U.4-@2,Q
96-4V4@,.CK7.4GJ@24W3,.6F@C67.@/8
X061'316Y)&$3
96-4Z1C0.GB7@1C450--4SB@/4GJ@24@,.-[/@1C@,E@4W3,.6F@7D1C@/4
T@/ISF@,4BGJQ4E652.4T@/-@C@,4J@/E@,4\?D1C@/46]2674SB@/@2^
,6,E@/L4?31CE0/1C5@--@/4N455L4?31C6B-.6,E4MP455_Q490/1C4
E6-43B@/@4?31C4E@,4Z1C0.GB7@1CC67.@/4\A_452.4E@/452.F@^
72@I@/.@,4W`^Z1C/60B@L4Z21C@/0,F-50..@/40,E4a,.@/7@F-1C@2B@4
6,4E6-4Z1C0.GB7@1C4-1C/60B@,Q496-40,.@/@4?31C450--4E@,4
H@/E/@C-1C0.G,31U@,4E@-4b67.@/-460I,@C5@,Q4
"53$313649652.4E6-4>S1U721C.4[6/677@74G0/4=6C/B6C,460-^
F@/21C.@.4J@/E@,4U6,,L4E6/I4@-4J@E@/4G04C31C4,31C4G04,2@E/2F44
654Z1C0.GB7@1C46,F@B/61C.4J@/E@,Q4c@T3/4E6-4Z1C0.GB7@1C452.4
W3,.6F@7D1C@/,4T@/-@C@,4J2/EL42-.40,B@E2,F.4-21C@/G0-.@77@,L44
E6--42,4E2@-@/4W3,.6F@[3-2.23,4@2,@4d6/677@760-/21C.0,F45DF721C42-.Q
"X061'316Y13&3eY83$3
9@,4b67.@/4\c_452.4E@5452.F@72@I@/.@,4f7@B@B6,E46,4E@/44
F@JS,-1C.@,4Z.@77@46,4E@/4Z6..@7-.S.G@43E@/4Z@2.@,-./@B@4
T3/I2]2@/@,Q496,,452.4E@54@B@,I677-4B@272@F@,E@,4f6B@7B2,E@/4
G0-K.G721C4B@I@-.2F@,Q4c2..@4B@61C.@,4Z2@L4E6--4@2,4AB-./6C7^
J2,U@74T3,4gMPh4F@JKC/7@2-.@.4-@2,450--Q4c@24W3,.6F@46,4E@/4
-@2.721C@,4Z./@B@4T@/E@1U.4E6-4=6C//6E4E2@-@,4AB-./6C7J2,U@74
G04@2,@/4Z@2.@4C2,L4-34E6--4G0-K.G721C4@2,4GJ@2.@-4>S1U721C.4
60I4E@/46,E@/@,4Z@2.@4T@/J@,E@.4J@/E@,450--Q4
96-4>S1U721C.4J2/E4T3,4@2,@54f0,-.-.3II/2,F4F@C67.@,Q492@4i-@4
6,4E@/4a,.@/-@2.@4E@-4>2,F-452.4E@/452.F@72@I@/.@,4Wg^Z1C/60B@4
0,E4^W0..@/42,4E@,4G0T3/453,.2@/.@,4b67.@/4\-2@C@43B@,_4
@2,-1C/60B@,Q496G04E@,4B@272@F@,E@,4Z[@G267-1C7S--@74T@/J@,
^
E@,Q496-4>S1U721C.4U6,,4601C4CK,F@,E453,.2@/.4J@/E@,Q496G04
2-.4-@2,4b67.@/2,F4G0T3/4054OjPh4G04E/@C@,Q492@4Z1C/2I.460I4E@/4
b2,.@/-@2.@4E@-4>S1U721C.-4E6/I4,21C.460I4E@54f3[I4-.@C@,Q496-4
>S1U721C.4654b67.@/4-3460-/21C.@,L4E6--4@-4@]6U.4,61C4C2,.@,4
G@2F.40,E4E6--4E6-4/3.@4k76-42,4@2,@54l2,U@74T3,4mPh4G0/4
=6C/B6C,4-.@C.Q4+,4E2@-@/4d3-2.23,452.4E@/4Z1C/60B@40,E4W0.
^
.@/4I2]2@/@,Q
jmPOPn;OPOj
"
o
96-4>S1U721C.4E6/I4,0/40,.@/4H@/J@,E0,F4E@/452.F@72@I@/.@,4
b67.@/40,E4,0/46,4E@,43B@,4F@,6,,.@,4Z.@77@,4E@-4=6C//6E-4
@2,F@-@.G.4J@/E@,L4IS/4E2@4E@/4p@J@272F@4b67.@/4T3/F@-@C@,4
2-.Q496-4>S1U721C.450--4-3453,.2@/.4J@/E@,L4E6--4@-4J@E@/4
2,4E2@4Z[@21C@,4F@/6.@,4,31C4-21C47D-@,4U6,,Q4H3/4p@E@54
=6C/.6,./2..42-.4G04SB@/[/SI@,L43B4E6-4>S1U721C.4-21C@/40,E4
I@-.46,4-@2,@54b67.@/40,E4E@/4b67.@/4@B@,-34-21C@/40,E4I@-.4
654=6C//6E4-2.G.Q4<0/40,.@/4E@,4T3/F@,6,,.@,4c@E2,F0,F@,4
F27.4E6-4>S1U721C.467-4-61CF@5KR4B@I@-.2F.Q4l2/4C6I.@,4,21C.4
IS/4Z1CKE@,L4E2@460I4@2,@40,-61CF@5KR@4c@I@-.2F0,F40,Eq3E@/4
0,-61CF@5KR@4H@/J@,E0,F4G0/S1UG0ISC/@,4-2,EQ
6)
9@/4A,-1C70--42-.452.4E@5460-4E@54>S1U721C.460-./@.@,E@,4
f6B@74T3/G0,@C5@,Q496-4f6B@74B@24c@E6/I4US/G@,L46B@/4,2@567-4
U35[7@..46B-1C,@2E@,Q
c@24c@./2@B452.4<6B@,Er,65342-.4E6-4>S1U721C.46,4E@,4
>S1U721C.6BF6,F4E@-4Z1C@2,J@/I@/-46,G0-1C72@R@,Q4
4
c@24Z@2.@,7K0I@/Er,653-4J2/E4E6-4>S1U721C.4E2/@U.46544
9r,65346,F@-1C73--@,Q
o
)6's9938253855'3t)6'$3136o
9r,653^H@/-23,8
Z1CJ6/G@-4f6B@784Z./354\u_
Z1CJ6/G^J@2R@-4f6B@784W6--@4\v_
<0/4F@@2F,@.4IS/4n4H4l@1C-@7-[6,,0,F
:^c2U@^H@/-23,8
Z1CJ6/G@-4f6B@784W6--@4\v_
Z1CJ6/G^J@2R@-4f6B@784Z./354\u_
<0/4F@@2F,@.4IS/4N^ON4H4k7@21C-[6,,0,F
()656
96-4>S1U721C.4T@/ISF.4SB@/4U@2,@,4:2,qA0-^Z1C67.@/Q4c@254
92/@U.6,-1C70--46,4E@,49r,65347@01C.@.4@-4E6C@/4255@/L4
4
J@,,4E6-4=6C//6E4IKC/.Q4:B@,I677-47@01C.@.4E2@4:^c2U@^H6/26,.@4
B@24@2,F@-1C67.@.@54=6C/G@0F4255@/L4601C4254Z.6,EL4J@,,4
4
E@/4c3/E135[0.@/4E@-4:^c2U@-4U@2,@4WDF721CU@2.4G054F@G2@7.@,44
:2,^4qA0--1C67.@,4E@/4?21C.6,76F@4B2@.@.Q
Y1625w6)86193856x
92@4Z.6,E721C.I0,U.23,42-.4255@/4B@./2@B-B@/@2.L4U35[7@..44
J6/.0,F-4I/@240,E4I0,U.23,2@/.43C,@4c6..@/2@,43E@/4AUU0-Q4
lKC/@,E4E@/4=6C/.4J2/E4@2,4F@/2,F@/4y@274E@/4:,@/F2@L4E2@4E@/4
9r,653472@I@/.L42,4@2,@54f3,E@,-6.3/4F@-[@21C@/.Q4<61C4
@.J64E/@24W2,0.@,4=6C/.42-.4E@/4f3,E@,-6.3/4T3774F@76E@,Q4
4
+54Z.6,E4T@/-3/F.4E2@-@4F@-[@21C@/.@4:,@/F2@4E2@4?:944
J@2.@/C2,452.4Z./35Q496-4>S1U721C.47@01C.@.4@2,@4z@2.76,F4J@2.@/Q
{35383s6%8915636
l2/E4E6-4=6C//6E4U3[ISB@/4./6,-[3/.2@/.43E@/4F@/@2,2F.L4-342-.4
E6-4>S1U721C.46BG0E21C.@,4\GQ4cQ452.4@2,@/4d76-.2U.S.@_L4054E6-4
:2,./@.@,4T3,4=@01C.2FU@2.4E0/1C4E2@40,.@/-@2.2F@,4iII,0,F@,4G04
T@/C2,E@/,Q
"

µ, LED rear light
Dynamo version: µ, type 332ALK
E-bike version: µ E, type 332ALDC
This instruction manual is text-only. Please note the overleaf illustrations.
Please note: The e-bike version of this rear light is only approved for use with vehicles that need not carry licence plates.
ounting:
The mounting height must be chosen in accordance with applicable regulations, in Germany between 2 and 120 cm. In addition to
that, light fixtures may never be covered.
µ contains two mounting brackets.
A – Bracket for mudguard mounting:
The mudguard must be furnished with two appropriate mounting holes (axially on top of each other, hole diameter mm, hole
distance 20 mm). Through the upper hole, fix the mudguard mount (A) with the included M4 screw, safety nut and washer. The
lower hole must hold the anti-turn pin of the mounting bracket.
Please note: In order to align the rear light parallelly to the road, it must be installed neither too high nor too low on the mudguard.
Before fitting the mudguard with mounting holes, please ensure that parallel alignment is possible in the chosen mounting position.
B – Bracket for seat post/strut mounting:
Pre-fix bracket (B) with the included adhesive tape to the desired position on the seat post or strut. Use the included wire strap to
fix the bracket completely. Please note that a light beam angle of 320° must be reached. When mounting the rear light to the lateral
strut, the bicycle covers this angle to one side, so that a second rear light must be installed on the opposite side.
The rear light is held by a plastic ring. Screw the bottom grommet of the ring into one of the aforementioned mounts, using the
included special wrench. The rear light may also be mounted in a hanging position, To do this, turn the ring 180°. The writing on the
back of the rear light may never be upside down. Adjust the rear light so it points exactly backwards and the red glass stands at a
right angle to the road. Fix the rear light in this position using the screw and washer.
The rear light may only be mounted using the included brackets and only to the aforementioned positions on the bicycle, for
which the respective bracket is intended. The rear light must be mounted so it can never end up between the spokes or loosen
itself. Prior to each ride, the secure and tight fit of the rear light on its bracket and of the bracket to the bicycle must be checked
and ensured. Only under these conditions, the rear light can be considered to be properly mounted. We are not liable for any
damages that are caused by improper mounting and/or use.
Connection:
Connect by using the wire protruding from the rear light. The wire may be shortened, but never cut off entirely.
When using the rear light with a hub dynamo, it must be connected to the rear light contacts on the headlight. When using a bottle
dynamo, directly connect the rear light to the dynamo.
Please note: Always observe the correct polarity!
Dynamo version:
Black wire: Current (+)
Black/white wire: Mass (–)
Only suitable for 6 V AC voltage
E-bike version:
Black wire: Mass (–)
Black/white wire: Current (+)
Only suitable for -1 V DC voltage
Function:
The rear light has no ON/OFF switch. When connected to the dynamo directly it always shines as soon as the bicycle move. Also, the
e-bike version always shines, even when standing still, when the vehicle’s control panel does not offer a specific ON/OFF option for
the light system.
Standlight (dynamo version only):
The standlight function is always operational, completely maintenance-free and works without batteries. During riding, a small
portion of the energy provided by the dynamo is stored in a capacitor. After approximately three minutes of cycling, the capacitor is
fully charged. When standing still, this energy is used to continually power the LED. The rear light continues shining for a while.
Further information:
If the bicycle is transported or cleaned upside down, the rear light must be sealed (e.g. with a plastic bag) to prevent moisture from
entering through the bottom apertures.
This manual suits for next models
3
Table of contents
Other Busch+Müller Bicycle Accessories manuals

Busch+Müller
Busch+Müller LUMOTEC IQ Eyro 163B User manual

Busch+Müller
Busch+Müller IXXI User manual

Busch+Müller
Busch+Müller IXBACK senso User manual

Busch+Müller
Busch+Müller LUMOTEC Upp 166 User manual

Busch+Müller
Busch+Müller IQ-X E User manual

Busch+Müller
Busch+Müller 160 Series User manual

Busch+Müller
Busch+Müller LUMOTEC IQ Cyo T 175QT User manual

Busch+Müller
Busch+Müller E-WERK User manual

Busch+Müller
Busch+Müller LUMOTEC IQ Fly RT User manual

Busch+Müller
Busch+Müller LUMOTEC IQ-X T senso plus 164 User manual