Cal-Royal CRCODE-203 Owner's manual

CRCODE-203
Mechanical Lock
Instruction and Programming Manual
Before Installing:
1. Please read the instructions carefully to prevent missing important steps.
*Note: Improper installations may result in damage to the lock which will
void the factory warranty.
2. Please keep this Instruction Manual for future reference.
3. Contact dealer if particular installation is needed.
6605 Flotilla St.,
Commerce, CA 90040
Tel (323) 888-6601 Fax (323) 888-6699
www.cal-royal.com

IMPORTANT NOTICE:
1. If entered code does not work, push the “C”
button followed by the code. Otherwise, it is not
necessary to push the “C” button before
entering the code.
2. The digits after the “C” button can be entered
in any order to confuse tailgaters watching
over your shoulders.

TABLE OF CONTENTS
Introduction
Parts
Checklist before installation
Door Handing
Installation Procedure
Mark and Drill Door
Change Door Handing
Alignment post location
CRCODE-203 Exploded View
Latch and Spindle Installation
Outside Lock Installation
Inside Lock Installation
Install Strike Plate
Check and Adjust
To Change Access Code
Access Code Recovery
1
2
3
3
3
4
5
6
7
7
8
9
9
9
10
11
Page
Introduction
1. This is a mechanical lock. It does not need a power supply.
2. There are 12 buttons that can be coded: 1 to 0, X and Z. The Y button is only used for setting
the new code. The C button is to clear the buttons if the wrong code is entered.
3. The numbers in the code can be interchanged and does not need to be typed in order.
Password combinations can be from 1-12 digits but 4 to 6 digit codes is suggested for security
purposes.
4.The lock is suitable for door thickness 1 3/8” - 1 3/4”. Choose the appropriate length of screws
according to the door thickness. If the door thickness is out of range, please contact
dealer to get special parts.
7KLVORFNFDQEHLQVWDOOHGRQZRRGDQGPHWDOGRRUV7RLQVWDOORQD¿UHGRRUSOHDVHSXUFKDVH
DFFHVVRULHVQHHGHGIRU¿UHGRRUV
The C button is used as
a clear button when the
wrong code is entered. It
can not be coded.
12 buttons can be coded:
1-0, X and Z
The Y button is only used
to set new codes, it can
not be coded.
n
be
coded:
onl
y
used
s
,
it can
16605 Flotilla St., Commerce, CA 90040
Tel (323) 888-6601 Fax (323) 888-6699
www.cal-royal.com

PARTS PCS REMARKS
1 Outside Lock 1
2 Inside Lock 1
32
3/4EDFNVHW¿UHODWFKEROW 1 70mm 2 3/4” backset
4 Spindle R 1 Right Hand (Blue) or “R”
5 Spindle L 1 Left Hand (Red) or “L”
6 8-32 X 3/8” screws 4 EDFNSODWH¿[LQJEROWV
7 10-32 X 1 3/16” screws 4 IURQWSODWH¿[LQJEROWVIRUGRRUWKLFNQHVV
44mm
8 8-32 3/4” screws 2 ODWFK¿[LQJVFUHZV
9 12-24 X 1” screws 2 VWULNHSODWH¿[LQJVFUHZV
10 ANSI strike 1
11 SC Keys 2x2 SCHLAGE “C” Keyway
12 Pin for lever latch 1 lever handle direction change tool
13 Alignment post for latchbolt 1
14 Easy code change key 1 code change tool
15 Factory Set Code 1 default code
16 Instruction Manual 1
17 Template / Installation Instructions 1
18 Fire Cup 1 RQO\SURYLGHGLQWKH8/¿UHUDWHGSURGXFWV
19 Mounting Plate 1
*Standard 70mm (2 3/4”) backset latch. Contact the distributor if 60mm (2 3/8”) backset latch is required.
Parts
CAL-ROYAL
1
2
3
4
5
X
Y
6
7
8
9
0
Z
C
CAL-ROYAL
1
2
3
4
5
X
Y
6
7
8
9
0
Z
C
x 4
26605 Flotilla St., Commerce, CA 90040
Tel (323) 888-6601 Fax (323) 888-6699
www.cal-royal.com

Checklist before installation:
Door Handing
drill the
holes
use the
right parts install adjust reset code
Installation Procedures
CHANGE THE LEVER HANDLE AND LATCH DIRECTION ACCORDINGLY
*THE EXAMPLE IN THIS MANUAL IS A RIGHT HAND DOOR
Right Hand Left Hand
Right Hand Reverse Left Hand Reverse
1. Door Material Wood / Steel
2. Door Thickness 1 3/8” - 1 3/4”
3. Mounting Plate
4. Door Handing Right Hand / Left Hand
5. Complete Accessories
INSIDE INSIDE
OUTSIDE
OUTSIDE
INSIDE INSIDE
OUTSIDEOUTSIDE
36605 Flotilla St., Commerce, CA 90040
Tel (323) 888-6601 Fax (323) 888-6699
www.cal-royal.com

Mark and Drill Door
1. Attach TEMPLATE onto door and verify
backset and latchbolt center, before
marking and drilling holes on the door.
2. Drill holes on the door.
*Drilling a hole from both sides is
recommended to avoid splintering wood doors.
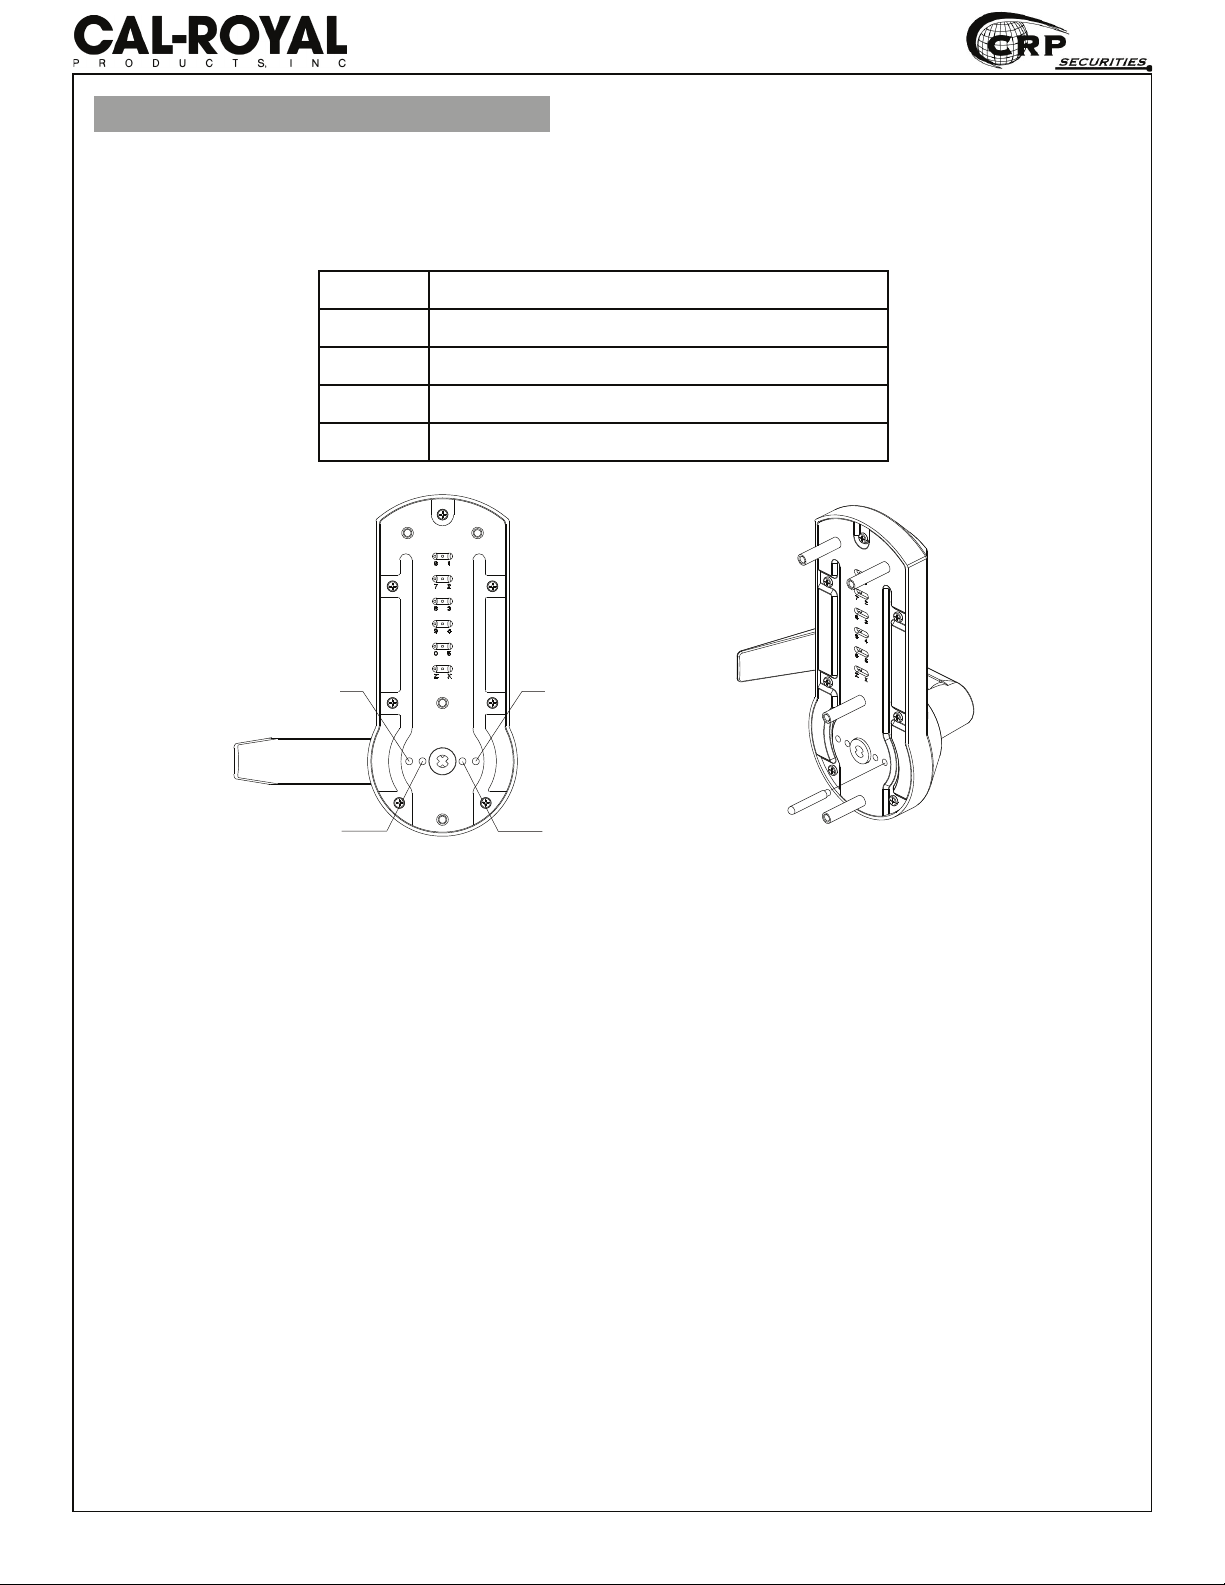
2.1 Drill 2 1/8” diameter thru holes. A
2.2 Drill two two 3/8” holes on top, per TEMPLATE. B
2.3 Drill two 3/8” thru holes, on top and bottom of
the bore hole vertically. C
2.4 Drill 1” hole on the edge of the door. Chisel a
UDEEHW´GHHSWRDOORZODWFKIDFHÀXVK¿W
with door edge. Mortise for latchbolt front
1 1/8” width x 2 1/4” height x 5/32” deep.
2.5 Drill Pilot hole for latchbolt screws 7/64”. E
3. Prepare and install strike.
3.1 Close door and mark center or latch center line
from the center of the template to the frame of
the door.
3.2 Align hole of the strike with vertical line.
Tighten strike plate using two screws provided.
Drill the latch hole
in the center of the
door width
38” from
WKHÀRRU
46605 Flotilla St., Commerce, CA 90040
Tel (323) 888-6601 Fax (323) 888-6699
www.cal-royal.com

To Change Handing
OUTSIDE LOCK
(Lever shipped Right Handed)
1. Insert key and turn 90° clockwise.
2. Insert pin for lever latch on the bottom of the lever.
3. Pull lever off.
4. Install lever to the desired handing of the door.
5. Turn key 90° clockwise and push lever until it
clicks.
6. Pull out key.
make sure this is
set horizontally
INSIDE LOCK
1. Insert key and turn 90° clockwise.
2. Insert pin for lever latch on the bottom of the lever.
3. Pull lever off.
4. Install lever to the desired handing of the door.
5. Turn key 90° clockwise and push lever until it
clicks.
6. Pull out key.
Check Spindle Timing:
Using a screwdriver, turn the
spindle timing guide towards
the direction of the tip of the
lever until it stops.
LH / LHR
RH / RHR
RH
/
RHR
L
H
/
LHR
pin for lever latch
56605 Flotilla St., Commerce, CA 90040
Tel (323) 888-6601 Fax (323) 888-6699
www.cal-royal.com

Alignment post location
A
D
C
B
1. As tubular latchbolts only have one bolt hole, fasten the alignment post to the desired
position, on the back plate of the Outside Lock .
Post positions provided for:
A Left hand, 2 3/4” backset
B Left hand, 2 3/8” backset
C Right hand, 2 3/4” backset
D Right hand, 2 3/8” backset
66605 Flotilla St., Commerce, CA 90040
Tel (323) 888-6601 Fax (323) 888-6699
www.cal-royal.com

OUTSIDE LEVER
HANDING OUTSIDE INSIDE
RH
RHR
RH Spindle
(Blue)
LH Spindle
(Red)
LH
LHR
LH Spindle
(Red)
RH Spindle
(Blue)
OUTSIDE
INSIDE
RH Spindle
(Blue)
LH Spindle
(RED)
Exploded View of CRCODE-203
Latch and Spindle Installation
,QVHUWWKH¿UHFXSLQWRWKHKROH,IQRWXVLQJD¿UH
cup, skip this step)
2. Insert the latch into the bore hole.
3. Fix the latch with two 8-32 x 3/4” combination
wood / machine screws.
4. Fit the Right Hand Spindle (Blue) or “R” on the out-
side of the door for (RH/RHR door)1
5. Insert the Left Hand Spindle (Red) “L” on the inside
of the door for (RH/RHR door)1
1Do the reverse for LH/LHR door. Left Hand Right Hand
5
76605 Flotilla St., Commerce, CA 90040
Tel (323) 888-6601 Fax (323) 888-6699
www.cal-royal.com

&KHFNWKDWWKHODWFKLVFRUUHFWO\¿WWHGDVVKRZQRQ
right image.
Outside Lock Installation
1. Place Outside Lock on door.
2. Align hub onto the spindle and 4
screw posts through prep doors.
3. Align the mounting plate of the
Outside lock and fasten with 4
screws.
86605 Flotilla St., Commerce, CA 90040
Tel (323) 888-6601 Fax (323) 888-6699
www.cal-royal.com

Inside Lock Installation
Install Strike Plate
Check & Adjust
3
1
2
1. Place Inside Lock onto the door.
3. Fasten with 8-32 X 3/8” screws.
2. Push lever onto the hub until it clicks.
1. Align strike plate with rabbet.
2. Fasten strike plate with 2 screws.
1. Enter factory set code and make sure that the latchbolt
retracts and the lever handle turns smoothly.
2. Check the operation of the inside lever handle.
3. Insert the key to check if the latchbolt retracts.
4. Close the door and make sure it closes without getting
stuck. (Remove the key before closing the door)
5. Enter the code or use the key to open the door.
6. If there is no binding of the latch or handles, the lock is
FRUUHFWO\¿WWHG2WKHUZLVHORRVHQWKH¿[LQJEROWVDQG
reposition the strike plate slightly until the correct
position is found. Re-tighten the bolts.
After entering the correct code, check the
lever if it is correctly installed by pushing
the lever down. If the latch retracts, push
the lever again without entering a code.
If it goes to breakaway mode, the lever
is installed correctly; if the latch retracts,
refer to Check Spindle Timing on
page 5 and adjust the timing.
96605 Flotilla St., Commerce, CA 90040
Tel (323) 888-6601 Fax (323) 888-6699
www.cal-royal.com

10 6605 Flotilla St., Commerce, CA 90040
Tel (323) 888-6601 Fax (323) 888-6699
www.cal-royal.com
To Change Access Code
CAL-ROYAL
1
2
3
4
5
X
Y
6
7
8
9
0
Z
C
1. Press current access code.
2. Turn lever 70° and hold.
3. Press the “Y” button.
5HOHDVHWKHOHYHU¿UVWDQGWKHQWKH³<´EXWWRQ
(“Y” button will stay pressed until code is changed)
5. Push the code change tool onto each button in
turn, pushing in the buttons approximately 2mm
turn counter-clockwise 180° or until it stops turning.
All buttons should now be in non-code position.
6. Test that all the buttons are in non-code by pressing
the “C” button and turning the lever handle which
should retract the latch and pop the “Y” button up.
If the latch can not be retracted, repeat step 5.
7. Press the “Y” button.
5HOHDVHWKHOHYHU¿UVWDQGWKHQWKH³<´EXWWRQ
(“Y” button will stay pressed until code is changed)
7. To select button as a code button, push code tool over
button. Press button in with tool approximately 2mm
and turn clockwise 180° or until it stops turning.

11 6605 Flotilla St., Commerce, CA 90040
Tel (323) 888-6601 Fax (323) 888-6699
www.cal-royal.com
To Change Access Code
8. Press “C” and the new access code.
9. Turn the lever. The “Y” button will pop back up once the
code is changed.
*Before pressing the access code, make sure to press
³&´EXWWRQ&OHDU¿UVW
Access Code Recovery
1. Remove the Outside Lock
*The buttons included in the access code (coded buttons)
will show dots above the number/letter.
*The buttons not included in the access code (non-coded)
buttons will be blank.
CODED
CAL-ROYAL
6
7
8
9
0
Z
C
1
2
3
4
5
X
Y

12 6605 Flotilla St., Commerce, CA 90040
Tel (323) 888-6601 Fax (323) 888-6699
www.cal-royal.com


6605 FLOTILLA ST., COMMERCE, CA 90040
TEL. (323) 888-6601 FAX. (323) 888-6699
WEBSITE: www.cal-royal.com
EMAIL: sales@cal-royal.com
Table of contents
Other Cal-Royal Door Lock manuals
Popular Door Lock manuals by other brands

Assa Abloy
Assa Abloy v.G1 Sargent installation instructions

Assa Abloy
Assa Abloy multi-t-lock Code Handle Window manual

Allegion
Allegion Schlage Control user guide

Assa Abloy
Assa Abloy Sargent Passport 1000 PG installation instructions

Miles Nelson
Miles Nelson Doorbot user manual

iCreation
iCreation CL-3223 user manual