Calmer BT Chopper Upgrade Kit User manual

Farmer Invented. Farmer Tested. Farmer Proven.®
RESIDUE MANAGEMENT UPGRADE KIT
INSTALLATION MANUAL
CASE IH* 4000 & NEW HOLLAND* 980CR
SERIES CORN HEADS
www.CalmerCornHeads.com
Weekdays 8-5 p.m. - Office (309) 629-9000
After Hours/Weekends - Marion’s Cell (309) 368-1182
*Trademarks are not owned by, affiliated with, or under license to Calmer Corn Heads, Inc.
and used solely for the utility of Calmer Corn Head products mentioned herein.

Introduction 2
Warranty 2
Safety Section 2
Before Operation 3
Components List 4
Step 1 – Disassembly of Current Components 5
Step 2 – Modifying Row Frames 6
Step 3 – Modifying Stalk Roll Spirals 9
Step 4 – Installing Calmer BT Chopper®Stalk Roll Shells 11
Step 5 – Reassembly of Components 15
Step 6 – Installing Oil Bath Sprockets 16
Helpful Corn Head Settings and Adjustments 17
TABLE OF CONTENTS INTRODUCTION
Thank you for purchasing Calmer’s BT Chopper®Upgrade Kit for your corn head. We hope you will
get many years of productive use from it. The purpose of this upgrade kit is to improve your corn
head’s performance and accelerate corn residue decomposition. All product users must read and
understand this manual prior to equipment operation. This manual is considered part of your machine
and should remain with the machine at all times. Do not allow anyone to operate or maintain this
equipment who has not fully read and comprehended this manual. Failure to follow the recommended
procedures may result in personal injury or death or equipment damage.
Information in this manual is designed to help owners and operators to obtain the best results and
safe operation from their investment. The life of these products depends largely on the care it is given
and we suggest that the manual should be read and understood and referred to frequently. If for any
reasons you do not understand the instructions and safety requirements, please contact us at any time.
The intent of this manual is to provide guidelines to cover general use and to assist in avoiding ac-
cidents and injuries.
There may be times when circumstances occur that are not covered in the manual. At those times it is
best to use common sense and contact our factory.
The requirements of safety cannot be emphasized enough in this publication. We urge you to make
safety your top priority when using and maintaining this equipment.
WARRANTY
Calmer Corn Heads, Inc. has been in business since 2004 and has an excellent reputation for
quality and workmanship. Please contact us (the manufacturer) if you feel a component has not lasted
to your expectation. These concerns will be handled on a case-by-case basis. Please contact our
factory directly at (309) 629-9000 for replacement parts.
SAFETY
Read and understand this manual and all safety signs before maintaining and operating. Review the
safety instructions and precautions annually.
TAKE NOTE! THIS SAFETY ALERT SYMBOL FOUND THROUGHOUT THIS
MANUAL IS USED TO CALL YOUR ATTENTION TO INSTRUCTIONS INVOLVING
YOUR PERSONAL SAFETY AND THE SAFETY OF OTHERS. FAILURE TO FOLLOW THESE
INSTRUCTIONS CAN RESULT IN INJURY OR DEATH.
1 www.CalmerCornHeads.com (309) 629-9000 2

THE COMPLETE CALMER RESIDUE MANAGEMENT DELUXE
UPGRADE KIT INCLUDES PER ROW:
Note: Your reference for Right and Left (Stalk Rolls) is as you are sitting in the combine cab looking
at the corn head.
THIS SYMBOL MEANS: ATTENTION!
BECOME ALERT! YOUR SAFETY IS INVOLVED!
Note the use of the signal words DANGER, WARNING and CAUTION with the safety messages. The
appropriate signal word for each has been selected using the following guidelines:
DANGER: Indicates an imminently hazardous situation that, if not avoided, will result in
death or serious injury. This signal word is to be limited to the most extreme situations
typically for machine components which, for functional purposes, cannot be guarded.
WARNING: Indicates a potentially hazardous situation that, if not avoided, could result
in death or serious injury, and includes hazards that are exposed when guards are removed.
CAUTION: Indicates a potentially hazardous situation that, if not avoided, may result in
minor or moderate injury.
NOTICE is used to address safety practices not related to personal safety.
This equipment is dangerous to children and persons unfamiliar with its operation. The operator
should be a responsible adult familiar with farm machinery and trained in this equipment’s
operations. Do not allow persons to operate or assemble this unit until they have
read this manual and have developed a thorough understanding of the safety
precautions of how it works.
SAFETY SIGNS
Sharp Objects signs are placed on the exterior of all stalk roll boxes. See
the sign, right, for reference and understand the associated cutting dangers
with the enclosed product.
BEFORE OPERATION
• Carefully study and understand this manual.
• Do not wear loose-fitting clothing which may catch on moving parts.
• Always wear protective clothing and substantial shoes.
• Always wear provided cut-resistant gloves when installing stalk rolls
3 www.CalmerCornHeads.com (309) 629-9000 4
Case IH 4000/NH 980CR Upgrade Kit
C
D
BE
A
B
C
D
E
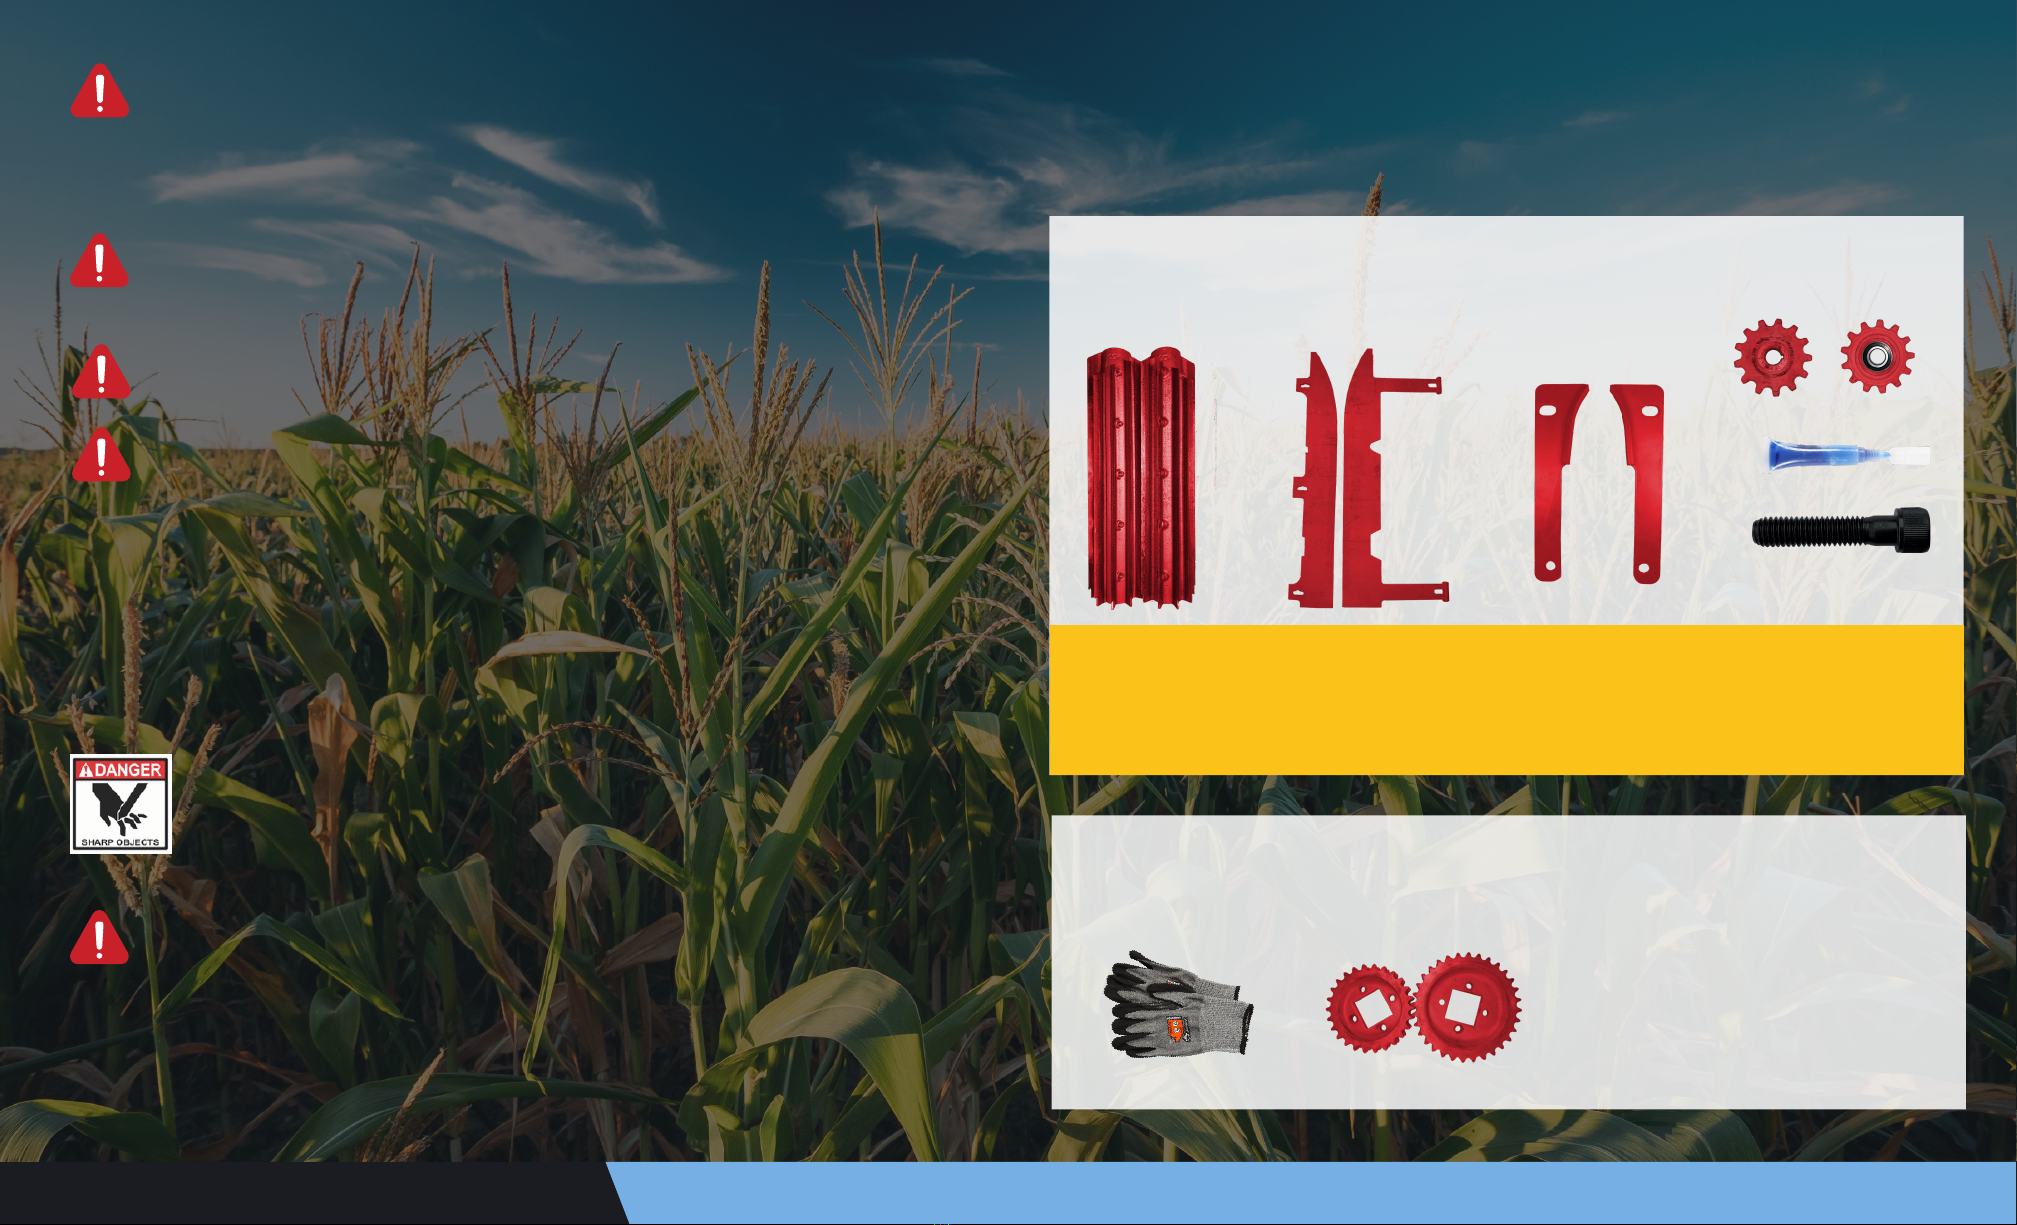
(2) BT Chopper®Stalk Roll Shells
(1) Left Manual Stripper Plate
(1) Right Hydraulic Stripper Plate
(2) Spiral Grass Knives
(2) 13-Tooth Accelerator Drive Sprockets
F
G
H
I
(2) 13-Tooth Idler Sprockets
(1) Medium-Strength Threadlocker Tube
(20) 3/8” - 16 x 1¾” Socket Head Cap
Screws
(1) Cut-O Wheel
Cut-O Wheel
G
H
(2) CUT-RESISTANT
GLOVES
The Complete Calmer Residue Management Deluxe Upgrade Kit Includes Per Head:
OIL BATH SPROCKETS
(1 pair for 6 row heads,
2 pairs for 8+ row heads)
(1) Angle Grinder
(1) Pair of Goggles
(2) Hex Bits
(1) Template for Modifying Row Units
(2) Pairs of 26:32 or 19:24 Oil Bath Sprockets
(1 pair for 6 row heads)
(2) Oil Bath Gaskets
(1 for 6 row heads)
I
AF

DANGER: Ensure the corn head is secured properly, combine lift cylinder stops
are in place, equipment is turned-o, and the parking brake is engaged before
attempting any adjustments. Be sure to follow all manufacturer’s safety
procedures when setting-up and working on the corn head.
1. Attach the corn head to your combine in accordance with the instructions in the manufacturer’s
owner’s manual. It is critical to lock the lift cylinder in the raised position before
making any further adjustments.
2. Raise and secure or remove the corn head dividers and hoods.
3. Remove gathering chains.
4. Remove chain guides.
5. Remove stripper plates.
6. Remove weed knives.
7. Remove stalk roll blades from square stalk roll shaft. (Do NOT remove entire shaft)
CAUTION: Inspect all parts to be reassembled and replace excessively worn
components as necessary.
IMPORTANT: Inspect all stalk roll shafts, bearings and check for backlash. Correct,
replace or repair as necessary. Failure to do so will void warranty!
Disassembly of Current Components
5 www.CalmerCornHeads.com (309) 629-9000 6
STEP 1 STEP 2
Modifying Row Frames
1. Use template provided with your kit to mark the appropriate modification lines on the
row frame unit OR mark vertical line 6” from the outside of the row unit, which is
approx. 7/8” from the inside edge of the row unit. (See below image)

7 www.CalmerCornHeads.com (309) 629-9000 8
2. Cut off the row unit with a cut-off wheel or plasma cutter from the rear of the stalk roll spiral to
the top of the row unit, even with the top “V” plate. (See below image)
a. If using a plasma cutter, cover the square stalk roll shaft to protect it from
damage.
b. Do not cut-off “V” plate at the top of the row unit.
3. Grind metal burrs near the top of the row unit and along the sides of the row frame to ensure
no material is hanging down. (See images below)
NOTE: The following step requires the use of an angle grinder and cut-o
wheel, which are provided in the kit.
DANGER: YOU MUST READ THE MANUFACTURER’S OWNER’S MANUAL
COVERING PROPER OPERATING AND SAFETY PROCEDURES PRIOR TO
MODIFICATION! IF YOU HAVE ANY QUESTIONS, CALL OUR FACILITY AT
(309) 629-9000 OR HIRE A QUALIFIED PROFESSIONAL TO INSTALL YOUR KIT.
WARNING: WHILE MODIFYING THE ROW UNIT, YOU MUST WEAR THE
PROTECTIVE GOGGLES PROVIDED WITH YOUR KIT TO HELP PROTECT AGAINST
SERIOUS EYE INJURIES!

9 www.CalmerCornHeads.com (309) 629-9000 10
1. Mark each stalk roll spiral in both locations shown in below pictures. There should be marks on
4 places on each spiral. (see “Before” images below)
Modifying Stalk Roll Spirals
STEP 3
2. Cut spirals where marked on each nose cone (Image A) and smooth surface where the
horizontal cut is made to remove the nose cone “fin.” (See image B)
BEFORE
AFTER
IMAGE A
DANGER: YOU MUST READ THE MANUFACTURER’S OWNER’S MANUAL
COVERING PROPER OPERATING AND SAFETY PROCEDURES PRIOR TO
MODIFICATION! IF YOU HAVE ANY QUESTIONS, CALL OUR FACILITY AT
(309) 629-9000 OR HIRE A QUALIFIED PROFESSIONAL TO INSTALL YOUR KIT.
WARNING: WHILE MODIFYING THE ROW UNIT, YOU MUST WEAR THE
PROTECTIVE GOGGLES PROVIDED WITH YOUR KIT TO HELP PROTECT AGAINST
SERIOUS EYE INJURIES!

11 www.CalmerCornHeads.com
Stalk rolls are marked on the left (L) and right (R) shells and should be
installed as a set, as packaged by Calmer Corn Heads.
NOTE: Stalk rolls are to be installed from your perspective while sitting in the
combine cab, looking at the corn head.
CAUTION: BT Choppers®are extremely sharp! Make sure that you are
wearing the gloves provided with your order and that you handle the stalk
rolls with extreme care!
CAUTION: Stalk rolls may fall o during assembly. Always follow the out-
lined procedure and stay out from underneath the unbolted stalk roll shells.
DO NOT TRY TO CATCH A FALLING STALK ROLL SHELL!
1. Remove and discard the shipping bolts in each roll. Do not reuse these bolts!
CAUTION: Do not hit the stalk roll shell blades with a hammer. Chipped
blades resulting from improper installation will void warranty!
IMPORTANT: The shells are designed to be installed so the seams of both
rolls are both horizontal or both vertical, depending on the rotation of the
rolls. Stalk rolls are improperly installed if one is horizontal and one is
vertical.
2. From the bottom of the corn head, install one shell on the right stalk roll shaft by aligning and
holding the front of the roll with the square shaft and driving the roll onto the square shaft with
an air hammer, ensuring the front, middle and back of the shell fits firmly on the shaft. (See
images at the top of the next page)
(309) 629-9000 12
Installing Calmer BT Chopper®Stalk Roll Shells
STEP 4
3. Rotate shaft 180 degrees to install the other half stalk roll shell on the right shaft. Repeat steps
with air hammer to ensure the front, middle and back of second half shell is fully secured on
the shaft. (See below images)
4. Install 3/8” – 16 x 1 ¾” bolts with medium-strength threadlocker and hand tighten to ensure
the right stalk roll is secure before installing rolls on the left side.
5. Install 1st half stalk roll shell on the left square shaft. Similar to step 2, install one shell on the
square shaft by holding and aligning the front of the roll with the square shaft and driving the
roll onto the shaft with an air hammer, ensuring the front, middle and back of the shell fits
firmly on the shaft. (See images on the top of next page)

13 www.CalmerCornHeads.com (309) 629-9000 14
IMPORTANT: The shells are designed to be installed so the seams of both
rolls are both horizontal or both vertical, depending on the rotation of the
rolls. Stalk rolls are improperly installed if one is horizontal and one is
vertical.
6. Rotate shaft 180 degrees to install the other half stalk roll shell on the left shaft. Repeat steps
with air hammer to ensure the front, middle and back of second half shell is full secured on the
shaft. (See below images)
7. Install all bolts with medium-strength threadlocker and hand tighten to ensure left stalk roll is
secure.
8. After hand tightening all bolts, torque bolts to 55 ft.-lbs., alternating from top to bottom of the
corn head and middle to ends of the rolls in the order shown.
*Tightening order: 1A, 1B, 2A, 2B, 3A, 3B, 4A, 4B, 5A, 5B (See below photo
showing tightening order, starting from the middle and working toward the ends)
5B
3B
1B
2A
4A
5B
3B
1B
2A
4A
5A
3A
1A
2B
4B
5A
3A
1A
2B
4B
TOP OF ROW UNIT BOTTOM OF ROW UNIT

15 www.CalmerCornHeads.com (309) 629-9000 16
Reassembly of Components
STEP 5
Reinstall all components in accordance with the manufacturer’s owner’s manual in reverse order
of the disassembly steps.
NOTE: Factory grass knives should NOT be reinstalled. Instead, install Calmer
Spiral Grass Knives to prevent the back-wrapping of grasses around the
threaded spiral.
NOTE: When reinstalling gathering chain sprockets, install Calmer’s 13-Tooth
Drive and 13-Tooth Idler Sprockets in place of factory sprockets (if purchased)
to better synchronize gathering chain speed to stalk roll speed. If your corn
head has a bracket directly below the top drive sprocket, you must remove
the bracket and cut o the two metal support stubs. This bracket will not be
used with Calmer drive sprockets. See the before and after pictures below for
reference.
When reinstalling stripper plates, follow the recommended stripper plate
adjustments: Begin with normal settings of 1 1/8-inch gap at the front and 1 3/16-inch gap
at the rear, then adjust accordingly to ensure plates are 1/16” wider than the diameter of the 3rd
cornstalk node above the brace root. Position stripper plates so the center gap between the edge
of the stripper plates is located over the center of the stripping tunnel/stalk rolls. Failure to do so
will void warranty.
NOTE: To minimize the amount of trash and stalk intake, the stripper plates must be open 1/16-
inch wider than the diameter of the 3rd cornstalk node above the brace root.
CAUTION: Corn head angle must be adjusted to 23-25 degrees in standing
corn and 20 degrees in down/lodged corn for maximum performance and to
avoid excessive wear on components. Failure to do so will void warranty!
STEP 6
Installing Oil Bath Sprockets
The Case IH 4000 Series corn head was designed to run very fast, which can increase trash
intake, butt shelling and ear toss problems. To resolve this issue, install Calmer’s 26-tooth driver
and 32-tooth driven oil bath sprockets with # 60 double chain or Calmer’s 19-tooth driver and
24-tooth driven oil bath sprockets with # 80 double chain (sprocket combination varies by corn
head).
By making this adjustment, cornstalks will travel further up the row unit so the ear is stripped
from the stalk at the proper time and location instead of doing more work near the front of the
row unit. This change will also help increase the longevity of the corn head.
(1 pair for 6 row heads,
2 pairs for 8+ row heads)
OIL BATH
SPROCKETS
BEFORE AFTER

17 www.CalmerCornHeads.com (309) 629-9000 18
2. Reinstall stalks guides with factory bolts. With the bevel facing forward, toward the front of
the corn head, install the longest stalk guides closest to the end of the poly dividers. With
the bevels facing forward, install the shorter stalk guides in location closest to the row unit.
(See below image)
NOTE: The bevel on all stalk guides must fast forward, toward the front of
the corn head
NOTE: Do not reuse factory washers as they are not necessary to reinstall
new guides.
Longer stalk
guides with bevel
facing forward
Shorter stalk
guides with bevel
facing forward
Installing Stalk Guides on Poly
If you are having problems with the feeding of cornstalks into the row unit, we recommend
removing the current factory black stalk guides along the corn head poly and replacing with
aftermarket stalk guides (Part # KFCN - 01401), which you can purchase from Poly Tech
Industries by calling 1-800-542-7659.
1. Remove hardware and factory stalk guides. You will reutilize the bolts to install new stalk
guides. Washers used for factory stalk guides will NOT be reused. (See below image)
Remove all hardware
axing factory stalk
guides to poly
Remove all hardware
axing factory stalk
guides to poly
HELPFUL CORN HEAD SETTINGS & ADJUSTMENTS

February 2021
TO OBTAIN WARRANTY SERVICE
PLEASE CALL 1-309-629-9000
P.O. Box 9 | Alpha, IL 61413 | (309) 629-9000 | fax (309) 629-9001
www.CalmerCornHeads.com
The replacement parts comprising and the methods associated with Calmer’s Residue
Management Program are covered by the following patents issued by the United States Patent
and Trademark Office: 7,886,510, 8,171,708, 8,220,237, 8,464,505, 8,857,139, 8,863,487,
9,554,511, 9,560,804, 9,668,414, 10,039,232, 10,045,483
Calmer Corn Heads Residue Management Upgrade Kit Limited Warranty
Calmer warrants our parts 100%. This warranty is good throughout the first season after purchase of the part.
What this means is that if the part breaks within the first season of use, we will replace the part with a new one without
charge to you. Calmer pays for the shipping both ways as well. In the alternative, if you wish, we will refund to you all
of the money you paid to Calmer for the part. If the Calmer part does not work in a manner that you expected, we
promise that we will work with you to adjust settings and to see if we can obtain satisfactory performance. In the end,
if the Calmer part does not work on your farm to your complete satisfaction, we will refund your purchase price.
Disclaimers: Calmer is not responsible for and does not warrant as to consequential damages or any other types of dam-
ages that may be claimed as a result of part breakage or unsatisfactory performance. In other words, except as stated
herein all other warranties or liabilities, expressed or implied, oral or statutory, including any warranty of merchantability
or fitness for a particular purpose are expressly denied.
“Thank you for purchasing Calmer Products
to improve your corn head and residue
management capabilities on your farm.”
Marion Calmer
CEO – Calmer Corn Heads, Inc.
President – Calmer Ag Research Center
Owner/Operator – Calmer Farms
Other manuals for BT Chopper Upgrade Kit
1
Table of contents
Other Calmer Farm Equipment manuals
Popular Farm Equipment manuals by other brands

AG SHIELD
AG SHIELD JD630FD OPERATOR’S HANDBOOK AND PARTS MANUAL

Toro
Toro 25531E Operator's manual

GREAT PLAINS
GREAT PLAINS NTA907HD Operator's manual

Honeybee
Honeybee AirFLEX SDX Series Operator's manual

MODERN AG PRODUCTS
MODERN AG PRODUCTS 12 PREDATOR Operator's manual

Baldan
Baldan ASDA instruction manual