CanMore TW-203 User manual

TW-203 Multi-Sport Watch
User Manual
WARNING
Use only USB chargers with 5V output that comply with the CE/FCC
standard. Using non-standard USB chargers will void the warranty.
82-203B-01010

1.
[GPS Locating Tips]:
• Receive a GPS signal in an open space, and refer to
the following instructions.
• GPS receiver is located at the bottom of the watch. Do
NOT cover the receiver and face it towards the sky.
• The first positioning will take 2~5 minutes. Subsequent
positioning will take 1-2 minutes.
• If you are unable to complete GPS positioning, press ②
to exit. Move to an open space and try again.
Correct
Building Nearby
Cover GPS Receiver
In car
In houseUnder eaves
Avoid
Open
Space

1. Device Overview
①③
④
②⑤
①Power and Backlight
Hold to turn the device on/off.
Press to turn the backlight on/off.
②Back/Lap
Press to return to the previous page or step.
Set a manual Lap. Switch time display mode.
③Up
Press to scroll up the menus.
④OK and Enter
Press to accept an entry or to move forward on a menu.
⑤Down
Press to scroll down the menus.
2.
23
42
31
DEC
WED

2. Starting with the Watch
<1> Please refer to the [GPS Locating Tips] on Page 1.
Complete watch profile setting by following steps when the first
time use, or after factory reset, or after software update.
Choose Language → Gender → Age → Choose Display Unit →
Height → Weight → Max Heart Rate → Time set up (by Manual
or by GPS <1>)
Age
20
Weight
80 kg
Unit
ft , mi , lb
Height
180 cm
Gender
Male
Time
Link GPS
Fix GPS outdoor
Max Heart Rare
180bpm
Language
English
WED
31
DEC
23
42
31
DEC
WED
1. At first time use, please charge the device more than 3
hours in advance.
2. If the watch battery runs out, time will need to be reset.
NOTE
3.

3. Watch Menus
1. Press ④to enter main menu.
2. Press ③/⑤to scroll up/down the menu.
3. Choose a selected function and press ④to enter.
4. Fitness Calculators/Bluetooth
Under the Time Mode, press ③/⑤to browse the step walked,
distance, calories burned, and turn on/off Bluetooth. Press ④under
each mode, you can set daily targets and set the achievement alarm.
•The Fitness calculator will be reset at 00:00am daily.
•To reset manually, please enter [Tools] → [Pedometer].
TOOLS
RUNNING SWIMMING TRIATHLON
HISTORYRECORDS
CYCLINGGOLF
TRAININGSETTINGS
WED
31
DEC
23
42
31
DEC
WED
Off
8000
10000
STEPS
TO DAY
8.00
10.00
Km
TO DAY
800
1000
Kcal
TO DAY
WED
31
DEC
23
42
31
DEC
WED
4.

6. Watch Settings
5. Time Mode
Press ④to enter main menu. Use ③/⑤to scroll to [SETTINGS].
Once in [SETTINGS], you will find the following options :
[System] :
Language : Select your preferred language.
Clock : Set time, toggle between 12/24-hour mode, and Daylight
Saving <2>.
Backlight : Set the duration for the backlight to remain on.
Alert : Select either Sound, Light or Vibrate for your alert mode.
Unit : Toggle between imperial/metric units.
<2>When Daylight Saving is on, the time will be adjusted one
hour head.
Under the Time Mode, press
②to switch Time display
interface.
②
5.
WED
31
DEC
23
42
31
DEC
WED
22WED

6.
Geolocation : Set the format of GPS coordinate.
SmartBand : Turn on or off the Smartband function.
Orientation : Choose to rotate the watch screen (180° or no rotate).
Format : Change your pace or speed settings.
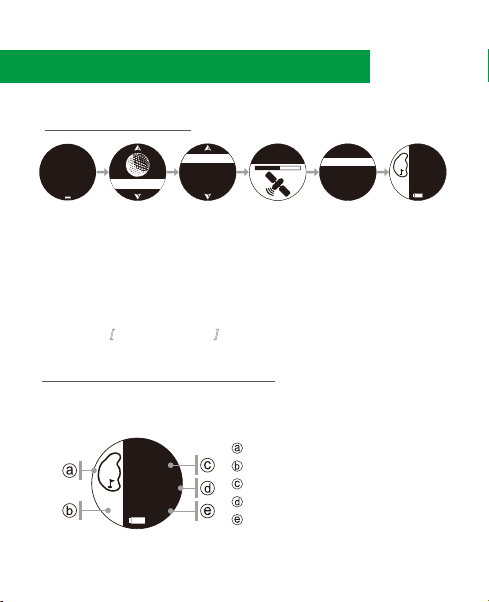
Key lock : Lock the watch buttons <3>.
Factory Reset : Reset the watch to factory settings.
About Watch : Check the Watch firmware and course version.
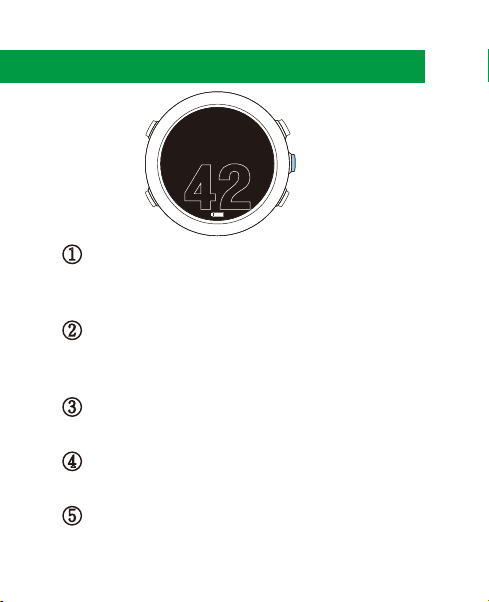
<3> To unlock Key Lock, press ②+④, and release them together.
[Personal] : To set user profile or Bike profile, including Gender,
Age, Height, Weight, Max Heart Rate, Weight of bike,
Wheel Size
[Sensors] : Pairing your Heart Rate sensor or Cadence sensor with
your watch.
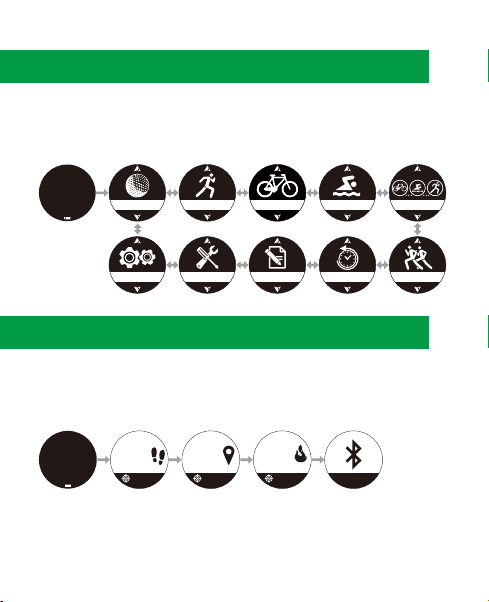
[Running / Cycling / Swimming] : Set following sport’s functions
under each sport’s mode.
Sports Screens : Select display mode, display figures,
and figure’s format under each sport mode. You can
choose to display Time, Distance, Calories, Pace,
Others, Heart Rate*, Stride rate, and Cadence *.
Disabled
3 Fields
2 Fields

7.
* Limited to the watch that is paired with Bluetooth 4.0 heart rate
or cadence sensor.
Smart Pause : During exercise, the timer will be paused
when your activity stops temporarily.
Smart Pause
O
Smart Lap : Mark a Lap by distance or manually. If you
choose by manually, press ②to mark a lap during
sport mode.
Edit
Manual
Smart Lap
Smart Scroll : Select screen scroll speed (Fast, Slow,
Off) to show sport’s figures under sport mode.
Smart Scroll
O
O
Pace
0’00” /mi
Smart Partner : Set your pace target, the smart partner
will remind you that you are behind or ahead of your
target.
Sport Alert : Set sport alert by Time, Pace, Heart Rate*,
Stride Rate*, or no Alert. The watch will send out an
alert once beyond the range.
Edit
None
Sport Alert

8.
7. Golf Mode
1. Press ④to enter main menu.
2. Select [GOLF], and press ④to enter.
3. Select [Play Golf], and press ④to enter.
4. Satellites will be located automatically<4>, and a list of golf courses will be
shown by proximity.
5. Press ③/⑤to scroll up/down, and press ④to enter a selected golf course.
<4> Refer to [GPS Lacating Tips]on Page1.
7-1 Play Golf
Course List
Campass
Pantai_Mentiri
Airport_Course
Empire_Hotel
GOLF
WED
31
DEC
23
42
31
DEC
WED
Locating GPS
Demo
Score History
Shot Distance
Play Golf 198
205
202
11:29
PAR
1
4
B
C
F
When playing golf, you will notice that there are five metrics displayed on the
screen. The list below explains what each of those pieces of information
represents.
7-2 On The Course
Current hole number.
PAR for the hole.
Distance to the back of green.
Distance to the center of green.
Distance to the front of green.
198
205
202
11:29
PAR
9
4
B
C
F
(To switch the display unit, please refer to 6. Watch settings)

9.
• Press ③/⑤to go to previous/next hole.
•Auto Hole : The auto hole will trigger after the following conditions are met:
Approach to within 30 yards of the center of the green, and
then move at least 30 yards away from the center of the green.
•Dual Green : If the course has dual greens, hold ④for three seconds to
switch right/left green distance.
12:34
PAR 418
299 - 305
250 - 285
165 - 193
Hold ⑤ for three seconds to access the Hazard screen,
then press ③/⑤ to scroll up/down to see all Hazards.
To exit, press ②.
While in GOLF mode. Follow below instructions to access Scorecard,
Shot Distance, Hazard or Save this record.
123Yard
Hold ③for three seconds to access Shot Distance.
Travel to your ball, and the distance will be calculated. To
exit, press ②.
12:34
PAR 418
Save & Exit
Discard & Exit
Cancel
To finish the round, press ②. Press ③/⑤to choose
whether save the record, and then press ④to confirm.
Total 7 +4
PAR 418
Score 7
GIR N
Putt -- Press ④to enter score card, and then use ③/⑤to enter
your score. To save and exit, press ④.

8. Sport Mode
1. Press ④to enter main menu, select [RUNNING/CYCLING/SWIMMING],
and press ④to enter.
2. Satellites will be located automatically.
3. After locating is completed, press ④to start.
4. Press ③/⑤to browse sport’s figures. To Lap manually, press ②.
5. To finish the sport mode, press ④. Then press ③/⑤to select
[Resume /Save /Discard], and press ④to confirm.
8-1 Running/Cycling/Swimming.
RUNNING
SWIMMING
CYCLING
Timer
2:55:45
Pace
06’05”
Distance
20.45
Push
to Go
Locating GPS
Current Mode
Or Or
10.
1. Press ④to enter main menu.
2. Press ④to enter [Golf].
3. Press ④to select [Score History].
4. Press ③/⑤to select a history record,
and press ④to enter.
5. To return, press ②.
Score History
Putts 0
GIR 0
Score 18 PAR 36
1 - 9
10 - 18
1 - 18
Score History
2018.01.15
2018.01.10
2018.01.03
2018.01.01
Score 1 - 18
S
0
0
0
0
0
P
4
3
4
4
3
H
1
2
3
4
5
7-3 Golf Score History
GOLF
Demo
Score History
Shot Distance
Play Golf

11.
Enter [TRIATHLON] mode (Follow the same procedure as 8-1). Press
② to switch sport mode, the sport icon will flash (to record the mode
switch preparation time). To start the next sport, press ②again to
confirm.
8-2 Triathlon Mode
It is your personal virtual trainer which can create the best training plan
according to your requirements.
1.Press ④ to enter main menu, and select [TRAINING].
2.Choose [Running /Cycling] and press ④to enter.
3. Choose [New Plan /Novice Training] and press ④to enter.
Please follow below procedure to design your own training plan, it includes
Warm up, Interval, Activity, Rest, and Cool Down settings.
8-3 Training Mode
8-3-1 New Plan
Intervals
Active 1
Rest 1
Cool Dowm
Warm Up
1.00 km
During Dist.
Warm Up
1.00 km
Completed
Target
During Dist.
Warm Up
Target
Pace
00'00" - 00'00"
Target
Other Target
Pace
Completed
00'00" - 00'00"
Target
Other Target
Pace
Completed
00'00" - 00'00"
Manual
Dist.
Time
Cal.
None
Pace or Speed <5>
Heart Rate
Stride Rate/Cadence
New PlanNew Plan
Novice Training

12.
After you create the training plan:
4. If 2nd target is required, press ④to enter [Other Target] and repeat
step 3.
5. Press ④to enter [Completed]
6. a. Press ④to enter [New Step], follow the same procedures 1 to 5
to add more training plans under this program.
b. To [Edit /Delete /Insert] above settings, press ④to enter the
above plan.
3. Press ④to enter [Target], then press ③/⑤to select [None /Pace
(Speed) <5> /Heart Rate /Stride Rate], enter target figure, then
press ④to enter.
<5> Modify the format at [SETTING -> SYSTEM -> Format]
Edit
Delete
Go
Locating GPS
Intervals
Active 1/ 3
120
130
Target-HR
118
Remain-Time
0:00:24
Run Plan 01
Run Plan 02
New Plan
Push
to Go Target
5’00”
Speed
5’33”
1. Under [New Plan], press ④ to enter [Warm up /Intervals /Active /
Rest /Cool Down].
2. At [During] Setting, press ③/⑤to select [Manual/Dist. /Time/Cal.],
press ④to enter ; Press ③/⑤ to enter a figure (ex: 3 km or 00:15
min or 500 Kcal), then press ④to enter.

13.
1. Press ④to enter [Run Plan 01] or [Run Plan 02].
2. Press ③/⑤to select [Go /Edit /Delete] this plan.
3. Select [Go], satellites will be located automatically.
4. After GPS locating complete, press ④to start, and then press
③/⑤to browse current figures and achievements.
5. To finish, press ④. Use ③/⑤to select [Resume/Save/Discard] ,
then press ④to confirm.
Enter Novice Training. Press ③/⑤to select a target and press ④to
confirm, then select [GO] and press ④to start.
8-3-2 Novice Training
New Plan
Novice Training
Novice Training
3Km=18min
Go
Novice Training
3Km=18min
Go
Calories
0
Stride Rate
0
Avg. Pace
--’--”
Push
to Go
Locating GPS
1. Press ④to enter main menu.
2. Press ④to enter [History].
3. Press ④to select a sport mode,
and to view the history record.
(The records will be sorted by time)
4. To exit, press ②.
9. History
HISTORY
RUNNING
CYCLING
SWIMMING
TRAINING
06/11 0.92 km
07/08 999.99 km
09/01 49.99 km

14.
1. Press ④ to enter main menu, select [TOOLS] → [Navigation].
To set or view Alarm, Navigation, Compass, Bubble Level, Timer,
and view your Geolocation.
11-1 Navigation
11. Tools
Shows the best score under each sport mode.
10. Records
Latitade
24°48’32.3’N
Longitude
121°02’25.1’E
001
001
001
001
New POI
Navigation
Alarm
Navigation
TOOLS
-15312 km
12:34
New POI
001
001
001
Latitade
24°48’32.3’N
Longitude
121°02’25.1’E
001
Go
Locating GPS
4. Press ④to enter the above destination.
2. Press ④to enter [New POI], use ③/⑤to select location type,
number, and enter Latitude and Longitude. Press ④to save and
switch column.
3. After you have completed this, press ④ to save. A destination will
be created.

15.
※ Please move 20-30 meters at the beginning, and then GPS
will show the right direction of your destination.
1. Press ④ to enter menu, select [TOOLS] → [Back Track].
2. Use ③/⑤to scroll to a selected sport type and a sport’s record,
and press ④to enter.
3. Satellites will be located automatically. Once it is done, follow the
direction to return to the starting point along the same path. To
finish, press ②.
11-3 Back Track
1. Press ④ to enter menu, select [TOOLS] → [Compass].
2. Press ④to enter recalibration . Use ③/⑤to scroll to OK, and
press ④to calibrate the compass.
3. Hold the watch horizontally and rotate 360 degrees, and then start to use it.
11-2 Compass
5. Press ③/⑤ to select [Go/Edit/Delete], and then press ④to confirm.
6. If you select [Go], watch will start GPS positioning. Once it is done, follow
the direction to go to your destination. To finish navigation, press ②.
Alarm
Navigation
Compass
Recallbration
OK

16.
13. Charge the Watch
Use only USB chargers with 5V output that comply with the CE/FCC standard.
Using non-standard USB chargers will void the warranty.
WARNING
1. Attached the CHARGING PINS at the watch CHARGING PORT which
located at the bottom of the watch. Be sure the pins are aligned.
2. Insert the USB end of the charging cord into a computer USB port or
CE/FCC certified 5V output USB charger.
Battery Specifications: 3.7V / 400mAh
Charging Specifications: 5V / 500mA
12. Troubleshooting
If any errors or malfunction occur, use factory
reset for troubleshooting at [SETTINGS →
Factory Reset]. If that does not work, try
hardware reset.
① ③
④
WED
31
DEC
23
42
31
DEC
WED
Press ③+④together, and then press ①.
Release three buttons at same time.

1. Download the App on your mobile phone.
Scan the below QR code or Search
[sports app] on the App Store or
[SportS watch] on Google play.
14. Connect with Mobile
17.
2. Turn on bluetooth both on mobile phone and the watch.
You will find the watch being detected by the App.
3. Follow below steps to synchronize your watch and mobile phone.
iOS Android
Note: Android runs on a wide range of device configurations, so there may have
compatible issues with some of Android devices.

18.
After Synchronize, App will shows the data.
Enter [Sport Records] or [Daily Fitness] , and then click to
Synchronize the records.
Click the
watch icon
on the App,
then click
[Pair].
Click
to connect
the watch.
2019-09-27

19.
15. Limited Warranty
The products are warranted to be free from defects
in materials or workmanship for 12 Months from the
date of purchase. Within the period, the
manufacture will, at its sole option, repair or replace
any components that fail in normal use. Such
repairs or replacement will be made at no charge to
the customer for parts or labor. The customer shall
be responsible for any transportation cost.
The limited warranty does not apply to
1. Cosmetic damage, such as scratches, nicks and
dents.
2. Consumable parts, such as batteries, unless
product damage has occurred due to the defect
in materials or workmanship.
Table of contents
Other CanMore Watch manuals

CanMore
CanMore TW-410HR User manual

CanMore
CanMore TW-410 User manual

CanMore
CanMore TW-402 User manual

CanMore
CanMore TW-411 User manual

CanMore
CanMore TW-310 User manual

CanMore
CanMore TW-353 User manual

CanMore
CanMore Trainer Watch TW-100 User manual

CanMore
CanMore Trainer Watch TW-100 User manual

CanMore
CanMore TW-356 User manual