CanMore TW-310 User manual
TW-310 Multi-Sport Watch
User Guide
WARNING
Use only USB chargers with 5V output that comply with the CE/FCC
standard. Using non-standard USB chargers will void the warranty.
82-310G-01010
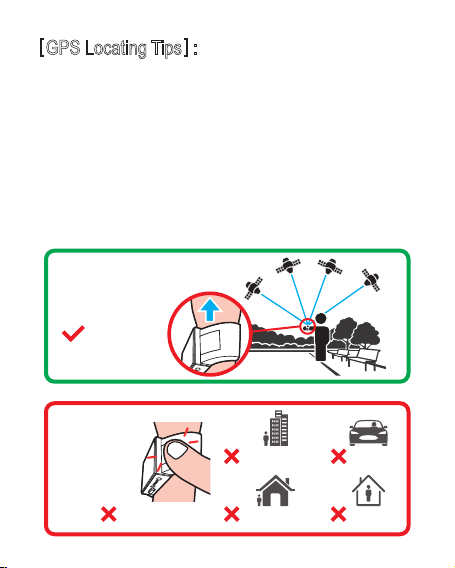
[GPS Locating Tips]:
• Receive a GPS signal in an open space, and refer to
the following instructions.
• GPS receiver is located at the bottom of the watch. Do
NOT cover the receiver and face it towards the sky.
• The first positioning will take 2~5 minutes. Subsequent
positioning will take 1~2 minutes.
• If you are unable to complete GPS positioning, press ①
to exit. Move to an open space and try again.
Open Space
Correct
Building Nearby
Cover GPS Receiver
In car
In houseUnder eaves
Wrong
1.
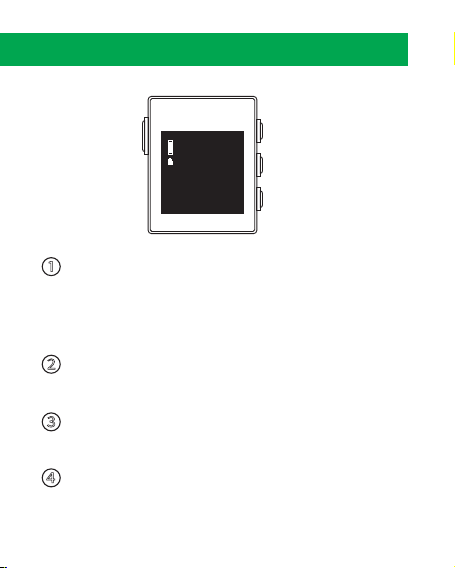
1. Device Overview
➀
➂
➃
➁
11
08
SUN
OCT
11
➀Power/Back
Hold to turn the device on/off.
Press to turn the backlight on/off.
Press to return to previous page or exit.
➁Up
Press to scroll up the menus.
➂OK/Enter/Save
Press to accept an entry or to move forward on a menu.
Press to scroll down the menus.
➃Down
2.
2. Starting with the Watch
<1> Please refer to the [GPS Locating Tips] on Page 1.
Complete watch profile settings by following steps for first time
use, or after factory reset, or after software update.
Choose Language → Time set up (by Manual or by GPS <1> )
→ Gender → Age → Display Unit → Height → Weigh → Max
Heart Rate
Unit
ft , mi , lb
Age
38
Language
English
Time
Custom
Gender
Male
Height
180 cm
Max Hear Rate
180 bpm
Weight
80 kg
12
28
FRI
JAN
10
1. At first time use, please charge the device more than 2
hours in advance.
2. If the watch battery runs out, time will need to be reset.
NOTE
3.

3. Watch Menus
1. Press ➂to enter main menu.
2. Press ➁/➃to scroll up/down the menu.
3. Choose a selected function and press ➂to enter.
4. Fitness Calculators/Bluetooth
Under the Time Mode, press ②/④to browse the walking
step/distance, calories burned, heart rate or turn on/off Bluetooth.
Press ③under each mode, you can set daily target and set the
achievement alarm.
•The Fitness calculator will be reset at 00:00am daily.
•To reset manually, please enter [TOOLS] → [Pedometer]
SETTINGS TOOLS TRIATHLON
RUNNING CYCLING SWIMMING JOGGING
12
28
FRI
JAN
10
TRAINING
HISTORY
1
RECORDS
GOLF
Off
12
28
FRI
JAN
10
123
4.

5. Watch Settings
Press ➂to enter main menu. Use ➁/➃to scroll to [SETTINGS].
Once in [SETTINGS], you will find the following options :
[System] : Language, Clock, Backlight, Alert, Unit, Geolocation,
SmartBand, Orientation, Power Saving<2>, Format, Key
Lock<3>, Factory Reset, About Watch.
<2> When Power Saving is on, GPS will be located once every 5
seconds instead of once per second.
<3> To unlock Key Lock, press ①+③, and release them together.
[Personal] : Gender, Age, Height, Weight, Max Heart Rate, Weight of
bike, Wheel Size.
[Sensors] : Pairing your Cadence sensor with the watch. (Limited to
the models with Bluetooth 4.0)
[Running/Cycling/Swimming/Jogging] : Smart Screen, Sport Alert,
Smart Pause, Smart Lap, Smart scroll, and smart partner.
<4> Limited to the watch that is paired with Bluetooth 4.0 cadence sensor.
Smart Screen : Select display mode, display figures,
and figure’s format under each sport mode. You can
choose display Time, Distance, Calories, Pace,
Others, Heart Rate, Stride rate, and Cadence <4>.
Disabled
3 Fields
2 Fields
5.
Sport Alert : Set sport alert by Time, Pace, Heart
Rate, Stride Rate, or no Alert. The watch will send
alert once beyond the range.
Sport Alert
None
Edit
Smart Lap : Mark a Lap by distance or manually. If
you choose by manually, press ①to mark a lap
during sport mode.
Smart Lap
Manual
Edit
Smart Scroll
Off
Smart Scroll : Select screen scroll speed (Fast, Slow,
Off) to show sport’s figures under sport mode.
Sport Pause : During exercise, the timer will be
paused when your activity stops temporarily.
Smart Pause
Off
Smart Partner
Pace
0’00’’
/km
Edit
Smart Partner : Set your pace target, the smart
partner will remind you that you are behind or ahead
of your target.
6.

6. Golf Mode
1. Press ➂to enter main menu.
2. Select [GOLF], and press ③to enter.
3. Select [PLAY GOLF], and press ③to enter.
4. Satellites will be located automatically <5> and a list of golf
courses will be shown by proximity.
5. Press ②/④to scroll up/down, and press ③to enter a
selected golf course.
<5> Refer to [GPS Lacating Tips]on Page1.
6-1 Play Golf
This product is your digital golf caddy and contains
thousands of golf course maps. The watch can locate
where you are, detect your distance to the hole, show
hazards and track your score.
Play Golf
Score Card
GOLF
Course
ragon Hill Admi
(C)Nine Dragon
(B)Nine Dragon
(New Course)Ti
GPS Searching…
12
28
FRI
JAN
10
7.

• Press ➁/➃to go to next/previous hold.
• If the course has dual greens, hold ➂for three seconds to switch
right/left green distance.
(The default unit is Yard. To switch the display unit, please refer to 5. Watch settings)
When playing golf, you will notice that there are five metrics displayed
on the screen. The list below explains what each of those pieces of
information represents.
6-2 On The Course
Hold ➃ for 3 seconds to access the Hazard screen. To
return, press ➀.
320
227
258
To finish the round press ➀, and then press ➂to exit
golf mode, or press ➀to continue playing golf.
SAVE?
YESNO
Hold ➁for 3 seconds to access Shot Distance. Travel
to your ball, and the distance will be calculated. To
return, press ➀.
SHOT
120
Press ➂to enter Score Card, and use ➁/➃to record
your score of each hole. To save and exit, press ➂.
3
-1
PAR 4#18
While in GOLF mode, follow below instruction to access Scorecard, Shot
Distance, Hazard or Save this record.
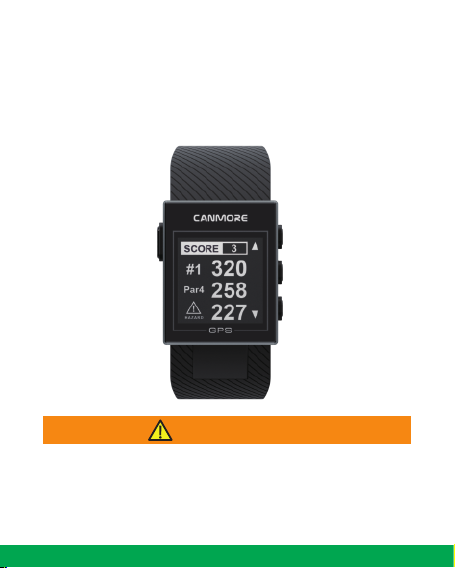
SCORE 3
#1 320
258
227
Par4
Current hole number.
PAR for the hole.
Distance to the back of green.
Distance to the center of green.
Distance to the front of green.
8.

7. Sport Mode
1. Press ➂to enter main menu, select [RUNNING/CYCLING/
SWIMMING/JOGGING], and press ➂to enter.
2. Satellites will be located automatically. After locating is completed,
press ➂to start.
3. Press ➁/➃to browse sport’s figures. To Lap manually, press ➀.
4. To finish exercise, press ➂. Use ➁/➃to select [Continue /Save /
Discard], then press ➂to confirm.
Enter [TRIATHLON] mode, and follow the same procedure as 7-1.
Press ① to switch sport mode, the sport icon will flash (to record the
mode switch preparation time). To start next mode, press ①again to
confirm.
7-1 Running/Cycling/Swimming/Jogging
7-2 Triathlon Mode
Timer
Distance
Pace
06
/ 100m
05
k
m
20.45
0:55:45
RUNNING
CYCLING SWIMMING
GPS Searching…
Or Or
Triathlon Mode
9.
Table of contents
Other CanMore Watch manuals

CanMore
CanMore TW-411 User manual

CanMore
CanMore TW-353 User manual

CanMore
CanMore TW-410 User manual

CanMore
CanMore TW-402 User manual

CanMore
CanMore Trainer Watch TW-100 User manual

CanMore
CanMore TW-356 User manual

CanMore
CanMore Trainer Watch TW-100 User manual

CanMore
CanMore TW-203 User manual

CanMore
CanMore TW-410HR User manual


