CanMore TW-356 User manual

TW-356 Golf Watch
User Guide
WARNING
Use only USB chargers with 5V output that comply with the CE/FCC
standard. Using non-standard USB chargers will void the warranty.
82-356U-01010

[GPS Locating Tips]:
• Receive a GPS signal in an open space, and refer to
the following instructions.
▪ GPS receiver is located in the middle of the watch. Do
NOT cover the receiver and face it towards the sky.
▪ The first positioning will take 2~5 minutes.
Subsequent positioning will take 1~2 minutes.
• If you are unable to complete GPS positioning, press ➀
to exit. Move to an open space and try again.
Open
Space
Correct
Building Nearby
Cover GPS Receiver
In car
In houseUnder eaves
Avoid
1.

1. Starting with the Watch
2. Device Overview
At first time use, or after factory reset, or after software update,
please choose language and set time. You can set the time by
manual or by GPS. If you choose to set time by GPS, please
refer to [GPS Locating Tips] on Page 1.
➀Power/Backlight/Return
Hold to turn the device on/off.
Press to turn the backlight on/off.
Press to return to previous page or step.
➁Up
Press to scroll up the menu.
➂OK/Enter
Press to accept an entry or to move
forward on a menu.
➃Down
Press to scroll down the menu.
➀
➂
➃
➁
11
08
SUN
OCT
11
2.
Note: 1. At first time use, please charge the device more
than 2 hours in advance.
2. If the watch battery runs out, time will need to be reset.

3. Watch Menus
1. Press ➂to enter main menu.
2. Press ➁/➃to scroll up/down the menu.
3. Choose a selected function and press ③to enter.
4. Watch Settings
Press ➂to enter main menu. Use ➁/➃to scroll to [SETTINGS].
Once in [SETTINGS], you will find following options :
•Language - Select your preferred language.
•Clock - Set time, alarm, toggle between 12-hour and 24-hour
mode, summer time <1>, and sun rise/set time.
•Backlight - Set the duration for the backlight to remain on.
•Alert - Select either Sound or Light for your alert mode.
•Unit - Toggle between imperial/metric units.
•GPS - Search for GPS signal.
•Factory Reset - Reset the watch to factory settings.
•About Watch - Watch version number.
12
28
FRI
JAN
10
PLAY GOLF
SCORE CARD
SETTINGS
<1> When summer time is on, the time will be adjusted one
hour ahead.
3.

5. Golf Mode
1. Press ➂to enter main menu.
2. Select [PLAY GOLF], and press ➂to enter.
3. Satellites will be located automatically<2> and a list of golf
courses will be shown by proximity.
4. Press ➁/➃to scroll up/down, and press ➂to enter a
selected golf course.
<2> Refer to [GPS Lacating Tips]on Page1.
5-1 Play Golf
This product is your digital golf caddy and contains
thousands of golf course maps. The watch can locate
where you are, detect your distance to the hole, show
hazards and track your score.
GPS Searching…
Course
ragon Hill Admi
(C)Nine Dragon
(B)Nine Dragon
(New Course)Ti
12
28
FRI
JAN
10
PLAY GOLF
4.

5-2 On The Course
5.
• Press ➁/➃to go to next / previous hole.
• Auto Hole: The auto hole will trigger after the following conditions are met:
Approach to within 30 yards of the center of the green, and then move at
least 30 yards away from the center of the green.
• Dual Green: If the course has dual greens, hold ➂for three seconds to
switch right / left green distance.
(The default unit is Yard. To switch the display unit, please refer to 4. Settings)
When playing golf, you will notice that there are five metrics
displayed on the screen. The list below explains what each of
those pieces of information represents.
Press ➂to enter Score Card, and use ➁/➃to
record your score of each hole. To save and exit,
press ➂.
3
-1
PAR 4#18
While in GOLF mode, follow below instruction to access Scorecard,
Shot Distance, Hazard or Save this record.
Current hole number.
PAR for the hole.
Distance to the back of green.
Distance to the center of green.
Distance to the front of green.
13:50
SCORE 3
#1 320
258
227
Par4

Hold ➃for 3 seconds to access the Hazard
screen. To return, press ➀.
320
227
258
To finish the round, press ➀, and then press ➂
to exit golf mode, or press ➀to continue playing
golf.
Quit?
YESNO
Hold ➁ for 3 seconds to access Shot Distance.
Travel to your ball, and the distance will be
calculated. To return, press ➀.
SHOT
120
1. Press ➂to enter main menu.
2. Select [SCORE CARD], and press ➂to enter.
3. Press ➁/➃to scroll up/down to check the history record.
4. To exit, press ➀.
Score
1-9
H
1
2
3
4
5
1
P
5
4
3
4
3
S
-1
0
1
0
1
Score
1 - 9
Total
PAR
Score
7
7
7
10 - 18
Score
2018.01.20
2018.01.18
2018.01.17
2018.01.15
6. Score History
6.

7. Charge the Watch
1.
2.
Attach the magnetic charger on the charging contacts located
on the side of the watch. Be sure the pins are aligned. Keep
the watch on a stable surface while charging.
Insert the USB end of the charging cord into a computer USB
port or CE/FCC certified 5V output USB charger.
(exceeding 5V will void the warranty).
Clean the charging contact port frequently to ensure the charging
efficiency.
Battery/ Charging Information
Battery Specifications: 3.7V / 400mAh
Charging Specifications: 5V / 500mA
CHARGING PINS CHARGING PORT
AVOID touching the magnetic end of the charging cable with
metallic objects to prevent short circuits and damage to the cable.
For safety reasons, after the watch is fully charged, disconnect
the charging cable from USB power source.
CAUTION
7.

9. Limited Warranty
The products are warranted to be free from defects in materials
or workmanship for 12 Months from the date of purchase.
Within the period, the manufacture will, as its sole option, repair
or replace any components that fail in normal use. Such repairs
or replacement will be made at no charge to the customer for
parts or labor. The customer shall be responsible for any
transportation cost.
If any errors or malfunction occur,
use factory reset at [SETTINGS →
Factory Reset]. If that does not
work, try hardware reset by pressing
➂+➃ together, and then press ➀.
Release all three buttons at the
same time.
8. Troubleshooting
➀
➂
➃
11
08
SUN
OCT
11
8.

The limited warranty does not apply to
1.
2.
3.
4.
5.
The manufacture reserves the right to refuse warranty claims
against products or services that are obtained or used in
contravention of the laws of any country. The device is
intended to be used only as a sport or leisure aid and must
not be used for any purpose requiring precise measurement
of direction, distance, and location. The manufacture makes
no warranty to the accuracy or completeness of the course
data.
To obtain warranty service, an original or copy of the sales
receipt from the retailer is required. Securely pack the device
and a copy of the original sales receipt. Send the device,
freight charges prepaid.
9.
Cosmetic damage, such as scratches, nicks and dents.
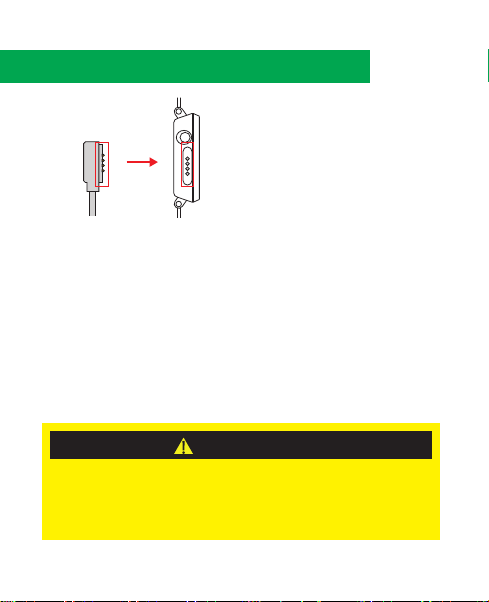
Consumable parts, such as batteries, watch band/ bunkle,
clip, iron, charging cable….etc. unless product damage has
occurred due to the defect in materials or workmanship.
Damage to a product that has been fallen accidentally,
modified or altered without written permission of the
manufacturer.
Damage to a product that has been connected to a
non-CE/FCC certified 5V power supply.
Damage caused by failure to observe the safety instruction.

10. Safety Instructions
Failure to heed the following warnings could result
in an accident or medical event resulting in death or
serious injury.
1. There is a built-in Li-polymer battery inside. Do
not expose the device to fire, explosion, or other
hazard.
2. Do not leave the device exposed to a heat
source or in a high-temperature location, such as
in the sun or in an unattended vehicle. To prevent
the possibility of damage, remove the device
from the vehicle or store it out of direct sunlight.
3. Do not operate the device outside of the
temperature lower than 0 or over 45 degrees
Celsius (from 32º to 113ºF).
4. AVOID touching the magnetic end of the charging
cable with metallic objects to prevent short
circuits and damage to the cable.
For safety reasons, after the watch is fully
charged, disconnect the charging cable from
USB power source.
10.

11.
11. Contact Us
http://www.canmore-sport.com/
5. Do not disassemble, modify, remanufacture,
drop, or puncture with forces.
6. Do not remove or attempt to remove the
non-user replaceable battery.
7. Do not use while driving or be in any situations or
environments require concentration.
8. The device trackers reply on sensors that track
your movement and other metrics. The data
provided by the device is intended to be a close
estimation of your activity, but may not be
completely accurate.
9. Contact your local waste disposal department to
dispose the device in accordance with applicable
local laws and regulations.
The content are subject to change without notice.
For latest user manual, please visit our website.
For further information, for golf course update,
firmware renew, or any other support, please visit
Table of contents
Other CanMore Watch manuals

CanMore
CanMore TW-310 User manual

CanMore
CanMore TW-203 User manual

CanMore
CanMore Trainer Watch TW-100 User manual

CanMore
CanMore Trainer Watch TW-100 User manual

CanMore
CanMore TW-410 User manual

CanMore
CanMore TW-353 User manual

CanMore
CanMore TW-411 User manual

CanMore
CanMore TW-402 User manual

CanMore
CanMore TW-410HR User manual