Casall X600 User manual

1
Casall X600
CROSSTRAINER
93003

2
PARTS LIST
No. Item spec. Q'ty
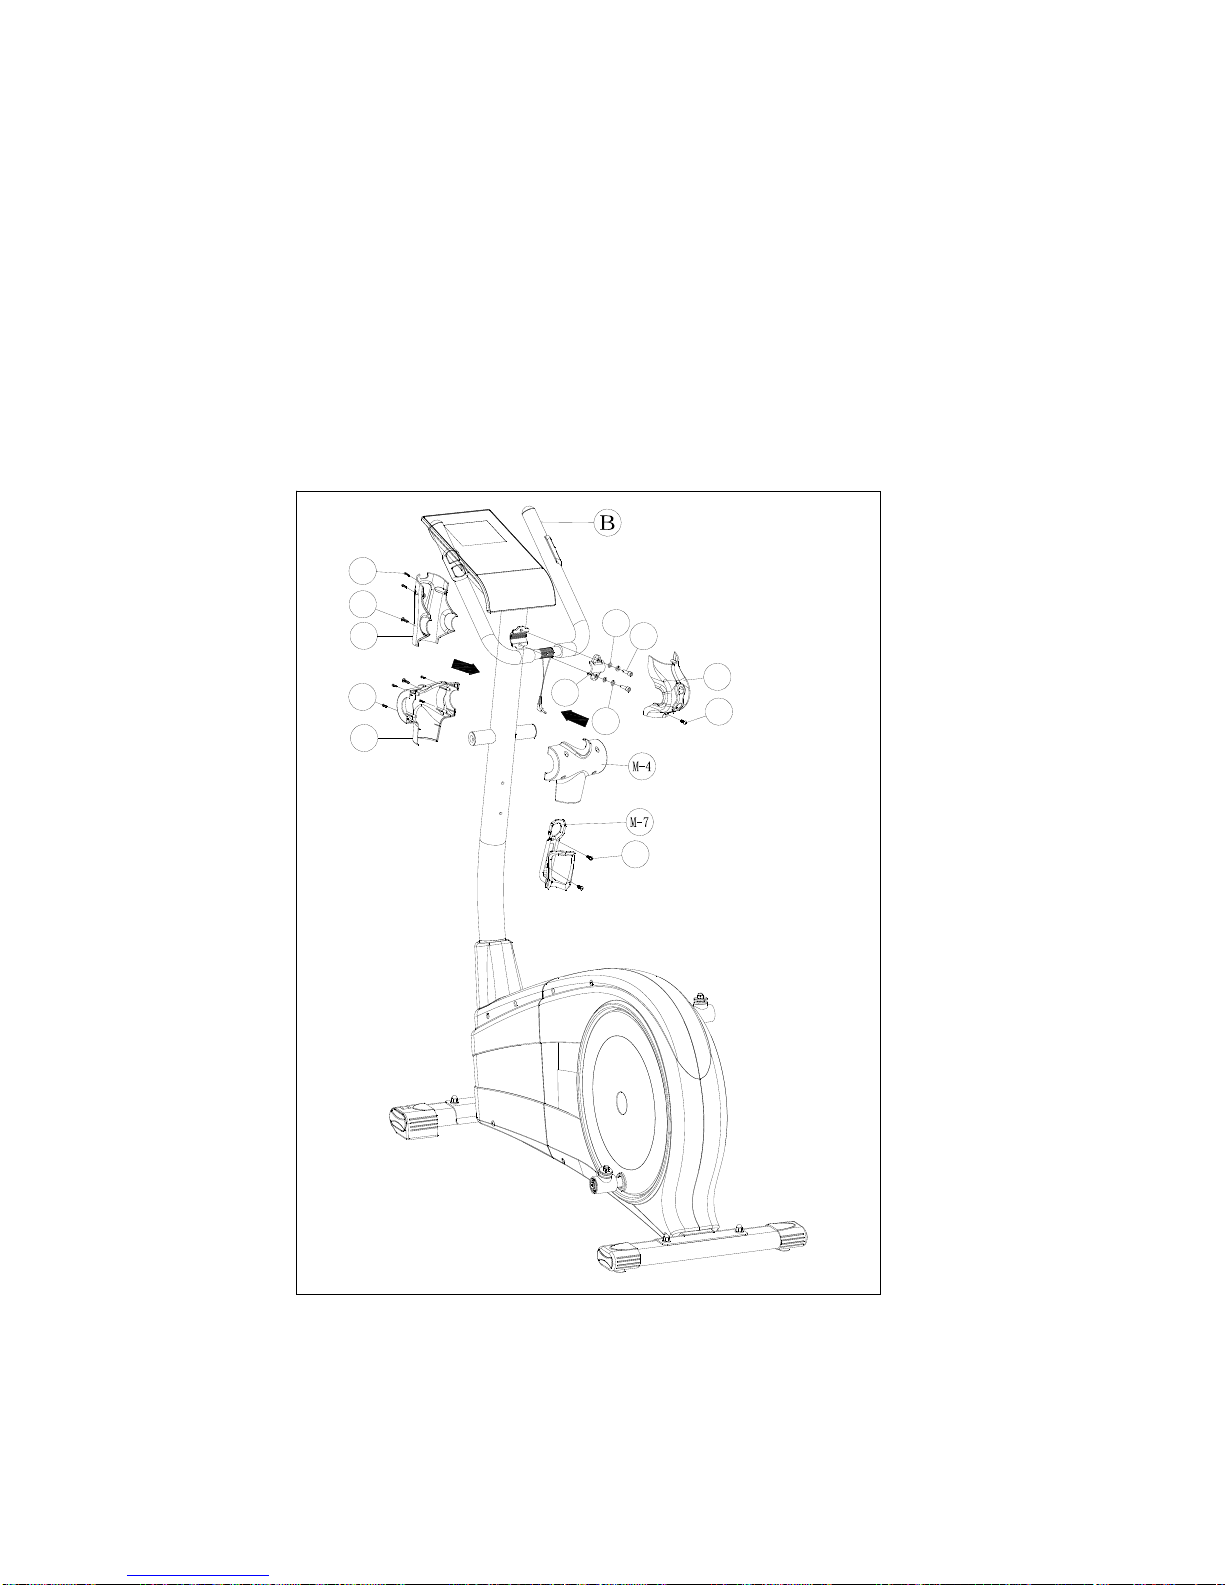
A , A-1 Computer & Screw for computer SM2871-67 1PCS
B Front handlebar φ25.4 1PCS
B-1 Foam grip for front handlebar 440xφ20x5.0m/m 2PCS
B-2 End cap for foam grip φ7/8" 2PCS
B-3,B-5 Hand pulse & Cable
WP1007-33B
(600L+600L) 1SET
C,C-3 Upper handlebar (R&L) 1SET
C-1 End cap for upper handlebar (R&L) φ1 1/4" 2PCS
C-2 Foam grip for upper handlebar 670Lxφ30x5m/m 2PCS
D Hand post 1PCS
D-1 Computer cable 1050L 1PCS
E~E7 First-lower handlebar (R& L) 1SET
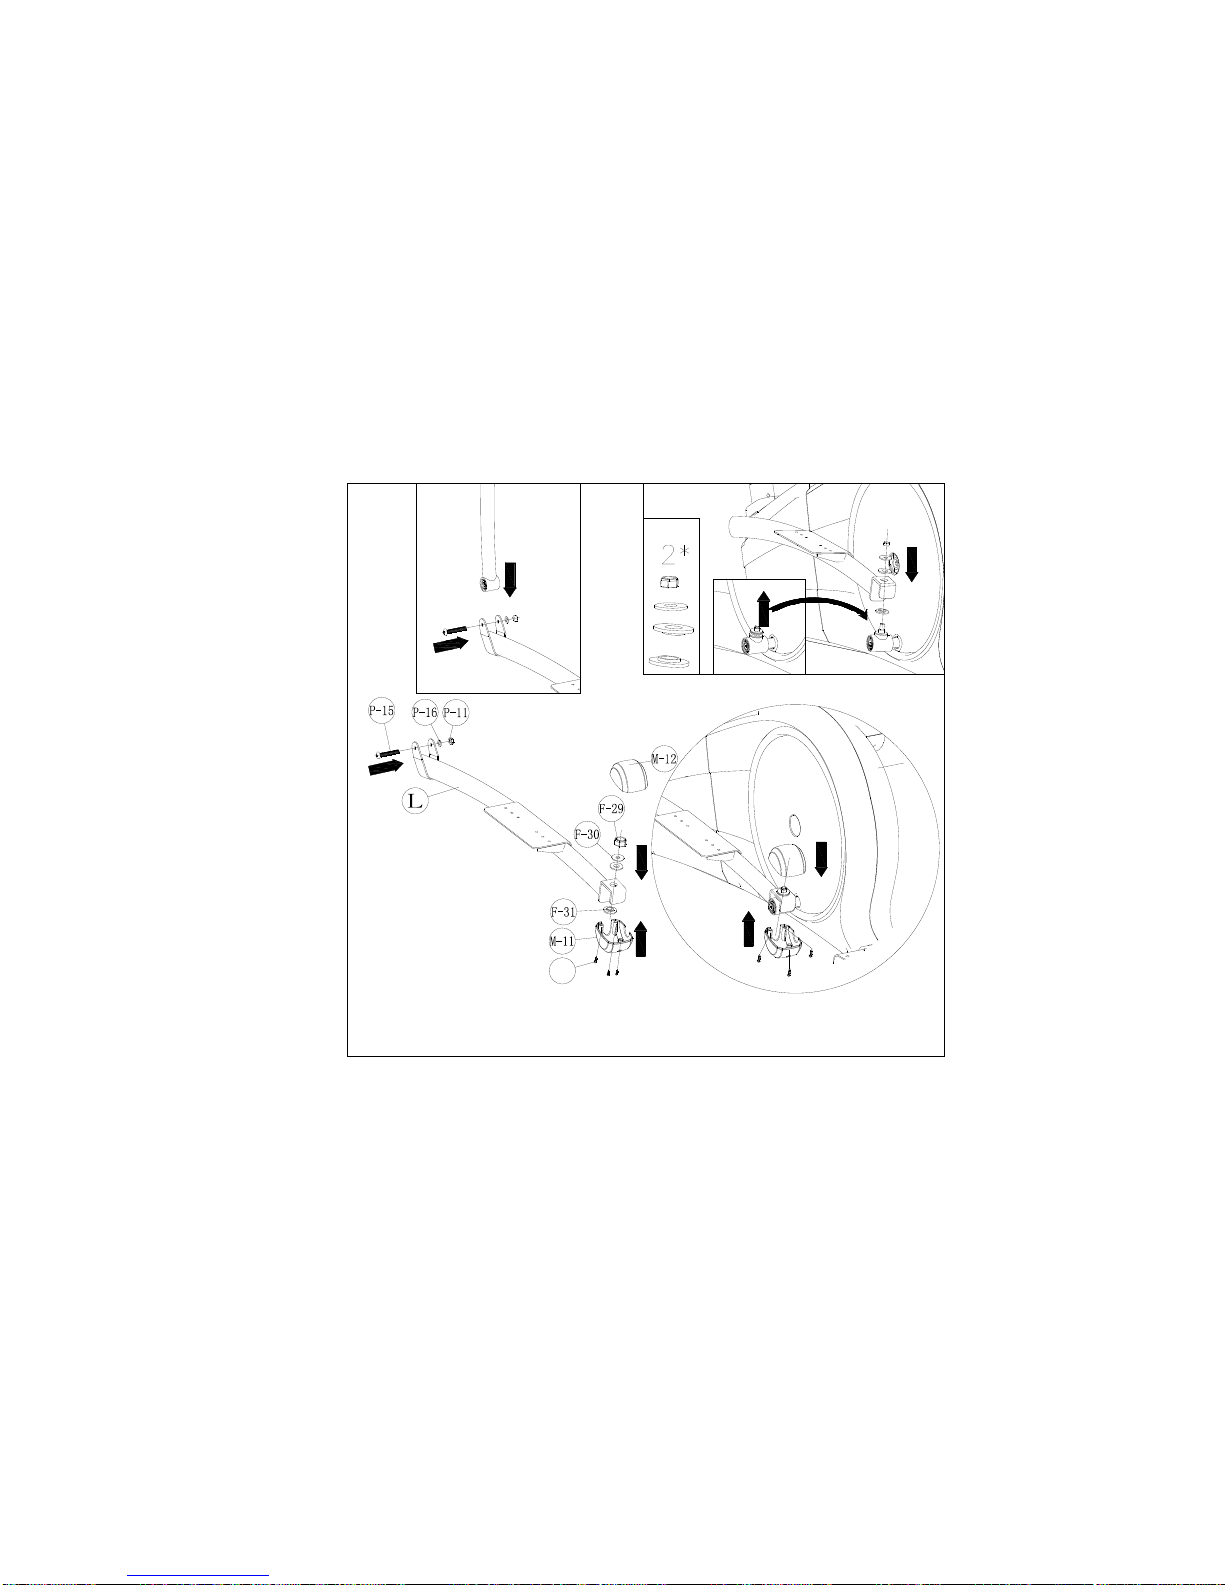
F Main frame 1SET
F-1 Screw M8*P1.25*16L(6m/m) 4PCS
F-2 Spring washer φ8.1*φ12.9*2.4T 4PCS
F-3 Semi washer φ8xφ19x2t 4PCS
F-5 Cap for hand post 1PCS
F-6 Sensor box 400L 1PCS
F-8 Pulley φ289*8(φ20) 1PCS
F-9 Belt J8 1219m/m(J8 480) 1PCS
F-10 Shaft 1PCS
F-11 Screw M8xP1.25x12Lx5t 3PCS
F-12 Screw for chain cover M4x20L 4PCS
F-13 Front Chain cover (R ) 1PCS
F-14 Rear Chain cover (R ) 1PCS
F-15 Front Chain cover (L ) 1PCS
F-16 Screw for chain cover M4x50L 8PCS
F-17 Screw for chain cover 3/16〃(#10)x3/4〃8PCS
F-18 Rear Chain cover (L ) 1PCS
F-19 Screw for disc M4x14L 8PCS
F-20 Flat washer φ5xφ16x1t 8PCS
F-21 Disc 2PCS
F-22 Round disc 2PCS
F-23 Cap for round disc 2PCS

3
F-24~
F-30 Crank connation 2PCS
G Flywheel set 1SET
H Magnet system 1SET
J Front stabilizer 1PCS
J-1,J-2 Front transportation wheel 1SET
J-4 Rear stabilizer 1PCS
J-5 End cap for rear stabilizer 1SET
K Idler wheel set 1SET
L Pedal post (Lift) 1PCS
L-2 Pedal post (Right) 1PCS
M Alex for first-lower handlebar φ17x323L 1PCS
M-1 Front salver 1PCS
M-2 Rear salver 1PCS
M-3 Rear cover for hand post 1PCS
M-4 Front cover for hand post 1PCS
M-5 Rear cover for first-lower handlebar 2PCS
M-6 Front cover for first-lower handlebar 2PCS
M-7 Bottle cage 1PCS
M-8,M-9 Front cover for pedal arm 1SET
M-10 Left pedal 1PCS
M-11,M-12 Rear cover for pedal arm (Left) 1SET
M-13 Right pedal 1PCS
M-14,M-15 Rear Cover for pedal arm (Right) 1SET
N Adaptor 1PCS
P~P-21 Bolt & nuts pack 1SET

4
B-5
C-3
M-1
D-2
P
A-1
P-1
P-2
P-4
P-3
M-3
P-5
D-2
E-L
E-7
E-6
M-2
D-2
E-R
D-1
F-4
F-5
F-1
F-3
F-2
L-1
M
P-5
P
-5
P-5
P-5
P-5
L-2

5
ASSEMBLY STEPS
STEP 1 Assembly the rear & front stabilizer (J & J-4)and main frame with 4
washer ( P-13 ), 4 nuts ( P-12) and 4 bolts (P-14 )
STEP 2 First, loosen the pre-assembled screws & cover.
Connect the computer cable upper & lower ( D-1 & F-4 ) each other
Assembly the handlebar post (D) and main frame with 4 washer ( F-3 ),
4 spring washer ( F-2 ) and 4 bolts ( F-1 )
STEP1
STEP2
F-1 F-2
F-3
F-4
D-1

6
STEP 3Slide the computer (A) down to the bracket situated at the top of hand post
(B), and fix with two Fixing screws (A-1). Then plug the Upper Computer
Wire (A-1) to the Computer as shown.
Plug the pulse Computer Wires (A-2) into the side of the Computer (A).
A-1

7
STEP 4 Assemble the Front post cover (Front & Rear) (M-3 & M-4) to the hand
post using Screw (M5xP0.8x14L) ( D-2), Screw (M3*25) (P-5).
Attach the Handlebar (B) to the Hand Post using the clamp (P-3), fix
with two Flat Washers (φ7) (P-2), two Spring Washers (φ7) (P-4) and
Screw (P-1).
Assembly the Handlebar cover (Front & Rear) (M-1 & M-2) to the Front
post using Screw (M5xP0.8x14L) (D-2) and Screw (M3x14L) (P).
Fasten the Bottle Cage (M-7) to the Handlebar Mast using the crews (D-2).
STEP4
M-2
D-2
D-2
M-3
P-5
M-1
D-2
P
P-1
P-2
P-4
P-3

8
STEP 5 Fixing the two Lower handrail (E) to the Hand Post (D) with one Alex (M),
two sets Waves washer φ17.5xφ25x0.3t (P-8), Flat washer φ10xφ26x2t (P-6) and
Plastic washer φ10xφ25x0.5t (P-21) and Bolt M8xP1.0x20L (P-7).
*2
17. 5x 25x0. 3t
M8x20 10* 26*2T *2
E-L
E-R

9
STEP 6Attach the Left and Right lower handrail (E-L/R) to the Left and Right pedal
tube (L & L-2) using tow Hexagon bolt (M8xP1.25x55L) (P-15), four flat
washer (φ8) (P-16) and two Nylon nut (M8) (P-11).
Then connect the crank connect (F-24) the Disc (F-21) (R/L) , Then
connect the crank connation (F-24) the Pedal arm (L & L-2)
Then connect the upper rear cover (M-12) and down rear cover (M-11) to
the pedal arm (L & L-2) using screw (P-5).
STEP6
P-5
B

10
STEP 7 Attach the lower handrail (E) (L&R) to the left and right pedal arm (L & L-
2),cover (M-8 & M-9) using screws (pt.Q12 & N14) .
Assembly the right & left pedal ( M-13) onto the 2 pedal arm ( L
& L-2 ) with 4 knob (P-18 ), 4 spring washer (P-19 ), 4 flat washer
( P-20 ), and 4 carriage bolt ( P-17 ).
STEP7
P-5 L-1
L-1

11
STEP 8 Slide the upper hand post (C-3,C-2) (R/L) into the lower hand post (E) and
then fix with the three carriage bolts (P-9) and washers (P-10) and Nylon nuts
(P-11).
S
TEP8

12
STEP 9 Assemble the Handrail cover (Rear & Front) (M-5 & M-6) to the lower handrail (L/R)
using Screw (M3x25L) (P-5), Screw (M5xP0.8x14L) (E-6) and Screws.
STEP9
D-2
P-5

13
Monitor manual instruction
【DISPLAY FUNCTION】
TIME : Count up - No preset target, TIME will count up from 00:00 to maximum 99:59 with each increment
is 1 second.
Count down - If training with preset Time, Time will count down from preset to 00:00.Each preset
Increment
or decrement is 1 minute between 1:00 to 99:00.
SPEED : Display current training speed from 0.0 to maximum 99.9 km or ml.
RPM : Display current training rotation per minute.
DISTANCE : Count up - No preset target, Distance will count up from 0.00 to maximum 99.90 with each
Increment 0.1 KM. Count down - If training with preset target, Distance will count down from
preset to 0.00. Each preset increment or decrement is 0.1 KM (or ML) between 0.00 to 99.90.
CALORIES : Count up - No preset target, Calories will count up from 0 to maximum 990 with each 1 cal
increment. Count down - If training with preset target, Calories will count down from preset
time to 0. Each preset increment or decrement is 10 cal from 0 to 990 cal.
PULSE : The monitor can detect pulse signal from handgrip.
HEART SYMBOL: When monitor receive heart rate signal, the symbol will blinking.
WATT : Display current training watt figures.
【FUNCTION BUTTONS:】
MODE: To confirm all settings and to enter into exercise mode.
UP : To select training mode and adjust function value up.
DOWN : To select training mode and adjust function value down.
START/STOP : To start or stop training.
RECOVERY : After exercising for a period of time, keep holding on handgrips and press “RECOVERY”
button. All function display will stop except “TIME” starts counting down from 00:60 to 00:00.
Screen will display your heart rate recovery status with the F1,F2….to F6. F1 is the best,
F6. F6 is the worst. User may keep exercising to improve the heart rate recovery status.
(Press the RECOVERY button again to return the main display.)
(If monitor did not receive heart rate signal, RECOVERY function can not work.)
RESET : Return to main menu in stop mode and clean all preset function value to zero.
TOTAL RESET : To power on the computer.
【OPERATING INSTRUCTION:】
POWER ON
Connect adaptor to the computer to power on, LCD will display all segment with a long- beep as testing for
2 seconds and wheel diameter 78” for seconds (drawing 1).
Drawing 1
【PROGRAMMING MODE】
USER personal data setting (U1 – U4):
1-1 U1 is blinking, user may turn UP and DOWN to select user 1, user 2 to user 4
1-2 Preset personal data (incl. AGE, WEIGHT, HEIGHT, SEX). And press the MODE for confirmation.
1-3 The computer will enter into MANUAL mode immediately, and selected user may preset his own
exercise data (incl. TIME, DISTANCE, CALORIES and PULSE). The computer will memorize and will recall
those data every time when the user is selected.
1-4 User may start exercise by press START button.
1-5 Press RESET button reverse to training mode selection main menu.

14
Program selections are MANUAL, PROGRAM, H.R.C., USER, WATT. Press UP and
DOWN to select the program you want and press START for QUICK START in Manual
mode.
MANUAL MODE
After selecting MANUAL mode, press UP and DOWN button to increase and decrease
level (from 1 to 16) and press MODE button to confirm. Level is adjustable during training.
(drawing 2)
Drawing 2
PROGRAM MODE
After enter PROGRAM mode, press UP and DOWN to
select program profile from P1 to P12, press MODE button to confirm and enter the
selected profile. User may press UP and DOWN to adjust level. Level is adjustable during
training. (drawing 3)
Drawing 3
H.R.C. MODE
After enter H.R.C. mode, press UP and DOWN to select different target from 55%, 75%,
90% and TARGET. Press MODE to confirm.
USER MODE
After enter USER mode, the first column of the profile is blinking, user may press UP,
DOWN and then press MODE to create his own profile. (from column 1 to column 20)
User may hold on pressing MODE button for 2 seconds to quit profile setting. (drawing 4).
Each user may have his own user profile.
Drawing 4
WATT MODE
The preset watt value 120 is flashing on screen in WATT setting mode. User may use
UP, DOWN button to set target value from 10 to 350. Press MODE button for confirm.
NOTE:
1. Adaptor spec: 9V, 500MA
2. If computer acted abnormal, user may plug out the adaptor and wait for 5 seconds
before plug in the adaptor again.

15
3. When computer just power on, it can not be touched or covered by any object or hand
within 6 seconds.
Attention! All preset data will be lost when unplug the power
(adaptor) from the "Elliptical".
Table of contents
Other Casall Elliptical Trainer manuals
Popular Elliptical Trainer manuals by other brands

NordicTrack
NordicTrack E5 si 831.23855.0 user manual

Bremshey
Bremshey Control owner's manual

Vision Fitness
Vision Fitness X6200 Frame 9 Assembly guide

Merach
Merach MR-526D instruction manual

Insportline
Insportline inCondi ET660i II user manual

Christopeit Sport
Christopeit Sport CX 6 Installation and operation instruction