CEM MARSXpress Plus User manual

MARSXpress Plus
110 mL Microwave Digestion Vessel
Manual

THIS PAGE INTENTIONALLY LEFT BLANK

Contents
Safety
Safety Notations 1
Introduction
About the MARSXpress Plus Vessels 2
Important Safeguards
Operating Parameters 3
Microwave Safeguards 3
Sample Preparation Safeguards 3
Vessel Safeguards 4
Compounds Unsuitable for Closed Vessel Microwave
Digestion 4
Vessel and Accessories Overview
Vessel Components 5
Accessories 6
New Liner, Plug, and Cap Conditioning
Nitric Acid Liner, Plug, and Cap Conditioning 7
Non-Nitric Acid Liner, Plug, and Cap Conditioning 8
Perform a Digestion
Vessel Assembly 9
Turntable Setup 11
Load and Perform a Method 13
Vessel Removal 15
Cleaning and Inspection
Liners, Vent Plugs, and Caps 16
Liner Bake-out Procedure 16
Sleeves 17
Turntable 17
Vessel Distribution
Vessel Distribution 18
Methods
Create a One Touch Method 19
Create a Classic Method 19
Fiber Optic Temperature Control (optional)
Fiber Optic Installation 20
Fiber Optic Temperature Verication 21
Fiber Optic Care 21
Routine Maintenance
After Every Use 22
As Needed 22
Annually 22
Troubleshooting
Problems and Possible Solutions 23
Technical Assistance
Applications Support 24
Technical Support 24

THIS PAGE INTENTIONALLY LEFT BLANK

1Safety
Safety
Safety Notations
This manual uses three safety alert words at points in the documentation where the user should be aware of
potential hazards. The safety alerts are shown in color-coded boxes. The three words – NOTE, CAUTION, and
WARNING – indicate differing levels of observation or action as described below:
NOTE
A NOTE is intended to provide emphasis on procedures that may be misinterpreted or overlooked, or to
clarify confusing situations.
CAUTION
A CAUTION is intended to provide essential information and to emphasize procedures that, if not strictly
followed, may result in improper instrument operation.
WARNING
A WARNING is intended to emphasize dangerous or hazardous conditions that may result in personal
injury to the user and/or damage or destruction of the instrument.

2 Introduction
Introduction
About the MARSXpress Plus Vessels
The MARSXpress™Plus vessel is designed for microwave digestion in a MARS 6TM with any temperature
control option. The MARSXpress Plus vessel is well suited to run samples such as: plant and animal tissues,
environmental, mixed food samples, consumer products, and industrial hygiene. Depending on the turntable
capacity, up to twenty four (24) vessels can be prepared simultaneously to meet the throughput requirements of
most analytical laboratories. Preinstalled One Touch™methods take the guesswork out of method creation and
sample preparation.
The MARS 6 requires software version 1.49 or newer to operate MARSXpress Plus.
This manual is intended for use by both novice and experienced users for the operation and maintenance of
the MARSXpress Plus Vessels. Additional information, including but not limited to: training notes and videos,
application notes, software updates, and parts can be viewed on CEM’s website at https://cem.com/marsxpress-
plus.
Depending on the MARS conguration, this Manual should be used in conjunction with the MARS 6 iWave Manual
(P/N 600832) or MARS 6 IR manual (P/N 600284). If your MARS instrument is not listed, contact your CEM
Representative for assistance.
Read and fully understand all documentation before operating the instrument.
This manual is NOT intended for use with the disposable glass vessels. View the "MARSXpress Plus Disposable
Glass Vessel Manual" (P/N 600951). The MARSXpress Plus Disposable Glass Vessels are only intended for use
with the iWave temperature sensor.

3Important Safeguards
Important Safeguards
Microwave sample preparation imposes a unique set of safety considerations beyond the basics of good laboratory
practice. Depending on the MARS conguration, additional safeguards are included in the MARS 6 iWave Manual
(P/N 600832) or MARS 6 IR manual (P/N 600284). General guidelines for safe operation of the vessels are
presented below and all specic safety messages are located throughout the manual.
Proper precautions must be taken to avoid contact with acids or acid vapors. Protective gear should be worn as
outlined in the user’s safety program for hazardous materials and the acid manufacturer’s safety data sheet. Refer
to these guidelines for proper handling and disposal of the acids.
Operating Parameters
MARSXpress Plus Vessels 110 mL (PFA or TFM*)
Acid Volume Minimum 5 mL
Maximum 55 mL
Maximum Temperature All Acids and Acid mixtures (excluding
HF)
210 ºC
HF 180 ºC
Maximum Hold Time** 30 min
Maximum Sample Weight Food, Plant, and Animal Tissue 1.0 g
Oil and Plastic 0.15 g
Environmental and Regulatory 1.0 g
Pharmaceutical 1.0 g
Inorganic 1.0 g
Metallurgical 1.0 g
Clinical 1.0 g
* The 16 place turntable is only available with TFM liners.
** Contact CEM Corporation if longer times are required.
Microwave Safeguards
• Minimum volume for the MARS 6 cavity is 10 mL of acid or 50 mL of water.
• If a run is stopped or paused for more than 30 seconds during the digestion, do not restart the method with hot
vessels.
• Allow vessels to cool until completion of the cool down time.
• Vent vessels and reseal.
• Restart method from the beginning.
• Allow vessels to cool until completion of the cool down time before opening the microwave door.
Sample Preparation Safeguards
• Run similar sample types with the same acid(s) and acid volume in each vessel
• If mixing similar samples or blanks, mix them evenly throughout the turntable
• Maximum sample weight varies per sample type. See “Operating Parameters” for weights
• Acid blanks cannot account for more than 25% of turntable when mixed with samples

4 Important Safeguards
Vessel Safeguards
• Only use consumables, accessories, vessels and vessel components purchased directly from CEM or through its
authorized dealer network.
• All vessel components must be dry prior to use.
• Always condition new liners, plugs, and caps.
• Minimum vessel requirement:
• Fiber Optic Control Vessel: 1 Vessel.
• iWave or IR control only: 2 Vessels.
• Do not batch old liners with new liners unless new liners have been conditioned.
• Ensure vessels are assembled properly.
• Group liners with similar sample history and usage.
• Segregate liners for HNO3and non-HNO3applications.
• Do not use a new liner with a set of liners that has been run consistently until the new liner has been
conditioned with that sample type.
• Bake out liners and plugs to remove residual HNO3& NOx gases.
• See "Liner Bake-Out Procedure" for details.
• Bake out liners if TempGuardTM is triggered.
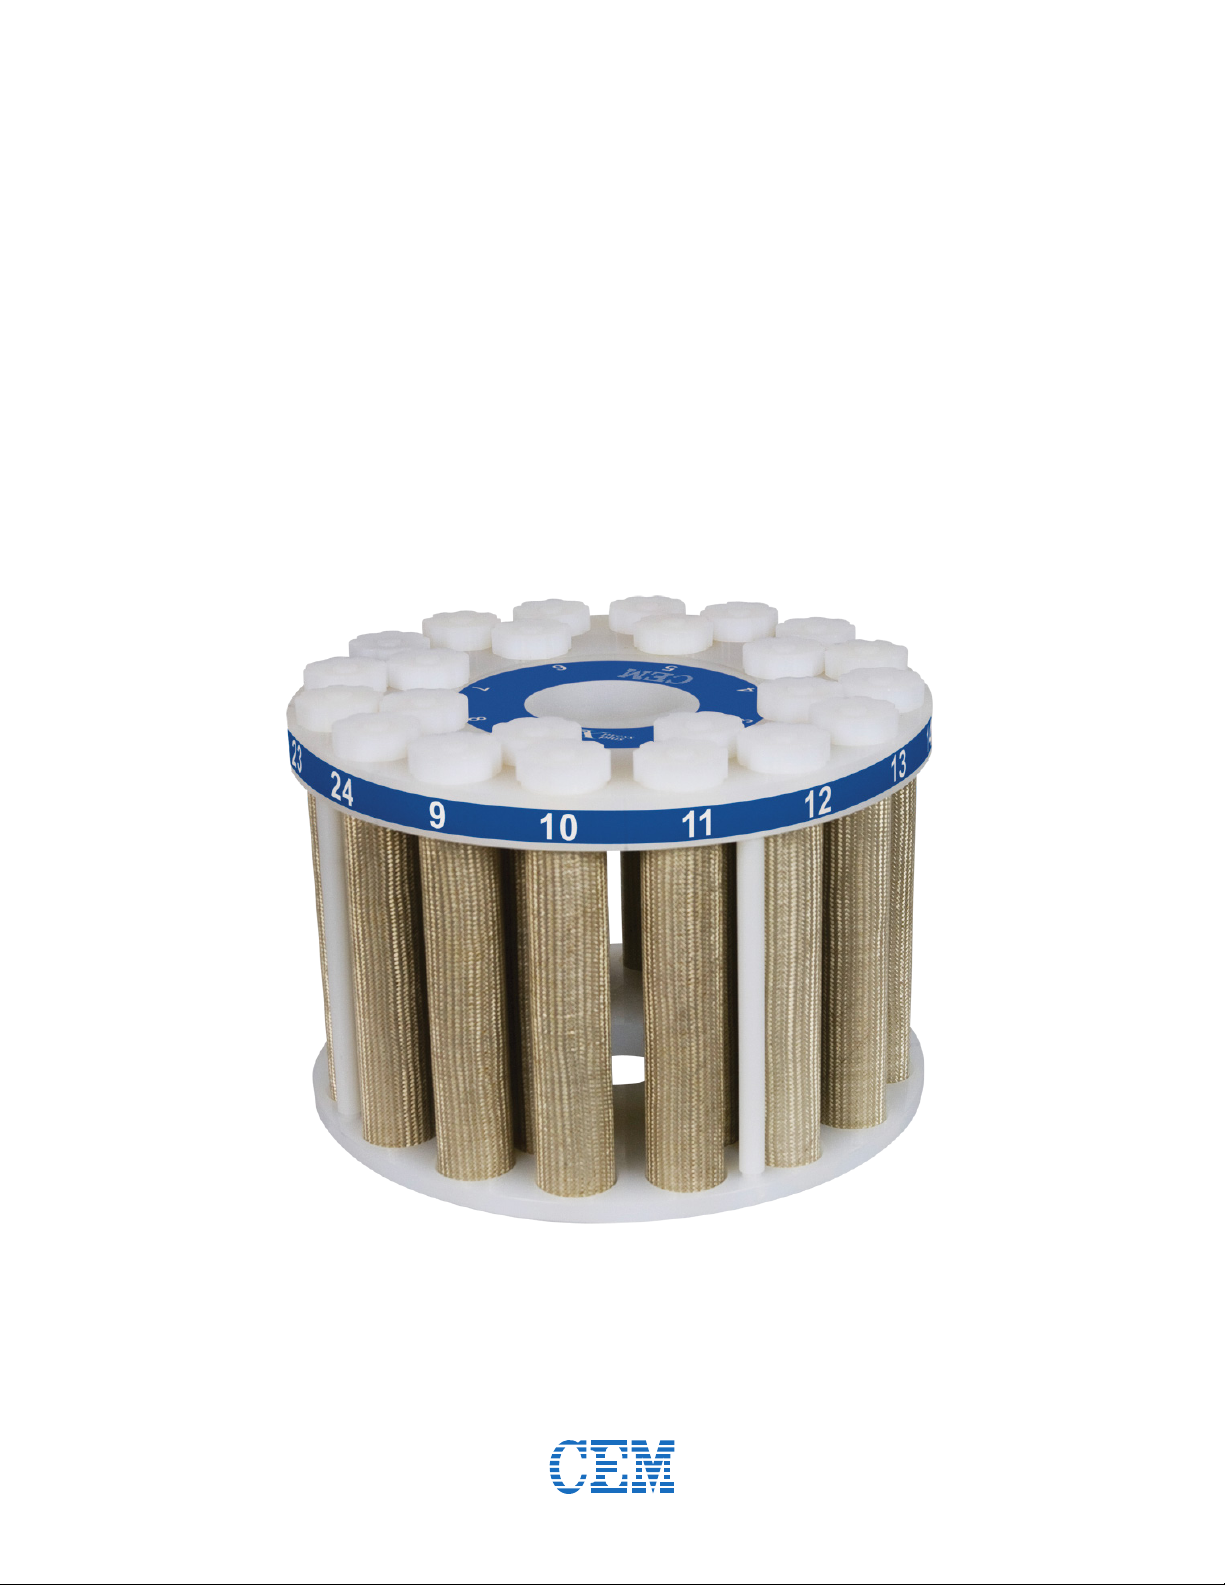
• The fully loaded turntable without sample may be heavy (>25 pounds (11 kg)). Use caution when lifting and
loading into the cavity. Do not place ngers beneath the turntable when placing in the cavity.
Compounds Unsuitable for Closed Vessel Microwave Digestion
WARNING
CEM will not be responsible for damage to equipment and facilities or personal injuries resulting from
microwave digestion of samples that are deemed unsuitable for closed vessel microwave digestion.
Acid decomposition of certain chemical compounds or types of samples constitutes unreasonable, hazardous
misuse of CEM microwave digestion systems. The classes of compounds listed below are unsuitable for closed
vessel microwave digestion because they are highly reactive with oxidizing acids and/or may become nitrated and
potentially explosive. Absence of a particular chemical compound from this list does not imply microwave acid
decomposition of such a sample is safe under all conditions.
• Explosives (TNT, Nitrocellulose, etc.)
• Propellants (Hydrazine, Ammonium Perchlorate, etc.)
• Pyrophoric chemicals
• Hypergolic mixtures (Nitric Acid and Phenol, Nitric Acid and Triethylamine, Nitric Acid and Acetone, etc.)
• Animal Fats (Esters of glycerol capable of nitration and the formation of nitroglycerin or other nitrated organic
compounds)
• Aviation Fuels (JP-1, etc.)
• Acetylides
• Glycols (Ethylene Glycol, Propylene Glycol, etc.)
• Perchlorates (Ammonium, Potassium, etc.)
• Ethers (Cellosolve - Ethylene Glycol Phenyl Ether, etc.)
• Lacquers
• Alkanes (Butane, Hexane, etc.)
• Ketones (Acetone, Methyl Ethyl Ketone, etc.) and Alcohols (Methanol, etc.)

5Vessel and Accessories Overview
Vessel and Accessories Overview
The MARSXpress Plus is available in 110 mL PFA and 110 mL TFM plastic liners. For a list of parts and part
numbers, visit our website at www.cem.com. A list of parts can be found on the “Products” page under “MARS 6”.
WARNING
Only use consumables, accessories, vessels and vessel components purchased directly from CEM
or through its authorized dealer network. The use of consumables, accessories, vessels and vessel
components other than original CEM parts will put operators and equipment at risk; therefore, CEM will
not assume any liability for use of these parts and all warranties, either written or implied, will immediately
become void.
Vessel Components
1
3
2
4
Standard Cover
Control Cover*
Item
1 Liner
2 Vessel Plug
3 Cap
4 Sleeve
*The control cover is only available for MARS units with the ber optic temperature control option.

6 Vessel and Accessories Overview
Accessories
MARSXpress Plus Turntable* Sleeve Torque Tool
Gripper MARSXpress Plus Liner Rack
*A 16 place, outer row only, turntable is available.

7New Liner, Plug, and Cap Conditioning
New Liner, Plug, and Cap Conditioning
All new liners and plugs should be conditioned as a set prior to being put into service. The break-in procedure is
used to condition the Teon®to ensure a proper seal. CEM recommends conditioning the plugs and liners based
on the acid type that will be used.
WARNING
Proper precautions must be taken to avoid contact with acids or acid vapors. Protective gear should be
worn as outlined in the user’s safety program for hazardous materials and the acid manufacturer’s safety
data sheet. Refer to these guidelines for proper handling and disposal of the acids.
Nitric Acid Liner, Plug, and Cap Conditioning
1. Use hot soapy water and foam brush to clean the liners, plugs, and caps. Rinse thoroughly with DI water and
allow to dry completely before use.
NOTE
Micro 90 Cleaner®liquid detergent works well on Teon. Avoid detergents that contain ingredients that
could cause potential contamination such as Na and P. Avoid abrasive cleansers and stiff brushes which
can scratch the Teon surface.
2. Place 0.25 g ± 0.05 g of tea leaves or appropriate sample into each liner. Never add sample or liquid to liner
with sleeve in place.
3. Add 10 mL of HNO3to each liner. Use the acid to rinse the inside of the liner to ensure that the sample is in
the base of the liner.
4. Wait 15 minutes to allow pre-digestion.
5. Assemble and torque each vessel. See “Vessel Assembly” for detailed instructions.
6. Select and load the “Plant Material” method from the One Touch directory.
7. Place vessels in turntable and insert the turntable into the cavity. See “Turntable Setup” and “Vessel Distribu-
tion” for detailed instructions.
8. Close the instrument door and run the preprogrammed “Plant Material” method. Verify that vessel count, type,
and position are correct. It is normal for vessels to vent during digestion.
9. After completion of the method, permit the vessels to cool in the automated sequence until the vessels cool
for a minimum of 15 minutes.
WARNING
Allow vessels to cool for a minimum of 15 minutes before opening the microwave door.
To prevent the possibility of severe burns, ensure that gloves and protective gear as outlined in your safety
program are worn.
10. Remove the vessel assemblies from the turntable. See “Vessel Removal” for detailed instructions.
11. Rinse the liners and plugs with deionized water.

8 New Liner, Plug, and Cap Conditioning
Non-Nitric Acid Liner, Plug, and Cap Conditioning
1. Use hot soapy water and foam brush to clean the liners, plugs, and caps. Rinse thoroughly with DI water and
allow to dry completely before use.
NOTE
Micro 90 Cleaner®liquid detergent works well on Teon. Avoid detergents that contain ingredients that
could cause potential contamination such as Na and P. Avoid abrasive cleansers and stiff brushes which
can scratch the Teon surface.
2. Place 0.25 g ± 0.05 g of your sample into each liner. Never add sample or liquid to liner with sleeve in place.
3. Add 10 mL of the digestion acid to each liner. Use the acid to rinse the inside of the liner to ensure that the
sample is in the base of the liner.
NOTE
For non-acid applications, use 20 mL of water. The minimum cavity load for water is 50 mL.
4. Wait 15 minutes to allow pre-digestion.
5. Assemble and torque each vessel. See “Vessel Assembly” for detailed instructions.
6. Select and load the “Xpress Clean” method from the One Touch directory.
7. Place vessels in turntable and insert the turntable into the cavity. See “Turntable Setup” and “Vessel Distribu-
tion” for detailed instructions.
8. Close the instrument door and run the preprogrammed “Xpress Clean” method. Verify that vessel count, type,
and position are correct. It is normal for vessels to vent during digestion.
9. After completion of the method, permit the vessels to cool in the automated sequence until the vessels cool
for a minimum of 15 minutes.
WARNING
Allow vessels to cool for a minimum of 15 minutes before opening the microwave door.
To prevent the possibility of severe burns, ensure that gloves and protective gear as outlined in your safety
program are worn.
10. Remove the vessel assemblies from the turntable. See “Vessel Removal” for detailed instructions.
11. Rinse the liners and plugs with deionized water.

9Perform a Digestion
Perform a Digestion
WARNING
Proper precautions must be taken to avoid contact with acids or acid vapors. Protective gear should be
worn as outlined in the user’s safety program for hazardous materials and the acid manufacturer’s safety
data sheet. Refer to these guidelines for proper handling and disposal of the acids.
Vessel Assembly
The assembly procedures are the same for all vessel congurations, except for the operating parameters.
1. Liners, plugs, and caps must be conditioned before use. See “New Liner, Plug, and Cap Conditioning” for de-
tails.
2. All vessel components must be dry prior to use.
CAUTION
Never add sample or liquid to vessel or liner with sleeve in place. Use the rack.
3. Place liners in vessel liner rack.
CAUTION
Do NOT batch old liners with new liners unless new liners have been conditioned.
4. Add the sample to the liner(s).
4.1. Inspect liners for abnormalities.
4.2. Weigh and transfer the sample into the liner. The maximum sample weight varies per sample type. See
“Operating Parameters” for specic weights.
4.3. Add the acid. See the "Operating Parameters" for working volumes. Use the acid to rinse the inside
of the liner to ensure that the sample is in the base of the vessel. If running more than one vessel,
all vessels must have similar samples, and the same acid(s) and acid volume in each vessel. See
“Sample Preparation Safeguards” for information regarding acid blanks along with additional safe-
guards.
4.4. Ensure that acid covers the sample and the base of the vessel.
CAUTION
Do not use water to dilute the acid(s) greater than 25% or to add volume before digestion. This can cause
uneven heating of vessels.
5. Wait 15 minutes to allow pre-digestion.
6. If applicable, assemble the MARSXpress Plus Control Vessel.

10 Perform a Digestion
6.1. Assemble the control cover.
6.1.1. Insert the open end of the thermowell into the underside of the control plug.
CAUTION
Do not force thermowell into control plug as it is fragile and may break.
6.1.2. Place the cap on the plug.
6.1.3. Slide the nut onto the thermowell and tighten the nut until nger tight.
6.2. Place the cap on the liner and tighten until nger tight. Ensure that the thermowell nut is nger tight.
7. Assemble the remaining vessels.
7.1. Place the plug on the liner. If a control vessel is required, use the liner containing the highest amount
of weighed sample as the control vessel.
7.2. Place the cap on the liner and tighten until nger tight.
CAUTION
Keep the vent hole facing away from the user at all times. Never look directly at the vent hole once it has
been placed on the liner.

11Perform a Digestion
8. Place the gripper on the assembled vessel(s).
9. Use the gripper to hold the vessel then tighten the cap using the provided preset torque tool until a single click
is heard or felt. An optional bench mounted manual torque station to hold the torque tool is available.
WARNING
Vessel torquing is critical to optimize controlled venting of the system and for the integrity of the vessel.
Over or under torquing may lead to sealing issues. If any issue is noted, contact CEM Corporation.
Turntable Setup
1. Load the control vessel in position "1" of the turntable.
2. If the control vessel has ber optic temperature control, insert the ber optic probe into the control vessel.
• The ber optic probe should slide easily into the thermowell through the cap until the probe reaches the
bottom of the thermowell.
• Do not force the ber optic probe.

12 Perform a Digestion
CAUTION
If resistance is felt when trying to insert probe, ensure that the thermowell is not broken inside the Teon
cover. The sharp edges of any break can restrict the movement of the probe.
3. Load the remaining vessel assemblies into the turntable one by one. See “Vessel Distribution” section of this
manual for optimal vessel distribution.
NOTE
The sleeves should be left in the turntable at all times.
4. Ensure that each vessel is properly positioned in the turntable. The outside of the cover MUST be below the
top of the turntable.
5. Verify the oor mat positioning, ensuring that the mat is not covering the temperature sensors.

13Perform a Digestion
6. Load the turntable into the instrument by aligning position “1” with the front of the instrument. The turntable
must be seated down on drive lug.
WARNING
The fully loaded turntable without sample may be heavy (>25 pounds (11 kg)). Use caution when lifting
and loading into the cavity. Do not place ngers beneath the turntable when placing in the cavity.
7. If applicable, connect the ber optic probe to the port in the top center of the MARS 6 cavity by pushing in the
plug until it snaps into place.
8. With the door open, use the Turntable icon to rotate the turntable. Observe the positioning and balance of
the turntable. If applicable, ensure the ber optic probe stays in position. Make adjustments by re-seating the
turntable if necessary.
Load and Perform a Method
1. If applicable, verify ber optic temperature.
1.1. Select the System Settings icon in the bottom right corner of the screen.
1.2. Select Tools.
1.3. Select the "System" tab. The "FISO Temperature (ºC)" will appear under "Status".

14 Perform a Digestion
1.4. Verify the temperature reading at room temperature.
• If the ber optic probe is new or the temperature is not reading correctly, enter the GF number. See
the "Fiber Optic" section of the manual for details.
• If “---” appears as the temperature, then the MARS 6 does not recognize the Fiber Optic Probe. The
probe is either not installed or is not working properly. See the "Fiber Optic" section of the manual
for details.
2. Press the Home icon in the lower left corner of the screen to return to the Home page. Select/load the method
from the directory, One Touch or Classic. See “Methods” section or contact CEM Corporation if assistance is
needed creating a new method.
2.1. To view method parameters, select the method and select the Information icon located at the top of
the screen.
3. Close the instrument door.
4. Select “Start” to run the method. The instrument will begin the method according to the selected parameters
– initializing, ramping, holding, cooling, etc. Verify that vessel count, type, and position are correct.
CAUTION
Observe the entire digestion sequence when establishing a procedure for the rst time.
NOTE
If a run is stopped during the digestion, do not restart the method with hot vessels. Allow vessels to cool
until completion of the cool down time, vent vessels and reseal, and restart method from the beginning.
5. After completion of the method, permit the vessels to cool in the automated sequence until the vessels cool
for a minimum of 15 minutes.
WARNING
Allow vessels to cool for a minimum of 15 minutes before opening the microwave door.
To prevent the possibility of severe burns, ensure that gloves and protective gear as outlined in your safety
program are worn.

15Perform a Digestion
Vessel Removal
1. Allow the vessels to cool down in cavity for 15 minutes before opening the microwave door.
WARNING
To prevent the possibility of severe burns, ensure that gloves and protective gear as outlined in your safety
program are worn.
Proper precautions must be taken to avoid contact with acids or acid vapors. Protective gear should be
worn as outlined in the user’s safety program for hazardous materials and the acid manufacturer’s safety
data sheet. Refer to these guidelines for proper handling and disposal of the acids.
2. If applicable, disconnect ber optic probe.
3. Remove the turntable from the instrument. Keep the vent holes facing away from the user when transportating
the turntable.
4. If applicable, remove the ber optic probe from the control vessel.
5. Remove the vessel assemblies from the turntable one by one, keeping the vent hole pointed away from the
user, and place them in the rack.
6. Place the rack containing the vessels into a fume hood.
7. With the vent hole pointing away from the user and into a fume hood, carefully loosen the caps, allowing them
to vent.
8. Remove the cap and plug. If the vessel plug is difcult to remove, then allow for additional time to cool for
easier removal.
9. Transfer the sample from liner and proceed with work-up.
10. If liquid is noted on the turntable or sleeves, wipe it off with a damp paper towel and allow to dry. Leave
sleeves in turntable.
CAUTION
Never pour sample or liquid from liner with sleeve in place.
11. Clean vessels as outlined in “Vessel Cleaning ” section.

16 Cleaning and Inspection
Cleaning and Inspection
WARNING
Proper precautions must be taken to avoid contact with acids or acid vapors. Protective gear should be
worn as outlined in the user’s safety program for hazardous materials and the acid manufacturer’s safety
data sheet. Refer to these guidelines for proper handling and disposal of the acids.
Liners, Vent Plugs, and Caps
1. Rinse the liners with deionized water and allow to dry completely before use.
2. If measuring ppm, ppb and/or ppt analyte levels, proceed with steps below.
3. Clean liners with hot, soapy water and foam brush. Rinse thoroughly with deionized water and allow to dry
completely before use.
NOTE
Micro-90®cleaning solution works well on Teon. Avoid detergents that contain ingredients that could
cause potential contamination such as Na and P. Avoid abrasive cleansers and stiff brushes which can
scratch the Teon surface.
4. Clean liners using the microwave as outlined below. All vessel components must be dry before use.
4.1. Add 10 mL of acid type that had been used for sample digestion, HNO3, HCl, H2SO4, H3PO4or HF.
4.2. Prepare vessel and turntable as outlined in manual.
4.3. Select and run the "Xpress Clean" method in the One Touch directory.
4.4. Wait for vessels to cool for a minimum of 15 minutes before opening microwave door.
4.5. Discard acid and rinse the liners and covers with deionized water.
5. Inspect liners.
• Liners should be smooth and white.
• Liners that are bowed, deformed, stretched or compressed, need to be discarded.
• Do not mix new and discolored liners in the same batch. See “Liner Bake-out procedure” below to restore
discolored liners.
Liner Bake-out Procedure
As needed: The bake-out procedure can be used to remove residual acid vapors and other trapped gases from the
Teon®material. Trapped gases can potentially cause uneven heating between new and used liners.
The bake-out procedure can be used to remove residual NOxgases from liners following digestion with HNO3that
may interfere in subsequent runs. This procedure has been successfully used to remove sulfur contamination from
the Teon following digestion of samples with high sulfur content.
1. Place the liners on their side in an air oven at room temperature.
Table of contents
Other CEM Laboratory Equipment manuals

CEM
CEM iPrep Guide

CEM
CEM liberty User manual

CEM
CEM Razor User manual

CEM
CEM iPrep Series User manual

CEM
CEM Discover SP-D 10/35 Configuration guide

CEM
CEM Discover Protein Hydrolysis User manual

CEM
CEM MARS 6 User manual

CEM
CEM Q-Dry User manual

CEM
CEM Discover Bio User manual

CEM
CEM Smart Trac II User manual
Popular Laboratory Equipment manuals by other brands

SMC Networks
SMC Networks Rapidox SF6 6100 instruction manual

Electro-Voice
Electro-Voice 7110XC Specifications

Horizon Fitness
Horizon Fitness FCJJ-37 Assembly guide

Waters
Waters ACQUITY Refractive Index Detector Overview and maintenance guide

Joycare
Joycare JC-222 quick start guide

Westlab
Westlab Shaker 3D Bundle manual