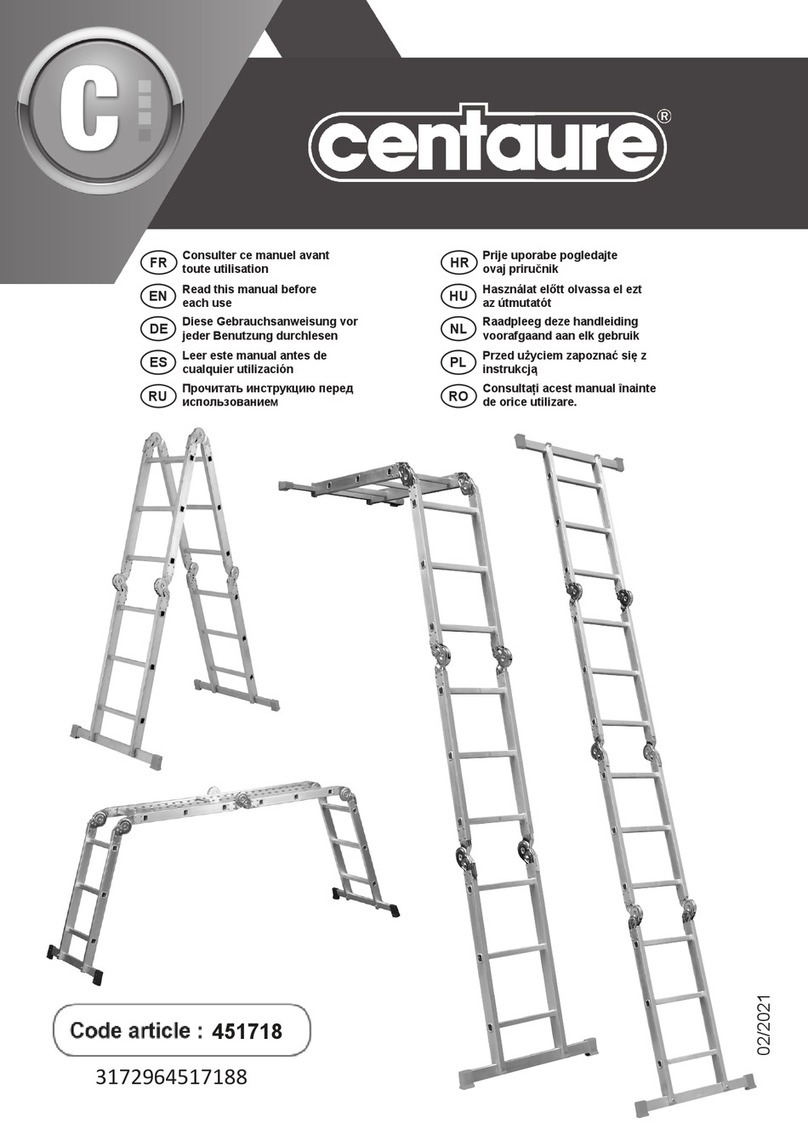
Centaure BAMBOO Instruction Manual

MODE D’EMPLOI
ÉCHELLE TÉLESCOPIQUE BAMBOO
Protecon murale
Montants supérieurs
Boutons pour replier les montants supérieurs
Échelons
Témoin de verrouillage
Boutons pour replier toute l’échelle
Stabilisateur
Protecon d’extrémité du montant de l’échelle
Pieds andérapants
1
2
3
4
5
6
7
8
9
OPERATING INSTRUCTIONS AND
USER MANUAL...............................9
Wall protecon
Top sle
Buons for collapsing the top les
Rungs
Lock indicators
Buons for pushing in the enre ladder
Base crossbar
End cap ladder sle
Non-slip feet
1
2
3
4
5
6
7
8
9
1
2
3
4
5
6
7
8
9
Wandschutz
Top-Holme
Verriegelung Wandadstandshalter
Sprossen
Verriegelungsanzeigen
Knöpfe zum Einschieben der gesamten Leiter
Standfußtraverse
Endkappe Leiterholm
Anrutschfüße
BEDIENUNGS-UND
GEBRAUCHSANLEITUNG......15
MODE
D’EMPLOI......................................3

2
Protecon murale
Bras de l’écarteur
Verrouillage de l’écarteur
Sac à ouls
Échelons
Témoin de verrouillage
Boutons pour replier toute l’échelle
Stabilisateur
Protecon d’extrémité du montant de l’échelle
Pieds andérapants
1
2
3
4
5
6
7
8
9
10
1
2
3
4
5
6
7
10
8
9
MODE D’EMPLOI
ÉCHELLE TÉLESCOPIQUE SPACE BAMBOO
OPERATING INSTRUCTIONS AND
USER MANUAL................................28
BEDIENUNGS-UND
GEBRAUCHSANLEITUNG.........34
MODE
D’EMPLOI.......................................22
9
10
Wall protecon
Wall spacer arm
Wall spacer locking
Tool bag
Rungs
Lock indicators
Buons for pushing in the enre ladder
Base crossbar
End cap ladder sle
Non-slip feet
1
2
3
4
5
6
7
8
Wandschutz
Arm Wandabstandshalter
Verriegelung Wandadstandshalter
Toolbag
Sprossen
Verriegelungsanzeigen
Knöpfe zum Einschieben der gesamten Leiter
Standfußtraverse
Endkappe Leiterholm
Anrutschfüße
1
2
3
4
5
6
7
8
9
10

1. Informations générales aux utilisateurs
d’échelles conformément à la norme EN 131-3
1.1 Avant d’uliser l’échelle
a) Votre état de santé est-il susant pour pouvoir uliser
l’échelle ? Certains problèmes de santé, la consommaon de
médicaments, d’alcool ou de drogues peuvent représenter un
danger pour votre sécurité en cas d’ulisaon de l’échelle ;
b) Si vous transportez l’échelle sur des barres de toit ou dans
un camion, pour éviter tout dommage, assurez vous que
l’échelle soit correctement aachée/installée ;
c) Contrôlez l’échelle à la livraison et avant la première
ulisaon an de vous assurer que toutes les pièces soient en
bon état et fonconnent correctement.
d) Eectuez un contrôle visuel de l’échelle avant chaque
jour de travail pour vous assurer qu’elle ne présente aucun
dommage et qu’elle puisse être ulisée en toute sécurité ;
e) Pour les ulisateurs professionnels, un contrôle régulier est
nécessaire ;
f) Assurez-vous que l’échelle est bien adaptée à l’ulisaon
prévue ;
g) N’ulisez jamais une échelle endommagée ;
h) Éliminez toute souillure présente sur l’échelle, comme de la
peinture, de la saleté, de l’huile ou de la neige ;
i) Avant toute ulisaon professionnelle de l’échelle, une
évaluaon des risques doit être eectuée en prenant en
compte les disposions légales du pays d’ulisaon.
1.2 Mise en place et installaon de l’échelle
a) L’échelle doit être installée dans une posion correcte, par
ex. respectez l’angle de pose correct pour une échelle d’appui
(angle d’inclinaison d’env. 1:4) ;
b) Les disposifs de verrouillage, s’ils existent, doivent être
parfaitement verrouillés avant ulisaon ;
c) L’échelle doit être posée sur un support plat, horizontal et
immobile ;
d) Une échelle d’appui doit être posée contre une surface
plane et solide et doit être sécurisée avant ulisaon, par ex.
des xaons ou des disposifs adaptés doivent être ulisés
pour assurer son mainen ;
e) L’échelle ne doit jamais être déplacée depuis le haut ;
f) Lors de la mise en place de l’échelle, veillez à éviter tout
risque de collision, par ex. avec des piétons, des véhicules ou
des portes. Si possible, verrouillez les portes (sauf issues de
secours) et les fenêtres de la zone de travail ;
g) Repérez tous les risques que peuvent occasionner les
équipements électriques présents dans la zone de travail,
comme des lignes aériennes à haute tension ou d’autres
équipements électriques exposés par exemple ;
h) L’échelle doit être posée sur ses pieds, et non pas sur des
échelons ou des marches ;
i) L’échelle ne doit pas être posée sur une surface glissante (ex.
verglas, surface lisse ou surface souillée), sauf si des mesures
complémentaires permeent d’éviter que l’échelle ne dérape
ou si vous neoyez susamment les zones souillées.
1.3 Ulisaon de l’échelle
a) Ne dépassez pas la capacité de charge maximale du type
d’échelle employé ;
b) Ne vous penchez pas trop loin ; la boucle de ceinture
(nombril) de l’ulisateur doit rester entre les deux montants
de l’échelle, et ses deux pieds doivent être posés sur le même
échelon/la même marche ;
c) Ne quiez jamais une échelle d’appui en hauteur sans
disposif de sécurité supplémentaire, comme une xaon, ou
un disposif permeant d’assurer la stabilité de l’échelle ;
d) N’ulisez pas une échelle double pour monter à un niveau
supérieur ;
e) Ne restez pas sur les trois échelons/marches supérieur(e)s
de l’échelle d’appui ;
f) Ne dépassez pas le 5ème échelon en partant du haut, et
accrochez-vous bien à l’échelle pour assurer votre sécurité et
votre mainen sur l’échelle. Si l’échelle n’est que parellement
déployée, avec quelques échelons vers le haut, ne montez pas
plus haut qu’un mètre sous l’extrémité de l’échelle ;
g) Les échelles doivent uniquement être ulisées
pour eectuer des tâches faciles et de courte
durée ;
h) Si des tâches sous tension électrique sont inévitables,
n’ulisez pas une échelle conductrice ;
i) N’ulisez pas l’échelle à l’air libre lorsque les condions
météorologiques sont défavorables, par ex. en cas de fortes
rafales de vent ;
j) Prenez des mesures de précauon pour que les enfants ne
jouent pas sur l’échelle ;
k) Si possible, verrouillez les portes (sauf issues de secours) et
les fenêtres de la zone de travail ;
l) Montez et descendez le visage tourné vers l’échelle ;
m) Lors de la montée et de la descente, accrochez-vous
fermement à l’échelle ;
n) N’ulisez pas l’échelle comme passerelle ;
o) Portez des chaussures adaptées pour monter sur l’échelle ;
p) Évitez toute charge latérale excessive, par ex. lorsque vous
percez dans de la maçonnerie ou du béton ;
q) Ne restez pas trop longtemps sur l’échelle sans interrupons
régulières (la fague constue un danger) ;
r) Pour accéder à un niveau supérieur, l’échelle d’appui doit
dépasser au minimum d’1 m le point de passage ;
s) Les objets transportés en montant ou en descendant sur
une échelle ne doivent pas être lourds et doivent être faciles
à manipuler ;
t) Les acvités impliquant une forte charge latérale sur
l’échelle, par ex. un perçage dans des matériaux solides (ex.
maçonnerie ou béton) doivent être évitées ;
u) Lorsque vous travaillez sur une échelle, tenez-vous d’une
main ou, si ce n’est pas possible, prenez des mesures de
sécurité supplémentaires.
1.4 Réparaon, maintenance et stockage
Les travaux de réparaon et de maintenance de l’échelle
doivent être eectués par un professionnel dans le respect
des consignes du fabricant. L’échelle doit être stockée
conformément aux consignes du fabricant.
3

5 Fixez les pieds avec les vis et vériez après xation
que les patins sont bien xés et ne présentent aucun
mouvement.
6 Insérez le stabilisateur en aluminium (sur laquelle vous
aurez déjà monté les deux pieds en plastique) dans les
cavités situées sous le montant de l’échelle. Vériez
que la couche rainurée antidérapante des pieds est bien
tournée vers le bas.
7 Serrez fermement les deux vis avec leurs rondelles.
Le stabilisateur une fois xé ne doit présenter aucun
mouvement. Il est nécessaire de vérié régulièrement le
serrage.
8 Les écrous sont prémontés dans la protection en
plastique du montant de l’échelle.
Une fois les vis serrées, vériez qu’elles sont bien
alignées avec la face arrière du montant de l’échelle, et
que les écrous sont entièrement vissés.
2. Informations aux utilisateurs de l’échelle
télescopique BAMBOO
Vous êtes sur le point d’utiliser un appareil spécial et haut de gamme, qui doit être employé avec
précaution. Pour ce faire, nous vous recommandons de suivre les consignes suivantes étapes par
étapes an d’avoir la garantie que vous utilisez cette échelle en toute sécurité.
Vous devez toujours monter la traverse dans un premier temps, avant d’utiliser l’échelle. Pour ce
faire, suivez les consignes suivantes :
1 L’accessoire se compose de 2 vis avec leurs rondelles,
prémontées sur le montant de l’échelle, d’un stabilisateur
en aluminium et de 2 pieds antidérapants en plastique
avec deux vis fournies séparément.
2 Dévissez entièrement les 2 vis.
3 Retirez-les du montant de l’échelle
4 Emboitez les pieds antidérapants des deux côtés du
stabilisateur.
4

1 Placez l’échelle de manière à ce que les deux pieds
de la traverse reposent sur le sol et que les quatre
boutons de commande soient tournés vers vous. Ce côté
correspond au côté correct pour monter sur l’échelle.
2 Pendant que vous déployez l’échelle, pour plus de
stabilité, posez un pied sur la traverse tandis que vous
tirez dans un premier temps sur les deux extrémités des
montants supérieurs.
3 Veillez à ce que les deux montants supérieurs soient
totalement déployés et exercez une légère pression sur
les patins supérieurs pour vérier le bon enclenchement.
Si vous voyez un marquage rouge à côté des boutons,
repliez les deux montants supérieurs et recommencez
l’étape précédente (2).
3. Utilisation correcte de l’échelle télescopique
BAMBOO
4 Déployez entièrement l’échelle.
5 Pendant le déploiement, gardez les mains sur les
montants et vériez que tous les échelons sont bien
enclenchés, et que le témoin de verrouillage rouge
apparaît entièrement.
6 Si vous ne souhaitez pas utiliser toute la longueur de
l’échelle, déployez l’échelle de manière à ce que les
échelons dont vous n’avez pas besoin restent en haut
(8).
7 Appuyez l’échelle contre le mur selon une inclinaison
correcte. Pour contrôler l’inclinaison de l’échelle, placez
les pieds devant les pieds de l’échelle, et touchez le
montant de l’échelle avec les deux mains, les deux bras
à l’horizontale.
5

Utilisation correcte de cette échelle :
Veillez à toujours conserver l’échelle propre, repliée et sèche.
Nous vous souhaitons une utilisation agréable et sûre de cette échelle. Pour toute question, contactez le
service clients dont les coordonnées sont indiquées à la n de ce mode d’emploi ou le professionnel dont les
coordonnées sont indiquées sur l’autocollant collé sur l’échelle.
8 Avant de monter sur l’échelle, assurez-vous qu’aucun
marquage rouge ne soit visible à côté des boutons de
verrouillage du bas.
9 Sous les échelons, les témoins de verrouillage doivent
être entièrement visibles.
10 Veillez à ce que les deux morceaux de caoutchouc de
protection murale soit correctement posés contre le mur.
11 Ne dépassez pas le 4ème échelon en partant du haut.
Tenez-vous bien aux montants supérieurs pour assurer
votre sécurité et votre maintien sur l’échelle.
Si l’échelle n’est que partiellement déployée, laissez
toujours 1 mètre d’échelle devant vous.
Si vous suivez correctement ces consignes, vous
disposerez toujours du bon maintien sur l’échelle, et
pourrez vous maintenir en toute sécurité jusqu’aux
montants supérieurs à hauteur de hanche.
12 Après utilisation, repliez l’échelle en déverrouillant
les boutons du bas d’une main, tout en guidant l’échelle
vers le bas de l’autre main.
ATTENTION : la main de guidage doit être positionnée
sur les montants.
13 Veillez à ce que vos mains soient séparées d’au
moins deux échelons an de ne pas vous coincer les
mains entre les échelons.
14 Repliez les deux montants supérieurs en appuyant
sur les deux boutons.
6

4. Explications des pictogrammes collés sur le
produit pour assurer une utilisation correcte de
l’échelle.
Lisez aenvement le mode d’emploi avant
d’uliser l’échelle. Le mode d’emploi se trouve
également dans l’emballage. Si vous ne le trouvez
pas, veuillez contacter votre revendeur avant
d’uliser l’échelle.
La capacité maximale de charge de l’échelle est de
150 kg. Cela comprend votre propre poids, le poids
de vos matériaux et ouls,
ainsi que la force créée pendant les travaux.
Si vous avez des doutes concernant le poids, il
est préférable de ne pas uliser l’échelle et de
vous adresser à votre revendeur ou d’uliser un
échafaudage.
Appuyez l’échelle contre le mur selon une
inclinaison correcte. Pour contrôler l’inclinaison
de l’échelle, placez les pieds devant les pieds de
l’échelle, et touchez le montant de l’échelle avec
les deux mains, les deux bras à l’horizontale.
Avant chaque ulisaon, vériez que toutes les
pièces de l’échelle sont en bon
état. En cas de doute, contactez votre revendeur
ou envisagez de remplacer la pièce concernée.
Avant ulisaon, vériez que les pieds
andérapants ne sont pas usés. En cas de doute,
contactez votre revendeur ou envisagez de
remplacer la pièce concernée.
Une échelle ne peut pas être ulisée par plus d’une
personne à la fois.
Veillez à ce que l’échelle soit sécurisée à tout
moment contre tout risque de dérapage. En cas de
doute, aachez l’échelle ou enfoncer les pieds de
l’échelle pour les bloquer.
Si vous ulisez l’échelle pour accéder à un toit,
veuillez à ce que l’échelle dépasse le bord du toit
d’1 m an de que vous ayez un mainen susant
en descendant. Néanmoins, ne montez pas plus
haut que le bord du toit pour éviter que l’échelle
ne bascule. En cas de doute, aachez l’échelle ou
enfoncer les pieds de l’échelle pour les bloquer.
N’ulisez jamais l’échelle sans traverse. Cee
dernière doit être montée avant ulisaon.
Ne placez jamais l’échelle sur un sol irrégulier.
Ne vous penchez pas trop sur le côté et gardez
toujours le haut du corps à hauteur de l’échelle.
Placez l’échelle sur un sol plat.
Ne placez jamais l’échelle dans l’eau ou sous la
pluie.
Placez l’échelle sur un sol stable et veillez à ce
qu’elle ne s’enfonce pas dans le sol.
Ne passez pas de l’échelle à un autre objet.
N’ulisez jamais l’échelle à plus d’une personne à
la fois.
N’ulisez jamais l’échelle comme passerelle ou
plate-forme.
Ne descendez jamais de l’échelle le dos tourné vers
l’échelle.
Soyez prudent, l’échelle pourrait déraper. Son
poids est très faible, et elle peut facilement se
renverser, ce qui peut occasionner des situaons
dangereuses.
7

Aenon à l’électricité, une échelle est un objet
conducteur de courant très dangereux.
Ne montez jamais sur les 3 échelons du dernier
mètre de l’échelle. Si l’échelle est posée sans pare
dépassant du rebord ou
si une pare des échelons est encore repliée en
haut de l’échelle (échelle télescopique), il convient
de veiller parculièrement à ce que personne ne
monte sur le dernier mètre de l’échelle.
Ne placez pas l’échelle à l’envers et veillez à ce
que les échelons se trouvent dans une posion
correcte, adaptée à l’ulisaon.
N’appuyez pas l’échelle contre un poteau ou un
arbre.
Ne placez jamais l’échelle sur un sol gras ou
humide.
5. Manipulation, stockage et maintenance
a. Cette échelle est un appareil de précision qui doit
être manipulé avec soin, stocké dans des conditions
adaptées et faire l’objet d’une maintenance pour
assurer son fonctionnement parfait an de vous
assurer une utilisation sûre et able, même à l’avenir.
b. Transportez l’échelle entièrement repliée, sous
le bras. Pour ce faire, tenez d’une main le boîtier le
verrou de l’échelle situé sous le 2ème échelon, placez
l’échelle sous votre bras, et maintenez-le de l’autre
main.
c. Repliez et déployez l’échelle avec précaution.
d. Évitez de percuter d’autres objets avec l’échelle. Si
le montant est cabossé ou endommagé, il deviendra
difcile voire impossible de déployer ou de replier
l’échelle.
e. Stockez l’échelle entièrement repliée, à la verticale,
sur ses pieds, posée contre une surface horizontale.
f. Stockez toujours l’échelle dans un endroit sec.
L’humidité peut avoir des effets néfastes sur l’état et le
fonctionnement de l’échelle.
g. Maintenez l’échelle propre. Frottez régulièrement
le montant de l’échelle à l’aide d’un chiffon propre
et sec. Si l’échelle est mouillée (ex. à cause de la
pluie), essuyez-la immédiatement et laissez-la sécher.
La peinture ou d’autres « substances étrangères
» peuvent empêcher le déploiement et le repli de
l’échelle, et doivent être retirées immédiatement.
h. S’il devient difcile de déployer l’échelle,
commencez par frotter le montant avec un chiffon
propre et sec et vaporisez un peu de silicone (essuyez
les excédents de produit).
i. Remplacez immédiatement les pieds et les dispositifs
de sécurité s’ils sont usés (ou endommagés).
Pour assurer votre sécurité, utilisez uniquement des
pièces de rechange d’origine.
j. Hormis pour les pieds et les dispositifs de sécurité,
n’essayez pas de démonter l’échelle ni de la réparer.
En cas de besoin, contactez le service clients.
Service clients
www.centaure.fr
979 avenue de la gare
27610 Romilly sur Andelle
8

1. General User Information Ladders in
accordance with EN 131-3
1.1 Before using the ladder
a) Does your health allow you to use the ladder? Certain
medical condions and medicaon, as well as alcohol and
drug misuse, can jeopardise your safety when using a ladder;
b) When transporng ladders on roof racks or in a heavy-
goods vehicle, ensure that they are secured or mounted
appropriately to prevent damage;
c) Inspect the ladder aer delivery and before using it for the
rst me, in order to check the condion and that all parts are
good working order;
d) Visually inspect the ladder for damage to ensure that it is
safe to use at the start of each working day that the ladder will
be needed;
e) For commercial users, a regular check is required;
f) Ensure that the ladder is suitable for the respecve acvity
in each case;
g) Never use a damaged ladder;
h) Remove all forms of contaminaon from the ladder, e.g.
wet paint, dirt, oil and snow;
i) Before using a ladder for work, rst carry out a risk
assessment in accordance with the legal regulaons applying
in the country of use.
1.2 Posioning and seng up the ladder
a) The ladder must be set up in the correct posion, e.g. at
the correct set-up angle for single-secon ladders (lt angle
approximately 1:4);
b) Where ed, locking devices must be fully secured before
use;
c) The ladder must stand on a at, level and stable surface;
d) Single-secon ladders should placed against at, rm
surfaces and secured before use, e.g. by securing the ladder
or using a suitable stability device.
e) Never re-posion the ladder from above;
f) When seng up the ladder, take care that there is no
potenal risk of it being hit by pedestrians, vehicles or doors,
for example. Lock doors (but not emergency exits) and
windows in the working area, wherever possible;
g) Assess all exisng risks in the working area posed by
electrical equipment, e.g. high voltage overhead power lines
or other bare electrical equipment.
h) The ladder must be set up on its feet and not on the rungs
and/or steps;
i) The ladder should not be set up on slippery surfaces (e.g.
ice, polished surfaces or obviously soiled but rm surfaces)
where no addional measures have been taken to prevent the
ladder from slipping or where the soiled areas are suciently
clean to allow it.
1.3 Using the ladder
a) Do not exceed the maximum load capacity of the respecve
type of ladder;
b) Do not overreach; users should keep their belt-buckle (i.e.
their navel) between the beams and stand with both feet on
the same step/rung.
c) Do not climb up a single-secon ladder to work at an
elevated height without addional safety measures, e.g. by
securing the ladder or using a suitable stability device.
d) Do not use stepladders for climbing up onto another level.
e) Do not use the top three steps/rungs of a single-secon
ladder as a support surface.
f) Do not use the top four rungs of a stepladder and hold on to
the ladder for your safety and to ensure comfortable standing.
On a parally extended ladder with a set of rungs on top, do
not go not higher than 1 metre below the end of the ladder;
g) Ladders should only be used for light jobs of short duraon;
h) For essenal work which involves live parts do not use
ladders which conduct electricity;
i) Do not use a telescopic ladder outdoors in unfavourable
weather condions, such as high winds;
j) Take precauonary measures to ensure that children cannot
play on the ladder.
k) Lock doors (but not emergency exits) and windows in the
working area, wherever possible;
l) Climb and descend the ladder facing the ladder;
m) Firmly hold on to the ladder when climbing up and down;
n) Do not use the ladder as a bridge;
o) Wear suitable footwear when climbing ladders;
p) Do not impose excessive side loading, e.g. when drilling into
masonry and concrete;
q) Do not work on the ladder for long periods without regular
breaks (redness is a risk);
r) When accessing a higher level, single-secon ladders should
project or be pushed out at least 1 metre above the landing
point;
s) Any objects to be carried whilst climbing up the ladder
should be light and easy to handle;
t) Avoid acvies which impose a side loading on stepladders,
e.g. drilling to the side into solid materials (e.g. masonry and
concrete);
u) When working on a ladder, ensure one hand is rmly on
the ladder or if this is not possible undertake addional safety
precauons.
1.4 Repair, maintenance and storage
Maintenance and repair work for ladders must be carried
out as required by a specialist and in accordance with the
manufacturers’ instrucons. Ladders should be stored
according to the manufacturers’ instrucons.
9

5 Fasten them using both loose screws..
6 Slide the aluminium crossbar with the two plastic feet
attached into the recesses on the bottom side of the
ladder stile. Check whether the feet with the ribbed anti-
slip prole are facing downward.
7 Tighten the two screws with the washers.
8 Check whether the screws on the other side are ush
with the ladder stile and are thus screwed completely
into the nut. The nuts are already pre-assembled in the
plastic end cap in the stile.
2. User information telescopic ladder BAMBOO
You are using a special and high-quality device, which must be used with care. Therefore, when using
this ladder, follow exactly the following step-by-step instructions as a xed guide.
Before use, always mount the base crossbar. Therefore, follow the following instructions :
1 The accessories include 2 screws with washers pre-
assembled in the ladder stile, 1 aluminium base crossbar
and 2 anti-slip feet made of plastic with 2 screws, included
loose.
2 Loosen both screws.
3 Take them out of the ladder stile.
4 Attach the anti-slip feet at both ends of the aluminium
crossbar.
10

1 Place the ladder on the oor with both traverse feet
so that the side with the four operating buttons points
towards allowing you to properly operate these buttons.
Moreover, this side is also the correct side for climbing
the ladder.
2 While extending the ladder, place one foot on the
crossbar for extra stability and rst pull out the two top
stiles.
3 Make sure that both top stiles are fully extended and
check whether the locking pins automatically click into
place. Make sure that there is no red mark next to the
buttons.
If a red mark appears next to the buttons, unlock them
and release them after collapsing the top stiles. Repeat
this process until the top stile is correctly locked and no
red mark is visible.
3. Correct use of this BAMBOO ladder
4 Fully extend the ladder.
5 When extending the ladder, make sure that all rungs
are clicked into place and the red locking indicator is fully
visible.
6 If you do not want to fully extend the ladder, pull the
ladder out so that the rungs that you do not need are on
top (8).
7 Lean the ladder against the wall with the correct
inclination. This can be easily checked by placing your
feet in front of the ladder and using both horizontally held
arms, holding the ladders by the beams.
11

Correct use of this ladder:
Ensure that the ladder is kept clean, collapsed and stored in a dry place.
We wish you safe and comfortable use of this ladder. If you have any questions, please contact the address
below in these instructions or the address you nd on the sticker on the ladder.
8 Before you climb the ladder, make sure there are no
red marks next to the bottom locking buttons.
9 The red lock indicators must be fully visible under the
rungs.
10 Ensure that the ladder has been correctly positioned
against the wall with both rubber wall protectors.
11 Do not use the top four rungs of a stepladder and
hold on to the top stiles for your safety and to ensure
comfortable standing. If the ladder is partially extended,
with one set of rungs on top, do not climb higher than
1 metre under the end of the ladder. If you follow this
correctly, you are always in the right position on the
ladder and can hold on securely to the top stiles at hip
height.
12 Collapse the ladder after use by unlocking the bottom
button with one hand, and pushing the ladder down with
the higher-positioned other hand.
13 Make sure that your hands are more than two rungs
apart so you cannot get your hands caught between the
rungs.
14 Collapse both top stiles by unlocking both buttons.
12

4. Explanations of the pictogrammes attached to
the product to guarantee safe use of the ladder.
Before using the ladder, read these instrucons
carefully. The instrucons are included in the
packaging. If they are missing, please contact your
dealer before using the ladder.
Never load a telescopic ladder in excess of 150
kg. This includes your own weight, the weight of
materials and tool as well the addional force that
arises when working. If you are unsure about the
weight, do not use the ladder and consult your
dealer or set up scaolding.
Lean the ladder with the correct slope against the
wall. This can be easily checked by placing your feet
in front of the ladder and using both horizontally
held arms, holding the ladders by the beams.
Check before each use whether all parts of the
ladder are in good condion. If in doubt, consult
your dealer or consider replacing the relevant part.
Before use, check whether the an-slip feet are not
worn. If in doubt, consult your dealer or consider
replacing the relevant part.
A ladder may not be used by more than 1 person
at the same me
Ensure that the ladder is secured against slipping
at all mes. If not sure, e the ladder rmly or pin
into the ground to secure the ladder base.
If you are using the ladder to access a roof, make
sure that the ladder projects 1 m above the roof
edge so that you have sucient support when
climbing up onto the roof. Do not climb higher than
the roof edge to prevent the ladder from pping
over. If not sure, e the ladder rmly or pin into the
ground to secure the ladder base.
Never use the ladder without the base crossbeam.
This must be installed before use.
Never place the ladder on uneven surface.
Do not lean too far to the side and keep your upper
body always at the level of the ladder.
Never place the ladder on an uneven surface.
Never place the ladder in water or in the rain.
Place the ladder on a stable surface and make sure
that it does not sink into the ground.
Do not climb from the ladder to another object.
Never use the ladder with more than one person
at a me.
Never use the ladder as a bridge or plaorm.
Never climb the ladder with your back to the
ladder.
Be careful as the ladder can slip. It has a low weight
and can be easily knocked over, which may result in
dangerous situaons.
13

Watch out for electricity; a ladder is a life-
threatening current conductor.
Never climb the top 3 rungs of the ladder. A ladder
without protruding ladder ends or a ladder,
in which some of the rungs at the top of the ladder
are sll collapsed (telescopic ladder), requires
special aenon and supervision to ensure that
the top metre thereof is not climbed.
Do not place the ladder upside down and make
sure that the rungs are in the correct posion for
use.
Do not lean the ladder against a post or tree.
Never place the ladder on a greasy or wet surface.
5. Handling, storage and maintenance
a. This ladder is a precision product and should be
handled with care, stored under suitable conditions, and
maintained as fully functional so that it remains safe and
reliable.
b.Transport the ladder in a fully closed position and
carry it under your arm. Use one hand to hold one side
of the unlocking housing on the underside of rung 2,
take the ladder under your arm and hold it with the other
hand.
c. Open and close the ladder slowly and carefully.
d. Make sure that you do not bump into anything with
the ladder. If any of the stiles are dented or damaged,
the ladder will be difcult to open or close or may not
work at all.
e. Store the ladder fully closed and in a vertical position,
standing on both feet and leaning against a vertical
surface.
f. Always store the ladder in a dry place. Damp conditions
could have a detrimental effect on the condition and
functioning of this product.
g. Keep the ladder clean. Clean the stiles every now
and then with a clean, dry cloth. Clean and dry the
product immediately after exposure to damp conditions
(e.g. rain). Paint or any other foreign materials could
hinder the telescopic function and must be removed
immediately.
h. If the telescopic function becomes stiff, rst clean the
stiles with a clean,dry cloth and then apply a little silicon
spray and remove any excess with a cloth.
i. Replace worn out (or damaged) ladder feet and
wall bumpers with safety-grip before they become
completely worn.
For you own safety, please only use original spare parts.
j. With the exception of replacing ladder feet and wall
bumpers with safety-grip, you may not dismantle or
repair the product yourself. Contact customer service
in case of need.
Customer Service │www.centaure.fr │ CENTAURE │ 979 avenue de la gare │ 27610 Romilly sur Andelle
14

1. Benutzerinformation Leitern Algemein nach
EN 131-3
1.1 Vor dem Gebrauch der Leiter
a) Sind Sie gesundheitlich in der Lage, die Leiter zu be
nutzen? Besmmte gesundheitliche Gegebenheiten,
Medikamenteneinnahme, Alkohol- oder Drogenmiss brauch
konnen bei der Benutzung der Leiter zu einer Geihrdung der
Sicherheit führen;
b) beim Transport von Leitem auf Dachtragem oder in einem
Lastkrawagen zur Verhinderung von Schaden sicherstellen,
dass sie auf angemessene Weise befesgt/angebracht sind;
c) Prüfen der Leiter nach der Lieferung und vor der ersten
Benutzung, um den Zustand und die Funkon aller Teile
festzustellen;
d) Sichtprüfung der Leiter auf Beschiidigung und sichere
Benutzung zu Beginn jedes Arbeitstages, an dem die Leiter
benutzt werden muss;
e) für gewerbliche Benutzer ist eine regelmäßige Überprüfung
erforderlich;
f) sicherstellen, dass die Leiter für den jeweiligen Einsatz
geeignet ist;
g) keine beschiidigte Leiter benutzen;
h) alle Verunreinigungen an der Leiter beseigen,
z. B. nasse Farbe, Schmutz, Öl oder Schnee;
i) vor der Benutzung einer Leiter bei der Arbeit sollte
eine Risikobewertung unter Berücksichgung der
Rechtsvorschrien im Land der Benutzung durchgeführt
werden.
1.2 In Stellung bringen und Aufstellen der Leiter
a) Die Leiter muss in der richgen Aufstellposion aufgestellt
werden, z. B. richger Aufstellwinkel für Anlegeleitem
(Neigungswinkel ca. 1:4);
b) Sperreinrichtungen, sofem angebracht, müssen vor der
Benutzung vollstandig gesichert werden;
c) die Leiter muss auf einem ebenen, waagerechten und
unbeweglichen Untergrund stehen;
d) eine Anlegeleiter sollte gegen eine ebene, feste Fläche
gelehnt und vor der Benutzung gesichert werden, z. B.
durch eine Befesgung oder Verwendung einer geeigneten
Einrichtung zur Sicherstellung der Standfesgkeit;
e) die Leiter darf niemals von oben her in eine neue Stellung
gebracht werden;
f) wenn die Leiter in Stellung gebracht wird, ist auf das Risiko
einer Kollision zu achten, z. B. mit Fußgängem, Fahrzeugen
oder Türen. Türen Uedoch nicht Notausgange) und Fenster im
Arbeitsbereich verriegeln, falls möglich;
g) alle durch elektrische Betriebsmiel im Arbeitsbereich
gegebenen Risiken feststellen,
z. B. Hochspannungs- Freileitungen oder andere freiliegende
elektrische Betriebsmiel;
h) die Leiter muss auf ihre Fi.iBe gestellt werden, nicht auf die
Sprossen bzw. Stufen;
i) die Leitem dürfen nicht auf rutschige Flächen gestellt
werden (z. B. Eis, blanke Flächen oder deutlich verunreinigte
feste Flächen), sofern nicht durch zusätzliche Maßnahmen
verhindert wird, dass die Leiter rutscht oder dass die
verunreinigten Stellen ausreichend sauber sind.
1.3 Benutzung der Leiter
a) Die maximale Nutzlast der jeweiligen Leiterart nicht
überschreiten;
b) nicht zu weit hinauslehnen; Benutzer sollten ihre
Gürtelschnalle (den Nabel) zwischen den Holmen halten und
mit beiden Füßen auf derselben Stufe/ Sprosse stehen;
c) nicht ohne zusätzliche Sicherung in größerer Höhe von
einer Anlegeleiter wegsteigen, z. B. Befesgung oder
Verwendung einer geeigneten Vorrichtung zur Sicherung der
Standsicherheit;
d) Stehleitern nicht zum Aufsteigen auf eine andere Ebene
benutzen;
e) die obersten drei Stufen/Sprossen einer Anlegeleiter nicht
als Standäche benutzen;
f) Steigen Sie nicht höher als auf die 5. Sprosse von oben und
halten Sie sich für lhre Sicherheit und bequemen Stand an den
Leiter fest. Steigen Sie bei einer teilweise ausgezogenen Leiter,
mit einem Sprossenpaket oben,
nicht höher als 1 Meter unterhalb des Leiterendes;
g) Leitern sollten nur für leichte Arbeiten von kurzer Dauer
benutzt werden;
h) für unvermeidbare Arbeiten unter elektrischer Spannung
nicht leitende Leitern benutzen;
i) die Leiter nicht im Freien bei ungünsgen Weerbedingungen,
z. B. starkem Wind, benutzen;
j) Vorsichtsmaßnahmen treen, damit keine Kinder auf der
Leiter spielen;
k) Türen (jedoch nicht Notausgange) und Fenster im
Arbeitsbereich verriegeln, falls moglich;
I) mit dem Gesicht zur Leiter aufsteigen und absteigen;
m)beim Aufsteigen und Absteigen an der Leiter gut fest
halten;
n) die Leiter nicht als Überbrückung benutzen;
o) beim Aufsteigen auf die Leiter geeignete Schuhe tragen;
p) übermäßige seitliche Belastungen vermeiden, z. B. beim
Bohren in Mauerwerk und Beton;
q) nicht zu lange ohne regelmäßige Unterbrechungen auf der
Leiter bleiben (Müdigkeit ist eine Gefahr);
r) Anlegeleitern für den Zugang zu einer größeren Höhe sollten
mindestens 1 m über den Anlegepunkt hinaus ausgeschoben
werden;
s) Gegenstände, die beim Besteigen einer Leiter transporert
werden, sollten nicht schwer und leicht zu handhaben sein;
t) Arbeiten, die eine seitliche Belastung bei Stehleitem
bewirken, z. B. seitliches Bohren durch feste Werkstoe (z. B.
Mauerwerk oder Beton), vermeiden;
u) beim Arbeiten auf einer Leiter mit einer Hand
festhalten oder, falls dies nicht möglich ist, zusätzliche
Sicherheitsvorkehrungen treen.
1.4 Reparatur, Wartung und Lagerung
Reparaturen und Wartungsarbeiten an der Leiter müssen von
einer sachkundigen Person und den Anleitungen
des Herstellers entsprechend durchgeführt werden. Leitern
sollten in Übereinsmmung mit den Anleitungen des
Herstellers gelagert werden.
15

2. Benutzerinformation telescopleiter BAMBOO
1 Die Zubehörteile umfassen 2 Schrauben mit
Unterlegscheiben, die sich vormontiert im Leiterholm
benden, 1 Aluminium Standfußtraverse und
2 Antirutschfüße aus Kunststoff mit 2 lose beigelegten
Schrauben.
2 Lösen Sie die beiden Schrauben.
3 Nehmen Sie sie aus dem Leiterholm heraus.
4 Bringen Sie die Antirutschfüße an beiden Enden
Aluminiumtraverse an.
5 Schrauben Sie sie mit den lose beigelegten Schrauben
fest.
6 Schieben Sie die Aluminiumtraverse mit den beiden
montierten Kunststofffüßen in die Aussparungen an der
Unterseite der Leiterholme. Kontrollieren Sie,ob die
Füße mit dem geriffelten Antirutschprol nach unten
ausgerichtet sind.
7 Ziehen Sie die beiden Schrauben mit den
Unterlegscheiben gut fest.
8 Kontrollieren Sie,ob die Schrauben auf der anderen
Seite bi.indig mit dem Leiterholm abschlieBen und somit
vollstiindig in die Mutter eingedreht sind. Die Muttern
benden sich schon vormontiert in der Plastikendkappe
im Holm.
Sie nehmen ein spezielles und hochwertiges Gerät in Gebrauch, das mit Sorgfalt eingesetzt werden
muss. Befolgen Sie deshalb beim Gebrauch dieser Leiter exakt die folgende Schritt-für-Schritt-
Anleitung als feste Richtschnur.
Vor dem Gebrauch müssen Sie immer erst die Standfußtraverse montieren. Befolgen Sie deshalb die
folgende Anleitung :
16

1 Stellen Sie die Leiter mit beiden Traversenfüßen auf
den Boden und zwar so, dass die Seite mit den vier
Bedienungsknöpfen zu Ihnen zeigt, sodass Sie diese
Knöpfe gut bedienen können. Diese Seite ist außerdem
die korrekte Seite zum Besteigen der Leiter.
2 Stellen Sie während des Ausziehens der Leiter für
zusätzliche Stabilität einen Fuß auf die Traverse und
ziehen Sie zuerst die beiden Top-Holme aus.
3 Achten Sie darauf, dass beide Top-Holme vollständig
ausgezogen sind und tasten Sie, ob die Verriegelungsstifte
automatisch einrasten. Kontrollieren Sie, dass keine
rote Markierung direkt neben den Knöpfen zu sehen ist.
Wenn eine rote Markierung neben den Knöpfen zu sehen
ist, diese entriegeln und dann nach dem Einschieben
der Top-Holme die Knöpfe loslassen. Den Vorgang
des Ausziehens wiederholen, bis der Top-Holm korrekt
verriegelt und keine rote Markierung mehr zu sehen ist.
4 Ziehen Sie die Leiter vollständig aus.
5 Kontrollieren Sie Während des ausziehens, dass alle
Sprossen einrasten und die rote Verriegelungsanzeige
ganz zu sehen ist.
6 Wenn Sie nicht die gesamte Leiterlänge nutzen
möchten, dann ziehen Sie die Leiter so aus, dass die
Sprossen, die sie nicht brauchen, oben sind(8).
7 Lehnen Sie die Leiter mit der korrekten Neigung gegen
die Wand. Dies können Sie einfach kontrollieren, indem
Sie lhre Füße vor das Leiterende stellen und mit beiden
waagerecht gehaltenen Armen die Leiter an den Holmen
greifen.
3. Korrekter Gebrauch dieser Leiter BAMBOO
17

Korrekter Gebrauch dieser Leiter :
Achten Sie darauf, dass die Leiter immer sauber, zusammengeschoben und trocken aufbewahrt wird.
Wir wünschen Ihnen einen sicheren und bequemen Gebrauch dieser Leiter. Bei Fragen wenden Sie sich für
weitere Empfehlungen an die Kontaktadresse unten in dieser Anleitung oder an die Adresse, die Sie auf dem
auf der Leiter bendlichen Aufkleber nden.
8 Prüfen Sie, bevor Sie die Leiter besteigen, dass
bei den untersten Verriegelungsknöpfen keine roten
Markierungen neben den Knöpfen zu sehen sind.
9 Unter den Sprossen müssen die roten
Verriegelungsanzeigen vollständig zu sehen sein.
10 Achten Sie darauf, dass die leiter mit beiden
Wandschutzgummis korrekt gegen dis Wand gestellt ist.
11 Steigen Sie nicht höher als auf die 4. Sprosse von oben
und halten Sie sich für Ihre Sicherheit und bequemen
Stand an den Top-Holmen fest. Steigen Sie bei einer
teilweise ausgezogenen Leiter, mit einem Sprossenpaket
oben, nicht höher als 1 Meter unterhalb des Leiterendes.
Wenn Sie dies korrekt befolgen, stehen Sie immer in der
richtigen Haltung auf Leiter und können sich in Hüfthöhe
sicher an den Top-Holmen festhalten.
12 Schieben sie die Leiter nach Gebrauch ein, indem
Sie die untersten Knöpfe mit einer Hand enttriegeln unt
mit der anderen Hand weiter oben die Leiter nach unten
führen.
13 Achten Sie darauf, dass Ihre Hände mehr als zwei
Sprossen Abstand voneinander haben, sodass Sie sich
Ihre Hände nicht zwischen den Sprossen einklemmen
können.
14 Schieben Sie die beiden Top-Holme ein, indem Sie
beide Knöpfe entriegeln.
18

4. Erläuterungen zu den Piktogrammen, die zur
Gewährleistung einer sicheren Nutzung der Leiter
auf das Produkt aufgeklebt sind.
Vor Benutzen der Leiter zuerst die Anleitung
sorgfälg lesen. Die Anleitung bendet sich
ebenfalls in der Verpackung. Sollte sie fehlen,
wenden Sie sich bie an lhren Händler, bevor Sie
die Leiter in Gebrauch nehmen.
Die Leiterdart nicht mit mehr als 150 kg belastet
werden. Dies umfasst 1hr eigenes Gewicht, das
Gewicht von Materialien und Werkzeug sowie
die zusätzliche Kra, die während des Arbeitens
entsteht. Sollten Sie bzgl. des Gewichts unsicher
sein, benutzen Sie die Leiter nicht und wenden Sie
sich an lhren Handler oder setzen Sie ein Gerüst
ein.
Lehnen Sie die Leiter mit der korrekten Neigung
gegen die Wand. Dies können Sie einfach
kontrollieren, indem Sie lhre Füße vor das
Leiterende stellen und mit beiden waagerecht
gehaltenen Armen die Leiter an den Holmen
greifen.
Kontrollieren Sie vor jedem Gebrauch, ob sich
alle Teile der Leiter in gutem Zustand benden.
Im Zweifel wenden Sie sich an lhren Händler oder
ziehen Sie einen Austausch des betreenden Teils
in Betracht.
Kontrollieren Sie vor dem Gebrauch, dass die
Anrutschfüße nicht abgenutzt sind. Im Zweifel
wenden Sie sich an lhren Händler oder ziehen Sie
einen Austausch des betreenden Teils in Betracht.
Eine Leiter dart nicht von mehr als 1 Person
zugleich genutzt werden.
Achten Sie darauf, dass die Leiter jederzeit gegen
Wegrutschen gesichert ist. Im Zweifel binden Sie
die Leiter fest oder schlagen Se in den Boden,
um die Leitertüße zu sichern.
Wenn Sie die Leiter als Zugang zu einem Dach
verwenden, achten Sie darauf, dass die Leiter 1 m
über die Dachkante hinausragt, sodass Sie beim
Aufsteigen auf das Dach genügend Halt haben.
Steigen Sie dabei nicht hoher als bis zur Dachkante,
um zu vermeiden, dass die Leiter kippt. Im Zweifel
binden Sie die Leiter fest oder schlagen Se in
den Boden, um die Leitertüße zu sichern.
Verwenden Sie die Leiter niemals ohne
Standfußtraverse. Diese muss vor der Verwendung
monert werden.
Stellen Sie die Leiter niemals auf unebenen
Untergrund.
Lehnen Sie sich nicht zu weit zur Seite und bleiben
Sie mit lhrem Oberkörper immer auf Höhe der
Leiter.
Stellen Sie die Leiter auf einen ebenen Untergrund.
Stellen Sie die Leiter niemals ins Wasser oder in
den Regen.
Stellen Sie die Leiter auf einen stabilen Untergrund
und achten Sie darauf, dass sie nicht in den Boden
einsinkt.
Steigen Sie nicht von Leiter auf ein anderes Objekt
über.
Verwenden Sie die Leiter niemals mit mehr als 1
Person zugleich.
Verwenden Sie die Leiter niemals als Brücke oder
Plaorm.
Besteigen Sie die Leiter niemals mit dem Rücken
zur Leiter.
Seien Sie vorsichg, da die Leiter wegrutschen
kann. Sie hat ein geringes Gewicht und lässt sich
leicht umstoßen, was zu gefährlichen Situaonen
führen kann.
19

Passen Sie auf Elektrizität auf; eine Leiter ist ein
lebensgefährlicher Stromleiter.
Besteigen Sie niemals die letzten 3 Sprossen
des obersten Meters der Leiter.Eine Leiter ohne
überstehende Leiterenden oder eine Leiter,
bei der ein Teil der Sprossen noch oben in der
Leiter zusammengeschoben ist (Teleskopleiter),
erfordern besondere Aufmerksamkeit und
Kontrolle, dass der oberste Meter nicht besegen
wird.
Stellen Sie die Leiter nicht auf den Kopf und achten
Sie darauf, dass die Sprossen sich in der korrekten
Posion für den Gebrauch benden.
Lehnen Sie die Leiter nicht an einen Pfahl oder
Baum.
Stellen Sie die Leiter niemals auf fegen oder
nassen Untergrund.
5. Handhabung, lagerung und wartung
a. Diese Leiter ist ein Präzisionsgerät und sollte mit
Sorgfalt gehandhabt, unter geeigneten Bedingungen
gelagert und im Hinblick auf die voile Funktions-fähigkeit
entsprechend gewartet werden, um ihre sichere und
zuverlässige Benutzung auch in Zukunft zu gewährleisten.
b. Die Leiter vollständig geschlossen unter dem Arm
transportieren. Dazu mit einer Hand um das Gehäuse der
Sperrriegel der Leiter an der Unterseite der 2. Sprosse
greifen, die Leiter unter den Arm nehmen und mit der
anderen Hand festhalten.
c.Die Leiter auf bedachtsame und vorsichtige Weise
ausziehen und zusammenschieben.
d.Vermeiden, mit dem Gerät gegen andere Gegenstände
zu stoßen. Bei einem verbeulten oder beschädigten
Holm lässt sich die Leiter möglicherweise nur
schwer oder überhaupt nicht mehr ausziehen oder
zusammenschieben.
e.Die Leiter vollständig geschlossen senkrecht auf den
Füßen aufgestellt und gegen eine senkrechte Fläche
gelehnt lagern.
f.Die Leiter stets in einem trockenen Raum lagern.
Feuchte Bedingungen können sich negativ auf Zustand
und Betrieb des Geräts auswirken.
g.Die Leiter sauber halten. Die Holme gelegentlich
mit einem sauberen, trockenen Tuch abwischen.
Wenn die Leiter feucht geworden sein sollte (z.B. bei
Regen), direkt abwischen und trocknen. Farbe oder
andere «Fremdstoffe» können das Ausziehen und
Zusammenschieben erschweren und sind direkt zu
entfernen.
h.Wenn das Ausziehen schwerfallen sollte,zuerst die
Holme mit einem sauberen, trockenen Tuch abwischen
und mit etwas Silikonspray einsprühen (überschüssiges
Spray abwischen).
i.Verschlissene (oder beschadigte) Leiterfüße und
Sicherungsstützen rechtzeitig erneuern.
Zur Gewährleistung lhrer Sicherheit ausschlieBlich
Original-Ersatzteile verwenden.
j.Abgesehen van den Leitfüßen und den Sicherungsstützen
nicht versuchen, das Gerät selbst auseinanderzubauen
oder zu reparieren. Im Bedarfsfall den Kundendienst
kontaktieren.
Customer Service │www.centaure.fr │ CENTAURE │ 979 avenue de la gare │ 27610 Romilly sur Andelle
20
This manual suits for next models
1
Table of contents
Languages:
Other Centaure Ladder manuals
Popular Ladder manuals by other brands

Ribimex
Ribimex PRET092 User and maintenance manual

Powerfix Profi
Powerfix Profi HG01091 Assembly, operating and safety instructions

Batavia
Batavia GIRAFFE AIR operating instructions

Telesteps
Telesteps TSO quick guide

DROMAD HIRE
DROMAD HIRE 500Tower instruction manual

Power Step
Power Step Cat D10R Dozer manual

METALLIC LADDER
METALLIC LADDER Aircraft Maintenance Ladder Assembly instructions

INNOVAPLAS
INNOVAPLAS Lumi-O ROYAL ENTRANCE II quick start guide

Bestway
Bestway 58331 owner's manual

Aqua Select
Aqua Select 832406KW manual

Jefferson
Jefferson JEFLADMPAS03 user manual

Louisville
Louisville Premium Series installation instructions