CENTREGO Toucan Eco Active How to use

Toucan Eco Active
&
Toucan Eco Active Plus
peration &
installation
Guides
Add salt to water and activate to produce ECA

P 2 P 3CENTREGO RENEWCENTREGO RENEW
1.0 INTRODUCTION
1.1 Introduction to your product
Congratulations on the purchase of your Centrego product.
Before using it for the first time, please read this instruction manual carefully and keep all
information for future reference.
This device will enable you to produce ECA (Electro chemically Activated) solution, a natural cleaning
and disinfectant fluid that is eco friendly and safe for staff to use.
With Centrego products you can produce ECA solution onsite and at a very low cost.
This means that you no longer need to purchase as many disposable cleaning and
disinfection products. This reduces your company's carbon footprint and will save you money.
1.2 Intended use
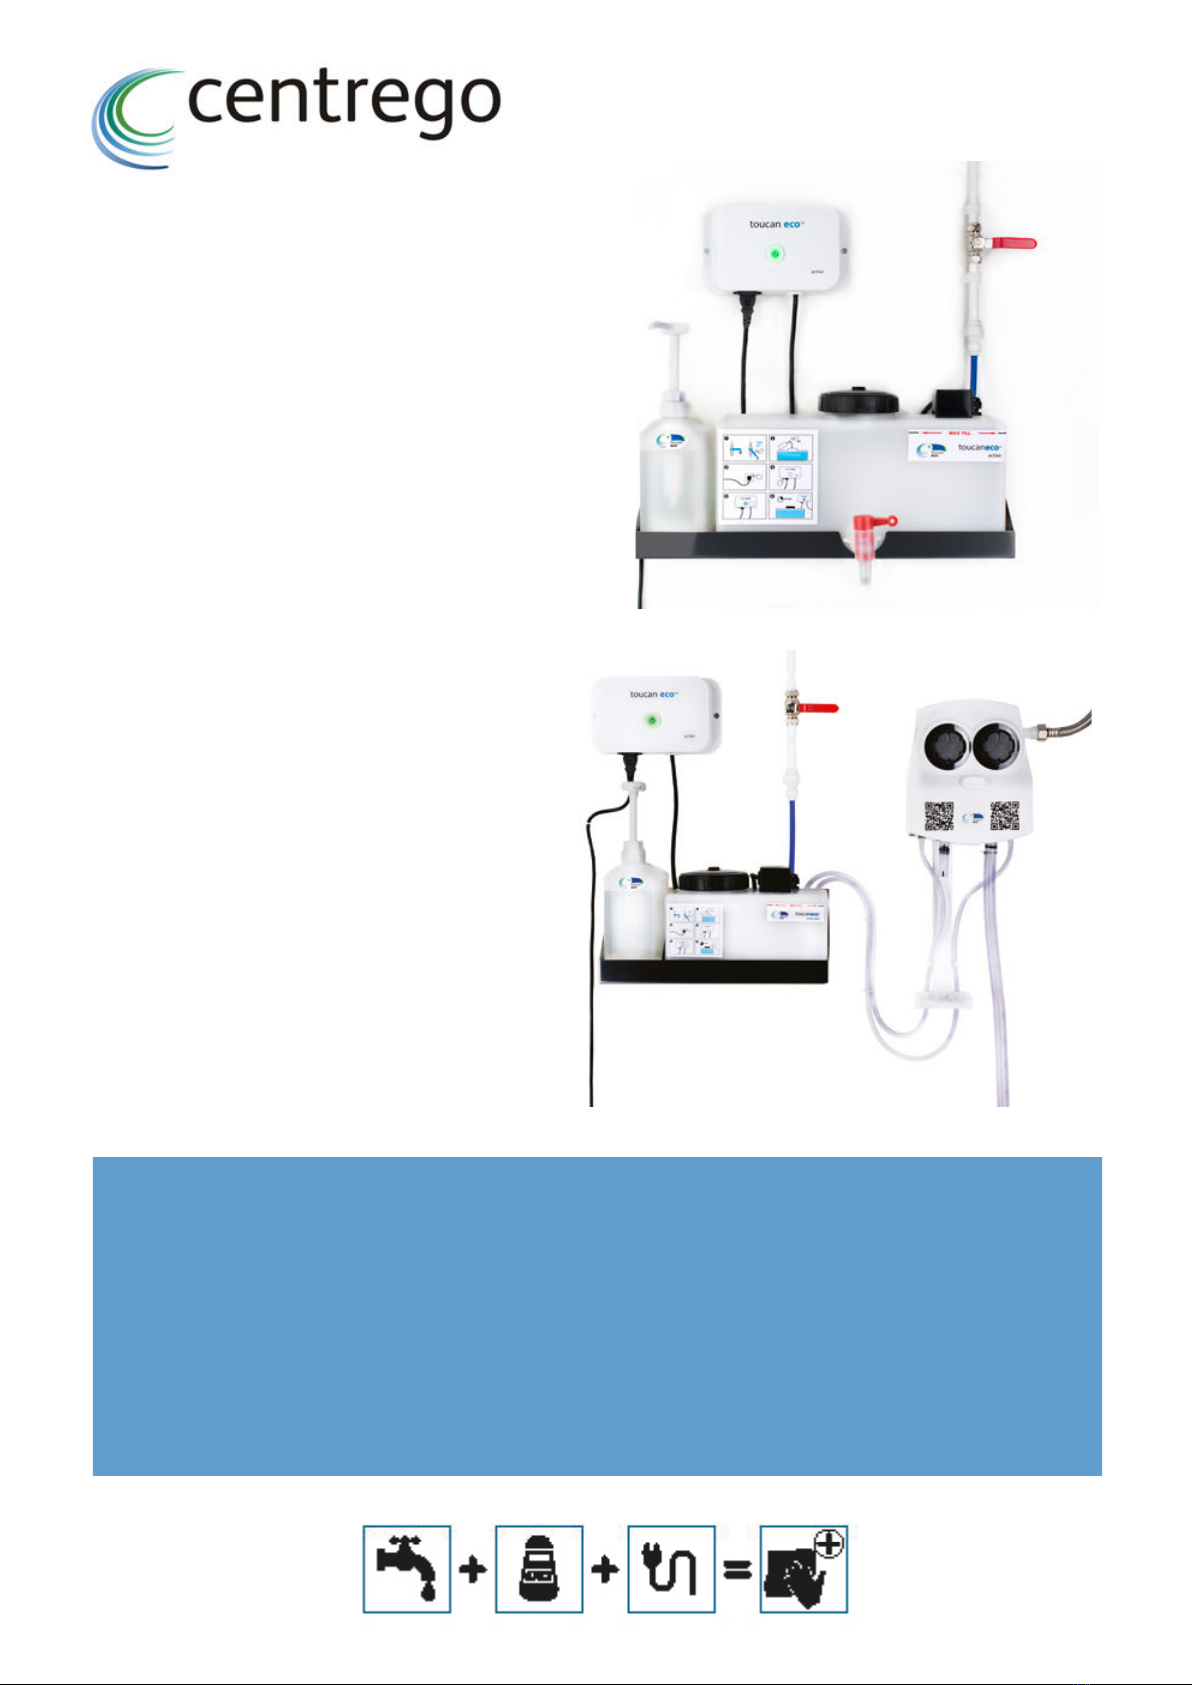
The Toucan Eco Active Plus and Toucan Eco Active are designed to be wall-mounted using electrical and
mains water services to produce eco-cleaning and disinfection fluid that is used instead of disposable
cleaning products.
These devices use electrolysis, salt and water to produce anolyte and catholyte together to produce a
mixed oxidant solution that cleans and disinfects effectively and safely.
Table of Contents
1.0 INTRODUCTION ...................................... 3
1.1 Introduction to your product.............................3
1.2 Intended use ............................................................3
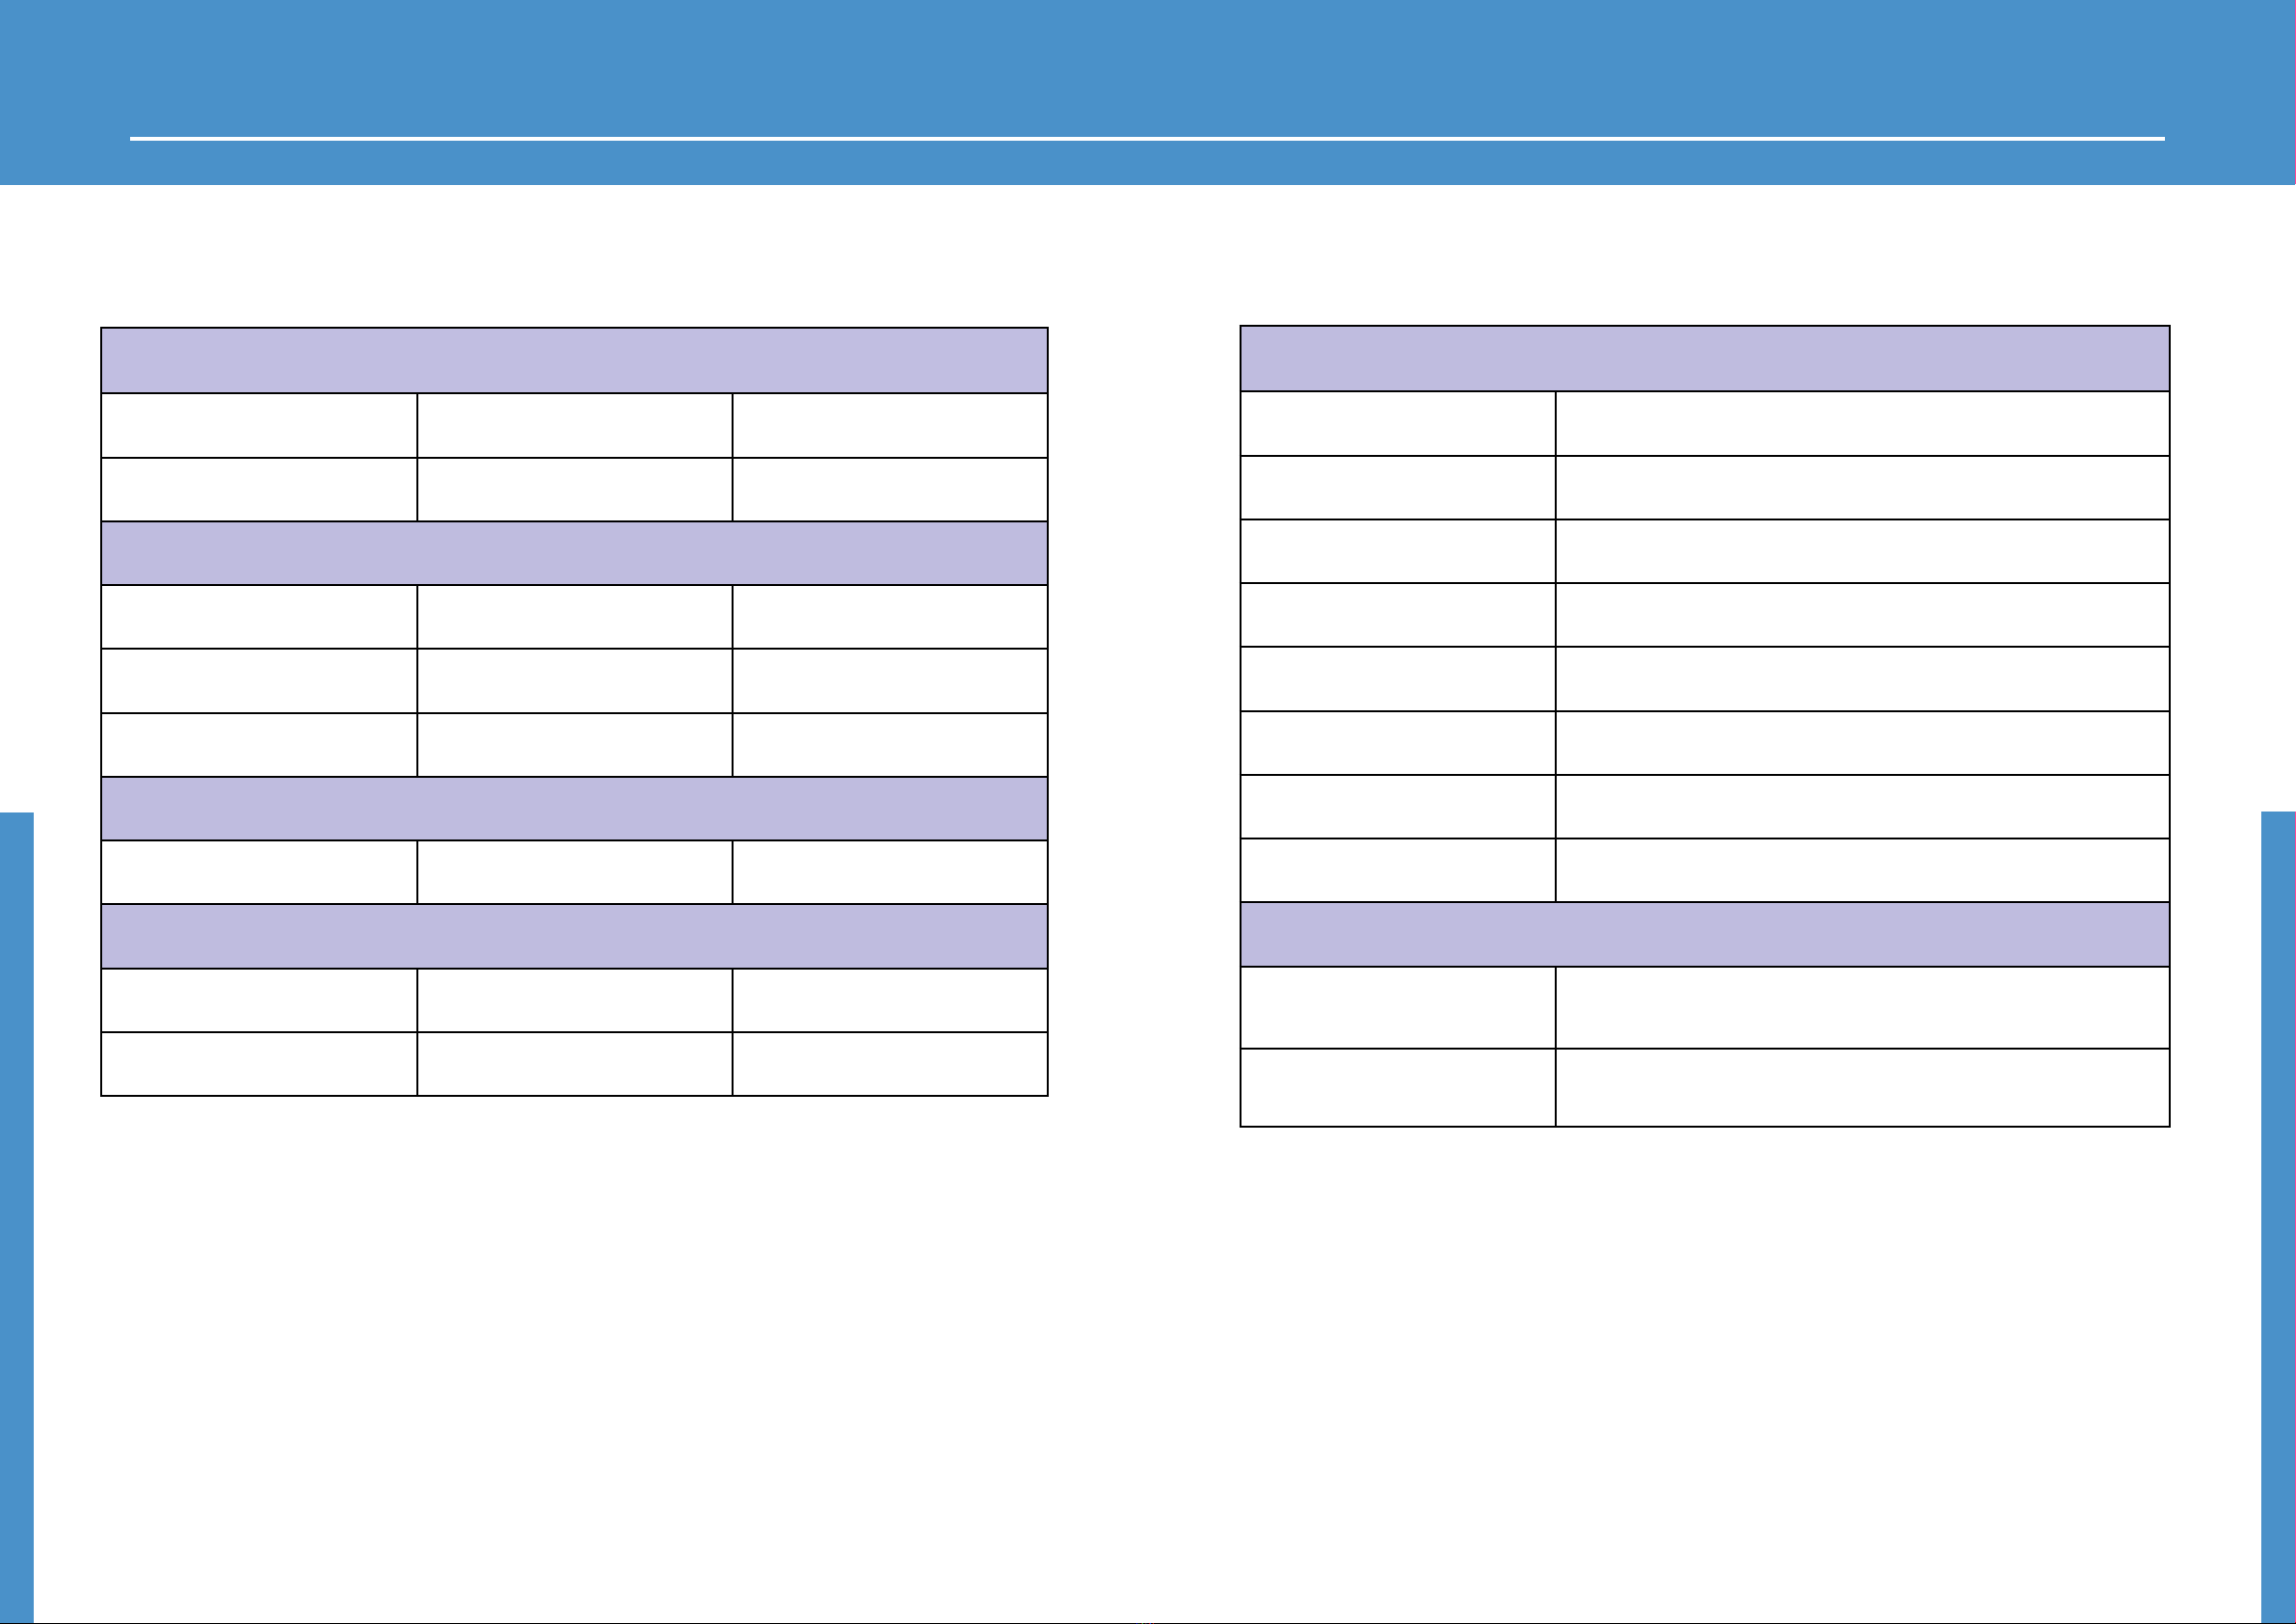
2.0 SPECIFICATIONS ..................................... 4
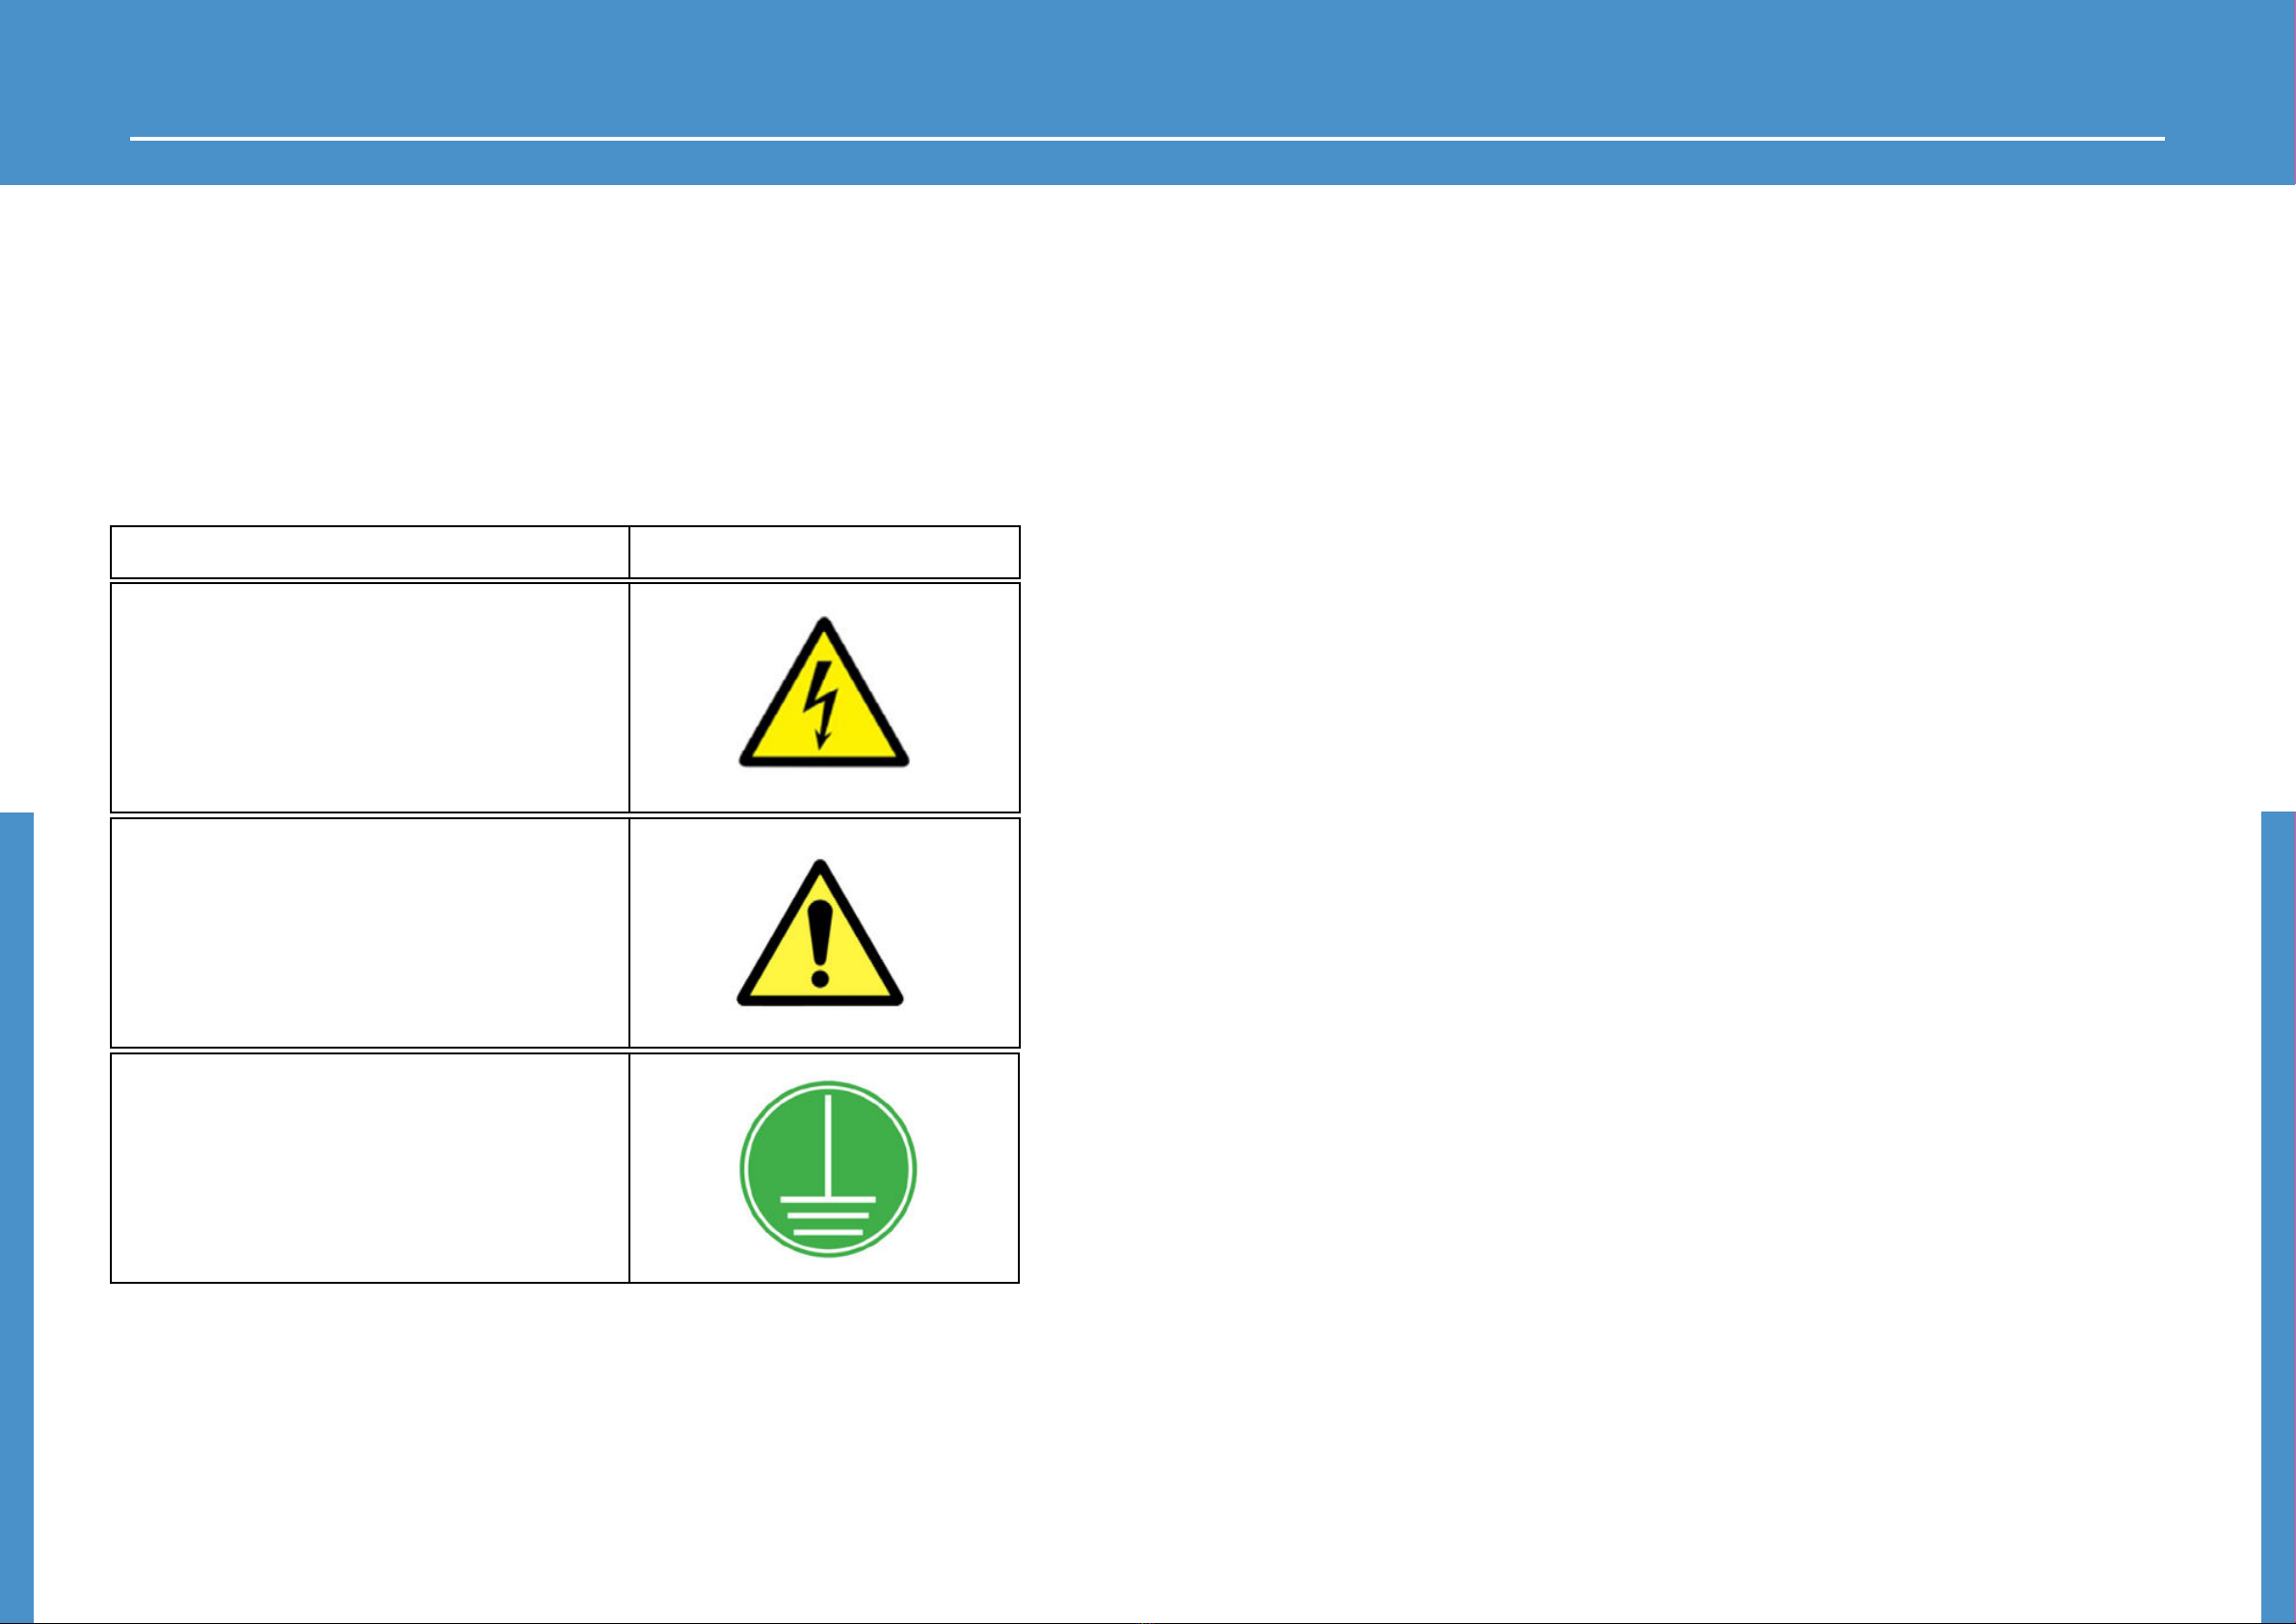
3.0 SAFETY SYMBOLS................................... 6
4.0 SAFETY INSTRUCTIONS.......................... 7
4.1 Solution Safety Instructions ...............................7
4.2 Device Safety Instructions...................................8
4.3 Installation Safety...................................................8
4.4 Water input safety instructions..........................9
4.5 Salt input safety instructions..............................9
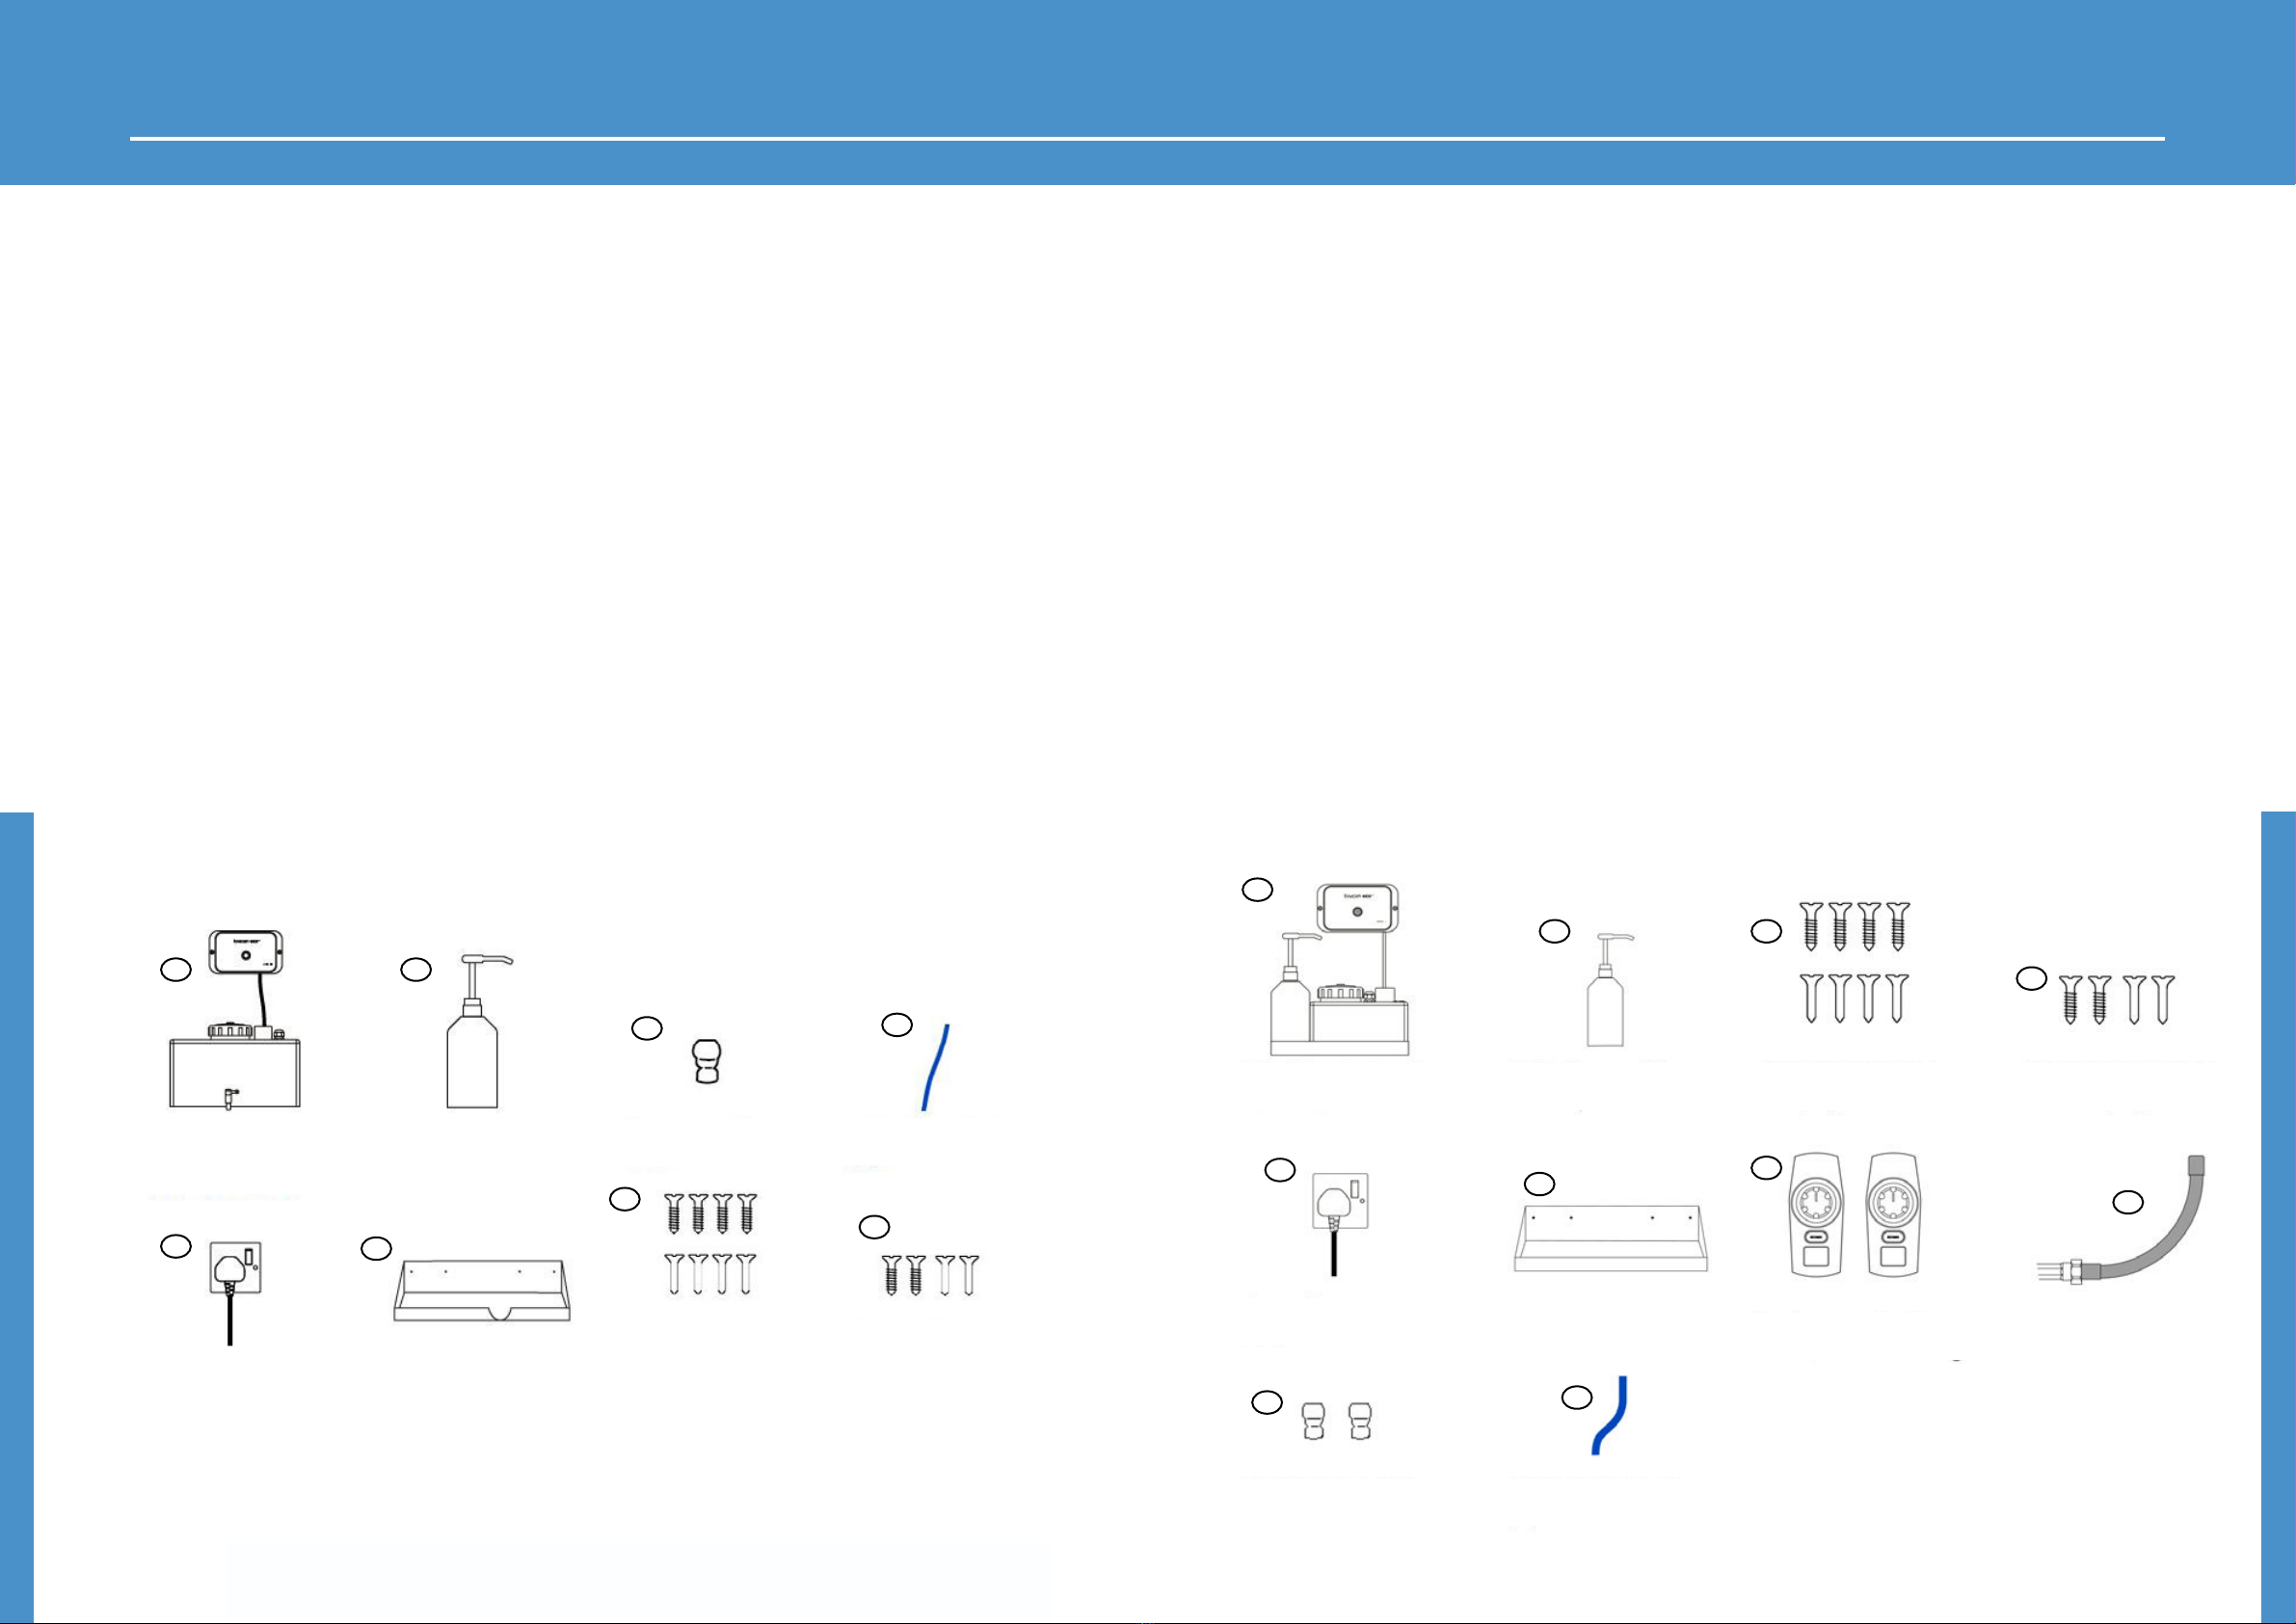
5.0 Supplied Components ........................... 10
5.1 Toucan Eco Active Components .......................10
5.2 Toucan Eco Active Plus Components..............11
6.0 INSTALLATION GUIDE............................. 12
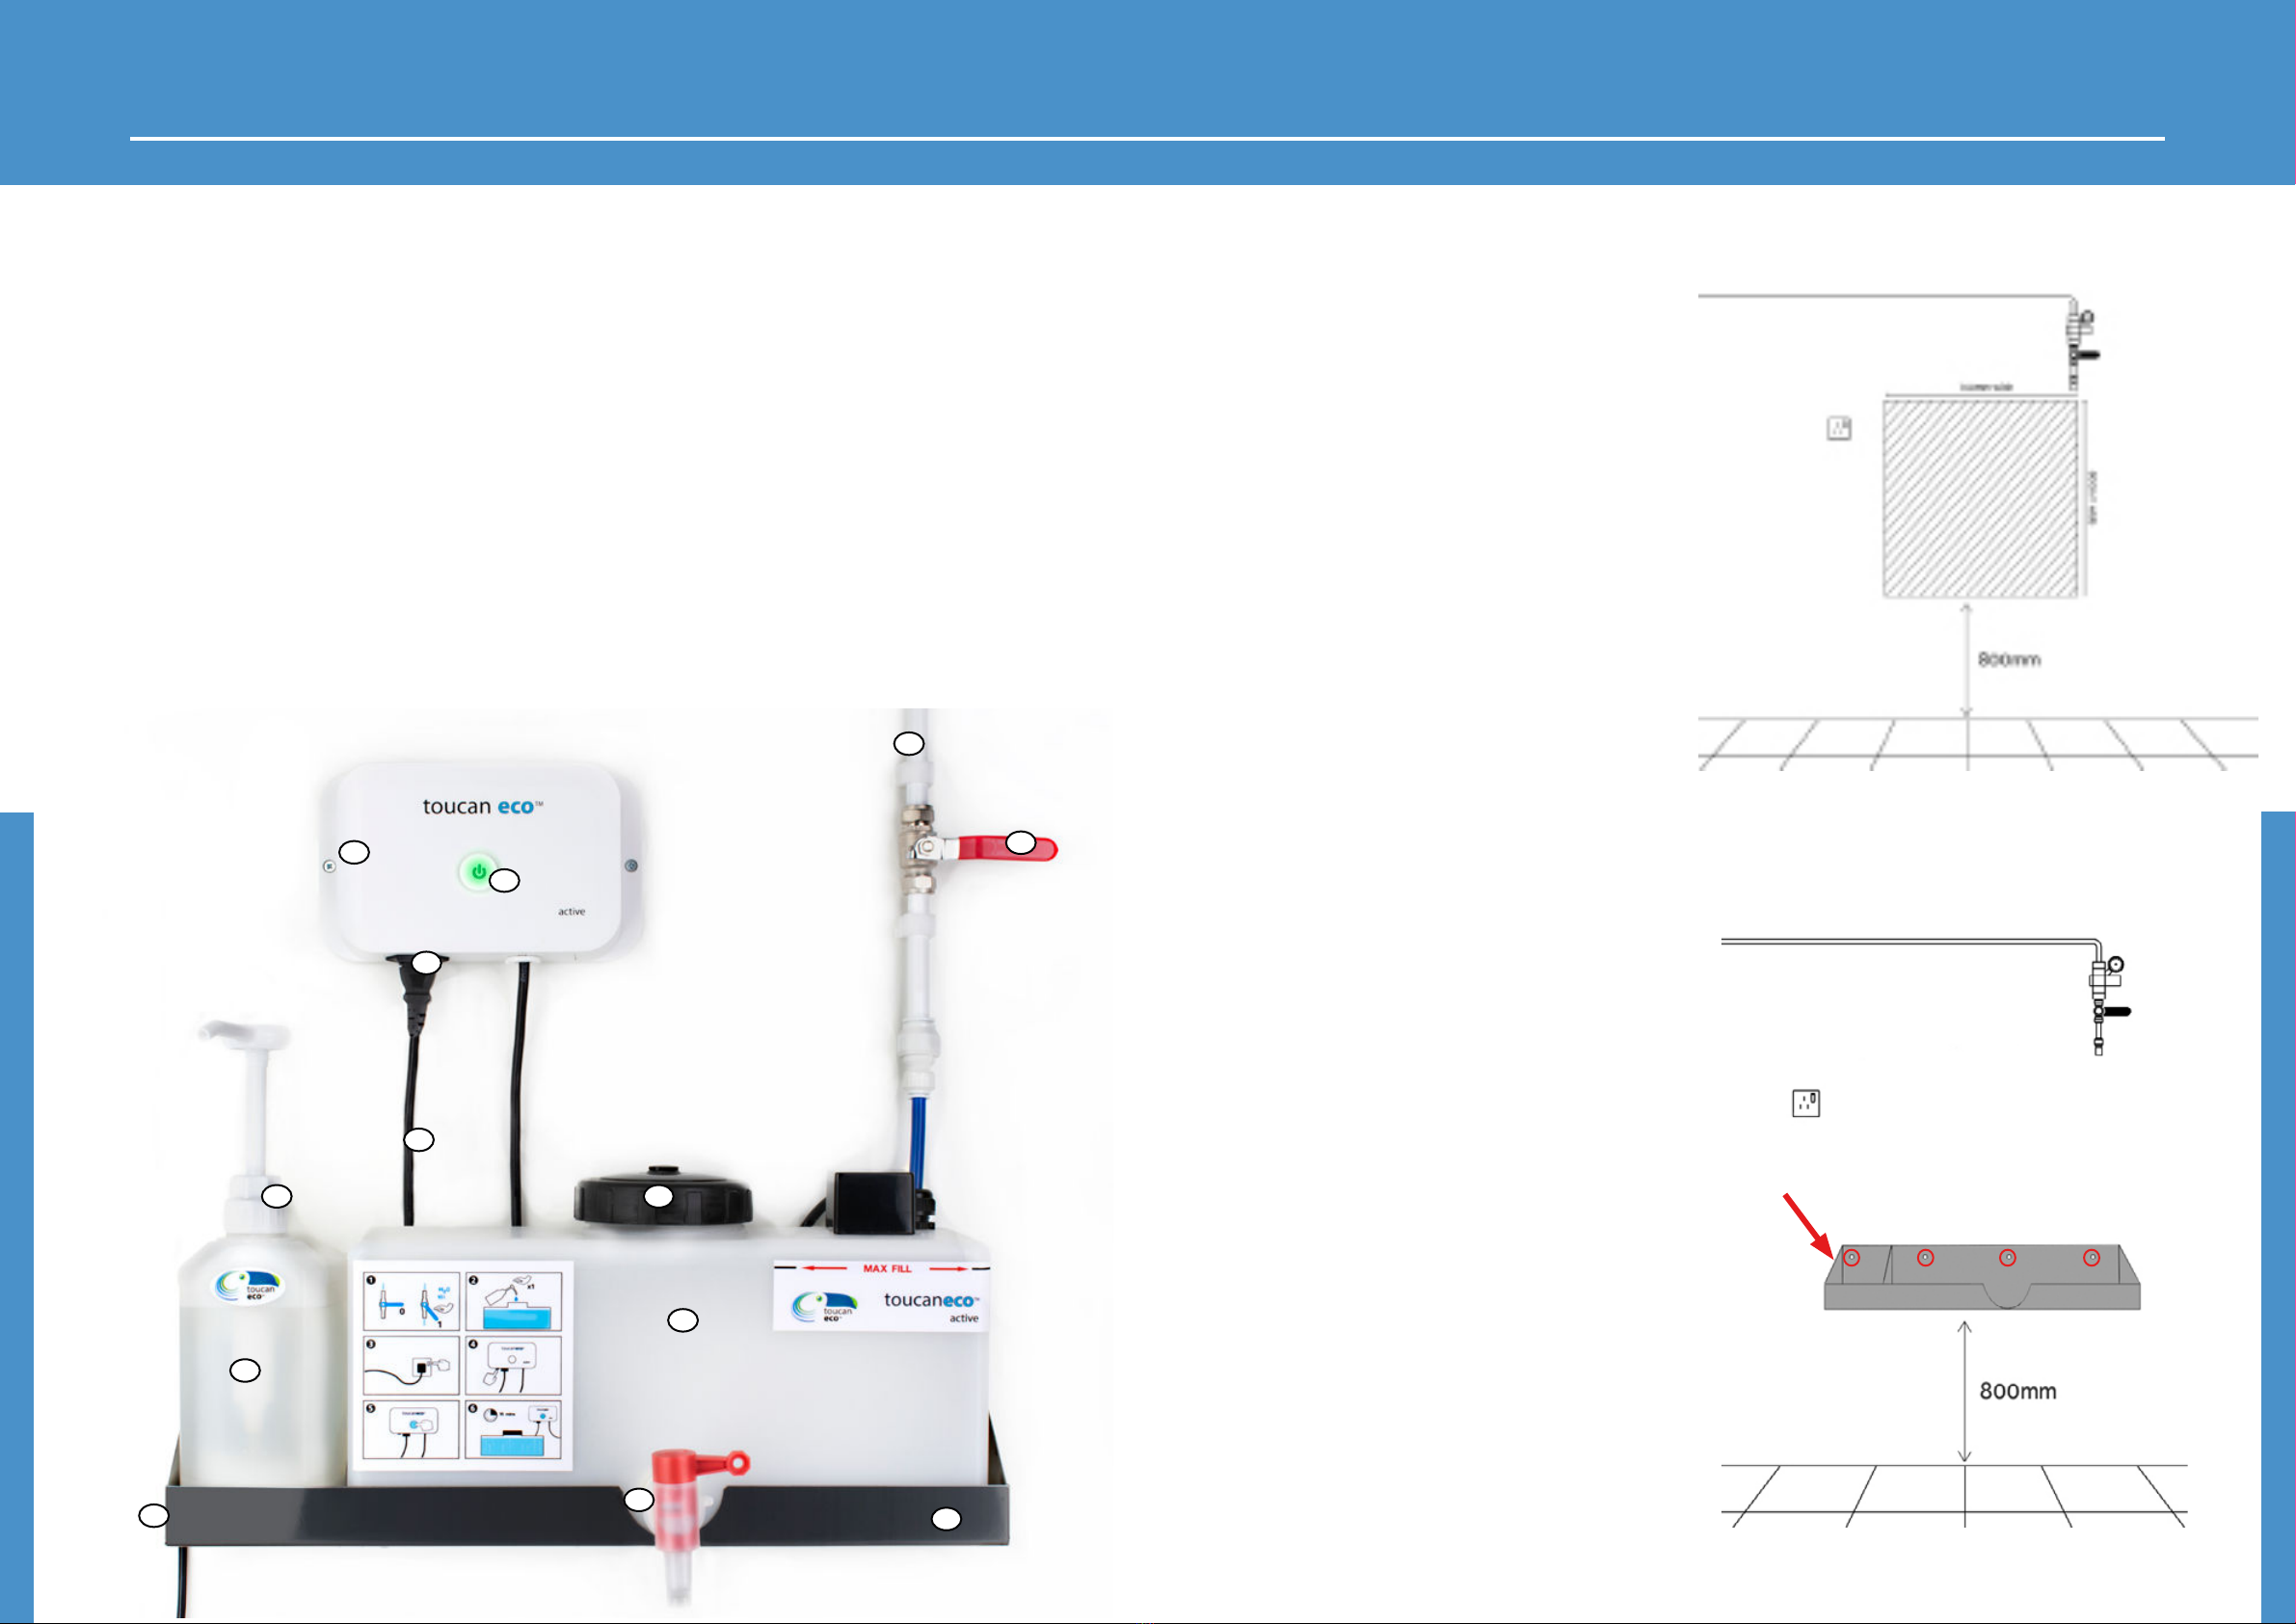
6.1 Toucan Eco Active - Installed device................12
6.2 Prepare the wall space for installation............13
6.3 Fix shelf to the wall ................................................13
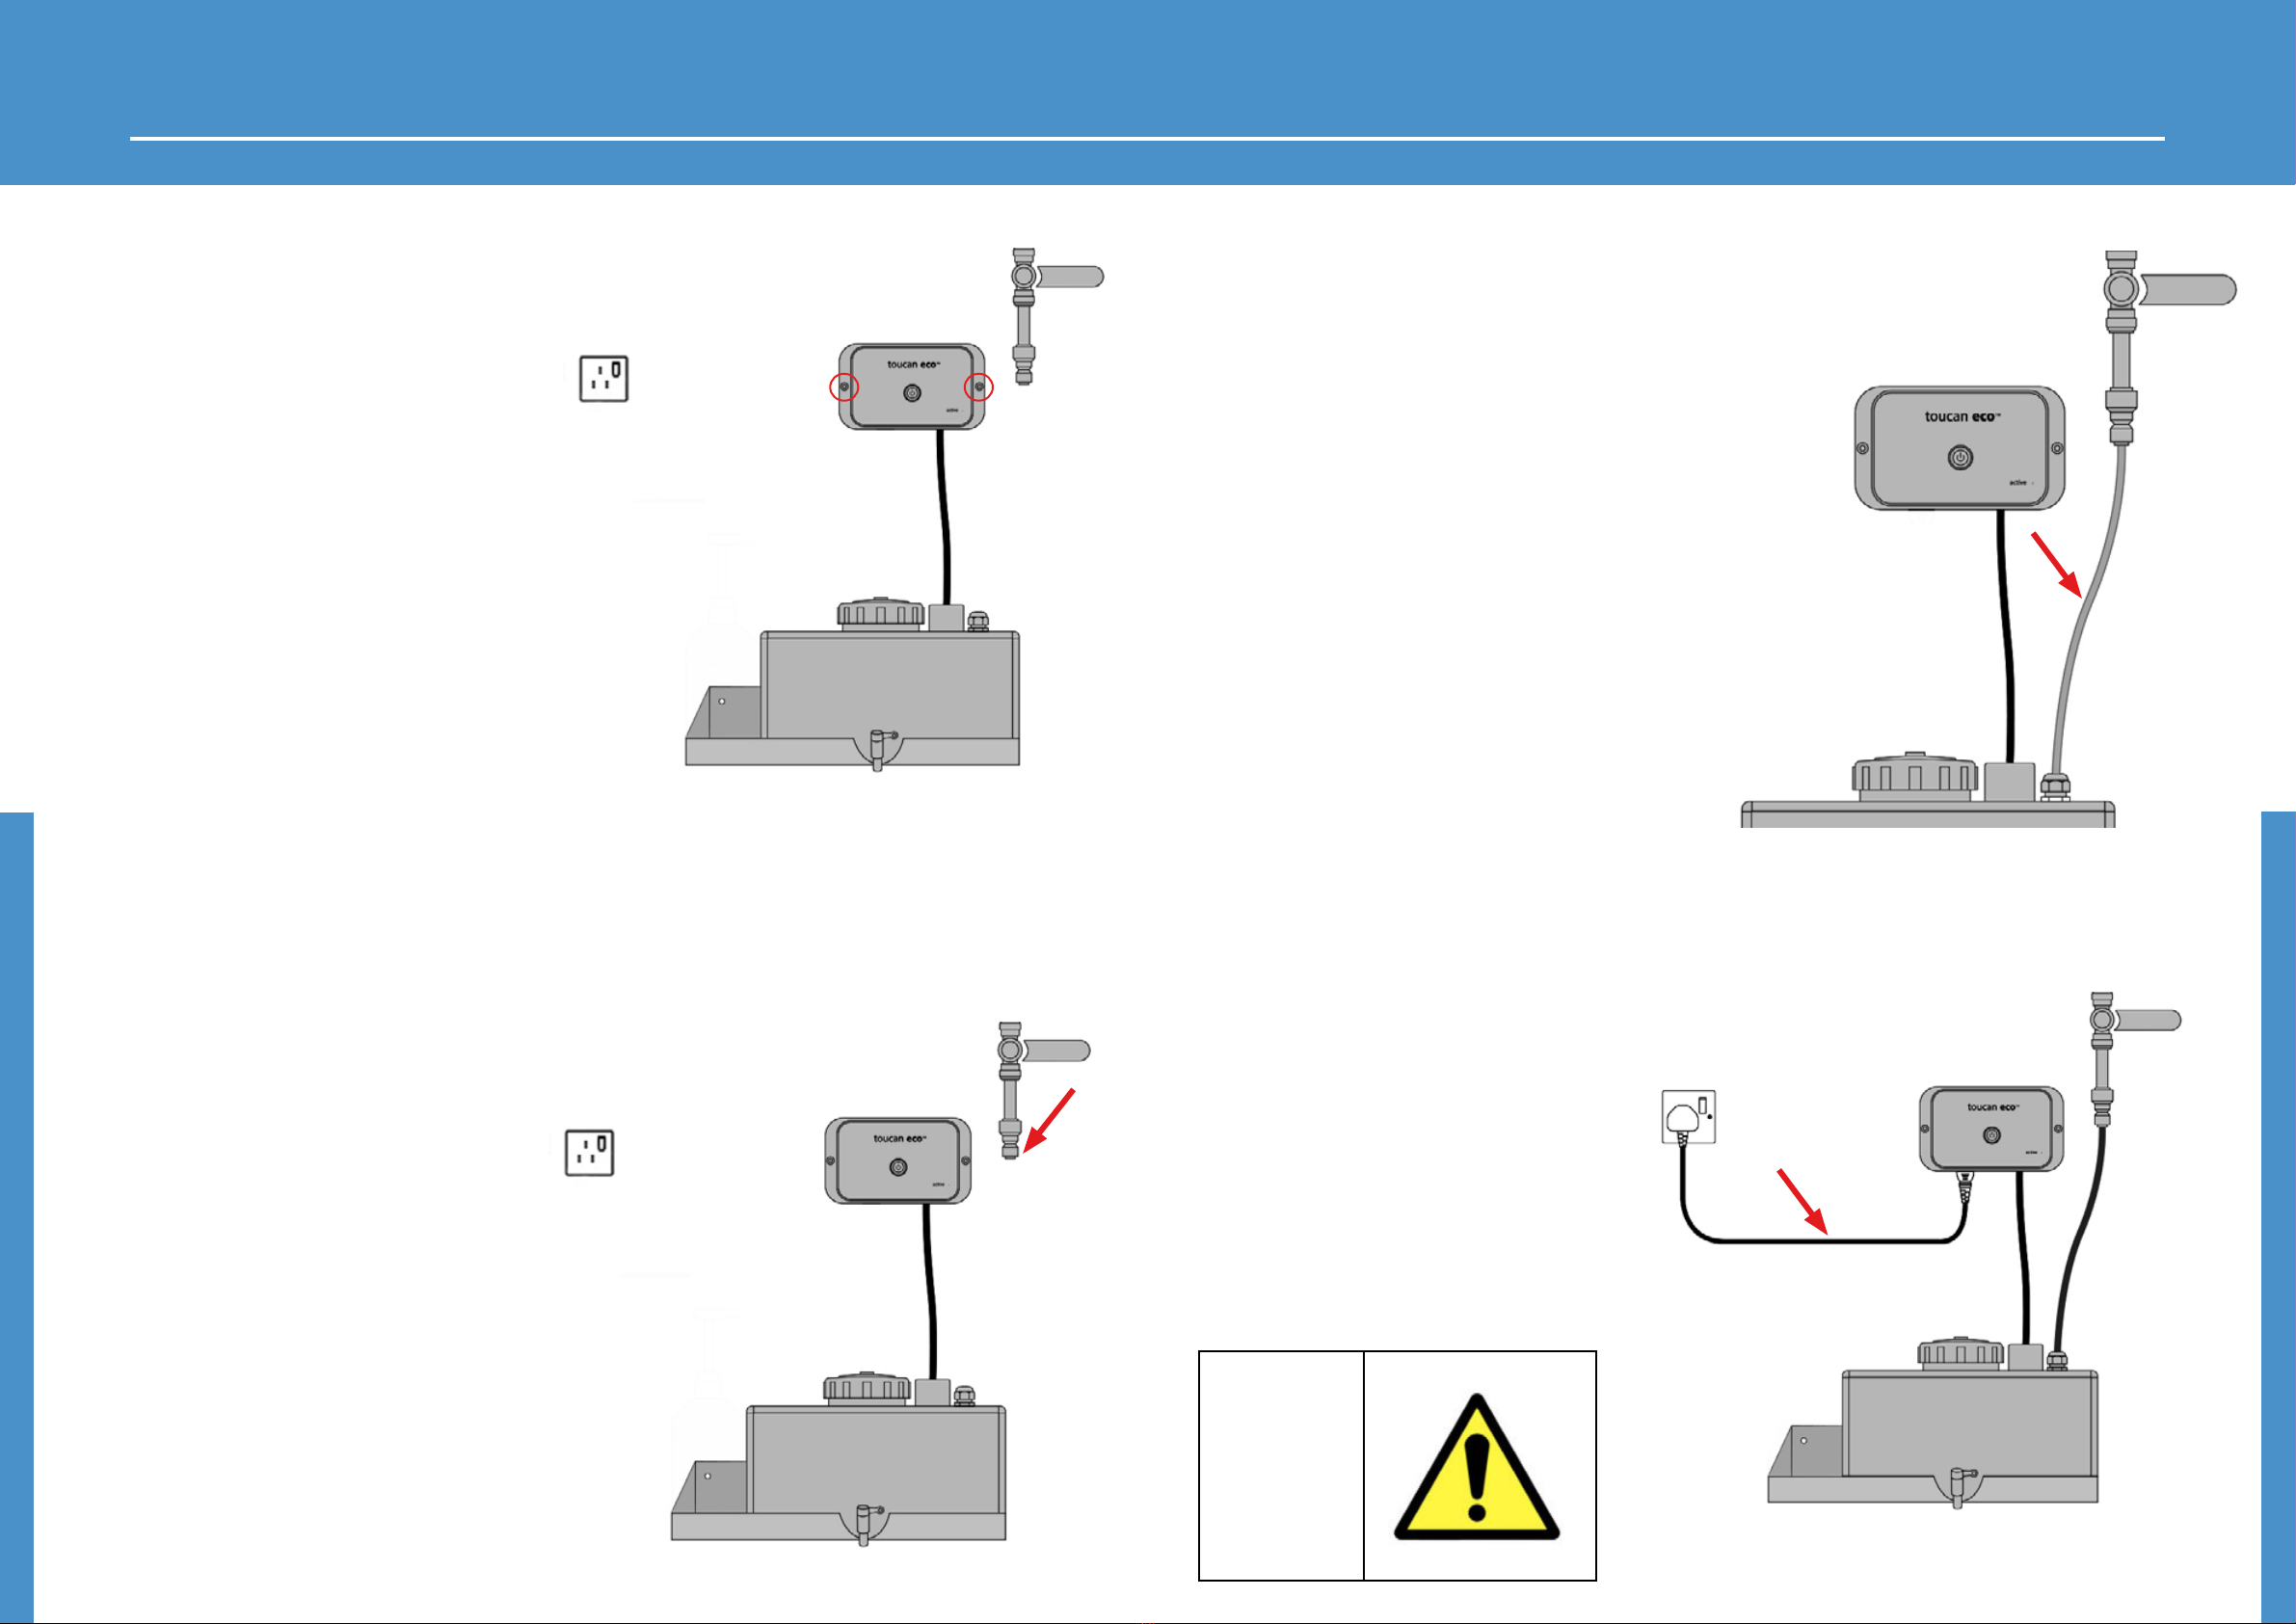
6.4 Fit control box to wall ...........................................14
6.5 Fit reducer to water supply input .....................14
6.6 Fit water input pipe ...............................................15
6.7 Fit power cable........................................................15
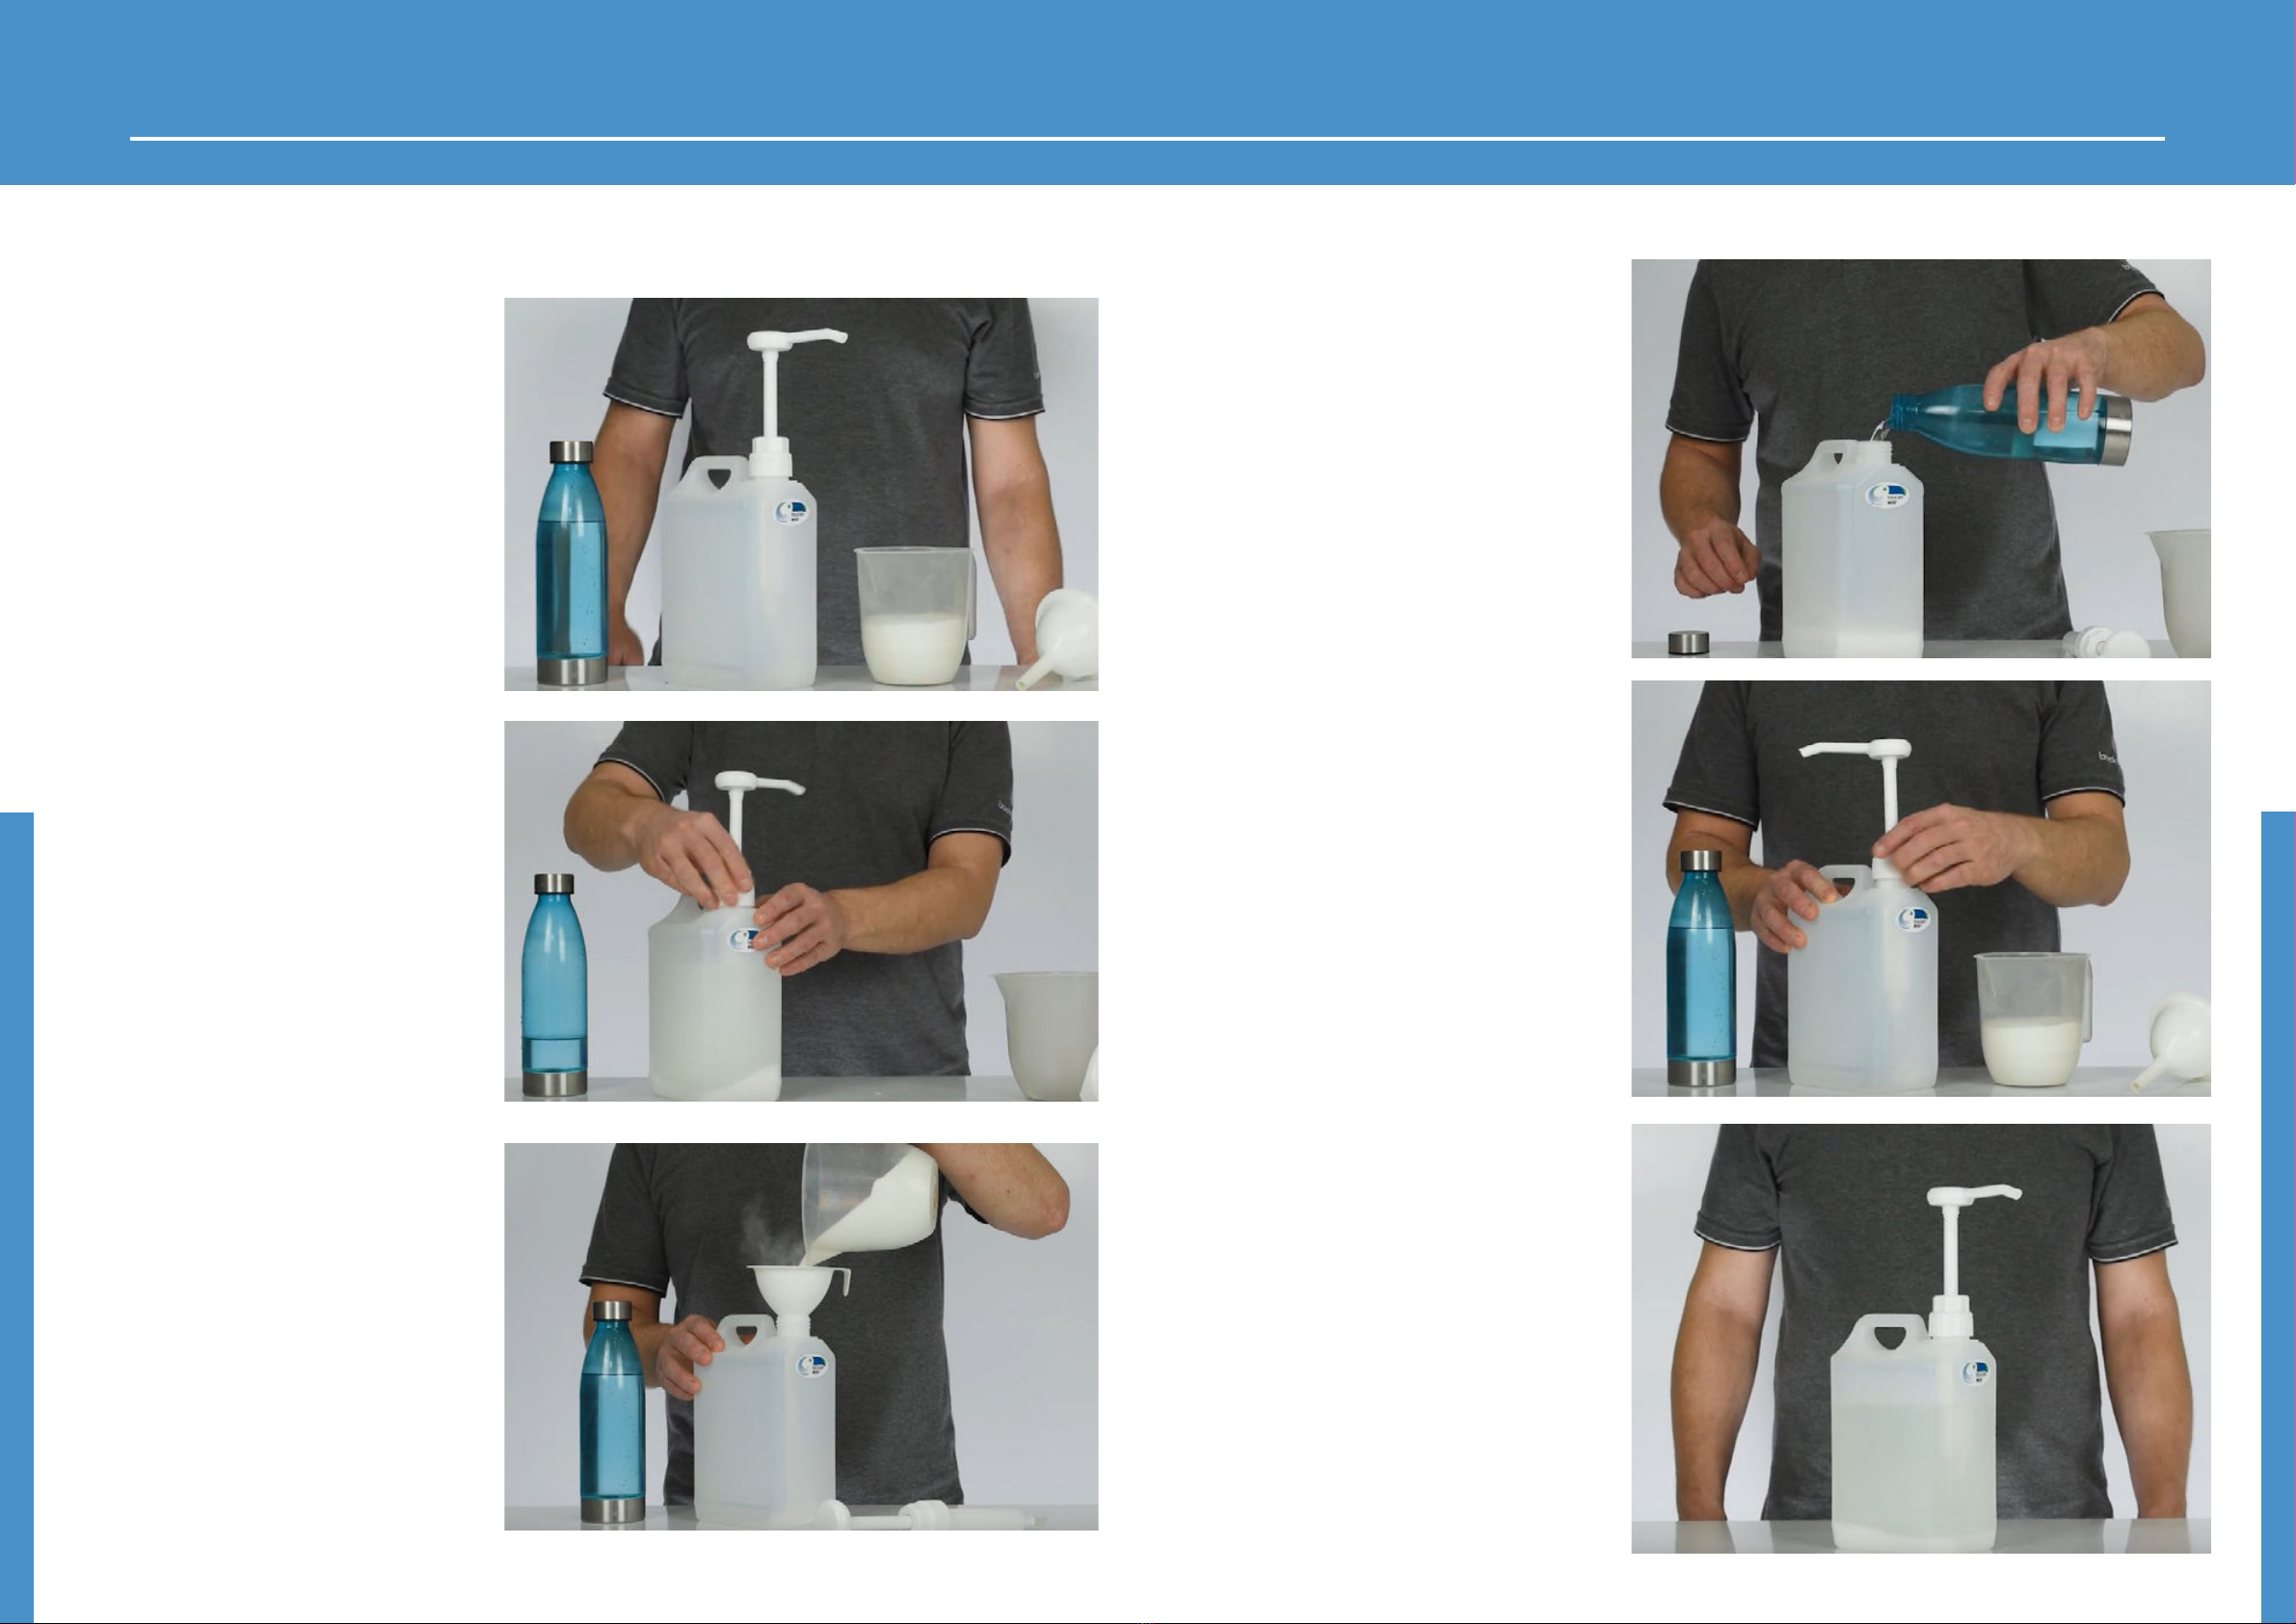
6.8 Brine tank preparation..........................................16
6.9 Place brine tank onto metal shelf.....................18
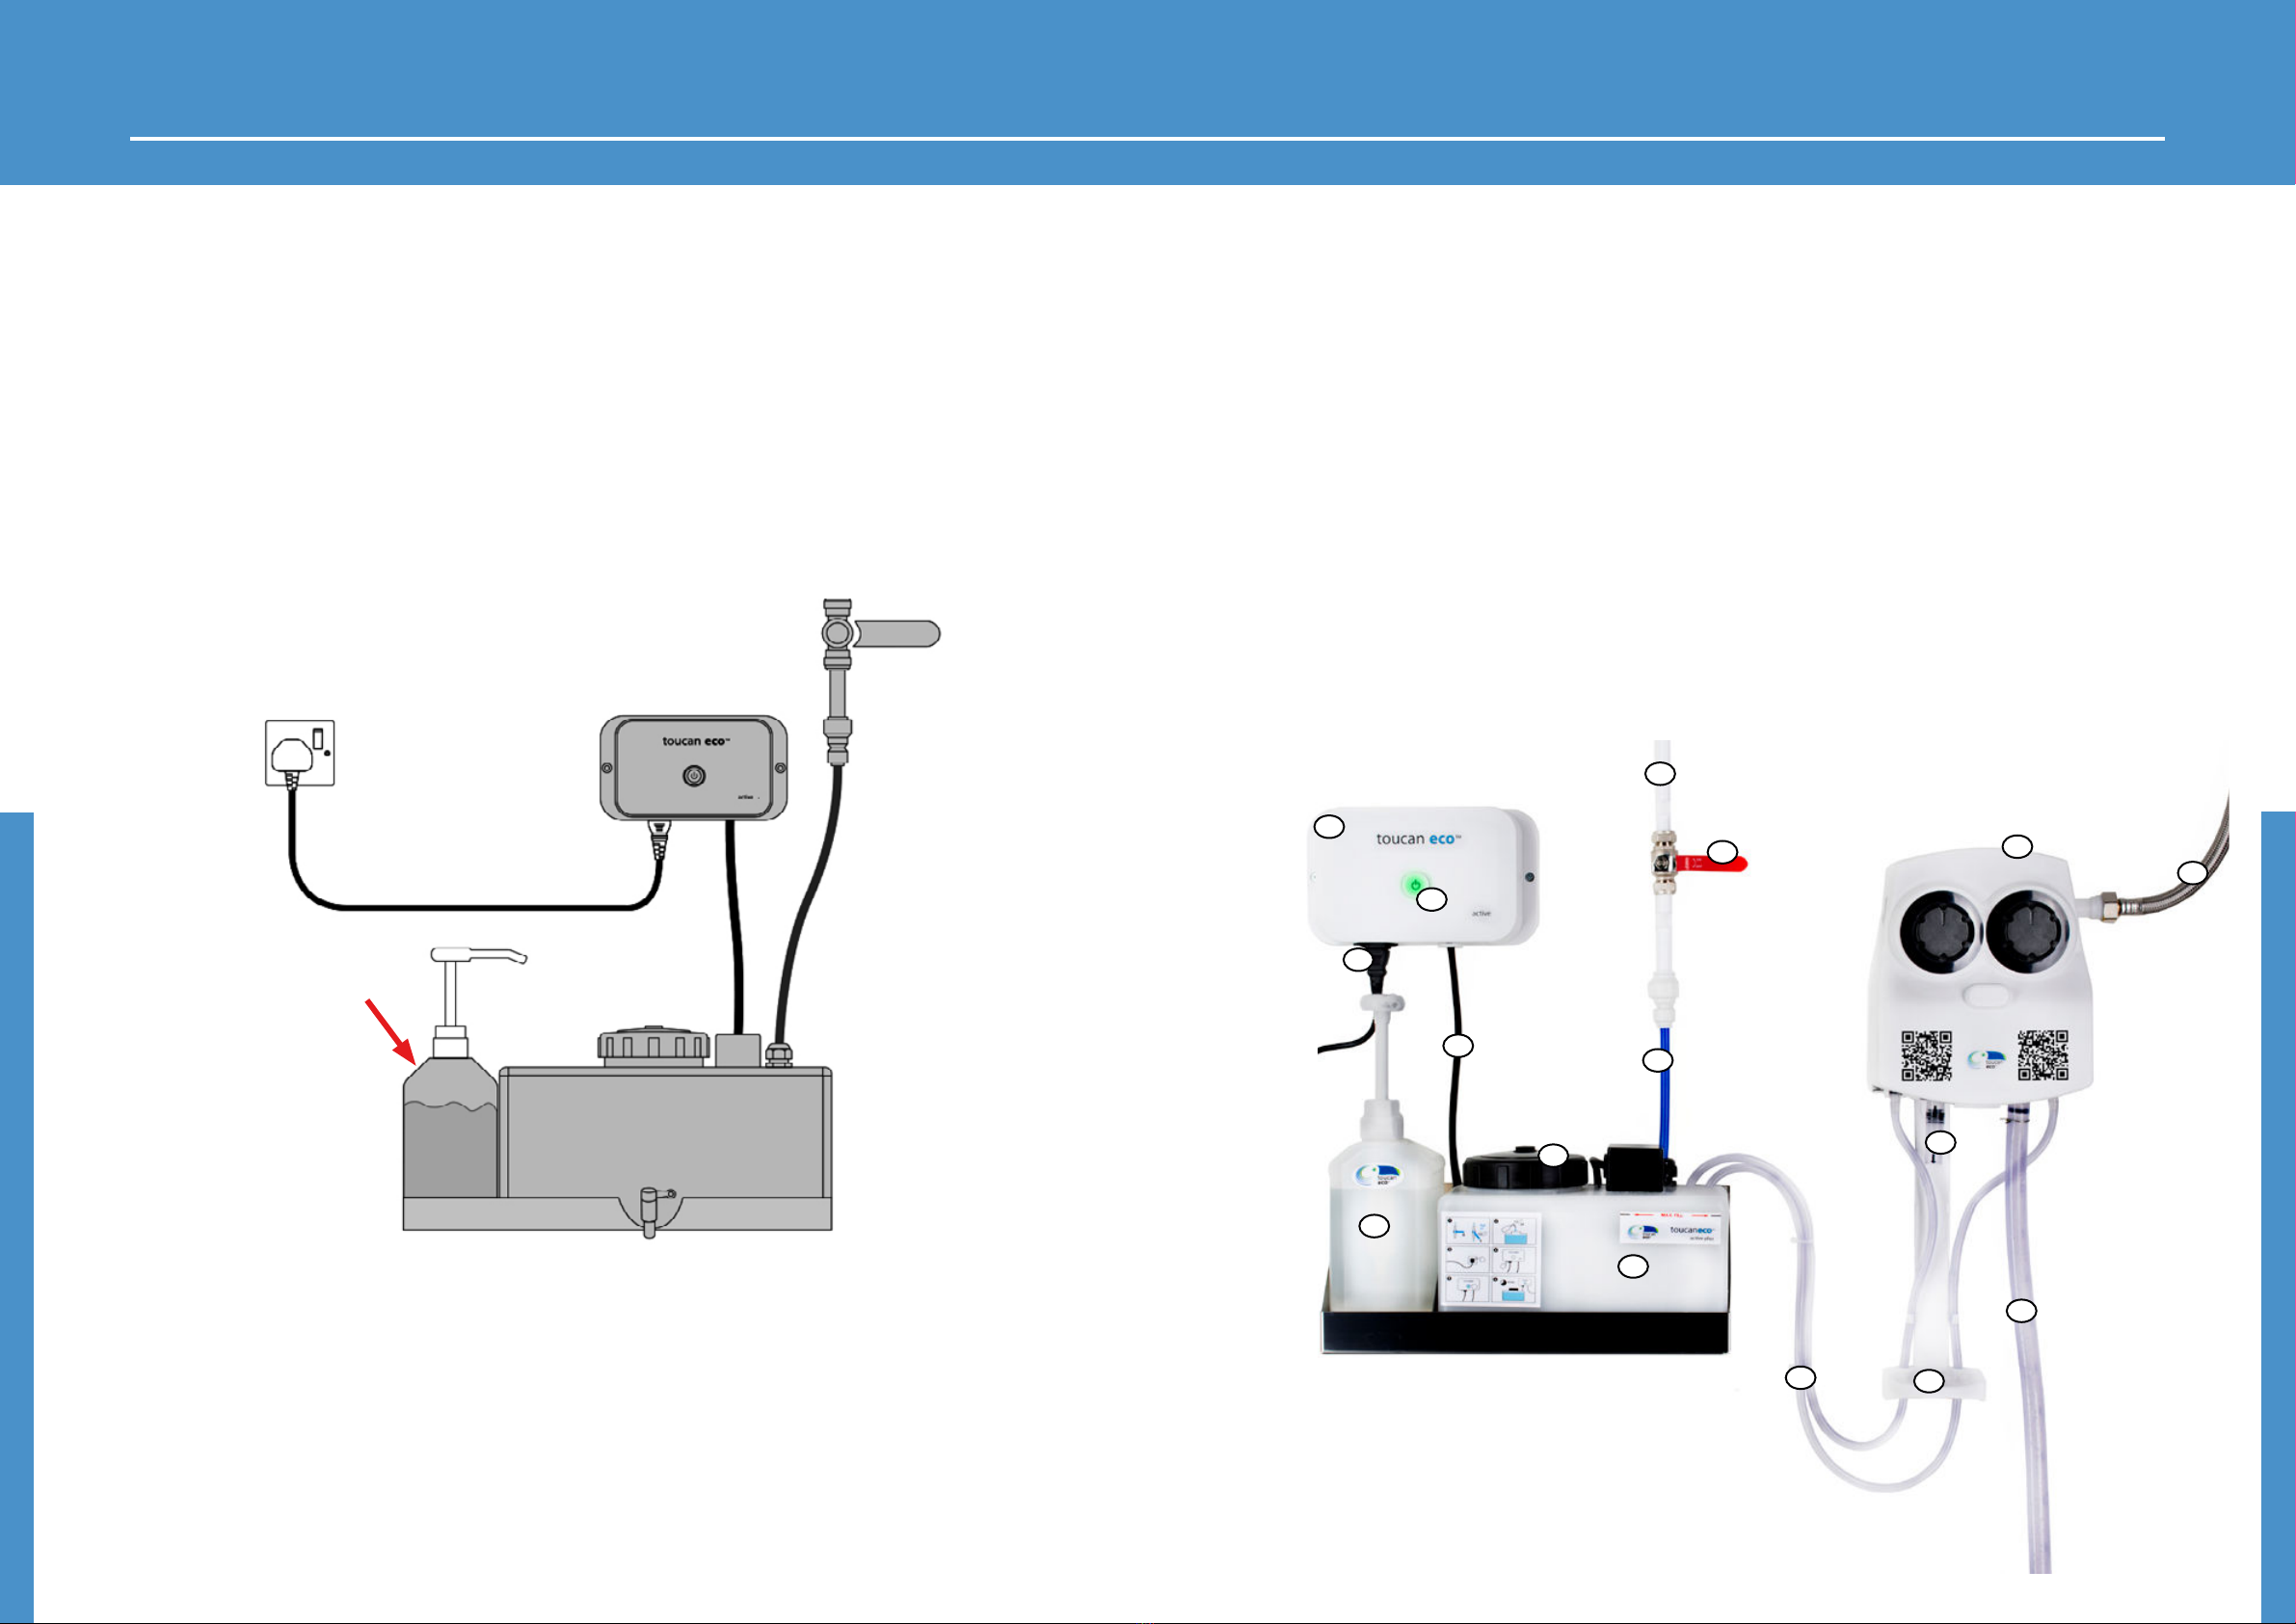
7.0 Toucan Eco Active Plus Installed device.19
7.1 Prepare the wall space for installation............20
7.2 Fix shelf to wall........................................................20
7.3 Prepare dispenser for installation......................21
7.4 Unclip internal tubing............................................21
7.5 Release internal tubing .........................................22
7.6 Replace dispenser mechanism...........................22
7.7 Screw dispenser casing to wall...........................23
7.8 Replace dispenser tube set..................................23
7.9 Install pipe for water input...................................24
7.10 Check output pipes are present ......................24
7.11 Pipes from tank to dispenser ............................25
7.12 Replace dispenser casing...................................26
7.13 Install water input pipe.......................................27
7.14 Install power cable ...............................................27
7.15 OPERATION INSTRUCTIONS ..............................28
7.16 Add the brine tank to the installation ...........30
8.0 Toucan Eco Active - Maintenance ..........31
8.1 Toucan Eco Active - Solution production......33
8.2 Fill spray bottle from dispenser........................34
8.3 Fill large container from dispenser .................35
8.4 Fill large container from dispenser .................36
8.5 Toucan Active Plus decanting ..........................38
solution to a spray bottle...........................................38
8.6 Toucan Active Plus decanting ..........................39
solution to a large container ....................................39
8.7 Maintanance of Toucan Eco Active Plus.......40
8.8 Maintanance of Toucan Eco Active .................44
9.0 warranty .................................................. 47
10 Transportation......................................... 48
11 Storage ..................................................... 48
12 Trouble shooting ..................................... 49

P 4 P 5CENTREGO RENEWCENTREGO RENEW
Centrego Toucan Eco batch ECA batch production products
Models Toucan eco Active Toucan eco Active Plus
Region Europe, Asia & US Europe, Asia & US
Electrical Specifications
Voltage 250V AC/DC 250V AC/DC
Power 100w 100w
Input Supply Requirements Domestic Domestic
Environmental
Operating Temperature Dependant on use Dependant on use
Mechanical
Dimensions (with makers box) H32cm W17.5cm L69cm H27cm W34cm L50,5cm
Weights (with makers box)
Approx
5.2 kg 6.7kg
Solution Production Details (This applies to Toucan Eco Active & Toucan Eco Active Plus)
Capacity 10 Litres for Toucan Eco Active & 5 Litres for Toucan Eco Active Plus
Concentration Toucan eco Active - 100ppm FAC
Toucan eco Acvtive Plus - 450ppm FAC
pH pH7.8 - pH8.5
Time per batch Toucan eco Active - 20 Minutes
Toucan eco Acvtive Plus - 40 Minutes
Max Capacity - Point of Use Toucan eco Active - 10 Litres
Toucan eco Acvtive Plus - 17 Litres
Salt Consumption 10 grams per batch
Additives Salt (NaCl) and Water (HO)
Active Substances Hypochlorus acid (HOCl) and Sodium Hypochlorite (NaOCl)
Solution Accreditations
Organisation Cirtification European Chemicals Agency (ECHA) listed, UK Health & Safety
Executive (HSE) listed, US Environmental Protection Agency
Approved
Solution Cirtification EN14476, EN16777, EN13697, EN1650, EN14348, EN13727, EN13624,
EN1656 (Cefas Aquaculture approved), EN1500
2.0 SPECIFICATIONS

P 6 P 7CENTREGO RENEWCENTREGO RENEW
3.0 SAFETY SYMBOLS
The following safety symbols may be used in this manual and on the device itself.
4.0 SAFETY INSTRUCTIONS
4.1 Solution Safety Instructions
The following safety information is guidance for the use of the ECA solution
that is produced by the Toucan Eco Active and Toucan Eco Active Plus.
• Use only for surface and fabric cleaning, disinfection and deodorisation
• Do not spray into your eyes or onto skin
• Do not swallow
• People with sensitive or damaged skin should avoid contact with the solution
• Keep solution out of the reach of children and pets
• Do not keep ECA solution in areas of food and drink preparation where it can be
ccccconfused with drinking water
• Do not freeze the device or the solution produced by the device
• Dispose of ECA solution to drain around one week after production
Warning/Caution
An appropriate safety instruction should be followed or
caution to potention hazard exists.
Protective Earth (Ground)
To identify any terminal which is intended for connection
to an external conductor for protection against electric
shock in case of a fault.
Or the terminal of a protective earth (ground) electrode.
MEANING/DESCRIPTION SYMBOL
Dangerous Voltage
To includ hazards arising from dangerous voltages.

P 8 P 9CENTREGO RENEWCENTREGO RENEW
4.2 Device Safety Instructions
The following safety instructions are for the devices themselves and not the ECA
solution produced by them.
• Read this manual fully before installation and use, of the Toucan Eco Active and Toucan Eco Active Plus
• Avoid direct sunlight to the device
• Alaway handle power cable with dry hands
• Always make sure that the outer surfaces of the machine are clean and free of salt buildup at all times
• We recommend that all staff installing and using the devices have been trained by Centrego Ltd
• Do not use device if under the influence of inhibiting substances
4.4 Water input safety instructions
•Only use water input from the mains water and not from a tank
• Use water input that has a temperature between 5 °C and 40 °C
• Low-calcium water is recommended
• Soft water is recommended
• Do not use groundwater, polluted water or excessively hard water
• If used in a hard water area use a water softener
• Use water with a pH range of pH 6.5 - pH 8
4.3 Installation Safety
•Install the device at a location that is sheltered from weather and extreme changes in temperature
• Do not install this device unless you have fully read this manual and have also been trained by Centrego
nnto install the device
• Ensure all water and solution pipes are straight, after installation. Any kinked or bent pipes will cause
vvissues with liquid flow
• Only install the device with two members of staff that have been trained by Centrego
• Do not lean or sit on the stainless steel shelf once attached to the wall
• Only carry out installation if the area has been prepared correctly by the staff at the facility
• Do not handle electrical equipment with wet hands
• Do not use power cables or plugs if they have become wet
4.5 Salt input safety instructions
•Do not use salt tablets of any kind
• No not use salt sachets of any kind
• Only use table salt or granulated salt
• Only use new/clean salt
• Only use white salt
• Only use food-grade salt
• Do not use salt that has become dirty or contaminated

P 10 P 11CENTREGO RENEWCENTREGO RENEW
5.0 Supplied Components
5.1 Toucan Eco Active Components
Spray Dispenser
A spray bottle/dispenser is commonly used with the Toucan Eco Active. If stock is needed of these, they can be
supplied by the manufacturer. This is not listed below.
Parts Supplied with the Unit
1) 10 litre holding tank and control box attached with cable, tap and 3/4 inch backnut
2) 2.5litre brine container and pump dispenser
3) 15mm to 10mm mains water flow reducer
4) 10mm blue water feeder pipe
5) Control box power lead with plug
6) Stainless steel shelf
7) 8 screws
8) 4 screws
The below images are not to scale
5.2 Toucan Eco Active Plus Components
Spray Dispenser
A spray bottle/dispenser is commonly used with the Toucan Eco Active Plus. If stock is needed of these, they
can be supplied by the manufacturer.
Parts Supplied with the Unit
1) 5litre holding tank and control box with cable
2) 2.5l brine container and pump dispenser
3) 4x shelf screws and wall plugs
4) 2x control box screws and wall plugs
5) Control box and power lead
6) Stainless steel shelf
7) Dispense bottle holder and tube fittings (Actual product may vary)
8) Silver pipe
9) 2x 15mm to 10mm reducer
10) 10mm blue feeder pipe
1 2
34
1
2 3
4
567
10
9
8
56
7
8

P 12 P 13CENTREGO RENEWCENTREGO RENEW
6.2 Prepare the wall space for installation
Choose a wall area 700mm wide and in height, and
800mm above floor level.
Ensure that the power socket for the power
cable is installed to the left of the area, as shown in
the picture.
Ensure that the water supply with stop cock is
aligned with the top right-hand corner of the area
as shown, and the water output is 15mm.
The water pressure on this input should be
2-4 bar for optimum performance.
6.3 Fix shelf to the wall
Fix the shelf to the wall 800mm above the floor,
making sure it can take 15kg.
If the supplied fixings are not appropriate for the
type of material that the wall is made of to
support 15kg of weight, then source correct
fittings for the wall material.
Ensure that the shelf is level.
Do not lean or sit on this shelf or use it
for anything other than the installation
and use of this device.
In this illustration red circles show where the screws
will go into the wall.
1
5
6
3
4
4
11
8
9
2
10
6.0 INSTALLATION GUIDE
6.1 Toucan Eco Active - Installed device example
1 - Toucan Eco Active Control Box
2 - Soft touch activation button
3 - Powercable input to control box
4 - Power cable
5 - Dosing pump
6 - Brine tank
7 - Solution output
8 - Mains water input pipe
9 - Isolation valve for mains water input
10 - Metal tank shelf
11 - Solution tank
12 - Lid for solution tank
12
7

P 14 P 15CENTREGO RENEWCENTREGO RENEW
6.4 Place solution tank into shelf and x control
box to wall
After placing the solution tank in metal shelf as
shown.
Fix control box to wall using supplied screws
ensuring that it is 1 meter to the right of the power
socket and at the same height. The red circles in the
illustration show the location of both screws.
Ensure that the wire between the tank and the
the control box is not bent, and the tank is not
pulling on the wire.
6.5 Fit reducer to water supply input
The water input with lever valve is top right of the
install area. (The water input pipe and valve is not
supplied with the system)
Fit the 15mm to 10mm reducer to the end of the
water supply located with the red arrow.
6.6 Fit water input pipe
Fit the 10mm blue water input pipe from the
reducer on the end of the water
input to the solution tank, as shown.
6.7 Fit power cable
Fit power cable from control box to power socket.
Ensure the cable is out of the way of the tank and
any moisture produced during operation.
Dangerous
Voltage
To includ haz-
ards arising
from dangerous
voltages.

P 16 P 17CENTREGO RENEWCENTREGO RENEW
6.8 Brine tank preparation
To prepare the brine tank first collect the
following:
• Brine tank and pump from the device
• 2 litres of water
• 400g of salt
• funnel
Unscrew pump from the brine tank
as shown
Pour 400g of table or granulated salt
into the brine tank using the funnel
Fill brine tank with 2 litres of tap water
Screw pump doser back onto brine tank
Brine tank is ready to use

P 18 P 19CENTREGO RENEWCENTREGO RENEW
6.9 Place brine tank onto metal shelf
Place the prepared brine tank into metal shelf as shown.
7.0 Toucan Eco Active Plus - Installed device example
1 - Toucan Eco Active Plus control unit
2 - Soft touch activation button
3 - Power cable
4 - Brine Dispenser
5 - Cable between control box and cell
6 - Solution tank
7 - Lid for tank
8 - Mains water input pipe
9 - Isolation valve for mains water input
10 - Water input link for tank
11 - Water input for dispenser
12 - Dispenser
13 - Water output for spray bottle
14 - Water output for larger containers
15 - Small shelf for holding spray bottles during refill
16 - tubes to connect solution tank to dispenser
1
2
3
4
5
6
7
8
12
13
14
15
16
10
9
11

P 20 P 21CENTREGO RENEWCENTREGO RENEW
7.1 Prepare the wall space for installation
Choose a wall space of 800mm wide by 800mm
high at 800mm above floor level.
Install close to a water and electrical supply as per
the layout in the illustration. The power socket in the
wall needs to be located to the top left as shown.
The water input pressure needs to be 2-4 bar for
optimum performance on both water inputs.
Install 15mm pipework with 2 lever valves in the
position is shown on the illustration above the install
area.
7.2 Fix shelf to wall
Fix metal shelf to the wall 800mm above the floor.
Make sure it can take10kg.
If the supplied fixings are not appropriate for the
material that the wall is made of.
Use appropriate fixings to support 10kg.
Holes for screws are circled with red circles in this
illustration.
7.3 Prepare dispenser for installation
Push the white key into the top of the dispenser
to release the front casing as shown.
7.4 Unclip internal tubing
Remove the internal tube set from the
dispenser.
Unclip the tube set by pushing the plastic holding
clips as shown with the red arrows.

P 22 P 23CENTREGO RENEWCENTREGO RENEW
7.5 Release internal tubing
After unclipping the internal tubes you will be able
to pull them out and up to remove the tube set from
the casing.
7.6 Replace despenser mechanism
After the tube set has been removed
the casing will look like this
7.7 Screw dispenser casing to wall
Fix the dispenser to the wall with the screw set
supplied. Screw holes are shown with red circles.
7.8 Replace despenser tube set
Replace the dispenser tube set into the
dispenser.
Rest the top of the tube set on the hooks
as shown with the red arrows.
Clip the tube set into the casing using the clips at
the red arrows.

P 24 P 25CENTREGO RENEWCENTREGO RENEW
7.9 Install connection between water input and
dispenser unit
After fitting the 15mm to 10mm reducers.
The 15mm flexible pipe can be hand screwed into
the dispener input (1), with the push fit connection
applied to the water inlet pipe (2).
Ensure the pipe is firmly attached on both ends to
ensure that there is no water leakage.
7.10 Check output pipes are present for dispenser
The dispenser tube set has two output pipes
connected as supplied.
Check that they are connected as per this image.
1) This is the solution output pipe from the dispenser
for small containers such as spray bottles
2) This is the solution output pipe from the dispenser
that is for filling up larger containers such as buckets
12
7.11 Pipes from tank to dispenser
Follow the below order to connect
the pipes from the tank to the
dispenser
1) This is where the pipes will al-
ready be installed in the tank.
Do not pull or remove them from
the tank.
2) Run the two pipes as shown in
the picture to the bottom of the
dispnser.
Use wall fixers to attach the pipe to
the wall for security as hown.
3) Clip the tubes against the side
of the dispenser base as seen. Run
them up to the desspenser.
4) Clip the plastic connectors into
the dispenser casing as shown.
5) Connect the black tubes to the
dispenser as shown.
Ensure all connections are firm and
in place as a weak connection may
cause a leak.
1
1
2
2
2
44
5
5
6
3
33
3

P 26 P 27CENTREGO RENEWCENTREGO RENEW
7.12 Replace dispenser casing
Replace the top casing for the dispenser
by resting the bottom of the top casing against
the back casing.
Then push the front casing into the back casing until it clicks shut.
The installation will look like this
at this stage of the process.
Check against this illustration
for all parts installed.
7.13 Install water input pipe
1) Connect blue 10mm water
pipe to mains water input
through reducer
2) Run 10mm blue water pipe
into tank through gromet.
7.14 Install power cable
Connect the power cable
from the control unit to the
socket in the wall.
Ensure that there is one meter
between the control unit
and the plug socket in the
wall.
Dangerous
Voltage
To includ haz-
ards arising
from dangerous
voltages.
2
1

P 28 P 29CENTREGO RENEWCENTREGO RENEW
7.15 OPERATION INSTRUCTIONS
To prepare the brine tank first collect the
following:
• Brine tank and pump from device
• 2 litres of water
• 400g of salt
• funnel
Unscrew pump from the brine tank
as shown
Pour 400g of table or granulated salt
into the brine tank using funnel
Fill brine tank with 2 litres of tap water
Screw pump doser back onto brine tank
Brine tank is ready to use

P 30 P 31CENTREGO RENEWCENTREGO RENEW
7.16 Add the brine tank to the installation
Put the prepared brine tank on the metal shelf.
The installation is now complete.
8.0 Toucan Eco Active - Maintenance
process
Empty the tank before following these steps.
To fill the solution tank with water using
the isolation valve from the mains
water see the following steps.
Turn the isolation valve on the water input
to 'on'.
Wait until the water fills to the line that says
'MAX FILL' shown with a red arrow.
Turn the isolation valve on the water input to
'off' to stop the tank from filling with water.

P 32 P 33CENTREGO RENEWCENTREGO RENEW
Unscrew the cap from the
main tank.
Pick up the brine tank and
push the head down as shown
squirting one pump of brine liquid
into the main tank.
Ensure brine tank is upright as
possible and one full squirt is added.
Screw the lid back onto
the main tank as shown.
8.1 Toucan Eco Active - Start solution
production
Make sure the control box is plugged in and
on.
The soft touch button will go green when on
and ready.
Press the soft touch
button once for a few seconds
it will glow purple for a moment
showing it has
accepted the command.
After you press and release the button it will
go blue.
The solution inside the solution tank will
start to bubble.
This means the ECA solution is now being
produced from the brine solution.
Wait 15/20 minutes and the unit will make a
beep. The solution is now ready to use.

P 34 P 35CENTREGO RENEWCENTREGO RENEW
8.2 Fill spray bottle from dispenser
Unscrew the top from the spray
bottle that you wish to fill.
Press the left button as shown,
this will fill the spray bottle
with ECA solution.
Release button to stop
filling container.
Once filled, screw the top back on
to the spray bottle.
The ECA solution can now
be used.
8.3 Fill large container from dispenser
Ensure the large container is on the floor with the
long pipe from the dispenser inside as shown.
Press the right hand side button to release ECA solution
into the large container.
ECA solution will pour into the large container
When the container is full
Release the button to stop the solution flow

P 36 P 37CENTREGO RENEWCENTREGO RENEW
8.4 Fill large container from dispenser
To lock the button on the dispenser to fill a large container
so that you do not need to hold the button down.
Press right hand button down.
Rotate clockwise
It will lock into place.
You can now release your hand
and the solution will continue to
flow into the large container.
Once the large container is full,
push button into the dispenser and then
rotate anticlockwise.
The button will release and the flow to the
large container will stop.

P 38 P 39CENTREGO RENEWCENTREGO RENEW
8.5 Toucan Active Plus decanting
solution to a spray bottle
To fill a spray bottle with ECA solution
Unscrew the lid from the spray bottle,
Put the bottle around the tap on the front
of the solution tank as shown.
The red lever will be to the right
(the off position)
Turn the red lever to the left to start
ECA solution decanting into the spray
bottle.
Once the spray bottle has been filled up,
Turn the red lever back to the right.
The solution will stop decanting.
8.6 Toucan Active Plus decanting
solution to a large container
Hold a large container under the tap.
Ensure that the large container is being
held firmly or is on top of a stand or table.
This is because the container will become
very heavy when it is full of ECA solution.
The red lever will be to the right showing
that it is turned off.
Turn the red lever to the left and the ECA
solution will start to come out of the tap.
Once the container contains as much
solution as is needed. Turn the red lever to
the right to turn the flow off.
This manual suits for next models
1
Table of contents
Other CENTREGO Cleaning Equipment manuals
Popular Cleaning Equipment manuals by other brands

Ro.Bia.Plast
Ro.Bia.Plast pulizia & stiro MultiEnergy Vap Instruction book

Alfalaval
Alfalaval Toftejorg SaniJet 20 instruction manual

Alfalaval
Alfalaval Toftejorg MultiJet 65 instruction manual

Good Way
Good Way Hi-Flo CC-400HF Operating and maintenance instructions

SJE
SJE OPTIMA X Series user manual

KROHNE
KROHNE OPTIWAVE 8300 C Technical data sheet