Chapman BT500 User manual


Page 2
English
Introduction
THIS MANUAL MUST BE HANDED TO THE OPERATOR BEFORE USE. THE OPERATOR MUST UNDERSTAND FULLY THE CONTENT OF THIS
HANDBOOK BEFORE USING THE MACHINE FOR THE FIRST TIME. OF THE IMPLEMENT IS RESOLD, THIS MANUAL MUST ACCOMPANY THE
MACHINE.
NOTE: The information contained in this manual is correct at the time of going to press. However, in the course of development, changes in
specification are inevitable. Should you find the information given differs from your machine, please contact Chapman Machinery Ltd direct for
advice. Use only Chapman Genuine Service Parts on Chapman Machinery and Machines.
HSE Information
The safe use of all-terrain vehicles (ATVs) & Side by Sides (UTVs) in agriculture and forestry must be adhered to at
all times with machinery attached or not. The HSE information, AIS Sheet 33, gives advice on the safe use of
ATVs/UTVs. It covers the two main types used in off-road working in agriculture and forestry. The Full HSE
information sheet can be found here or using the QR Code to the right https://www.hse.gov.uk/pubns/ais33.pdf
and must be read prior to any ATV/UTV use.
REMEMBER - GET PROPERLY TRAINED AND ALWAYS WEAR HEAD PROTECTION
Important Safety Information
Always read this manual before fitting or operating the machine –whenever any doubt exists contact your dealer or the Chapman Machinery
Service Department for advice and assistance.
•Do not operate this equipment unless you have studied this manual in full
•Only use this machine for its designated task - improper use is both highly dangerous and damaging to machine components
•Both operators & maintenance fitters should be familiar with the machine and fully aware of dangers surrounding improper use
or incorrect repairs
•Before starting, carry out a visual check on both machine & towing vehicle as regards functionality,road safety & accident
prevention rules
•Even when using the machine correctly, accidents can occur. It is imperative that nobody stand withinthe danger area. If working
near roads, buildings or animals, special attention must be taken to ensure safety.
•Never wear loose clothing which could get caught in rotating equipment
•Never carry passengers on the towing vehicle
•Do not stand near the machine when operating
•Damaged or missing safety decals must be replacedimmediately
Transportation Safety
•When transporting, especially over rough ground, reduce speed to prevent damage to machine.
•This machine is not road legal in its standard form. DO NOT tow on public highways unless you have specified the road-legal model,
and checked that this and the towing vehicle comply with local highway regulations in place.
Operating Safety
•Pay special attention when working not to harm livestock if crowding around the machine occurs.
•If anything should become entangled in the mechanism, stop the machine and disconnect the power before attempting to clear the
blockage.

Page 3
English
Description
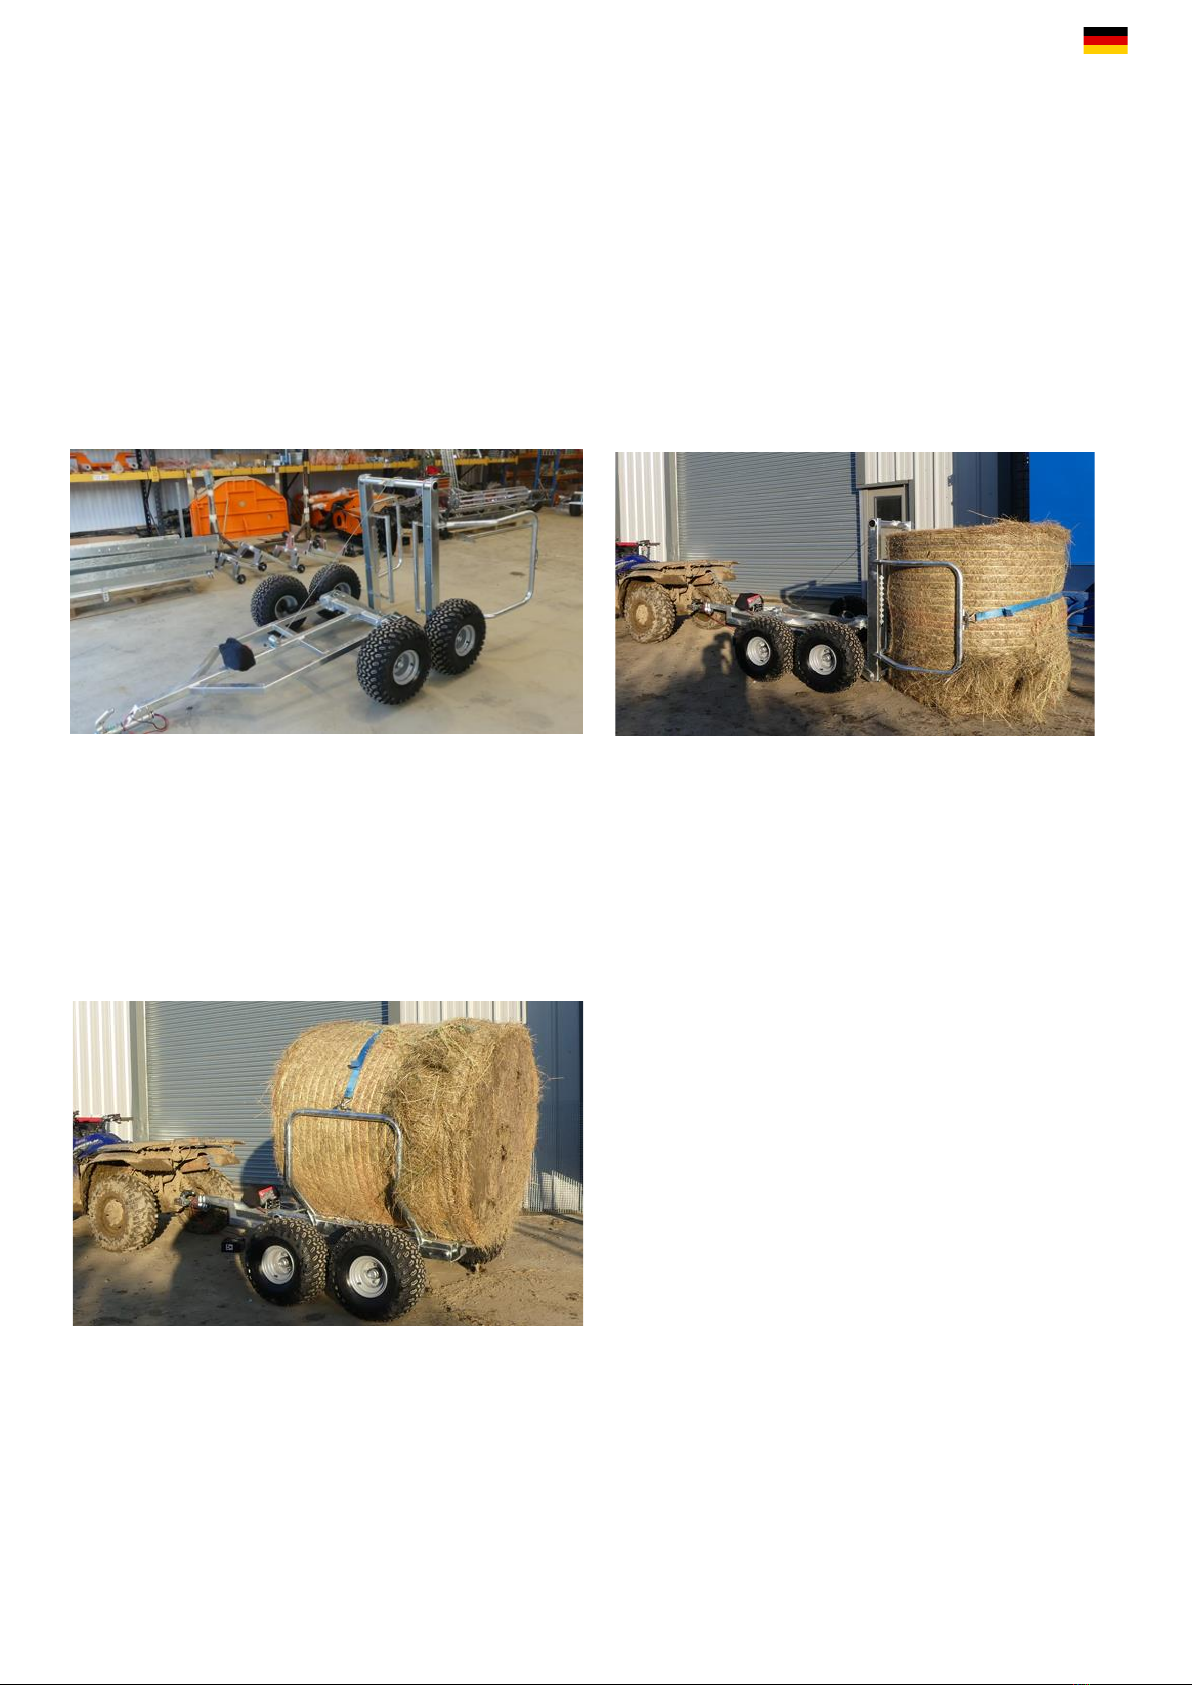
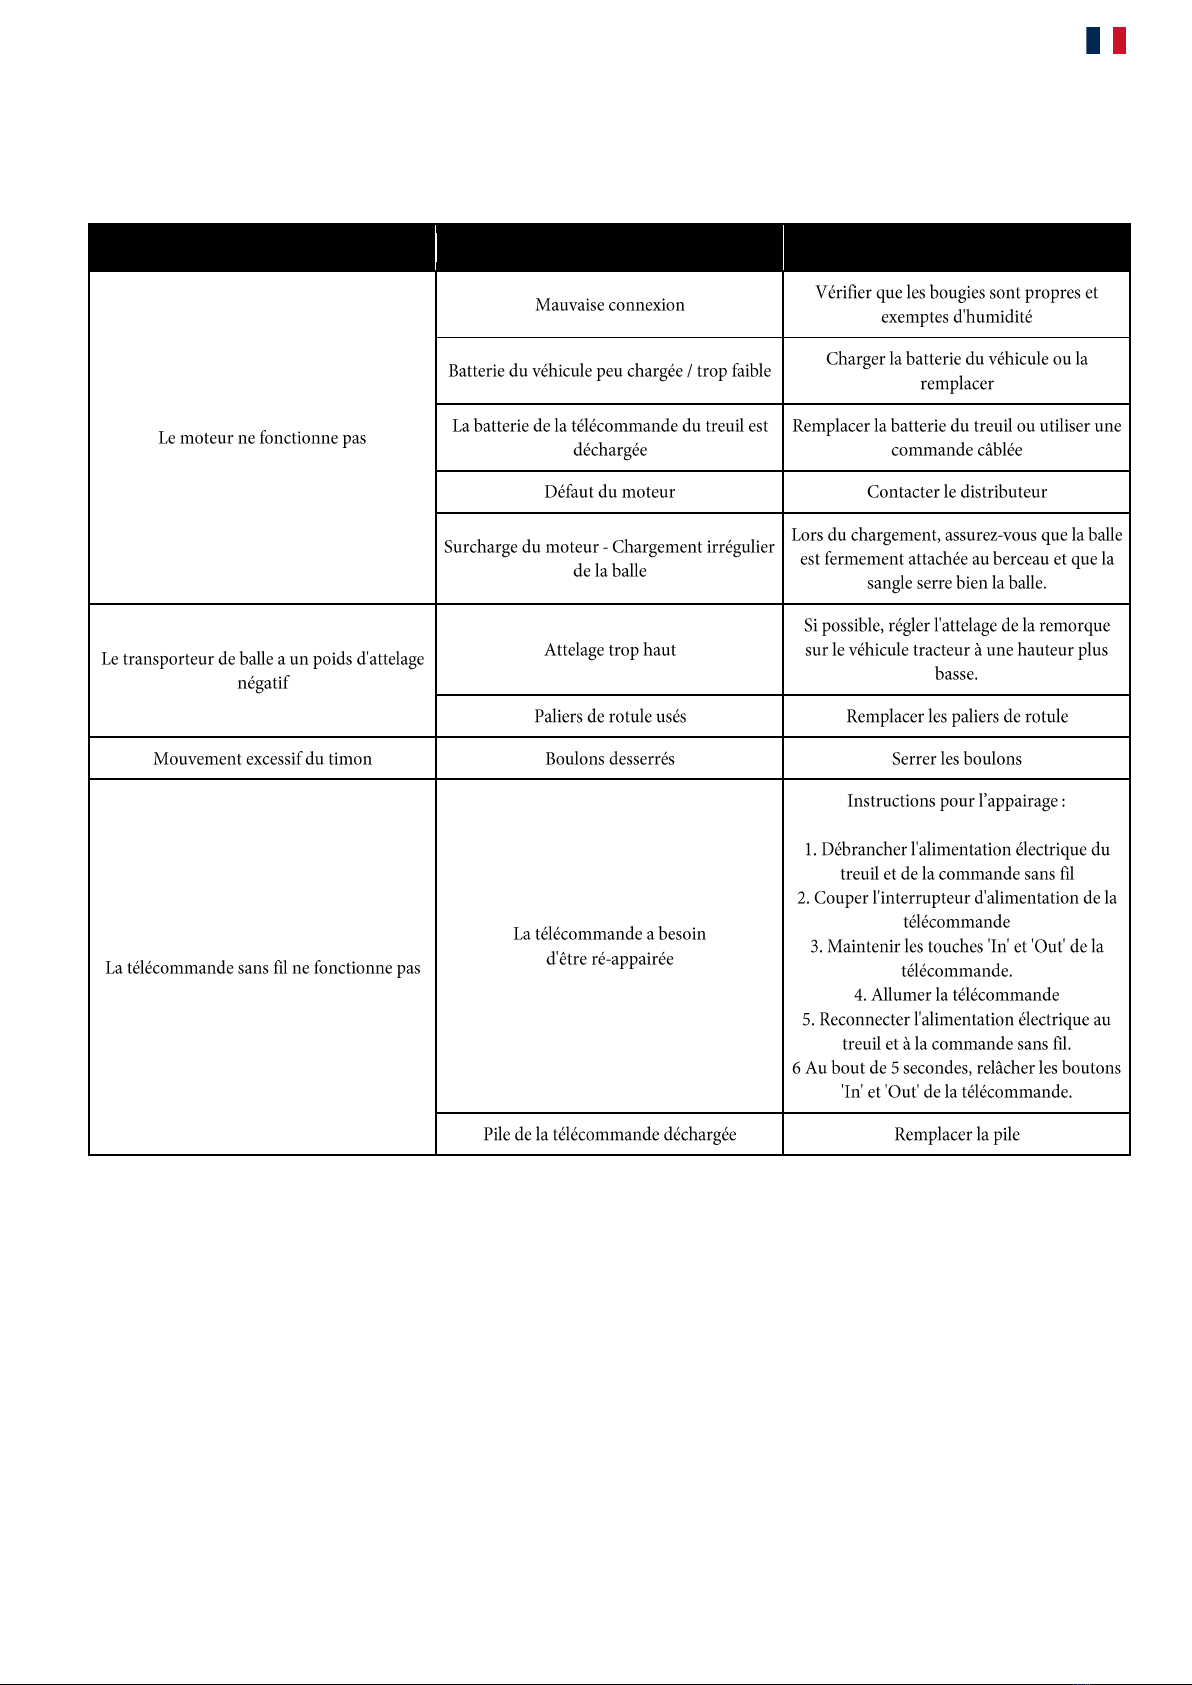
The BT500 Bale Transporter is designed to load, transport and unload round baled fodder such as silage or hay to stock.
The BT500 is a trailed attachment, attaching to the towing vehicle with a 50mm ball hitch connection with integral overturn safety swivel hitch.
Available with either standard single axle or with the optional twin bogie axle system for rougher ground and heavier bales.
Loading and unloading of the bales is achieved using a ratchet and electric winch system, with the winch drawing power from the towing vehicle
via a dedicated power draw off and connector. Winch actuation is achieved using either the supplied remote controls or hard-wired switch.
These machines should however only be used to perform tasks for which they were designed - use of the machine for any other function may be
both dangerous to persons, and potentially damaging to components. Use of the machine beyond the stated usage may invalidate any
applicable warranty, as well as being potential in breach of applicable safety regulations.
Note: This machine is for off-road use only and is not designed or approved for highway travel
Identification
Each machine is fitted with a serial plate (shown below) which details the
following:
1. Model
2. Date of Manufacture (DOM)
3. Serial Number
4. Mass
When enquiring regarding spares or additional equipment, ensure you have
this information to hand.
Implement Decals
If your implement does not contain all of the decals shown below, please contact Chapman Machinery for replacement decals before use. Note:
All decals must be present and visible. It is imperative that these are replaced if damaged to prevent potential harm to users.
CAUTION - Read operators
manual before handling this
machine. Observe
instructions and safety rules
when operating.
WARNING - Entanglement
Hazard. Keep hands away
from moving parts
ENSURE CONTROL EQUIPMENT IS SECURELY ATTACHED TO THE TOWING
VEHICLE BEFORE USE

Page 4
English
Attachment
Before attachment, ALWAYS ensure the following:
•All safety guards & decals are in good working order and correctly fitted
•Lubrication points have been lubricated as per scheduled maintenance period
•The tyres are free of damage and inflated to the correct pressure
•Electrical connections are free of dirt and moisture
NOTE: This machine is designed to attach to the towing vehicle through a 50mm diameter ball hitch.
1. Reverse the towing vehicle up to the machine.
2. Attach the machine onto the towing vehicle’scoupling.
3. Attach the power cable to the control socket fitted on the towing machine, ensuring a secure connection.
Initial Set-up
Towing Vehicle Wiring
Initially the towing vehicle must be wired using the supplied two core power cable to be wired directly to the vehicle battery terminals. Failure to
wire the supplied dedicated feed directly to the battery may cause issues with towing vehicle electrics. Ensure the supply is suitably routed to
protect from heat and mechanical damage.
Battery Specification
12V DC Nominal, Minimum 18Ah battery
Initial Test Operation
In order to familiarise the operator(s) with the machine, first test the mechanism and controls on a flat surface, without using a bale of fodder.
Once happy with the principles of operation then test using a suitable round bale before proceeding to use as normal.
Remote Battery Replacement / Pairing
If left on the remote will drain it’s internally battery – replace as required with a 27A (12v) battery which are readily available. After replacement
you may need to re-pair the remote to the receiver as follows:
1. Turn off power to receiver (unplug Anderson connector) and turn off remote handset
2. Turn on remote handset.
3. Press and hold IN & OUT buttons continuously. Whilst holding these buttons turn on power to receiver.
4. Release IN & OUT buttons.
5. Check operation both in and out to ensure pairing is complete.
Operating Limits
Minimum / Maximum Temperature: -5°C / +40°C
Maximum Bale Weight: 900kg [ensure towing vehicle is suitable for towing a load of this weight]
Maximum Bale Diameter: 1.5m (5’)
Maximum speed: 8 km/h (5mph)
Battery Voltage: 12V DC nominal
DO NOT OPERATE BEYOND OPERATING LIMITS, DAMAGE TO MACHINERY OR INJURY TO
OPERATOR MAY OCCUR.

Page 5
English
Operation
Ensure that the operator is suitably qualified to use a machine of this nature and that they have fully read and understood this manual - they
should be aware of all safety aspects relating to the safe use of the machine.
AFTER APPROXIMATELY ONE HOUR OF WORK WITH A NEW MACHINE, ALL NUTS, BOLTS AND DRIVE BELTS SHOULD BE CHECKED FOR
TIGHTNESS AND ADJUSTED AS NECESSARY
Machine Operation
Loading
1. Standing at the RH side of the machine, release the foot latch
pushing rearwards. Press the “OUT” button on the remote (Or the
“OUT” button on the hand toggle switch if using in place of the
remote).
2. Continue feeding out cable and lifting the bale cradle until it is in
the fully upright position.
3. Reverse the transporter up to the bale ensuring the bale is
centred onto the frame and the cradle is pushed back tight to the
bale. Fit the supplied ratchet strap around the rear of the bale
between the two cradle arm attachment lugs. Tighten Securely!
4. Operate the electric lift to load the bale by pressing the “IN”
button on the remote or hand control.
5. As the bale comes “over centre” press the foot latch rearwards
again, and keep winding in the electric lift until the cradle is fully
resting on the frame. Release the catch and ensure ensure the
locking pin has latched securely into place.
Unloading
Unloading is essentially a reverse of the loading procedure; with the
foot latch released, as the winch is fed out the bale should lower
onto it’s end, at which point the securing strap can be released and
the BT500 pulled away from the bale. For transport the cradle
should be lowered back onto the frame of the BT500. Please note
that without a bale in the cradle the cradle is top heavy and liable
to come down onto the frame rapidly once it goes over-centre.
*Please take care with the empty cradle to avoid injury!* Once the
cradle is resting on the frame, again, ensure the catch is secured to
prevent the cradle moving in transit.
Machine Disposal
Disposal of this machine and any of its component parts must be performed in a responsible and inoffensive manner respecting all current laws
relating to this subject. Materials forming this machine that must undergo differentiated division and disposal are; Steel, Mineral Oil, Rubber,
Plastic
Storage
For extended periods of storage, it is advisable that the machine be kept in a clean dry environment protected from the elements to avoid risk
of corrosion.

Page 6
English
Troubleshooting
Problem
Possible Causes
Remedies

Page 7
English
Warranty
The Chapman Warranty
Chapman Machinery Ltd (herein ‘Chapman’ or ‘Chapman Machinery’) warrants that the machine referred to in the Warranty Registration Form will be free
from manufacturing defects for a period of 24 months from the date of sale. This warranty does not affect your statutory rights, but merely adds to them.
Should you have a problem within 24 months from the date of sale please contact your original dealer, or Chapman Machinery’s Service Department.
Any part found to be defective during this period will be replaced or repaired, at our discretion, by the dealer or a authorised Service Engineer.
Warranty Conditions
1. The Warranty Registration Form must be completed and returned to Chapman Machinery Ltd within 30 days of the date of sale
2. This warranty does not cover defects arising from fair wear and tear, wilful damage, negligence, misuse, abnormal working conditions, use in competition,
failure to follow Chapman Machinery’s instructions (oral or written, including all instructions and recommendation made in the Operator’s Manual) or
alteration or repair of the
machinery without prior approval.
3. The machinery must have been serviced in accordance with the Operator’s Manual and the Service Log must have been
kept up to date and made available tothe
dealer should service, repair or warranty work be undertaken.
4. This warranty does not cover claims in respect of wearing parts such as blades, flails, paintwork, tyres, belts, hydraulic hoses, bearings, bushes, linkage pins,
top links, ball ends unless there is a manufacturing or material defect or the cost of normal servicing items such as oils and lubricants.
5. This warranty does not cover any expenses or losses incurred whilst the machinery is out of use for warranty repairs or parts replacement.
6. This warranty does not extend to parts, materials or equipment not manufactured by Chapman Machinery, for which the Buyer shall only be entitled to the
benefit of any such warranty or guarantee given by themanufacturer to Chapman Machinery. Only genuine replacement parts will be allowable for warranty
claims.
7. All parts replaced by Chapman Machinery under warranty become the property of Chapman Machinery and must be returned to Chapman Machinery if
so requested. Such parts may only be disposed of after a warranty claim has been accepted and processed by Chapman Machinery.
8. Chapman Machinery is not liable under this warranty for any repairs carried out without Chapman Machinery’s written consent or without Chapman
Machinery being afforded a reasonable opportunity toinspect the machinery the subject of the warranty claim. Chapman Machinery’s written consent must,
therefore, be obtained before any repairs are carried out or parts replaced. Use of non- Chapman Machinery parts automatically invalidates the Chapman
Warranty. Failed components must not be dismantled except as specifically authorised by Chapman Machinery and dismantling of any components without
authorisation from Chapman Machinery will invalidate this warranty.
9. All warranty claims must be submitted to Chapman Machinery on Chapman Machinery Warranty Claim Forms within 30 days of completion of warranty
work.
Using the machine implies the knowledge and acceptance of these instructions and the limitations contained in this
Manual.
Transfer of Warranty
The Chapman warranty be transferred to a subsequent owner of the machinery (for use within the UK only) for the balance of the warranty period subject to
all of the stated warranty conditions and provided that the Change of Owner form is completed and sent to Chapman Machinery within 14 days of change of
owner- ship.
Chapman Machinery Ltd retain the right to refuse transfer of warranty.
Chapman Machinery reserves the right to make alterations and improvements to any machinery
without notification and without obligation to do so.

Page 8
English
DECLARATION OF CONFORMITY
EU: Machinery Directive 2006/42/EC
UK: Supply of Machinery (Safety) Regulations 2008
Manufacturer: Chapman Machinery Ltd, Hele Barton, Week St Mary, Holsworthy, Devon, EX22 6XR, UK
Product(s) covered: BT500 Bale Transporter
Serial Number: Stated on Accompanying Invoice
Standards and Regulations Used: Machinery Directive 2006/42/EC
Supply of Machinery (Safety) Regulations 2008
Place of Issue: United Kingdom
Name of Representative: James Chapman
Position of Representative: Director
Basis of Conformity Declaration: Self Declaration by Manufacturer
Declaration:
I declare that as the authorised representative, the above information in relation to the supply / manufacture of this
product, is in conformity with the stated standards and other related documents following the provisions of Machinery
Directive 2006/42/EC directives [EU] and Supply of Machinery (Safety) Regulations 2008 [UK]
The products described above comply with the essential requirements of the directives specified.
Signed:
Date: 06/04/2022

Seite 9
Deutsch
Einführung
DIESES HANDBUCH MUSS DEM BEDIENER VOR DER BENUTZUNG AUSGEHÄNDIGT WERDEN. DER BEDIENER MUSS DEN INHALT DIESES
HANDBUCHSVOLLSTÄNDIG VERSTEHEN , BEVOR ER DIE MASCHINE ZUM ERSTEN MAL BENUTZT. WENN DAS GERÄT WEITERVERKAUFT
WIRD, MUSS DIESES HANDBUCH DER MASCHINE BEILIEGEN .
HINWEIS: Die in diesem Handbuch enthaltenen Informationen sind zum Zeitpunkt der Drucklegung korrekt. Im Laufe der Entwicklung sind
jedoch Änderungen der Spezifikationen unvermeidlich. Sollten Sie feststellen, dass die angegebenen Informationen nicht mit Ihrer Maschine
übereinstimmen, wenden Sie sich bitte direkt an Chapman Machinery Ltd, um Rat zu erhalten. Verwenden Sie nur Chapman-
Originalersatzteile für Chapman-Maschinen und -Geräte.
Wichtige Sicherheitsinformationen
Lesen Sie dieses Handbuch immer, bevor Sie die Maschine montieren oder in Betrieb nehmen. Wenden Sie sich im Zweifelsfall an Ihren
Händler oder an die Kundendienstabteilung von Chapman Machinery, um Rat und Unterstützung zu erhalten.
•Bedienen Sie dieses Gerät nur, wenn Sie dieses Handbuch vollständig gelesen haben.
•Verwenden Sie diese Maschine nur für die vorgesehene Aufgabe - unsachgemäßer Gebrauch ist sehr gefährlich und schadet
den Maschinenkomponenten.
•Sowohl Bediener als auch Wartungspersonal sollten mit der Maschine vertraut sein und sich der Gefahren bewusst sein, die
mit einer unsachgemäßen Verwendung oder falschen Reparaturen verbunden sind.
•Führen Sie vor dem Start eine Sichtprüfung der Maschine und des Zugfahrzeugs in Bezug auf Funktionalität, Verkehrssicherheit
und Unfallverhütungsvorschriften durch.
•Auch bei sachgemäßer Verwendung der Maschine können Unfälle passieren. Es ist unbedingt erforderlich, dass sich niemand im
Gefahrenbereich aufhält. Wenn Sie in der Nähe von Straßen, Gebäuden oder Tieren arbeiten, müssen Sie besonders vorsichtig
sein, um die Sicherheit zu gewährleisten.
•Tragen Sie niemals lose Kleidung, die sich in rotierenden Geräten verfangen könnte.
•Befördern Sie niemals Passagiere auf dem Zugfahrzeug
•Halten Sie sich während des Betriebs nicht in der Nähe der Maschine auf.
•Beschädigte oder fehlende Sicherheitsaufkleber müssen sofort ersetzt werden.
Sicherheit im Verkehr
•Verringern Sie beim Transport, insbesondere auf unebenem Gelände, die Geschwindigkeit, um Schäden an der Maschine zu
vermeiden.
•Diese Maschine ist in ihrer Standardform nicht für den Straßenverkehr zugelassen. Schleppen Sie das Fahrzeug NICHT auf
öffentlichen Straßen, es sei denn, Sie haben das für den Straßenverkehr zugelassene Modell angegeben und geprüft, ob dieses
und das Zugfahrzeug den geltenden örtlichen Straßenverkehrsvorschriften entsprechen.
Betriebssicherheit
•Achten Sie bei der Arbeit besonders darauf, dass das Vieh nicht zu Schaden kommt, wenn es sich um die Maschine drängt.
•Sollte sich etwas im Mechanismus verfangen haben, halten Sie die Maschine an und unterbrechen Sie die Stromzufuhr, bevor Sie
versuchen, die Blockade zu beseitigen.

Seite 10
Deutsch
Beschreibung
Der Ballentransporter BT500 ist für das Laden, den Transport und das Entladen von Rundballenfutter wie Silage oder Heu für das Vieh
bestimmt.
Das BT500 ist ein gezogenes Anbaugerät, das über eine 50-mm-Kugelkopfkupplung mit integriertem Sicherheitsdrehkranz am Zugfahrzeug befestigt
wird. Erhältlich entweder mit Standard-Einzelachse oder mit dem optionalen Doppelachsensystem für unebenen Boden und schwerereBallen.
Das Be- und Entladen der Ballen erfolgt über ein Ratschen- und elektrisches Windensystem, wobei die Winde über einen speziellen
Stromanschluss vom Zugfahrzeug gespeist wird. Die Betätigung der Winde erfolgt entweder über die mitgelieferten Fernbedienungen oder
über einen fest verdrahteten Schalter.
Diese Maschinen sollten jedoch nur für die Aufgaben verwendet werden, für die sie konstruiert wurden - die Verwendung der Maschine für
andere Funktionen kann sowohl für Personen gefährlich sein als auch potenziell die Komponenten beschädigen. Die Verwendung des Geräts
über den angegebenen Verwendungszweck hinaus kann zum Erlöschen jeglicher Garantie führen und stellt möglicherweise einen Verstoß
gegen die geltenden Sicherheitsvorschriften dar.
Anmerkung: Diese Maschine ist nur für den Einsatz im Gelände bestimmt und nicht für den Straßenverkehr zugelassen.
Identifizierung
Jede Maschine ist mit einem Serienschild versehen (siehe unten), das
folgende Angaben enthält:
5. Modell
6. Datum der Herstellung
7. Seriennummer
8. Masse
Wenn Sie sich nach Ersatzteilen oder zusätzlicher Ausrüstung erkundigen,
stellen Sie sicher, dass Sie diese Informationen zur Hand haben.
Aufkleber am Gerät
Wenn Ihr Gerät nicht alle der unten aufgeführten Aufkleber enthält, wenden Sie sich bitte vor dem Einsatz an Chapman Machinery, um
Ersatzaufkleber zu erhalten. Anmerkung: Alle Aufkleber müssen vorhanden und sichtbar sein. Diese müssen unbedingt ersetzt werden, wenn
sie beschädigt sind, um mögliche Schäden für die Benutzer zu vermeiden.
VORSICHT - Lesen Sie die
Bedienungsanleitung, bevor
Sie die Maschine bedienen.
Beachten Sie beim Betrieb die
Anweisungen und
Sicherheitsvorschriften.
WARNUNG - Gefahr des
Verfangens. Hände von
beweglichen Teilen
fernhalten
STELLEN SIE SICHER, DASS DIE STEUERGERÄTE VOR DER VERWENDUNG SICHER
AM ZUGFAHRZEUG BEFESTIGT SIND

Seite 11
Deutsch
Anbau
Stellen Sie vor der Befestigung IMMER Folgendes sicher:
•Alle Schutzvorrichtungen und Aufkleber sind in einwandfreiem Zustand und korrekt angebracht
•Die Schmierstellen wurden gemäß den geplanten Wartungsintervallen geschmiert.
•Die Reifen sind nicht beschädigt und haben den richtigen Luftdruck
•Elektrische Anschlüsse sind frei von Schmutz und Feuchtigkeit
HINWEIS: Diese Maschine ist so konzipiert, dass sie über eine Kugelkupplung mit 50 mm Durchmesser am Zugfahrzeug befestigt werden kann.
4. Fahren Sie das Zugfahrzeug rückwärts an die Maschine heran.
5. Befestigen Sie die Maschine an der Anhängerkupplung des Zugfahrzeugs.
6. Schließen Sie das Stromkabel an die Steuerbuchse der Zugmaschine an und stellen Sie eine sichere Verbindung her.
Erstmalige Einrichtung
Verkabelung von Zugfahrzeugen
Zunächst muss das Zugfahrzeug mit dem mitgelieferten zweiadrigen Stromkabel verkabelt werden, das direkt an die Klemmen der
Fahrzeugbatterie angeschlossen wird. Wenn Sie die mitgelieferte Zuleitung nicht direkt an die Batterie anschließen, kann es zu Problemen
mit der Elektrik des Zugfahrzeugs kommen. Vergewissern Sie sich, dass die Zuleitung in geeigneter Weise verlegt ist, um sie vor Hitze und
mechanischen Beschädigungen zu schützen.
Technische Daten der Batterie
12V DC Nennspannung, Batterie mindestens 18Ah
Erster Testbetrieb
Um den/die Bediener mit der Maschine vertraut zu machen, testen Sie zunächst den Mechanismus und die Bedienelemente auf einer
ebenen Fläche, ohne einen Futterballen zu verwenden. Wenn Sie mit der Funktionsweise zufrieden sind, sollten Sie einen Test mit einem
geeigneten Rundballen durchführen, bevor Sie mit der normalen Verwendung fortfahren.
Austausch der Fernbedienungsbatterie / Pairing
Wenn die Fernbedienung eingeschaltet bleibt, entlädt sich die interne Batterie - ersetzen Sie sie bei Bedarf durch eine 27A (12v) Batterie, die
leicht erhältlich ist. Nach dem Austausch müssen Sie möglicherweise die Fernbedienung wie folgt neu mit dem Empfänger koppeln:
6. Schalten Sie die Stromversorgung des Empfängers aus (ziehen Sie den Anderson-Stecker ab) und schalten Sie die Fernbedienung
aus.
7. Schalten Sie die Fernbedienung ein.
8. Drücken und halten Sie die Tasten IN & OUT kontinuierlich. Wenn Sie diese Tasten gedrückt halten, schalten Sie den Empfänger
ein.
9. Lassen Sie die Tasten IN & OUT los.
10. Überprüfen Sie den Betrieb sowohl bei IN als auch bei OUT, um sicherzustellen, dass die Kopplung vollständig ist.
Betriebsgrenzwerte
Minimale / maximale Temperatur: -5°C / +40°C
Maximales Ballengewicht: 900kg [stellen Sie sicher, dass das Zugfahrzeug für das Ziehen einer Last mit diesem Gewicht geeignet ist]
Maximaler Ballendurchmesser: 1.5m (5')
Höchstgeschwindigkeit: 8 km/h (5mph)
Batteriespannung: 12V DC Nennspannung
NICHT ÜBER DIE BETRIEBSGRENZEN HINAUS ARBEITEN, DA DIES ZU SCHÄDEN
AN DER MASCHINE ODER VERLETZUNGEN DES BEDIENERS FÜHREN KANN.
Seite 12
Deutsch
Bedienung
Vergewissern Sie sich, dass der Bediener für die Verwendung einer solchen Maschine qualifiziert ist und dass er dieses Handbuch vollständig
gelesen und verstanden hat - er sollte sich aller Sicherheitsaspekte im Zusammenhang mit der sicheren Verwendung der Maschine bewusst
sein.
NACH ETWA EINER STUNDE ARBEIT MIT EINER NEUEN MASCHINE SOLLTEN ALLE MUTTERN, SCHRAUBEN UND ANTRIEBSRIEMEN AUF
FESTEN SITZ GEPRÜFT UND GEGEBENENFALLS NACHGESTELLT WERDEN
Betrieb der Maschine
Laden
1. Stellen Sie sich an die rechte Seite der Maschine und lösen Sie
die Fußverriegelung, indem Sie sie nach hinten drücken. Drücken
Sie die Taste "OUT" auf der Fernbedienung (oder die Taste "OUT"
auf dem Handkippschalter, wenn Sie ihn anstelle der
Fernbedienung verwenden).
2. Fahren Sie mit dem Herausführen des Kabels und dem Anheben
der Ballenhalterung fort, bis sie sich in der vollständig aufrechten
Position befindet.
3. Fahren Sie den Transporter rückwärts an den Ballen heran und
stellen Sie sicher, dass der Ballen mittig auf dem Rahmen liegt und die
Halterung fest an den Ballen gedrückt wird. Legen Sie den
mitgelieferten Ratschengurt um die Rückseite des Ballens zwischen
den beiden Befestigungslaschen des Halterungsarms. Sicher anziehen!
4. Betätigen Sie den elektrischen Heber zum Laden des Ballens, indem Sie
die Taste "IN" auf der Fernbedienung oder der Handsteuerung drücken.
5. Wenn der Ballen "über die Mitte" kommt, drücken Sie die
Fußverriegelung wieder nach hinten und ziehen Sie den elektrischen
Heber weiter auf, bis die Halterung vollständig auf dem Rahmen ruht.
Lassen Sie den Verschluss los und vergewissern Sie sich, dass der
Sicherungsstift sicher eingerastet ist.
Entladen
Das Entladen erfolgt im Wesentlichen in umgekehrter Reihenfolge wie das
Beladen; bei gelöster Fußverriegelung sollte sich der Ballen beim Ausfahren
der Winde auf sein Ende absenken, woraufhin das Sicherungsband gelöst
und der BT500 vom Ballen weggezogen werden kann. Für den Transport
sollte die Halterung wieder auf den Rahmen des BT500 abgesenkt werden.
Bitte beachten Sie, dass die Halterung ohne einen Ballen in der Halterung
kopflastig ist und schnell auf den Rahmen fallen kann, wenn sie über die
Mitte hinausgeht. *Bitte gehen Sie vorsichtig mit der leeren Halterung um,
um Verletzungen zu vermeiden!* Sobald die Halterung auf dem Rahmen
ruht, stellen Sie sicher,dass der Verschluss gesichert ist, um zuverhindern,
dass sich die Halterung beim Transport bewegt.
Maschinenentsorgung
Die Entsorgung dieser Maschine und ihrer Bestandteile muss auf verantwortungsvolle und unschädliche Weise und unter Beachtung aller
geltenden Gesetze zu diesem Thema erfolgen. Die Materialien, aus denen diese Maschine besteht und die differenziert getrennt und
entsorgt werden müssen, sind: Stahl, Mineralöl, Gummi, Kunststoff
Lagerung
Bei längerer Lagerung ist es ratsam, das Gerät in einer sauberen, trockenen und vor Witterungseinflüssen geschützten Umgebung
aufzubewahren, um Korrosionsrisiken zu vermeiden.

Seite 13
Deutsch
Fehlersuche
Problem
Mögliche Ursachen
Abhilfemaßnahmen

Seite 14
Deutsch
Garantie
Die Chapman-Garantie
Chapman Machinery Ltd (im Folgenden "Chapman" oder "Chapman Machinery") garantiert, dass die im Garantie-Registrierungsformular angegebene Maschine
für einen Zeitraum von 24 Monaten ab dem Verkaufsdatum frei von Herstellungsfehlern ist. Diese Garantie schränkt Ihre gesetzlichen Rechte nicht ein, sondern
ergänzt sie lediglich. Sollten Sie innerhalb von 24 Monaten nach dem Verkaufsdatum ein Problem haben, wenden Sie sich bitte an Ihren Händler oder an die
Kundendienstabteilung von Chapman Machinery.
Jedes Teil, das sich während dieses Zeitraums als defekt erweist, wird nach unserem Ermessen durch den Händler oder einen autorisierten
Servicetechniker ersetzt oder repariert.
Garantiebedingungen
4. Das Garantie-Registrierungsformularmuss ausgefüllt und innerhalb von 30 Tagen nach dem Verkaufsdatum an Chapman Machinery Ltd zurückgeschickt werden.
5. Diese Garantie deckt keine Mängel ab, die durch normalen Verschleiß , vorsätzliche Beschädigung, Fahrlässigkeit, Missbrauch, anormale Arbeitsbedingungen,
Verwendung im Wettbewerb, Nichtbeachtung der Anweisungen von Chapman Machinery (mündlich oder schriftlich, einschließlich aller Anweisungen und
Empfehlungen in der Betriebsanleitung) oder Änderungen oder Reparaturen am
Maschinen ohne vorherige Genehmigung.
6. Die Maschine muss gemäß der Betriebsanleitung gewartet worden sein, und das Wartungsprotokoll muss auf dem neuesten Stand gehalten und dem
Hersteller zur Verfügung gestellt worden sein.
Händler, wenn Service-, Reparatur- oder Garantiearbeiten durchgeführt werden sollen.
4. Diese Garantie deckt keine Ansprüche in Bezug auf Verschleißteile wie Messer, Schlegel, Lackierung, Reifen, Riemen, Hydraulikschläuche, Lager, Buchsen,
Gestängebolzen, Oberlenker, Kugelköpfe ab, es sei denn, es liegt ein Fabrikations- oder Materialfehler vor oder die Kosten für normale Wartungsarbeiten wie Öle
und Schmiermittel.
10.Diese Garantie deckt keine Kosten oder Verluste ab, die entstehen, während die Maschine für Garantiereparaturen oder den Austausch von Teilen außer
Betrieb ist.
11.Diese Garantie erstreckt sich nicht auf Teile, Materialien oder Ausrüstungen, die nicht von Chapman Machinery hergestellt wurden, für die der Käufer nur
Anspruch auf die vom Hersteller an Chapman Machinery gewährte Garantie oder Gewährleistung hat . Nur Originalersatzteile sind für Garantieansprüche zulässig.
12.Alle von Chapman Machinery im Rahmen der Garantie ersetzten Teile gehen in das Eigentum von Chapman Machinery über und müssen auf Verlangen an
Chapman Machinery zurückgegeben werden. Solche Teile dürfen erst dann entsorgt werden, wenn ein Garantieanspruch von Chapman Machinery akzeptiert und
bearbeitet wurde.
13.Chapman Machinery haftet im Rahmen dieser Garantie nicht für Reparaturen, die ohne die schriftliche Zustimmung von Chapman Machinery oder ohne dass
Chapman Machinery eine angemessene Gelegenheit zur Inspektion der Maschine, die Gegenstand des Garantieanspruchs ist, erhalten hat, durchgeführt werden.
Daher muss vor der Durchführung von Reparaturen oder dem Austausch von Teilen die schriftliche Zustimmung von Chapman Machinery eingeholt werden. Die
Verwendung von Teilen, die nicht von Chapman Machinery stammen, führt automatisch zum Erlöschen der Chapman-Garantie.Defekte Bauteile dürfen nur mit
ausdrücklicher Genehmigung von Chapman Machinery demontiert werden, und die Demontage von Bauteilen ohne Genehmigung von Chapman Machinery führt
zum Erlöschen dieser Garantie.
14. Alle Garantieansprüche müssen innerhalb von 30 Tagen nach Beendigung der Garantiearbeiten mit dem Garantieantragsformular von Chapman
Machinery bei Chapman Machinery eingereicht werden.
Die Benutzung der Maschine setzt die Kenntnis und Akzeptanz dieser Anweisungen und der in diesem Handbuch enthaltenen Einschränkungen voraus.
Übertragung der Garantie
Die Chapman-Garantie kann auf einen nachfolgenden Besitzer der Maschine (nur für die Verwendung innerhalb Großbritanniens) für die restliche Garantiezeit
übertragen werden, vorbehaltlich aller angegebenen Garantiebedingungen und unter der Voraussetzung, dass das Formular für den Besitzerwechsel ausgefüllt
und innerhalb von 14 Tagen nach dem Besitzerwechsel an Chapman Machinery geschickt wird.
Chapman Machinery Ltd behält sich das Recht vor, die Übertragung der Garantie abzulehnen.
Chapman Machinery behält sich das Recht vor, Änderungen und Verbesserungen an allen Maschinen ohne Benachrichtigung und ohne dazu
verpflichtet zu sein, vorzunehmen.

Page 15
Français
Introduction
CE MANUEL DOIT ÊTRE REMIS À L'OPÉRATEUR AVANT L'UTILISATION. L'OPÉRATEUR DOIT COMPRENDRE PARFAITEMENT LE CONTENU DE CE
MANUEL AVANT D'UTILISER LA MACHINE POUR LA PREMIÈRE FOIS. EN CAS DE REVENTE DE L'APPAREIL, LE PRÉSENT MANUEL DOIT
ACCOMPAGNER LA MACHINE.
NOTE : Les informations contenues dans ce manuel sont correctes au moment de l’impression. Cependant, au cours du développement, des
changements dans les spécifications sont inévitables. Si vous constatez que les informations données diffèrent de votre machine, veuillez
contacter directement Chapman Machinery Ltd pour obtenir des conseils. N'utilisez que des pièces de rechange d'origine Chapman sur les
machines et équipements Chapman.
Informations importantes en matière de sécurité
Lisez toujours ce manuel avant d'installer ou d'utiliser la machine. En cas de doute, contactez votre revendeur ou le service après-vente de
Chapman Machinery pour obtenir des conseils et de l'aide.
•N'utilisez pas cet équipement sans avoir lu le présent manuel dans son intégralité
•N'utilisez cette machine que pour la tâche pour laquelle elle a été conçue - une utilisation inappropriée est à la fois très
dangereuse et dommageable pour les composants de la machine.
•Les opérateurs et les ajusteurs-monteurs doivent connaître la machine et être pleinement conscients des dangers liés à une
utilisation inappropriée ou à des réparations incorrectes.
•Avant de commencer, effectuez un contrôle visuel de la machine et du véhicule tracteur en ce qui concerne la fonctionnalité, la
sécurité routière et les règles de prévention des accidents.
•Même en cas d'utilisation correcte de la machine, des accidents peuvent survenir. Il est impératif que personne ne se tienne dans
la zone de danger. En cas de travail à proximité de routes, de bâtiments ou d'animaux, une attention particulière doit être
accordée à la sécurité.
•Ne jamais porter de vêtements amples qui pourraient être happés par des équipements en rotation.
•Ne jamais transporter de passagers sur le véhicule tracteur
•Ne vous tenez pas à proximité de la machine lorsqu'elle fonctionne
•Les autocollants de sécurité endommagés ou manquants doivent être remplacés immédiatement.
Sécurité des transports
•Lors du transport, en particulier sur un terrain accidenté, réduisez la vitesse pour éviter d'endommager la machine.
•Cette machine n'est pas homologuée pour la circulation routière dans sa forme standard. NE PAS remorquer sur la voie publique
sans avoir spécifié le modèle homologué pour la route et vérifié que celui-ci et le véhicule de remorquage sont conformes au
code de la route local en vigueur.
Sécurité de fonctionnement
•Veillez tout particulièrement à ne pas blesser le bétail en cas d'attroupement autour de la machine.
•Si un objet se coince dans le mécanisme, arrêtez la machine et débranchez-la avant d'essayer de le dégager.

Page 16
Français
Description
Le transporteur de balles BT500 est conçu pourcharger, transporter et décharger des fourrages en balles rondes tels que l'ensilage ou le foin.
Le BT500 est un accessoire tracté, qui s'attache au véhicule tracteur par un attelage à boule de 50 mm avec un attelage pivotant de sécurité
intégré pour le retournement. Disponible avec un essieu simple standard ou avec un système d'essieu tandem en option pour les terrains
plus accidentés et les balles plus lourdes.
Le chargement et le déchargement des balles s'effectuent à l'aide d'un système de cliquet et de treuil électrique, le treuil étant alimenté par
le véhicule tracteur au moyen d'une prise de courant et d'un connecteur dédiés. L'actionnement du treuil s'effectue à l'aide des
télécommandes fournies ou d'un interrupteur câblé.
Ces machines ne doivent toutefois être utilisées que pour effectuer les tâches pour lesquelles elles ont été conçues - l'utilisation de la
machine pour toute autre fonction peut s'avérer dangereuse pour les personnes et potentiellement dommageable pour les composants.
L'utilisation de la machine au-delà de l'usage indiqué peut entraîner l'annulation de toute garantie applicable, ainsi qu'une violation
potentielle des règles de sécurité en vigueur.
Remarque : Cette machine est destinée à une utilisation hors route uniquement et n'est pas conçue ni approuvée pour circuler sur les
routes.
Identification
Chaque machine est équipée d'une plaque de série (illustrée ci-dessous) qui
contient les informations suivantes :
9. Modèle
10. Date de fabrication (DOM)
11. Numéro de série
12. Poids
Lorsque vous demandez des pièces détachées ou du matériel
supplémentaire, assurez-vous d'avoir ces informations à portée de main.
Autocollants d’outil
Si votre outil ne contient pas tous les autocollants indiqués ci-dessous, veuillez contacter Chapman Machinery pour obtenir des autocollants
de remplacement avant de l'utiliser. Remarque : Tous les autocollants doivent être présents et visibles. Il est impératif de les remplacer s'ils
sont endommagés afin d'éviter tout risque pour les utilisateurs.
ATTENTION - Lisez le manuel
de l'opérateur avant de
manipuler cette machine.
Respectez les instructions et
les règles de sécurité lors de
l'utilisation.
AVERTISSEMENT - Risque
d'enchevêtrement. Tenir les
mains à l'écart des pièces
en mouvement
S'ASSURER QUE L'ÉQUIPEMENT DE CONTRÔLE EST SOLIDEMENT FIXÉ
AU VÉHICULE TRACTEUR AVANT DE L'UTILISER

Page 17
Français
Accessoire
Avant de procéder à la fixation, il faut TOUJOURS vérifier les points suivants :
•Tous les dispositifs de sécurité et les autocollants sont en bon état de fonctionnement et correctement installés.
•Les points de graissage ont été lubrifiés conformément à l’intervalle d'entretien prévu.
•Les pneus ne sont pas endommagés et sont gonflés à la bonne pression.
•Les connexions électriques sont exemptes de saleté et d'humidité
NOTE : Cette machine est conçue pour s'attacher au véhicule tracteur par l'intermédiaire d'une boule d'attelage de 50 mm de diamètre.
7. Faites reculer le véhicule tracteur jusqu'à la machine.
8. Attachez la machine à l'attelage du véhicule tracteur.
9. Fixez le câble d'alimentation à la prise de contrôle installée sur la machine de remorquage, en veillant à ce que la connexion soit
bien fixée et sécurisée.
Mise en place initiale
Câblage des véhicules tracteurs
Le véhicule tracteur doit d'abord être câblé à l'aide du câble d'alimentation à deux conducteurs fourni, qui doit être branché directement sur
les bornes de la batterie du véhicule. Le fait de ne pas raccorder l'alimentation dédiée fournie directement à la batterie peut entraîner des
problèmes avec l'alimentation électrique du véhicule tracteur. Veillez à ce que l'alimentation soit correctement acheminée pour la protéger
de la chaleur et des dommages mécaniques.
Spécifications de la batterie
12Vc.c. nominal, batterie minimum 18Ah
Déroulement du test initial
Afin de familiariser le(s) opérateur(s) avec la machine, il faut d'abord tester le mécanisme et les commandes sur une surface plane, sans
utiliser de balle de fourrage. Une fois que vous êtes satisfait du déroulement du fonctionnement, faites un essai en utilisant une balle ronde
appropriée avant de procéder à l'utilisation normale.
Remplacement de la pile de la télécommande / appairage
Si elle reste allumée, la télécommande épuisera sa batterie interne - remplacez-la au besoin par une batterie de 27A (12v) qui est facilement
disponible. Après le remplacement, il peut être nécessaire d'appairer à nouveau la télécommande au récepteur de la manière suivante :
11. Coupez l'alimentation du récepteur (débranchez le connecteur Anderson) et éteignez la télécommande.
12. Allumez la télécommande.
13. Appuyez sur les touches IN et OUT et maintenez-les enfoncées en continu. En maintenant ces boutons enfoncés, vous mettez le
récepteur sous tension.
14. Relâchez les boutons IN & OUT.
15. Vérifiez le fonctionnement à l'entrée et à la sortie pour s'assurer que l'appariement est terminé.
Limites de fonctionnement
Température minimale / maximale : -5°C / +40°C
Poids maximal de la balle : 900 kg [s'assurer que le véhicule tracteur est adapté à la traction d'une charge de ce poids].
Diamètre maximal de la balle : 1,5 m (5')
Vitesse maximale : 8 km/h (5mph)
Tension de la batterie : 12Vc.c. nominal
NE PAS DÉPASSER LES LIMITES DE FONCTIONNEMENT, SOUS PEINE D'ENDOMMAGER LA
MACHINE OU DE BLESSER L'OPÉRATEUR.

Page 18
Français
Fonctionnement
Assurez-vous que l'opérateur est qualifié pour utiliser une machine de cette nature et qu'il a entièrement lu et compris ce manuel ; il doit
être conscient de tous les aspects liés à la sécurité de l'utilisation de la machine.
APRÈS ENVIRON UNE HEURE DE TRAVAIL AVEC UNE MACHINE NEUVE, IL CONVIENT DE VÉRIFIER LE SERRAGE DE TOUS LES ÉCROUS ET
BOULONS, DE VÉRIFIER QU’IL N’Y A PAS DE RUPTURES ET DE PROCÉDER AUX AJUSTEMENTS NÉCESSAIRES.
Fonctionnement de la machine
Chargement
1. En se plaçant du côté droit de la machine, relâcher le verrou du
pied en le poussant vers l'arrière. Appuyez sur la touche "OUT" de la
télécommande (ou sur la touche "OUT" de l'interrupteur manuel s'il
est utilisé à la place de la télécommande).
2. Continuez à dérouler le câble et à soulever le berceau à balles
jusqu'à ce qu'il soit en position verticale.
3. Faites reculer le transporteur jusqu'à la balle en vous assurant
que la balle est centrée sur le châssis et que le berceau est
poussé vers l'arrière pour serrer la balle. Fixez la sangle à cliquet
fournie à l'arrière de la balle, entre les deux pattes de fixation du
bras du berceau. Serrez fermement !
4. Actionnez l'élévateur électrique pour charger la balle en
appuyant sur le bouton "IN" de la télécommande ou de la
commande manuelle.
5. Lorsque la balle atteint "le centre", appuyez à nouveau sur la
pédale de déverrouillage vers l'arrière et continuez à enrouler
l'élévateur électrique jusqu'à ce que le berceau repose
complètement sur le châssis. Relâchez la pédale et assurez-vous
que la goupille de verrouillage s'est bien enclenchée.
Déchargement
Le déchargement consiste essentiellement à suivre la procédure
inverse à celle du chargement ; avec la pédale relâchée, lorsque
le treuil est alimenté, la balle devrait s'abaisser vers son
extrémité, à ce moment-là la sangle de fixation peut être
relâchée et le BT500 peut être écarté de la balle. Pour le
transport, le berceau doit être abaissé sur le châssis du BT500.
Veuillez noter que sans balle dans le berceau, ce dernier est très
lourd et risque de tomber rapidement sur le châssis une fois qu'il
est décentré. *Faites attention à ne pas vous blesser quand le
berceau est vide ! Une fois que le berceau repose à nouveau sur
le châssis, assurez-vous que la pédale est fixé pour éviter que le
berceau ne bouge pendant le transport.
Mise au rebut de la machine
La mise au rebut de cette machine et de ses composants doit être effectuée de manière responsable et inoffensive, en respectant toutes les
lois en vigueur en la matière. Les matériaux composant cette machine qui doivent faire l'objet d'une séparation et d'une mise au rebut
distincte sont : l'acier, l'huile minérale, le caoutchouc, le plastique.
Stockage
Pour les périodes de stockage prolongées, il est conseillé de conserver la machine dans un environnement propre et sec, à l'abri des
intempéries, afin d'éviter tout risque de corrosion.
Page 19
Français
Dépannage
Problème
Causes possibles
Remèdes

Page 20
Français
Garantie
La garantie Chapman
Chapman Machinery Ltd (ci-après "Chapman" ou "Chapman Machinery") garantit que la machine mentionnée dans le formulaire d'enregistrement de la
garantie sera exempte de défauts de fabrication pendant une période de 24 mois à compter de la date de vente. Cette garantie n'affecte pas vos droits
statutaires, mais les complète simplement. En cas de problème dans les 24 mois suivant la date de vente, veuillez contacter votre revendeur d'origine ou le
service après-vente de Chapman Machinery.
Toute pièce jugée défectueuse pendant cette période sera remplacée ou réparée, à notre discrétion, par le revendeur ou un technicien agréé.
Conditions de garantie
7. Le formulaire d'enregistrement de la garantie doit être rempli et renvoyé à Chapman Machinery Ltd dans les 30 jours suivant la date de vente.
8. Cette garantie ne couvre pas les défauts résultant d'une usure normale , d'un dommage volontaire, d'une négligence, d'une mauvaise utilisation, de
conditions de travail anormales, d'une utilisation en compétition, du non-respect des instructions de Chapman Machinery (orales ou écrites, notamment
toutes les instructions et recommandations figurant dans le manuel de l'opérateur) ou d'une modification ou d'une réparation de la
machine sans autorisation préalable.
9. La machine doit avoir été entretenue conformément au manuel de l'opérateur et le livret d'entretien doit avoir été tenu à jour et mis à la disposition du
concessionnaire en cas d'entretien, de réparation ou de travaux sous garantie.
4. Cette garantie ne couvre pas les réclamations concernant les pièces d'usure telles que les lames, les fléaux, la peinture, les pneus, les courroies, les flexibles
hydrauliques, les roulements, les douilles, les axes de liaison, les maillons supérieurs, les embouts à rotule, sauf en cas de défaut de fabrication ou de
matériau, ni le coût des articles d'entretien normal tels que les huiles et les lubrifiants.
15.Cette garantie ne couvre pas les dépenses ou les pertes encourues pendant que la machine est hors d'usage pour des réparations sous garantie ou le
remplacement de pièces.
16.Cette garantie ne s'étend pas aux pièces, matériaux ou équipements non fabriqués par Chapman Machinery , pour lesquels l'acheteur ne pourra bénéficier
que de la garantie donnée par le fabricant à Chapman Machinery. Seules les pièces de rechange d'origine pourront être prises en compte dans le cadre de la
garantie.
17.Toutes les pièces remplacées par Chapman Machinery dans le cadre de la garantie deviennent la propriété de Chapman Machinery et doivent être
renvoyées à Chapman Machinery à la demande, le cas échéant. Ces pièces ne peuvent être mises au rebut qu'après qu'une demande de garantie a été
acceptée et traitée par Chapman Machinery.
18.Chapman Machinery n'est pas responsable, dans le cadre de cette garantie, des réparations effectuées sans l'accord écrit de Chapman Machinery ou sans
que Chapman Machinery ait eu la possibilité d'inspecter la machine faisant l'objet de la réclamation au titre de la garantie. L'accord écrit de Chapman Machinery
doit donc être obtenu avant toute réparation ou remplacement de pièces. L'utilisation de pièces autres que celles de Chapman Machinery annule
automatiquement la garantie Chapman. Les composants défectueux ne doivent pas être démontés, sauf autorisation expresse de Chapman Machinery. Le
démontage de tout composant sans l'autorisation de Chapman Machinery annulera la présente garantie.
19. Toutes les réclamations au titre de la garantie doivent être soumises à Chapman Machinery sur les formulaires de réclamation au titre de la garantie
de Chapman Machinery dans les 30 jours suivant l'achèvement des travaux sous garantie.
L'utilisation de la machine implique la connaissance et l'acceptation de ces instructions et des limitations contenues dans ce manuel.
Transfert de garantie
La garantie Chapman peut être transférée à un propriétaire ultérieur de la machine (pour une utilisation au Royaume-Uni uniquement) pour le reste de la
période de garantie sous réserve de toutes les conditions de garantie énoncées et à condition que le formulaire de changement de propriétaire soit rempli et
envoyé à Chapman Machinery dans les 14 jours suivant le changement de propriétaire.
Chapman Machinery Ltd se réserve le droit de refuser le transfert de la garantie.
Chapman Machinery se réserve le droit d'apporter des modifications et des améliorations à toute machine.
sans notification et sans obligation de le faire.
Other manuals for BT500
1
Table of contents
Languages:
Other Chapman Farm Equipment manuals


