Chassis Plans CPX17 User manual
17” TFT-LCD Monitor
Owner’s Instructions
Chassis Plans 4360 Viewridge Avenue Suite B San Diego, CA 92123
858-571-4330 425-969-6815 Fax
www.chassisplans.com

Chassis Plans 17” TFT-LCD Monitor User’s Guide
CPX17 17” LCD User’s Guide Rev A 4/1/03
2
Table of Contents
Self-Test Feature Check ..................................................................................................................2
Precautions ......................................................................................................................................3
Installation .......................................................................................................................................4
Plug and Play ..................................................................................................................................................4
Connecting Your LCD Monitor .....................................................................................................................4
Adjusting Your LCD Monitor ........................................................................................................5
User Controls ..................................................................................................................................................5
Automatic Save ..............................................................................................................................................6
Getting Help ...................................................................................................................................................7
Warm-Up Time ..............................................................................................................................................7
Direct Access Features
Auto Adjustment ..............................................................................................................................7
Brightness ........................................................................................................................................7
On Screen Menu System ................................................................................................................................8
Accessing Main Menu .....................................................................................................................8
OSD Functions and Adjustments .....................................................................................................9
Power Management ......................................................................................................................................11
Maintenance of Your LCD Monitor .............................................................................................................12
Troubleshooting ...........................................................................................................................................13
Technical Specifications ............................................................................................................... 14
Pin Assignments ...........................................................................................................................................15
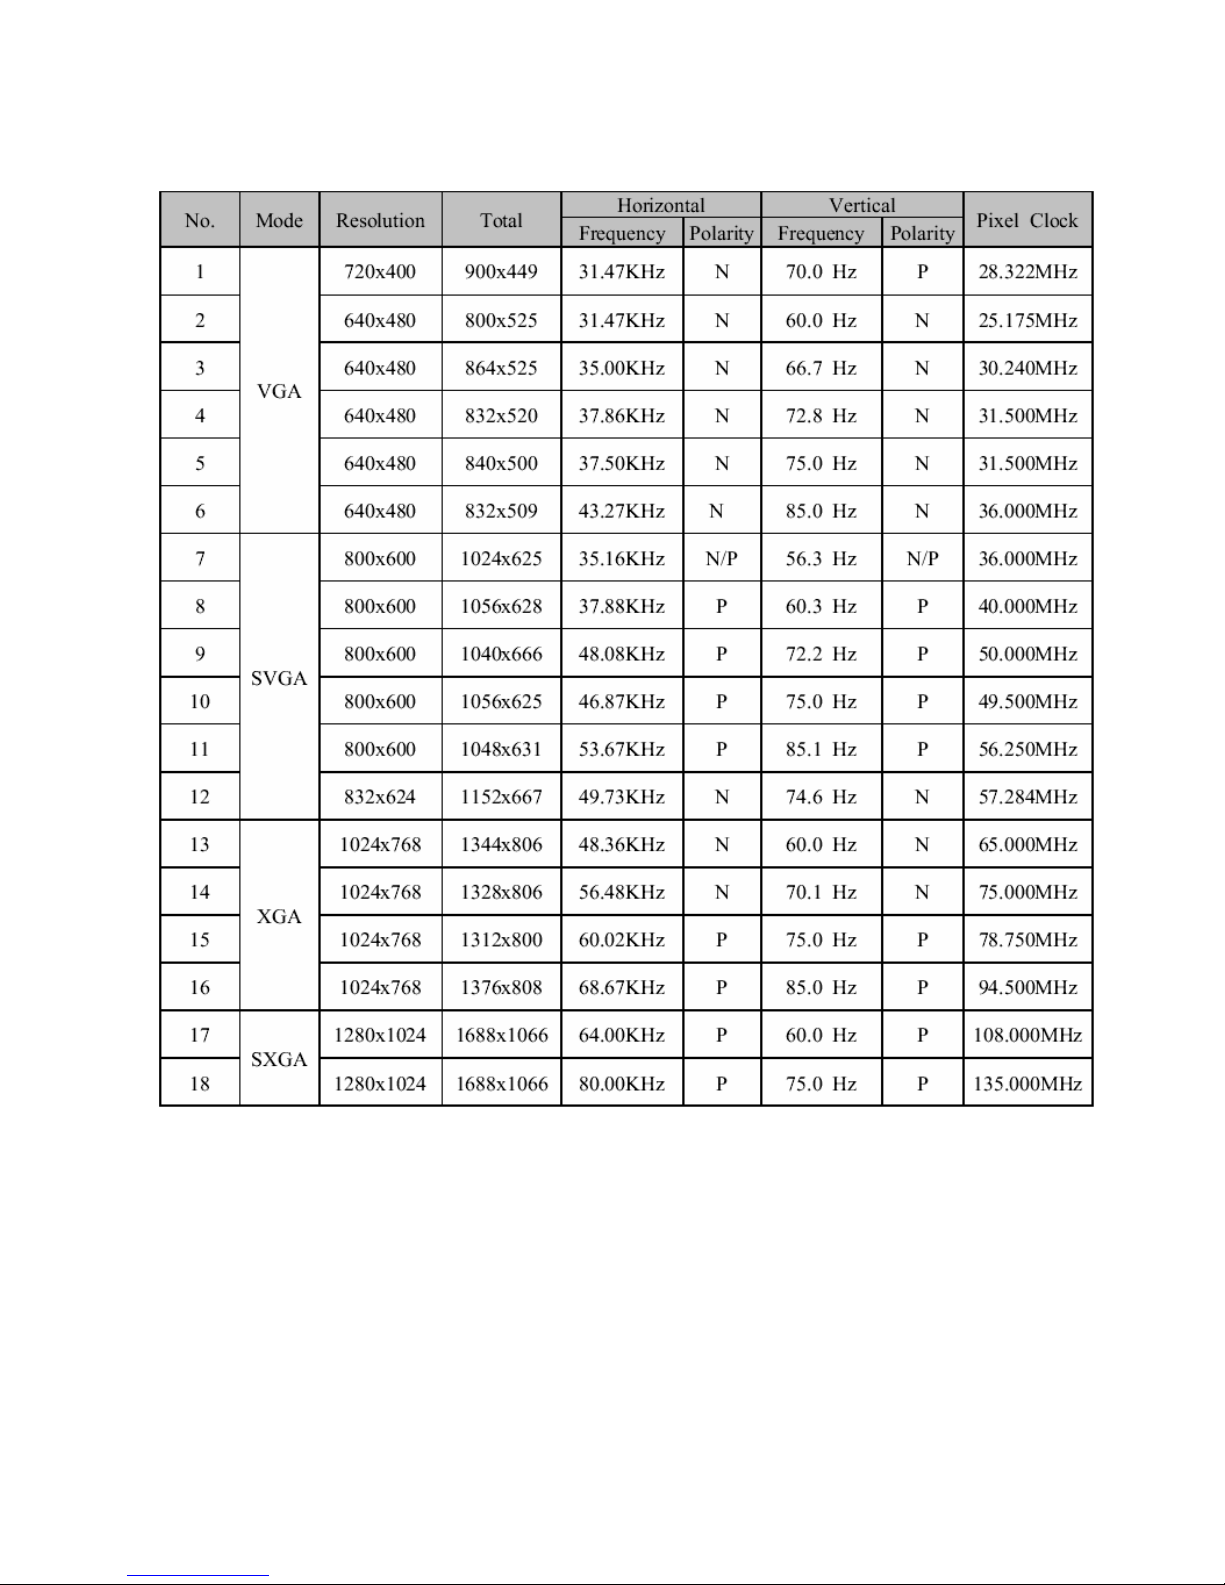
Display Modes Timing Chart .......................................................................................................................16
Keyboard/Trackball Combo ..........................................................................................................17

Chassis Plans 17” TFT-LCD Monitor User’s Guide
CPX17 17” LCD User’s Guide Rev A 4/1/03
3
Self-Test Feature Check
Self-Test Feature Check (STFC)
Your monitor provides a self-test feature that allows you to check whether your monitor is
functioning properly. If your monitor and computer are properly connected but the monitor
screen remains dark and the power indicator is blinking, run the monitor self-test by performing
the following steps:
1. Turn off both your computer and the monitor.
2. Unplug the video cable from the back of the computer.
3. Turn on the monitor.
If the monitor is functioning properly, you will see the following message:
These messages also appear during normal operation if the video cable becomes disconnected or
damaged.
4. Turn off your monitor and reconnect the video cable; then turn on both your computer and the
monitor.
If your monitor screen remains blank after using the previous procedure, check your video
controller and computer system; your monitor is functioning properly.
No Input Signal
Check connection

Chassis Plans 17” TFT-LCD Monitor User’s Guide
CPX17 17” LCD User’s Guide Rev A 4/1/03
4
Precautions
Before connecting the AC power cord to the DC adapter outlet, make sure the voltage of
the local electrical supply is within the range of 100-240VAC.
Never insert anything metallic into the openings in the cabinet of the LCD monitor; doing
so may create the danger of electric shock.
To avoid electric shock, never touch the inside of the LCD monitor. Only a qualified
technician should open the case of the LCD monitor.
Never use your LCD monitor if the power cord has been damaged. Do not allow anything
to rest on the power cord or pinch the power cord.
Be sure to hold the plug, not the cord, when disconnecting the LCD monitor from an
electric socket.
Openings in the LCD monitor cabinet are provided for ventilation. To prevent
overheating, these openings should not be blocked or covered.
Put your LCD monitor in a location with low humidity and a minimum of dust.
If the LCD monitor accidentally gets wet, unplug it and contact an authorized dealer
immediately. You can clean the LCD monitor with a damp cloth when necessary, but be
sure to unplug the LCD monitor first.
Place the LCD monitor on a solid surface and treat it carefully. The screen is made of thin
glass with a plastic front surface and can be damaged if dropped, hit or scratched. Do not
clean the front panel with keton-type materials (e.g. acetone), ethyl alcohol, toluene, ethyl
acid, methyl, or chloride -these may damage the monitor.
Locate your LCD monitor near an easily accessible AC outlet.
If your LCD monitor does not operate normally -in particular, if there are any unusual
sounds or smells corning from it -unplug it immediately and contact an authorized dealer
or service center.
High temperature can cause problems. Don't use your LCD monitor in direct sunlight,
and keep it away from heaters and other sources of heat.
Unplug the LCD monitor when it is going to be left unused for an extended period of
time.
Unplug your LCD monitor from the AC outlet before any service.
Maximum operating ambient temperature is 40°C.
Never restrict the airflow through the devices’ fan or vents. Install the unit in a well-
ventilated area.
When installing equipment into a rack, distribute the units evenly. Otherwise, hazardous
conditions may be created by an uneven weight distribution.
Connect the unit only to a properly rated supply circuit.
Mouse (trackball) and keyboard connections to be connected only to Listed ITE with
Limited Power Source (LPS) keyboard and mouse (trackball) outputs.
CAUTION
RISK OF ELECTRIC SHOCK
DO NOT OPEN
CAUTION: TO REDUCE THE RISK OF ELECTRIC SHOCK, DO
NOT REMOVE COVER (OR BACK).
NO USER-SERVICEABLE PARTS INSIDE.
REFER SERVICING TO QUALIFIED SERVICE PERSONNEL.

Chassis Plans 17” TFT-LCD Monitor User’s Guide
CPX17 17” LCD User’s Guide Rev A 4/1/03
5
Installation
Plug and Play
Our adoption of the new VESA @ Plug and Play solution eliminates complicated and time
consuming setup. It allows you to install your monitor in a Plug and Play compatible system
without the usual hassles and confusion. Your PC system can easily identify and configure itself
for use with your display. This monitor automatically tells the PC system its Extended Display
Identification (EDID) data using Display Data Channel (DDC) protocols so the PC system can
automatically configure itself to use the LCD monitor.
Connecting Your LCD Monitor
Before connecting the LCD monitor to your computer, make sure that your computer supports at
least one of the video modes supported by the LCD monitor. If the video mode, at the time of
installation, is not one supported by the LCD monitor, the LCD monitor may not display the
image as it is intended.
1. Be sure the power switches of both the computer and the LCD monitor are off.
2. Connect the VGA video cable from the LCD monitor to the video output connector on a
server/computer or console switch. Connect the trackball and keyboard mini din
connectors from the LCD monitor to the mouse and keyboard port of a server/computer
or console switch.
3. Plug the computer and monitor power cables into a power outlet.
4. Turn on the monitor power and then the server power (if connected to a console switch,
be sure to turn on the power to the console switch first, followed by the LCD monitor and
then the server/computer).
If your monitor displays an image, you have successfully installed the monitor.
If the monitor does not display an image, check all the connections and follow the
"Troubleshooting" guide beginning on page 13.
5. Your LCD monitor is now ready to use, but to get the best image on the LCD monitor,
most of the LCD monitor parameters must be fine tuned to work with the video adapter
you are using. The following sections will guide you through the step-by-step procedures
for adjusting the parameters for your specific needs.
Chassis Plans 17” TFT-LCD Monitor User’s Guide
CPX17 17” LCD User’s Guide Rev A 4/1/03
6
User Controls
Your LCD monitor allows you to easily adjust the characteristics of the image being displayed.
All of these adjustments are made using the control buttons on the front of the monitor. While
you use these buttons to adjust the controls, an on-screen menu shows you their numeric values
as they change.
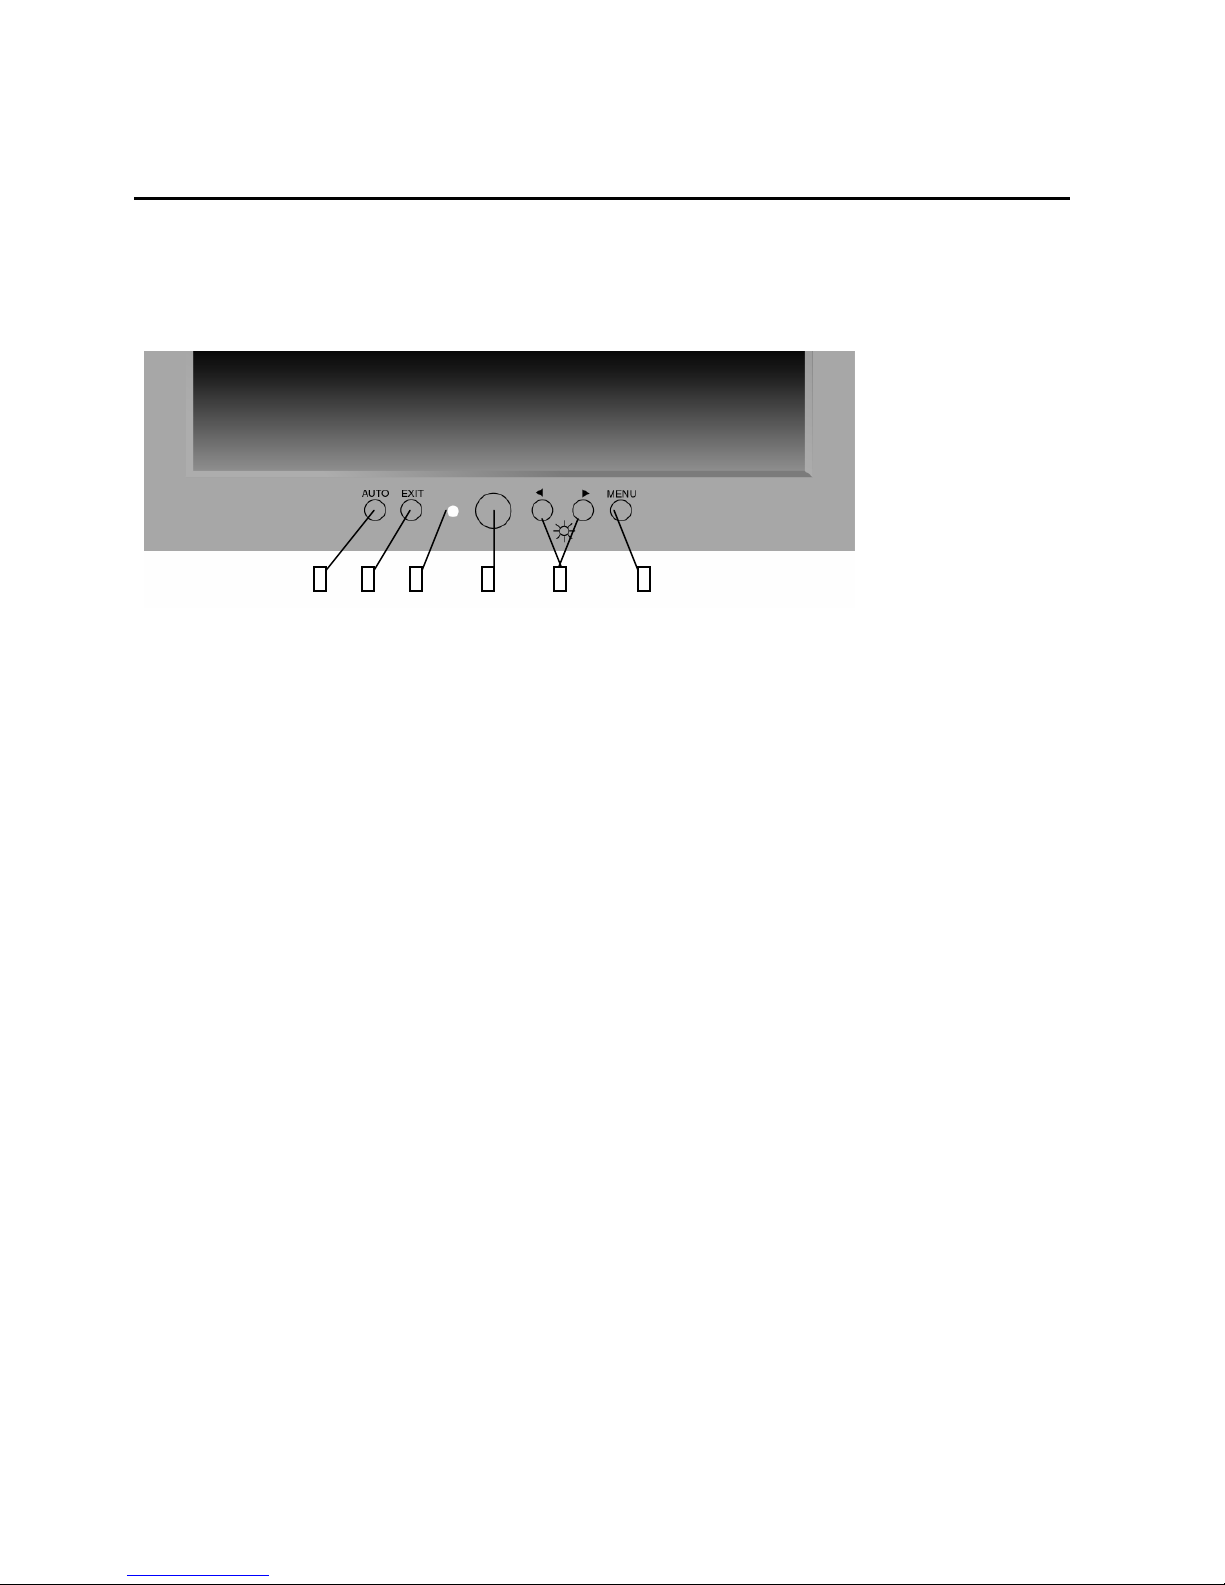
User Controls
1. Auto
Activates the Auto adjustment function. The “Auto adjustment is being process” message
appears.
2. Exit
Exit from the OSD function or back to previous menu.
3. Power Indicator
Indicates the status of monitor operation.
Green: Normal
Black: Power OFF
Amber: Power saving mode or Disconnection of signal cable.
4. Power Button
Turn on and off the monitor power.
5. /
Moves the selector left and right on the OSD menu.
Increase or decease the value of selected adjustment or select proper setting.
Brightness: Adjusts the brightness of back light lamp by pressing the or buttons
without OSD menu. (Hot key)
6. Menu
Calls OSD menu.
Select the function to be adjusted.
Moves the selector down on the OSD menu.
1 2 3 4 5 6

Chassis Plans 17” TFT-LCD Monitor User’s Guide
CPX17 17” LCD User’s Guide Rev A 4/1/03
7
Adjusting Your LCD Monitor
Automatic Save
Whenever you open the on-screen menu and allow an adjustment window to remain active for
about 3 seconds without pressing another button, the monitor automatically saves any
adjustments you have made. These changes are saved into a user area in the monitor. User areas
are reserved according to the signal frequency from your computer. The monitor can save
adjustments for up to 5 user modes. It has 10 factory preset or preload modes, one for each signal
frequency as listed in "Display Modes" on page 16.
If you have made no adjustments, the on-screen menu disappears and the monitor does not save
anything. To exit without saving the changes you have made, press the EXIT button before the 3
seconds elapse.

Chassis Plans 17” TFT-LCD Monitor User’s Guide
CPX17 17” LCD User’s Guide Rev A 4/1/03
8
Adjusting Your LCD Monitor
Getting Help
If your monitor does not display an image, check your cable connections and refer to
"Troubleshooting" on page 13. If you experience difficulties with the quality of the displayed
image, run Auto Adjustment (see below) and refer to "Adjusting Your LCD" on page 5 or
"Troubleshooting" on page 13.
Warm-up Time
All LCD monitors need time to become thermally stable the first time you turn them on each
day. Therefore, to achieve more accurate adjustments for parameters, allow the LCD monitor to
warm (be on) for at least 20 minutes before making any screen adjustments.
Direct-Access Features
The features described in this section can be accessed quickly, at the touch of one button. Once
you finish making adjustments to a feature, push the EXIT button to turn off the menu or allow
the OSD to time-out and disappear automatically.
Auto Adjustment
Your computer system can recognize your new LCD monitor; the Auto Adjustment function will
optimize the display settings for use with your computer.
Brightness
To adjust the brightness of the monitor's display, with the menu
off, push the or button to display the brightness screen.
Effect of Buttons
Brightness
50

Chassis Plans 17” TFT-LCD Monitor User’s Guide
CPX17 17” LCD User’s Guide Rev A 4/1/03
9
Adjusting Your LCD Monitor
On-Screen Display (OSD) Accessing Menu System
1.With the OSD off, push the MENU button to open it and display the OSD.
2. Use the and buttons to move between the menus. A complete list of all the functions
available for the monitor begins on page 9.
3. Push the MENU button once to activate the highlighted menu/function.
4. After selecting a menu use the MENU button to move between functions.
5. Use the and buttons to make the adjustments to the highlighted functions. The setting
slidebar moves and the numeric value indicator changes to reflect your adjustments.
NOTE: The numeric value indicator is provided as a point of reference only and does not reflect
any measurable value.
6. Push the EXIT button to return to the previous menu or to close the OSD.
NOTE: If the timeout function closes the OSD, the next time the MENU button is pushed the
OSD will be in the same place. The timeout function does not return the OSD to the main menu.
The EXIT button must be used to get back to a previous menu/function.
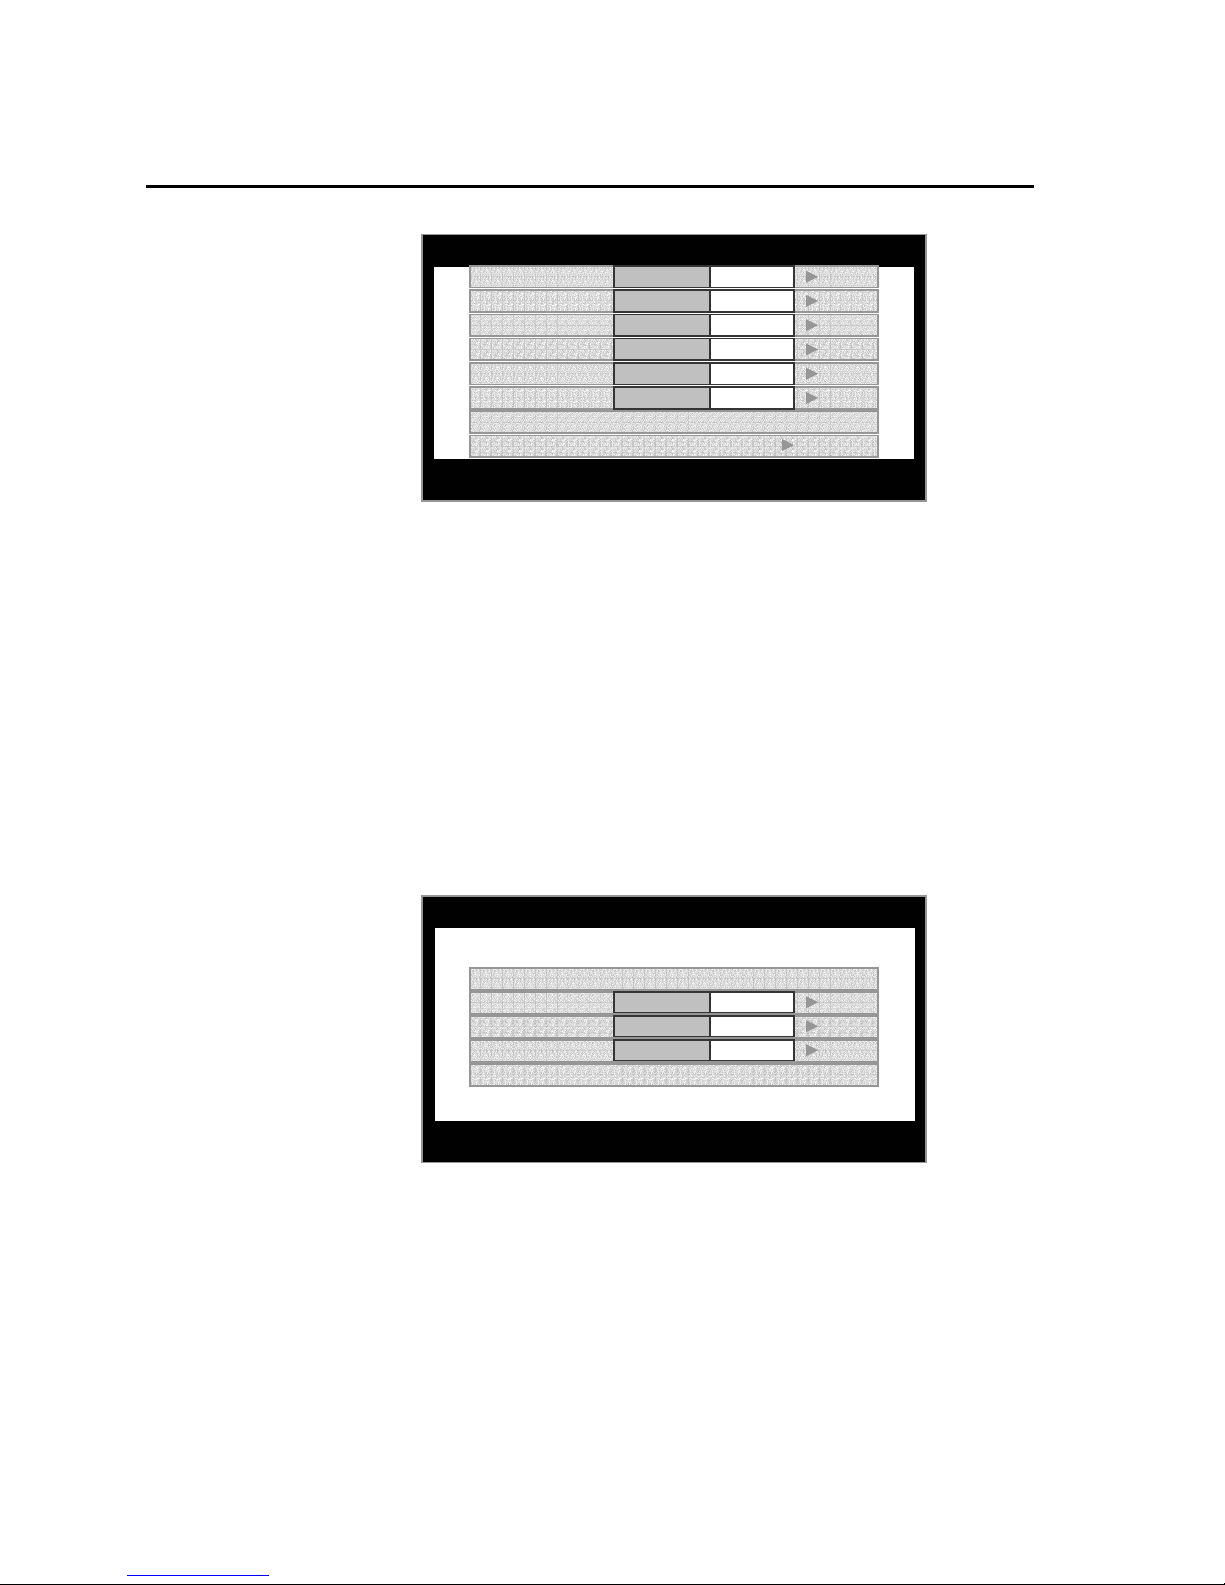
Menu
Function Name
PC OSD Utility Auto
MENU: Select / : Move EXIT: Exit
Bri
g
htness 50
Contrast 50
Phase 50
Frequenc
y
50
H
–
Position 50
V
–
Position 50
Sharpness Sharp Normal Soft
Color Tem
p
erature Press Ke
y
Button Function
Chassis Plans 17” TFT-LCD Monitor User’s Guide
CPX17 17” LCD User’s Guide Rev A 4/1/03
10
Adjusting Your LCD Monitor
OSD Functions and Adjustments -Screen Controls
PC MENU
Brightness: Adjusts the brightness of the display (Increase & Decrease).
Contrast: Adjusts the contrast of the display (Increase & Decrease).
Phase & Frequency: The Phase and Frequency adjustments allow you to more closely
adjust your monitor to your preference. Use the and buttons to adjust away
interference.
If satisfactory results are not obtained using the Phase adjustment, use the Frequency
adjustment and then use Phase again.
This function may change the width of the display image. Use the H-Position menu to
center the display image on the screen.
Horizontal Position: Moves the Display Area location (Left & Right).
Vertical Position: Moves the Display Area location (Up & Down).
Sharpness: Sharp, normal, and soft are the available settings.
Color Temperature: Press the key to access the color temperature adjustments.
Color Temperature Menu
Color Temperature: Sets the Color Mode of the LCD monitor.
C1 sets the color to a cool (bluish) white.
C2 sets the color to the natural characteristics of the LCD.
C3 sets the color to a warm (reddish) white.
User mode adjusts the saturation of red, green, and blue in the display area.
Red: In User Mode decreases () or increases () the redness.
Green: In User Mode decreases () or increases () the redness.
Blue: In User Mode decreases () or increases () the redness.
User color reset: Sets the red, green, and blue to a value of 50.
PC OSD Utility Auto
MENU: Move / : Enter
Bri
g
htness 50
Contrast 50
Phase 50
Frequenc
y
50
H
–
Position 50
V
–
Position 50
Sharpness Sharp Normal Soft
Color Tem
p
erature Press Ke
y
PC OSD Utility Auto
MENU: Move / : Enter
Color Tem
p
erature C1 C2 C3 Users
User Color Reset No Yes
Red 50
Green 50
Blue 50

Chassis Plans 17” TFT-LCD Monitor User’s Guide
CPX17 17” LCD User’s Guide Rev A 4/1/03
11
OSD Functions and Adjustments-Screen Controls (continued)
OSD Menu
OSD Horizontal Position: Moves the OSD widow location (Left & Right).
OSD Vertical Position: Moves the OSD widow location (Up & Down).
Language: Changes the OSD language.
OSD Timeout Control:Sets time span before OSD menu disappearance. (5 to 200
seconds)
Utility Menu
Dynamic Brightness: N/A
Information: Current monitor settings.
Reset: User setting becomes invalid, and return to factory default settings.
Half Tone: Changes the background color of OSD window.
Auto Menu
Press the Menu button. The “Automatic adjustment in progress” message appears. When
finished, the current and the best monitor resolutions are displayed in the bottom right
corner.
PC OSD Utility Auto
MENU: Move / : Enter
H - Position 50
V - Position 50
OSD Timeout 50
Lan
g
ua
g
e 50
PC OSD Utility Auto
MENU: Move / : Enter
D
y
namic Bri
g
htness Off On
Information Hf: 48.3 kHz Vf: 60 Hz
Reset No Yes
Half Tone Off On
Resolution: 1024 x 768
PC OSD Utility Auto
MENU: Select / : Move EXIT: Exit
Press MENU key

Chassis Plans 17” TFT-LCD Monitor User’s Guide
CPX17 17” LCD User’s Guide Rev A 4/1/03
12
Power Management
This monitor has a built-in power management system. This system saves energy by switching
your monitor into a low-power mode when it has not been used for a certain amount of time. The
available modes are On, Standby and Suspend.
The Power Management system operates with a VESA DPMS compliant video card installed in
your computer. You use a software utility installed on your computer to set up this feature. See
the table below for details.
Power-Saving Function Mode (EPA/NUTEK)
State Normal Standby Mode Suspend Mode
Operation
Horizontal Sync Active Inactive Active
Vertical Sync Active Active Inactive
Power Indicator Green Green/Amber Blinking Green/Amber Blinking
Power 20W (Nom.) Less than 3W Less than 3W
Consumption
NOTE
This monitor automatically returns to normal operation when horizontal and vertical
sync return. This occurs when you move the computer’s mouse or press a key on the
keyboard.
This monitor is EPA ENERGY STAR and NUTEK/ ENERGY 2000 compliant when used with
a computer equipped with VESA DPMS functionality.
For energy conservation, turn your monitor OFF when it is not needed, or when leaving it
unattended for long periods.

Chassis Plans 17” TFT-LCD Monitor User’s Guide
CPX17 17” LCD User’s Guide Rev A 4/1/03
13
Maintenance of Your LCD Monitor
WARNING
To avoid risk of electric shock, do not disassemble the monitor cabinet. Users cannot
service the monitor. User maintenance is restricted to cleaning as explained below.
Unplug the monitor from the power outlet before cleaning.
To clean your LCD screen, lightly dampen a soft, clean cloth with water or mild
detergent. If possible, use a special screen cleaning tissue or solution suitable for the
antistatic coating.
To clean the monitor cabinet, use a cloth lightly dampened with a mild detergent.
Never use flammable cleaning material to clean your LCD or any other electrical
apparatus.

Chassis Plans 17” TFT-LCD Monitor User’s Guide
CPX17 17” LCD User’s Guide Rev A 4/1/03
14
Troubleshooting
If you have a problem setting up or using your LCD monitor, you may be able to solve it
yourself. Before contacting customer service, try the suggested actions that are appropriate to
your problem.
Image Problems
Problem Suggested Action References
LED doesn’t light/ No image Check if the display is in power saving mode
Check if the display is switched on or the power cable is
properly connected
Image is unstable Check if signal cable is secured
(Flicker, Interference, Noise, etc.) Check if frame (vertical) frequency of video signal is lower
than 75Hz because this monitor cannot run over 75Hz. In
this case, please change the setting of ‘Display Control
Panel’ of Windows to 60Hz, that displays the best
performance
Dull image Try to pushing the Auto button
Adjust the Frequency or Phase
Adjust the frame (vertical) frequency to 60Hz
Remove any video signal distributor
Dark or saturated image Adjust the Brightness or Contrast

Chassis Plans 17” TFT-LCD Monitor User’s Guide
CPX17 17” LCD User’s Guide Rev A 4/1/03
15
Technical Specifications
LCD Panel
Size 17.0" Diagonal
Display area 337.92 (H) x 270.336 (V) mm
Type a-Si TFT active matrix
Pixel pitch 0.264 (H) x 0.264 (W) mm
Frequency
Horizontal 30- 61 kHz
Vertical 50 -75Hz
Display Color 16.7M Colors
Display Resolution
Optimum Mode 1280 x 1024 @ 60Hz
Maximum Mode 1280 x 1024 @ 75Hz
Input Signal
Sync HN Separate, TTL, Positive or Negative
HN Composite, TTL, Positive or Negative
Sync-on-green 0.3 Vp-p, Negative
Video Signal 0.700Vp-p @ 75ohm, Positive
Power Supply
AC 100-240V, 60Hz -50Hz to 12V/ 3.75A
Power Consumption
Normal 20 Watt
Power Saving Less than 3 Watts
Environmental Considerations
Operating Temperature (0°C to 40°C)
Operating Humidity 10% to 80%
Storage Temperature (-25°C to 60°C)
Storage Humidity 5% to 95%
Chassis Plans 17” TFT-LCD Monitor User’s Guide
CPX17 17” LCD User’s Guide Rev A 4/1/03
16
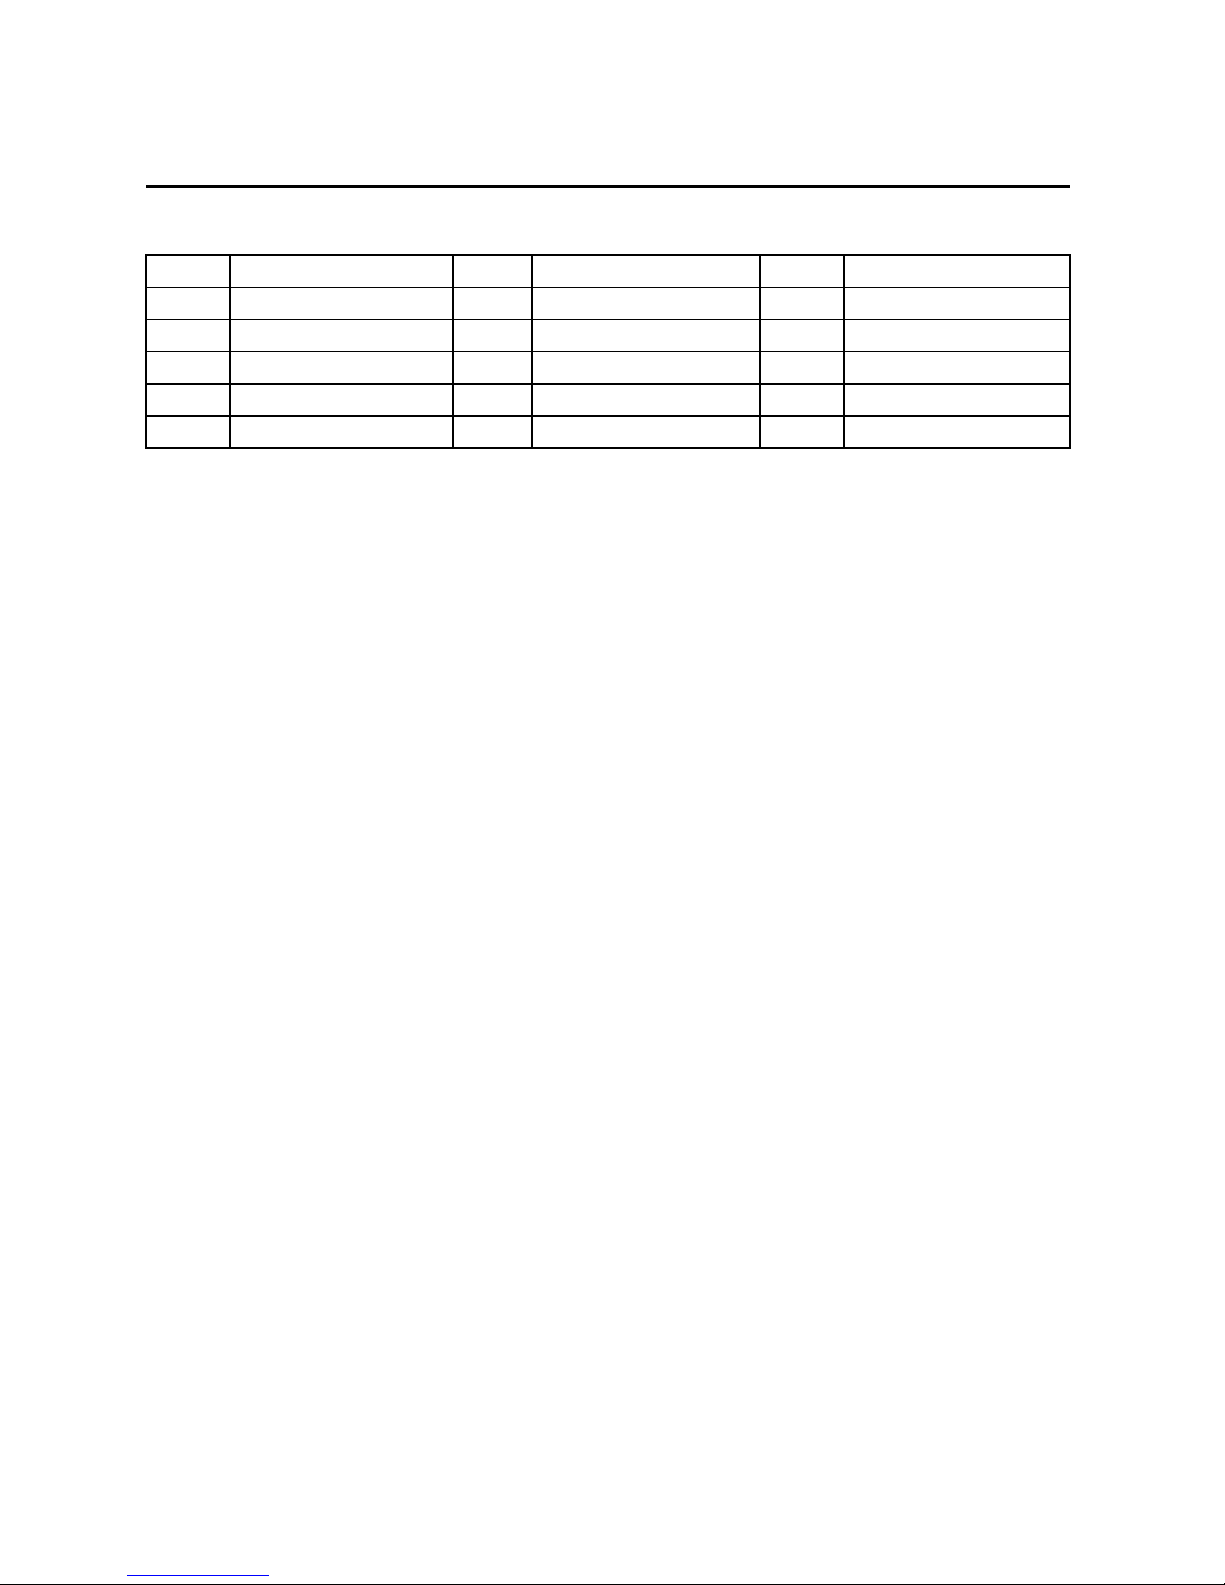
Pin Assignment
15 pin D-sub connector
Pin no. Function
1
2
3
4
5
Pin no. Function
6
7
8
9
10
Pin no. Function
11
12
13
14
15
Red
Green
Blue
NC
GND
R_GND
G_GND
B_GND
NC
GND
GND
SDA (DDC data)
Hsync
Vsync
SCL (DDC clock)
Chassis Plans 17” TFT-LCD Monitor User’s Guide
CPX17 17” LCD User’s Guide Rev A 4/1/03
17
Video Mode Support
Table of contents
Popular Touchscreen manuals by other brands


Omron
Omron Sti H-T40M-P Installation and operating manual

Universal Remote Control
Universal Remote Control TOTAL CONTROL TKP-7500 owner's manual

SMC Networks
SMC Networks Ruby SMCRB5701-Z user manual

InFocus
InFocus INF5532AG Handling guide

panel
panel PSR110-EM Series user manual

Tangent
Tangent Medix KW user manual