WARRANTY INFORMATION
WE NEED TO HEAR FROM YOU!
To Establish Your Warranty Period And Provide Access To Technical Support, Send Us your
Product Registration Card Today!
CIM S.p.A. warrants the mechanism, control electronics and power supply, under normal use and
service, to be free from defects in material and workmanship for a period of twelve (12) months
from the date of purchase by the end user. CIM S.p.A. warrants the print head, under normal use
and service, to be free from defects in material and workmanship for a period of twelve (12) months
or 100k passes (whichever occurs first) from the date of purchase by the end user. Proof of purchase
or product registration is required. If proof of purchase or product registration cannot be estab-
lished, shipment date to the original buyer (dealer or distributor) will be used to establish the war-
ranty period.
Failure to exercise caution to protect the equipment from electrostatic discharge damage, adverse
temperature and humidity conditions or physical abuse, including, but not limited to, improper
packaging, shipping, service or repairs performed by personnel not authorized by CIM S.p.A. may
void the warranty. Failure to use only CIM S.p.A. approved media may void the warranty. CIM
S.p.A. will, at its option, repair or replace the equipment or any parts which are determined to be
defective within this warranty period, and which are returned to CIM S.p.A. F.O.B. factory of ori-
gin.The warranty set forth above is exclusive and no other warranty, whether written or oral, is ex-
pressed or implied. CIM S.p.A. specifically disclaims the implied warranties of merchantability and
fitness for a particular purpose.
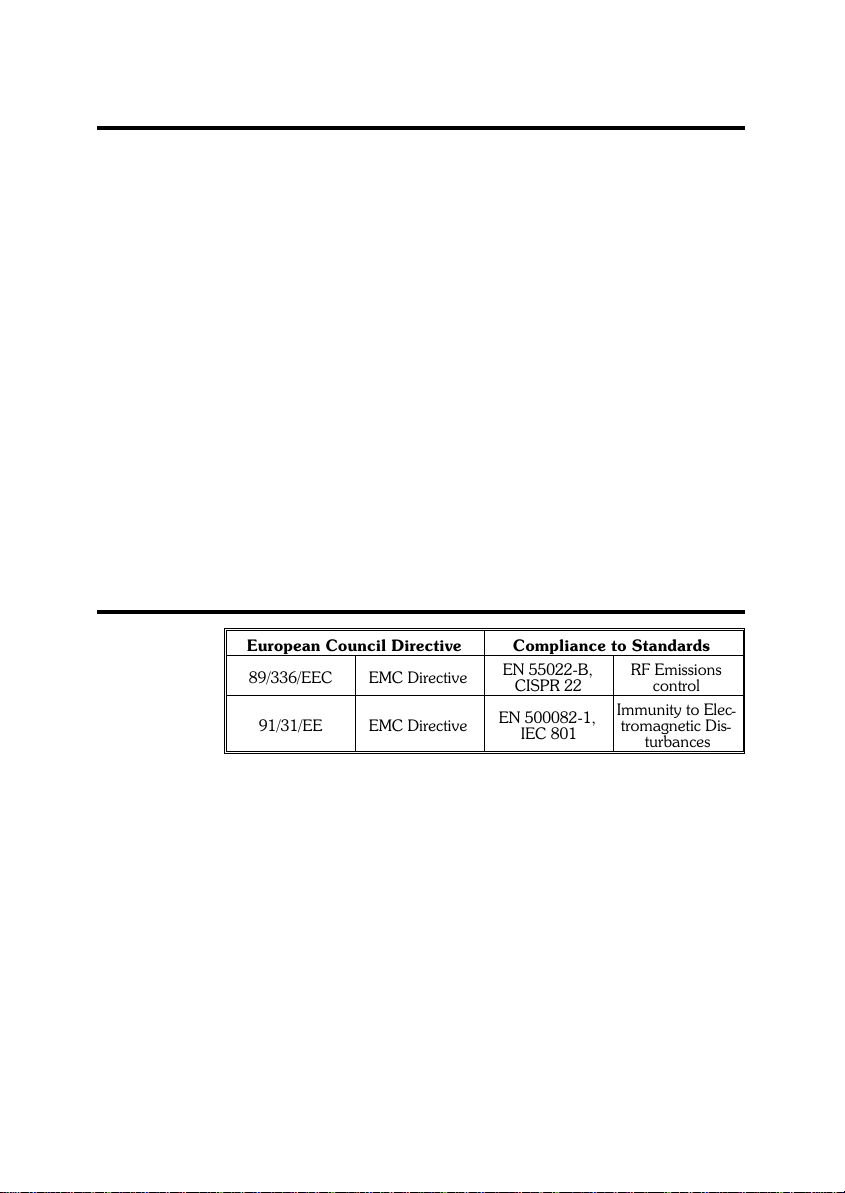
DECLARATIONS OF CONFORMITY
European Council Directive Compliance to Standards
89/336/EEC EMC Directive EN 55022-B,
CISPR 22
RF Emissions
control
91/31/EE EMC Directive EN 500082-1,
IEC 801
Immunity to Elec-
tromagnetic Dis-
turbances
Model: K300 Optima conforms to the following specification:
FCC Part 15, Subpart A, Section 15.107(a) and Section 15.109(a)
Class A digital device
Supplemental Information:
This device complies with Part 15 of the FCC Rules. Operation is subject to the following Two Con-
ditions: (1) This device may not cause harmful interference , and (2) this device must accept any
interference received, including interference that may cause undesired operation.
Note: This equipment has been tested and found to comply with the limits for a class A digital de-
vice, pursuant to Part 15 of the FCC Rules. These limits are designed to provide reasonable protec-
tion agaist harmful interference when the equipment is operated in a commercial environment.
This equipment generates, uses, and can radiate radio frequency energy and, if not installed and
used in accordance with the instruction manual, may cause harmful interference to radio commu-
nications. Operation of this equipment in a residential area is likely to cause harmful interference in
which case the user will be required to correct the interference at his own expense.
iv
WARRANTY INFORMATION
WE NEEDTO HEAR FROMYOU!
To establish your warranty period and provide access to technical support, send us
your warranty registration card today!
CIM warrants the mechanism, control electronics and power supply, under normal
use and service, to be free from defects in material and workmanship for a period of
twelve (12) months from the date of purchase by the end user. If proof of purchase or
product registration cannot be established, shipment date to the original buyer (dea-
ler or distributor) will be used to establish the warranty period.
Failure to exercise caution to protect the equipment from electrostatic discharge
damage, adverse temperature and humidity conditions or physical abuse, including,
but not limited to, improper packaging, shipping, service or repairs performed by
personnel not authorized by CIM may void the warranty. CIM will, as its option,
repair or replace the equipment or any parts which are determined to be defective
within this warranty period, and which are returned to CIM.
The warranty set forth above is exclusive and no other warranty, whether written or
oral, is expressed or implied. CIM specifically disclaims the implied warranties of
merchantability and fitness for a particular purpose.
DECLARATIONS OF CONFORMITY
Supplemental Information:
This device complies with Part 15 of the FCC Rules. Operation is subject to the
following two conditions: (1)This device may not cause harmful interference, and (2)
this device must accept any interference received, including interference that may
cause undesired operation.
Note:
This equipment has been tested and found to comply with the limits for a class A
digital device, pursuant to Part 15 of the FCC Rules. These limits are designed to
provide reasonable protection against harmful interference when the equipment is
operated in a commercial environment. This equipment generates, uses, and can
radiate radio frequency energy and, if not installed and used in accordance with the
instruction manual, may cause harmfull interference to radio communications.
Operation of this equipment in a residential area is likely to cause harmful
interference in which case the user will be required to correct the interference at his
own expense.
73/23/EEC modified
by 93/68/EEC
EMC Directive
EN 500082-1,1992 Immunity to
Electromagnetic
Disturbances
European Council Directive Compliance to Standards
89/336/EEC
modified by
92/31/EEC and
93/68/EEC
RF Emissions
control
Low voltage
Directive
EMC Directive
EN 60950
EN 55022-B
Product safety
Model:K 500 Optima conforms to the following specification:
FCC Part 15, Subpart A, Section 15.107(a) and Section 15.109(a)
Class A digital device