CIM SUNLIGHT SATURN User manual


Contents
Safety Precautions 06
Getting Started 09
Product Overview 09
In the Box 09
Names of Parts 10
Manual Feeding, Single-sided Printing 10
Auto Feeding, Single-sided Printing,1 Input hopper 14
16
Load Blue Cleaning Roller & Ribbon 22
Load Blue Cleaning Roller 22
Load Ribbon 23
Load Cards 24
Place Cards in the Input Hopper 24
Place Cards after Removing the Input Hopper 25
Magnetic Cards 28
Input Hopper & Ribbon Lock 29
Input Hopper Lock 29
Ribbon Lock 29
Print Single Card 27
Install/Remove Output Stacker 30
Open the Output Stacker Cover and Remove the Cards 30
Auto Feeding, Single-sided Printing, 2 Input hoppers
Auto Feeding,Double-sided Printing,1 Input hopper 18
20
Auto Feeding,Double-sided Printing, 2 Input hoppers
Manual Feeding, Double-sided Printing 12

System Requirements 33
Install Program 33
① Supported Operating System 33
② Recommended Specifications 33
Install Software 33
① Install Software Using Local Port (USB) 33
② Install Software for Network Printer 35
③ Configure Networking Settings 40
④ Install Software from the List of Connected Devices (Optional) 47
1)Network Configuration Window 40
2) DHCP (Dynamic Host Configuration Protocol)? 41
3)Network Settings - Automatic (DHCP supported) 41
4)Network Settings - Manual 44
Uninstall Program 49
Print Cards 49
Set as Default Printer 49
Change Printer Port (Using the Printer Driver) 50
Select Input Hopper in the Printer Settings 52
Select Input Hopper 1/2 from External Program 54
Print Using Application Programs 55
Print Using Application Programs & Configure Driver Settings 55
Configure Printer Default Settings in Application Programs 55
① Layout 56
② Output 57
③ Output-Option 58
④ Image 59
⑤ Magnetic 60
Connect Power & Communication Cables 32
Use the Spring Load to Remove a Small Quantity of Cards 31
Remove the Output Stacker and the Cards 31
(Windows Preview)

Check IP Address 62
① If Connected to a PC 64
② If Not Connected to a PC: User Mode 65
Print Self-Test Card 64
Maintenance Instructions 67
Supported Cards 67
① Size 67
② Thickness 67
③ Acceptable Cards 67
④ Unacceptable Cards 67
Clean the Printer 67
Clean the Exterior 67
Clean Inside the Printer Using Cleaning Kit 68
① Cleaning Kit & Use 68
② Clean the Printer Using CR80 Cleaning Card / Long-T Cleaning Card 68
1) Check the Proper Use of CR80 Cleaning Card / Long-T Cleaning Card 68
2) Not Connected to a PC: User Mode 69
3) Connected to a PC 72
③ Clean the Printer Using Alcohol Swab 73
1) Clean the Inside of the Printer Using Alcohol Swab 73
2) Clean the Printer's TPH Using Alcohol Swab 74
Clean the Blue Cleaning Roller 75
Troubleshooting 75
Errors 75
① TPH 75
② Card Feeding 78
1) Remove Jammed Card (Single-sided Printing) 78
③ Ribbon 81
④ Card 81
1) Replace the TPH 76
Check IP Address & Print Test Card 62
⑥ Control 61
⑦ About 62
2) Remove Jammed Card (Double-sided Printing) 79

④ Miscellaneous 83
Additional Errors 83
Ribbon Specifications 83
Color Ribbons 83
Monochrome Ribbons 83
Printer Specifications 84
Product Features 84
Standard Specifications 84
① Printing Type 84
② Printing Function 84
③ Resolution 84
④ Printing Speed 84
1) Color Printing 84
2) Monochrome Printing 84
⑤ Card Capacity 85
Optional Accessories 85
Printer Specifications 85
① Dimensions (Width x Length x Height) & Weight 85
1) Manual Feed 85
2) Auto Feed 85
② Power Adapter 85
③ Font 85
⑤ Interface 86
⑥ PC Specifications 86
⑦ Software 86
④ Memory 86
② Ribbon 82
③ SAM 82
① Card 82
Warranty Certificate 86
Warning 82
⑤ Miscellaneous 81

Safety Precautions
Before using this product, please make sure that you have read the safety precautions
described below. The safety precautions noted on this page are categorized as Warning,
Caution, Attention,and Note. We are not responsible for any injuries or damage when
the product is not used in compliance with these precautions.
Note
This is a note that provides more details or information that is
useful for users.
Important
Use this information to check and inspect for the proper operation of
the product.
Caution
Not following this caution can cause service interruption or product
damage.
Warning
These warnings must always be followed; otherwise, this may result
in serious injury or damage.
06 Install printer and ready

-Warning
These warnings must always be followed; otherwise, serious injury
may result.
- Do not use a damaged plug or loose outlet.
- Do not pull the cable to unplug or touch the plug with wet hands.
- Do not bend the cable by force or place any heavy objects on it.
- Keep it unplugged if not in use for an extended period of time or in
case of lightning or thunder.
Power
Installation
/ Storage
- Do not install the printer in a place where it may be subjected to
moisture, dust, or splashes of water (rain).
- Keep the printer away from heat sources, as well as lit candles and
cigarettes.
- Unplug the printer when moving it.
(If the printer is moved while plugged, the cable may be damaged
and cause electric shock.)
- Keep any inflammable liquid, gas, and aerosol away from the printer.
Cleaning - Keep the power plug clean, away from dust and water.
- Unplug when cleaning, and do not spray water or use benzene or
thinner.
Misc. -Do not place metalobjects, chemicals, or anything with wateron it.
- If you observe strange smoke, odor, or noise from the printer, unplug it
immediately and contact your dealer.
-Use only the specified adapter.
※Do not use adapters from other devices, e.g. laptop, monitor, game
console.
07
CIM User Guide Manual

Installation/
Storage
Misc. - Do not remove any cover or protective device that is attached with
screws.
- Do not operate the printer while your hand is placed inside.
- Clean and maintain the printer according to the user instructions.
- Do not disassemble, repair, or modify the printer arbitrarily.
-Caution
Not following this caution can cause service interruption or product
damage.
- Do not install the printer on an unstable surface.
- Do not place the printer under direct sunlight as it may cause a
malfunction.
08 Install printer and ready

Thankyouforpurchasingthe
This printer is designed to print cards quickly and easily according to your specifications.
It supports IC and RF cards as well as magnetic cards and can print high quality color
images on the surface of the card using the dye-sublimation method.
In addition, the user can edit and print various types of barcodes, magnetic cards, and
photos using software provided together.
This printer is suitable for printing membership cards, rewards cards, employee ID
cards, and access cards as it prints directly to PVC cards for faster and more efficient
printing.
-In the Box
Cleaning Roller
Power Cable Power AdaptorUSB Cable
Installation CD Quick Start Guide
Output Stacker InputHopperLock Input Hopper
Manual Card Printing
Auto feeding Card Printing
Getting Started
Please make sure that all the components and accessories are included in
the box. If there are missing or damaged items, then please contact your
dealer for assistance.
Important
OPTION
OPTION
-Product Overview
09
CIM User Guide Manual
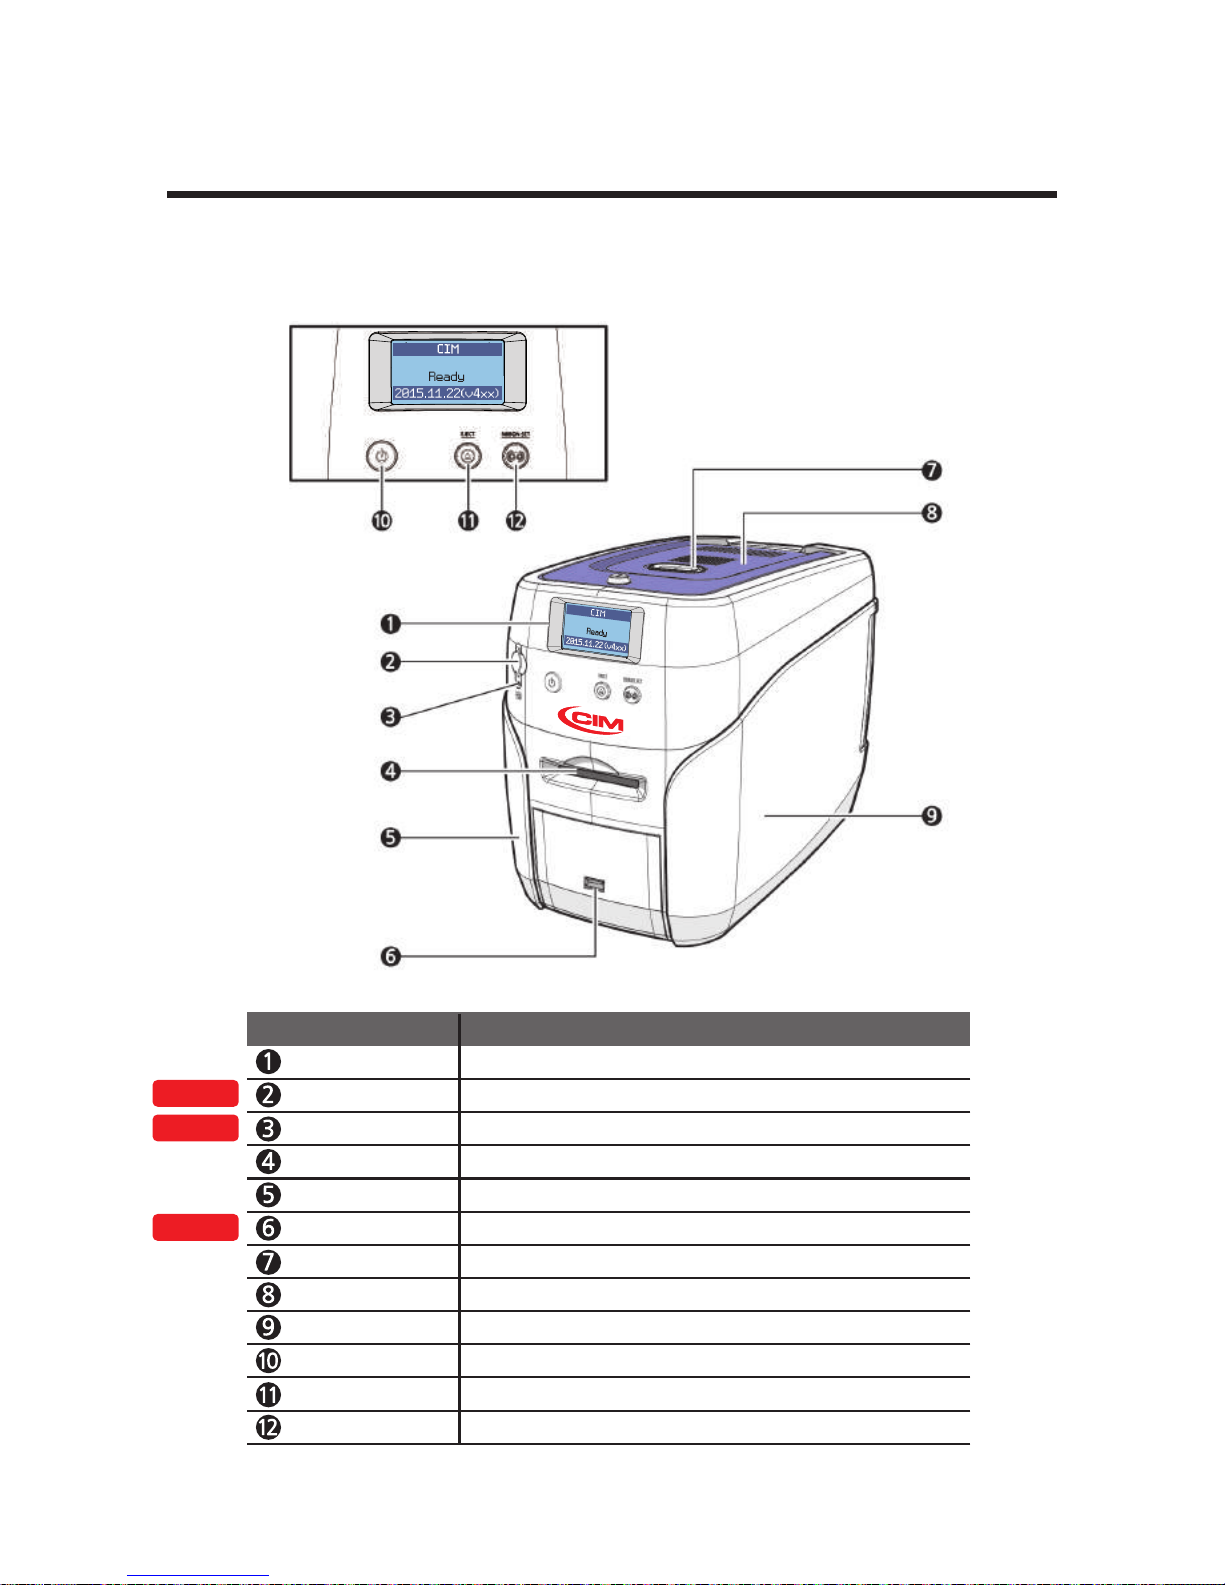
LCD DisplayDisplays the printer’s operation status on the LCD screen.
Mobile ConnectorUsed for inserting mobile chips.
Mobile Connector LED
Indicates the mobile chip status.
Single Card SlotUsed to insert or release a single card.
Left Side CoverOpen to install optional accessories or fix errors.
USB SocketUsed to insert USB memory media or to connect to a PC.
Top Cover Button Opens the Top Cover.
Top CoverOpen to replace the cleaning roller.
Right Side CoverOpen to replace the main board or fix errors.
Power Switch
Turns the printer on/off.
Card Eject ButtonRelease the card inside the printer.
Names of Parts
Manual Feeding, Single-sided Printing
OPTION
OPTION
OPTION
10
Ribbon Set ButtonReplace or reposition the ribbon.
NameDescription
Install printer and ready
Table of contents
Other CIM Printer manuals


