manuals.online logo
Brands
  1. Home
  2. •
  3. Brands
  4. •
  5. Cisco
  6. •
  7. IP Phone
  8. •
  9. Cisco 7912 Operator's manual

Cisco 7912 Operator's manual

Cisco 7912 IP Phone - User Documentation
Dialing Instructions
Placing A Call
Answering A Call
Ending A Call
Placing A Call On Hold
Last Number Redial
Voice Mail
Call Forwarding (to an extension)
Call Forwarding (to voice mail)
Call Parking
Transferring A Call (cold transfer)
Transferring A Call (warm transfer)
Conference
Activating Monitor
Menu Button
Directories: Missed Calls/Received Calls/Placed Calls
View Call Records
Dial From A Call Record
Delete Call Records
Name or Phone Number Search
Settings: Customizing Your Telephone
Display Contrast
Ring Type
Volume Adjustment - Ringer
Volume Adjustment - Handset/Speaker
Services:
Currently unavailable until further notice
Page 1 of 5
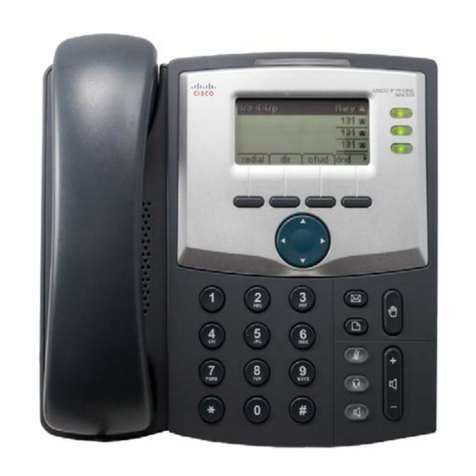
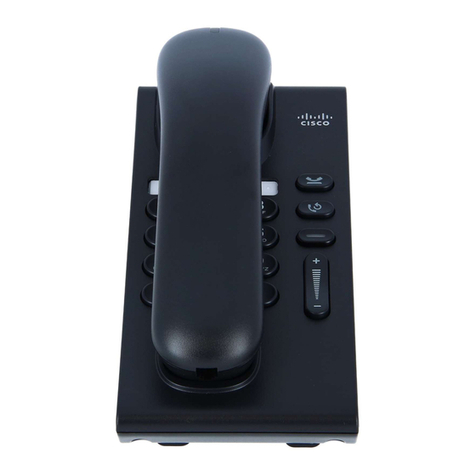
1. LCD screen
2. Model type
3. Soft key buttons
4. Navigation button
5. Menu button
6. Hold button
7. Keypad
8. Volume Control button
9. Handset
10. Footstand
11. Ring/Message indicator
Figure 1: Cisco 7912 IP Phone
Page 2 of 5
Dialing Instructions
Placing A Call
•Lift handset OR
•Press NewCall soft key
•Dial number using keypad (9 must be
dialed prior to placing an external
call. Internal extensions can be
dialed directly)
When placing a call your telephone will be in "listen"
mode until the receiver is lifted. In "listen" mode you
will be able to hear the call but the other party will not
hear you. When the call is answered lift the receiver to
talk.
Tip: When placing a call, dial number with the handset
down, press the Dial soft key, and then lift the handset.
Dialing in this manner provides more time to place call
before it times out.
Answering A Call
•Lift handset Called line is automatically selected.
Please Note: While on a call, another call can be
answered by pressing the Answer soft key. The
original call will be placed on hold.
Ending A Call
•Hang up OR
•Press EndCall soft key
Placing A Call On Hold
•Press the Hold button The call placed on hold will flash on phone’s LCD
screen. To return to a held call press the Hold button
again.
Please Note: If multiple calls are placed on hold, use
the Navigation button (4) to select the call you wish to
take off hold and then press the Hold button.
Last Number Redial
•Lift the handset and press the Redial
soft key OR
•Press the Redial soft key and lift
handset when party answers
If using the redial feature before lifting the handset your
telephone will be in “listen” mode. You will not be able
to speak with the other party until the handset is lifted.
Voice Mail
•Lift the handset and press the
Message soft key to access your
voice mail
Follow voice mail instructions to retrieve messages or
change user options.
Indicator light (11) on handset is lit when new
messages are received. Light will remain lit until all
new messages have been accessed.
Call Forwarding (to an extension)
•With the handset down press
CFwdAll soft key and wait for two
beeps
•Enter the extension number
While call forwarding is in effect you can call out from
your telephone but can not receive incoming calls. To
cancel call forwarding press the CFwdAll soft key
again.
Page 3 of 5
Call Forwarding (to voice mail)
•With the handset down press
CFwdAll soft key and wait for two
beeps
•Press the Message soft key
While call forwarding is in effect you can call out from
your telephone but can not receive incoming calls. To
cancel call forwarding press the CFwdAll soft key
again.
Call Parking
•Press the more soft key
•Press the Park soft key (call is
placed on hold)
•Hang up phone
•“Call park At XXXX”, where XXXX is
the extension used to store the call,
will display on the phone’s LCD
screen for 10 seconds
•Note the “call park” extension and
dial it at the phone that wishes to
retrieve the call
Call parking allows a call to be placed on hold so that it
can be retrieved from another phone on the Cisco
system.
If the parked call is not retrieved within 60 seconds, it
will ring the phone or extension that originally parked
the call, and “CallPark Reversion (XXXX)”, where
XXXX is the extension used to store the call, will
display.
Transferring A Call (cold transfer)
•Press the Trnsfer soft key and wait
for a tone (the caller is placed on
hold)
•Dial the extension you wish to
transfer the call to
•When you hear ringing press the
Trnsfer soft key to transfer the call
If you make a dialing error while attempting to transfer
a call press the EndCall soft key and then the Hold
button to return to the original caller.
Transferring A Call (warm transfer)
•Press the Trnsfer soft key and wait
for a tone (the caller is placed on
hold)
•Dial the extension you wish to
transfer the call to
•Wait for an answer and announce the
call
•Press the Trnsfer soft key to transfer
the call
If you make a dialing error, or the called party does not
answer or want to accept the transferred call, press the
EndCall soft key and then the Hold button to return to
the original caller.
Conference
•While on a call press the more and
then the Confrn soft keys - you will
hear a tone and the caller is placed
on hold
•Dial the telephone number you wish
to add to the call
•When the called party answers you
can talk privately
•To complete the conference call
press the Confrn soft key
•Repeat the procedure to add up to 5
additional parties to the conference
call, including yourself
If you make a dialing error, or the called party does not
answer or want to participate in the conference call,
press the EndCall soft key and then the Hold button to
return to the original caller(s).
Page 4 of 5
Activating Monitor
•While on a call, press the Monitor
soft key
While monitoring a call you will be able to hear the
other party but they will not be able to hear you.
To resume the call, press the MonOff soft key. If you
hung up the handset after pressing the “Monitor” soft
key, simply lift the handset to resume the call.
Menu Button
Directories: Missed Calls/Received Calls/Placed Calls
View Call Records
•Press the Menu button
•Select Directories
•Select a particular directory (Missed
Calls/Received Calls/Placed Calls)
Dial From A Call Record
•Follow the steps above to access the
desired directory
•Select a record using the Navigation
button
•If necessary, use the EditDial soft
key to add digits to the number (e.g.,
"9" for external calls)
•Press the Dial soft key to dial the
number
•To exit directory press the Exit soft
key until all menus are closed
Please Note: If a call record is selected and you lift the
handset, the number will be dialed.
Delete Call Records
•Press the Menu button
•Select Directories
•Press the Clear soft key to delete all
of the records in all the directories
(Missed Calls/Received Calls/Placed
Calls) OR
•To delete a particular call record,
select the directory where the record
resides, highlight it using the
Navigation button, and then press
the Delete soft key
Name or Phone Number Search
•Press the Menu button
•Select Directories
•Select Directory Services
•Select Corporate Directory
•Use the keypad to enter search
criteria (name or phone number)
•Press Search soft key to perform
search
•To exit directory press the Exit soft
key until all menus are closed
When using the “Corporate Directory” you can search
Trent University’s Phone Directory by name or phone
number.
If the search returns a number it can be dialed by
pressing the Dial soft key. If necessary, use the
EditDial soft key to add digits to the number (e.g., "9"
for external calls).
Please Note: If a searched entry is selected and you lift
the handset, its number will be dialed.
Page 5 of 5
Settings: Customizing Your Telephone
Display Contrast
•Press the Menu button
•Select Settings
•Select Contrast
•Press the Up and Down soft keys to
adjust contrast
•Press the Ok soft key to save the
changes and exit
Ring Type
•Press the Menu button
•Select Settings
•Select Ring Type
•Use the Navigation button to
highlight a ring type
•Press Play soft key to listen to ring
type
•With the ring type of choice
highlighted, press Select and then
Ok soft keys to save selection
Volume Adjustment – Ringer
•While not on a call and with the
handset down, press the Volume
control button (8) to adjust the
volume
Volume Adjustment - Handset/Speaker
•While on a call, press the Volume
control button (8) to adjust the
volume
•Press the Save soft key
Services:
•Press the Menu button
•Select Services
Services are currently unavailable until further notice.
If “Services” is selected, please lift and replace handset
until “Menu” button is no longer illuminated. Otherwise,
phone will be locked up.

Other manuals for 7912

4

Other Cisco IP Phone manuals

Cisco 504 Instruction manual

Cisco

Cisco 504 Instruction manual

Cisco Cisco 525 Service manual

Cisco

Cisco Cisco 525 Service manual

Cisco Small Business Pro SPA 504G User manual

Cisco

Cisco Small Business Pro SPA 504G User manual

Cisco 7940G User manual

Cisco

Cisco 7940G User manual

Cisco 7942 User manual

Cisco

Cisco 7942 User manual

Cisco 7931G - Unified IP Phone VoIP Instruction Manual

Cisco

Cisco 7931G - Unified IP Phone VoIP Instruction Manual

Cisco UNIFIED 9971 User manual

Cisco

Cisco UNIFIED 9971 User manual

Cisco IP Phone User manual

Cisco

Cisco IP Phone User manual

Cisco 8865 User manual

Cisco

Cisco 8865 User manual

Cisco 7921G - Unified Wireless IP Phone VoIP User manual

Cisco

Cisco 7921G - Unified Wireless IP Phone VoIP User manual

Cisco Webex 840 Operating instructions

Cisco

Cisco Webex 840 Operating instructions

Cisco DX650 User manual

Cisco

Cisco DX650 User manual

Cisco 6800 Series User manual

Cisco

Cisco 6800 Series User manual

Cisco 6851 User manual

Cisco

Cisco 6851 User manual

Cisco 8941 User manual

Cisco

Cisco 8941 User manual

Cisco 7920 - Unified Wireless IP Phone VoIP Instruction Manual

Cisco

Cisco 7920 - Unified Wireless IP Phone VoIP Instruction Manual

Cisco 8800 Series User manual

Cisco

Cisco 8800 Series User manual

Cisco Cisco 7940 User manual

Cisco

Cisco Cisco 7940 User manual

Cisco 8832 User manual

Cisco

Cisco 8832 User manual

Cisco 7911 User manual

Cisco

Cisco 7911 User manual

Cisco 794X User manual

Cisco

Cisco 794X User manual

Cisco Unified 6921 User manual

Cisco

Cisco Unified 6921 User manual

Cisco 7975G - Unified IP Phone VoIP User manual

Cisco

Cisco 7975G - Unified IP Phone VoIP User manual

Cisco 7940G Instruction Manual

Cisco

Cisco 7940G Instruction Manual

Popular IP Phone manuals by other brands

TRENDnet ClearSky TVP-SP1BK Frequently asked questions

TRENDnet

TRENDnet ClearSky TVP-SP1BK Frequently asked questions

Excelltel CDX-IPH303 user manual

Excelltel

Excelltel CDX-IPH303 user manual

iPECS eMG80 installation guide

iPECS

iPECS eMG80 installation guide

Alcatel-Lucent OPENTOUCH ALE-500 user manual

Alcatel-Lucent

Alcatel-Lucent OPENTOUCH ALE-500 user manual

VOIspeed V-IP400P user manual

VOIspeed

VOIspeed V-IP400P user manual

Aastra 6735i user guide

Aastra

Aastra 6735i user guide

Gigaset N300IP user guide

Gigaset

Gigaset N300IP user guide

Avaya 1230 Administration

Avaya

Avaya 1230 Administration

urmet domus IPerCom System Technical Manual

urmet domus

urmet domus IPerCom System Technical Manual

Avaya 4600 Series Administrator's guide

Avaya

Avaya 4600 Series Administrator's guide

HP officejet 4110 quick start guide

HP

HP officejet 4110 quick start guide

Avaya 3600 Series Configuration and administration guide

Avaya

Avaya 3600 Series Configuration and administration guide

Linksys SPA922 - IP Phone With Switch Administrator's guide

Linksys

Linksys SPA922 - IP Phone With Switch Administrator's guide

ATCOM AT820 series user manual

ATCOM

ATCOM AT820 series user manual

Nortel 1535 Get started

Nortel

Nortel 1535 Get started

Siemens Hicom 150 optiset E standard Operator's guide

Siemens

Siemens Hicom 150 optiset E standard Operator's guide

cetis 3300IP user manual

cetis

cetis 3300IP user manual

Xorcom XP0150G Quick installation guide

Xorcom

Xorcom XP0150G Quick installation guide

manuals.online logo
manuals.online logoBrands
  • About & Mission
  • Contact us
  • Privacy Policy
  • Terms and Conditions

Copyright 2025 Manuals.Online. All Rights Reserved.