manuals.online logo
Brands
  1. Home
  2. •
  3. Brands
  4. •
  5. Cisco
  6. •
  7. IP Phone
  8. •
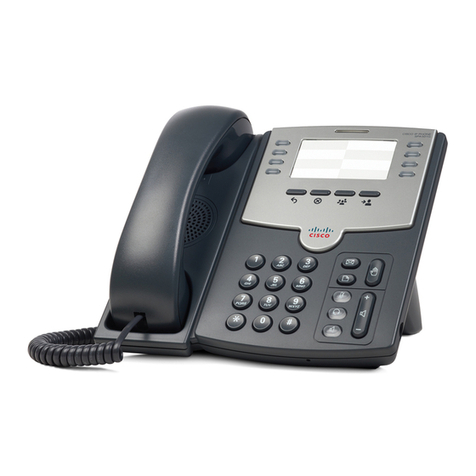
  9. Cisco SPA-500 Series Instruction manual

Cisco SPA-500 Series Instruction manual

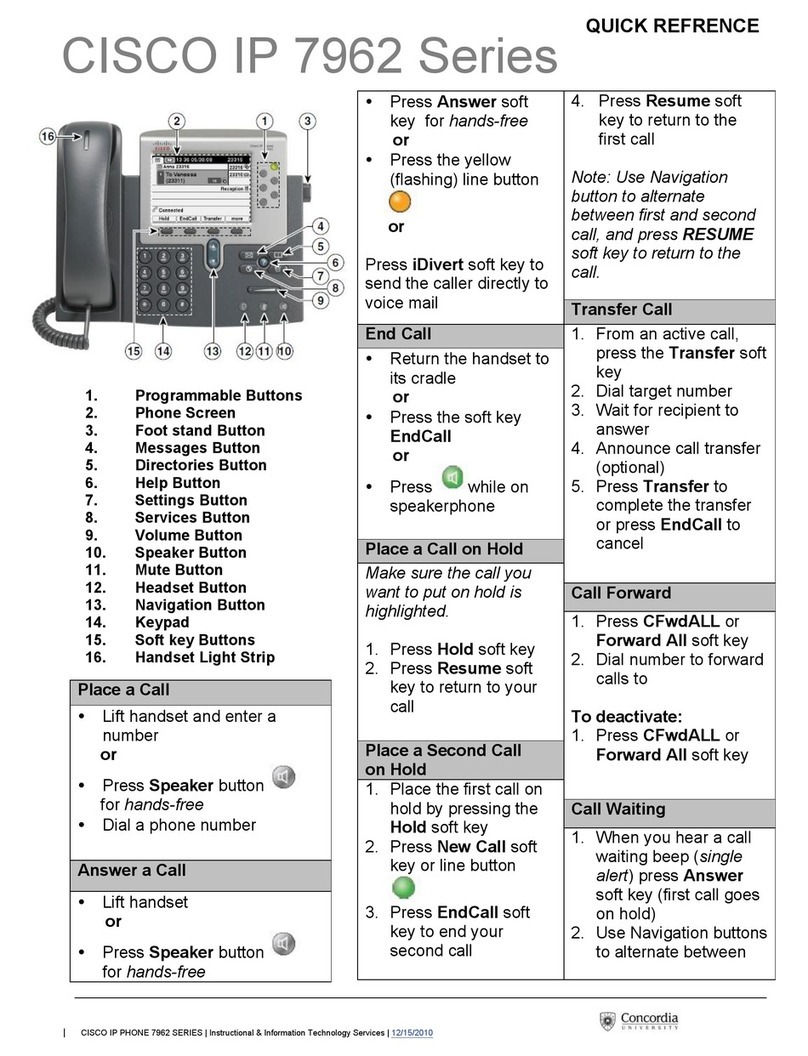
Phone Quick User Guide
Cisco Small Business
SPA300 Series and SPA500 Series
IP Phone with Cisco Unified
Communications UC320W
This guide helps you to get started using your IP
Phone with the Cisco Unified Communications System
UC320W. For details, see the phone user guide (links
in the Where to Go from Here section of this guide).
NOTE Available features depend on the phone model
and the phone setup at your site. Some features may
be unavailable on your phone.
•Some functions require pressing a phone button,
such as .
•Some functions require pressing keys on the
keypad, such as .
•For some functions, you can use the softkeys on the
phone screen, such as .
•The LED buttons next to the phone screen may
be used as line buttons for a call, or as feature
buttons for special functions (see the Using
Feature Buttons section).
Placing a Call
1. Lift the handset, press to use the speaker, or
press to use a headset (not included).
2. Press a line button (optional). If you do not
choose a line button, the first line button is used.
3. Dial an extension number or an external number.
#
Redial
Dialing an External Number
• Use an outside line (if allowed): Select the line
button , and enter the phone number, including
any long-distance prefix required by your phone
service. No access code is needed.
• Use a personal extension (if allowed): Enter the
access code, such as 9. Enter the phone number,
including any long-distance prefix required by your
phone service. Check with your phone administrator
for details.
Making a Conference Call
• Create a conference call: During a call with one
party, press (SPA301), (SPA501G),or
(other models). Dial the extension or
phone number of the third party. When the party
answers, press the button again.
• End the conference for everyone: Hang up, or
press .
• Exit the conference while the other parties
continue: Press . Not available on
SPA301 or SPA501G.
Transferring a Call
• SPA301 and SPA501G: Press (SPA301) or
(SPA501G). Dial the extension or phone
number. Anytime after the call starts ringing, press
the button again.
•Othermodels:
–Attended Transfer: Press or
. Dial the extension or phone number.
After speaking to the other party, press
or again.
–Immediate Transfer with softkey: Press
or . Dial the extension or
phone number.
–One Button Transfer (if available): If your phone
has an Auto-Dial or BLF feature button for a user,
you can press this button during a call to
immediately transfer the call to that user. The
transfer is non-consultative.
Holding and Resuming Calls
•SPA301:To hold a call, press . To resume a
held call, press twice.
•Othermodels: To hold a call, press or
. To resume a held call, press the flashing
line button or .
FLASH
Conf
End Call
Join
FLASH
Transfer
Xfer Transfer
Xfer
Bxfer BlindXfer
FLASH
FLASH
Hold Resume
Handling Missed Calls
If you miss a call, an alert appears on the phone
screen, along with two soft keys.
• Return a missed call: Press (Last Call
Return) or to view information for the most
recent missed call. To return the call, press
.
• View a list of missed calls: Press . You
can use the navigation button to choose a call, and
then press .
Note: The Call History is available at any time. Press
, and then choose Call History > Missed Calls to
view or return missed calls.
Using Your Voicemail Box
• Set up your voicemail: Press . Enter the default
password, 12345, followed by . Follow the
prompts to change your password and record your
greetings.
• Check messages for your primary personal
extension (if enabled): Press . Enter your
password, followed by .
• Check messages outside the office: Call your own
extension. When the call goes to voicemail, press
for the menu. Enter your password, followed by
.
Using a Group Voicemail Box
• Use the Messages button: Press . Press for
the menu.Enter the mailbox number, followed by
. When prompted, enter the password (default
12345), followed by .
• Use a feature button (if available): Press the
feature button , which displays the letters VM
and the name of the group or line. Press . Enter
the password (default 12345), followed by . (If
the mailbox is not yet set up, follow the prompts.)
LCR
Call Rtn
Dial Miss
Dial
#
#
#
#
#
##
#
Monitoring Calls on a Shared Line, Shared
Extension, or Busy Lamp Field (BLF)
The line button indicates the status.
•Unlit:Idle.
• Green (steady): Connected to a call on this phone.
• Green (flashing): Holding a call on this phone. To
resume the call, press the phone button.
• Orange (flashing): Ringing.
•Red(steady):Connected to a call on another user’s
phone.
• Red (flashing): Holding a call on another user’s
phone. To pick up the call, press the line button.
• Orange (steady): There is an error. Contact your
phone administrator for assistance.
Parking and Unparking Calls
•Useastarcode:
–Park a call: Place the call on hold. Press
. Enter an easily remembered number
for your park slot. Press .
–Unpark a call: Lift the handset. Press .
Enter the park slot number. Press .
• Use a softkey:
–Park a call: Press the right-arrow
navigation button and then press
. Enter an easily remembered number
for your park slot. Then press or .
–Unpark a call: Press the right-arrow
navigation button, and then press .
Enter the park slot number. Press or .
• Use a feature button (if available): Press the Park
Slot feature button . To unpark, press the same
feature button, such as Park Slot 1, or use one of the
other techniques described in this section.
Picking Up a Call for Another User
Not available on SPA301 or SPA501G
• Enter an extension number: Press . Enter
the extension number. Press .
• Use a feature button (if available): Press the
feature button , which displays the user’s name.
Picking Up a Call from a List of Ringing Calls
Not available on SPA301 or SPA501G
• Use a softkey: Press the right-arrow navigation
button, and then press or
(Group Pickup). Use the navigation button to choose
a call, and then press .
• Use a feature button (if available): Press
the Group Pickup feature button . Use
the navigation button to choose a call, and
then press .
*
3
8
#
*
3
9
#
Park
#
Dial
Unpark
#
Dial
Pickup
Dial
GrPick
Grpickup
Dial
Dial
Diverting Calls to Voicemail
•Ignore a ringing call: Press . The call is
forwarded to your Call Forward No Answer number
(usually voicemail).
• Prevent new calls from ringing your phone: Press
(Do Not Disturb). All calls are forwarded to
your Call Forward No Answer number (usually
voicemail). To clear, press or
(Clear Do Not Disturb).
Forwarding Calls to Another Number
• Forward all incoming calls: Press or
(Call Forward) to forward all incoming
calls. Then enter an extension or phone number.
Press (not required if you entered an
extension).
• Cancel Call Forward All: Press or
(Clear Forward).
Using the Site Directory
To find extension numbers for users, groups, and
system features, press or .
Use the navigation button to choose a
directory. To place a call, select a number, and
then press .
Using Feature Buttons
Your phone administrator may configure feature
buttons for your phone. Ask your phone
administrator for details. Not available on
SPA301, SPA501G, or SPA502G
• Auto-dial (system speed dial): Immediately calls or
transfers a call to the specified extension or phone
number. The transfer is non-consultative.
•BLF(BusyLampField):Monitors the specified
extension. Can be used to pick up a ringing call, to
immediately call the target, or to transfer a call to the
target. The transfer is non-consultative.
• Block Caller ID: Blocks your caller ID for a new call.
Lasts for the duration of the call.
•ParkSlot:Places a call on hold in the specified park
slot, such as Park Slot 2. To unpark, press the same
park slot button on any IP phone.
•ForceNight:The function depends on the Day/
Night settings for your phone system.
–In a manual day/night system: Press to toggle
between Day mode (green) and Night mode (red).
–In an automated day/night system: Press to
temporarily override the schedule by enabling
Night mode (red). Press again to resume the
normal schedule (green).
Ignore
Dnd
-Dnd
Clr Dnd
Forward
Cfwd
Dial
-Cfwd
Clr Fwd
Dir
Directory
Dial
•Intercom:Initiates a two-way call to the phone
speaker of the specified user. To end the intercom
call, press the button again.
• Individual Pickup: Flashes to indicate a ringing call
on the specified extension. Press to pick up the call.
• Group Pickup: Flashes to indicate a ringing
call on any extension. Press to display a list of
ringing calls. Use the navigation button to
choose a call, and then press .
Creating a Personal Speed Dial Button
If there is an unused feature button on your phone,
you can add a personal speed dial.
1. Press and hold the unused button for 3 to 4
seconds.
2. To enter the Name, repeatedly press the
corresponding key on the keypad until the
desired letter appears. To erase a character,
press . When finished, press the down-
arrow navigation button.
3. In the PhoneNo field, enter an extension or phone
number, including any required outside line digit,
such as 9. Finally, press .
Using Star Codes
• Enter a code manually (all models): Lift the
handset. Press , followed by the code. For
details, see your phone user guide (links in the
Where to Go from Here section).
• Select a star code on Cisco SPA50xG
models (except SPA501G): Lift the handset.
Press the right-arrow navigation button
twice. Press . Press the down-
arrow navigation button to select a star code.
Press . Additional prompts may appear.
• Select a star code on Cisco SPA525G/G2:
Lift the handset. Press Option, and then
select Input Star Code. Press the down-
arrow navigation button to select a star code.
Press . Additional prompts may
appear.
Where to Go from Here
•Cisco Small Business Support Community:
www.cisco.com/go/smallbizsupport
•Additional Phone Documentation:
www.cisco.com/go/uc300 (see the Resources
tab)
Dial
delChar
Save
*
*code
Dial
Select

Other manuals for SPA-500 Series

11

This manual suits for next models

1

Other Cisco IP Phone manuals

Cisco 7821 User manual

Cisco

Cisco 7821 User manual

Cisco 7965G - Unified IP Phone VoIP User manual

Cisco

Cisco 7965G - Unified IP Phone VoIP User manual

Cisco 7925G - Unified Wireless IP Phone VoIP User manual

Cisco

Cisco 7925G - Unified Wireless IP Phone VoIP User manual

Cisco 7931G - Unified IP Phone VoIP Instruction Manual

Cisco

Cisco 7931G - Unified IP Phone VoIP Instruction Manual

Cisco Productivity Services User manual

Cisco

Cisco Productivity Services User manual

Cisco Nexus 7000 Series User manual

Cisco

Cisco Nexus 7000 Series User manual

Cisco SPA 303 Series User manual

Cisco

Cisco SPA 303 Series User manual

Cisco 7925G (SCCP) User manual

Cisco

Cisco 7925G (SCCP) User manual

Cisco 7800 Series User manual

Cisco

Cisco 7800 Series User manual

Cisco 6945 Series User manual

Cisco

Cisco 6945 Series User manual

Cisco 8945G User manual

Cisco

Cisco 8945G User manual

Cisco 6941 - Unified IP Phone Slimline VoIP Instruction Manual

Cisco

Cisco 6941 - Unified IP Phone Slimline VoIP Instruction Manual

Cisco Unified 7905G User manual

Cisco

Cisco Unified 7905G User manual

Cisco 7961G - IP Phone VoIP Instruction Manual

Cisco

Cisco 7961G - IP Phone VoIP Instruction Manual

Cisco 8800 Series User manual

Cisco

Cisco 8800 Series User manual

Cisco 8800 Series User manual

Cisco

Cisco 8800 Series User manual

Cisco 7821 User manual

Cisco

Cisco 7821 User manual

Cisco SPA 303 Series User manual

Cisco

Cisco SPA 303 Series User manual

Cisco 7906G - Unified IP Phone VoIP User manual

Cisco

Cisco 7906G - Unified IP Phone VoIP User manual

Cisco SPA525G - Small Business Pro IP Phone VoIP User manual

Cisco

Cisco SPA525G - Small Business Pro IP Phone VoIP User manual

Cisco 7912G - IP Phone VoIP Instruction Manual

Cisco

Cisco 7912G - IP Phone VoIP Instruction Manual

Cisco 8841 How to use

Cisco

Cisco 8841 How to use

Cisco 524SG - Unified IP Phone VoIP User manual

Cisco

Cisco 524SG - Unified IP Phone VoIP User manual

Cisco 6945 Series User manual

Cisco

Cisco 6945 Series User manual

Popular IP Phone manuals by other brands

Siemens Gigaset S450 IP manual

Siemens

Siemens Gigaset S450 IP manual

iPECS 1020i Features guide

iPECS

iPECS 1020i Features guide

Unify OpenScape CP600 user guide

Unify

Unify OpenScape CP600 user guide

Grandstream Networks Grandstream GXP-2000 user manual

Grandstream Networks

Grandstream Networks Grandstream GXP-2000 user manual

Peaq PDP 270 user manual

Peaq

Peaq PDP 270 user manual

Nortel NN10042-116 user guide

Nortel

Nortel NN10042-116 user guide

Polycom 250 user guide

Polycom

Polycom 250 user guide

Fujitsu IP Centrex SRS-12i Quick reference card

Fujitsu

Fujitsu IP Centrex SRS-12i Quick reference card

SHORE TEL IP 560 Quick install guide

SHORE TEL

SHORE TEL IP 560 Quick install guide

Mitel MiVoice 5360 Quick reference guide

Mitel

Mitel MiVoice 5360 Quick reference guide

Polycom SoundPoint IP 550 user guide

Polycom

Polycom SoundPoint IP 550 user guide

Mitel 6863i Quick reference guide

Mitel

Mitel 6863i Quick reference guide

Yealink T43U Quick start up guide

Yealink

Yealink T43U Quick start up guide

Lucent Technologies 6402 user manual

Lucent Technologies

Lucent Technologies 6402 user manual

Yealink Yealink SIP-T46G quick reference

Yealink

Yealink Yealink SIP-T46G quick reference

ZyXEL Communications V300 Series quick start guide

ZyXEL Communications

ZyXEL Communications V300 Series quick start guide

Hanlong UC860(P) user guide

Hanlong

Hanlong UC860(P) user guide

DayStarr Yealink T46-G Quick user guide

DayStarr

DayStarr Yealink T46-G Quick user guide

manuals.online logo
manuals.online logoBrands
  • About & Mission
  • Contact us
  • Privacy Policy
  • Terms and Conditions

Copyright 2025 Manuals.Online. All Rights Reserved.