Citizen C650-00A User manual

60
70
80
90
11
12
13
14
15
16
17
18
19
20
21
22
23
24
25
30
35
40
45
50
55
10
KM.
70
80
90
11
12
13
14
15
16
17
18
19
20
21
22
23
24
25
30
35
40
45
50
55
10
N
A
U
T.
S
T
A
T.

Please charge the watch fully before use
by exposing it to light.
When the watch does not operate according to the
instruction manual, it is insufficiently charged.
Charge the watch for at least 3 hours approximately
20 cm (8 in) away from a fluorescent or incandescent
lamp (30 W) as a light source. When charging, do
not place the watch too close to the light source to
prevent the watch from becoming too hot.
* When charging the watch under direct sunfight,
charge for at least 50 minutes.
3
English

CONTENTS
1. Features .................................................................................................... 6
2. Before Using............................................................................................. 7
3. Names of Components and Major Functions........................................ 8
4. Switching the Mode (Display Functions) ............................................. 12
5. Checking 0-Position of Each Hand....................................................... 13
6. Accessing Times or Dates of Major Cities........................................... 18
7. Switching Analog Time and Digital Time............................................. 20
8. Setting the Time ..................................................................................... 22
9. Setting the Date...................................................................................... 25
10. Using the Alarm Mode ........................................................................... 28
11. Using the Chronograph ......................................................................... 32
12. Using the Timer ...................................................................................... 34
13. Using Zone Setting ................................................................................ 36
14. All-Reset.................................................................................................. 43
15. Functions Unique to Solar Powered Watches..................................... 46
• Insufficient Charge Warning Function
• Time Setting Warning Function
• Overcharging Prevention Function
• Power Save 1
• Power Save 2
• Manual Power Save
• Charge Indicator
16. General Reference for Charging Times ............................................... 59
17. Notes Regarding Handling of this Watch............................................. 60
18. Replacing The Secondary Battery........................................................ 61
19. Using the Register Ring......................................................................... 62
20. Precautions............................................................................................. 66
21. Specifications......................................................................................... 72
4 5

1. Features
This watch is a combination solar-powered watch that contains a solar cell in
its face that drives the watch hands, alarm, chronograph, timer and numerous
other functions by converting light energy into electrical energy.
It is also equipped with convenient functions including three power save
modes that reduce power consumption when light is not shining on the solar
cell, and a “charge indicator” that roughly indicates how much the secondary
battery is charged.
6 7
2. Before Using
This watch is a solar-powered watch. Before using, allow light to shine
onto the watch so that it is sufficiently charged.
If the manual power save function has been activated, cancel it before
charging. (Refer to p.58 for information on the procedure for canceling
the manual power save function.)
A secondary battery is used in this watch to store electrical energy. This
secondary battery is a clean energy battery that does not contain mercury or
other toxic substances. Once fully charged, the watch will continue to run for a
maximum of 4 years without additional charging (when in the power save 2
mode).
[Proper Use of this Watch]
To use this watch comfortably, make sure to recharge it before it stops running
completely. There is no risk of overcharging the watch no matter how often it is
recharged (Overcharging Prevention Function).
It is recommended that the watch be recharged everyday.

9
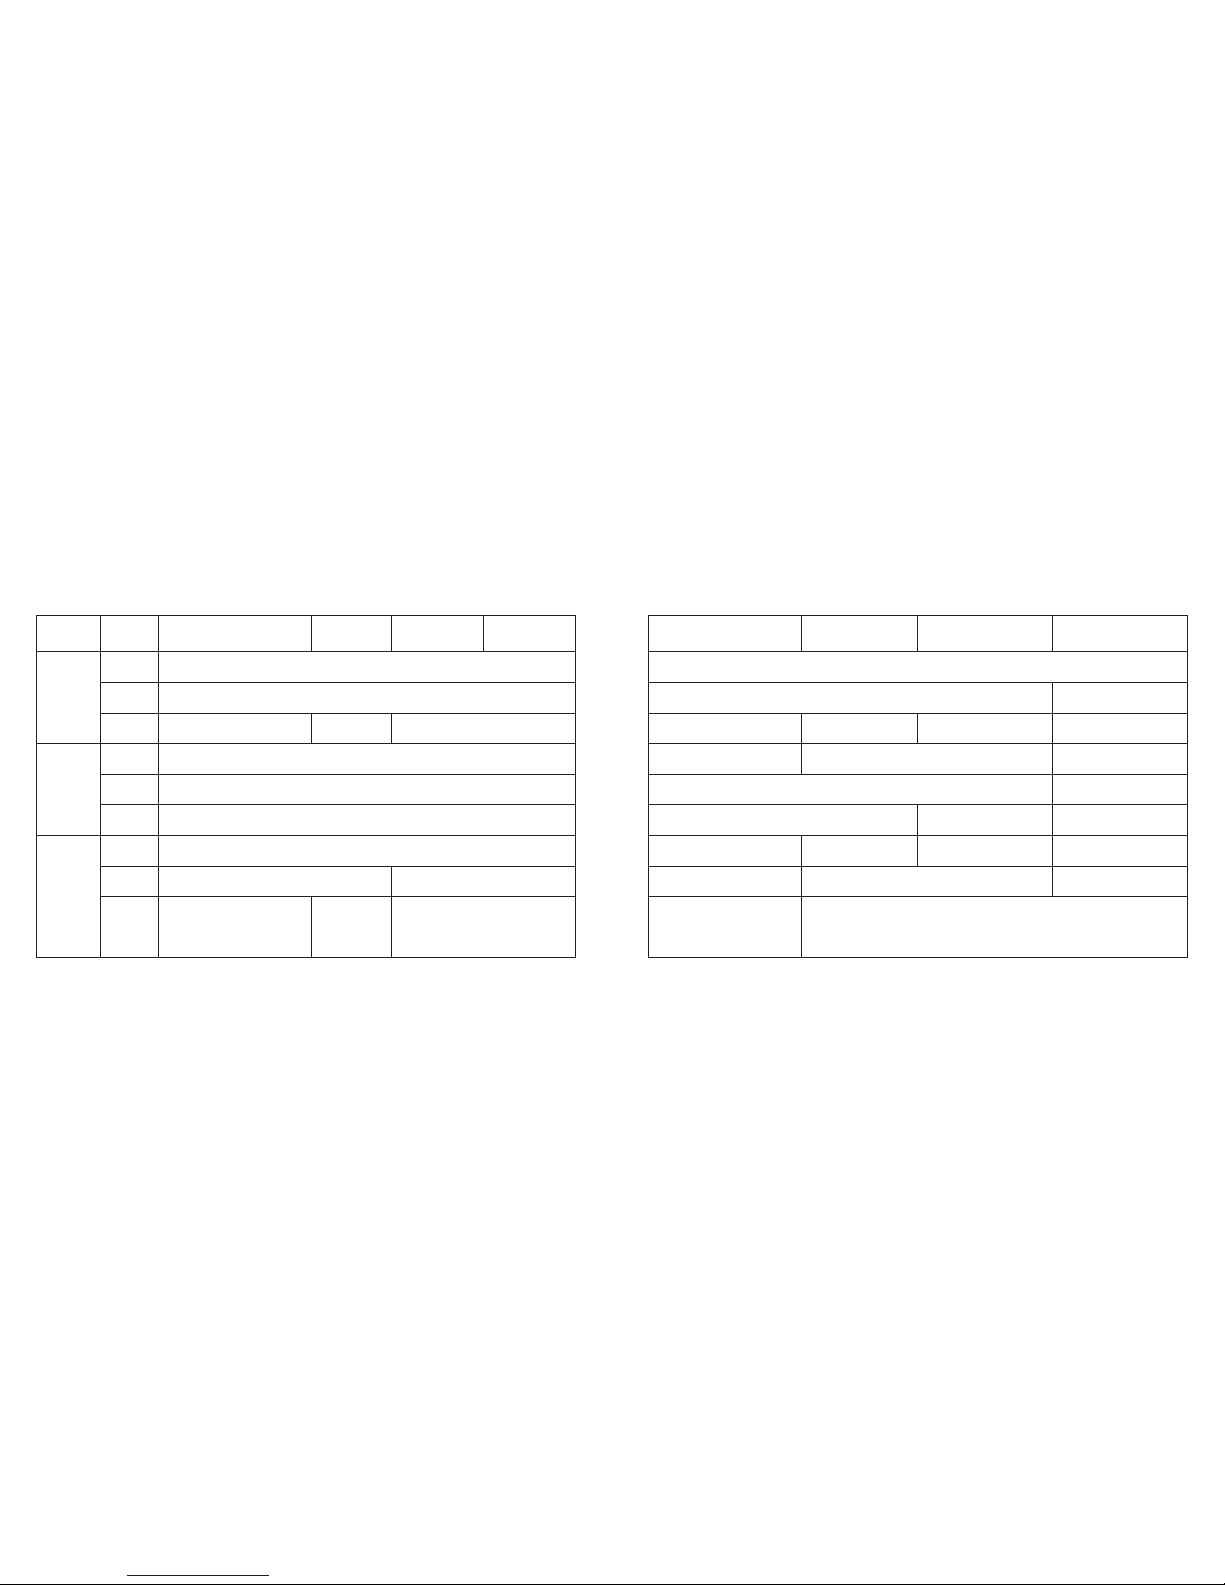
3. Names of Components and Major Functions
8
Name/Mode Time Calendar Alarm 1 Alarm 2
AMode hand TME CAL AL-1 AL-2
BHour hand Always indicates “hours”
CMinute hand Always indicates “minutes”
DSecond hand Always indicates “second“
E24 hour hand Always indicates “24-hour time” in conjunction with hours and minutes
FUTC hour hand Always indicates “UTC hours”
GUTC minute hand Always indicates “UTC minutes”
IDigital display 2
City name
Charge indicator
HDigital display 1
Hours, minutes, seconds,
A/P, SMT (when set to
daylight savings time)
Month, date, day, SMT
(when set to daylight
savings time)
Hours, minutes, A/P,
alarm (ON/OF)
Alarm 3 Chronograph Timer Zone setting
AL-3 CHR TMR SET
Always indicates “hours”
Always indicates “minutes”
Always indicates “second“
Always indicates “24-hour time” in conjunction with hours and minutes
Always indicates “UTC hours”
Always indicates “UTC minutes”
Hours, minutes, A/P,
alarm (ON/OF)
Measured time
(seconds, minutes,
1/100 seconds)
Remaining time
display (minutes,
seconds)
City name (SET/OFF)
SMT (ON/OF)
City name Measured time (hours) Set time (minutes) City name
Charge indicator
1110
Name
/Mode Time Calendar Alarm 1 Alarm 2
Crown
position
Normal
position
1st click
2nd click
Normal
position
1st click
2nd click
Normal
position
1st click
Mode switching
------
Time correction Date
correction Alarm time correction
Changing the city
------
Switching location to be corrected
Changing the city
------
Switching SMT (ON/OF)
Switching between
"seconds" correction and
"24 hour time" correction
2nd click
Alarm 3 Chronograph Timer Zone setting
Mode switching
------ Changing the city
Alarm time correction
Changing the city
------
Switching location to be corrected
Changing the city
Switching alarm (ON/OF)
Switching alarm (ON/OF)
0-position setting
Start/stop
------
Split, reset
------
------
Set time correction
Reset
City name, time
difference setting
Changing the city
Switching city name
(SET/OFF)
Switching location to
be corrected
Changing the city
Switching SMT
(ON/OF)
JCrown
Button (A)
Button (B)
------
Switching alarm (ON/OF)
Switching alarm (ON/OF)

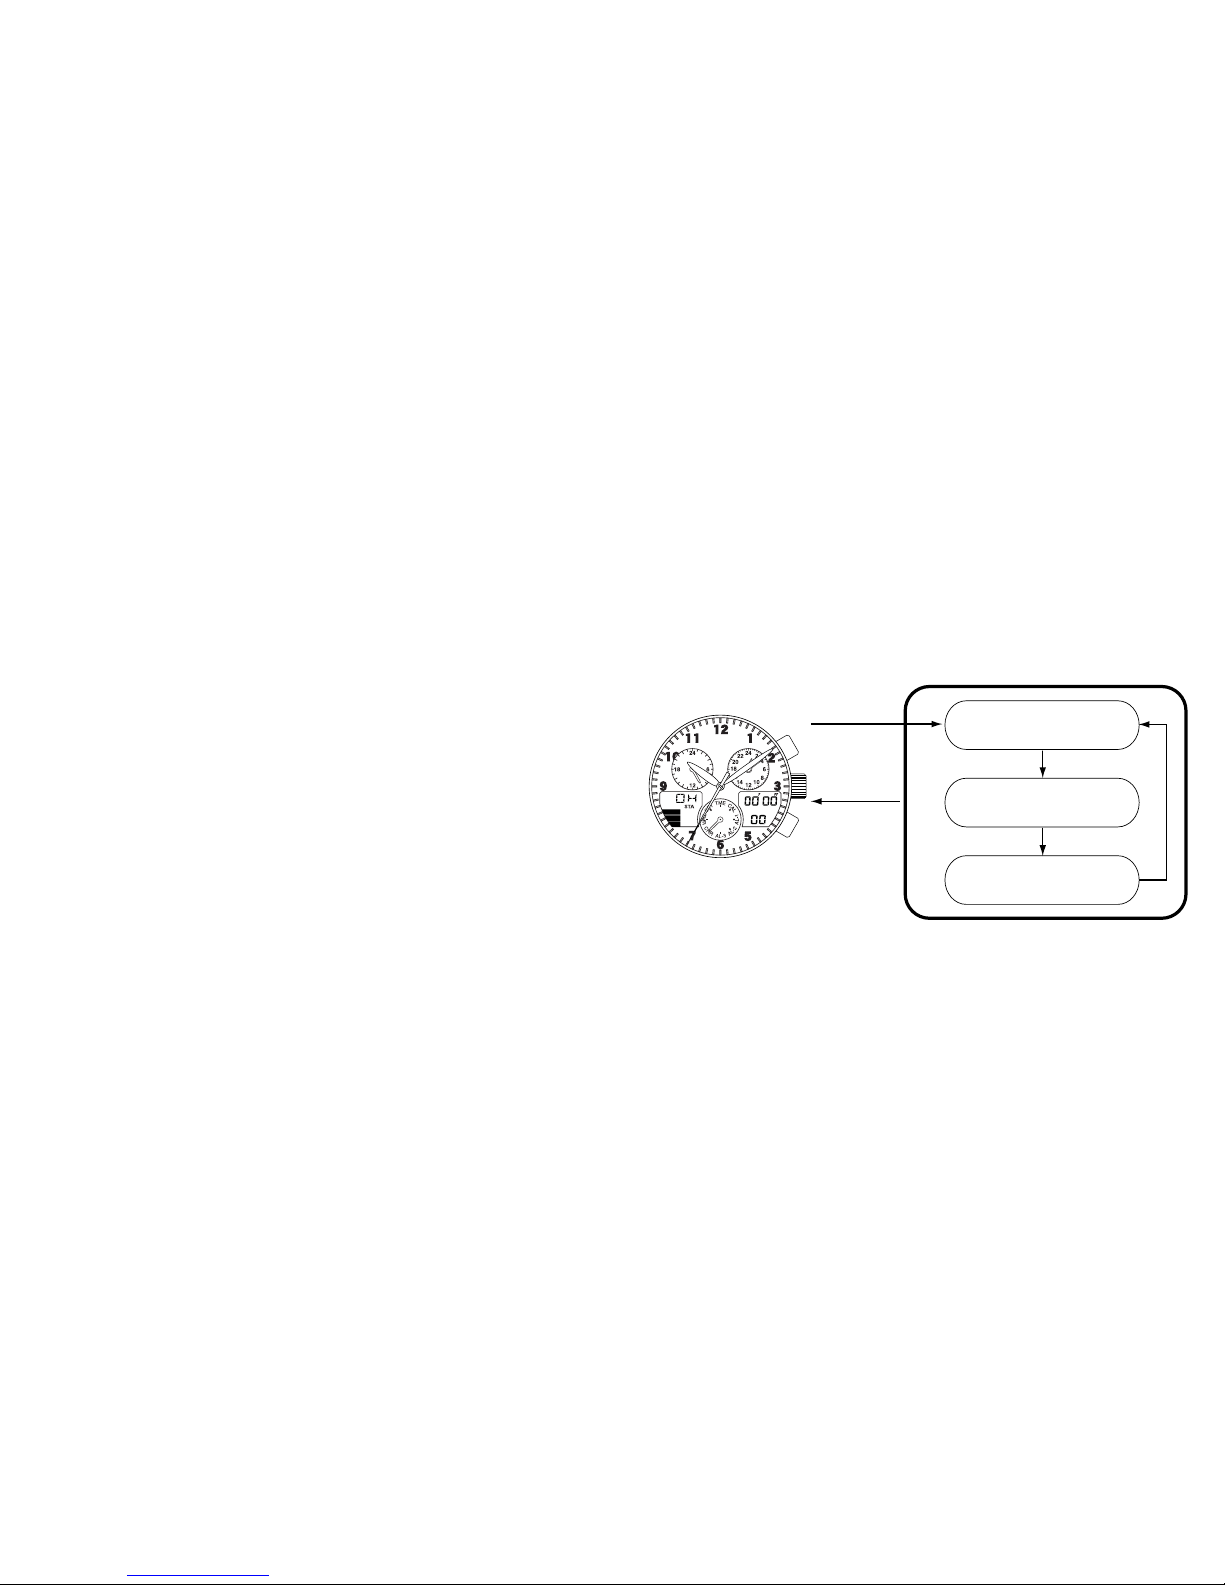
4. Switching the Mode (Display Functions)
In addition to the time and date modes, this watch is also equipped with three
additional modes consisting of the alarm, chronograph and timer modes. The
mode can be switched by turning the crown. Check the current mode with the
mode hand.
5. Checking 0-Position of Each Hand
Before using this watch, check that the 0-position (base position of each hand) is
set correctly to ensure that the functions of the watch operate properly by
performing the following procedure.
12 13
<Switching the Mode>
TME
Time
CAL
Calendar
AL-1
Alarm 1
AL-2
Alarm 2
SET
Zone Setting
TMR
Timer
CHR
Chronograph
AL-3
Alarm 3
Mode hand

<0-Position Correction (Setting to the Watch Base Position)>
When setting the 0-position of each hand, always make sure to turn the crown
forward (clockwise) to set each hand to its 0-position in the clockwise direction.
1. Turn the crown while in the normal position to set the mode hand to the
chronograph [CHR] mode.
2. Pull the crown out to the second click (0-position correction position).
• The second hand, minute hand, hour hand, 24 hour hand, UTC hour hand
and UTC minute hand rapidly advance to the position stored in memory.
• "HR" lights during digital display 2 indicating that the watch is in the
correction state.
3. Turning the crown forward (clockwise) allows correction to be made in the
positive direction. Turning the crown continuously allows the 0-position to be
corrected continuously.
4. Pressing button (A) switches the correction location between "MIN" (minute
hand) and "SEC" (second hand) each time it is pressed.
5. Turn the crown forward (clockwise) to align each hand at the 0-position at
each correction location. Although correction can be made in the negative
direction by turning the crown backward (counter-clockwise), always make
sure to set the 0-position by turning the crown forward to ensure that the 0-
position is set correctly.
• The 24 hour hand is corrected in conjunction with the hour hand. 15
<0-Position Check>
1. Turn the crown while in the normal position
to set the mode hand to the chronograph
[CHR] mode.
2. Pull the crown out to the second click (0-
position correction position).
• The second hand, minute hand, hour
hand, 24 hour hand, UTC hour hand and
UTC minute hand rapidly advance to the
0-position (12:00 position).
Note:
• When each hand is not at the 0-position,
perform the "0-position correction"
procedure. If this 0-position is out of
alignment, each hand will not indicate the
correct position.
14
17
• The UTC hour and minute hands are corrected in conjunction with the
minute hand.
• The second hand can only be corrected in the forward (clockwise) direction
only.
6. After correcting, return the crown to the normal position.
• After correcting the 0-position of each hand, reset the time, calendar and
other modes before using the watch.
Note:
• None of the buttons on the watch operate during movement of each hand.
Operate the buttons only after the hands have stopped moving.
16
Hour hand/24 hour hand
Minute hand/UTC hour hand,
UTC minute hand
Second hand
<Normal Chronograph
Display>
Crowned
pulled out to
second click
Crown
returned to
normal
position
<0-position (Base Position)
Correction State>
(A)
(A)
(A)
6. Accessing Times or Dates of Major Cities
The time or date of major cities pre-registered in this watch can be easily
accessed by pressing the buttons.
<Access Procedure>
1. Turn the crown to set the mode hand to the time [TME] or [CAL] calendar
mode.
2. When button (A) is pressed, the times or dates of major cities are displayed
while scrolling up each time it is pressed.
3. When button (B) is pressed, the times or dates of major cities are displayed
while scrolling down each time it is pressed.
• Pressing button (A) or (B) continuously causes the display to advance
rapidly.
18 19
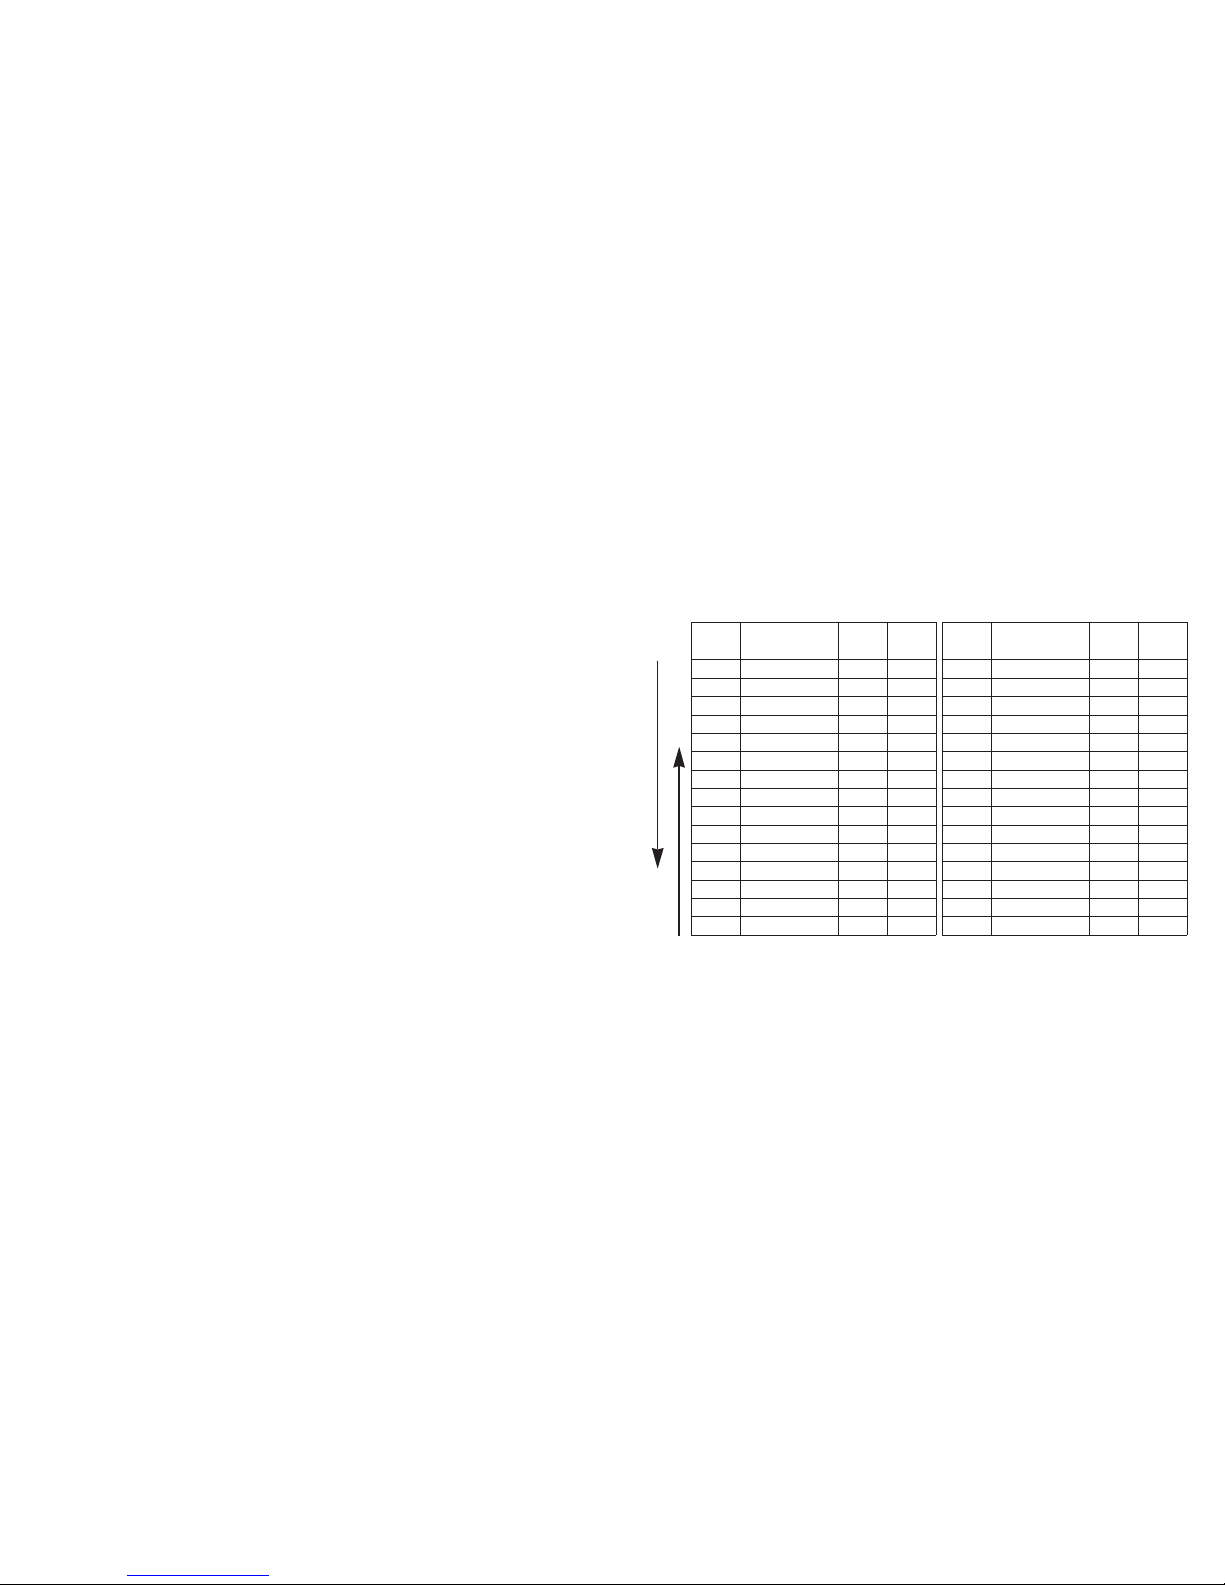
<Cities and UTC Time Differences Pre-registered in this Watch>
Display
on watch City name
Time
difference
Daylight
savings
time
UTC
Universal time constant
±0 ---
Display
on watch City name
Time
difference
Daylight
savings
time
TYO Tokyo +9 M
LON London ±0 KSYD Sydney +10 K
PAR Paris +1 KNOU Noumea +11 M
ROM Rome +1 KAKL Auckland +12 K
CAI Cairo +2 KHNL Honolulu
-
10 M
IST Istanbul +2 KANC Anchorage
-
9K
MOW Moscow +3 KLAX Los Angeles
-
8K
KWI Kuwait +3 MDEN Denver
-
7K
DXB Dubai +4 MCHI Chicago
-
6K
KHI Karachi +5 MMEX Mexico City
-
6M
DAC Dacca +6 MNYC New York
-
5K
BKK Bangkok +7 MYUL Montreal
-
5K
SIN Singapore +8 MCCS Caracas
-
4M
HKG Hong Kong +8 MRIO Rio de Janeiro
-
3K
PEK Beijing +8 MBUE Buenos Aires
-
3M
Scrolling UP
Scrolling DOWN
* Cities (regions) in which daylight savings time is used are indicated with a K, while those in which it
is not are indicated with an M.
* The time difference and use of daylight savings time of each city are subject to change by the
particular country.
Table of contents
Other Citizen Watch manuals

Citizen
Citizen Eco-Drive User manual

Citizen
Citizen H33 Series User manual

Citizen
Citizen JP25 User manual

Citizen
Citizen YF20 User manual

Citizen
Citizen u680 User manual

Citizen
Citizen 8712 User manual

Citizen
Citizen h950 User manual

Citizen
Citizen AV0025-51A User manual

Citizen
Citizen JM8XXX User manual

Citizen
Citizen AT9030-55L User manual

Citizen
Citizen H060 User manual

Citizen
Citizen C520 User manual

Citizen
Citizen PCAT User manual

Citizen
Citizen 82 Series User manual

Citizen
Citizen C100 Manual

Citizen
Citizen H486 User manual

Citizen
Citizen 9184 User manual

Citizen
Citizen Quartz 7822 User manual

Citizen
Citizen 66 User manual

Citizen
Citizen Watch User manual


