manuals.online logo
Brands
  1. Home
  2. •
  3. Brands
  4. •
  5. Citizen
  6. •
  7. Watch
  8. •
  9. Citizen H990 Eco-Drive Satellite Wave User manual

Citizen H990 Eco-Drive Satellite Wave User manual

1/4
H990 Abbreviated instruction
• This watch is solar-powered. Expose the dial to light and use it sufficiently charged.
• To see details of charging time, specifications, and operations, refer to the instruction manual: H990 instruction manual
English
Component identification
Minute hand
24-hour indication
Area name / time
zone
Reception-in-progress indication (RX)
Date indication
Hour hand
Second hand
Reception result
indication
(OK / NO)
Button
B
Button
A
Crown
Function indication
• Day of week
• Summer time setting
(SMT ON/OFF)
• Actual appearance may differ from the illustration.
• The crown has two positions when pulling it out.
Checking the power reserve
1.
Push the crown in to position 0.
2.
Press and release the lower right button A.
The second hand moves to indicate the power reserve.
Second hand movement Power reserve status
Pointing “OK” or “NO” after moving
clockwise Power reserve is sufficient.
Pointing “OK” or “NO” after moving
counterclockwise
Charge immediately
• “OK” and “NO” indicate the satellite time signal reception result. They
have no relation to the charge level.
3.
Press and release the lower right button Ato finish the
procedure.
• It returns to current time indication automatically in about 10 seconds
without pressing the button.
Setting the world time
Checking the world time
1.
Push the crown in to position 0.
2.
Press and release the upper right button B.
The second hand moves to point the area currently set.
3.
Press and release the upper right button Bto finish checking.
• It returns to current time indication automatically in about 10 seconds
without pressing the button.
Setting the world time
Select an area from 26 worldwide areas to indicate its time.
1.
Pull the crown out to position 1.
The second hand indicates the current world time setting and the function
hand indicates the summer time information.
2.
Rotate the crown to select an area.
3.
Push the crown in to position 0to finish the procedure.
Table of time zones and representative areas
• The time zone in the table is based on UTC (Coordinated Universal Time).
• Countries or regions may change time zones for various reasons.
• When setting the world time to the summer time while the area selected is in
the summer time period, select an area and then set the summer time.
Time
zone
Second
hand
Area
name
Representative
area
0
0
LON
London
+1
2
PAR
Paris
+2
4
ATH
Athens
+3
7
RUH
Riyadh
+4
9
DXB
Dubai
+5
11
KHI
Karachi
+5.5
14
DEL
Delhi
+6
16
DAC
Dhaka
+7
18
BKK
Bangkok
+8
21
BJS
Beijing
+9
23
TYO
Tok yo
+9.5
25
ADL
Adelaide
+10
28
SYD
Sydney
+11
30
NOU
Noumea
Time
zone
Second
hand
Area
name
Representative
area
+12
32
AKL
Auckland
–11
35
MDY
Midway
–10
37
HNL
Honolulu
–9
39
ANC
Anchorage
–8
42
LAX
Los Angeles
–7
44
DEN
Denver
–6
46
CHI
Chicago
–5
49
NYC
New York
–4
51
SCL
Santiago
–3
53
RIO
Rio de Janeiro
–2
56
FEN
Fernando de
Noronha
–1
58
PDL
Azores
Crown's position
0 1 2
2/4
H990 Abbreviated instruction
Switching the summer time and standard time
Checking the summer time setting
1.
Push the crown in to position 0.
2.
Press and release the upper right button B.
The function indication indicates the current summer time setting.
Summer time setting Function indication Description
ON
Summer time is indicated.
OFF
The standard time is indicated.
3.
Press and release the upper right button Bto finish checking.
• It returns to current time indication automatically in about 10 seconds
without pressing the button.
Switching summer time and standard time
1.
Pull the crown out to position 1.
The function indication indicates the current summer time setting.
2.
Press and release the lower right button A.
• Each time you press button
A
, the summer time ON and OFF changes
alternately.
3.
Push the crown in to position 0to finish the procedure.
Checking the reception result of the satellite signal
1.
Push the crown in to position 0.
2.
Press and release the lower right button A.
The tail of the second hand indicates the result of the last reception.
OK
The reception was successful.
NO
The reception failed.
3.
Press and release the lower right button Ato finish checking.
• It returns to current time indication automatically in about 10 seconds
without pressing the button.
Receiving the satellite time signal
• To cancel the reception, press and hold the lower right button
A
until the
second hand returns to indicate the seconds.
Manual reception 1
• It may take 6 to 26 seconds to receive time information.
1.
Push the crown in to position 0.
2.
Press and hold the lower right button Auntil the tail of the
second hand points "RX" (about 2 seconds).
• After finishing the reception, the second hand indicates the reception result
and returns to indicate the seconds.
Manual reception 2
• Use this method when the leap second has been updated or when all reset has
been performed.
• It may take 35 seconds to 13 minutes to receive time information.
1.
Push the crown in to position 0.
2.
Press and hold the lower right button Afor 7 seconds.
Release the button after the tail of the second hand points “RX” and turns
fully around to point “RX” again.
Reception starts.
• After finishing the reception, the second hand indicates the reception result
and returns to indicate the seconds.
Checking and adjusting the leap second setting
1.
Pull the crown out to position 2.
2.
Press and release the upper right button B.
Using the “0:00:00” position as the starting point, the minute and second
hands indicate the leap second setting.
The leap second setting is specified according to the time of shipment.
Ex.) When the leap second setting is “−34
seconds”*
When the leap second setting is “−65
seconds”
The hands point to “0 minute 34
seconds”.
The hands point to “1 minute 5
seconds”.
*as of January 2011
Turn the crown to adjust the setting if the leap second is not correct.
3.
Push the crown in to position 0to finish the procedure.
The second hand returns to time indication.
3/4
Adjusting the time and calendar manually
• Check world time setting in Setting the world time beforehand.
1.
Pull the crown out to position
2
.
The second hand points to 30 seconds and stops.
2.
Press and release the lower right button A.
The second hand points 0 second and time and calendar become adjustable.
3.
Press and release the lower right button Arepeatedly to
change the hand/indication to be corrected.
• Each time you press button
A
, the target changes as follows:
Minute → hour/24-hour → date → year/month → day of week → (back to
the top)
• The hands and indications slightly move when selected to show they
become adjustable.
4.
Rotate the crown to adjust the hand/indication.
• Date and the function indication (day of week) move synchronously.
• When you rotate the crown quickly a few times, the hand/indication will
move continuously. To stop the rapid movement, rotate the crown in either
direction.
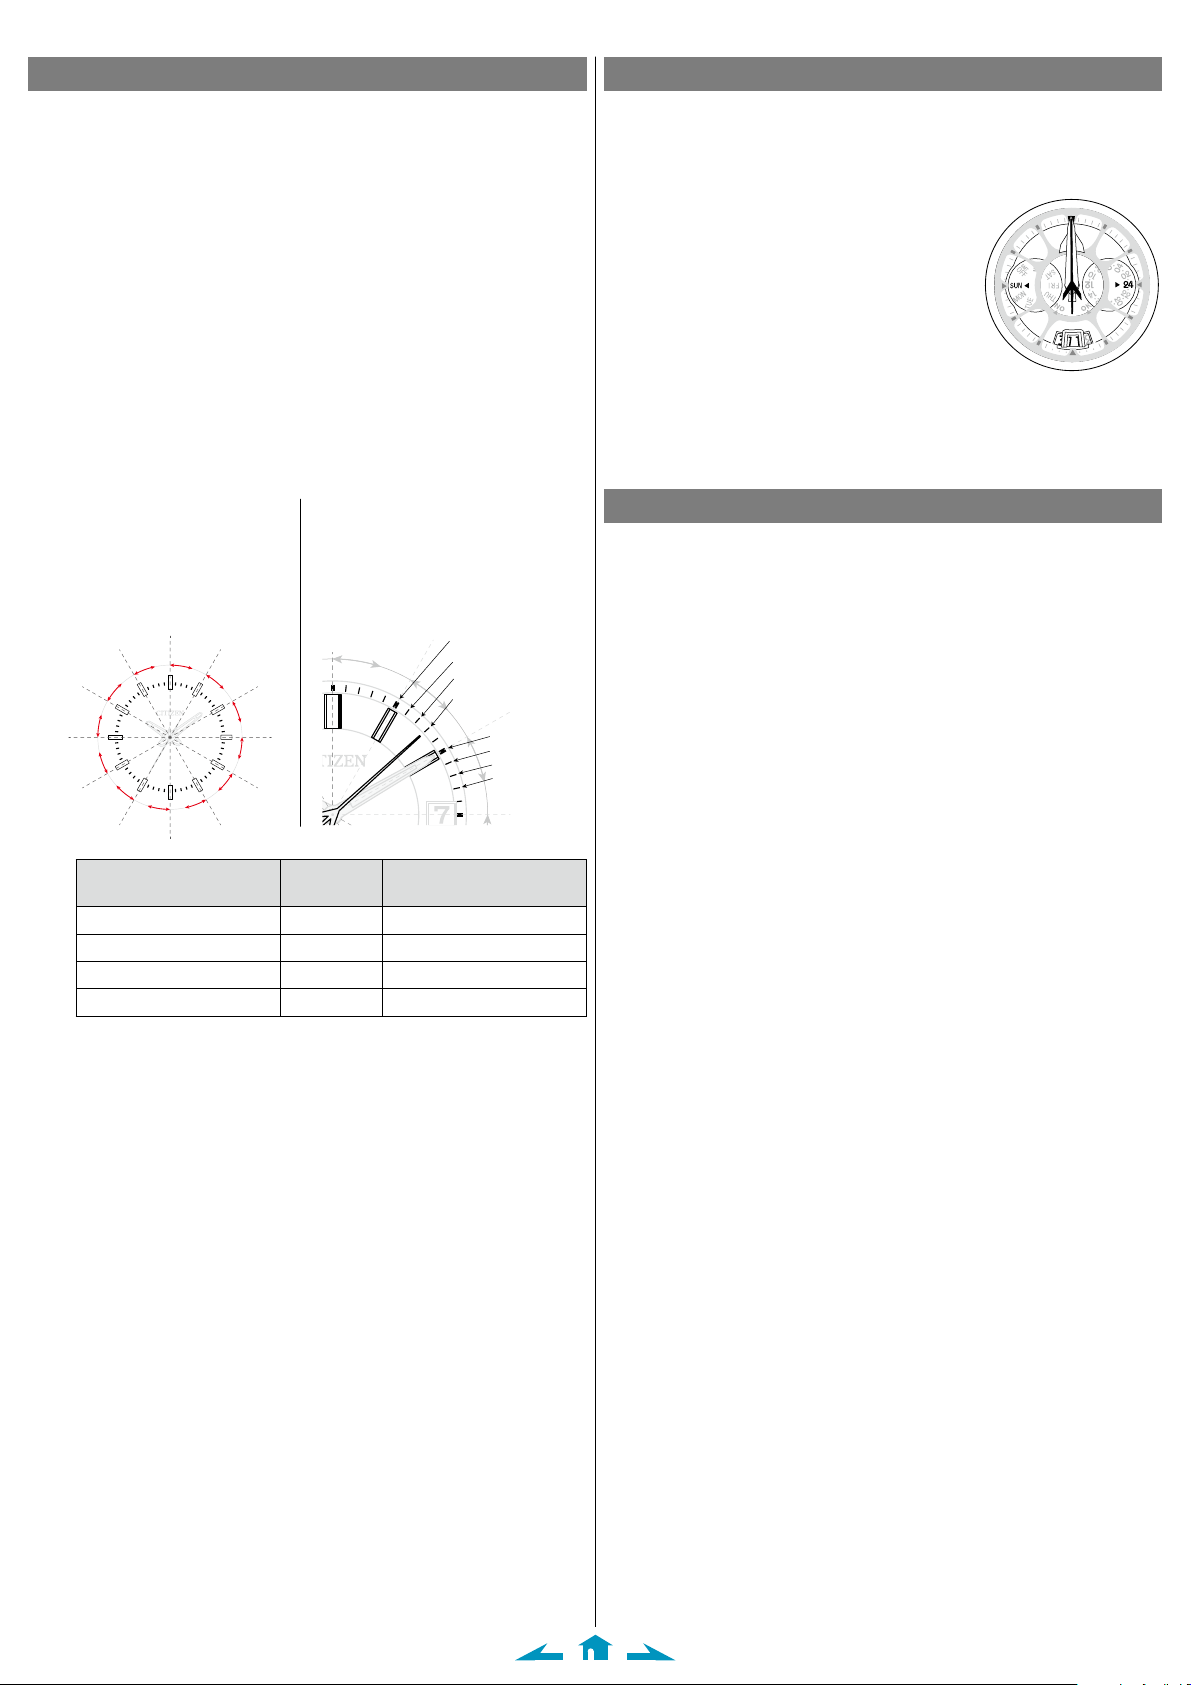
• Year and month are indicated with the second hand.
0
1
2
3
12
1
2
3
4
56
7
8
9
10
11
“Month” corresponds to one of
the 12 zones shown in the figure
below.
Each number means month.
“Year” corresponds to the years
since leap year and is indicated
with markers in the zone of each
month. Years since leap year:
0
(Leap year)
Years since leap year:
1
Years since leap year:
2
Years since leap year:
3
Actual year Years since leap
year Second hand position
2016 2020 2024 2028 0
(Leap year) Hour marker
2017 2021 2025 2029 1
1st min. marker
2018 2022 2026 2030 2
2nd min. marker
2019 2023 2027 2031 3
3rd min. marker
5.
Repeat steps 3 and 4.
6.
Push the crown in to position
0
in accordance with a reliable
time source to finish the procedure.
The second hand starts moving from 0 second.
H990 Abbreviated instruction
Checking the reference position
1.
Push the crown in to position 0.
2.
Press and hold the upper right button Bfor 7 seconds or more.
The hands and indication start to move to the current reference positions
stored in memory.
• Release the button as the hands start to move.
3.
Check the reference positions.
Hour, minute and second hands: 0 hour 00
minute 0 second
24-hour indication: 24
Day of week (function indication) : "SUN"
(Sunday)
Date indication: midway between "31" and "1"
When the current reference position is different from the correct one, adjust
the position following the steps of “Correcting the reference position”.
4.
Press and release the upper right button Bto finish the
procedure.
Correcting the reference position
1.
Push the crown in to position 0.
2.
Press and hold the upper right button Bfor 7 seconds or more.
The hands and indication start to move to the current reference positions
stored in memory.
• Release the button as the hands start to move.
3.
When all the hands stop moving, pull the crown out to position
2.
Day of week (function indication) and date indication become adjustable.
4.
Press and release the lower right button Arepeatedly to
change the hand/indication to be corrected.
• Each time you press the button, the target changes as follows:
Day of week (function indication)/date indication → hour hand/24-hour
indication → second/minute hands → (back to the top)
• The hands and indications slightly move when selected to show they
become adjustable.
5.
Rotate the crown to adjust the hand/indication.
• When you rotate the crown quickly a few times, the hand/indication will
move continuously. To stop the rapid movement, rotate the crown in either
direction.
• Date indication changes to the next as the day of week indication rotates 5
times.
6.
Repeat steps 4 and 5.
7.
Push the crown in to position 0.
8.
Press and release the upper right button Bto finish the
procedure.
• After pushing the crown in to position
0
, it returns to current time
indication automatically in about 2 minutes without pressing the button.
4/4
H990 Abbreviated instruction
Resetting the watch - All Reset
1.
Pull the crown out to position 2.
2.
Press and hold buttons Aand Bat the same time for 3 seconds
or more and release them.
The second hand moves to the 0 second position and other hands and date
indication move slightly, and All Reset is executed.
The setting values after All Reset
Calendar January of leap year (5 seconds position)
World time ±0 from UTC (LON), London
Summer time Off at all areas
Leap seconds No change after All Reset
Rollover number
After All Reset
After All Reset, adjust the reference position, set the world time and time/
calendar.

Other manuals for H990 Eco-Drive Satellite Wave

1

Other Citizen Watch manuals

Citizen H060 User manual

Citizen

Citizen H060 User manual

Citizen CTZ-B 8195 User manual

Citizen

Citizen CTZ-B 8195 User manual

Citizen AT8260-18A User manual

Citizen

Citizen AT8260-18A User manual

Citizen 0S80 User manual

Citizen

Citizen 0S80 User manual

Citizen 6P09 User manual

Citizen

Citizen 6P09 User manual

Citizen 6P21 User manual

Citizen

Citizen 6P21 User manual

Citizen Promaster Tsuno Chrono Racer User manual

Citizen

Citizen Promaster Tsuno Chrono Racer User manual

Citizen J304 User manual

Citizen

Citizen J304 User manual

Citizen GP11 User manual

Citizen

Citizen GP11 User manual

Citizen 677 User manual

Citizen

Citizen 677 User manual

Citizen E650 User manual

Citizen

Citizen E650 User manual

Citizen C47 User manual

Citizen

Citizen C47 User manual

Citizen Corso User manual

Citizen

Citizen Corso User manual

Citizen C650-00A User manual

Citizen

Citizen C650-00A User manual

Citizen H24 series User manual

Citizen

Citizen H24 series User manual

Citizen PCAT User manual

Citizen

Citizen PCAT User manual

Citizen Quartz CTZ-B8025 User manual

Citizen

Citizen Quartz CTZ-B8025 User manual

Citizen YF20 User manual

Citizen

Citizen YF20 User manual

Citizen CB1 Series User manual

Citizen

Citizen CB1 Series User manual

Citizen 8218 User manual

Citizen

Citizen 8218 User manual

Citizen G910 User manual

Citizen

Citizen G910 User manual

Citizen 0S21 User manual

Citizen

Citizen 0S21 User manual

Citizen 895 Series Manual

Citizen

Citizen 895 Series Manual

Citizen NB0 SERIES User manual

Citizen

Citizen NB0 SERIES User manual

Popular Watch manuals by other brands

HOLZKERN Radiance 42 mm quick start guide

HOLZKERN

HOLZKERN Radiance 42 mm quick start guide

Dubey?&?Schaldenbrand ARTISANS XTREME user manual

Dubey?&?Schaldenbrand

Dubey?&?Schaldenbrand ARTISANS XTREME user manual

Seiko SMY125P1 quick start guide

Seiko

Seiko SMY125P1 quick start guide

Martian Watches COMMANDER user manual

Martian Watches

Martian Watches COMMANDER user manual

Elari Fixitime Lite user manual

Elari

Elari Fixitime Lite user manual

Casio 2030 General guide

Casio

Casio 2030 General guide

Casio 1898 Getting started

Casio

Casio 1898 Getting started

Brainz 38561 instruction manual

Brainz

Brainz 38561 instruction manual

G.A.W ESPLORATORE user manual

G.A.W

G.A.W ESPLORATORE user manual

Casio ID-16S Operation guide

Casio

Casio ID-16S Operation guide

Casio 5268 Operation guide

Casio

Casio 5268 Operation guide

Tissot MOON PHASES WATCHES user manual

Tissot

Tissot MOON PHASES WATCHES user manual

Casio QW-2605 Service manual

Casio

Casio QW-2605 Service manual

Trilobe NUIT FANTASTIQUE user manual

Trilobe

Trilobe NUIT FANTASTIQUE user manual

Conrad 67 25 86 operating instructions

Conrad

Conrad 67 25 86 operating instructions

MOB MO6195 user manual

MOB

MOB MO6195 user manual

Calypso Watches IKMY121E61 instruction manual

Calypso Watches

Calypso Watches IKMY121E61 instruction manual

ALEXANDRE MEERSON D15 Mk-1 GMT OPERATING MANUAL & WARRANTY

ALEXANDRE MEERSON

ALEXANDRE MEERSON D15 Mk-1 GMT OPERATING MANUAL & WARRANTY

manuals.online logo
manuals.online logoBrands
  • About & Mission
  • Contact us
  • Privacy Policy
  • Terms and Conditions

Copyright 2025 Manuals.Online. All Rights Reserved.