Clam C-560 User manual

M o d e l
N o .
–14477
–
S p e c i f i c a t i o n s
▪
Center H e i g h t -
8
0
i
n c h e
s
▪
Footprint –
9
0 x 9
0
i
n c h e
s
▪
Hub-to-Hub -
1 1
0 x
1 1 0
i
n
c h e
s
▪
W
e
i
g
h
t –
3
9
l
b s
.
p
/
n
114477
I n s t r u c t i o n N o . 106240
- C l a m
C
u
s
t
o m e r
S
e
r
v
i
c
e
I
n
f
o
r
m
a t i o n -
NOTICE: Please contact Customer Service directly at the email address or phone number
below for any quality issues.
Customer Service Hrs: 9am to 4pm, Monday –Friday CST
Phone: 763-231-4120
Fax: 763-231-4121
Email: customerservice@clamcorp.com
** Warranty cannot be honored without an original, dated receipt **
IMPORTANT! PLEASE READ: Warranty Information
This product is warranted to the original retail purchaser
(
n
o
t
t
r
a
n
s
f
e
r
a
b
l
e
)
t
o be free from
manufacturers defects for one (1) year from the date of the original purchase.
W
a
r
r
a
n
t
y
d
o
e
s n o t
c
o
v
e
r
c
r
a
c
k
e
d
w
i
n
d
o
w
s
,
t
e
n
t
t
e
a
r
s
,
b
r
o
k
e
n
o
r
b
e
n
t
p
o
l
e
s
d
u
e
t
o
h
i
g
h
w
i
n
d
w
e
a
t
h
e
r
c
o
n
d
i
t
i
o
n
s
o
r
u
n
a
t
t
e
n
d
e
d
u
s
e
.
T
h
e
p
a
r
t will
b
e replaced or repaired (manufacturer’s option)
i
f
found defective within the one (1) year time frame. Warranty will be void if product has been subject to
neglect, misuse, improper installation, misapplication, alteration, or accident including, but not limited to,
improper maintenance or use of unauthorized parts or attachments. Please read this entire owner’s
manual to ensure proper
installation,
use, storage, and care for your Clam shelter.
To submit a Warranty Claim Request, please use one of the following methods:
•
Email:
CustomerService@ClamCorp.com (Preferred
Method)
•
Call: 763-231-4120
•
Write:
Customer
Service –Warranty Department
12135 Brockton Lane N.
Rogers, MN 55369
Information needed to submit a warranty claim: If you need to submit a warranty claim, please e-
mail Clam’s Customer Service Department at customerservice@clamcorp.com. In your e-mail, please
include your full name, address, phone number, a copy of your receipt, a brief description of the problem,
and pictures to clearly show the area(s) of concern. Clam’s warranty department will review your request
and a Clam representative will contact you regarding your claim status. If instructed by warranty
department,
all returns must be returned with postage pre-paid.
- L i m i t a t i o n o f L i a b i li t y -
It is expressly understood that Clam Corporation’s liability for its products, whether due to breach of warranty,
negligence, strict liability, or otherwise, is limited to the repair of the product as stated above. Clam Corporation is
not liable for any injury, loss, damage, or expense, whether direct or consequential, including but not limited to loss
of use, income, profit, or damage to material arising in connection with the sale, installation, use of, inability to use,
or the repair or replacement of Clam Corporation products. Clam Corporation reserves the right to make alterations
or modifications in its products at any time, which in its opinion, may improve the performance and efficiency of the
product. Clam shall not be obligated to make such alterations or modifications to products already in service.
C-560 Thermal Hub Shelter

Page 2
SAFETY INSTRUCTIONS
Please fully understand and follow all safety instructions
outlined in this booklet. Failure to do so could result in
severe injury.
•
Do not use open flame heaters in your ice shelter.
Open vents for cross ventilation.
•
Ice Armor fabric will melt when contact is made with
hot surfaces (i.e., heaters).
•
Never leave shelter unattended when set up.
•
Due to the increase in traffic (snowmobiles, autos,
etc.) on area lakes, ice fishing can be hazardous at
night. If you choose to fish at night or in poor visibility
conditions, be sure to take precautions with lights or
reflectors to show drivers your whereabouts.
•
Use external anchors during excessive wind (15+mph)
Death from asphyxiation may result from use of
oxygen depleting heaters. Open all vents for
fresh air ventilation.
Injury or death may result from fire if tent fabric is
exposed to open flame.
Tent fabric is not fireproof. Fabric will burn with
extended exposure to open flame. Do not use
open flame products inside tent. Tent fabric is
treated with fire retardant. Application of any for-
eign substance may render the flame retardant
properties ineffective.
Night time: exterior reflectors must be visible to
reduce risk of collisions.
This tent is made with flame resistant fabric
which meets CPAI-84 specifications.
P
A
R
T
S
LIST
Customer service hours:
ITEM
#
1
DESCRIPTION
HUB ASSY
QTY
.
5
PART
NO.
103507
9am –4pm, (CST) Monday-
2
ICEANCHOR
4
102457
Friday.
3
EXTERNAL
ANCHORSTRAP
4
104042
4
HUB & POLE KIT (4 POLES & 1 HUB)
5
109078
customerservice@clamcorp.com
5
CARRYBAG
1
105036
6
BUCKLEASSY
W
ITH STRAP
4
103244
7
INSTRUCTIONS/OWNER’S
MANUAL
1
106240
Ice Anchors included in small carry pouch
Replacement parts can be ordered on-line at www.clamoutdoors.com
SET-UP
INSTRUCTIONS
BEFORE ATTEMPTING TO USE THIS PRODUCT ON THE ICE go to www.clamoutdoors .com
and watch the set-up video for hubs shelters provided. Then practice setting up and taking
down at home in the comfort of a heated area such as a garage or basement. Repeat several times
until comfortable. This will make your on-ice set-up much easier.
NO TOOLS ARE NEEDED FOR SET-UP OF
YOUR CLAM HUB SHELTER
.
1.Unzip the storage bag completely and remove
the shelter. Use care not to misplace the anchor
pouch (Photo 1). It is advised to store your
anchors and pouch in the storage pocket of
your carry bag.
Anchor pouch Photo 1

Page 3
SET-UP
INSTRUCTIONS
2. Open the shelter so that the gray top is facing
upward. Lay the shelter as flat on the ice as you
can, making sure that the tent is not twisted or
overlapping any of the poles (Photo 2). Do NOT
force the shelter while unfolding.
3. Stand on the skirt of the shelter, grasp the blue
loop sewn onto the eyelet in the center of the roof.
Pull upward on the loop until the roof section pops up
(Photo
3).
NOTE: The blue looped hub (roof) gets deployed
FIRST on set-up and collapsed LAST on take-down.
Photo 2
Photo 3
4.Grasp the loop sewn onto the eyelet in the center
of one of the walls and pull outward until the wall
pops out (Photo
4).
Photo 4
5.Walk around the entire shelter and pull each loop
sewn onto the eyelet in the center of the wall until all
sides are popped out (Photo 5).
Photo 5

Page 4
SET-UP INSTRUCTIONS
6.Your shelter should be standing up completely (Photo 6)
.
Anchor the shelter to the ice by using ice anchors
and
straps.
Screw ice anchors into the ice near the corners of the
shelter using Clam’s Ice Anchor Installation Tool PN
108348 (not included). Feed the adjustable strap grommet
onto the ice anchor and cinch the strap tight (Photo 7).
Repeat for each anchor drilled into the ice. In windy
conditions you may need to screw an anchor outside the
shelter several feet away from the hub on the windward
side and attach a strap found in the pockets under each
side panel hub from the hub eye bolt to the remote anchor.
Adjust strap so that it is snug between hub and anchor.
This will help keep the shelter in place and the walls from
collapsing. If more anchors are needed, order PN 108064
(pack of two) viawww.clamoutdoors.com.
.
Photo 6
Photo 7
Ice Anchors in corners. Shelter is
secured to the ice by hooking the
grommet on the strap to the anchor and
cinching the strap tight.

Page 5
TAKE-DOWN INSTRUCTIONS
1. Close all windows. Leave one or both doors open
to allow air to escape.
2. Remove all internal ice anchors and store them in
the provided pouch or in the carry bag side pocket. In
windy conditions, remove ice anchor straps from
anchors and store back in hub pockets prior to
collapsing the roof and walls. Gather outside anchors
and place back in pouch.
3. Push the center hub on any wall until it collapses
inward (Photo 8). Continue pushing each wall
inward until all the walls are collapsed. The shelter
will fall to the ice on its own.
4.Push the hub of the roof (blue loop) down until
it collapses.
NOTE: The blue looped hub (roof) gets
deployed FIRST on set-up and collapsed LAST
on take- down.
5. The shelter will now be flat. Gather all corners of
the shelter and fold together (Photo 9). Do NOT
force the shelter when folding! Watch for
entanglement of poles (Photo 10).
6.Place the folded shelter and the ice anchor
pouch back into the carrying case with the hubs
toward the bottom end of the bag.
Make sure your ice shelter is completely dried
out after each use and before storing. Store
your ice shelter in a cool, dry place. Keep away
from rodents.
Photo 8
Photo 9
Photo 10
Tangled Untangled

-
S
a
f
e
t
y
I
n
s
t
r
u
c
t
i
o
n s -
Please fully understand and follow all safety instructions as outlined. Failure to do so could result in severe
injury or death.
▪
Do not use open flame heaters in your ice shelter. Injury or death may result from fire if tent fabric is
exposed to open flame. The tent is not fireproof, but the fabric is treated with a fire retardant that meets
CPAI-84 specifications. Application of any foreign substance may render the flame retardant properties
ineffective. Ice Armor fabric will melt when contact is made with hot surfaces (i.e., heaters).
▪
Death from asphyxiation may result from use of oxygen depleting heaters. Open all vents for fresh air
ventilation.
▪
Never leave shelter unattended when set up.
▪
Due to the increase in traffic (snowmobiles, autos, etc.) on area lakes, ice fishing can be hazardous at
night. If you choose to fish at night or in poor visibility conditions, be sure to take precautions with lights
or reflectors to show drivers your whereabouts. Night time: exterior reflectors must be visible to reduce
risk of collisions.
Death from asphyxiation may result from use of oxygen depleting heaters. Open all vents for
fresh air ventilation.
Injury or death may result from fire if tent fabric is exposed to open flame.
Tent fabric is not fireproof. Fabric will burn with extended exposure to open flame. Do not
use open flame products inside tent. Tent fabric is treated with fire retardant. Application of
any foreign substance may render the flame retardant properties ineffective.
Night time: exterior reflectors must be visible to reduce risk of collisions.
This tent is made with flame
resistant
fabric which meets CPAI-84 specifications.
*For replacement parts, frequently asked questions, shelter information, videos, and all of your icefishing
needs visit our web siteat www.clamoutdoors.com.
Due to Clam’s continued product development, Clam reserves the right to change specifications without notice. For complete
de
tails,
see the assembly and/or operating instructions that are provided and packaged with the purchased product.
Page 6

FREQUENTLY ASKED QUESTIONS
Q:
A:
Q:
A:
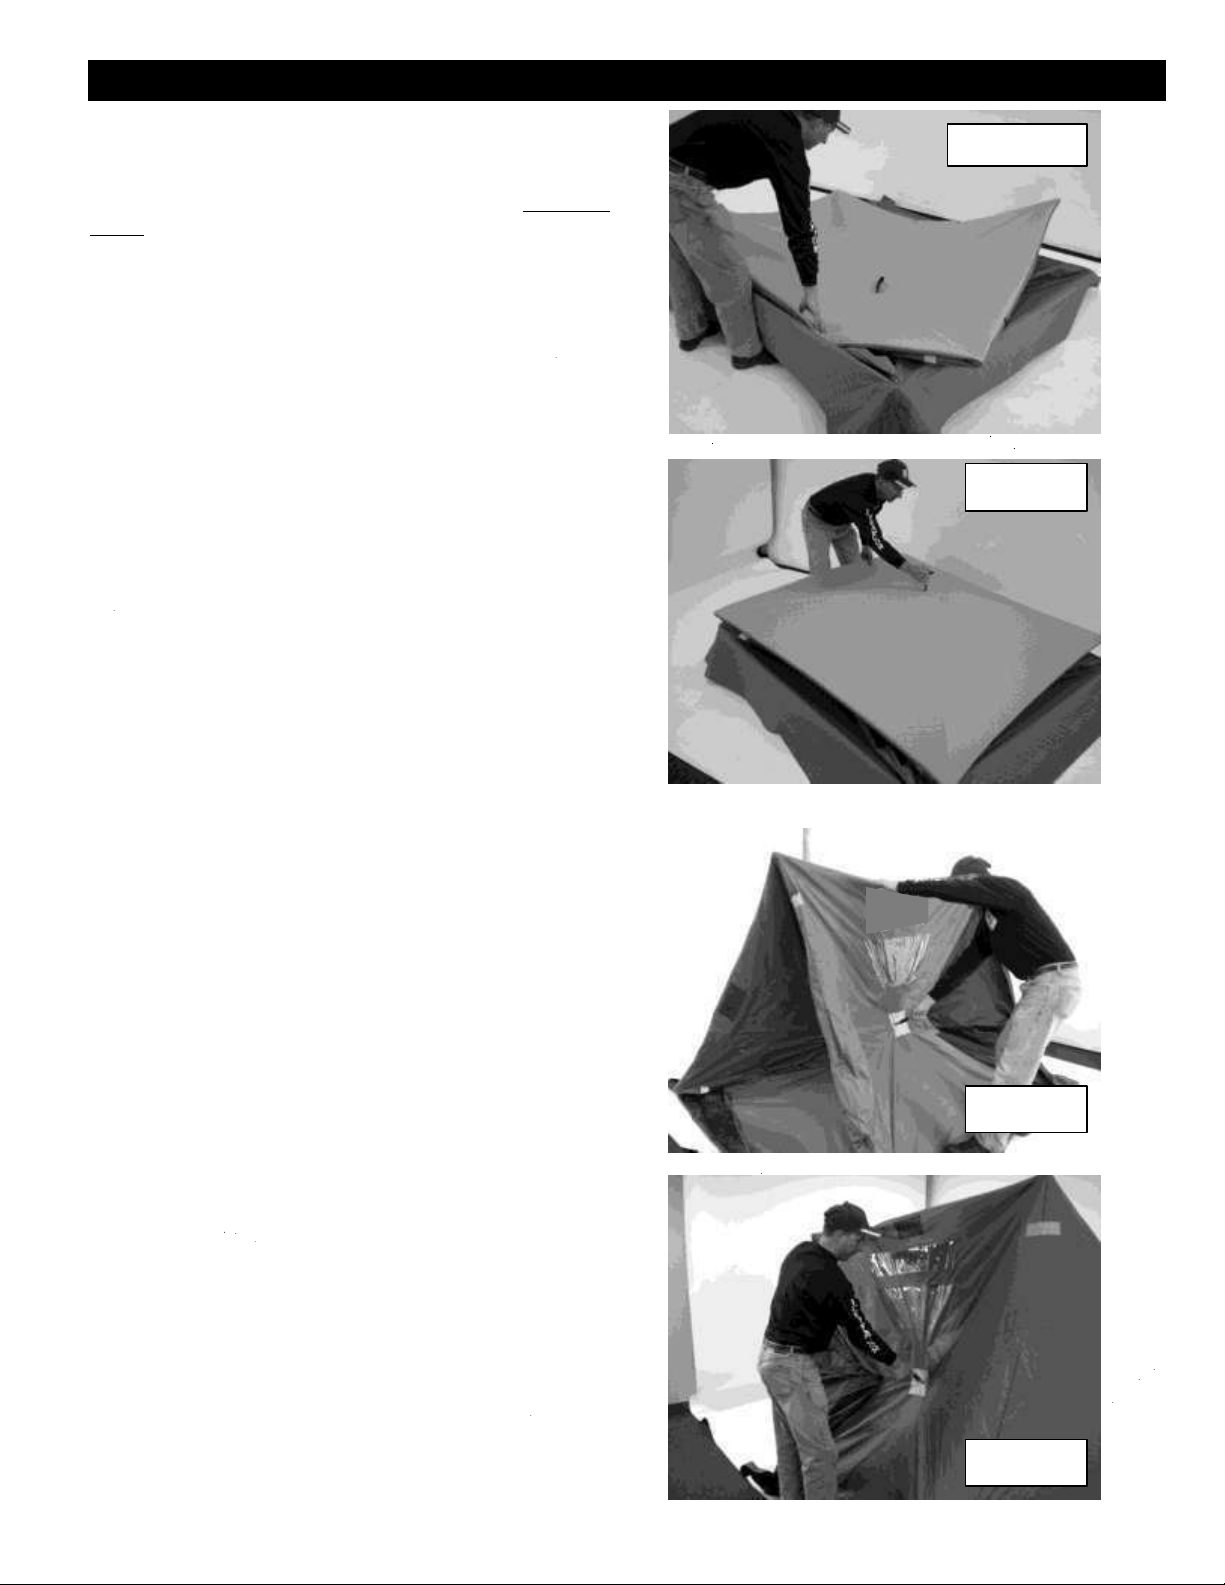
How do I set-up my hub shelter?
Go to www.clamoutdoors.com to watchan instructional videoon the proper & simplest wayto set-up and take-
down a hub style shelter.
I can see pin holes in my fabric:
There are a few explanations as to why those pin holes exist.
Simply the color and/or black-out coating being worn off the fabric due exposure in the elements and wear
due to friction.
The fabric used is a woven material and these pin holes are parts of the thread that the coating did not attach
to. Either way this has no effect on the function of the fabric and is simply an appearance issue.
Q: There are cracks on the inside finish of the fabric:
A: This is normal, when you fold up your shelter, lines develop in the fabric. The inside coating may even appear to be
peeling. This is normal and will not affect the overall function of the ice house.
Q: Will my Fish House leak because I can see pin holes in the fabric?
A: Quite the opposite, as you heat your house and the snow and ice begin to melt, the vapors can better escape the
shelter through an uncoated fabric. When it snows or rains, the water molecules are larger than the vapor molecules
and cannot pass through the fabric and into the house.
Q: Are patch kits available for my Fish Trap and Clamshelter?
A: Patch kits are available they can be purchased online www.clamcorp.comunder “Parts/Info”
Q: How do I apply the patch material?
A: When applying a patch it works best to spray some adhesive (we recommend using 3M #77 or 3M #90 spray
adhesive) on to both surfaces; the part of the tent where the patch is going to be applied and the patch itself. Wait
until the adhesive begins to dry and becomes tacky, then place the patch on the tent, and they will stick together.
Q: Is there anything can be put on outside of the tent to prevent water from coming through, when we are using it? A:
Customers have been known to spray or apply water repellant on the outside of the shelter that you would use for
camping tents or boots. (Camp Dry would be an example of this type of product).These products will not damage
your tent in anyway.
Q: What will help keep mice or rodents fromeating my Clam Hub shelter?
A: Some of our customers have had success with the followingways to keep mice out.
Keep your tent in a sealed plastic tote with DRYER SHEETS and or MOTH BALLS
Q: The zipper on my tent freezes up and or sticks; is there anything I can use to help prevent this from happening?
A: Yes, there are a couple of zipper lubricants out there that our customers and pro staff have had good luck with.
Zipper Lube - A gel that you can apply just by squeezingit onto the zipper and moving the zipper back
and forth. This brand can be found in the camping section of most sporting goods store.
Silicone spray may also be used as well.
Q:
A:
Q:
A:
Q:
A:
Would it be best to completelydry my shelter out every time it gets used?
It is recommended to dry your tent out completely after each use, if not dried completely moisture left in the house
may cause damage to your tent.
How do I wash my shelter tent?
You can use a bleach and water solution (10 parts water to 1 part bleach) to get rid of the mildew smell. If you want
to wash the tent you can use a standard soap to wash it.
*** Please note - We do not recommend placing your shelter tent into a washing machine for cleaning.
Am I able to orderparts and accessories from your website?
Absolutely, if you would like to orderparts you cango to www.clamoutdoors.com.
Page 7
This manual suits for next models
1
Table of contents
Other Clam Shelter manuals
Popular Shelter manuals by other brands

Crivit
Crivit 104155 Operation and safety notes

Landscape Forms
Landscape Forms Kaleidoscope smart Installation and maintenance manual

No Butts Bin
No Butts Bin SR8060-F Assembly instructions

TMG
TMG TMG-DT4041C product manual

NBB
NBB SR8061-F Assembly instructions

PLASTIC VACUUM FORMING
PLASTIC VACUUM FORMING The Blynd Bow Assembly instructions

ShelterLogic
ShelterLogic Power-Up 90101 Assembly instruction

Shelters4Less
Shelters4Less SR1605 manual

Shelters4Less
Shelters4Less SR0059-01-160117 Assembly instructions

Eskimo
Eskimo Eskape 2600 Operator's manual

ShelterLogic
ShelterLogic ShelterCoat 12'W x 8'H Peak manual

TMG
TMG DUAL TRUSS PRO Series product manual