manuals.online logo
Brands
  1. Home
  2. •
  3. Brands
  4. •
  5. CLIMAQUA
  6. •
  7. Outdoor Fountain
  8. •
  9. CLIMAQUA MODUM S User manual

CLIMAQUA MODUM S User manual

A
A1LED®
H2O
CLIMAQUA® 1LED
CLIMAQUA® PUMP 150
AUFBAU
MONTAGE
MONTAGGIO
SET UP
Abbildung 1
Illustration 1
Esempio 1
Illustration 1
AQUASOFT
ALGICID
1
2
6
4
8
3
Stecker und Schalter vom Wasser fern halten
Gardez la prise et le régulateur hors de l’eau
Tenere la spina e l’erogatore fuori dall’acqua
Keep plug and switch out of the water
CLIMAQUA® PUMP 150 USB
Wassertank
Réservoir d’eau
Serbatoio di acqua
Water tank
Schlauch
Tuyau flexible
Tubo flessibile
Hose
Kupferrohr
Tube en cuivre
Tubo in rame
Copper tube
Rundes
Steinelement
Pierre ronde
Pietra rotonda
Round Stone
Eckiges
Steinelement
Pierre angulaire
Pietra angolare
Retangular Stone
Kreiselement
Plaque ronde
Elemento circolare
Circular stone
Goldener Sechskantring
Écrou hexagonal doré
Anello esagonale dorato
Hexagonal golden ring
DEUTSCH
Auau- und Pflegeanleitung MODUM S
Auau
1. Schlauch durch Kupferrohr führen und Kupferrohr an oberstem
Steinelement festdrehen.
2. Oberstes Steinelement nach unten kippen. Abwechslungsweise runde
und eckige Steinelement über das Kupferrohr führen (Abbildung 1).
3. Mit Kreiselement abschliessen und den goldenen Sechskantring am
Kupferrohr mit Sechskantwerkzeug (im Montageset) festdrehen.
4. Pumpe am Schlauch anschliessen.
5. Steinelemente treppenförmig gleichmässig ausrichten.
6. Behälter mit kaltem Wasser füllen. Der Wasserstand sollte stets mind.
1cm über der Pumpe liegen. Wenn möglich entmineralisiertes Wasser
verwenden oder CLIMAQUA®AQUA SOFT und CLIMAQUA®ALGICID
gemäss Dosierung auf Flasche dem Wasser beigeben.
7. Den USB Stecker im USB Stromanschluss (Computer, USB Netzteil, USB
Steckdose, etc.) einstecken.
8. Der Wasserdruck kann am Wasserdruckregler der Pumpe eingestellt
werden (Abbildung 2).
Anweisungen
– Der Brunnen muss waagrecht stehen.
– Die Pumpe ist nur für Zimmerbrunnen geeignet.
– Die Pumpe nie trocken laufen lassen und sofort austauschen, wenn
beschädigt.
– Die Pumpe muss alle 3 bis 4 Monate gereinigt werden. Dazu können die
Frontpartie und der Rotor entfernt werden.
– Zimmerbrunnen regelmässig reinigen.
– Vor der Reinigung oder diversen Manipulationen immer den
Stromstecker herausziehen.
– Zimmerbrunnen sind nicht für den Einsatz im Freien geeignet.
– Keine beschädigten Netzkabel verwenden. Beschädigte Netzkabel
sofort reparieren lassen.
– Der Stromstecker darf nicht mit Wasser in Berührung kommen.
JEDES STÜCK EIN UNIKAT. HANDGEMACHT.
HAFTUNGSAUSSCHLUSS
Unregelmässigkeiten in Stein und Verarbeitung charakterisieren
das handgearbeitete Naturprodukt. Die Garantie deckt nur Mängel
ab, welche die Funktion des Produktes beeinträchtigen. Nicht ohne
Schutz auf kratzempfindliche Unterlage stellen. Den Brunnen nie auf
wasserempfindliche Möbel/Boden/Umgebung stellen. Der Hersteller
übernimmt keine Haung bei Nichteinhalten dieser Vorschri.
VIELEN DANK UND VIEL FREUDE MIT IHREM BRUNNEN VON CLIMAQUA®
FRANÇAIS
Instructions de montage et d’entretien MODUM S
Montage
1. Passer le tuyau plastique à travers le tube de cuivre. Visser le tube dans
l’élement de pierre.
2. Retourner l’élément de pierre afin qu’il soit „la tête en bas“. Passer
les éléments de pierre ronde et angulaire en altérnance sur le tube de
cuivre (image 1).
3. Terminer le montage avec la plaque en pierre ronde. Serrer l’écrou sur
le tube de cuivre à l’aide de la clé outil (inclue dans le set de montage).
4. Raccorder la pompe au tuyau plastique.
5. Aligner les éléments en pierre en forme d’escalier.
6. Remplir le récipient d’eau froide. Le niveau d’eau doit impérativement
et toujours être à 1 cm au-dessus de la pompe. Si possible, utiliser de
l’eau déminéralisée ou ajouter CLIMAQUA® AQUA SOFT et CLIMAQUA®
ALGICID à l’eau selon le dosage indiqué sur le flacon.
7. Insérez la fiche USB dans la connexion d’alimentation USB (ordinateur,
alimentation USB, prise USB, etc.).
8. La pression du jet peut être réglée à l’aide du régulateur de pression
d’eau (sur la pompe) (Figure 2).
Instructions
– La fontaine doit être en position horizontale.
– La pompe convient uniquement aux fontaines d’intérieur.
– Ne jamais laisser fonctionner la pompe à sec et la remplacer
immédiatement si elle est endommagée.
– La pompe doit être neoyée tous les 3 à 4 mois. Pour ce faire, la partie
avant et le rotor peuvent être démontés.
– Neoyer régulièrement la fontaine d’intérieur.
– Avant le neoyage ou d’autres manipulations, toujours débrancher la
prise d’alimentation.
– Les fontaines d’intérieur ne sont pas conçues pour être utilisées en
extérieur.
– Ne pas utiliser un câble d’alimentation endommagé. Il faut le faire
immédiatement réparer.
– Le câble d’alimentation ne doit pas entrer en contact avec l’eau.
CHAQUE PIÈCE EST UNIQUE. FABRIQUÉ À LA MAIN.
CLAUSE DE NON-RESPONSABILITÉ
Les imperfections légères de la pierre ou de la finition sont une
caractéristique des produits naturels fabriqués à la main. La garantie
couvre uniquement les défauts ayant un impact sur la fonctionnalité
du produit. Ne pas placer sans protection sur un sol craignant des
égratignures. Ne jamais placer la fontaine sur un meuble/sol/
environnement sensible à l’eau. Le fabricant ne pourra être tenu
responsable en cas de non-respect de cee recommandation. Veuillez
conserver ce manuel d’utilisation.
MERCI ET PROFITEZ BIEN DE VOTRE FONTAINE CLIMAQUA®
HO
7
5
MODUM S
BEDIENUNGSANLEITUNG
INSTRUCTIONS
ISTRUZIONI
INSTRUCTIONS
29cm
18cm 18cm
DYNCO AG CH-3065 Bolligen www.dynco.ch
ITALIANO
Istruzioni per il montaggio e la manutenzione di MODUM S
Montaggio
1. Guidare il tubo flessibile araverso il tubo di rame e serrare il tubo di
rame all’elemento in pietra più in alto.
2. Ruotare l’elemento superiore in pietra verso il basso. Far passare
alternativamente altri elementi rotondo e angolare in pietra sul tubo di
rame (Figura 1).
3. Chiudere con elemento circolare e serrare l’anello esagonale dorato sul
tubo di rame con l’utensile esagonale (in dotazione).
4. Collegare la pompa al tubo flessibile.
5. Allineare gli elementi in pietra a scai.
6. Riempire il contenitore con acqua fredda. Il livello dell’acqua deve
sempre essere almeno 1 cm al di sopra della pompa. Se possibile,
utilizzare acqua demineralizzata o aggiungere CLIMAQUA®AQUA SOFT e
CLIMAQUA®ALGICID all’ acqua in base al dosaggio sul flacone.
7. Inserire la spina USB nella connessione di alimentazione USB (computer,
alimentatore USB, presa USB, ecc.).
8. La pressione dell’acqua può essere regolata tramite il regolatore di
pressione dell’acqua della pompa (Figura 2).
Istruzioni d’uso
– La fontana deve essere posizionata in senso orizzontale.
– La pompa è adaa unicamente a fontane da interni.
– Non fare funzionare mai la pompa a secco. In caso di danneggiamento,
sostituirla immediatamente.
– La pompa deve essere pulita ogni 3 – 4 mesi. Per pulirla, è
possibilerimuovere il pannello frontale e il rotore.
– Pulire la fontana da interni regolarmente.
– Prima della pulizia o di altri interventi di manutenzione, è sempre
necessario staccare la spina.
– Le fontane da interni non sono adae all’uso in ambienti esterni.
– Non usare cavi di alimentazione danneggiati. In caso di danneggiamento,
farli riparare immediatamente.
– La spina non deve venire in contao con l‘acqua.
OGNI ESEMPLARE È UN PEZZO UNICO. FATTO A MANO.
ESONERO DA RESPONSABILITÀ
Le irregolarità della pietra e della lavorazione caraerizzano il prodoo
naturale realizzato manualmente. La garanzia copre soltanto i difei
che compromeono la funzionalità del prodoo. Non appoggiare senza
protezione su pavimenti sensitivi al graffio. La fontana non deve mai
essere posizionata su mobili/superfici o in ambienti sensibili all’acqua. Il
produore non si assume alcuna responsbilità in caso di mancato rispeo di
questa norma. Conservare queste istruzioni d’uso.
VI RINGRAZIAMO E VI AUGURIAMO PIACEVOLISSIMI MOMENTI CON LA
VOSTRA FONTANA DI CLIMAQUA®
ENGLISH
Assembly and Maintenance Instructions MODUM S
Assembly
1. Insert the hose through the copper tube and tighten the copper tube to
the top stone element.
2. Turn the top stone element downwards. Slide the round and retangular
stone elements over the copper pipe alternately (Figure 1).
3. End with circular stone element and tighten the golden hexagonal ring to
the copper tube with hexagonal tool (in the assembly set).
4. Connect the pump to the hose.
5. Adjust stone elements in steps.
6. Fill the container with cold water. The water level should always be at
least 1cm above the pump. If possible, use demineralised water or add
CLIMAQUA®AQUA SOFT and CLIMAQUA®ALGICID according to dosage
on bole.
7. Insert the USB plug into the USB power connector (computer,
USB power adapter, USB socket, etc.).
8. The water pressure can be adjusted on the pump’s water pressure
regulator (Figure 2).
Instructions
– The fountain must stand vertically.
– The pump is only suitable for indoor fountains.
– Never let the pump run dry and replace it immediately, once it is
damaged.
– The pump must be cleaned every 3 to 4 months. In so doing, the front
section and rotor may be removed.
– Clean the indoor fountain regularly.
– Before cleaning or handling the pump in any way, always pull the power
plug from the wall socket.
– Indoor fountains are not suitable for installation outdoors.
– Do not use damaged power cords. Repair them immediately.
– The power plug may not come into contact with the water.
EACH PIECE IS UNIQUE. HANDMADE.
DISCLAIMER
This handmade natural product is characterized by irregularities in the
stone and workmanship. The warranty only covers defects which impair the
functionality of the product. Do not place without protection on scratch-
sensitive floors. Never place the fountain on water-sensitive furniture, floors
or surroundings. The manufacturer accepts no liability for failure to observe
this provision. Please keep these operating instructions handy.
THANK YOU VERY MUCH. WE HOPE YOU ARE DELIGHTED WITH YOUR
FOUNTAIN FROM CLIMAQUA®
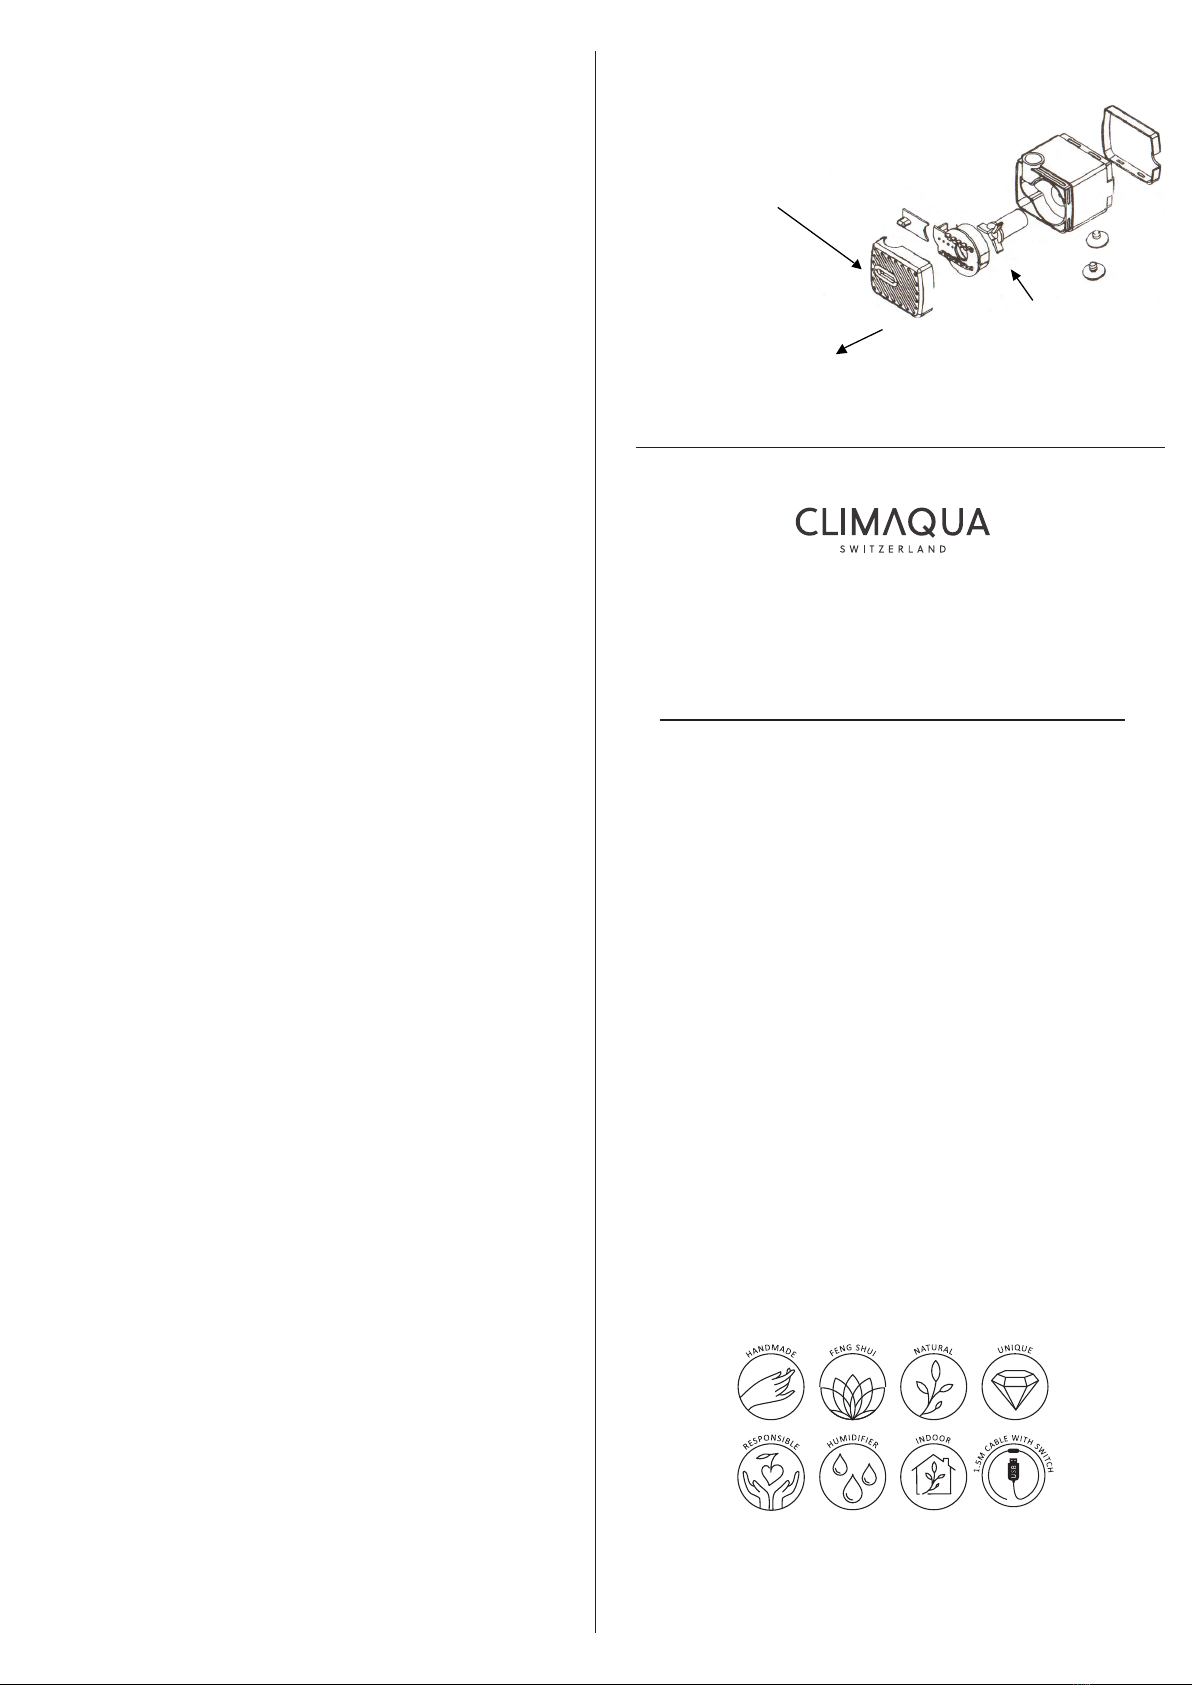
ÖFFNEN DER PUMPE
OUVRIR LA POMPE
APRIRE LA POMPA
OPEN THE PUMP
Abbildung 2
Illustration 2
Esempio 2
Illustration 2

Vorsichtig von Hand öffnen
ouvrir soignesement à la main
aprire a mano con attenzione
carefully open by hand

1.

Rotor reinigen
nettoyer le rotor
pulire il rotore
clean the rotor
2.

Wasserdruckregler und Frontpartie
réglage de la pression d’eau et plaque frontale
regolazione del flusso d'acqua e coperchio
water pressure regulator and front part
CLIMAQUA.SWISS
CLIMAQUA® Produkte sind Unikate und werden aus
natürlichen Materialien von Hand gefertigt.
Besuchen Sie unsere Webseite, um mehr über die
CLIMAQUA® Welt zu erfahren. Dort zeigen wir Ihnen weitere
FLAMES, sowie auch das ganze Sortiment
an FOUNTAINS, PLANTERS und BOUTIQUE.
Les produits CLIMAQUA® sont uniques et fabriqués à la
main à partie de matériaux naturels.
Pour plus d’informations sur l’univers de CLIMAQUA®,
nous vous invitons à visiter notre site internet.
Vous y trouverez d’autres FLAMES et l’ensemble de
l’assortiment de FOUNTAINS, PLANTERS et BOUTIQUE.
I prodoi CLIMAQUA® sono esemplari unici prodoe
a mano e con soli materiali naturali. Visiti il nostro sito
per saperne di più sull’universo CLIMAQUA®.
Potrà trovare molti altri modelli di FLAMES, oltre che l’intero
assortimento FOUNTAINS, PLANTERS et BOUTIQUE.
CLIMAQUA® products are unique pieces, made by hand out
of natural materials. Visit the website and discover
the world of CLIMAQUA®. You’ll find out the complete range
of FLAMES and learn about the large program of
the FOUNTAINS, PLANTERS and BOUTIQUE.
WE DESIGN FOR
LIVING WITH NATURE

This manual suits for next models

1

Other CLIMAQUA Outdoor Fountain manuals

CLIMAQUA TAIPEI XL User manual

CLIMAQUA

CLIMAQUA TAIPEI XL User manual

CLIMAQUA KUBO User manual

CLIMAQUA

CLIMAQUA KUBO User manual

CLIMAQUA MODUM S User manual

CLIMAQUA

CLIMAQUA MODUM S User manual

CLIMAQUA HARUMI User manual

CLIMAQUA

CLIMAQUA HARUMI User manual

CLIMAQUA KERMO 10619 User manual

CLIMAQUA

CLIMAQUA KERMO 10619 User manual

CLIMAQUA SIERRA User manual

CLIMAQUA

CLIMAQUA SIERRA User manual

CLIMAQUA SIERRA User manual

CLIMAQUA

CLIMAQUA SIERRA User manual

CLIMAQUA COBRA User manual

CLIMAQUA

CLIMAQUA COBRA User manual

CLIMAQUA LIV S User manual

CLIMAQUA

CLIMAQUA LIV S User manual

CLIMAQUA MYO User manual

CLIMAQUA

CLIMAQUA MYO User manual

CLIMAQUA SPUTNIK User manual

CLIMAQUA

CLIMAQUA SPUTNIK User manual

CLIMAQUA LIV M User manual

CLIMAQUA

CLIMAQUA LIV M User manual

CLIMAQUA EDEN WIDE User manual

CLIMAQUA

CLIMAQUA EDEN WIDE User manual

CLIMAQUA CHI User manual

CLIMAQUA

CLIMAQUA CHI User manual

CLIMAQUA VIDA 11 Set User manual

CLIMAQUA

CLIMAQUA VIDA 11 Set User manual

CLIMAQUA DUBAI S User manual

CLIMAQUA

CLIMAQUA DUBAI S User manual

CLIMAQUA MODUM M User manual

CLIMAQUA

CLIMAQUA MODUM M User manual

CLIMAQUA SUMI Quick guide

CLIMAQUA

CLIMAQUA SUMI Quick guide

CLIMAQUA AVA S User manual

CLIMAQUA

CLIMAQUA AVA S User manual

CLIMAQUA HELIOS L User manual

CLIMAQUA

CLIMAQUA HELIOS L User manual

CLIMAQUA DUBAI L User manual

CLIMAQUA

CLIMAQUA DUBAI L User manual

CLIMAQUA SWAN User manual

CLIMAQUA

CLIMAQUA SWAN User manual

CLIMAQUA SHANTI User manual

CLIMAQUA

CLIMAQUA SHANTI User manual

CLIMAQUA VIDA 60 User manual

CLIMAQUA

CLIMAQUA VIDA 60 User manual

Popular Outdoor Fountain manuals by other brands

Haws 3060 Installation, operation & maintenance instructions

Haws

Haws 3060 Installation, operation & maintenance instructions

Blumfeldt Empoli manual

Blumfeldt

Blumfeldt Empoli manual

Alpine TIZ194BZ owner's manual

Alpine

Alpine TIZ194BZ owner's manual

Restoration Hardware Pisa Assembly instructions

Restoration Hardware

Restoration Hardware Pisa Assembly instructions

ASC SF016 instructions

ASC

ASC SF016 instructions

Sunnydaze Decor GSI-790 instructions

Sunnydaze Decor

Sunnydaze Decor GSI-790 instructions

Haws H1011.8HPSHO quick start guide

Haws

Haws H1011.8HPSHO quick start guide

Serenity G4640 instruction manual

Serenity

Serenity G4640 instruction manual

Streetwize GW280 INFORMATION FOR USE

Streetwize

Streetwize GW280 INFORMATION FOR USE

Haws 3611 Installation, operation & maintenance instructions

Haws

Haws 3611 Installation, operation & maintenance instructions

Murdock A151-VR Series Installation & maintenance instructions

Murdock

Murdock A151-VR Series Installation & maintenance instructions

Woodstock Chimes ENCORE WATER BELL FOUNTAIN Assembly instructions

Woodstock Chimes

Woodstock Chimes ENCORE WATER BELL FOUNTAIN Assembly instructions

Fountain Medici Ellipse manual

Fountain

Fountain Medici Ellipse manual

Campania International Auberge FT-123 Assembly instructions

Campania International

Campania International Auberge FT-123 Assembly instructions

Halsey Taylor OVL Series owner's manual

Halsey Taylor

Halsey Taylor OVL Series owner's manual

HoMedics enviraScape SERENITY BOWLS WF-SBW Instruction manual and  warranty information

HoMedics

HoMedics enviraScape SERENITY BOWLS WF-SBW Instruction manual and warranty information

Blumfeldt Korinth instructions

Blumfeldt

Blumfeldt Korinth instructions

Campania International Wychwood FT-292 Product information

Campania International

Campania International Wychwood FT-292 Product information

manuals.online logo
manuals.online logoBrands
  • About & Mission
  • Contact us
  • Privacy Policy
  • Terms and Conditions

Copyright 2025 Manuals.Online. All Rights Reserved.