manuals.online logo
Brands
  1. Home
  2. •
  3. Brands
  4. •
  5. CLIMAQUA
  6. •
  7. Outdoor Fountain
  8. •
  9. CLIMAQUA HELIOS L User manual

CLIMAQUA HELIOS L User manual

B
A
—DE
Sicherheitshinweise
Brunnen mit den beiliegenden Schrauben gut xieren. Den Schieferbrunnen auf ger-
ader, nicht spritzwasserempndlichen Fläche aufstellen. Es dauert ein bis zwei Tage,
bis der Brunnen richtig eingelaufen ist.
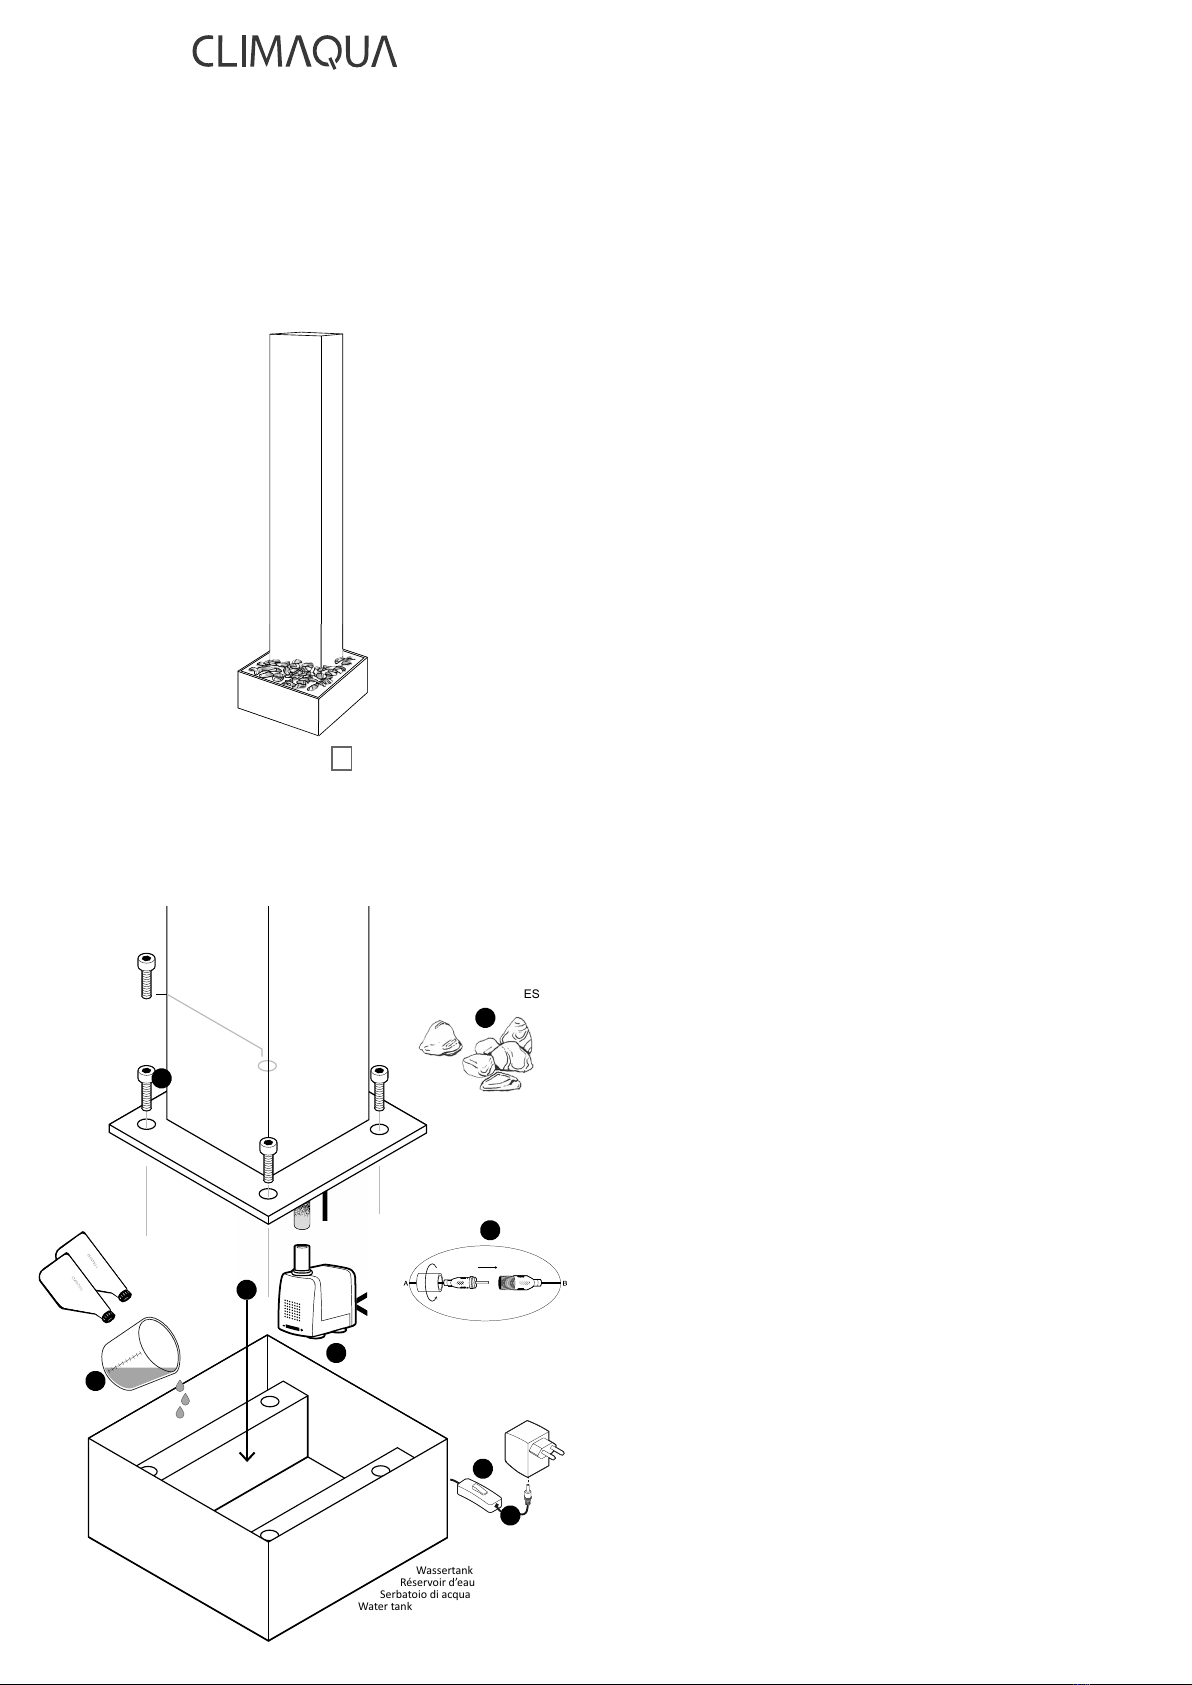
MONTAGE
1. Den Tank mit Wasser füllen.
2. Schliessen Sie die Pumpe und LED am Schlauch/Kabel an.
3. Achten Sie darauf, dass der Stecker der Pumpe ausserhalb des
Wassertanks liegt und nie in den Kontakt mit dem Wasser gerät.
4. Stellen Sie den Brunnen auf den Wassertank.
5. Richten Sie den Brunen mit den Richtschrauben am Wassertank.
6. Setzen Sie die Pumpe und LED in Betrieb und regulieren Sie den Wasserdruck
am Wasserdruckregler wenn nötig.
7. Dekorieren Sie Steine nach Wunsch.
8. Der Stecker muss vor jeder Manipulation am Gerät aus der Steckdose gezogen
werden.
AUFBAU- UND PFLEGEANLEITUNG ZUR PUMPE
Nur für Zimmerbrunnen mit kaltem Wasser und nicht im Freien einsetzen. Pumpe
nie trocken laufen lassen. Nie beschädigtes Netzkabel verwenden oder reparieren.
Pumpe sofort austauschen wenn sie beschädigt ist. Vor der Reinigung oder irgend
welchen Manipulationen immer Stecker herausziehen. Der Stecker darf nie mit Was-
ser in Berührung kommen. Die Pumpe muss alle 3 bis 4 Monate gereinigt werden.
Dazu können die Frontpartie und der Rotor entfernt werden. Wenn möglich entmineral-
isiertes Wasser verwenden oder regelmässig CLIMAQUA® AQUA SOFT dem Wasser
beigeben. Die Wassermenge kann am Regulator der Pumpe verstellt werden.
EDES STÜCK EIN UNIKAT. HANDGEMACHT.
HAFTUNGSAUSSCHLUSS
Unregelmässigkeiten in Stein und Verarbeitung charakterisieren das handgearbeitete
Naturprodukt. Die Garantie deckt nur Mängel ab, welche die Funktion des Produktes
beeinträchtigen.
Nicht ohne Schutz auf kratzempndliche Unterlage stellen.
Den Brunnen nie auf wasserempndliche Möbel/Boden/Umgebung stellen.
Spritzgefahr!
Der Hersteller übernimmt keine Haftung bei Nichteinhalten dieser Vorschrift.
VIELEN DANK UND VIEL FREUDE MIT IHREM BRUNNEN VON CLIMAQUA®
—FR
Instructions de sécurité
Bien xer la fontaine avec les vis inclues. Placer la fontaine en ardoise sur une surface
droite et résistante à l’eau. Il faut jusqu’à deux jours pour roder la fontaine et pour que
l’eau coule de manière optimale.
Montage
1. Remplir le bac avec de l’eau.
2. Fixer la pompe et LED au tuyau en plastique/ cable, sous la fontaine.
3. Contrôler que la prise de la pompe reste à l’extérieur du bac et
ne soit jamais en contact avec l’eau.
4. Poser la fontaine sur le bac.
5. Adjuster la fontaine sur le bac à l’aide des visses.
6. Mettre la pompe et LED en marche et régler la pression si néssecaire.
7. Disposer les cailloux déco dessus.
8. Toujours enlever la prise de courant avant toute manipulation.
Instructions de montage et entretien de la pompe
Utiliser uniquement pour des fontaines d’intérieur, avec de l’eau froide et jamais à
l’extérieur. La pompe ne doit jamais marcher au sec. Ne jamais utiliser ou réparer un
câble abîmé. Remplacer immédiatement la pompe si elle est cassée. Toujours enlever
la prise de courant avant le nettoyage ou toute manipulation. La prise ne doit jamais
être en contact avec l’eau. La pompe doit être nettoyée tous les 3 à 4 mois. Pour cela,
enlever la plaque frontale et le rotor. Utiliser régulièrement la solution CLIMAQUA®
AQUA SOFT ou privilégier l’eau déminéralisée.
La quantité d’eau peut être réglée par le régulateur de la pompe.
CHAQUE PIÈCE EST UNIQUE. FABRIQUÉ À LA MAIN.
CLAUSE DE NON-RESPONSABILITÉ
Les imperfections légères de la pierre ou de la nition sont une caractéristique des
produits naturels fabriqués à la main. La garantie couvre uniquement les défauts ayant
un impact sur la fonctionnalité du produit.
Ne pas placer sans protection sur un sol craignant des égratignures. Ne jamais
placer la fontaine sur un meuble/sol/environnement sensible à l’eau. Risque
d’éclaboussures! Le fabricant ne pourra être tenu responsable en cas de non-
respect de cette recommandation. Veuillez conserver ce manuel d’utilisation.
MERCI ET PROFITEZ BIEN DE VOTRE FONTAINE CLIMAQUA®
—IT
Istruzioni di sicurezza per il montaggio della Parete d’Acqua
Fissare bene la fontana con le viti fornite in dotazione. Posizionare la fontana d’ardesia
su di una supercie orizzontale e resistente all’acqua. Ci vorranno almeno due giorni
afnché la fontana funzioni correttamente e l’acqua scorra in maniera ottimale.
MONTAGGIO
1. Riempire il contenitore con l’acqua.
2. Fissare la pompa e LED al manicotto in plastica/ cavo sotto la fontana.
3. Controllare che la spina della pompa rimanga al di fuori del contenitore d’acqua e
non venga mai a contatto con l’acqua.
4. Posizionare la fontana sopra il contenitore.
5. Aggiustare la fontana sul serbatoio per mezzo delle viti.
6. Far funzionare la pompa e LED e regolarne la pressione per mezzo del
regolatore di usso.
7. Decorare con le pietre secondo il gusto.
8. Prima di qualsiasi intervento o manutenzione sulla fontana, staccare
sempre la spina dalla presa di corrente.
Istruzioni per il montaggio e la manutenzione della pompa
La pompa va utilizzata solo per fontane da interno, mai all’esterno e con acqua fredda.
La pompa non deve mai funzionare a secco, cioè senza acqua. Non tentare mai di
DEKOSTEINE
PIERRES DÉCO
PIETRE DECO
DECO STONES
CLIMAQUA PUMP 400LED
AUFBAU
MONTAGE
MONTAGGIO
SET UP
BEDIENUNGSANLEITUNG
INSTRUCTIONS
ISTRUZIONI
INSTRUCTIONS
®
NATURE AT HOME
12V
AQUASOFT
ALGICID
Wassertank
Réservoir d’eau
Serbatoio di acqua
Water tank
H2O
1
2
7
3
4
6
6
5
HELIOS L
Wasserdruckregler und Frontpartie
réglage de la pression d’eau et plaque frontale
regolazione del usso d’acqua e coperchio
water pressure regulator and front part
Rotor reinigen
nettoyer le rotor
pulire il rotore
clean the rotor
Vorsichtig von Hand öffnen
ouvrir soignesement à la main
aprire a mano con attenzione
carefully open by hand
<
riparare il cavo se danneggiato. Sostituire immediatamente la pompa. Prima della
pulizia o di qualsiasi operazione di manutenzione o manipolazione della pompa
staccare sempre la spina dalla presa di corrente. La spina non deve mai venire a
contatto con l’acqua. La pompa deve venir pulita almeno ogni 3-4 mesi. Se pos-
sibile usare acqua demineralizzata o usare regolarmente nell’acqua CLIMAQUA®
AQUA SOFT. Il usso dell’acqua può venir regolato tramite l’apposita regolazione
nella pompa. Compila più acqua nel serbatoio no a quando la pompa è comple-
tamente sommerso. Una volta che questo è dovuto a evaporazione non è più il
caso, aggiungere acqua.
OGNI ESEMPLARE È UN PEZZO UNICO. FATTO A MANO.
ESONERO DA RESPONSABILITÀ
Le irregolarità della pietra e della lavorazione caratterizzano il prodotto naturale
realizzato manualmente. La garanzia copre soltanto i difetti che compromettono la
funzionalità del prodotto.
Non appoggiare senza protezione su pavimenti sensitivi al grafo. La fontana
non deve mai essere posizionata su mobili/superci o in ambienti sensibili
all’acqua. Pericolo di spruzzi! Il produttore non si assume alcuna responsbilità in
caso di mancato rispetto di questa norma. Conservare queste istruzioni d’uso.
VI RINGRAZIAMO E VI AUGURIAMO PIACEVOLISSIMI MOMENTI CON LA
VOSTRA FONTANA DI CLIMAQUA®
—EN
Safety Information
Fix the fountain securely with the screws provided. Place the slate fountain on an
even, splash-proof surface. It will take one or two days until the fountain is properly
running.
Assembly
1. Fill the tank with water.
2. Connect the tube and LED cable to the pump.
3. Ensure that the plug for the pump is outside the water tank and never comes
into contact with water.
4. Place the slate fountain on the water tank.
5. Adjust the slate fountain to the water tank with the adjusting screws.
6. Turn the pump on and adjust the water pressure with the regulator if
necessairy.
7. Decorate with stones as desired.
8. The plug must be removed from the socket before making any
adjustments to the device.
Pump Installation and Maintenance Instructions
Only to be used with cold water and indoors. Never let the pump run dry. Never
use with a damaged or repaired electrical cable. Replace a damaged pump imme-
diately. Always pull the plug out before cleaning or making any adjustments. The
plug must never come into contact with water. The pump must be cleaned every
three to four months. The front part and rotor can be removed for this purpose. If
Öffnen der Pumpe/ ouvrir la pompe
aprire la pompa/ open the pump
DY NCO AG
CH-3065 Bolligen
www.dynco.ch WWW.CLIMAQUA.SWISS
®
NATURE AT HOME
FLAMES PLANTERSFOUNTAINS
CLIMAQUA® Produkte sind unikate und werden aus natürlichen
Materialen von Hand gefergt. Besuchen Sie unsere Website, um mehr
über die CLIMAQUA® Welt zu ehfahren. Dort zeigen wir Ihnen weitere
FOUNTAINS, sowie aber auch das ganze Sorment an CLIMAQUA®
FLAMES und CLIMAQUA® PLANTERS.
Les produits CLIMAQUA® sont uniques et fabriqués à la main à pare de
matériaux naturels. Pour plus d’informaons sur L’univers de CLIMAQUA®,
nous vous invitons à visiter notre site internet. Vous y trouverez d’autres
fontaines et l’ensemble de l’assorment de CLIMAQUA® FLAMES et
CLIMAQUA® PLANTERS.
I prodo CLIMAQUA® FOUNTAINS sono esemplari unici prodoe a
mano e con soli materiali naturali. Visi il nostro sito per saperne di più
sull’universo CLIMAQUA®. Potrà trovare mol altri modelli di fontane,
oltre che l’intero assormento CLIMAQUA® FLAMES e CLIMAQUA®
PLANTERS.
CLIMAQUA® products are unique pieces, made by hand out of natural
materials. Visit the website and discover the world of CLIMAQUA®. You’ll
nd out the complete range of natural Fountains and learn about the
large program of the CLIMAQUA® FLAMES and CLIMAQUA® PLANTERS.
possible, use demineralized water or add CLIMAQUA® AQUA SOFT to the water
regularly. The amount of water can be adjusted with the regulator on the pump.
EACH PIECE IS UNIQUE. HANDMADE.
DISCLAIMER
This handmade natural product is characterized by irregularities in the stone and
workmanship.
The warranty only covers defects which impair the functionality of the product.
Do not place without protection on scratch-sensitive oors. Never place the
fountain on water-sensitive furniture, oors or surroundings. Risk of splashing!
The manufacturer accepts no liability for failure to observe this provision. Please
keep these operating instructions handy.
THANK YOU VERY MUCH. WE HOPE YOU ARE DELIGHTED WITH YOUR
FOUNTAIN FROM CLIMAQUA®
B
A
LED Wechseln/ Changement de LED/
Cambio del LED/ LED Change
CLIMAQUA® 1LED
Kupferrohr/ tube en cuivre/
tubo in rame/ copper tube
Gummi/ Caoutchouc/
Gomma/ Rubber

Other CLIMAQUA Outdoor Fountain manuals

CLIMAQUA LIV M User manual

CLIMAQUA

CLIMAQUA LIV M User manual

CLIMAQUA AVA S User manual

CLIMAQUA

CLIMAQUA AVA S User manual

CLIMAQUA DUBAI S User manual

CLIMAQUA

CLIMAQUA DUBAI S User manual

CLIMAQUA HARUMI User manual

CLIMAQUA

CLIMAQUA HARUMI User manual

CLIMAQUA MODUM S User manual

CLIMAQUA

CLIMAQUA MODUM S User manual

CLIMAQUA ONI User manual

CLIMAQUA

CLIMAQUA ONI User manual

CLIMAQUA MODUM S User manual

CLIMAQUA

CLIMAQUA MODUM S User manual

CLIMAQUA AVA WALL User manual

CLIMAQUA

CLIMAQUA AVA WALL User manual

CLIMAQUA VIDA 60 User manual

CLIMAQUA

CLIMAQUA VIDA 60 User manual

CLIMAQUA MYO User manual

CLIMAQUA

CLIMAQUA MYO User manual

CLIMAQUA KUBO User manual

CLIMAQUA

CLIMAQUA KUBO User manual

CLIMAQUA SUMI Quick guide

CLIMAQUA

CLIMAQUA SUMI Quick guide

CLIMAQUA TAIPEI XL User manual

CLIMAQUA

CLIMAQUA TAIPEI XL User manual

CLIMAQUA EDEN WIDE User manual

CLIMAQUA

CLIMAQUA EDEN WIDE User manual

CLIMAQUA SHANTI User manual

CLIMAQUA

CLIMAQUA SHANTI User manual

CLIMAQUA AVA L User manual

CLIMAQUA

CLIMAQUA AVA L User manual

CLIMAQUA PLATO User manual

CLIMAQUA

CLIMAQUA PLATO User manual

CLIMAQUA YOKO User manual

CLIMAQUA

CLIMAQUA YOKO User manual

CLIMAQUA LIV S User manual

CLIMAQUA

CLIMAQUA LIV S User manual

CLIMAQUA SWAN User manual

CLIMAQUA

CLIMAQUA SWAN User manual

CLIMAQUA VIDA 11 Set User manual

CLIMAQUA

CLIMAQUA VIDA 11 Set User manual

CLIMAQUA VIDA 40 User manual

CLIMAQUA

CLIMAQUA VIDA 40 User manual

CLIMAQUA SUMI User manual

CLIMAQUA

CLIMAQUA SUMI User manual

CLIMAQUA KERMO 10619 User manual

CLIMAQUA

CLIMAQUA KERMO 10619 User manual

Popular Outdoor Fountain manuals by other brands

Backyard Expressions 906029 Assembly instructions

Backyard Expressions

Backyard Expressions 906029 Assembly instructions

AquaScape AQUABASIN 30 Instructions & maintenance

AquaScape

AquaScape AQUABASIN 30 Instructions & maintenance

Alpine MLT102 manual

Alpine

Alpine MLT102 manual

Bradley Terreon Classic WF2500 Series Installation

Bradley

Bradley Terreon Classic WF2500 Series Installation

Urban A300D Installation, operation and maintenance instructions

Urban

Urban A300D Installation, operation and maintenance instructions

Campania International Concept Birdbath FT-336 Assembly instructions

Campania International

Campania International Concept Birdbath FT-336 Assembly instructions

Bond Signature Series manual

Bond

Bond Signature Series manual

Alpine GIL1696 owner's manual

Alpine

Alpine GIL1696 owner's manual

Essential Garden FE0007BA owner's manual

Essential Garden

Essential Garden FE0007BA owner's manual

Elkay Soft Sides ECDFPW314C Installation & use manual

Elkay

Elkay Soft Sides ECDFPW314C Installation & use manual

Oase Water Trio operating instructions

Oase

Oase Water Trio operating instructions

Campania International FT-391 Assembly instructions

Campania International

Campania International FT-391 Assembly instructions

Britex Dado DDS2 installation guide

Britex

Britex Dado DDS2 installation guide

Blumfeldt 10031002 manual

Blumfeldt

Blumfeldt 10031002 manual

Sunnydaze Decor SL0430 Assembly instructions

Sunnydaze Decor

Sunnydaze Decor SL0430 Assembly instructions

Massarelli's VAIL GOBLET URN Setup instructions

Massarelli's

Massarelli's VAIL GOBLET URN Setup instructions

Murdock A131408F installation instructions

Murdock

Murdock A131408F installation instructions

Beper P201UTP200 Use instruction

Beper

Beper P201UTP200 Use instruction

manuals.online logo
manuals.online logoBrands
  • About & Mission
  • Contact us
  • Privacy Policy
  • Terms and Conditions

Copyright 2025 Manuals.Online. All Rights Reserved.