Climax Mobile Pro Series Assembly instructions

Mobile Pro
Medical Alarm & 4G/LTE PERS Locator
Installer’s Guide
Aug 25, 2020

Table of Contents
1. INTRODUCTION ....................................................................................................................1
1.1. MOBILE PRO KIT...................................................................................................................1
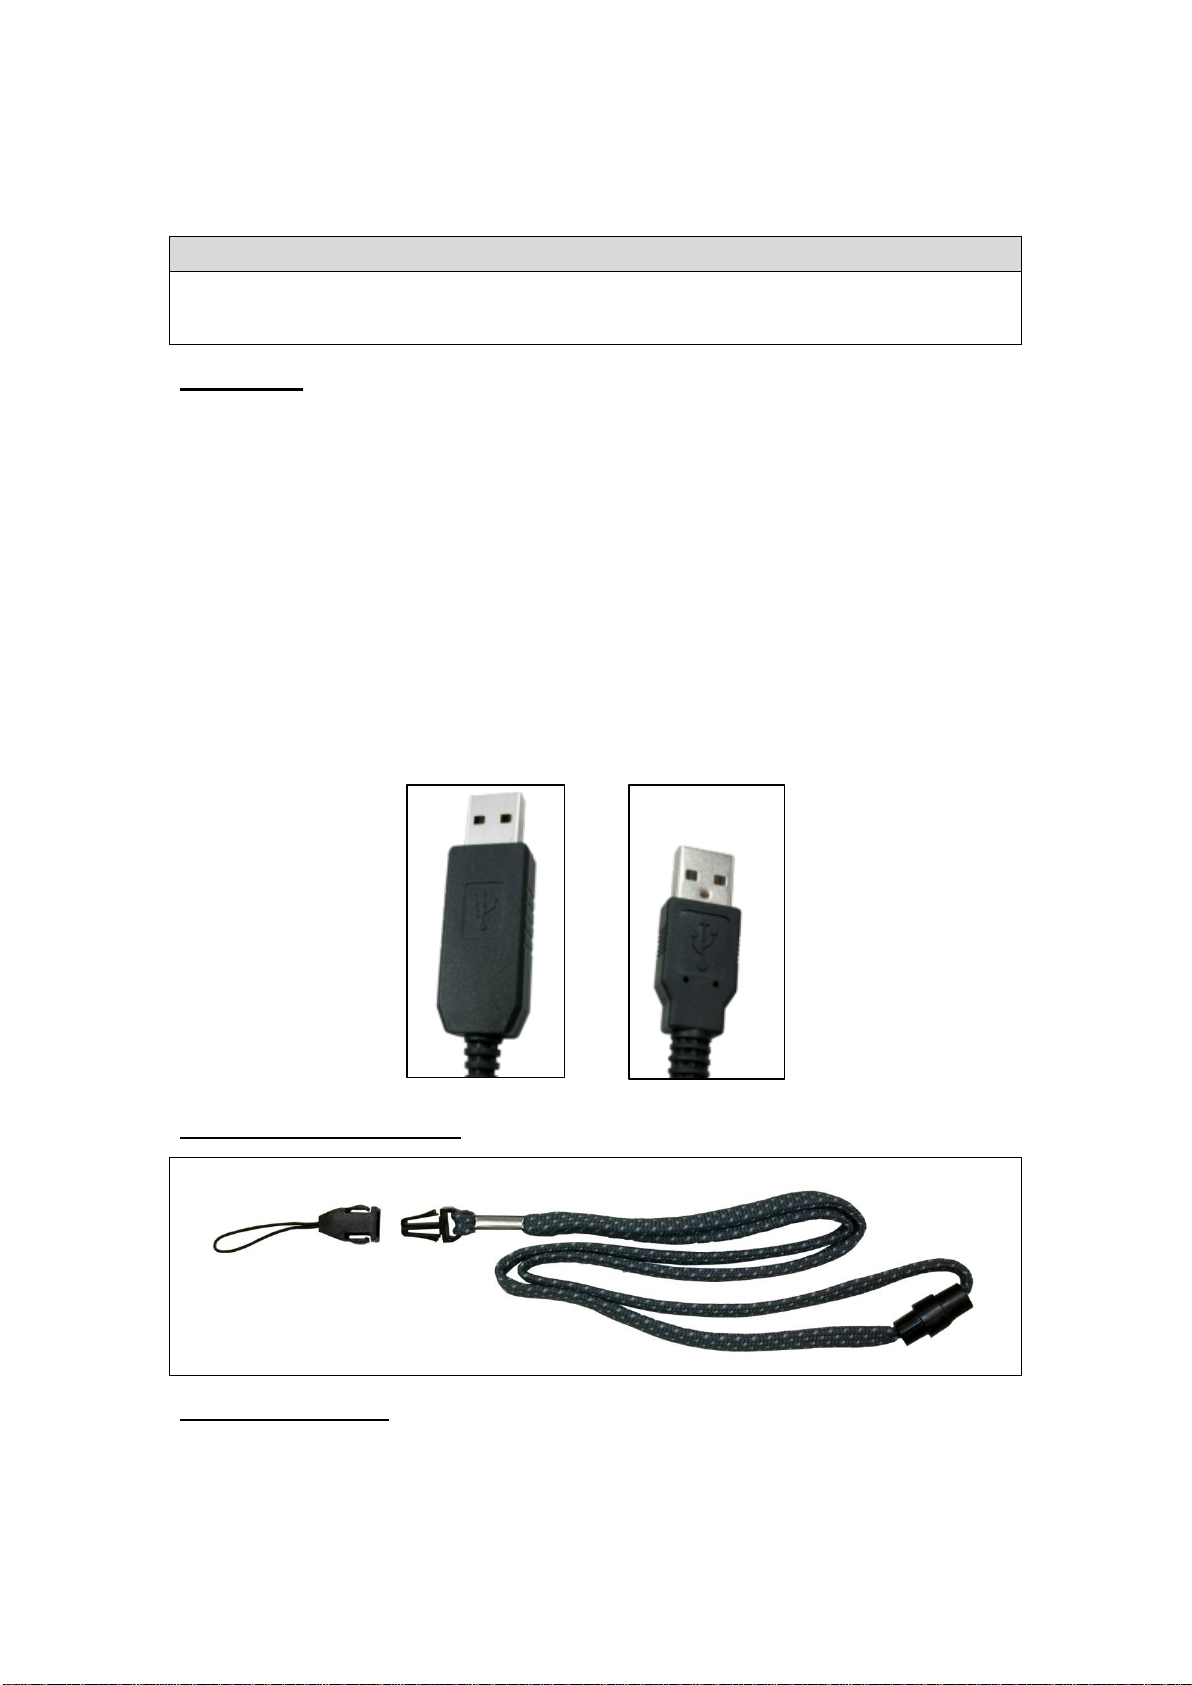
1.2. WHAT’S IN THE BOX..............................................................................................................2
2. SYSTEM OVERVIEW ............................................................................................................4
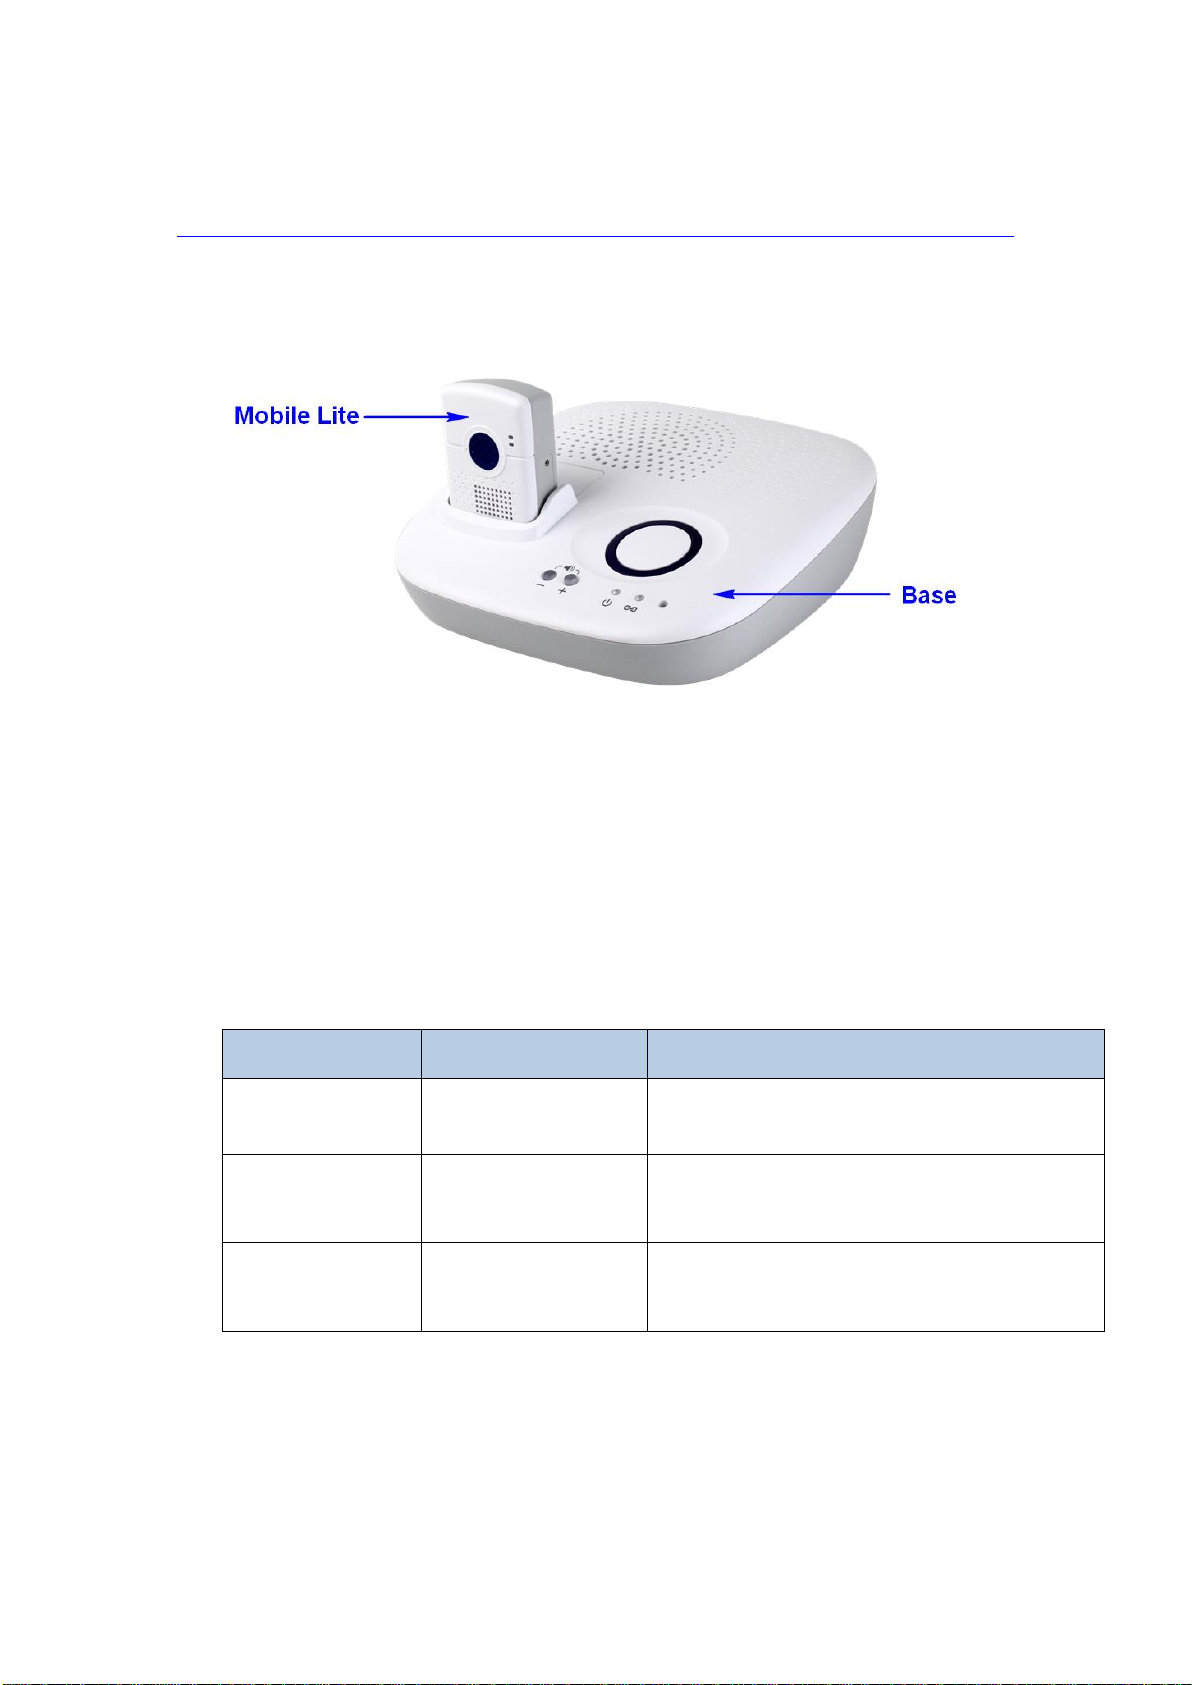
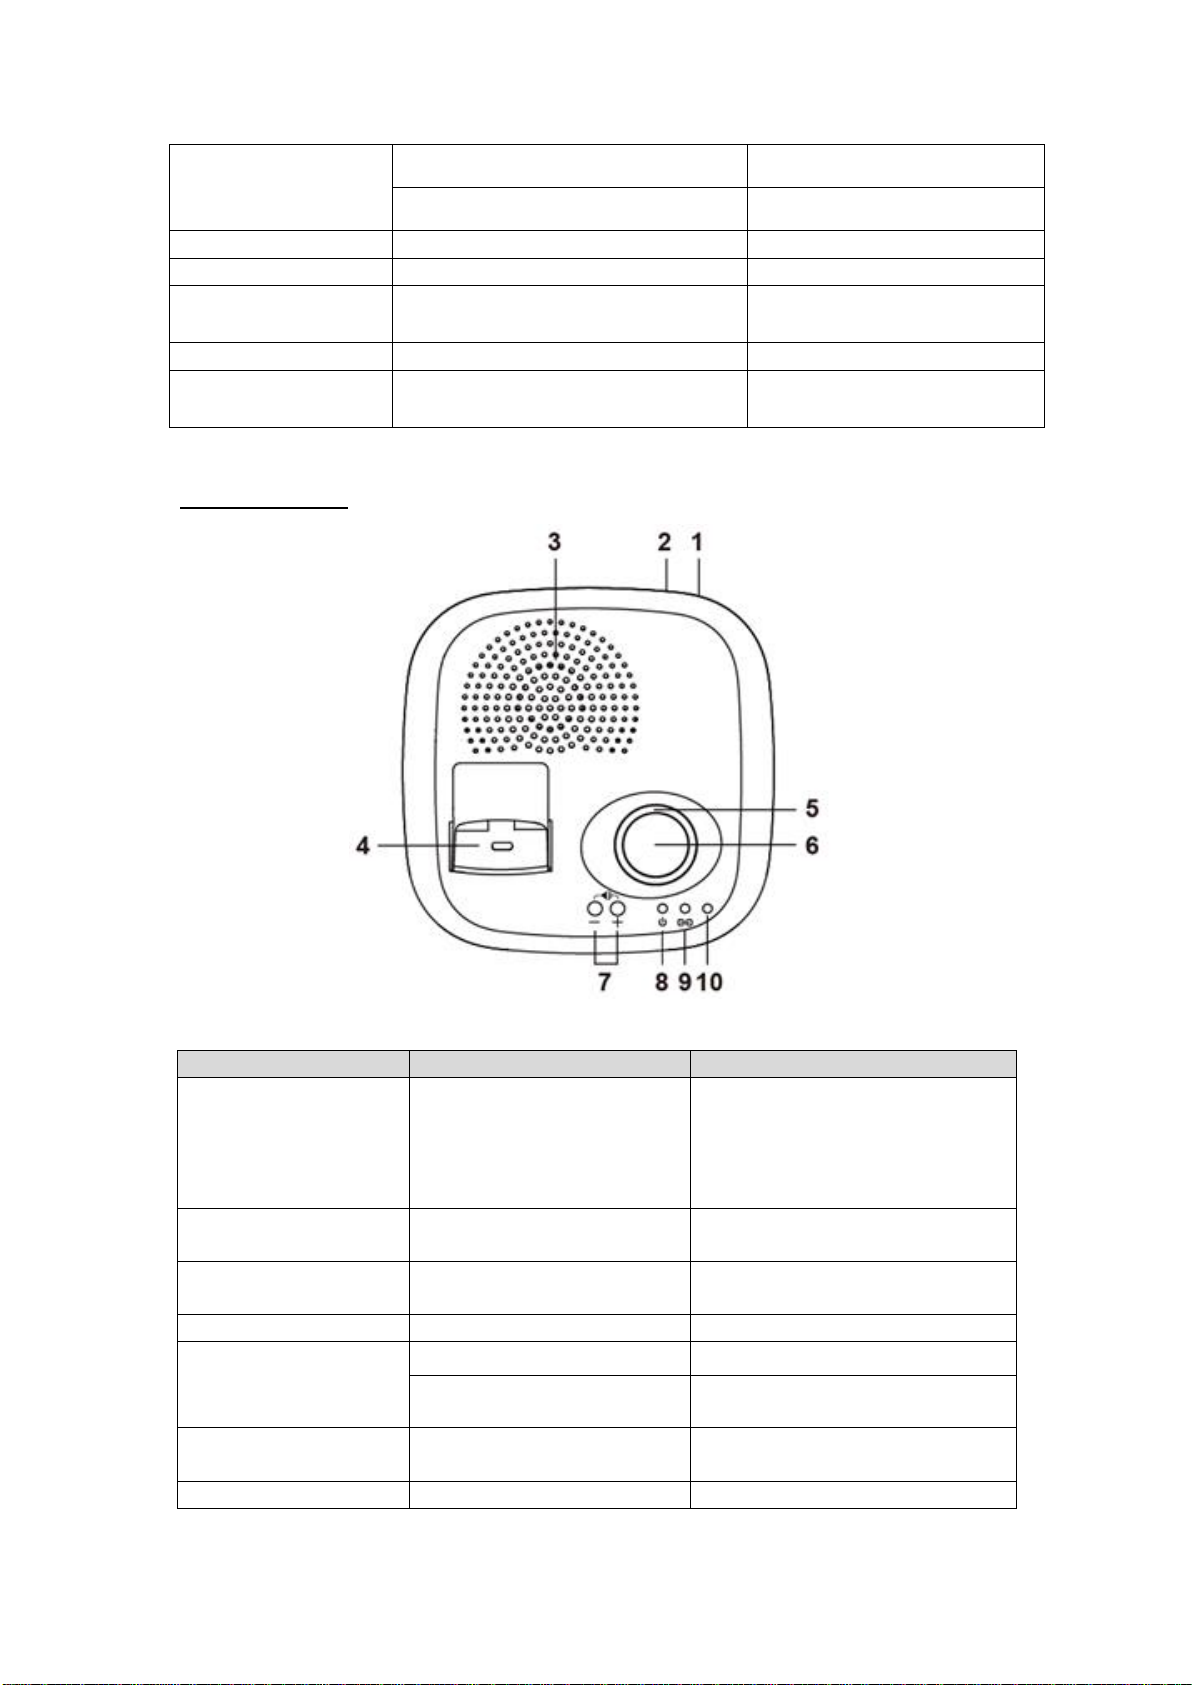
2.1. IDENTIFYING THE PARTS .......................................................................................................4
2.2. POWER SUPPLY ....................................................................................................................6
3. GETTING STARTED –SETTING UP MOBILE LITE..........................................................7
3.1. SIM CARD INSERTION...........................................................................................................7
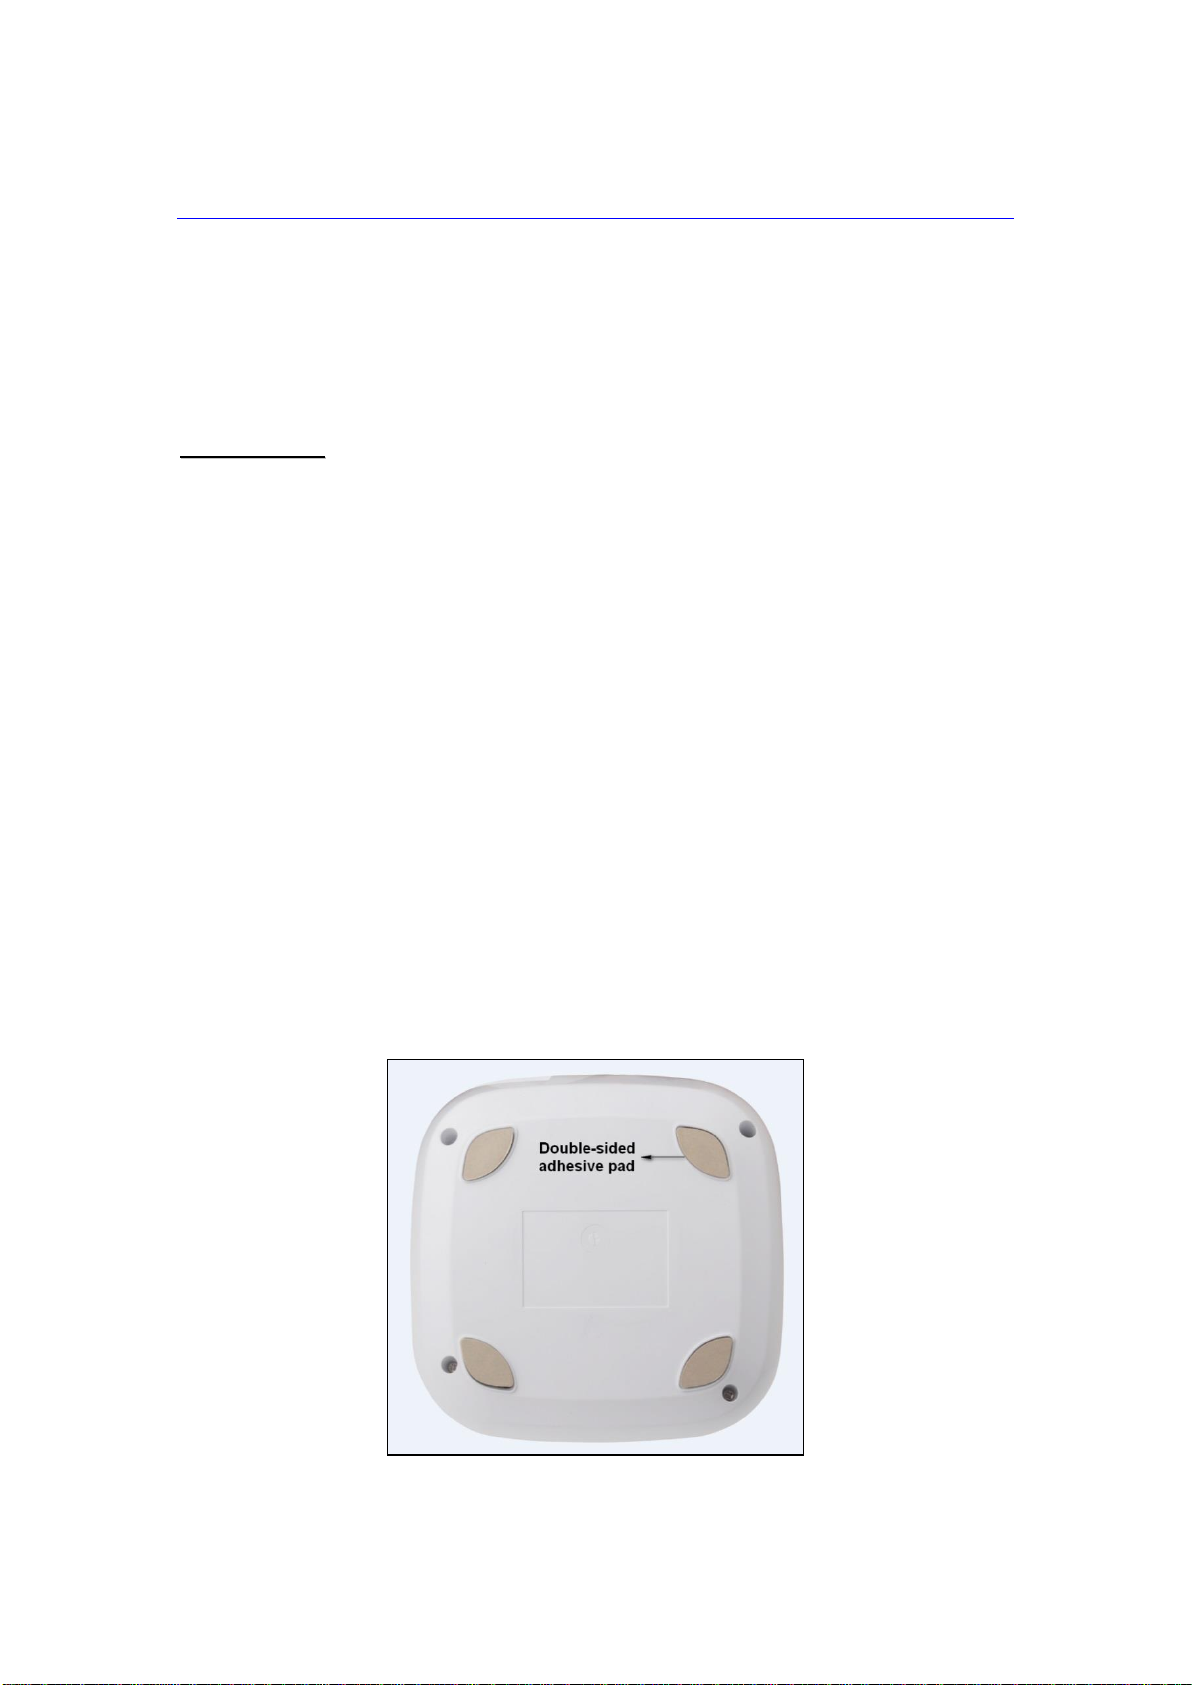
3.2. AMPLIFIER BASE INSTALLATION...........................................................................................7
3.3. CHARGING MOBILE LITE.......................................................................................................8
3.4. HARDWARE INSTALLATION....................................................................................................8
3.5. SOFTWARE INSTALLATION ....................................................................................................9
3.5.1. Installing USB Driver...................................................................................................9
3.5.2. Installing PC Programming Tool..............................................................................9
4. PROGRAMMING MOBILE LITE.........................................................................................10
4.1. PC PROGRAMMING TOOL (INSTALLERS ONLY).................................................................10
4.1.1. Profile............................................................................................................................12
4.1.2. SMS Program..............................................................................................................14
4.1.3. APN................................................................................................................................14
4.1.4. Report Setting.............................................................................................................15
4.1.5. Geo-fence.....................................................................................................................22
4.1.6. Setting...........................................................................................................................26
4.1.7. Device (R8, R18 Only)...............................................................................................31
4.1.8. Miscellaneous.............................................................................................................32
4.1.9. Firmware ......................................................................................................................33
4.2. SMS REMOTE PROGRAMMING...........................................................................................35
5. LOCAL RF DEVICE MANAGEMENT (R8, R18 ONLY)....................................................36
6. OPERATION.........................................................................................................................37
6.1. ANSWERING INCOMING CALLS...........................................................................................37
6.2. CURRENT OPERATION CONDITION .....................................................................................38
6.3. GPS/WI-FI LOCATE FUNCTION..........................................................................................38
6.4. GEOFENCING ......................................................................................................................39
6.5. ALARM ACTIVATION ............................................................................................................40
6.5.1. Alarm Report Procedure..........................................................................................42
6.5.2. Callback Mode ............................................................................................................45

6.5.3. Speech Reporting Method.......................................................................................46
6.5.4. Report Sequence .......................................................................................................47
6.6. SLEEP MODE.......................................................................................................................49
6.7. USAGE RECOMMENDATION FOR FALL DETECTION (R15, R18 ONLY)...............................50
6.8. VOICE PROMPTS .................................................................................................................51
7. AMPLIFIER BASE ...............................................................................................................52
8. APPENDIX............................................................................................................................53
8.1. SMS REMOTE PROGRAMMING COMMANDS TABLE...........................................................53
8.2. CONTACT ID COMMUNICATIONS PROTOCOL AND FORMAT ...............................................56
8.3. SIADIGITAL COMMUNICATION STANDARD.........................................................................59

1
1. Introduction
1.1. Mobile Pro Kit
The Mobile Pro R8/R15/R18 includes two main components.
I. Mobile Lite: Mobile Lite is a light, portable and richly featured cellular
medical alarm with GPS positioning, Wi-Fi positioning, GeoFencing and
mobile network that protect you wherever you go. Models with built -in fall
sensor (R15, R18) will raise an alarm call when a fall has been detected.
The device is a standalone medical alarm capable of playing voice
prompts to raise the users’self-awareness and reporting events via
Speech, SMS and IP protocols to directly communicate with the
monitoring centers.
The Mobile Lite Medical Alarm covers the following models:
Name
Cellular
Feature
Mobile Lite-R8
LTE/GPRS
RF, Voice Prompt, GPS positioning,
Wi-Fi positioning
Mobile Lite-R15
LTE/GPRS
Built-in Fall Sensor, Voice Prompt, GPS
positioning, Wi-Fi positioning
Mobile Lite-R18
LTE/GPRS
RF, Built-in Fall Sensor, Voice Prompt,
GPS positioning, Wi-Fi positioning
II. Amplifier Base 3: The Amplifier Base provides improved functionalities to
Mobile Lite when Mobile Lite is inserted into the base, which makes
Mobile Lite more suitable for home operation.

2
1.2. What’s in the Box
Your Mobile Lite package includes the following items:
Items
Mobile Lite
Amplifier Base
USB Type C cable
USB Cable
Mobile Lite has a USB Type C port for charging or programming.
For charging, place Mobile Lite on Amplifier Base, then connect AC power to
base to charge Mobile Lite.
For programming via connecting Mobile Lite to computer, a special
programming USB cable is required. The USB end of programming cable is
larger than the regular cable.
Always use the Programming USB Type C cable for connecting Mobile Lite to
computer. Never use a regular USB Type C cable for computer
connection.
If Programming cable is not provided, please contact your supplier.
Lanyard and Attachment
Using the Lanyard
Step 1. Attach the lanyard to the Mobile Lite unit by looping the lanyard strap
through the lanyard holes on the Mobile Lite unit, and then pulling the
Programming USB
Cable
Regular USB
Cable

3
strap through until it is tight.
Step 2. Lock the release buckle by inserting the male part into the female part
until you hear a click sound.
Step 3. Put the lanyard around the neck of the user.

4
2. System Overview
2.1. Identifying the Parts
Mobile Lite
Button/LED/Compon
ent
Behavior
Function/Indication
1. Microphone
2. Top LED (Green)
On
Charging
1 flash every 5 seconds
Normal Operation
Top LED (Red)
1 Flash every 3 seconds
Low Battery
When Mobile Lite is charging, the Red LED will not indicate the battery
status.
3. Bottom LED
(Amber)
1 Flash every 3 seconds
Mobile Network fault
4. Active Button
Plug Mobile unit into base
To turn on the unit (exits sleep
mode)
Press and hold for 5 seconds
- To turn on the unit (exits sleep
mode) without using the base.
- To turn off the unit (enters
sleep mode).
Cellular module will be
powered down 30
seconds after the button
is pressed for 5 seconds.
Press once
Trigger emergency alarm
Press and hold for 5 seconds during
a Guard Time
Cancel alarm
Press once when Mobile Lite is
ringing
Pick up incoming call
Press and hold for 5 seconds during
a call
Terminate the call
Press and hold for 8 seconds in
normal mode
Enter RF device learning mode

5
Press twice in learning mode
Remove all learnt device
Press once in learning mode
Exit learning mode
5. Speaker
6. USB Type C Port
7. SIM Card Cover
Fixing Screw
8. SIM Card Cover
9. Micro SIM Card
Slot
Amplifier Base
Button/LED/Component
Behavior
Function/Indication
1. Battery Switch
Slide the battery switch to ON
position.
The backup battery will be
charged when AC power is
connected and serve as a backup
power source when AC power is
missing.
2. DC Jack
Connect to an AC-DC 12V/1A
switching power adapter.
3. Speaker
Replace Mobile Lite speaker
when Mobile Lite is inserted.
4. Mobile Lite Slot
5. LED Indicator
ON
Reporting
Flash
Guardtime Delay or
Retrying report
6. Help Button
Press when Mobile Lite is
inserted
Activate alarm
7. Volume Adjustment
Press +or –when Mobile Lite
Increase or decrease volume

6
Button
is inserted
8. Power LED (Green)
ON
AC power connected
OFF
AC power disconnected
9. Mobile Lite LED
(Blue)
ON
Mobile Lite is inserted
OFF
Mobile Lite removed
10. Microphone
Replace Mobile Lite
microphone when Mobile Lite
is inserted.
2.2. Power Supply
Mobile Lite R8/R15/R18
Mobile Lite R8/R15/R18 is powered by rechargeable battery.
As the battery may not be 100% charged when you get your Mobile Lite,
make sure to charge your Mobile Lite before the first use.
The typical charging time is 4 hours.
To Charge Mobile Lite, please refer to 3.3. Charging Mobile Lite.
When Mobile Lite is low on battery, the Top LED will flash Red every 3
seconds and Mobile Lite will make Low Battery report.
If battery is not changed after making Low Battery report, Mobile Lite will
make the second Low Battery report when battery voltage drops too low
and turn off GPS/Wi-Fi positioning function.
Mobile Lite makes a battery restored report to the CMS when its battery is
fully recharged.
Amplifier Base 3
An AC power adapter is required to connect to a wall outlet. Be sure only
to use an adapter with the appropriate AC voltage rating to prevent
component damage. A DC 12V output and 1A Switch power adapter is
generally used to power Amplifier Base 3.
In addition to the adapter, there is a rechargeable battery inside the
Amplifier Base, which serves as a back-up in case of a power failure.
During normal operation, the AC power adapter is used to supply power to
Amplifier Base and at the same time recharge the battery. It takes
approximately 72 hours to fully charge the battery.
The battery can be manually disconnected by the battery switch located at
the back.
When the Battery Switch is set as OFF, the battery will not be charged
when AC power is connected, nor will it serve as a back-up power source
when AC power is missing. You need to switch the battery to ON after
supplying AC power to Amplifier Base.

7
3. Getting Started –Setting up Mobile Lite
3.1. SIM Card Insertion
Step 1. Loosen the Cover Fixing Screws using a Philips screwdriver and
remove the SIM Card Protective Cover.
Step 2. Insert SIM Card into Mobile Lite, the chip side of the SIM card should
face the front side of Mobile Lite as you insert the card.
<
<W
WA
AR
RN
NI
IN
NG
G>
>
Only a Micro SIM card can fit it the SIM card slot. If you don't have the
right SIM size, please contact your service provider for a replacement SIM
card, or use a SIM card adapter to convert your SIM card to correct size.
Please make sure that the micro SIM card PIN code is deactivated and all
SMS messages removed before insertion.
Step 3. Replace the Protective Cover and tighten the Protective Cover Fixing
Screws using a Philips screwdriver.
3.2. Amplifier Base Installation
Step 1. Clean the location where you wish to place the Amplifier Base with
degreaser.
Step 2. Remove the paper backing of the double-sided adhesive pad on the
back of the Amplifier Base.
Step 3. Place the Amplifier Base at the desired locaiton, and press firmly for
30 seconds to ensure good contact.

8
3.3. Charging Mobile Lite
Step 1. Connect Amplifier Base to AC power to power up the base
Step 2. Place Mobile Lite onto the slot on Amplifier Base to charge Mobile
Lite. The Blue LED on the base will light up if Mobile Lite is properly
connected.
3.4. Hardware Installation
To use PC Programming Tool for programming Mobile Lite, follow the
hardware installation steps below:
Step 1. Connect Programming USB Type C Cable to the USB Type C port at
bottom of Mobile Lite.
Step 3. Insert the programming/charging end of the Programming USB Type
C Cable into a computer USB port as shown in the picture below:
<
<W
WA
AR
RN
NI
IN
NG
G>
>
If programming cable is not provided, please contact your supplier. DO
NOT attempt to connect Mobile Lite to computer with a regular USB Type
C cable.
Programming USB
Cable
Regular USB
Cable

9
3.5. Software Installation
3.5.1. Installing USB Driver
Mobile Lite can be programmed via USB port connection of a computer using
the PC Programming Tool software (using the Programming Cable).
If the computer cannot recognize the USB connection, please try installing the
USB driver as instructed below.
Step 1. Make sure Mobile Lite and the computer is connected properly
(please refer to 3.4. Hardware Installation)
Step 2. Please go to http://www.ftdichip.com/Drivers/VCP.htm. Scroll down
the webpage and select the driver file according to your operation system,
download and install the driver.
3.5.2. Installing PC Programming Tool
PC Programming Tool for Mobile Lite is a portable application and requires no
installation. After installing the USB driver, simply unzip the file to a desired
folder and execute the “MobileTool.exe” file.

10
4. Programming Mobile Lite
Mobile Lite can be programmed by sending SMS commands to the device or
using a PC Programming Tool.
4.1. PC Programming Tool (Installers Only)
For system setting programming with PC Programming Tool software via USB
port, follow instruction below.
Step 1. Execute the programming tool:
The following configuration screen will be opened.
Step 2. Select the following settings in the top section of the configuration

11
screen and click “Open.”
Port: Select the COM port generated for Mobile Lite after
installing the USB Driver (the USB port connected to Mobile
Lite).
Baud rate: 115200
Data: 8
Parity: None
Stop: 1
FlowCtrl: None
Step 3. Read Configuration
To start configuring Mobile Lite settings, click on “Open”. A Read configuration
success message will pop up, click “OK” to proceed:
The current Mobile Lite setting will be displayed. Click on different tabs to see
and edit Mobile Lite functions.

12
4.1.1. Profile
The Profile function allows you to create and edit different setting profiles
which can be easily accessed in the future for quick programming.
Current Setting
After reading the configuration of Mobile Lite, the Profile scroll down bar will
now display “Current Setting” indicating PC Programming Tool is now
displaying the current Mobile Lite configurations. Selecting different tabs will
show the current values of each setting.
If you select a different profile from the drop down menu, the “Current Setting”
profile will disappear to indicate the PC Programming Tool is no longer
displaying Mobile Lite’s current configuration. To access Current Setting again,
click on “Read”.
Default
When “Default” is selected, the PC Programming Tool will display default
configurations of Mobile Lite, you can use this profile to return Mobile Lite to its
default setting.
New Profile
To create a new profile, click on “New Profile”. A pop-up window will prompt
you to enter a profile name:
After entering a profile name, the profile scroll down bar will show the new
profile name:
After editing the settings, click “Save Profile”to save the profile settings. A
pop-up window will indicate the profile has saved. You can use this profile in
the future to apply the same setting to other Mobile Lite.
Apply profile

13
If you wish to apply all the configuration of a profile into Mobile Lite, go to each
individual page and click on all the “Write”buttons to make sure all settings are
programmed into Mobile Lite.
Profile Manager
Click on “Profile Manager” to manage the profiles:
Delete Profile
Select a profile and click on “Delete Profile”. A pop-up window will ask you to
confirm the selection:
Select “Yes” to delete the profile, or “No” to return to the previous page.

14
4.1.2. SMS Program
This tab allows the user to program SMS Keyword (15 characters max.) and
Access Code 1 (4-8 digits) which are used for SMS Programming feature.
Enter the information and click “Write” to complete programming. Please note
that SMS Keyword is case-sensitive. For detail information, please refer to 4.2.
SMS Programming.
SMS Keyword: PROG (default)
Access Code: 1111 (default)
4.1.3. APN
The APN setting must be completed for Mobile Lite to report events via cellular
network.
Click “APN” to set APN Name, APN User and APN Password and click “Write”
to confirm.
APN Name: The name of an access point for GPRS. Please ask your SIM
card service provider for your APN.
APN User: Offered by your SIM card service provider. Please ask your
service provider for your GPRS username. If no username is required, you
may skip this step.
APN Password: Offered by your SIM card service provider. Please ask
your service provider for your GPRS password. If no password is required,
you may skip this step.

15
4.1.4. Report Setting
The “Report”tab allows the user to configure report settings.
Mobile Lite reports over 3 media: IP (Mobile Network), Speech channel, and
SMS message.
5 Report Indexes are available for setting:
4 programmable settings are available per Report Index:
1. Report Destination
Enter a report destination. The format of the report destination will depend
on the Reporting Format (Type). Please see Report Destinations below.
If there are no report destinations programmed, Mobile Lite will not report
upon alarm activation and will emit 1 beep as a reminder.
2. Event Filter
Select an event filter. The event filter determines which events are reported
to the selected Report Destination.
3. Reporting Format (Type)
Select a reporting format. The reporting format determines how the events
are reported to the Report Destination.
4. (Reporting) Groups
Assign the Report Index to a Reporting Group. The Reporting Group
determines the sequence of reporting.
Click “Write” to the apply the settings to Mobile Lite.
Report Destinations
After Report Format is determined, enter the Report Destinations according to
the designated Report Format:
IP Report Format: AccountNumber@server:port
IP Reporting: When activated, Mobile Lite will send event code and
location information (if available) via mobile network.

16
AccountNumber: Enter 4 to 23 alphanumeric account number assigned by
CMS.
Server: Enter either the IP address or the domain name of receiver.
Port: Separate from Server with a colon “:”, then enter the port number
For XML Report Format, you can also enter
http://AccountNumber@server url or
https://AccountNumber@server url
AccountNumber: Enter 4 to 23 alphanumeric account number assigned by
CMS.
Server URL: Enter the Server URL of receiver.
Example : http://111111@developer.climaxrd.com/soap/test
https://111111@developer.climaxrd.com/soap/test
Speech reporting and SMS Text Report Format: PhoneNumber
Example: 0912345678
Speech Reporting: When activated, Mobile Lite will dial to the telephone
number and open two-way voice communication directly.
Speech reporting is for Emergency Event only. Status event will not
be sent via speech.
Please note that Location info cannot be sent via Speech.
It is recommended to program at least one IP report before a Speech
Report. The IP and speech reports each should be assigned to a
separate Group. During two-way communication, Mobile Lite location
info will be updated every minute, and at the same time reported via
the last successful IP channel. (refer to 6.5. Alarm Activation for
more details).
SMS Text Reporting: When activated, Mobile Lite sends a SMS text
message to the recipient. The message contains event information and a
Google Map link for location. If the recipient’s receiver device supports
map function, he/she can click on the link to locate Mobile Lite.
Event Filter
This parameter determines which events are reported to the selected Report
Destination.

17
3 options: “All”, “Emergency”and “Status”. When an event is triggered, it will
be reported to the reporting destination according to the setting. If set to All,
the panel will report all events regardless of event type.
For example:
Mobile Lite being low on battery is a “status” event. If report index 3 and 5
are set as “status” and index 4 as “all” in event filters, this status event will
be reported to destinations 3, 4, and 5.
For more information, refer to 8. Appendix for event code types.
Reporting Format (Type)
The available reporting formats include:
Speech: Mobile Lite reports over the Speech channel to allow the user to
talk directly to the call recipient.
SIA_CID over IP:Mobile Lite reports digital CID event codes and
location information over mobile network TCP Protocol in SIA format.
SIA2_CID over IP: Mobile Lite reports digital CID event codes and
location information over mobile network TCP Protocol in SIA2 format.
SIA over IP: Mobile Lite reports digital SIA event codes and location
information over mobile network TCP Protocol.
SIA2 over IP: Mobile Lite reports digital SIA2 event codes and location
information over mobile network TCP Protocol.
SIA_CID over UDP: Mobile Lite reports digital CID event codes and
location information over mobile network UDP Protocol in SIA format.
SIA2_CID over UDP: Mobile Lite reports digital CID event codes and
location information over mobile network UDP Protocol in SIA2 format.
SIA over UDP: Mobile Lite reports digital SIA event codes and location
information over mobile network UDP Protocol.
SIA2 over UDP: Mobile Lite reports digital SIA2 event codes and location
information over mobile network UDP Protocol.
XML: XML reporting in Avant Guard XML protocol.
SMS CID: Mobile Lite sends a SMS text message containing event code
and a location link.
SMS TEXT: Mobile Lite sends a SMS text message containing event
information and a location link.
This manual suits for next models
3
Table of contents
Other Climax Personal Care Product manuals

Climax
Climax Vesta Series User manual

Climax
Climax SUPER 32-DT35A User manual

Climax
Climax VCP-LTE User manual

Climax
Climax Vesta Series Operating instructions

Climax
Climax Mobile Lite-R8 Slim Assembly instructions

Climax
Climax Mobile Mates R8 Slim Assembly instructions

Climax
Climax WTRVS User manual

Climax
Climax Vesta Series User manual
Popular Personal Care Product manuals by other brands

BaByliss PRO
BaByliss PRO CryoCare ColdBrush manual

R.T. LARGE
R.T. LARGE PERTH 2 MRTL259 installation instructions

I-Tech
I-Tech UE user manual

Kristall-Form
Kristall-Form Paradiso Series Mounting instruction

Silvercrest
Silvercrest SGS 100 A1 operating instructions

C-Aire
C-Aire Eclipse 5 Provider technical maunal