Climax Mobile Mates R8 Slim Assembly instructions

Mobile Mates
Smart Care System & 4G/LTE PERS Locator
Installer’s Guide
Dec. 14, 2020

Table of Contents
1. INTRODUCTION ....................................................................................................................1
1.1. MOBILE MATES .....................................................................................................................1
1.2. WHAT’S IN THE BOX..............................................................................................................2
2. SYSTEM OVERVIEW ............................................................................................................3
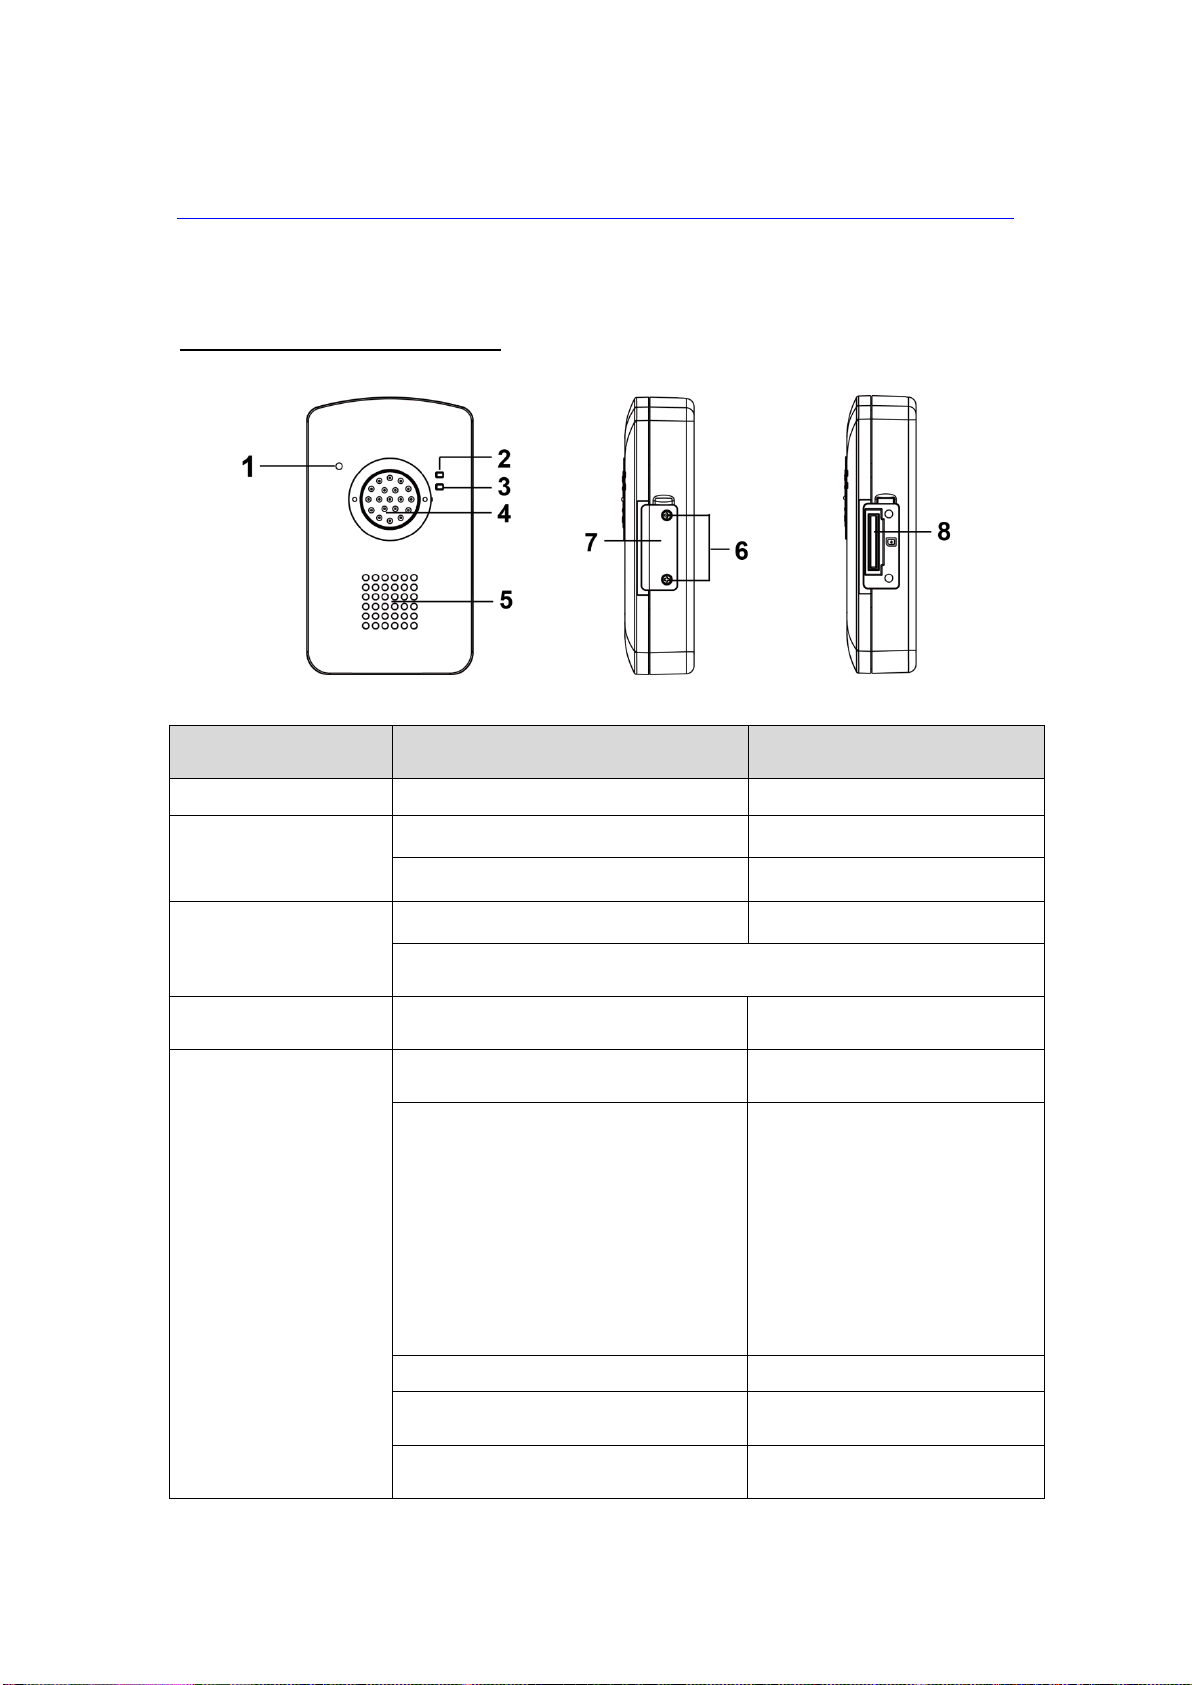
2.1. IDENTIFYING THE PARTS .......................................................................................................3
2.2. POWER SUPPLY ....................................................................................................................6
3. GETTING STARTED –SETTING UP MOBILE LITE..........................................................7
3.1. MOBILE LITE SIM CARD INSERTION.....................................................................................7
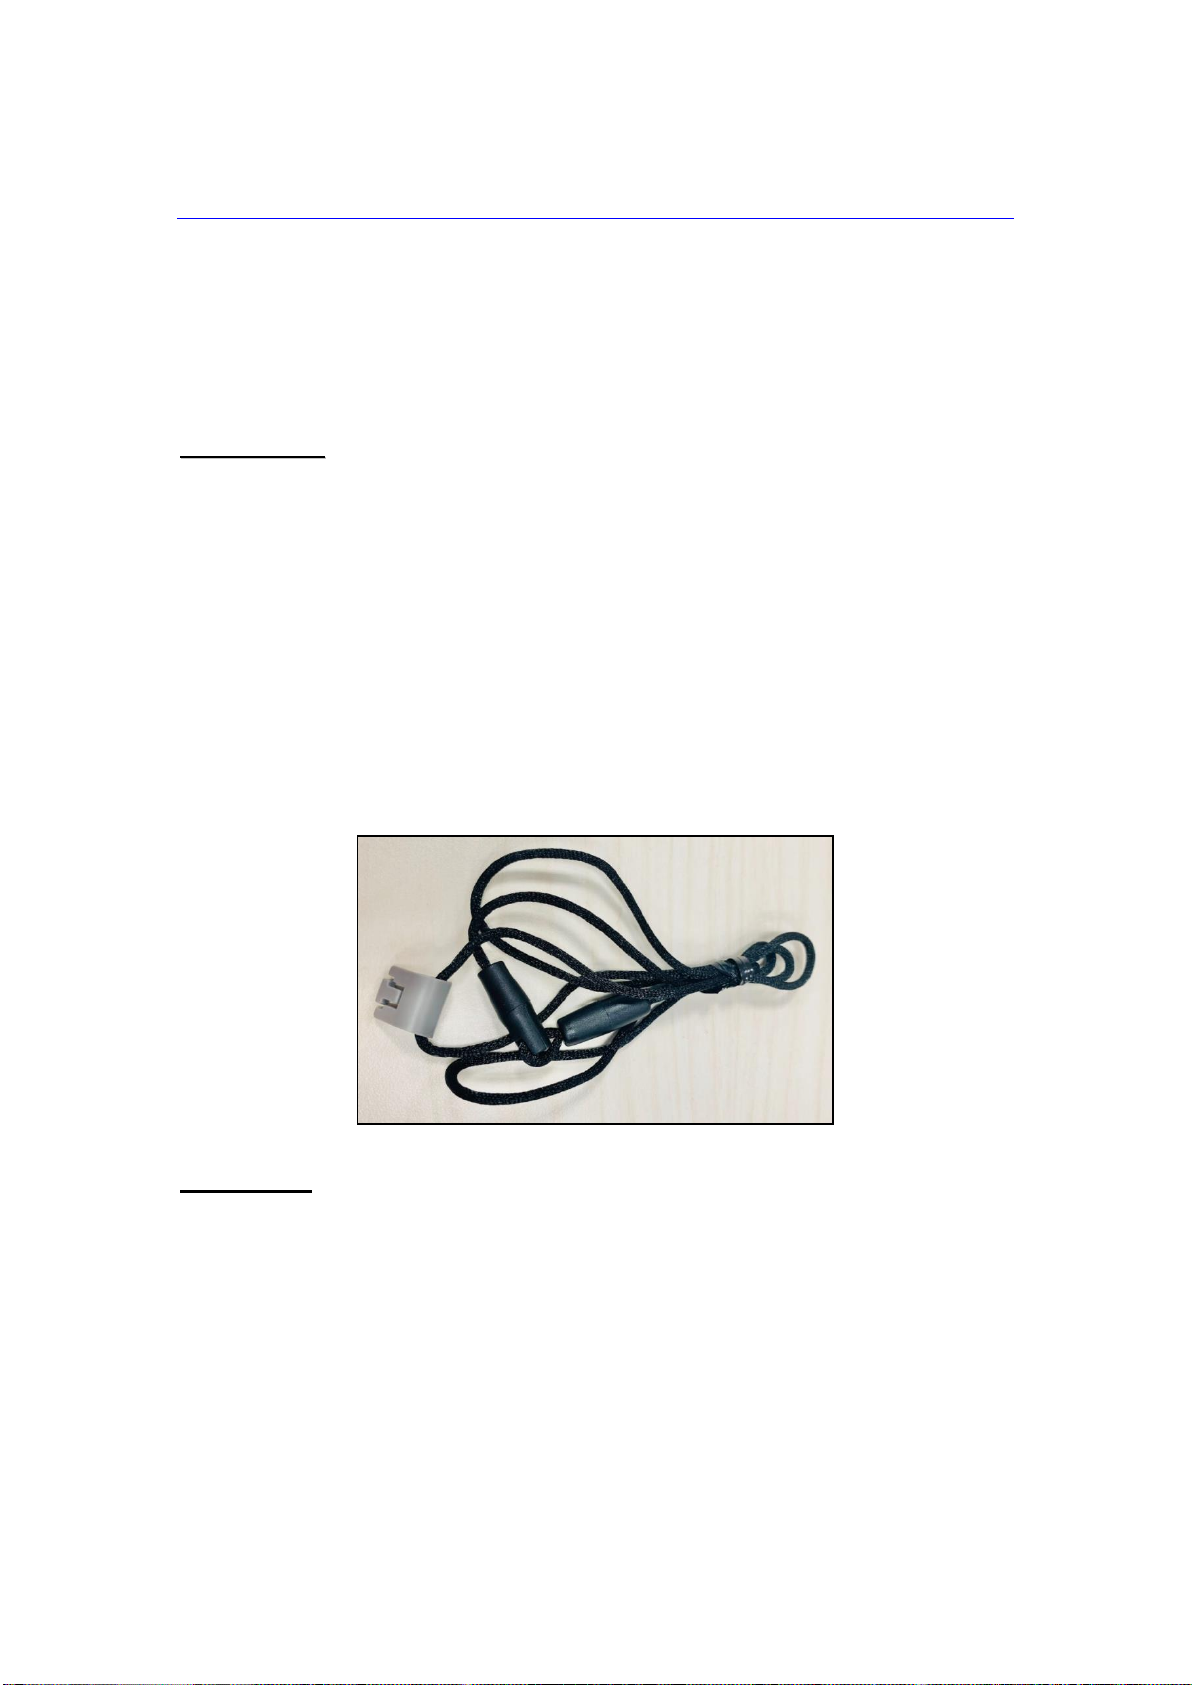
3.2. MOBILE LITE LANYARD AND ATTACHMENT ..........................................................................7
3.3. MOBILE LITE BELT CLIP AND ATTACHMENT.........................................................................8
3.4. BASE 15 INSTALLATION ......................................................................................................10
3.5. CHARGING MOBILE LITE.....................................................................................................10
3.6. HARDWARE INSTALLATION (FOR PC PROGRAMMING)......................................................11
3.6.1. Programming Mobile Lite Slim...............................................................................11
3.6.2. Programming Base 15..............................................................................................12
3.7. SOFTWARE INSTALLATION (FOR PC PROGRAMMING).......................................................14
3.7.1. Installing USB Driver.................................................................................................14
3.7.2. Installing PC Programming Tool............................................................................14
4. PROGRAMMING..................................................................................................................15
4.1. PC PROGRAMMING TOOL (PROGRAMMING MOBILE LITE)................................................15
4.1.1. Profile............................................................................................................................17
4.1.2. SMS Program..............................................................................................................19
4.1.3. APN................................................................................................................................19
4.1.4. Report Setting.............................................................................................................20
4.1.5. Geo-fence.....................................................................................................................26
4.1.6. Setting...........................................................................................................................31
4.1.7. Device (R8, R18 Only)...............................................................................................36
4.1.8. Miscellaneous.............................................................................................................37
4.1.9. Firmware ......................................................................................................................38
4.2. PC PROGRAMMING TOOL (PROGRAMMING BASE 15) ......................................................40
4.2.1. Profile............................................................................................................................41
4.2.2. SMS Program..............................................................................................................44
4.2.3. APN................................................................................................................................44
4.2.4. Report Setting.............................................................................................................45
4.2.5. Setting...........................................................................................................................50
4.2.6. Device...........................................................................................................................54

4.2.7. Miscellaneous.............................................................................................................55
4.2.8. Firmware ......................................................................................................................56
4.3. SMS REMOTE PROGRAMMING (MOBILE LITE &BASE 15)...............................................57
5. LOCAL RF DEVICE MANAGEMENT ................................................................................58
5.1. FOR MOBILE LITE (R8, R18)..............................................................................................58
5.2. FOR BASE 15......................................................................................................................59
6. OPERATION.........................................................................................................................60
6.1. MOBILE LITE........................................................................................................................60
6.1.1 Answering Incoming Calls ......................................................................................60
6.1.2 Current Operation Condition..................................................................................61
6.1.3 GPS/Wi-Fi Locate Function.....................................................................................61
6.1.4 GeoFencing.................................................................................................................62
6.1.5 Alarm Activation.........................................................................................................63
6.1.5.1 Alarm Report Procedure...............................................................................................65
6.1.5.2 Callback Mode.................................................................................................................68
6.1.5.3 Speech Reporting Method ...........................................................................................69
6.1.5.4 Report Sequence............................................................................................................70
6.1.6 Sleep Mode..................................................................................................................72
6.1.7 Usage Recommendation for Fall Detection (R15, R18 only) ..........................73
6.1.8 Voice Prompts ............................................................................................................74
6.2. BASE 15..............................................................................................................................75
6.2.1 Answering Incoming Calls ......................................................................................75
6.2.2 Alarm Activation.........................................................................................................75
6.2.2.1 Callback Mode.................................................................................................................76
6.2.2.2 Speech Reporting Method ...........................................................................................77
6.2.2.3 Report Sequence............................................................................................................78
6.2.2.4 Special Reporting Case: IP + Speech Report..........................................................79
6.2.3 Factory Reset..............................................................................................................80
6.2.4 Sleep Mode..................................................................................................................80
6.2.5 Voice Prompts ............................................................................................................81
7APPENDIX............................................................................................................................82
7.1 SMS REMOTE PROGRAMMING COMMANDS TABLE...........................................................82
7.2 CONTACT ID COMMUNICATIONS PROTOCOL AND FORMAT ...............................................85
7.3 SIADIGITAL COMMUNICATION STANDARD.........................................................................88

1
1. Introduction
1.1. Mobile Mates
The Mobile Mates- R8/R15/R18 Slim -Base 15 includes two main components.
I. Mobile Lite (R8/R15/R18 Slim): Mobile Lite Slim is a light, portable and
richly featured cellular medical alarm with GPS positioning, Wi-Fi
positioning, GeoFencing and mobile network that protect you wherever
you go. Models with built -in fall sensor (R15, R18 Slim) will raise an alarm
call when a fall has been detected.
The mobile lite unit is capable of playing voice prompts to raise the users’
self-awareness and reporting events via Speech, SMS and IP protocols to
directly communicate with the monitoring centers.
The Mobile Lite Slim Medical Alarm covers the following models:
Name
Cellular
Feature
Mobile Lite-R8 Slim
LTE/GPRS
RF, Voice Prompt, GPS positioning, Wi-Fi
positioning
Mobile Lite-R15 Slim
LTE/GPRS
Built-in Fall Sensor, Voice Prompt, GPS
positioning, Wi-Fi positioning
Mobile Lite-R18 Slim
LTE/GPRS
RF, Built-in Fall Sensor, Voice Prompt,
GPS positioning, Wi-Fi positioning
II. Base 15: The Base is used to charge the Mobile Lite when Mobile Lite is
inserted into the base.
Furthermore, it also acts as an independent LTE medical alarm system for
indoor operation.
Mobile Lite
Base

2
1.2. What’s in the Box
Your Mobile Mates package includes the following items:
Items
Mobile Lite Slim
Lanyard
Belt Clip
Base 15
Base Adaptor

3
2. System Overview
2.1. Identifying the Parts
Mobile Lite R8/R15/R18 Slim
Button/LED/Compon
ent
Behavior
Function/Indication
1. Microphone
2. Top LED (Green)
On
Charging
1 flash every 5 seconds
Normal Operation
Top LED (Red)
1 Flash every 3 seconds
Low Battery
When Mobile Lite is charging, the Red LED will not indicate the battery
status.
3. Bottom LED
(Amber)
1 Flash every 3 seconds
Cellular Network fault
4. Active Button
Plug Mobile unit into base
To turn on the unit (exits sleep
mode)
Press and hold for 5 seconds
- To turn on the unit (exits sleep
mode) without using the base.
- To turn off the unit (enters
sleep mode)
Cellular module will be
powered down 30
seconds after the button
is pressed for 5 seconds.
Press once
Trigger emergency alarm
Press and hold for 5 seconds during
a Guard Time
Cancel alarm
Press once when Mobile Lite is
ringing
Pick up incoming call

4
Press and hold for 5 seconds during
a call
Terminate the call
Press and hold for 8 seconds in
normal mode
Enter RF device learning mode
Press twice in learning mode
Remove all learnt device
Press once in learning mode
Exit learning mode
5. Speaker
6. SIM Card Cover
Fixing Screw
7. SIM Card Cover
8. Micro SIM Card
Slot
Base 15
Button/LED/Component
Behavior
Function/Indication
1. White Backlight
Dimly lit
Idle/normal mode
ON
Alarm Reporting
Flash
During Guard time or
Retrying report
2. Help Button
Press and hold for 5 seconds
- To turn on the Base (exits sleep
mode)
- To turn off the Base (enters sleep
mode)
Cellular module will be

5
powered down 30 seconds
after the button is pressed
for 5 seconds.
Press once
Activate alarm
Press and hold for 5 seconds
during a Guard Time
Cancel alarm
Press once when Base is
ringing
Pick up incoming call of Base
Press and hold for 5 seconds
during a call
Terminate the call
Press and hold for 8 seconds
in normal mode
Enter RF device learning mode
Press once in learning mode
Exit learning mode
Press twice in learning mode
Remove all learnt device
3. Microphone
4. LED (Blue)
ON
Mobile Lite is inserted
OFF
Mobile Lite removed
1 Flash every 3 seconds
Low Battery
1 Flash every 2 seconds
In learning mode
4. LED (Amber)
1 Flash every 3 seconds
Cellular Network fault
All LEDs On
During Remote Update
5. Power LED (Green)
ON
AC power connected
OFF
AC power disconnected
6. Volume Adjustment
Button
Press +or –
Increase or decrease volume
Press and hold the + and –
keys while supplying power to
Base 15
Factory Reset
7. Lock release button
Press this button
Open the bounce cover of Mobile
Lite slot
8. Bounce Cover of
Mobile Lite Slot
9. Speaker
10. Mobile Lite Slot
11. Battery Switch
Slide the battery switch to ON
position.
The backup battery will be
charged when AC power is
connected and serve as a backup
power source when AC power is
missing.
12. DC Jack
Connect to an AC-DC 12V/1A
switching power adapter.
13. USB Type C Port
Connects to a programming
USB Cable
For programming
14. Micro SIM Card Slot

6
2.2. Power Supply
Mobile Lite R8/R15/R18 Slim
Mobile Lite R8/R15/R18 slim is powered by rechargeable battery. The
typical charging time is 4 hours.
As the battery may not be 100% charged when you get your Mobile Lite,
make sure to charge your Mobile Lite before the first use.
To carge Mobile Lite, please refer to 3.5. Charging Mobile Lite.
When Mobile Lite is low on battery, the Top LED will flash Red every 3
seconds and Mobile Lite will make Low Battery report.
If battery is not changed after making Low Battery report, Mobile Lite will
make the second Low Battery report when battery voltage drops too low
and turn off GPS/Wi-Fi positioning function.
Mobile Lite makes a battery restored report to the CMS when its battery is
fully recharged.
Base 15
An AC power adapter is required to connect to a wall outlet. Be sure only
to use an adapter with the appropriate AC voltage rating to prevent
component damage. A DC 12V output and 1A Switch power adapter is
generally used to power Base 15.
In addition to the adapter, there is a rechargeable battery inside the Base,
which serves as a back-up in case of a power failure.
During normal operation, the AC power adapter is used to supply power to
Base and at the same time recharge the battery. It takes approximately 72
hours to fully charge the battery.
The battery can be manually disconnected by the battery switch located at
the back.
When the Battery Switch is set as OFF, the battery will not be charged
when AC power is connected, nor will it serve as a back-up power source
when AC power is missing. You need to switch the battery to ON after
supplying AC power to the Base.
<
<W
WA
AR
RN
NI
IN
NG
G>
>
When Mobile Lite is inserted on the base, but AC power is not
connected, the Base will not charge the mobile lite.

7
3. Getting Started –Setting up Mobile Lite
3.1. Mobile Lite SIM Card Insertion
Step 1. Loosen the Cover Fixing Screws using a Philips screwdriver and
remove the SIM Card Protective Cover.
Step 2. Insert SIM Card into Mobile Lite, the chip side of the SIM card should
face the back side of Mobile Lite as you insert the card.
<
<W
WA
AR
RN
NI
IN
NG
G>
>
Only a Micro SIM card can fit in the SIM card slot. If you don't have the
right SIM size, please contact your service provider for a replacement SIM
card, or use a SIM card adapter to convert your SIM card to correct size.
Please make sure that the micro SIM card PIN code is deactivated and all
SMS messages removed before insertion.
Step 3. Replace the Protective Cover and tighten the Protective Cover Fixing
Screws using a Philips screwdriver.
3.2. Mobile Lite Lanyard and Attachment
Attachment
Hook the the lanyard onto the Mobile Lite unit.

8
Put the lanyard around the neck of the user.
Removal
Press the button to release the hook and remove the lanyard.
3.3. Mobile Lite Belt Clip and Attachment
Attachment
Hook the the belt clip onto the Mobile Lite unit.

9
Use the clip to attach the Mobile Lite to the user’s waistband or belt.
Removal
Press the button to release the hook and remove the belt clip.
<
<N
NO
OT
TE
E>
>
When the fall detection function is enabled for Mobile Lite (R15, 18),
please use the lanyard to wear Mobile Lite unit on the neck and let it hang
in front of the chest, so that Fall Sensor can be effectively triggered.
Please do not use the belt clip to wear the Mobile Lite on waistband or
hide the Mobile Lite unit inside coat pocket, which may lead to difficult
trigger or non-detection of fall.

10
3.4. Base 15 Installation
Step 1. Choose a suitable location for the Base. The Base requires the mains
power and good cellular coverage, and should be easily accessible. It
should not be placed in a damp location such as a bathroom or close
to a heat source like a microwave oven, which could reduce signal
strength.
Step 2. Insert the SIM card with the chip side facing down.
Step 3. Plug the AC power adaptor into the Base's DC jack and connect to the
mains power.
Step 4. Clean the location where you wish to place the Base with degreaser.
Step 5. Remove the paper backing of the double-sided adhesive pad on the
back of the Base.
Step 6. Place the Base at the desired locaiton, and press firmly for 30 seconds
to ensure good contact.
3.5. Charging Mobile Lite
Step 1. Connect the Base 15 to AC power to power up the base
Step 2 Press the lock release button to open the Mobile Lite slot cover.
Step 3. Place Mobile Lite onto the slot on the Base to charge Mobile Lite. The
Blue LED on the base will light up if Mobile Lite is properly connected.
<
<W
WA
AR
RN
NI
IN
NG
G>
>
When Mobile Lite is inserted on the base, but AC power is not
connected, the Base will not charge the mobile lite.

11
3.6. Hardware Installation (For PC Programming)
3.6.1. Programming Mobile Lite Slim
CT-6 Cradle and Programming Micro-USB Cable (Optional
Mobile Lite Slim can be programmed via USB port connection of a computer
using the PC Programming Tool software.
Put Mobile Lite on CT-6 Cradle and use the Programming Micro-USB Cable to
connect to PC USB port.
The CT-6 Cradle and Programming Micro-USB are sold separtely.
The USB end of programming cable is larger than the regular cable.Always
use the Programming micro USB cable for connecting CT-6 to computer.
Never use a regular micro USB cable for computer connection.
To use PC Programming Tool for programming Mobile Lite, follow the
hardware installation steps below:
Step 1. Place Mobile Lite into the CT-6 Cradle. Please make sure that the
programming Contact Plates (of both Mobile Lite and the cradle) are
in contact with each other.
Programming
Micro-USB Cable
Regular Micro-USB
Cable

12
Step 2. Insert the device/cradle end of the Programming Micro-USB Cable
into the Micro-USB jack as shown in the picture:
Step 3. Insert the programming end of the Programming Micro-USB Cable
into a computer USB port as shown in the picture below:
3.6.2. Programming Base 15
To use PC Programming Tool for programming the Base 15, follow the
hardware installation steps below:
Step 1. Connect Programming USB Type C Cable to the USB Type C port at
back of the Base 15.
Step 2. Insert the programming/charging end of the Programming USB Type
C Cable into a computer USB port.
<
<W
WA
AR
RN
NI
IN
NG
G>
>
Programming USB Type C Cable is sold separately. If programming cable
is not provided, please contact your supplier. DO NOT attempt to connect
Base 15 to computer with a regular USB Type C cable.

13
Programming USB
Type C Cable
Regular USB Type
C Cable

14
3.7. Software Installation (For PC Programming)
3.7.1. Installing USB Driver
Mobile Lite Slim and Base 15 can be programmed via USB port connection of
a computer using the PC Programming Tool software (using the Programming
Cable).
If the computer cannot recognize the USB connection, please try installing the
USB driver as instructed below.
Step 1. Make sure Mobile Lite Slim /Base 15 and the computer is connected
properly (please refer to 3.6. Hardware Installation)
Step 2. Please go to http://www.ftdichip.com/Drivers/VCP.htm. Scroll down
the webpage and select the driver file according to your operation system,
download and install the driver.
3.7.2. Installing PC Programming Tool
PC Programming Tool for Mobile Lite Slim /Base 15 is a portable application
and requires no installation. After installing the USB driver, simply unzip the file
to a desired folder and execute the “Mobile Tool.exe” file.

15
4. Programming
Mobile Lite Slim and Base 15 can be programmed by sending SMS commands
to the device or using a PC Programming Tool.
4.1. PC Programming Tool (Programming Mobile Lite)
For system setting programming with PC Programming Tool software via USB
port, follow instruction below.
Step 1. Execute the programming tool:
The following configuration screen will be opened.

16
Step 2. Select the following settings in the top section of the configuration
screen and click “Open.”
Port: Select the COM port generated for Mobile Lite after
installing the USB Driver (the USB port connected to Mobile
Lite).
Baud rate: 115200
Data: 8
Parity: None
Stop: 1
FlowCtrl: None
Step 3. Read Configuration
To start configuring Mobile Lite settings, click on “Open”. A Read configuration
success message will pop up, click “OK” to proceed:
The current Mobile Lite setting will be displayed. Click on different tabs to see
and edit Mobile Lite functions.

17
4.1.1. Profile
The Profile function allows you to create and edit different setting profiles
which can be easily accessed in the future for quick programming.
Current Setting
After reading the configuration of Mobile Lite, the Profile scroll down bar will
now display “Current Setting” indicating PC Programming Tool is now
displaying the current Mobile Lite configurations. Selecting different tabs will
show the current values of each setting.
If you select a different profile from the drop down menu, the “Current Setting”
profile will disappear to indicate the PC Programming Tool is no longer
displaying Mobile Lite’s current configuration. To access Current Setting again,
click on “Read”.
Default
When “Default” is selected, the PC Programming Tool will display default
configurations of Mobile Lite, you can use this profile to return Mobile Lite to its
default setting.
New Profile
To create a new profile, click on “New Profile”. A pop-up window will prompt
you to enter a profile name:
After entering a profile name, the profile scroll down bar will show the new
profile name:
After editing the settings, click “Save Profile”to save the profile settings. A
pop-up window will indicate the profile has saved. You can use this profile in
the future to apply the same setting to other Mobile Lite.
This manual suits for next models
2
Table of contents
Other Climax Personal Care Product manuals

Climax
Climax Vesta Series User manual

Climax
Climax Vesta Series Operating instructions

Climax
Climax SUPER 32-DT35A User manual

Climax
Climax Mobile Lite-R8 Slim Assembly instructions

Climax
Climax VCP-LTE User manual

Climax
Climax Mobile Pro Series Assembly instructions

Climax
Climax WTRVS User manual

Climax
Climax Vesta Series User manual