Cognivue Clarity User manual

User Manual
© 2021 COGNIVUE, INC. 7911 Rae Blvd | Victor, NY 14564 | 585.203.1969

Cognivue Clarity® User Manual
© 2021 Cognivue, Inc. UM-410-J Page 1
Contents
1.0 About Cognivue Clarity® ................................................................................................................... 3
2.0 Device Description ............................................................................................................................ 4
3.0 Recommendations for Use ............................................................................................................... 5
General Testing Location ................................................................................................................. 5
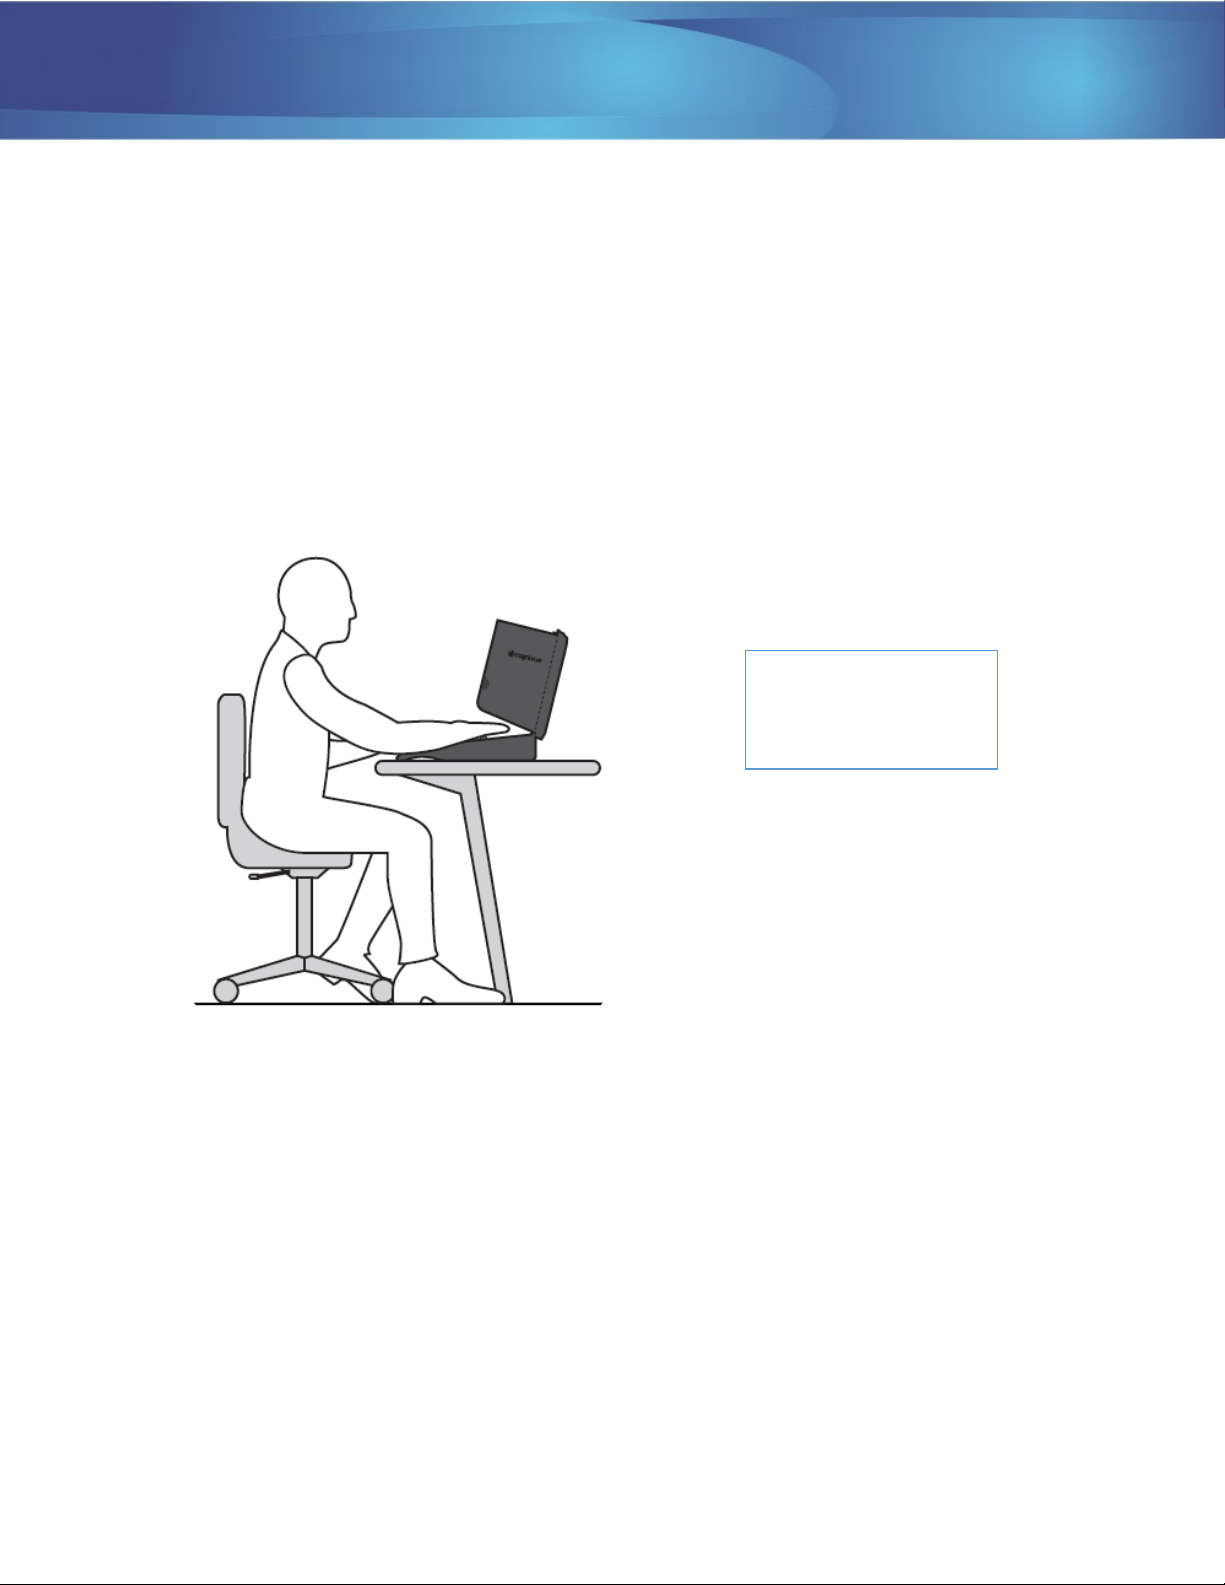
Positioning of Cognivue Clarity® and the Patient. ........................................................................... 5
Cleaning and Disinfecting Cognivue Clarity® ................................................................................... 5
Use of Personal Protective Equipment ............................................................................................ 6
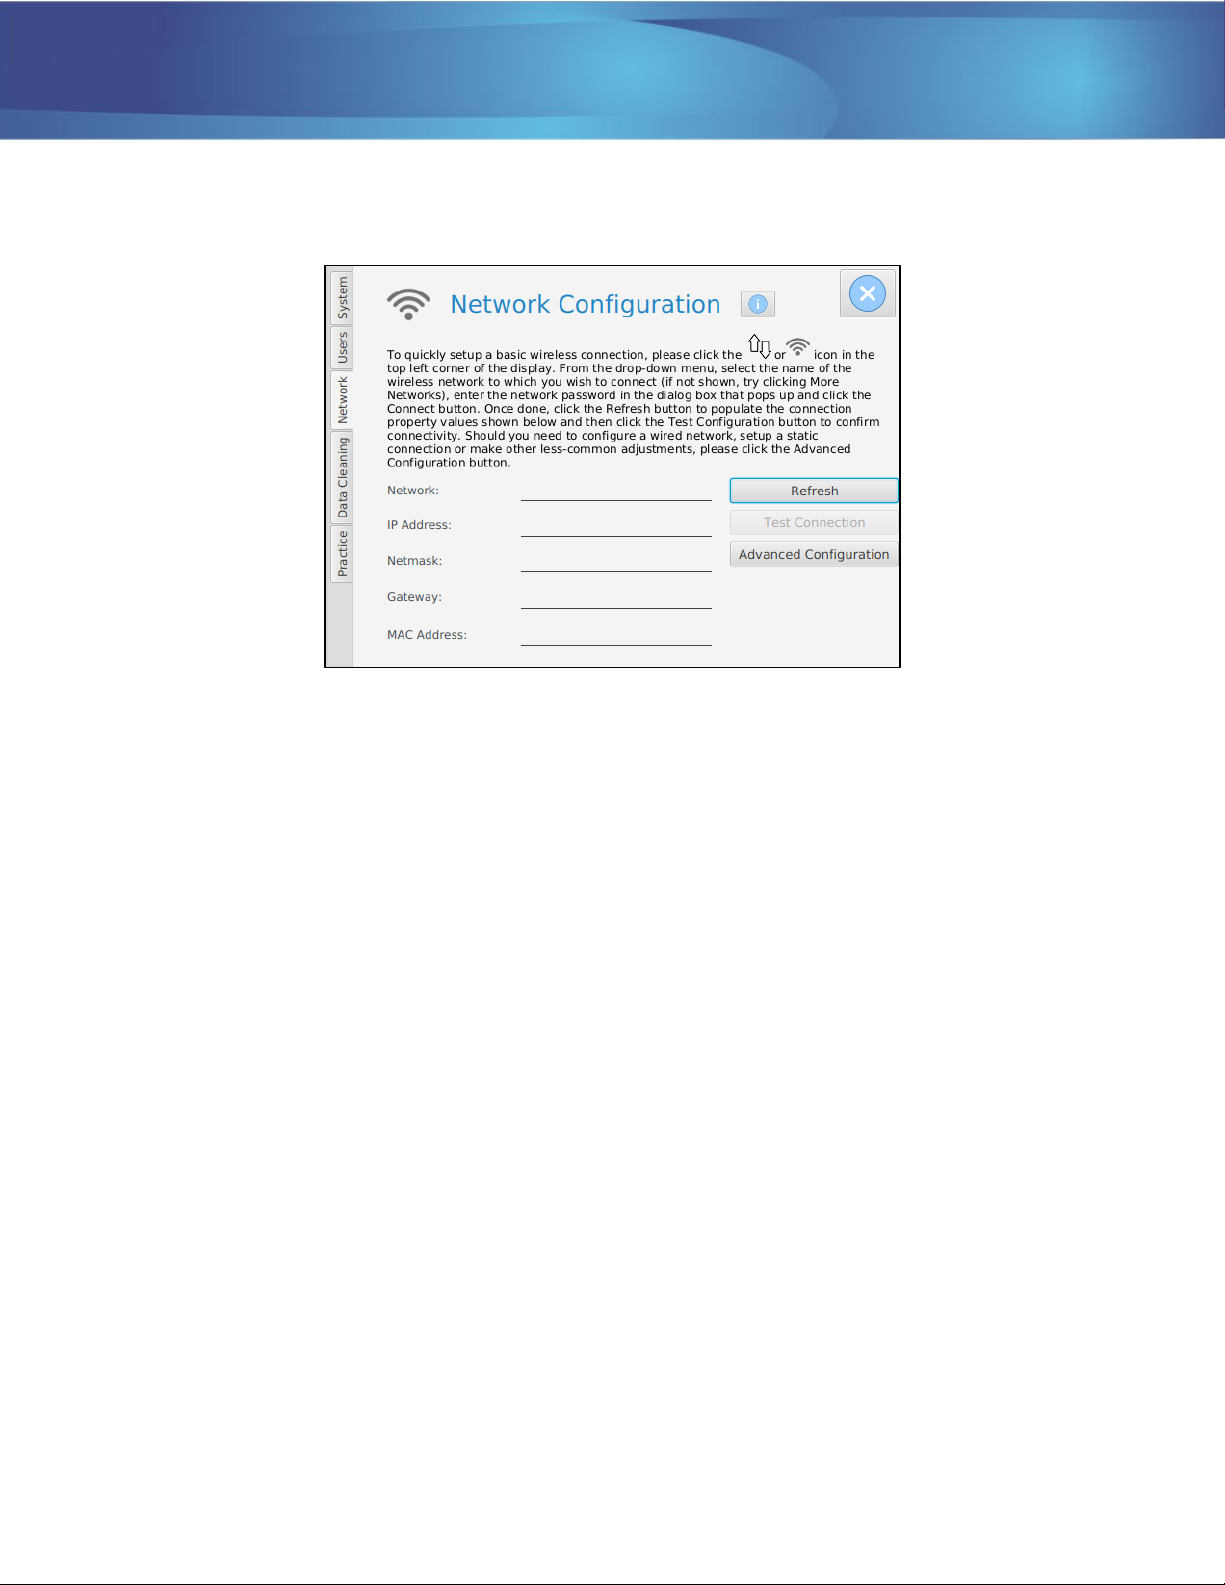
4.0 Network Connectivity ....................................................................................................................... 6
Basic Wi-Fi Configuration................................................................................................................. 6
Basic Wired Connection................................................................................................................... 7
Connection Details........................................................................................................................... 8
Advanced Configuration .................................................................................................................. 8
Static IP Address Configuration .................................................................................................. 8
5.0 Logging on to Cognivue Clarity® ..................................................................................................... 11
6.0 Managing User Accounts ................................................................................................................ 12
Creating User Accounts..................................................................................................................13
Modifying User Accounts...............................................................................................................13
Deleting User Accounts.................................................................................................................. 14
Password Expiration....................................................................................................................... 15
7.0 System Information.........................................................................................................................15
8.0 System Settings...............................................................................................................................16
Enable Report Emailing..................................................................................................................16
Disable Report Printing ..................................................................................................................16
Setting a Default Printer ...........................................................................................................16
Enable Force Intro Video ............................................................................................................... 17
9.0 Practice Information ....................................................................................................................... 18
10.0 Running a Test................................................................................................................................. 18
11.0 Video Volume Control..................................................................................................................... 19
12.0 Finding and Viewing Reports .......................................................................................................... 19
13.0 Printing Reports ..............................................................................................................................22
14.0 Emailing Reports .............................................................................................................................22
15.0 Removing Reports...........................................................................................................................23
16.0 Power Management .......................................................................................................................24
Screen Sleep................................................................................................................................... 24
Screen Wake ..................................................................................................................................24
Power Alert ....................................................................................................................................24

Cognivue Clarity® User Manual
© 2021 Cognivue, Inc. UM-410-J Page 2
17.0 Technical Specifications ..................................................................................................................24
18.0 Safety Precautions and Compliance ...............................................................................................25
About This Guide
This User Manual contains information that describes the installation and operation of
Cognivue Clarity®. Additional information can be found at www.cognivue.com.Cognivue
Support personnel can be reached from 9-5pm EST at 1-585-433-2992 or
support@cognivue.com.
UM-410-J Cognivue Clarity® User Manual, 02/2/2021
© 2020 Cognivue, Inc. | 7911 Rae Blvd | Victor, NY 14564 | 585.203.1969

Cognivue Clarity® User Manual
© 2021 Cognivue, Inc. UM-410-J Page 3
1.0 About Cognivue Clarity®
Cognivue Clarity® is a computerized cognitive assessment aid that objectively, quantitatively, and
reliably evaluates cognitive function. Upon completion of a series of 10 subtests, Cognivue Clarity®
creates a one-page easy-to-interpret patient report with a single clinical score of cognitive function and
a two-page physician report that includes the overall score, breakdown into key cognitive domains and
two key speed parameters. Using these reports, physicians are able to evaluate the patient’s cognitive
profile and decide on the proper course of action to improve patient care. If the score indicates the
patient does not have cognitive impairment, their overall and breakdown cognitive scores can be used
as a baseline for future comparison.
Cognivue Clarity® is indicated for use as an adjunctive tool for evaluating cognitive function. It is not a
stand-alone diagnostic tool. The device results are to be assessed and interpreted by a licensed
physician.
Warnings
1) Cognivue Clarity® does not identify the presence or absence of clinical diagnoses.
2) Cognivue Clarity® cannot be used as a stand-alone diagnostic.
3) Cognivue Clarity® is intended to be used in clinical settings.
Cognivue® scores ≤ 50 are consistent with being impaired (moderate to severe impairment), and scores
≥ 75 are consistent with being unimpaired (normal cognitive function) and scores between 51 and 74
are intermediate (low cognitive impairment). In the Cognivue® clinical validation study, 401 participants
completed ≥ 1 testing session, and 358 completed 2 sessions 1-2 weeks apart. The study showed that
SLUMS cut-off scores of < 21 (impairment) and > 26 (no impairment) corresponded to Cognivue® scores
of 54.5 (NPA = 0.92; PPA = 0.64) and 78.5 (NPA = 0.5; PPA = 0.79), respectively. Cognivue® classification
scores demonstrated good agreement with SLUMS scores (weighted κ 0.57; 95%CI: 0.50-0.63).
Reliability analyses showed similar scores across repeated testing for Cognivue® (R2 = 0.81; r = 0.90) and
SLUMS (R2 =0.67; r = 0.82).
Cognivue Clarity® has been validated with Cognivue Advanced® in a clinical trial with 31 subjects. The
correlation between Advanced and Clarity was very high positive (0.943) and Clarity’s test reliability
analysis was similar to Advanced (R2 = 0.859; r = 0.927)
Additional information is available in the following references:
•Cognivue Advanced De Novo Clearance, DEN130033
•Diego Cahn-Hidalgo, Paul W Estes, Reina Benabou, “Validity, reliability, and psychometric
properties of a computerized cognitive assessment test (Cognivue®),” World Journal of
Psychiatry 2020 January 19; 10(1): 1-11.

Cognivue Clarity® User Manual
© 2021 Cognivue, Inc. UM-410-J Page 4
2.0 Device Description
The Cognivue Clarity® is a portable, battery powered, and laptop-like device that includes a wireless
keyboard with a touchpad, a rotary CogniWheel® and a CogniCover®. The CogniWheel® is the sole
patient input device. The CogniCover® is designed for privacy and to reduce distraction and light
reflections on the computer screen. The CogniCover® and CogniWheel® are designed to fold for
portability.
CogniWheel
®
CogniCover
®
Battery Indicator Lights &
Headphone Jack
USB (for Keyboard)
Ethernet
Battery Charger
Power Button

Cognivue Clarity® User Manual
© 2021 Cognivue, Inc. UM-410-J Page 5
Avoid Distractions in the
Patient Viewing Area
Behind the Device
3.0 Recommendations for Use
To provide the best experience for patients and to produce repeatable test results, Cognivue
recommends the following when using Cognivue Clarity®.
General Testing Location
When possible, choose a test location that reduces distractions (for example, an exam room, office or
conference room rather than a busy hallway).
Positioning of Cognivue Clarity® and the Patient.
Put the device on a flat, stable surface that is ergonomically comfortable for the patient (see below).
The patient should be able to comfortably reach and manipulate the CogniWheel® and view the
computer screen. Avoid placing the Cognivue Clarity® in a location where there may be distractions
behind the device which are visible to the patient.
Do not place the device on the patient’s lap for the test. This does not provide a stable surface during
the administration of the test and may lead to the patient not being able to consistently use the
CogniWheel®.
Cleaning and Disinfecting Cognivue Clarity®
Cognivue recommends sanitizing the Cognivue Clarity® before and after administering a test using one
of the following procedures:
•Preferred: Use sanitizing or disinfectant wipes to thoroughly wipe the CogniWheel® and the
base of the device where the patient palm rests. Do NOT wipe the screen!
•In the event wipes are not available, sanitizing or disinfecting spray may be used as follows:
Spray twice onto a paper towel and thoroughly wipe the CogniWheel® and the base of the
device where the patient palm rests. Do NOT wipe the screen and do NOT spray sanitizer or
disinfectant directly onto the device!

Cognivue Clarity® User Manual
© 2021 Cognivue, Inc. UM-410-J Page 6
Use of Personal Protective Equipment
While Cognivue recommends sanitizing the device (see Cleaning and Disinfecting Cognivue Clarity®)
before and after administering a test, Cognivue also recommends that operators and patients wear a
disposable mask while interacting with the device. In the event it is not possible to sanitize the device
between patients, Cognivue recommends that operators and patients also use disposable gloves.
4.0 Network Connectivity
Network connectivity is essential to utilize the full capability of the Cognivue Clarity® device. Connecting
to a network will allow your facility to access reports from other computers within the same network. In
addition, Cognivue remotely provides regular software updates that enable new features, fix issues, and
ensure that the system configuration remains secure. These automatic software updates require
Cognivue Clarity® to be connected periodically through your network to Cognivue back-end services.
While it does not need to be connected to run a test, it should be regularly re-connected to a network,
ideally on a daily basis. Cognivue recommends that Clarity devices be connected to a network when
they are plugged into a power source for charging.
Basic Wi-Fi Configuration
To establish a basic network connection, click on the Network icon in the status bar at the upper left
corner of the screen. From the drop-down menu, select the available Wi-Fi network to which you wish
to connect. In this example, the network is “Cognivue”, but you will connect to your network with a
different name. If there is a large number of networks available, you may see a More networks option
which you can check if you do not see your network listed.
Network icon

Cognivue Clarity® User Manual
© 2021 Cognivue, Inc. UM-410-J Page 7
Upon selecting a network, you will be prompted to enter the Wi-Fi password for the selected network.
Wifi Authentication dialog
Upon entering a correct password and clicking the Connect button, the Cognivue Clarity® device will be
connected. Note that the icon in the top left has now changed to the Wi-Fi connection strength icon
indicating network connectivity.
Wi-Fi Connection Strength icon
The first time the device is connected to any network, it will be necessary to follow this procedure to
select the network and enter the credentials for that network. Once connected to a network, the device
will remember the credentials so that when moving from one previously-connected network to another,
it will be necessary to simply click the Network icon and select the desired network.
Basic Wired Connection
To establish a wired connection to a network, connect one end of a standard network cable to an active
network jack at your location and the other end into the RJ-45 network port on the back of the Cognivue
Clarity® device. Follow the same instructions as above, but this time select Wired Connection 1. The
icon in the top, left corner will now be the Network icon.

Cognivue Clarity® User Manual
© 2021 Cognivue, Inc. UM-410-J Page 8
Connection Details
When logged on to a Cognivue Clarity® device, administrators can view and test the current network
configuration information on the Network Configuration window.
Network Configuration window
To open the Network Configuration window, on the Primary window (see 5.0 Logging on to Cognivue
Clarity®) select Device Administration >> Settings and then click the Network tab. The Network
Configuration window contains network configuration properties and their values, as well as
instructions for setting up a basic connection as described above. To ensure the displayed connection
property values are current, click the Refresh button. If all the property values are blank, the device is
not connected and you will need to follow the instructions to establish a connection. Once there are
property values displayed, you can use the Test Connection button to confirm that the device has
network connectivity and is able to connect to the Cognivue back-end systems.
Advanced Configuration
When more advanced network configuration is required, an administrator can log on to the Cognivue
Clarity® device and open the Network Configuration window as described above. Generally, this more
advanced configuration will be done during a consultation with a network administrator and/or
Cognivue Support staff; however, one of the more common advanced configurations is described in the
following subsection.
Static IP Address Configuration
Click the Advanced Configuration button on the Network Configuration window.

Cognivue Clarity® User Manual
© 2021 Cognivue, Inc. UM-410-J Page 9
A Network Connections configuration wizard window will appear. Click on the connection named for
your SSID and then click the Gear icon.
Network Connections wizard
On the pop-up window that appears, click on the IPV4 Settings tab.
Network Configuration Editor
Gear icon

Cognivue Clarity® User Manual
© 2021 Cognivue, Inc. UM-410-J Page 10
Click the Method drop-down menu button and select Manual.
Network Configuration Editor
Now perform the following steps:
1. Click the Add button.
2. In the Address field enter your static or reserved IP (obtained from your network team).
3. In the Netmask field enter the Subnet mask (obtained from your network team).
4. In the Gateway field enter the default gateway address (obtained from your network team).
5. Click the Savebutton.
6. Close the Network Connections window and return to the Network Configuration window by
clicking the title bar menu icon and selecting Close from the drop-down menu.
Network Configuration Editor
Title bar menu icon

Cognivue Clarity® User Manual
© 2021 Cognivue, Inc. UM-410-J Page 11
On the Network Configuration window, click the Refresh button to display the new settings. Then
click the Test Connection button to confirm connectivity to the Cognivue back-end systems.
5.0 Logging on to Cognivue Clarity®
The user Login window is displayed when Cognivue Clarity® is powered on, after an operator completes
administration of a test, after a user clicks the Exit button on the Primary window, or after 30 minutes of
inactivity.
Login window
Any defined Administrator or Operator user (see 6.0 Managing User Accounts) on the specific device can
enter their username and password and click the Login button to log on to the device and see the
Primary window.
Primary window for Administrator users
Primary window for Operator users
The Shutdown button on the Login window can be used by anyone, whether or not a defined user, to
power down the device. Clicking the Shutdown button will display a Confirmation dialog. Clicking the
Cancel button returns the user to the Login window and clicking the OK button shuts down the device.

Cognivue Clarity® User Manual
© 2021 Cognivue, Inc. UM-410-J Page 12
Note: This is the preferred way to shut down the device. The physical power button should be used only
if absolutely necessary.
6.0 Managing User Accounts
Each Cognivue Clarity® user should have their own user account. User accounts can be assigned one of
two roles: Administrator or Operator. Administrators are responsible for setting up and managing
accounts, Operators can set up and run tests with patients. The table below summarizes the capabilities
associated with each type of user account.
Administrator
Operator
Setting up new accounts
X
Disabling accounts
X
Changing accounts
X
Configure network connection
X
X
Entering patient data & running a test
X
X
Running a test with an intro video
X
X
Viewing a test report
X
Role Capabilities table
User accounts must be managed directly on Cognivue Clarity®. After you log in as an Administrator, the
Primary window for Administrators (see 5.0 Logging on to Cognivue Clarity®) will be displayed. On the
menu bar, select Device Administration >> Settings. Select the Users tab to display the User
Management window.Note: the first time you log in, you will see only two accounts: The COGSUPPORT
account, which is for Cognivue support staff use, and the Administrator account defined during
Cognivue Clarity® installation and configuration.
User Management window
Add User button
Modify User button
Delete User button

Cognivue Clarity® User Manual
© 2021 Cognivue, Inc. UM-410-J Page 13
The User Management window lists all the user accounts that have been set up on the system and
allows for adding, modifying, and deleting user accounts. This window also allows you the option to set
a defined amount of time before passwords expire.
Creating User Accounts
Click on the Add User button to display the Create Account window.
Create Account window
Enter a valid Username and Password, then re-type it to Confirm Password. Enter the user’s First
Name, Last Name and Email address. Confirm Email by re-typing it, select the appropriate Role
(Operator or Administrator) for this user account, and finally click the Save button. A Confirmation
dialog will be presented and when the Yes button is clicked, the user account will be added to the
device. If there are any errors on the form, appropriate error messages will be displayed and you will be
given the opportunity to make corrections.

Cognivue Clarity® User Manual
© 2021 Cognivue, Inc. UM-410-J Page 14
Modifying User Accounts
To modify a user account, open the User Management window, select from the list the user account to
be modified and click the Modify User button.
Modify Account window
Make the desired changes, enter and confirm the account Password (or a new password), click the Save
button and click the Yes button on the Confirmation dialog to complete the changes.
Deleting User Accounts
From the User Management window, you can also delete user accounts by selecting from the list the
user account to delete and then clicking on the Delete User button. You will be presented with a
Confirmation dialog and when you click the Yes button, the account will be deleted and cannot be
recovered.
Note: Only accounts that have not been used to administer a test can be fully deleted. Those that have
been used to administer one or more tests will appear to be deleted, but will, in fact, only be disabled in
order to maintain traceability for all tests administered from that account. Once disabled, an account
cannot be re-enabled, nor can a new account be created with the same username.

Cognivue Clarity® User Manual
© 2021 Cognivue, Inc. UM-410-J Page 15
Delete User Confirmation dialog
Password Expiration
This feature is off by default. To enable/disable password expiration for all accounts, click the Enable
Password Expiration checkbox. When this feature is enabled, a password lifetime must be specified.
The default setting is 0 days which will require users to reset their password each time they log on to the
system. To specify a longer period, change the value in the Password Expires after box to the number
of days before a user must reset their password. Each time a user logs on the device within three days
of their password expiration date (determined based on the last time their password was reset) they will
be presented a warning message. Then, the first time they log onto the device on or after the password
has expired they will be forced to reset their password. Note: Operator user accounts can only reset
their own password once it has expired.
7.0 System Information
Basic system information about Cognivue Clarity® is available to any user on the About window
(accessed by clicking About >> About on the Primary window). The information displayed here will be
useful when contacting support.
About window

Cognivue Clarity® User Manual
© 2021 Cognivue, Inc. UM-410-J Page 16
8.0 System Settings
The Clarity device includes several configurable options. The ability to make these configuration
changes is available only to Administrator users on the System Settings window which is accessed from
the Primary window by clicking Device Administration >> Settings and selecting the System tab.
System Settings window
Enable Report Emailing
Sending a test report from Cognivue Clarity® to a patient via encrypted email following completion of a
test (see 14.0 Emailing Reports) is not enabled by default. An Administrator can enable this functionality
by clicking the Enable Report Emailing checkbox. When enabled, the option for the patient to receive a
copy of the test report via encrypted email will be provided on the Patient Information window (see
10.0 Running a Test). Note: This setting applies to all users of the device.
Disable Report Printing
Printing test reports from Cognivue Clarity® (see 13.0 Printing Reports) is enabled by default. An
Administrator can disable this functionality by clicking the Enable Report Printingcheckbox. When
enabled, a Print button will be displayed on the top navigation bar of the Report Viewer. Note: This
setting applies to all users of the device.
Setting a Default Printer
To set the default printer used to print reports, click the Printer icon next to the Network icon at the top
left of the screen to open the Printer Configuration window.

Cognivue Clarity® User Manual
© 2021 Cognivue, Inc. UM-410-J Page 17
Printer Configuration window
Press the Refresh button to discover network printers (please work with your IT team to connect your
printer to your network). Right click on the desired printer to open a drop-down menu and select the
Set as Default option. Select the Properties option from this same menu to adjust other printer settings
as desired. To close the Printer Configuration window, click the title bar menu icon and select Close
from the drop-down menu. Note: Any user of the device can set the default printer, whether or not
Report Printing is enabled; however, they can only print a report if the option is enabled.
Enable Force Intro Video
By default, the Cognivue Clarity® device is configured to provide the operator the option to run the test
with or without the introductory video. By enabling this feature, an Administrator can remove the
option to run the test without playing the video. This will remove the Run Test w/ Intro Video button
from the Patient Information window and change the functionality of the Run Test button to play the
introductory video before the test begins. To force Operators to always play the introductory video
before a test begins, an Administrator can check the Force Introduction Video checkbox.

Cognivue Clarity® User Manual
© 2021 Cognivue, Inc. UM-410-J Page 18
9.0 Practice Information
The contact information of the practice administering a Cognivue Clarity® test may be included on test
reports (see 12.0 Finding and Viewing Reports). The ability to configure this information is only available
to Administrator users on the Practice Information window. This window is accessible from the Primary
window by clicking Device Administration >> Settings and selecting the Practice tab. To enter practice
contact information to be displayed on reports, fill in all desired fields and press the Save button. All of
the fields displayed on this window are optional and may be omitted. To enable/disable this feature,
select the Include on report checkbox and press the Save button.
Practice Information window
10.0 Running a Test
To administer a test on Cognivue Clarity®, log on to the device using an Operator account. When the
Primary window (see 5.0 Logging on to Cognivue Clarity®) appears, click the Run a Test button. A
patient information window is displayed that allows the Operator to enter patient data and run a test.
Note: The test can be administered in two different languages: English or Spanish.
Patient Information window

Cognivue Clarity® User Manual
© 2021 Cognivue, Inc. UM-410-J Page 19
If enabled by an Administrator (see 8.0 System Settings), there is an option for emailing the report to the
patient. If that option is selected the Operator will be prompted to enter the patient’s email address
and then verify it by entering it a second time. Note: By checking this box, a patient is opting in to
receive email from Cognivue. For more detail on emailing patient reports see 14.0 Emailing Reports.
Patient Information window w/ Email Option
Once the required information is completed, the operator will have two options to initiate the Clarity
test: Run Test or Run Test w/ Intro Video. If the operator clicks the Run Test w/ Intro Video, the
patient will be prompted to turn the wheel to begin playing a short, four-minute video. This video will
play on the device in the language selected. The goal of this video is to prepare the patient for what to
expect during the test. At the completion of the video, or immediately after the operator clicks the Run
Test button, the patient will be prompted to turn the wheel to start the test.
When the test has completed, a new window will appear asking whether to display the test result
report. Only the Operator can respond to the prompt, as keyboard input is required. If the Report
Printing option is enabled and a default printer is configured (see 8.0 System Settings), the Operator will
be able to click a Print button on the report viewer header bar to print the report.
When finished viewing/printing the report, the Operator can click the Close Report button on the
header bar of the report viewer to close the report viewer and return to the Primary window.
11.0 Video Volume Control
In order to control the volume of video playback, the volume control keys on the keyboard can be used.
Volume Control keys
Note: The Mute button sets the volume to its lowest setting. To unmute, it is necessary to use the
volume-up key to increase the volume to the desired level.
12.0 Finding and Viewing Reports
When the test has completed, the Operator will have the option to review the test report. To review a
test report at a later time, log on to Cognivue Clarity® with an Administrator account, and select the
Other manuals for Clarity
3
Table of contents
Other Cognivue Diagnostic Equipment manuals
Popular Diagnostic Equipment manuals by other brands

Edwards
Edwards SIGA-MFT Installation sheet

Magneti Marelli
Magneti Marelli TPMS CONNECT EVO quick guide

HEINEMANN
HEINEMANN MODULA MINI user manual

Royal Enfield
Royal Enfield Himalayan owner's manual

Bully Dog
Bully Dog BIG RIG HEAVY DUTY GT installation manual

Hella Gutmann
Hella Gutmann macsRemote operating instructions