Cognivue Clarity User manual

User Manual
© 2021 COGNIVUE, INC. 7911 Rae Blvd | Victor, NY 14564 | 585.203.1969

Cognivue Clarity® User Manual
© 2021 Cognivue, Inc. UM-410-M Page 1
Contents
1.0 About Cognivue Clarity®......................................................................................................................3
1.1 Disclaimers.................................................................................................................................3
1.2 Clinical Reference Information ..................................................................................................3
2.0 Device Description .............................................................................................................................. 4
3.0 Power Management............................................................................................................................5
3.1 Indicator Lights...........................................................................................................................5
3.1 Screen Sleep...............................................................................................................................5
3.2 Screen Wake ..............................................................................................................................5
3.3 Power Alert ................................................................................................................................ 5
4.0 Recommendations for Use.................................................................................................................. 6
4.1 General Testing Location ...........................................................................................................6
4.2 Positioning of Cognivue Clarity® and the Patient ......................................................................6
4.3 Cleaning and Disinfecting Cognivue Clarity® .............................................................................6
4.4 Use of Personal Protective Equipment ......................................................................................7
5.0 Network Connectivity..........................................................................................................................7
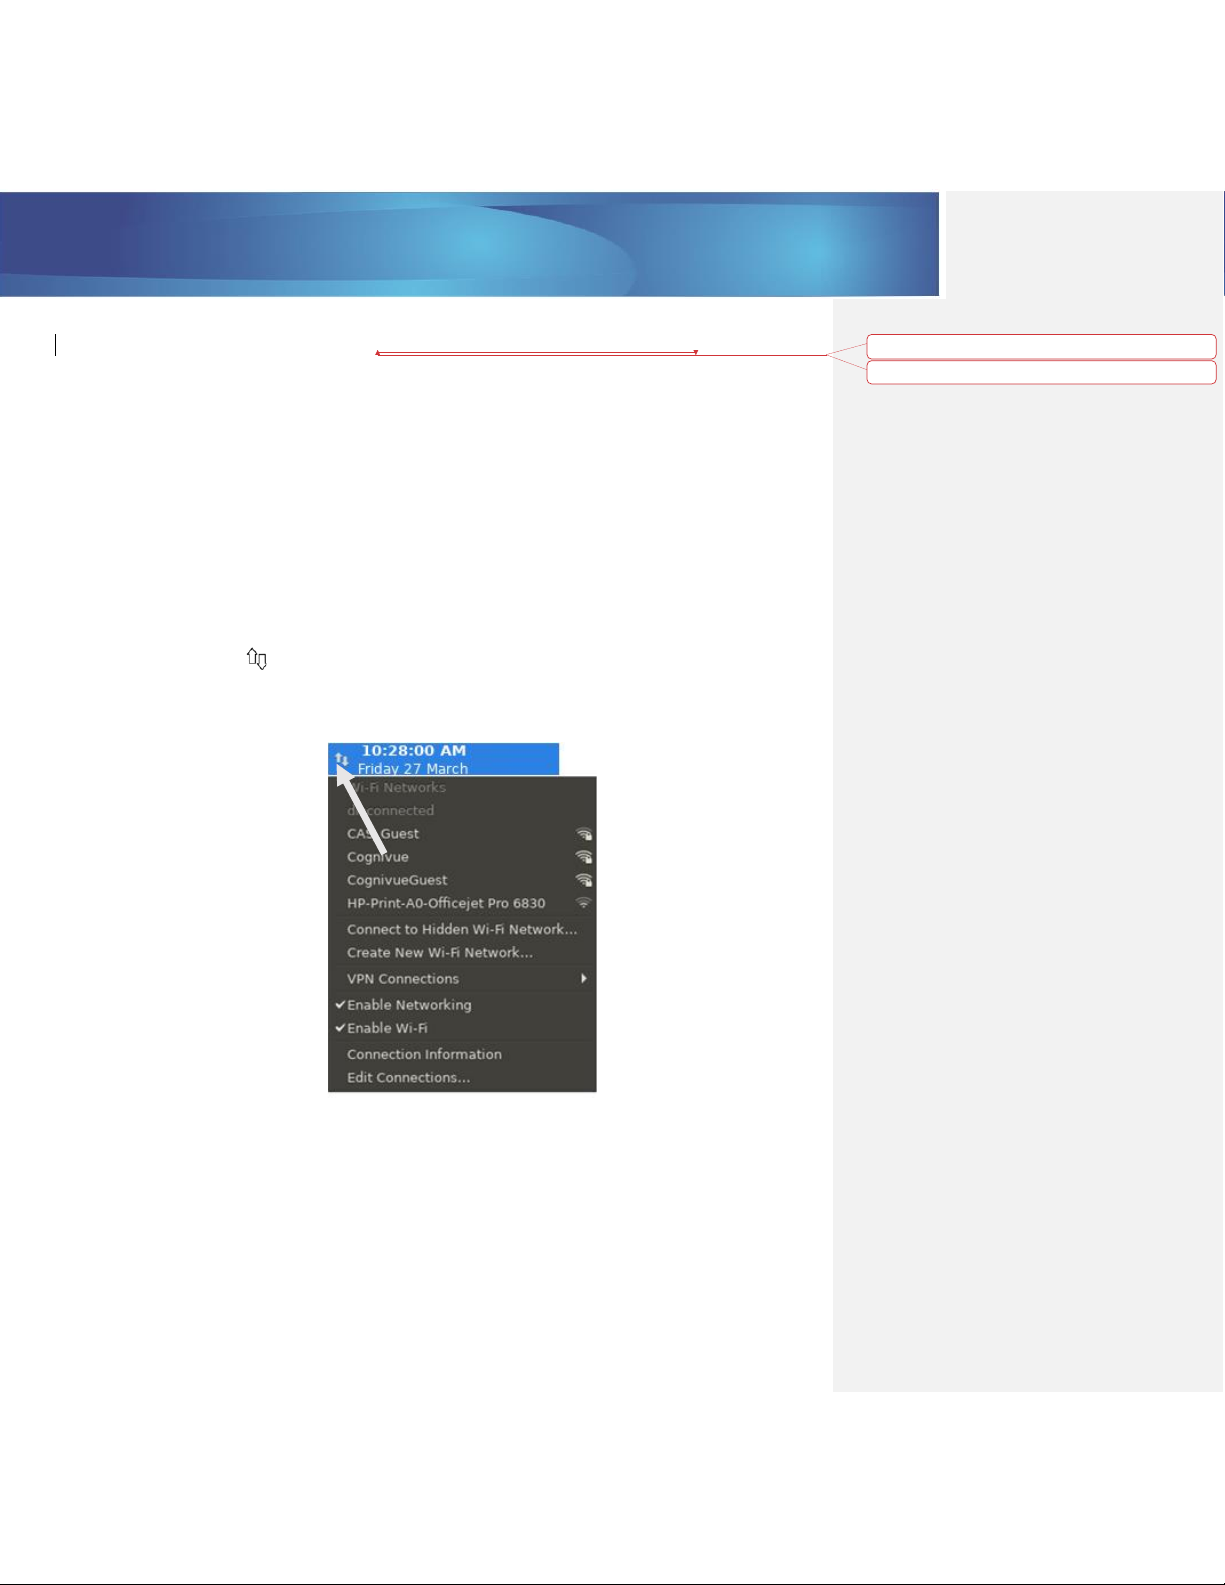
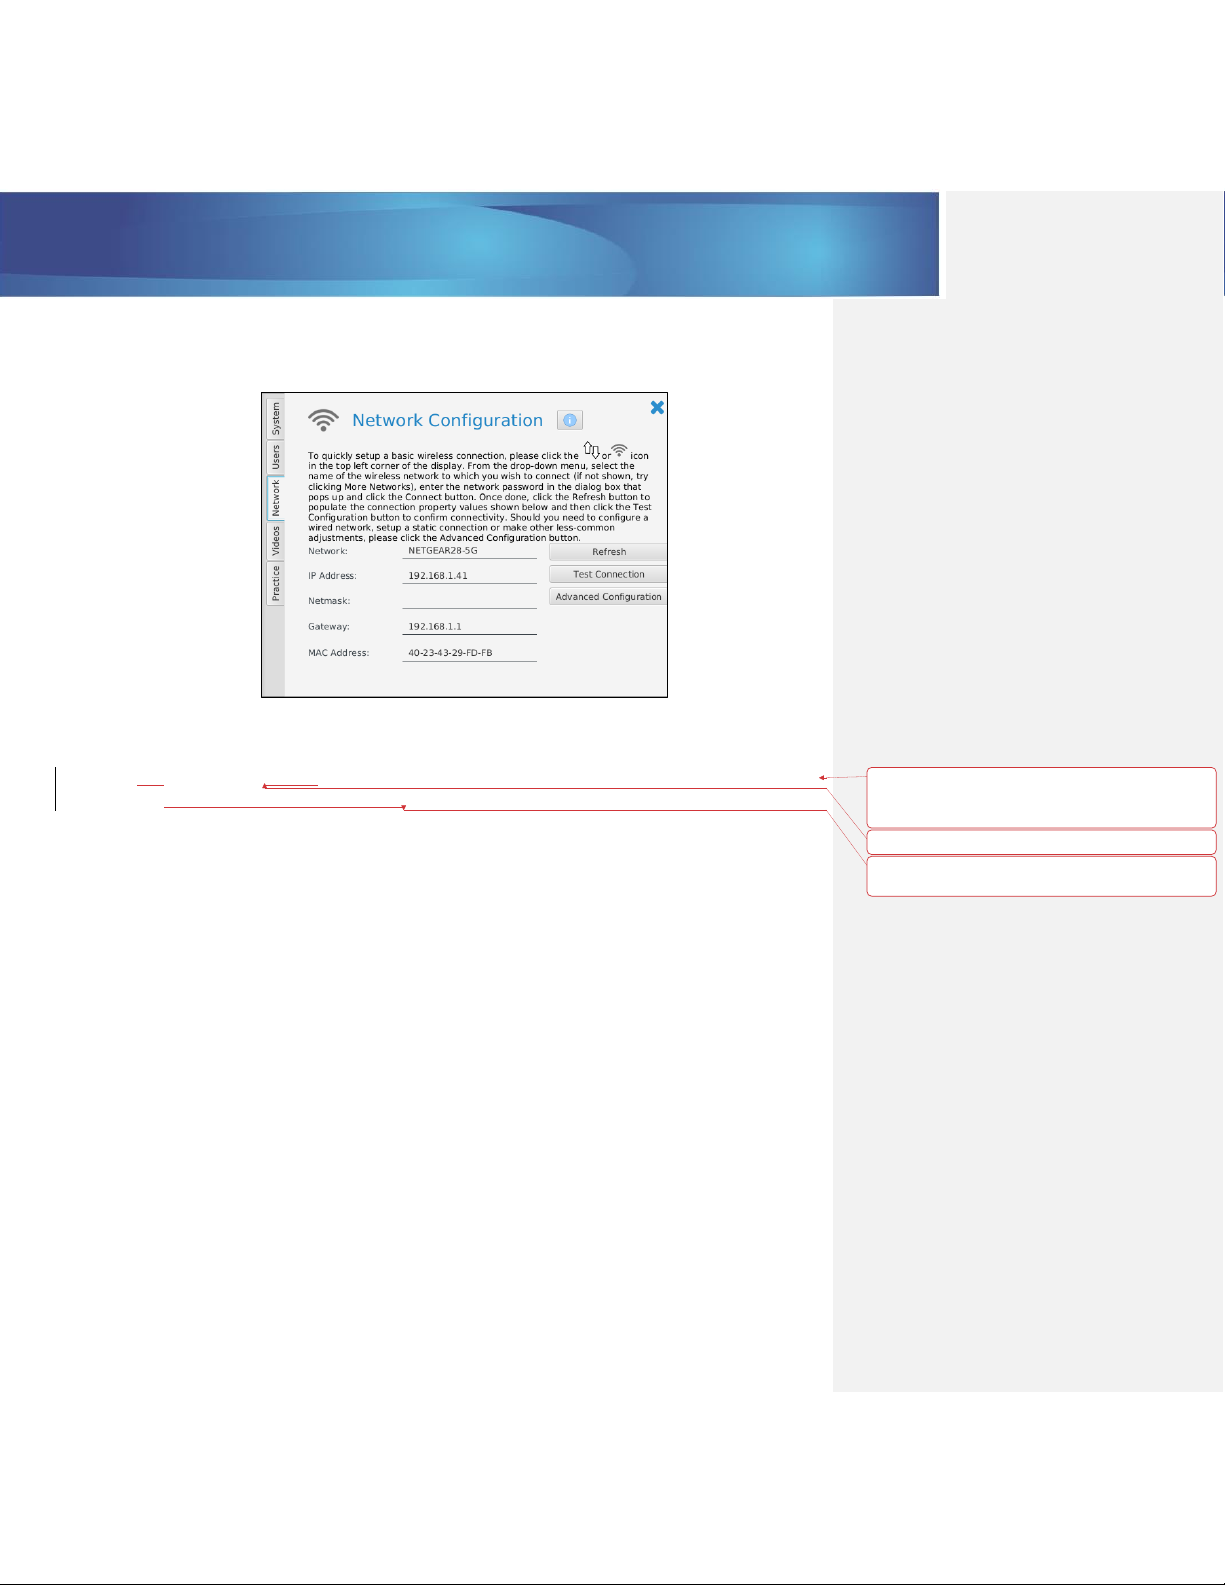
5.1 Basic Wi-Fi Configuration........................................................................................................... 7
5.2 Basic Wired Connection............................................................................................................. 8
5.3 Connection Details.....................................................................................................................9
5.4 Static IP Address Configuration..................................................................................................9
6.0 Security..............................................................................................................................................12
6.1 Logging on to Cognivue Clarity® .............................................................................................. 12
6.2 Auto Logout.............................................................................................................................. 12
6.3 A Note on Roles........................................................................................................................12
6.4 Shutting Down .........................................................................................................................13
7.0 Managing User Accounts ..................................................................................................................13
7.1 Administrators ......................................................................................................................... 13
7.2 Operators.................................................................................................................................13
7.3 A Very Special Account ............................................................................................................13
7.4 Managing User Accounts .........................................................................................................14
7.5 Creating User Accounts............................................................................................................15
7.6 Modifying User Accounts.........................................................................................................16
7.7 Changing Passwords ................................................................................................................16
7.8 Disabling User Accounts...........................................................................................................18
7.9 Password Expiration.................................................................................................................18
8.0 System Information...........................................................................................................................19
9.0 System Settings.................................................................................................................................19

Cognivue Clarity® User Manual
© 2021 Cognivue, Inc. UM-410-M Page 2
9.1 Report Emailing........................................................................................................................20
9.2 Report Printing.........................................................................................................................20
9.3 Video Options ..........................................................................................................................24
9.4 Practice Information ................................................................................................................25
10.0 Running a Test...................................................................................................................................26
11.0 Video Volume Control.......................................................................................................................28
12.0 Finding and Viewing Reports ............................................................................................................ 28
13.0 Printing Reports ................................................................................................................................ 32
Setting a Default Printer ...........................................................................................................32
14.0 Emailing Reports ...............................................................................................................................33
15.0 CSV Data Export ................................................................................................................................34
16.1 Initiating CSV Export...............................................................................................................34
16.0 Technical Specifications ....................................................................................................................35
17.0 Safety Precautions and Compliance..................................................................................................36
About This Guide
This User Manual contains information that describes the installation and operation of
Cognivue Clarity®. Additional information can be found at www.cognivue.com. Cognivue
Support personnel can be reached from 9-5 pm ET at 1-585-433-2992 or
UM-410-M Cognivue Clarity® User Manual, 09/10/2021
© 2021 Cognivue, Inc. | 7911 Rae Blvd | Victor, NY 14564 | 585.203.1969

Cognivue Clarity® User Manual
© 2021 Cognivue, Inc. UM-410-M Page 3
1.0 About Cognivue Clarity®
Cognivue Clarity® is a computerized cognitive assessment aid to evaluate cognitive function objectively,
quantitatively, and reliably. Cognivue Clarity® relies on a series of 10 subtests. Using the results from
these subtests, Cognivue Clarity® creates a short, easy-to-interpret patient report and an in-depth
physician report. The patient report shows a single score for cognitive function. The physician report
shows the overall score, a breakdown into key cognitive domains, and two key speed parameters. These
cognitive scores provide a baseline for future comparison and help the physician evaluate the patient’s
cognitive profile and decide on the proper course of action to improve patient care.
1.1 Disclaimers
Cognivue Clarity® is indicated for use as an adjunctive tool for evaluating cognitive function. It is not a
stand-alone diagnostic tool. The device results are to be assessed and interpreted by a licensed clinician.
Warnings
1) Cognivue Clarity® does not identify the presence or absence of clinical diagnoses.
2) Cognivue Clarity® cannot be used as a stand-alone diagnostic.
3) Cognivue Clarity® is intended to be used in clinical professional offices or similar settings.
1.2 Clinical Reference Information
Cognivue® scores ≤ 50 are consistent with being impaired (moderate to severe impairment), and scores
≥ 75 are consistent with being unimpaired (normal cognitive function) and scores between 51 and 74
are intermediate (low cognitive impairment). In the Cognivue® clinical validation study, 401 participants
completed ≥ 1 testing session, and 358 completed 2 sessions 1-2 weeks apart. The study showed that
SLUMS cut-off scores of < 21 (impairment) and > 26 (no impairment) corresponded to Cognivue® scores
of 54.5 (NPA = 0.92; PPA = 0.64) and 78.5 (NPA = 0.5; PPA = 0.79), respectively. Cognivue® classification
scores demonstrated good agreement with SLUMS scores (weighted κ 0.57; 95%CI: 0.50-0.63).
Reliability analyses showed similar scores across repeated testing for Cognivue® (R2 = 0.81; r = 0.90) and
SLUMS (R2 =0.67; r = 0.82).
Cognivue Clarity® has been validated with Cognivue Advanced® in a clinical trial with 31 subjects. The
correlation between Advanced and Clarity was very high positive (0.943), and Clarity’s test reliability
analysis was similar to Advanced (R2 = 0.859; r = 0.927)
Additional information is available in the following references:
•Cognivue Advanced De Novo Clearance, DEN130033
•Diego Cahn-Hidalgo, Paul W Estes, Reina Benabou, “Validity, reliability, and psychometric
properties of a computerized cognitive assessment test (Cognivue®),”World Journal of
Psychiatry 2020 January 19; 10(1): 1-11.

Cognivue Clarity® User Manual
© 2021 Cognivue, Inc. UM-410-M Page 4
2.0 Device Description
The Cognivue Clarity® is a portable, battery-powered, laptop-like device that includes a wireless
keyboard with a touchpad, a rotary CogniWheel®, and a CogniCover®. The CogniWheel® is the sole
patient input device. The CogniCover® is designed for privacy and to reduce distraction and light
reflections on the computer screen. The CogniCover® and CogniWheel® are designed to fold for
portability.
CogniWheel®
CogniCover®
Battery Indicator Lights &
Headphone Jack
USB (for Keyboard)
Ethernet
Battery Charger
Power Button
CogniWheel®
Figure 2.1
Figure 2.2
Figure 2.3

Cognivue Clarity® User Manual
© 2021 Cognivue, Inc. UM-410-M Page 5
3.0 Power Management
The Cognivue Clarity®, much like a laptop, is designed to be battery-powered during regular use but can
also be used when the provided charging adapter is plugged in.
The battery sustains 4 hours of intensive, off charger usage but can last for over 8 hours typical usage.
The battery recharges in approximately 4 hours if depleted completely.
3.1 Indicator Lights
There are two indicator lights on the right side of the device (see Figure 2.2).
Left Light
Right Light
Device is unpowered
Off
Off
Device is discharging
Orange
Off
Device is charging
Green/Off
Orange
Plugged in and fully charged
Green/Off
Green
3.1 Screen Sleep
When the Cognivue device is not in use for a period of 10 minutes, the screen will go into sleep mode.
3.2 Screen Wake
When the screen is asleep, it can be awakened by pressing a key on the keyboard.
3.3 Power Alert
When the device is low on battery charge and not plugged in, if an attempt is made to start a testing
session, i.e., upon clicking the Run a Test button on the main screen, it will display an alert and not allow
the testing session to begin. Plugging in the device will allow tests to be administered. In order to avoid
running out of power during a test, please charge the device for at least one hour before again
administering tests on battery power.

Cognivue Clarity® User Manual
© 2021 Cognivue, Inc. UM-410-M Page 6
Avoid Distractions in the
Patient Viewing Area
Behind the Device
4.0 Recommendations for Use
To provide the best experience for patients and to produce repeatable test results, Cognivue
recommends the following when using Cognivue Clarity®.
4.1 General Testing Location
When possible, choose a test location that reduces distractions (for example: an exam room, office, or
conference room rather than a busy hallway).
4.2 Positioning of Cognivue Clarity® and the Patient
Put the device on a flat, stable surface that is ergonomically comfortable for the patient (see below). The
patient should be able to comfortably reach and manipulate the CogniWheel® and view the computer
screen. Avoid placing the Cognivue Clarity® in a location where there may be distractions behind the
device which are visible to the patient.
DO NOT place the device on the patient’s lap for the test. This does not provide a stable surface during
the administration of the test. This interferes with a patient’s ability to take the test.
4.3 Cleaning and Disinfecting Cognivue Clarity®
Cognivue recommends sanitizing the Cognivue Clarity® before and after administering a test using one
of the following procedures:
•Preferred: Use sanitizing or disinfectant wipes to thoroughly wipe the CogniWheel® and the
base of the device where the patient palm rests. DO NOT wipe the screen!
•Please turn the power off on the Cognivue Keyboard using the appropriate slider switch prior to
cleaning/transport; this prevents unintentional keypress combinations on the device.
•In the event wipes are not available, spray a sanitizer onto a paper towel, being careful not to
oversaturate the paper towel, and thoroughly wipe the CogniWheel® and the base of the device
where the patient palm rests. DO NOT wipe the screen, and do NOT spray sanitizer or
disinfectant directly onto the device!
Figure 4.1

Cognivue Clarity® User Manual
© 2021 Cognivue, Inc. UM-410-M Page 7
4.4 Use of Personal Protective Equipment
In addition to sanitizing the device (see 4.3 Cleaning and Disinfecting Cognivue Clarity®), Cognivue
recommends that operators and patients wear a disposable mask while interacting with the device. In
the event that it is not possible to sanitize the device between patients, Cognivue recommends
operators and patients use disposable gloves.
5.0 Network Connectivity
Network connectivity is essential to utilize the full capability of the Cognivue Clarity® device.
Connecting to a network allows
•Access to the reporting share from other computers within the same network
•Updates and enhancements from Cognivue
•Staying secure with the latest security patches
5.1 Basic Wi-Fi Configuration
1. Click on the Network icon in the status bar at the upper left corner of the screen
2. From the drop-down menu, select the available Wi-Fi network to which you wish to connect
a. If there are a large number of networks available, you may see a More networks option
which you can check if you do not see your network listed.
Network icon
Figure 5.1
Formatted: Font: Italic
Deleted: 4.3 Cleaning and Disinfecting Cognivue Clarity®

Cognivue Clarity® User Manual
© 2021 Cognivue, Inc. UM-410-M Page 8
3. Enter the Wi-Fi password for the selected network
Wi-Fi Authentication dialog
4. Click Connect
5. Connection can take a few seconds. A successful connection is indicated by when the network
icon in the top left changes to the Wi-Fi connection strength icon indicating network
connectivity.
Wi-Fi Connection Strength icon
In the future the device will remember the network and automatically connect when possible.
5.2 Basic Wired Connection
1. Connect one end of a standard network cable to an active network jack at your location
2. Connect the other end to the network port on the back of the Cognivue Clarity® device (see
figure 2.2).
3. If not automatically connected, follow the instructions above, selecting Wired Connection 1.
4. Success is indicated when the icon in the top left corner is the Network icon.
Figure 5.2
Figure 5.3

Cognivue Clarity® User Manual
© 2021 Cognivue, Inc. UM-410-M Page 9
5.3 Connection Details
When logged on to a Cognivue Clarity® device, administrators can view and test the current network
configuration information on the Network Configuration window.
Network Configuration window
To open the Network Configuration window
1. Log in (see 6.1 Security
2. 6.1 Logging on to Cognivue Clarity®)
3. Select Device Administration >> Settings
4. Click the Network tab
The Network Configuration window contains network configuration properties and their values
•The Refresh button refreshes the displayed connection property values
•If all the property values are blank after pressing the Refresh button, the device is not connected
•The Test Connection button confirms that the device has network connectivity
•The Advanced Configuration button opens settings for more advanced networking options
Advanced Configuration is intended for use by network administrators and/or Cognivue Support Staff.
The most common usage of this functionality is outlined in 5.4 Static IP Address Configuration.
5.4 Static IP Address Configuration
Open the Advanced Configuration screen by clicking the Advanced Configuration button on the
Network Configuration screen (See 5.3 Connection Details).
Figure 5.3
Formatted: List Paragraph, Numbered + Level: 1 +
Numbering Style: 1, 2, 3, …+ Start at: 1 + Alignment:
Left + Aligned at: 0.25" + Indent at: 0.5"
Formatted: Font: Italic
Deleted: Security
6.1 Logging on to Cognivue Clarity®

Cognivue Clarity® User Manual
© 2021 Cognivue, Inc. UM-410-M Page 10
1. Click on the connection named for your SSID
2. Click the Gear icon.
Network Connections wizard
3. On the pop-up window that appears, click on the IPV4 Settings tab.
Network Configuration Editor
Gear icon

Cognivue Clarity® User Manual
© 2021 Cognivue, Inc. UM-410-M Page 11
4. Click the Method drop-down-menu button and select Manual.
Network Configuration Editor
5. Click the Add button.
6. In the Address field, enter your static or reserved IP (obtained from your network team).
7. In the Netmask field, enter the Subnet mask (obtained from your network team).
8. In the Gateway field, enter the default gateway address (obtained from your network team).
9. Click the Save button.
10. Close the Network Connections window and return to the Network Configuration window by
clicking the title bar menu icon and selecting Close from the drop-down menu.
Network Configuration Editor
Title bar menu icon

Cognivue Clarity® User Manual
© 2021 Cognivue, Inc. UM-410-M Page 12
11. On the Network Configuration window, click the Refresh button to display the new settings
12. Then click the Test Connection button to confirm connectivity to the Cognivue back-end
systems
6.0 Security
6.1 Logging on to Cognivue Clarity®
The user Login window is how you log in to a device.
It is how you log in to the device. Logging in with a unique account ensures an audit trail for viewing
patient reports and running assessments.
Login window
6.2 Auto Logout
To allow compliance with HIPAA regulations, the device will be logged out after 30 minutes of inactivity.
6.3 A Note on Roles
Administrators see an extra button to allow reviewing reports. Operator users do not see this since they
cannot view old reports (See 7.04 Managing User Accounts for more details).
Primary window for Administrator users
Formatted: Font: Italic
Deleted: Managing User Accounts

Cognivue Clarity® User Manual
© 2021 Cognivue, Inc. UM-410-M Page 13
Primary window for Operator users
6.4 Shutting Down
The Shutdown button appears on the Login window can be used by anyone to power down the device.
Clicking the Shutdown button will prompt confirmation before shutting down the device.
Note: This is the preferred way to shut down the device. The physical power button should be used only
if necessary.
7.0 Managing User Accounts
Each Cognivue Clarity® user should have their own user account to ensure audit trail and safety of
patient data.
User accounts can be assigned as an Administrator or Operator.
The table below summarizes the capabilities associated with each type of user account.
Administrator
Operator
Setting up new accounts
X
Delete accounts
X
Changing accounts
X
Configure network connection
X
X
Entering patient data & running a test
X
X
Running a test with an intro video
X
X
Viewing past test reports
X
Role Capabilities table
7.1 Administrators
Administrators are responsible for setting up and managing other user accounts.
Additionally, they can run tests and review reports.
7.2 Operators
Operators can set up and run tests with patients.
7.3 A Very Special Account
The CogSupport account is a special account to allow help the Cognivue support team when on-site. As
with other accounts, it is audited.

Cognivue Clarity® User Manual
© 2021 Cognivue, Inc. UM-410-M Page 14
7.4 Managing User Accounts
User accounts must be managed directly on the Cognivue Clarity® device.
To reach the user management screen
1. Log in as an Administrator user (like the one created during device Configuration, See
Installation Guide)
2. On the menu bar, select Device Administration >> Settings.
3. Select the Users tab
4. This is the User Management screen
*Note: the first time you log in, you will see only two accounts: The COGSUPPORT account and the
Administrator account defined during Cognivue Clarity® installation and configuration.
User Management window
The User Management screen lists all the active user accounts that have been set up on the system and
allows for adding, modifying, and deleting user accounts.
This screen also allows the option to set a defined amount of time before passwords expire.
Commented [NP1]: update image

Cognivue Clarity® User Manual
© 2021 Cognivue, Inc. UM-410-M Page 15
7.5 Creating User Accounts
1. Click on the Add User button to display the Create Account window.
Create Account window
2. Fill out form
3. Click Save
4. Click Yes to confirm when prompted
5. Error messages will prevent saving if there are any issues with the entered data
6. Click the blue ‘X’ in the upper right when finished entering users

Cognivue Clarity® User Manual
© 2021 Cognivue, Inc. UM-410-M Page 16
7.6 Modifying User Accounts
1. Click on a user in the list
2. Click the Modify User button
Modify Account window
3. Make the desired changes
4. Click the Save button
7. Click the Yesbutton on the Confirmation dialog to complete the changes.
8. Error messages will prevent saving if there are any issues with the entered data
9. Click the blue ‘X’ in the upper right when finished
7.7Changing Passwords
1. Click on a user in the list
2. Click the Edit button

Cognivue Clarity® User Manual
© 2021 Cognivue, Inc. UM-410-M Page 17
Modify Account window
3. Click the Set Password button
4. Click the Save button
5. Click the Yes button on the Confirmation dialog to complete the changes.
6. Error messages will prevent saving if there are any issues with the entered data
7. Close the User Modification Screen

Cognivue Clarity® User Manual
© 2021 Cognivue, Inc. UM-410-M Page 18
7.8 Disabling User Accounts
To maintain an audit trail, User Accounts cannot be fully removed from the system. Disabling prevents
the user from logging in. Disabled accounts can be reactivated in the future.
1. Click on a user in the list
2. Click the Disable User button
3. Click to Yes to confirm when prompted
Disable User Confirmation dialog
7.9 Password Expiration
Some organizations have password change policies. To enable this, Cognivue provides the ability to
expire user passwords. This feature is off by default and when turned on, is on for all accounts.
Users are warned about password expiration for three days before it expires. Once expired, the user will
be forced to change their passwords before they can log in.
To enable/disable password expiration for all accounts:
1. Click the Enable Password Expiration checkbox
2. When this feature is enabled, a password lifetime must be specified
3. Enter a number of days in the text field labeled Password Expires after
4. The default setting is 0 days which will require users to reset their password each time they log
in
Note: Currently, operator user accounts can only reset their own password once it has expired.

Cognivue Clarity® User Manual
© 2021 Cognivue, Inc. UM-410-M Page 19
8.0 System Information
Basic system information about Cognivue Clarity® is available to any logged-in user in the About window
(accessed by clicking About >> About on the Primary window). The information displayed here will be
useful when contacting support.
About window
9.0 System Settings
The Clarity device includes several configurable options. The ability to make these configuration changes
is available only to Administrator users on the System Settings screen
To access the System Settings screen
1. Log in as an Administrator user (like the once created during device Configuration, See
Installation Guide)
2. On the menu bar, select Device Administration >> Settings
System Settings window
Other manuals for Clarity
3
Table of contents
Other Cognivue Diagnostic Equipment manuals
Popular Diagnostic Equipment manuals by other brands

AJS Motorcycles
AJS Motorcycles DN-3000 manual

Maico
Maico touchTymp MI 26 Operation manual

TESTO
TESTO 0638.1445 Handling instructions

ADC
ADC 2.5V EENT Instruments Instructions for use

Mitchell Diagnostics
Mitchell Diagnostics MD-350 quick start guide

Daikin
Daikin Service Checker TYPE 3.1 instruction manual