Coltene PerFect TCS II User manual

PerFect® TCS II
Tissue Contouring
System
Owner’s Guide
Benutzerhandbuch
Mode d'emploi
Manual de usuario
Manuale di istruzioni per l'uso
Gebruikshandleiding
Bruksanvisning
Brugervejledning
Käyttöohje
Brukerhåndbok
Manual do Utilizador
√‰ËÁ›Â˜ ÃÚ‹Ûˆ˜


Owner’s Guide 3
Table of Contents
1. Introducing PerFect Tissue Contouring System
How does monopolar electrosurgery work? ......................4
2. Preparing PerFect TCS II for use
Unpacking and setting up the unit....................................4
Activating the unit............................................................4
Preoperative practice ........................................................5
Cutting practice ...............................................................5
Coagulation practice ........................................................5
General principles of electrosurgery technique ..................5
Placement of equipment...................................................5
The dispersive electrode....................................................5
The cutting stroke ............................................................5
3. Clinical Guide to PerFect TCS II
Bleeding control...............................................................6
Access to caries................................................................6
Gingival contouring: Creating a gingival trough ................6
Gingival contouring: Removing redundant tissue...............6
Gingival contouring: Aesthetic contouring ........................7
4. Technical Information
PerFect TCS II Electrosurge................................................7
General............................................................................7
Classification....................................................................7
Electrical ..........................................................................7
Transport and storage conditions......................................7
Operational ambient conditions........................................7
5. Special Notes and Precautions
Maintenance and service ..................................................7
Sterilizing electrode sheaths..............................................7
Cleaning unit and handpiece cord ....................................8
Electrosurge Analyzer .......................................................8
Anesthesia .......................................................................9
Control of odor and viral plume........................................9
Product markings .............................................................9
Accessories ....................................................................10
Bibliography.................................................................101
6. Figures
Figure 1 – Figure 8 .......................................................102
Figure 9 – Figure 14......................................................103

4PerFect®TCS II Tissue Contouring System
1. Introducing PerFect Tissue Contouring
System
Few technologies have a potential equal to that of electrosurgery
for enhancing the efficiency and improving the results of soft tissue
management. With a reasonable investment of time to acquire the
necessary skills, electrosurgery can pay considerable dividends to
both practitioner and patient.
With this in mind, Coltène/Whaledent has developed the PerFect
Tissue Contouring System — an advanced, affordable monopolar
electrosurge designed to appeal to both the new and experienced
user of electrosurgery. PerFect TCS II can simplify and enhance the
results of a variety of everyday procedures performed by virtually
every dentist, including the control of bleeding, gaining access to
caries and aesthetic contouring of gingiva.
How does monopolar electrosurgery work?
Electrosurgery is a proven technology that has been used for many
years in both dentistry and medicine. It uses radio-frequency (RF)
energy, similar to that used in radio broadcasting, to volatilize,
cut and coagulate soft tissue. The radio-frequency energy used
by PerFect TCS II is able to sever and coagulate tissue because it
focuses the heat energy at the small, active electrode. While the
active electrode remains cold, sufficient heat energy is generated in
its path to sever and coagulate effectively.
The high frequency energy focused at the active electrode returns
to the electrosurge through the large dispersive electrode, which
is placed on the back of the dental chair against the patient’s
back during use. The dispersive electrode provides an efficient and
predictable completion of the energy path.
Depending on the intended use, the energy output of an electrosurge
may be either partially or fully rectified. A fully rectified output is
appropriate for cutting, while coagulation is best achieved with a
partially rectified output. For these reasons, PerFect TCS II has two
output modes: “Cut’’ and “Coag.’’ The intensity of these modes can
be adjusted by the operator as required.
Cutting with the scalpel crushes and cleaves tissue. Electrosurgical
cutting volatilizes tissue in the path of the electrode. When the power
output is adjusted properly, the electrode cuts without resistance,
permitting an extraordinary degree of control and precision.
2. Preparing PerFect TCS II for use
Unpacking and setting up the unit
Remove PerFect TCS II from the shipping carton and inspect for
possible damage during shipping. Check the serial number of the
unit (Figure 2) against the serial number on the shipping carton
to make sure they agree (if they don’t agree, contact your dealer).
Fill out the warranty card and mail to Coltène/Whaledent within 10
days of receipt.
See Figures 1 and 2 and follow the steps below to prepare your
PerFect TCS II for operation. The unit and accessories are pictured
in Figure 3.
• Before connecting the unit to the AC power supply, check
that the Coag/Cut output intensity control is set at the center
(“0”) position and that the power switch is in the “Off”
(“O”) position.
This product has been manufactured with an IEC 320 power cord
inlet connector using a detachable cordset (line cord) to plug in at
the rear of the unit. Please be sure to plug the cordset into the inlet
connector before the next step.
• Plug the line cord plug into a three-wire grounded AC
power outlet.
• Plug the handpiece cable BNC connector into the handpiece
jack on the right side of the unit.
• The handpiece holder can be placed on either side of the unit
by snapping it into the placement grooves under the side lip
of the unit. Once the handpiece holder is attached, it cannot
be removed.
• This unit performs monopolar electrosurgery. A dispersive
electrode must be placed against the patient’s back to provide
a safe return path for the high frequency current.
• Insert the dispersive electrode cable plug into the dispersive
electrode jack on the right side of the unit.
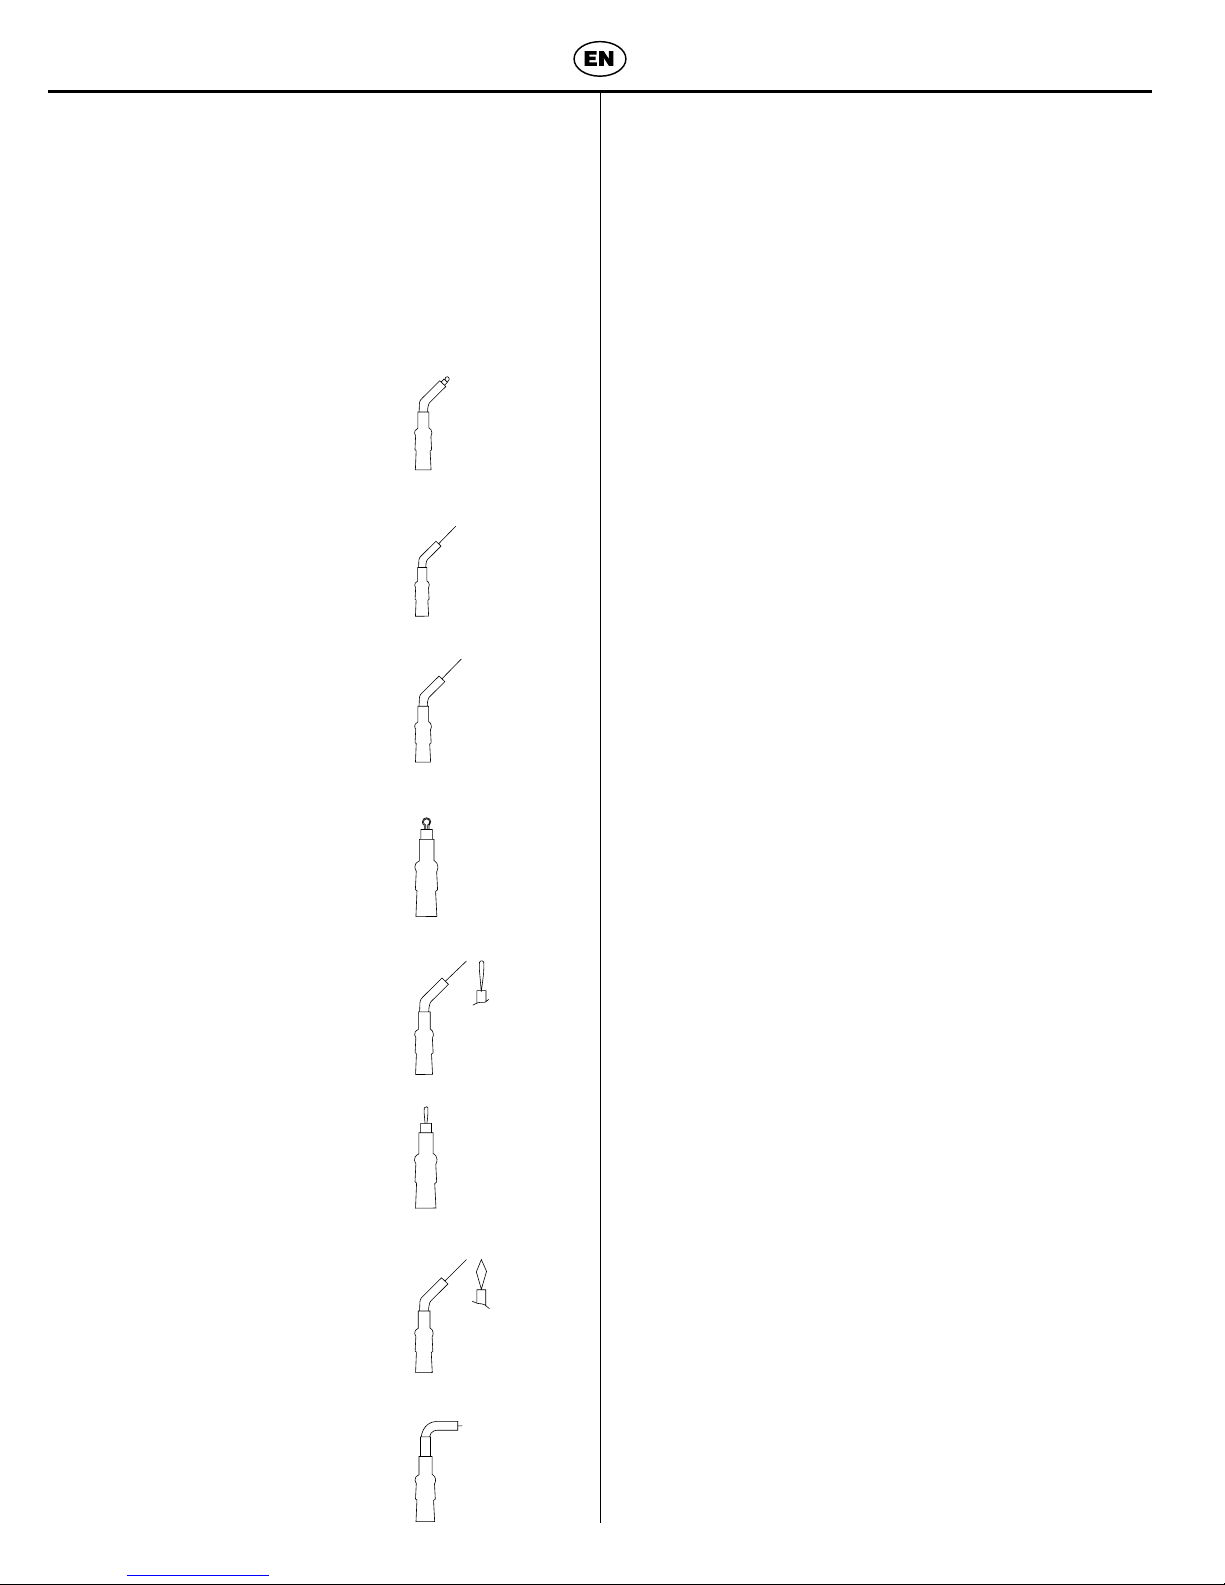
• Select one of the three electrode sheaths supplied with the
unit (Straight Knife, Long Loop, or Coag Ball). To assemble the
handpiece, hold the swivel connector and thread the electrode
into the handpiece cord assembly. To disassemble, simply
reverse rotations.
CAUTION: Electrode sheaths must be sterilized before use.
(See sterilization section.)
Activating the unit
The power switch is located in the rear alongside the IEC 320 power
cord inlet connector. With the power switch in the “On” position
(“1”) the green power indicator light should be on and all other
indicator lights should be off. If the red indicator light is on, the
dispersive electrode is not properly connected or is defective and
should be replaced. First, rotate the output intensity control to the
left (Coag) or right (Cut). Output intensity is increased by moving
the control away from center in either direction. It may be necessary
to move past the “1” position before an output will be generated.
PerFect TCS II is now in the “ready” position. No warm-up time is
required for the unit.
To energize the electrode, depress the footswitch before applying
the electrode to tissue. The electrode should only be energized
for short, intermittent periods — just long enough to perform the
required procedure. The unit should emit a tone while the output is
energized. A yellow indicator should be “On” to indicate cut mode
or a blue indicator should be “On” to indicate coagulate mode.
CAUTION: A warbling sound indicates that the dispersive
electrode is not connected or is defective. In this situation,
the unit is automatically deactivated and will not operate.
Verify the dispersive electrode connector is fully inserted. If
it is, the dispersive electrode may be defective and should be
replaced. If the replacement does not correct the situation,
the unit requires servicing.
When the procedure has been completed, remove the electrode
from tissue and deactivate the footswitch. Rotate the intensity
The PerFect®TCS II is intended only for use by licensed dental
practitioners who have received appropriate training in the
application of electrosurgery. This guide is not intended as a
substitute for formal instruction.
The unit should only be operated in locations where the standard
nominal mains voltage is indicated for use with the equipment.
CAUTION: Federal law restricts this device to sale by or
on the order of a licensed healthcare practitioner.

Owner’s Guide 5
control to the center “0” position and unscrew the electrode sheath
from the handpiece cord assembly for sterilization.
Please Note: In compliance with IEC 60601-2-2, requirements for
the safety of high frequency surgical equipment, this unit generates
an audible tone when operated.
Preoperative practice
This guide is not intended to be a substitute for formal instruction.
The new user of electrosurgery is strongly urged to undertake
adequate study before performing clinical operative procedures.
After receiving instruction, practicing on raw, lean beef can help
the practitioner acquire the necessary dexterity to achieve superior
clinical results. Select a piece of fresh, lean beef (round steak or shin
beef) and allow to reach room temperature.
Cutting practice
1. Place the meat on the dispersive electrode.
2. Thread the Straight Knife electrode sheath onto the handpiece
swivel connector.
3. With the power switch “On,” rotate the Intensity Control to
position “1” in the Cut mode (to the right).
4. Depress the footswitch to activate the electrode.
5. Using a smooth, rapid, brush-like motion, make several incisions
of varying length and depth (Figure 4). You may find it helpful
to use a finger rest to achieve precise control. Observe that the
electrode either fails to cut or does so only with considerable
dragging. Note also that cutting, if it occurs, causes tissue
shreds to adhere to the electrode tip.
6. Repeat the procedure above at successively higher intensity
settings. If the electrode encounters appreciable resistance, the
setting is too low. Increase the setting until there is no resistance
to cutting and there is no sparking and no discoloration along
the incision. This point is the lowest effective intensity setting
for a practice procedure. Allow 10–15 seconds for the tissue to
cool before cutting again in the same area.
7. Increase the intensity setting one position above that which
provided optimum results. Observe sparking and discoloration
in the form of charring and tissue blanching along the
cutting track.
Continue to practice a variety of incisions using different electrodes
and with the intensity setting at different levels. Observe the cutting
results and the action of the electrode tip when settings are too low,
too high, or correct. For best results, use the lowest effective output
intensity; this is the proper setting for most procedures.
Coagulation practice
With a little practice, coagulation is easily achieved with the
PerFect TCS II. Use the same specimen of lean beef on the dispersive
electrode. Simulation of effective coagulation is achieved when the
treated area shows a blanched spot of approximately 2 mm or less
in diameter.
1. Insert the Coag Ball electrode and rotate the Output Control to
position “1” on the Coag scale (to the left).
2. Activate the electrode and, with a dabbing motion, place the
ball tip in light contact with the specimen, maintaining contact
for approximately 1 second. Allow 10–15 seconds for the
tissue to cool and repeat the procedure until a blanched spot
indicates that coagulation is achieved.
3. Repeat this technique at successively higher output
intensity settings until blanching occurs after one or two
applications of the electrode: this is the proper setting for most
coagulation procedures.
4. Also practice coagulating with the Straight Knife electrode,
which is particularly useful in hard to reach areas. However,
since the Straight Knife electrode focuses energy in a smaller
area, the intensity setting should be lower than that used with
the Coag Ball electrode.
General principles of electrosurgery technique
The following guidelines will help you benefit from the advantages
of electrosurgery. For additional important information, please refer
to the Special Notes and Precautions section.
Placement of equipment
It’s important to place the PerFect TCS II unit so that the controls,
handpiece, electrodes, and accessories are readily accessible for use
with a minimum of motion and wasted time. The unit should be
plugged in at all times and the console should be within arm’s reach
of the operator. All of the functions, controls and settings should be
controlled by the dentist.
The dispersive electrode
The dispersive electrode ensures that the energy flow from the small,
active electrode is predictable and uniform. It must be used during
all electrosurgical procedures. The entire area of the dispersive
electrode should be placed in firm, nonconductive contact with the
patient, preferably against the patient’s upper back, contacting the
maximum possible area.
CAUTION: Do not place the dispersive electrode in contact
with bare skin. Hand-held or hand-worn dispersive electrodes
should not be used.
The patient, operator or assistant should not come into contact
with metal parts, such as metal arm rests of chairs. Use only
non-conducting (plastic) instruments (mirror, retractor, saliva
evacuation tube, etc.) when performing procedures.
The cutting stroke
Your cutting stroke should be smooth, rapid and brush-like. Before
each cut, you may find it helpful to try several practice strokes with
an inactive electrode, much as a golfer takes practice strokes before
putting. This will help you assume a comfortable grasp on the
handpiece and will enable you to plan the position and length of
the actual cutting stroke. Remember to use the lowest effective
output setting for best results. When cutting, use several short
strokes rather than a single long stroke. Rather than commit to a
single irreversible cut (as you must do with a scalpel), you may find
it preferable to shave tissue in very fine layers to achieve a more
precise, aesthetically pleasing result. Cutting precision can also be
enhanced by using a finger or hand rest to steady your stroke.
CAUTION: If your cutting stroke is too slow, or if you leave
the electrode too long in one area, a build-up of lateral heat
may cause necrosis and sloughing of tissue.

6PerFect®TCS II Tissue Contouring System
CAUTION: Begin with as low a power setting as will properly
perform the procedure.
• To allow heat to dissipate safely, you should always wait
10–15 seconds between cuts in the same area.
• After each cutting stroke, deactivate the electrode and
wipe it on an alcohol-soaked pad. Charred or carbonized
electrodes should not be used; they should be restored
by cleaning with alcohol and a very fine emery cloth.
• Electrosurgery should only be performed on
healthy tissue.
• Tissue should be moist, but not wet, in the
operative area.
• In addition, the electrode should not be activated in a pool
of blood.
3. Clinical Guide to PerFect TCS II
Bleeding control
The improved bleeding control you achieve with PerFect TCS II saves
chair time, simplifies procedures and improves patient comfort.
Bleeding is virtually absent during electrosurgical procedures
because the electrode coagulates as it cuts. If bleeding does occur,
coagulation is a relatively simple procedure.
1. Attach the Coag Ball electrode sheath to the handpiece cord
assembly (or use the Straight Knife electrode if the area to be
coagulated is difficult to reach).
2. Rotate the Output Control to the coagulation output setting
you have established from previous experience or during
preoperative practice. Remember to use the lowest effective
output setting for best results.
3. Rinse and air dry the operative field to visualize the bleeder.
4. Touch the bleeding area intermittently with the electrode
(Figures 5 and 6). Duration of contact should be approximately
one second, with a 10–15 second pause between contacts.
Bleeding cessation indicates a successful coagulation. One
or two applications of the electrode are usually sufficient to
stop bleeding.
5. Use postoperative dressing if necessary.
Access to caries
The benefits of the PerFect TCS II will be readily apparent when
it is used to gain access to caries. The PerFect TCS II makes it
possible to remove occluding tissue in a matter of seconds and
complete restorative procedures immediately. The procedure is
usually blood-free and provides a clean, dry and highly visible
operative field for the removal of caries and the placement of
restorations during one visit.
1. The Long Loop electrode is well suited for obtaining access to
most carious lesions. For caries occurring in tight interproximal
areas, the Straight Knife may be more appropriate.
2. Explore the extent of the tissue to be removed with a
periodontal probe.
3. With the Output Control setting in the cutting mode and
at the predetermined output setting, shave off the gingival
tissue covering the lesion with a few strokes of the Long Loop
electrode (Figure 7). Allow 10–15 seconds for the tissue to
cool before cutting again in the same area.
4. With the caries exposed (Figure 8), restorative procedures can
begin immediately.
Gingival contouring: Creating a gingival trough
Gingival troughs are created to provide a space into which a sufficient
amount of impression material can flow. You will find PerFect TCS II
to be exceptionally useful in this procedure, either as an alternative
to a retraction cord or in conjunction with it. For example, you may
create a partial trough in an area where the retraction cord does
not provide space for a sufficient amount of impression material
to flow. Gingival troughs can be made either before or after tooth
preparation. If they are made before tooth preparation, visibility and
access are improved and margins can be finished readily. When the
trough is completed and the tooth is prepared, the impression can
be taken immediately. Gingival troughs should not be made in
aesthetically critical areas with thin marginal gingiva because
of the possible loss of gingival height on healing.
1. When creating a complete gingival trough, use the Long Loop
electrode (for shoulderless preparations with a thin gingival
mucosa, the Straight Knife electrode may be used).
2. Electrode position is especially important during this procedure:
the angle between the electrode and the tooth should be
minimal. Too wide an angle may result in a reduced height of
the marginal gingiva. Figure 9 shows the proper angle of the
Loop electrode in relation to the tooth. If the resulting trough is
too narrow, retrace the trough (after waiting 15 seconds) while
increasing the electrode angle slightly.
3. Begin troughing on the lingual surface, so the output intensity,
stroke speed and cutting depth can be adjusted before operating
on the facial surfaces. Do not attempt to create a gingival
trough with one continuous sweep around the circumference
of the tooth. Instead, the troughing should be performed in
four separate, short cutting strokes (Figure 10), each sweeping
a quadrant of the gingival sulcus. The following cutting stroke
sequence is recommended: (1) the palatal (lingual) surface, (2)
the labial (buccal) surface, (3) the mesial surface, and (4) the
distal surface. As shown in Figure 10, the last two (shorter)
excisions join the first two to create a continuous and uniform
gingival trough. Figure 11 shows the immediate postoperative
condition of a gingival trough.
Gingival contouring: Removing redundant tissue
Prior to impression-taking or cementation of restorations, PerFect
TCS II may be used to remove redundant tissue that may interfere
with the procedure and help control bleeding.
1. Thread the Long Loop electrode sheath onto the handpiece
swivel connector of the handpiece cord assembly.
2. With the electrode loop parallel to the tissue being removed,
(Figure 12), slice the tissue off in thin layers until the desired
result is obtained.
Remember to allow 10–15 seconds for the tissue to cool before
cutting again in the same area.

Owner’s Guide 7
Gingival contouring: Aesthetic contouring
PerFect TCS II pays special dividends in tissue contouring for aesthetic
purposes. Frequently a minor procedure can greatly enhance the
patient’s appearance. With care and practice, it is possible to
attain precise control of the amount of tissue removed to ensure
superior results, both aesthetically and therapeutically. In addition,
the smooth, pressureless cutting stroke reduces the time necessary
for most aesthetic contouring procedures. You may use either the
Straight Knife or the Long Loop electrode for aesthetic contouring.
Shave or “plane’’ away tissue in successive thin layers until the
desired appearance is achieved.
Remember to allow 10–15 seconds for the tissue to cool before
cutting again in the same area.
In Figures 13 and 14, the operator has easily corrected a patient’s
crooked smile resulting from a marked asymmetry of the gingival
levels of the incisors.
4. Technical Information
PerFect TCS II Electrosurge
Coltène/Whaledent Inc. Catalog Nos. S8230CE, S8230UK, S8240,
S8115 and S8100 (Additional suffixes are used to indicate differences
in types and quantity of included electrodes.)
General
Dimensions: 108 x 159 x 222 mm
(4 1/8 x 6 1/4 x 8 3/4”)
Weight (unit and attached footswitch): 2.4 kg (5.29 lbs.)
Safety Standards IEC60601-1/1988, A1 and A2
IEC60601-2-2/2001
EMC Standards IEC60601-1-2
S8115 and S8100 Flat Blade USA style three prong AC plug
(NEMA 5-15P)
S8230CE Continental European style AC plug with earth contact
(IEC 60884-1 CEE7 VII)
S8230UK British style three prong AC plug with fuse
(BS 1363)
S8240 Australian style three prong plug
(AS 3112:2000, NZS 198)
Classification
Electrical: Class I, protective earth conductor utilized in power cord
Applied Part: Type BF
Equipment not suitable for use in the presence of a
FLAMMABLE ANAESTHETIC MIXTURE WITH AIR or WITH OXYGEN
OR NITROUS OXIDE.
Equipment Limitation
Intermittent operation maximum: 10s output energized, 30s
minimum de-energized. In other words, for continuous repetitive
use do not operate for more than 10 seconds followed by a
30 second resting period.
Electrical
Maximum Power Consumption 135 Watts
AC Line Voltage
S8100: 100 VAC ± 10%, 50/60 Hz
S8115: 115 VAC ± 10%, 50/60 Hz
S8230CE, S8230UK: 230 VAC ± 10%, 50/60 Hz
S8240: 240 VAC ± 10%, 50/60 Hz
CUT Maximum Power Output 55 Watts, ±10%
COAG Maximum Power Output 33 Watts, ±10%
Output Impedance 600 Ohms
Nominal Operating Frequency 3.68 MHz
Coag Modulation Frequency 120 Hz
Coag Modulation Waveshape Square wave
Transport and storage conditions
Temperature -40°C to +70°C (-40°F to 158°F)
Relative Humidity 10% to 100% including condensation
Atmospheric Pressure 500 hPa to 1060 hPa (7.25 psi to 15.4 psi)
Operational ambient conditions
Temperature -10°C to +40°C
(14°F to 104°F)
Relative Humidity 30% to 75%
Atmospheric Pressure 700 hPa to 1060 hPa
(10.2 to 15.4 psi)
5. Special Notes and Precautions
CAUTION: Remove AC power by disconnecting line cord
before performing any maintenance on the unit.
Maintenance and service
PerFect TCS II has been carefully designed and constructed to
ensure reliability and long life. Other than protecting the unit from
misuse or damage, minimum maintenance is required. Should your
PerFect TCS II fail to perform in accordance with specifications, if
any component is dropped or mishandled, or if any evidence of
damage is found, the unit should not be used. Return it to your
dental dealer or to Coltène/Whaledent for servicing. We urge you
to periodically examine your unit and accessories for visible signs of
damage or wear. Yearly verification of performance characteristics
is recommended.
CAUTION: Disconnect the PerFect TCS II from AC power
source before performing the following maintenance.
Sterilizing electrode sheaths
For safety and optimum performance, sterilize each electrode sheath
before initial use and after each subsequent use.
1. Remove all debris from the electrode sheath by scrubbing with
brush and soap and water. Do not bend wire.
2. Clean in an ultrasonic cleaner, (such as Coltène/Whaledent’s
BioSonic®Ultrasonic Cleaner), with general purpose,
non-ammoniated solution diluted in accordance with
manufacturer’s directions. Remove and rinse thoroughly.
3. Sterilize electrode sheath via a gravity steam sterilizing cycle
at 132°C for 15 minutes in a bag according to the directions
of the sterilizer manufacturer. Do not use dry heat, cold
sterilization or chemiclave. Make sure connector area is dry
before assembly.
<10s
>30s

8PerFect®TCS II Tissue Contouring System
PerFect TCS II Power Output vs Control Setting
Power (Watts)
Control Setting
CUT COAG
PerFect TCS II Output Power
PerFect TCS II Power Output vs Load Resistance
Power (Watts)
Load Resistance (Ohms)
CUT 3 CUT 6 COAG 3 COAG 6
Power vs. Load per Setting and Mode
PerFect TCS II Unloaded Output Voltage vs Setting
Volts Peak
Control Setting
CUT COAG
Open Circuit Output Voltage
Cleaning unit and handpiece cord
1. The handpiece cord assembly may be wiped clean with gauze
pads saturated in 70% ethyl alcohol after unplugging from
unit. Before use, dry the connector area thoroughly with a dry
wipe and by gently blowing air on the connector.
2. The unit may be wiped clean with gauze pads dampened in
70% ethyl alcohol after unplugging the unit. Assure that it is
thoroughly dry before use.
3. The dispersive electrode assembly may be wiped clean with
gauze pads dampened in 70% ethyl alcohol after unplugging
from the unit. Assure that it is thoroughly dry before use.
CAUTION: The following test must be performed by
a technician who has been trained in maintenance of
electrosurge units and is aware of the potential for RF burns.
Electrosurge Analyzer
The use of an electrosurgical device analyzer to measure
performance of the PerFect TCS II will likely indicate lower than
expected output power. The capacitive loading caused by the
input circuit of the analyzer will detune the output circuit of the
PerFect TCS II electrosurge. Measurement can still be made by
making direct connection to the PerFect TCS II at the output BNC
connector on the side of the unit rather than using the supplied
cable. Eliminating the cable will reduce output capacitance by
250 pF. An additional capacitance will have to be added to bring the
totaloutputcapacitance(analyzerinputcircuitplusaddedcapacitor)to
250 pF. Any capacitor added to the output must be rated for at
least 1000V.
CAUTION
1. Do not tamper with the PerFect TCS II or any of
its components.
2. For safe operation, be certain the PerFect TCS II is plugged into
a three-wire grounded power source. Do not use plug adaptors
that eliminate ground.
3. Electrosurgery should not be used within approximately 4.5
meters of persons with active implantables, such as pacemakers,
cochlear implants, or nerve stimulators.
4. Do not use PerFect TCS II in the presence of flammable
anesthetics or explosive gases.
5. Metal conducts radio frequency energy just as it conducts
electricity. Remove partial dentures if removable and check the
area for fixed partial dentures. Metal restorations can conduct
energy beyond the anesthetized area and cause discomfort to
the patient.
6. Take care that metal restorations, bone, or teeth do not come
into contact with active electrodes. While fleeting contact will
not be detrimental, extended contact may result in damage.
All instruments used during electrosurgery should be made
of a non-conducting plastic material. Cotton rolls or gauze
pads used in the patient’s mouth should be kept moist during
electrosurgery. Remember to deactivate the electrode each
time the electrode sheath is removed from the operative site
and before it is cleaned or changed. Skin-to-skin contact (for
example between the arms and body of the patient) should be
avoided by insertion of dry gauze for example.
7. When high frequency surgical equipment and physiological
monitoring equipment is used simultaneously on the same
patient, all monitoring electrodes should be placed as far
as possible from the surgical electrode. Needle monitoring
electrodes are not recommended. In all cases, monitoring
0.00
10.00
20.00
30.00
40.00
50.00
60.00
100 200 500 600 1000 2000
CUT 3 CUT 6 COAG 3 COAG 6

Owner’s Guide 9
systems incorporating high frequency, current limiting devices
are recommended.
8. Position cables to the surgical electrodes in such a way that
contact with the patient or other leads is avoided.
9. Store electrodes out of reach of the patient.
10. Apparent low output or failure to function correctly at the
normal operating settings may indicate faulty application of
the neutral electrode or poor contact at its connections.
11. The use of flammable anesthetics or oxidizing gases such as
nitrous oxide and oxygen should be avoided. Non-ammable
agents should be used for cleaning or disinfecting. Solvents
of adhesives should be allowed to evaporate before the
application of high-frequency electrosurgery. Some material
may be ignited by sparks produced in normal use of the
equipment (for example, cotton wool and gauze when
saturated with oxygen). Endogenous gases may be ignited
by electrosurgery.
12. Interference produced by the operation of the high frequency
surgical equipment may adversely influence the operation of
other electrical equipment. In case of interference, de-energize
or increase distance to susceptible equipment. Connection to
a different power circuit may also reduce interference.
13. Regularly inspect the accessories, particularly the electrode
sheaths and cables, for possible insulation damage.
14. Allow a 10–15 second cool down period between cuts in the
same area for heat to dissipate safely.
15. The electrode sheaths used with the electrosurgical device
have a limited life expectancy and should be replaced after
twenty (20) autoclave cycles or sooner, upon the appearance
of any signs of wear or erosion.
16. Use only accessories supplied by Coltène/Whaledent intended
for use with this equipment. The active electrode and handle
is 100% hi-pot tested to 3000 VAC. Peak voltage to the active
electrode may reach 450V and must be rated to 675V at
3.68 MHz. The dispersive electrode normally does not receive
significant voltage but must be insulated to 4000 VAC.
17. Failure of HF (high frequency) surgical equipment or excessive
electrical interference could result in an unintended power
output increase, decrease or activation. In the case of
electrical interference, de-energize or increase distance to the
equipment causing interference. Connection to a different
power circuit may also reduce interference.
18. Where HF (high frequency) current could flow through a
relatively small cross section of the body it may be desirable
to use bipolar techniques not available with this equipment.
Anesthesia
Local or general anesthesia must be used with all electrosurgical
procedures. As with any other surgical device, the patient may
experience temporary post-operative pain from the use of
electrosurgery after the anesthetic effect has diminished.
Control of odor and viral plume
Odors and viral plume caused by electrosurgery must be minimized
by using a high speed, high volume evacuator between the patient’s
mouth and nose, such as Coltène/Whaledent’s VacEjector®System
with a high speed suction tip.
Contraindications
Do not use on patients with active implantables. Do not contact
metal restorations with the electrode tip.
Product markings
Type BF equipment
Neutral electrode referenced to earth
Attention, consult accompanying
documents
Footswitch cable
Handpiece connector
Cut mode
Coagulate mode
Non-ionizing electromagnetic radiation
Intermittent operation maximum:
10s output energized,
30s minimum de-energized.
European Directive 2002/96/EC
(Waste Electrical and Electronic Equipment - WEEE)
<10s
>30s
Foot Switch
Handpiece

10 PerFect®TCS II Tissue Contouring System
Accessories
S213 Dispersive Electrode
S6000CE Complete Handpiece System
S6008CE Handpiece Cord Assembly
S6010A 8 Sterilizable Electrode Sheaths (1 of each type)
S7001 Handpiece Holder
S7010A 3 Sterilizable Electrode Sheaths
(1 Straight Knife, 1 Long Loop, 1 Coag Ball)
S6011A Coag Ball (2)
S6012A 45° Straight Knife (2)
S6013A 45° Tapered Knife (2)
S6014A Straight Round Loop (2)
S6015A 45° Long Loop (2)
S6016A Straight Long Loop (2)
S6017A 45° Diamond Loop (2)
S6018A 90° AP 1 1/2 (2)
S6011A
S6012A
S6013A
S6014A
S6015A
S6017A
S6018A
S6016A

Benutzerhandbuch 11
Inhaltsverzeichnis
1. Einführung in die PerFect TCS II Gewebekonturierung
Wie funktioniert Elektrochirurgie? ..................................12
2. Vorbereitung des PerFect TCS II für die Verwendung
Auspacken und Aufstellen des Geräts.............................12
Aktivierung des Geräts ...................................................12
Präoperative Übungen....................................................13
Übungen zum Schneiden................................................13
Übungen zum Koagulieren .............................................13
Allgemeine technische Grundsätze der Elektrochirurgie...13
Aufstellort......................................................................13
Neutralelekrode..............................................................13
Schnittbewegung...........................................................14
3. Klinische Bedienanweisungen für PerFect TCS II
Hämostase......................................................................14
Zugang zur Karies............................................................14
Zahneischkonturierung: Erweiterung des Sulcus ....................14
Zahneischkonturierung: Entfernen überschüssigen Gewebes ...15
Zahneischkonturierung: Ästhetische Zahneischkonturierung ..15
4. Technische Informationen
PerFect TCS II-Elektrochirurgiegerät.................................15
Allgemeines ...................................................................15
Klassifizierung ................................................................15
Elektrik...........................................................................15
Transport- und Lagerbedingungen ..................................15
Umgebungsbedingungen für den Einsatz........................15
5. Anmerkungen und Warnhinweise
Wartung und Kundendienst............................................16
Sterilisation der Elektroden .............................................16
Reinigung des Geräts und des Handgriffkabels................16
Analysegerät für das Elektrochirurgiegerät......................17
Anästhesie .....................................................................17
Geruchskontrolle............................................................17
Produktkennzeichnungen ...............................................18
Zubehör.........................................................................18
Literaturverzeichnis.......................................................101
6. Abbildungen
Abbildung 1 – Abbildung 8 ..........................................102
Abbildung 9 – Abbildung 14 ........................................103

12 PerFect®TCS II-Gewebekonturierungssystem
PerFect® TCS II ist nur für zugelassene Zahnärzte bestimmt, die
entsprechend in Anwendung der von Elektrochirurgie geschult
wurden. Diese Bedienungsanleitung soll eine formale Schulung
nicht ersetzen.
Das Gerät darf nur betrieben werden, wenn die
normale Nennnetzspannung der für das Gerät angegebenen
Spannung entspricht.
Vorsicht: Laut US-Bundesgesetz darf dieses Gerät nur
an einen zugelassenen Arzt oder auf Anweisung eines
zugelassenen Arztes verkauft werden.
1. Einführung in die PerFect TCS II
Gewebekonturierung
Nur wenige Technologien haben das Potenzial der Elektrochirurgie, die
Effizienz und die Ergebnisse im Bereich Weichgewebemanagement
zu verbessern. Die erforderlichen Fähigkeiten können mit
zumutbarem Zeiteinsatz erworben werden und die Elektrochirurgie
kann dann für Arzt und Patient beträchtliche Vorteile erbringen.
Angesichts dieser Tatsachen hat Coltène/Whaledent das PerFect
TCS II Gewebekonturierungssytem entwickelt: ein ausgereiftes,
erschwingliches Elektrochirurgiegerät, das sowohl erfahrene als
auch neue Anwender der Elektrochirurgie ansprechen soll. PerFect
TCS II kann eine Vielzahl alltäglicher Eingriffe, wie sie von praktisch
jedem Zahnarzt durchgeführt werden, vereinfachen und ihr Ergebnis
verbessern, z. B. Hämostase, Zugang zur Karies und ästhetische
Zahnleischformung.
Wie funktioniert Elektrochirurgie?
Elektrochirurgie ist eine erprobte Technologie, die seit vielen
Jahren in Medizin und Zahnmedizin eingesetzt wird. Sie verwendet
Hochfrequenzstrom, ähnlich Funkfrequenzen, um Weichgewebe zu
verdampfen, zu schneiden und zu koagulieren. Mit dem vom PerFect
TCS II verwendeten Hochfrequenzstrom kann Gewebe geschnitten
und koaguliert werden, da die Hitzeentwicklung sich auf die kleine,
aktive Elektrode beschränkt. Obwohl die aktive Elektrode kalt
bleibt, wird in ihrer unmittelbaren Umgebung eine zum wirksamen
Schneiden und Koagulieren ausreichende Hitzeenergie erzielt.
Der Hochfrequenzstrom, der an der aktiven Elektrode fokussiert
wird, kehrt über eine großächige, Neutralelektrode zum
Elektrochirurgiegerät zurück. Die Neutralelektrode wird auf der
der Rückenlehne des Behandlungsstuhls platziert und ist während
der Behandlung mit dem Rücken des Patienten in Kontakt.
Die Neutralelektrode gewährleistet eine efziente und sichere
Ableitung des Hochfrequenzstroms.
Je nach gewünschter Wirkung kann die Ausgangsleistung eines
Elektrochirurgiegeräts auf impulsmodulierten Wechselstrom oder
Gleichstrom eingestellt werden. Gleichstrom ist zum Schneiden
geeignet, während für das Koagulieren am Besten impulsmodulierter
Wechselstrom eingesetzt wird. Aus diesem Grund verfügt PerFect
TCS II über zwei Betriebsmodi: „Cut“ (Schneiden) und „Coag“
(Koagulieren). Die Ausgangsleistung in diesen Betriebsmodi kann
vom Anwender nach Wunsch reguliert werden.
Beim Schneiden mit dem Skalpell wird das Gewebe gequetscht
und gespalten. Beim elektrochirurgischen Schneiden wird das
Gewebe in unmittelbarer Nähe der Elektrode verdampft. Ist die
Ausgangsleistung korrekt eingestellt, schneidet die Elektrode
widerstandslos und ermöglicht so einen aussergewöhnlichen Maß
an Kontrolle und Präzision.
2. Vorbereitung des PerFect TCS II für
die Verwendung
Auspacken und Aufstellen des Geräts
PerFect TCS II aus dem Versandkarton entnehmen und auf mögliche
Transportschäden überprüfen. Überprüfen Sie, ob die Seriennummer
des Geräts (Abbildung 2) mit der Seriennummer auf dem
Versandkarton übereinstimmt (andernfalls bitte mit Ihrem Händler
Kontakt aufnehmen). Die Garantiekarte ausfüllen und innerhalb
von 10 Tagen nach Erhalt an Coltène/Whaledent senden.
Unter Berücksichtigung der Abbildungen 1 und 2 die folgenden
Schritte durchführen, um das PerFect TCS II für den Gebrauch
vorzubereiten. Gerät und Zubehör sind in Abbildung 3 dargestellt.
• Bevor das Gerät an die Wechselstromquelle angeschlossen wird,
sicherstellen, dass der Ausgangsleistungsregler für „Coag/Cut“
in der Neutralstellung („0“) steht und dass der Netzschalter
ausgeschaltet ist („O“).
Dieses Gerät verfügt über eine IEC 320-Netzkabelbuchse mit
trennbarem Netzkabel, das hinten am Gerät angeschlossen wird.
Vor dem nächsten Schritt muss das Netzkabel an der Buchse am
Gerät angeschlossen werden.
• Den Stecker des Netzkabels an eine dreiadrige, geerdete
Wechselstromsteckdose anschließen.
• Den BNC-Stecker des Handgriffkabels an die Buchse für den
Handgriff rechts am Gerät anschließen.
• Der Handgriffhalter kann ganz nach Wunsch auf einer der
beiden Seiten des Geräts angebracht werden, indem er in die
Aussparungen unter dem seitlichen Rand des Geräts eingerastet
wird. Wenn der Handgriffhalter einmal eingerastet ist, kann
er nicht mehr entfernt werden.
• Den Kabelstecker der Neutralelektrode an die Buchse für die
Neutralelektrode rechts am Gerät anschließen.
• Eine der drei mitgelieferten Elektroden auswählen (gerades
Messer, längliche Schlinge oder Koagulationskugel). Um den
Handgriff zu montieren, den Schraubanschluss festhalten
und die Elektrode auf die Handgriffkabeleinheit schrauben.
Zum Abnehmen die Elektrode einfach in die andere Richtung
drehen.
VORSICHT: Elektroden müssen vor Gebrauch sterilisiert
werden. (Siehe Kapitel zur Sterilisation.)
Aktivierung des Geräts
Der Netzschalter bendet sich hinten am Gerät neben der IEC
320-Netzkabelbuchse. Wenn der Netzschalter eingeschaltet ist
(„I“), muss die grüne Stromanzeige aueuchten, während alle
anderen Anzeigeleuchten ausgeschaltet sind. Wenn die rote
Anzeigeleuchte leuchtet, ist die Neutralelekrode nicht richtig
angeschlossen oder defekt und sollte ausgetauscht werden.
Zunächst den Ausgangsleistungsregler nach links (Coag) oder rechts
(Cut) drehen. Die Ausgangsleistung erhöht sich, je weiter der Regler
von der Neutralstellung in die jeweilige Richtung gedreht wird. Es
kann erforderlich sein, über die Position „1“ hinauszugehen, bevor
die Leistung eingeschaltet wird. PerFect TCS II ist nun bereit. Das
Gerät benötigt keinerlei Aufwärmzeit.
Um Spannung an die Elektrode anzulegen, den Fußschalter
betätigen, bevor die Elektrode mit dem Gewebe in Kontakt
gebracht wird. Die Elektrode sollte nur für kurze Zeit und mit
Unterbrechungen unter Spannung gesetzt werden: Gerade lang
genug, um den gewünschten Eingriff durchzuführen. Während
Spannung an die Elektrode angelegt ist, ertönt ein Warnton. Der
Modus „Schneiden“ (Cut) wird von einer gelben Anzeigeleuchte

Benutzerhandbuch 13
angezeigt, eine blaue Anzeigeleuchte zeigt den Modus „Koagulieren“
(Coag) an.
VORSICHT: Ein trällerndes Tonsignal zeigt an, dass die
Neutralelekrode nicht angeschlossen oder defekt ist. In diesem
Fall wird das Gerät automatisch ausgeschaltet und kann nicht
betätigt werden. Überprüfen, ob die Neutralelekrode ganz
eingesteckt ist. Falls ja, kann die Neutralelekrode defekt
sein und sollte ausgetauscht werden. Falls ein Austauschen
der Elektrode das Problem nicht löst, muss das Gerät vom
Kundendienst gewartet werden.
Nach Abschluss des jeweiligen Eingriffs die Elektrode vom Gewebe
entfernen und den Fußschalter deaktivieren. Den Leistungsregler
in die neutrale Mittelstellung „0“ drehen und die Elektrode zur
Sterilisation von der Handgriffkabeleinheit abschrauben.
Wichtiger Hinweis: In Befolgung der Sicherheitsvorgaben für
Hochfrequenz-Elektrochirurgie gemäss IEC 60601-2-2, generiert
dieses Gerät einen hörbaren Ton während der Anwendung.
Präoperative Übungen
Diese Bedienungsanleitung soll eine formale Schulung nicht
ersetzen. Unerfahrenen Anwendern der Elektrochirurgie wird stark
empfohlen, vor der Durchführung klinischer Operationsverfahren
entsprechende Schulungen zu besuchen. Nach der Schulung
können Übungen an einem Stück magerem rohem Rindeisch dem
Arzt helfen, die für hervorragende klinische Ergebnisse erforderliche
Fingerfertigkeit zu erzielen. Ein Stück frisches, mageres Rindeisch
(Keule oder Wadschinken) auswählen und abwarten, bis es sich auf
Raumtemperatur erwärmt hat.
Übungen zum Schneiden
1. Das Fleisch auf die dispersive Elektrode legen.
2. Die gerade Messerelektrode auf den Schraubanschluss des
Handgriffs schrauben.
3. Mit eingeschaltetem Netzschalter den Leistungsregler auf die
Position „1“ im Modus Schneiden (Cut) drehen (nach rechts).
4. Den Fußschalter drücken, um die Elektrode zu aktivieren.
5. Mit weichen, schnellen und bürstenden Bewegungen
mehrere Schnitte verschiedener Länge und Tiefe ausführen
(Abbildung 4). Es kann hilfreich sein, eine Fingerstütze zu
verwenden, um eine präzise Kontrolle über die Bewegungen
zu erlangen. Es fällt auf, dass die Elektrode entweder nicht
schneidet oder nur mit erheblichem Nachziehen. Des weiteren
fällt auf, dass beim Schneiden, wenn es denn gelingt,
Gewebereste an der Elektrodenspitze haften bleiben.
6. Das oben beschriebene Verfahren mit stufenweise erhöhter
Leistungseinstellung wiederholen. Wenn die Elektrode auf
deutlich spürbaren Widerstand trifft, ist die Einstellung zu
niedrig. Die Einstellung erhöhen, bis kein Schneidwiderstand
mehr spürbar ist und kein Funkenschlag oder Verfärbungen
entlang des Schnitts auftreten. Dies ist der Punkt der
geringsten wirksamen Leistung für einen Eingriff. Das Gewebe
10–15 Sekunden abkühlen lassen, bevor erneut im selben
Bereich geschnitten wird.
7. Die Leistung eine Position höher einstellen als die obige
Einstellung, mit der optimale Ergebnisse erzielt wurden. Auf
Funkenschlag und Verfärbungen, d. h. auf Verkohlen und
Ausbleichen des Gewebes am Schnitt entlang achten.
Verschiedene Schnitte mit unterschiedlichen Elektroden und
verschiedenen Leistungseinstellungen ausprobieren. Die
Schnittergebnisse und das Verhalten der Elektrodenspitze
beobachten, wenn die Leistung zu niedrig, zu hoch oder gerade
richtig eingestellt ist. Für optimale Ergebnisse die geringste wirksame
Leistung auswählen; dies ist die korrekte Einstellung für die
meisten Verfahren.
Übungen zum Koagulieren
Mit etwas Übung kann mit dem PerFect TCS II leicht kauterisiert
werden. Die gleiche Rindeischart auf der Neutralelekrode
verwenden. Effektive Koagulation wird simuliert, wenn die
behandelte Stelle einen bleichen Fleck mit einem Durchmesser von
ca. 2 mm oder weniger zeigt.
1. Die Koagulationskugelelektrode anbringen und den
Leistungsregler in die Position „1“ auf der Skala zum
Koagulieren (Coag) drehen (nach links).
2. Die Elektrode aktivieren und mit einer tupfenden Bewegung
die Kugeloberfläche leicht mit dem Fleisch in Kontakt bringen.
Den Kontakt ca. 1 Sekunde lang aufrecht erhalten. Das
Gewebe 10–15 Sekunden abkühlen lassen und das Verfahren
wiederholen, bis ein bleicher Fleck die erfolgreiche Koagulation
anzeigt.
3. Diese Technik bei schrittweise erhöhter Ausgangsleistung
wiederholen, bis der bleiche Fleck nach ein- bis zweimaligem
Kontakt mit der Elektrode auftritt; dies ist die korrekte
Einstellung für die meisten Koagulationsverfahren.
4. Das Koagulieren auch mit der geraden Messerelektrode
üben, die insbesondere an schwer zugänglichen Stellen
nützlich ist. Da die gerade Messerelektrode den Strom auf
einen kleineren Bereich fokussiert, sollte die Leistung eingestellt
werden als mit der Koagulation-kugelelektrode.
Allgemeine technische Grundsätze der Elektrochirurgie
Die folgenden Richtlinien sollen Ihnen helfen, die Vorteile der
Elektrochirurgie voll zu nutzen. Für zusätzliche Informationen siehe
den Abschnitt Anmerkungen und Warnhinweise.
Aufstellort
Das PerFect TCS II muss so aufgestellt werden, dass die
Bedienelemente, der Handgriff, die Elektroden und das Zubehör mit
einem Minimum an Bewegung und Zeitverlust greifbar sind. Das
Gerät sollte immer angeschlossen und die Konsole in Reichweite
des Chirurgen platziert sein. Alle Funktionen, Bedienelemente und
Einstellungen sollten vom Zahnarzt bedient werden.
Neutralelekrode
Neutralelekrode, dass der Energiestrom, der von der kleinen, aktiven
Elektrode ausgeht, vorhersehbar und gleichmässig verläuft. Sie
muss bei allen elektrochirurgischen Verfahren verwendet werden.
Der gesamte Bereich der Neutralelekrode muss in sicherem,
nichtleitendem Kontakt mit dem Patienten stehen, vorzugsweise
gegen den oberen Rücken des Patienten. Die Kontaktäche sollte
so groß wie möglich sein.
VORSICHT: Die Neutralelekrode nicht mit der
nackten Haut in Kontakt bringen. Keine Neutralelekrode,
die in der Hand gehalten werden oder an ihr befestigt sind,
verwenden.
Patient, Zahnarzt oder Zahnarzthelfer sollten nicht in
Kontakt mit Metallteilen, wie den metallenen Armlehnen
von Stühlen, kommen. Bei den Eingriffen nur nichtleitende
Instrumente (Kunststoff) verwenden (Spiegel, Retraktor,
Speichelabsauger etc.).

14 PerFect®TCS II-Gewebekonturierungssystem
Schnittbewegung
Beim Schneiden ist die Elektrode mit weichen, schnellen und
bürstenartigen Bewegungen zu führen. Vor jedem Schnitt kann es
hilfreich sein, mehrere Testbewegungen mit der inaktiven Elektrode
auszuführen, wie Golfer Testschwünge durchführen, bevor sie
putten. Dies hilft, einen bequemen Halt am Handgriff zu finden und
Position und Länge des tatsächlichen Schnitts zu planen. Daran
denken, die geringste wirksame Leistungseinstellung für die
besten Ergebnisse zu wählen. Beim Schneiden sind mehrere kurze
Bewegungen einer langen Schnittbewegung vorzuziehen. Statt
eines einzigen, nicht rückgängig zu machenden Schnitts (wie bei
einem Skalpell unvermeidbar) kann es besser sein, das Gewebe in
sehr feinen Schichten abzuschälen, um ein genaueres und ästhetisch
ansprechenderes Ergebnis zu erzielen. Die Schnittpräzision kann
auch durch Einsatz einer Finger- oder Handstütze zur Unterstützung
der Bewegung verbessert werden.
VORSICHT: Wenn Ihre Schnittbewegungen zu langsam
ausfallen oder die Elektrode zu lange an einer Stelle verbleibt,
kann das Aufstauen von seitlicher Hitze zu Nekrose und
Schorfbildung am Gewebe führen.
VORSICHT: Mit der niedrigsten Leistungseinstellung
beginnen, mit der der Eingriff ordnungsgemäß durchgeführt
werden kann.
• Um eine sichere Ableitung der Hitze zu gewährleisten,
sollte vor Schnitten im selben Bereich immer 10–15
Sekunden abgewartet werden.
• Nach jeder Schnittbewegung die Elektrode deaktivieren
und auf einer mit Alkohol getränkten Kompresse
abwischen. Keine verkohlten oder geschwärzten
Elektroden verwenden; sie müssen mit Alkohol und
durch Abschleifen mit einem sehr feinen Schmirgeltuch
gereinigt werden.
• Elektrochirurgische Eingriffe dürfen nur an gesundem
Gewebe durchgeführt werden.
• Das Gewebe sollte im Operationsbereich feucht, aber
nicht nass sein.
• Zudem darf die Elektrode nicht in einer Blutansammlung
aktiviert werden.
3. Klinische Bedienanweisungen für
PerFect TCS II
Hämostase
DieverbesserteBlutungskontrolle,diemitPerFect TCS II erzieltwerden
kann, verkürzt die Behandlungszeiten, vereinfacht die Verfahren und
steigert den Patientenkomfort. Bei elektrochirurgischen Verfahren
kommt es praktisch nicht zu Blutungen, da die Elektrode beim
Schneiden auch gleichzeitig koaguliert. Kommt es zu Blutungen, ist
die Koagulation relativ einfach zu bewerkstelligen.
1. Die Koagulationskugelelektrode an der Handgriffkabeleinheit
anbringen (oder bei schwer zugänglichen Stellen die gerade
Messerelektrode verwenden).
2. Den Leistungsregler auf „Coag“ (Koagulation) in der
Leistung stellen, die bei den präoperativen Übungen
ermittelt wurde. Daran denken, die geringste wirksame
Leistungseinstellung für die besten Ergebnisse
zu wählen.
3. Den Operationsbereich ausspülen und lufttrocknen, um die
Blutungsstelle erkennen zu können.
4. Die Blutungsstelle mehrmals mit der Elektrode berühren
(Abbildungen 5 und 6). Der Kontakt sollte ca. 1 Sekunde
dauern, mit einer Unterbrechung von 10–15 Sekunden
zwischen den Kontakten. Ein Abklingen der Blutung weist
auf die erfolgreiche Koagulation hin. Normalerweise sind ein
bis zwei Berührungen mit der Elektrode ausreichend, um die
Blutung zu stillen.
5. Ggf. Maßnahmen zur postoperativen Wundversorgung
ergreifen.
Zugang zur Karies
Die Vorteile des PerFect TCS II werden besonders beim Zugang zur
Karies deutlich. Mit dem PerFect TCS II kann die Karies verdeckendes
Zahneisch in Sekunden entfernt und die restaurativen Verfahren
können umgehend durchgeführt werden. Das Verfahren verläuft
normalerweise unblutig und ermöglicht die Etablierung einer
sauberen, trockenen und sehr gut einsehbaren Operationsstelle für
die Kariesentfernung und die Einbringung von Restaurationen in
einem Operationsgang.
1. Die längliche Schlingenelektrode ist hervorragend für den
Zugang zu den meisten Kariesläsionen geeignet. Für Karies in
engen Zahnzwischenräumen kann die gerade Messerelektrode
besser geeignet sein.
2. Die Ausdehnung des zu entfernenden Gewebes mit einer
periodontalen Sonde ermitteln.
3. Den Leistungsregler in der ermittelten Dosierung auf
Schneiden einstellen und dann das die Läsion verdeckende
Zahneischgewebe mit einigen wenigen Bewegungen der
länglichen Schlingenelektrode abschälen (Abbildung 7). Das
Gewebe 10–15 Sekunden abkühlen lassen, bevor erneut im
selben Bereich geschnitten wird.
4. Ist der Karies exponiert (Abbildung 8), kann unverzüglich mit
den restaurativen Verfahren begonnen werden.
Zahnfleischkonturierung: Erweiterung des Sulcus
Der Sulcus wird geöffnet, um Platz zu schaffen, für den eine
ausreichende Menge von Abdruckmaterial. PerFect TCS II erweist
sich bei diesem Verfahren als außergewöhnlich nützlich, entweder
als Alternative zu einem Retraktionsfaden oder in Verbindung mit
ihm. So kann beispielswiese der Sulcus teilweise erweitert werden,
an einer Stelle an der ein Rektraktionsfaden nicht ausreichend Platz
für das Abdruckmaterial schaffen kann. Der Sulcus kann vor oder
nach der Präparation (Beschleifen) erweitert werden. Wird er vor
der Präparation des Zahns erweitert, wird die Eingriffsstelle besser
einsichtigundzugänglichund dieRänderkönnenraschabgeschlossen
werden. Wenn die Erweiterung hergestellt und der Zahn präpariert
ist, kann umgehend mit der Abformung begonnen werden. Die
Erweiterung des Sulcus sind an ästhetisch kritischen Stellen
mit dünnem marginalem Zahnfleisch zu vermeiden, da die
Zahnfleischhöhe nach der Heilung verringert sein kann.
1. Wird eine komplette Erweiterung des Sulcus angestrebt, die
längliche Schlingenelektrode verwenden (für schulterlose
Präparationen mit dünnem Zahneisch kann die gerade
Messerelektrode eingesetzt werden).
2. Bei diesem Verfahren ist die Elektrodenstellung von besonderer
Bedeutung: Der Winkel zwischen Elektrode und Zahn sollte
möglichst gering sein. Ein zu großer Winkel kann zu einer
verringerten Höhe des marginalen Zahneischs führen.
Abbildung9zeigtdenkorrektenWinkel der Schlingenelektrode
zum Zahn. Ist die erzielte Sulcuserweiterung zu schmal, den
Sulcus erneut entlangfahren (nach einer Unterbrechung von 15

Benutzerhandbuch 15
Sekunden) und dabei den Elektrodenwinkel leicht vergrößern.
3. Ban der lingualen Oberfläche, damit Ausgangsleistung,
Bewegungsgeschwindigkeit und Schnitttiefe der Elektrode vor
dem Eingriff an den fazialen Oberflächen angepasst werden
können. Nicht versuchen, den Sulcus mit einem durchgehenden
Schnitt um den Zahn herum zu öffnen. Stattdessen sollte
der Sulcus mit vier individuellen, kurzen Schnittbewegungen
geöffnet werden (Abbildung 10), je eine für jeden Quadranten
der Zahneischfurche. Für die Schnittbewegungen wird die
folgende Reihenfolge empfohlen: (1) die palatale (linguale)
Oberfläche, (2) die labiale (buccale) Oberfläche, (3) die
mesiale Oberfläche und (4) die distale Oberfläche. Wie in
Abbildung 10 dargestellt, verbinden die beiden letzten
(kürzeren) Schnitte die beiden ersten und bilden so eine
durchgehende und gleichmäßige Furche. Abbildung 11 zeigt
den Zustand Sulcus direkt nach dem Eingriff.
Zahnfleischkonturierung:Entfernen überschüssigen Gewebes
Vor der Abformung oder der Zementierung von Restaurationen kann
PerFect TCS II eingesetzt werden, um beim Eingriff möglicherweise
störendes, überschüssiges Gewebe zu entfernen und um Blutungen
zu kontrollieren.
1. Die längliche Schlingenelektrode auf den Schraubanschluss des
Handgriffs schrauben.
2. Die Elektrodenschlinge parallel zum zu entfernenden Gewebe
halten (Abbildung 12) und so das Gewebe in dünnen
Schichten abschälen, bis das gewünschte Ergebnis erreicht ist.
Daran denken, das Gewebe 10–15 Sekunden abkühlen zu lassen,
bevor erneut im selben Bereich geschnitten wird.
Zahnfleischkonturierung: Ästhetische Zahnfleischformung
PerFect TCS II ist besonders für die Zahneischkonturierung aus
ästhetischen Gründen hervorragend geeignet. Häug kann ein
kleiner Eingriff das Erscheinungsbild des Patienten stark verbessern.
Mit Sorgfalt und Übung kann eine präzise Kontrolle über den Umfang
des zu entfernenden Gewebes erreicht und somit hervorragende
ästhetische und therapeutische Ergebnisse erzielt werden. Zusätzlich
reduzieren die weichen, druckfreien Schnittbewegungen die Zeit,
die für die meisten ästhetischen Formgebungsverfahren erforderlich
ist. Für die ästhetische Zahneischkonturierung können die gerade
Messerelektrode oder die längliche Schlingenelektrode verwendet
werden. Das Gewebe in dünnen Schichten nacheinander abschälen
oder „abhobeln“, bis das gewünschte Aussehen erreicht ist.
Daran denken, das Gewebe 10–15 Sekunden abkühlen zu lassen,
bevor erneut im selben Bereich geschnitten wird.
Die Abbildungen 13 und 14 zeigen, wie der Chirurg das schiefe
Lächeln des Patienten aufgrund einer ausgeprägten Asymmetrie des
Zahneischstands an den Eckzähnen korrigiert hat.
4. Technische Informationen
PerFect TCS II-Elektrochirurgiegerät
Coltène/Whaledent Inc. Katalognr. S8230CE, S8230UK, S8240,
S8115 und S8100 (zusätzliche Suffixe werden zur Angabe der
unterschiedlichen im Lieferumfang inbegriffenen Elektrodentypen
und -mengen verwendet)
Allgemeines
Maße: 108 x 159 x 222 mm
(4 1/8 x 6 1/4 x 8 3/4”)
Gewicht (Gerät und
angeschlossener Fußschalter): 2,4 kg (5,29 lbs.)
Sicherheitsstandards IEC 60601-1/1988, A1 und A2
IEC 60601-2-2/2001
EMC Standards IEC60601-1-2
S8115 und S8100 US-Wechselstromstecker mit drei
achen Kontakten (NEMA 5-15P)
S8230CE Europäischer Wechselstromstecker mit Erde
(IEC 60884-1 CEE7 VII)
S8230UK Britischer Wechselstromstecker mit drei Kontakten
mit Sicherung (BS 1363)
S8240 Australischer Stecker mit drei Kontakten
(AS 3112:2000, NZS 198)
Klassifizierung
Elektrik: Klasse I, Schutzleiter in Netzkabel
Typ: Typ BF
Gerät nicht geeignet zur Verwendung mit BRENNBAREN
ANÄSTHESIEGEMISCHEN MIT LUFT oder MIT SAUERSTOFF ODER
STICKSTOFFOXID.
Gerätegrenzwerte
Höchstwert für den Betrieb mit Unterbrechungen: 10s aktiviert,
mindestens 30s nicht aktiviert. D. h. für den kontinuierlichen Einsatz
darf das Gerät nicht länger als 10 Sekunden aktiviert werden. Darauf
muss eine Ruhepause von 30 Sekunden folgen.
Elektrik
Maximale Stromaufnahme 135 Watt
Wechselstromnetzspannung
S8100: 100 VAC ± 10%, 50/60 Hz
S8115: 115 VAC ± 10%, 50/60 Hz
S8230CE, S8230UK: 230 VAC ± 10%, 50/60 Hz
S8240: 240 VAC ± 10%, 50/60 Hz
Maximalleistung CUT (Schneiden) 55 Watt, ± 10%
Maximalleistung COAG (Koagulieren) 33 Watt, ± 10%
Ausgangswiderstand 600 Ohm
Nenn-Betriebsfrequenz 3,68 MHz
Modulationsfrequenz Coag 120 Hz
Modulationswellenform Coag Rechteckimpuls
Transport- und Lagerbedingungen
Temperatur -40°C bis +70°C (-40°F bis 158°F)
Relative Feuchtigkeit 10% bis 100% einschl. Kondensation
Atmosphärischer Druck 500 hPa bis 1060 hPa
(7,25 psi bis 15,4 psi)
Umgebungsbedingungen für den Einsatz
Temperatur -10°C bis +40°C
(14°F bis 104°F)
Relative Feuchtigkeit 30% bis 75%
Atmosphärischer Druck 700 hPa bis 1060
hPa (10,2 psi bis
15,4 psi)
<10s
>30s

16 PerFect®TCS II-Gewebekonturierungssystem
5. Anmerkungen und Warnhinweise
VORSICHT: Vor allen Wartungsarbeiten das Gerät von
der Stromversorgung trennen, indem das Netzkabel
gezogen wird.
Wartung und Kundendienst
Bei Entwicklung und Bau des PerFect TCS II wurde mit größter
Sorgfalt vorgegangen, um Zuverlässigkeit und eine lange
Nutzungsdauer zu gewährleisten. Abgesehen vom Schutz des
Geräts vor falscher Bedienung oder Beschädigung sind nur minimale
Wartungsmaßnahmen erforderlich. Sollte das PerFect TCS II nicht wie
angegeben funktionieren, wenn eine Komponente fallen gelassen
oder grob behandelt wird oder Schäden ersichtlich sind, darf das
Gerät nicht verwendet werden. Zur Reparatur an den Händler oder
Coltène/Whaledent senden. Das Gerät und sein Zubehör müssen
regelmässig auf Beschädigungen oder Verschleiss sichtgeprüft
werden. Eine jährliche Überprüfung der Leistungseigenschaften
wird empfohlen.
VORSICHT: Vor den folgenden Wartungsarbeiten das PerFect
TCS II von der Stromquelle trennen.
Sterilisation der Elektroden
Aus Sicherheitsgründen und für eine optimale Leistung alle Elektroden
vor dem ersten und nach jedem weiteren Einsatz sterilisieren.
1. Mit einer Bürste, Seife und Wasser alle Rückstände von der
Elektrode entfernen. Den Draht nicht verbiegen.
2. In einem Ultraschallreiniger (bspw. dem Coltène/Whaledent
BioSonic®-Ultraschallreiniger) mit Allzweckreinigungsgerät
ohne Ammonium reinigen, das entsprechend den
Herstelleranweisungen verdünnt wurde. Entnehmen und
gründlich abspülen.
3. Die Elektrode durch Autoklavieren bei 132 °C 15 Minuten
sterilisieren. Dabei einen Beutel entsprechend den Anweisungen
für das Sterilisationsgerät verwenden. Keine trockene
Hitze, Kaltsterilisation oder Chemieklav verwenden. Vor
dem Zusammenbau überprüfen, dass der Steckerbereich
trocken ist.
Reinigung des Geräts und des Handgriffkabels
1. Die Handgriffkabeleinheit kann mit Gazekompressen gereinigt
werden, die in 70%gem Ethylalkohol getränkt wurden.
Hierfür muss das Kabel vom Gerät getrennt werden. Vor
der Verwendung den Steckerbereich gründlich mit einem
trockenen Tuch sowie durch vorsichtiges Trockenblasen des
Steckers trocknen.
2. Das Gerät kann mit Gazekompressen gereinigt werden, die
mit 70%gem Ethylalkohol angefeuchtet wurden. Hierfür muss
es von der Stromquelle getrennt werden. Vor dem erneuten
Gebrauch sicherstellen, dass das Gerät gut trocken ist.
3. Die Neutralelktrode kann mit Gazekompressen gereinigt
werden, die mit 70%gem Ethylalkohol angefeuchtet wurden.
Hierfür muss sie vom Gerät getrennt werden. Vor dem erneuten
Gebrauch sicherstellen, dass die Elektrode gut trocken ist.
VORSICHT: Der folgende Test muss von einem Techniker
durchgeführt werden, der in der Wartung von
Elektrochirurgiegeräten geschult wurde und dem die Gefahr
von Funkfrequenz-Verbrennungen bekannt ist.
ANALYSEGERÄT FÜR DAS ELEKTROCHIRURGIEGERÄT
Der Einsatz eines Analysegeräts für Elektrochirurgiegeräte zur
Messung der Leistung des PerFect TCS II ergibt wahrscheinlich
PerFect TCS II-Leistungsausgang vs. Reglereinstellung
Strom (Watt)
Reglereinstellung
CUT COAG
PerFect TCS II-Ausgangsleistung
PerFect TCS II-Leistungsausgang vs. Lastwiderstand
Strom (Watt)
Lastwiderstand (Ohms)
CUT 3 CUT 6 COAG 3 COAG 6
Strom vs. Last nach Einstellung und Modus
PerFect TCS II Ausgangsspannung ohne Last vs. Einstellung
Spannungsspitze
Reglereinstellung
CUT COAG
Ausgangsspannung offener Stromkreis
0.00
10.00
20.00
30.00
40.00
50.00
60.00
100 200 500 600 1000 2000
CUT 3 CUT 6 COAG 3 COAG 6

Benutzerhandbuch 17
eine geringere Ausgangsleistung als erwartet. Die kapazitive
Ladung, die durch den Eingangsstromkreis des Analysegeräts
ausgelöst wird, führt zu einer Verstellung des Ausgangsstromkreises
des PerFect TCS II-Elektrochirurgiegeräts. Messungen können
dennoch durchgeführt werden, indem der Anschluss direkt an den
BNC-Stecker an der Seite des PerFect TCS II angeschlossen wird,
statt das mitgelieferte Kabel zu verwenden. Ohne das Kabel wird
der kapazitive Ausgangswiderstand um 250 pF reduziert. Ein
zusätzlicher kapazitiver Widerstand muss hinzugefügt werden,
um den kapazitiven Ausgangswiderstand insgesamt auf 250 pF zu
bringen (Eingangsstromkreis des Analysegeräts plus zusätzlichem
Kondensator). Ein dem Ausgang hinzugefügter Kondensator muss
für mindestens 1000 V ausgelegt sein.
VORSICHT
1. Nicht versuchen, das PerFect TCS II oder eine seiner
Komponenten zu öffnen.
2. Für einen sicheren Betrieb muss das PerFect TCS II an
eine dreiadrige, geerdete Steckdose angeschlossen sein.
Keine Steckdosenadapter verwenden, die nicht über
Erdung verfügen.
3. Elektrochirurgie sollte nicht in einem Umkreis von ca.
4,5 Metern von Personen mit aktiven Implantaten, wie
Schrittmachern, Cochlear-Implantaten oder Nervenstimulatoren
eingesetzt werden.
4. Das PerFect TCS II nicht in der Gegenwart von brennbaren
Anästhetika oder explosiven Gasen verwenden.
5. Metall leitet Funkfrequenzstrom genau wie Elektrizität.
Teilgebisse entfernen, falls möglich, und die Anwesenheit von
fest montierten Teilgebissen überprüfen. Metallrestaurationen
können Energie über den anästhesierten Bereich hinaus leiten
und zu Beeinträchtigung des Patienten führen.
6. Sicherstellen, dass Metallrestaurationen, Knochen oder Zähne
nicht mit aktiven Elektroden in Kontakt kommen. Obwohl
vorübergehender Kontakt nicht schädlich sein muss, kann
ein längerer Kontakt Schäden verursachen. Alle während
der Elektrochirurgie verwendeten Instrumente sollten aus
nichtleitendem Kunststoffmaterial bestehen. Während
des elektrochirurgischen Eingriffs sollten Watterollen oder
Gazekompressen im Mund des Patienten feucht gehalten
werden. Daran denken, die Elektrode immer zu deaktivieren,
wenn sie von der Operationsstelle entfernt und bevor sie
gereinigt oder ausgetauscht wird. Hautkontakt (z. B. mit Arm
oder Körper des Patienten) sollte vermieden werden, z. B.
durch eine Schicht trockene Gaze.
7. WennHochfrequenz-ChirurgiegeräteundÜberwachungsgeräte
gleichzeitig am selben Patienten verwendet werden, sollten
alle Überwachungselektroden so weit wie möglich von
der chirurgischen Elektrode entfernt platziert werden. Von
der Verwendung von Nadelelektroden zur Überwachung
wird abgeraten. In jedem Fall wird empfohlen, bei
Überwachungssystemen mit Hochfrequenz strombegrenzende
Vorrichtungen einzusetzen.
8. Kabel zu den chirurgischen Elektroden so anordnen, dass
ein Kontakt mit dem Patienten oder anderen leitenden
Vorrichtungen vermieden wird.
9. Die Elektroden außerhalb der Reichweite des
Patienten anbringen.
10. Scheinbar geringe Leistung oder Funktionsstörungen bei
normaler Betriebseinstellung können auf eine fehlerhafte
Positionierung der Neutralelektrode oder einen mangelhaften
Kontakt an ihren Anschlüssen hinweisen.
11. DieVerwendungvonbrennbarenAnästhetikaoderoxidierenden
Gasen wie Stickstoffoxid und Sauerstoff ist zu vermeiden.
Zur Reinigung und Desinfektion sollten nichtbrennbare
Mittel verwendet werden. Klebstofflösungsmittel sollten
verdampfen können, bevor Hochfrequenz-Elektrochirurgie
angewandt wird. Einige Materialien können durch Funken
entzündet werden, die beim normalen Gebrauch des Gerätes
entstehen (z. B. Baumwolle oder Gaze, die mit Sauerstoff
saturiert sind). Durch Elektrochirurgie können endogene Gase
entzündet werden.
12. Durch den Betrieb von Hochfrequenz-Chirurgiegeräten kann
der Betrieb anderer elektrischer Geräte gestört werden.
Bei Störung das Gerät deaktivieren oder den Abstand
zum beeinträchtigten Gerät vergrößern. Auch durch
Anschluss an einen anderen Stromkreis kann die Störung
reduziert werden.
13. Das Zubehör, insbesondere die Elektroden und ihre Kabel,
regelmäßig auf Schäden an der Isolierung überprüfen.
14. Zwischen Schnitten im selben Bereich 10–15 Sekunden
abkühlen lassen, damit die Hitze sicher abgeleitet
werden kann.
15. Die mit dem Elektrochirurgie-Gerät eingesetzten Elektroden
können nur für einen begrenzten Zeitraum verwendet
werden und sind nach zwanzig (20) Autoklavierzyklen zu
ersetzen bzw. früher, wenn sich Anzeichen von Verschleiss
oder Abnutzung bemerkbar machen.
16. Mit diesem Gerät ausschließlich Originalzubehör von
Coltène/Whaledent verwenden. Die aktive Elektrode
und der Griff sind 100 % Hi-Pot getestet bis 3000 VAC.
Spitzenspannungen der aktiven Elektrode können 450
V erreichen, daher ist eine Auslegung auf 675 V bei
3,68 MHz erforderlich. Die Neutralelekrode wird normalerweise
keinen Spitzenspannungen ausgesetzt, muss jedoch für bis
zu 4000 VAC isoliert sein.
17. Störungen des Hochfrequenz-Elektrochirurgiegeräts oder
übermäßige elektrische Interferenz können zu einem
unerwünschten Anstieg oder Abfall des Stromausgangs
bzw. zu unbeabsichtigter Aktivierung führen. Bei elektrischer
Störung das Gerät deaktivieren oder den Abstand zum
störungsverursachenden Gerät vergrößern. Auch durch
Anschluss an einen anderen Stromkreis kann die Störung
reduziert werden.
18. Wenn der Hochfrequenzstrom durch einen relativ kleinen
Körperdurchschnitt ießen kann, kann es wünschenswert
sein, bipolare Techniken zu verwenden, die nicht mit diesem
Gerät möglich sind.
Anästhesie
Bei allen elektrochirurgischen Verfahren sind lokale oder Vollnarkose
einzusetzen. Wie bei allen anderen chirurgischen Geräten kann der
Patient vorübergehende postoperative Schmerzen aufgrund des
Einsatzes der Elektrochirurgie verspüren, nachdem die Wirkung der
Anästhesie abgeklungen ist.
Geruchskontrolle
Der durch Elektrochirurgie verursachte Geruch kann durch
leistungsstarke Absaugung zwischen Mund und Nase des Patienten
vermieden werden, bspw. mit dem Coltène/Whaledent VacEjector®.

18 PerFect®TCS II-Gewebekonturierungssystem
Kontraindikationen
Nicht an Patienten mit aktiven Implantaten verwenden. Es dürfen
keine Metallrestaurationen mit der Elektrodenspitze in Kontakt
kommen.
Produktkennzeichnungen
Gerät vom Typ BF
Geerdete neutrale Elektrode
Achtung, siehe Begleitdokumentation
Fußschalterkabel
Handgriffstecker
Modus „Schneiden“
Modus „Koagulieren“
Nichtionisierende
elektromagnetische Strahlung
Maximale Anwendungsintervalle:
10s aktiviert,
mindestens 30s nicht aktiviert.
Europäischen Richtlinie 2002/96/EC
(Waste Electrical and Electronic Equipment - WEEE)
Zubehör
S213 Neutralelekrode
S6000CE Komplette Handgriffeinheit
S6008CE Handgriffkabeleinheit
S6010A 8 sterilisierbare Elektroden (1 von jeder Sorte)
S7001 Handgriffhalter
S7010A 3 sterilisierbare Elektroden
(1 gerades Messer, 1 längliche Schlinge, 1 Koagulationskugel)
S6011A Koagulationskugel (2)
S6012A 45° gerader Schnitt (2)
S6013A 45° konischer Schnitt (2)
S6014A Gerade, runde Schlaufe (2)
S6015A 45° lange Schlaufe (2)
S6016A Gerade, lange Schlaufe (2)
S6017A Diamant Schlaufe 45° (2)
S6018A AP 90° 1 1/2 (2)
<10s
>30s
S6011A
S6012A
S6013A
S6014A
S6015A
S6017A
S6018A
S6016A
Foot Switch
Handpiece

Mode d'emploi 19
Table des matières
1. Présentation du système de modelage des tissus PerFect
Comment l'électrochirurgie unipolaire fonctionne t-elle? ....20
2. Préparer le TCS II PerFect à l'utilisation
Désemballage et configuration de l'appareil....................20
Mise sous tension de l'appareil .......................................20
Exercice préopératoire ....................................................21
Exercice d'incision ..........................................................21
Exercice de coagulation ..................................................21
Principes généraux de la technique électrochirurgicale ....21
Placement de l'équipement ............................................21
L'électrode neutre ..........................................................21
Le trait d'incision............................................................22
3. Guide clinique du TCS II PerFect
Contrôle du saignement.................................................22
Accès au caries...............................................................22
Modelage gingival : création d'une
récession parodontale.....................................................22
Modelage gingival : retrait de l'excédent tissulaire...........22
Modelage gingival : modelage esthétique .......................23
4. Informations techniques
Appareil d'électrochirurgie TCS II PerFect .......................23
Généralités.....................................................................23
Classification..................................................................23
Électriques .....................................................................23
Conditions de transport et stockage ...............................23
Conditions ambiantes de fonctionnement.......................23
5. Remarques spéciales et précautions
Maintenance et réparation .............................................24
Stérilisation des gaines d’electrodes ................................24
De l’appareil de nettoyage et du cordon de la pièce à main ...24
Analyseur électrochirurgical............................................24
Anesthésie .....................................................................25
Contrôle des odeurs.......................................................25
Marquage des produits...................................................26
Accessoires ....................................................................26
Bibliographie................................................................101
6. Figures
Figure 1 - figure 8 ........................................................102
Figure 9 - figure 14.......................................................103

20 Système de modelage des tissus TCS II PerFect®
Le TCS II PerFect®est destiné à être utilisé par des chirurgiens-
dentistes autorisés ayant reçu une formation appropriée en
application de l'électrochirurgie. Ce guide n'a pas la prétention
de remplacer les instructions formelles.
L'appareil doit être utilisé uniquement dans les endroits où la
tension secteur nominale standard est indiquée pour l'utilisation
de l'équipement.
Attention : En vertu de la loi fédérale, cet appareil ne
peut être vendu que sur ordonnance médicale ou par un
professionnel de la santé dûment autorisé.
1. Présentation du système de modelage des
tissus PerFect
Peu de technologies disposent d'un potentiel égal à celui de
l'électrochirurgie en matière de d'optimisation de l'efficacité et
d'amélioration des résultats de la prise en charge des tissus mous.
Avec un investissement de temps décent pour acquérir les aptitudes
nécessaires, l'électrochirurgie peut s'avérer extrêmement gratifiante
pour le praticien comme le patient.
Dans cet esprit, Coltène/Whaledent a développé le système de
modelage des tissus PerFect (un appareil d'électrochirurgie de pointe
abordable, conçu pour être attrayant à l'égard de l'utilisateur novice
ou expérimenté en électrochirurgie. Le TCS II PerFect peut simplifier
et optimiser les résultats de diverses procédures quotidiennes
réalisées par quasiment tous les dentistes, notamment le contrôle
du saignement, l'accès aux caries et le modelage esthétique de
la gencive.
Comment l'électrochirurgie unipolaire fonctionne t-elle?
L'électrochirurgie est une technologie approuvée utilisée depuis de
nombreuses années en dentisterie et médecine. Elle utilise l'énergie
des fréquences radioélectriques (RF), similaire à celle utilisée en
radiodiffusion, pour volatiliser, inciser et coaguler les tissus mous.
L' énergie des fréquences radioélectriques utilisée par le TCS II
PerFect a la capacité de séparer et coaguler les tissus parce qu'elle
focalise l'énergie thermique au niveau de la petite électrode active.
Une énergie thermique suffisante est générée sur son passage
pour séparer et coaguler efficacement alors que l'électrode active
demeure froide.
L'énergie haute fréquence focalisée sur l'électrode active est
renvoyée à l'appareil d'électrochirurgie à travers la grande électrode
neutre, qui est placée à l'arrière du fauteuil dentaire, dos au patient,
lors de son utilisation. L'électrode neutre permet un passage de
l'énergie efficace et prévisible.
Selon l'utilisation envisagée, le rendement énergétique d'un appareil
d'électrochirurgie peut être en partie ou complètement rectifié.
Une tension de sortie complètement rectifiée est appropriée en cas
d'incision, alors que la meilleure façon d'effectuer une coagulation
est d'utiliser une tension de sortie partiellement rectifiée. Pour ces
raisons, le TCS II PerFect dispose de deux modes de tension de
sortie : « Cut » et « Coag. » L'intensité de ces modes peut être au
besoin réglée par l'utilisateur.
Un incision au scalpel déchire et sectionne les tissus. L'incision
électrochirurgicale volatilise les tissus se trouvant sur le passage de
l'électrode. Lorsque la puissance de sortie est correctement réglée,
l'électrode incise sans se heurter à une résistance, ce qui permet un
extraordinaire degré de contrôle et de précision.
2. Préparation du TCS II PerFect à
l'utilisation
Désemballage et configuration de l'appareil
Retirer le TCS II PerFect du carton d'expédition et vérifier qu'il n'a pas
été endommagé lors de l'expédition. Comparer le numéro de série
de l'appareil (figure 2) au numéro de série figurant sur le carton
d'expédition pour s'assurer qu'ils concordent (si ce n'est pas le cas,
contacter votre revendeur). Remplir le bon de garantie et l'envoyer
à Coltène/Whaledent dans un délai de 10 jours après réception
du colis.
Voir les figures 1 et 2 et suivre les étapes ci-dessous pour préparer
votre TCS II PerFect à l'utilisation. L'appareil et les accessoires sont
illustrés à la figure 3.
• Avant de raccorder l'appareil à un bloc d'alimentation c.a.,
s'assurer que la commande d'intensité de sortie Coag/Cut est au
centre, en position (« 0 »), et que l'interrupteur d'alimentation
est en position « Off » (« O »).
Ce produit est fourni avec un raccord d'entrée pour cordon
d'alimentation CEI 320 utilisant un cordon amovible (cordon
d'alimentation) à brancher à l'arrière de l'appareil. Veiller à brancher
le cordon amovible dans le raccord d'entrée avant de passer à l'étape
suivante.
• Brancher la che du cordon d'alimentation dans une prise de
terre à trois broches.
• Brancher le connecteur BNC du câble de la pièce à main dans le
jack pour pièce à main situé sur le côté droit de l'appareil.
• Le support de pièce à main peut être placé sur n'importe
quel côté de l'appareil en l'enclenchant dans l'encoche de
positionnement située en dessous de la bordure latérale de
l'appareil. Une fois fixé, le support de la pièce à main ne peut
pas être retiré.
• Ce matériel réalise de l’électrochirurgie unipolaire. Une électrode
dispersive doit être placée sous le dos du patient pour assurer le
retour du courant de haute fréquence en toute sécurité.
• Insérer la che du câble de l'électrode neutre dans le jack pour
électrode neutre situé sur le côté droit de l'appareil.
• Sélectionner une des trois gaines pour électrodes fournies
avec l'appareil (couteau droit, anse longue ou boule pour
coagulation). Pour assembler la pièce à main, tenir le connecteur
pivotant et enfiler l'électrode dans le jeux pièce à main et
cordon. Pour la désassembler, inverser simplement la rotation.
Attention : Les gaines d'électrodes doivent être stérilisées
avant toute utilisation. (Voir la rubrique Stérilisation.)
Activation de l'appareil
L'interrupteur d'alimentation est situé à l'arrière, à côté du
connecteur d'entrée du cordon d'alimentation CEI 320. Lorsque
l'interrupteur d'alimentation est en position « On » (« I »), le voyant
d'alimentation vert doit être allumé et tous les autres voyants
doivent être éteints. Si le voyant rouge est allumé, l'électrode neutre
n'est pas correctement raccordée ou est défectueuse, et elle doit
être remplacée. Commencer par tourner la commande d'intensité
de sortie vers la gauche (Coag) ou la droite (Cut). On augmente
l'intensité de sortie en éloignant la commande du centre dans
n'importe quelle direction. Il peut s'avérer nécessaire de dépasser
la position « 1 » pour pouvoir générer une tension de sortie. Le
TCS II PerFect est maintenant en position « Ready ». L' appareil ne
nécessite aucune période de réchauffement.
Other manuals for PerFect TCS II
1
Table of contents
Languages:
Other Coltene Medical Equipment manuals