manuals.online logo
Brands
  1. Home
  2. •
  3. Brands
  4. •
  5. Commax
  6. •
  7. Door Lock
  8. •
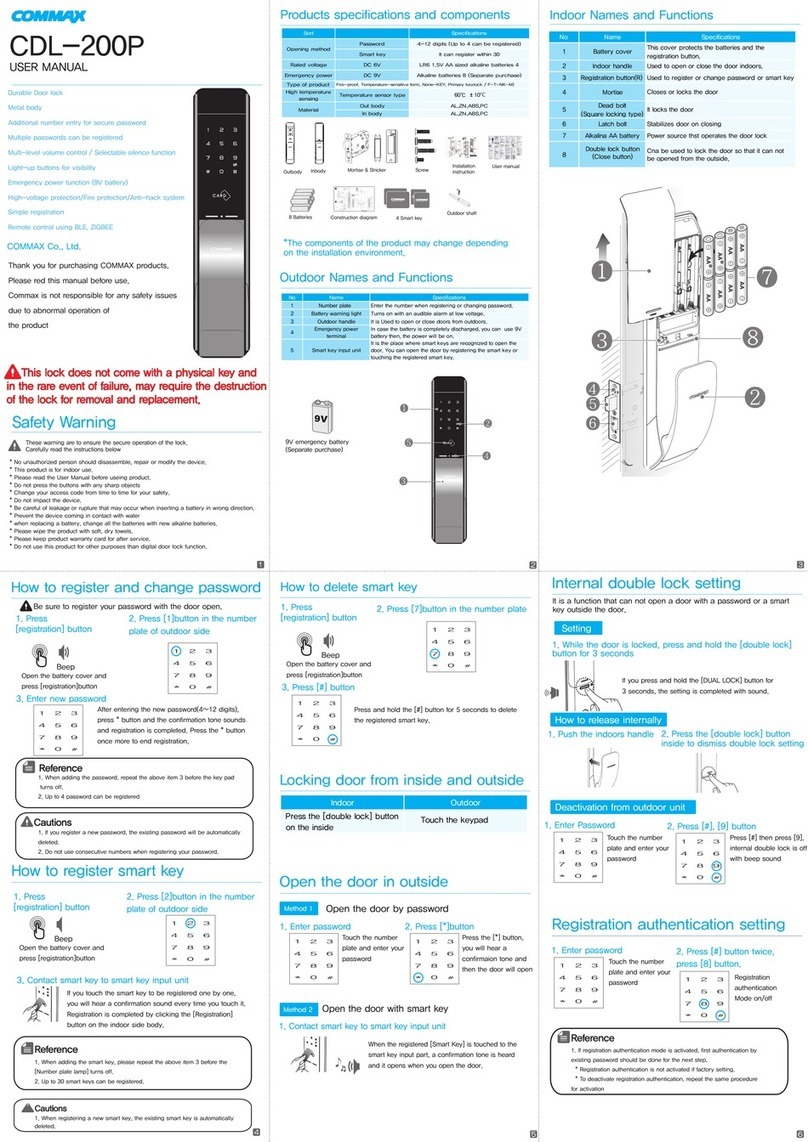
  9. Commax CDL-210P User manual

Commax CDL-210P User manual

CDL-210P
USER MANUAL
* No unauthorized person should disassemble, repair or modify the device.
* This product is for indoor use.
* Please read the User Manual before useing product.
* Do not press the buttons with any sharp objects
* Change your access code from time to time for your safety.
* Do not impact the device.
* Be careful of leakage or rupture that may occur when inserting a battery in wrong direction.
* Prevent the device coming in contact with water
* when replacing a battery, change all the batteries with new alkaline batteries.
* Please wipe the product with soft, dry towels.
* Please keep product warranty card for after service.
* Do not use this product for other purposes than digital door lock function.
Products specifications and components
Outdoor Names and Functions
*The components of the product may change depending
on the installation environment.
This lock does not come with a physical key and
in the rare event of failure, may require the destruction
of the lock for removal and replacement.
Open the door in outside
Method 1 Open the door by password
1. Enter password 2. Press [*]button
Touch the number
plate and enter your
password
Press the [*] button,
you will hear a
confirmaion tone and
then the door will open
Method 2 Open the door by fingerprint
1. Contact registered fingerprint to fingerprint input unit
COMMAX Co., Ltd.
Thank you for purchasing COMMAX products.
Please red this manual before use.
Commax is not responsible for any safety issues
due to abnormal operation of
the product
Safety Warning
These warning are to ensure the secure operation of the lock.
Carefully read the instructions below
How to register and change password
Be sure to register your password with the door open.
3. Enter new password
After entering the new password(4~12 digits),
press * button and the confirmation tone sounds
and registration is completed. Press the * button
once more to end registration.
1. If you register a new password, the existing password will be automatically
deleted.
2. Do not use consecutive numbers when registering your password.
Cautions
1. Press
[registration] button
2. Press [1]button in the number
plate of outdoor side
Beep
Open the battery cover and
press [registration]button
1. When adding the password, repeat the above item 3 before the key pad
turns off.
2. Up to 4 password can be registered
Reference
Indoor Names and Functions
9V emergency battery
(Separate purchase)
No Name Specifications
1 Battery cover This cover protects the batteries and the
registration button.
2 Indoor handle Used to open or close the door indoors.
3 Registration button(R) Used to register or change password or smart key
4 Mortise Closes or locks the door
5Dead bolt
(Square locking type) It locks the door
6 Latch bolt Stabilizes door on closing
7 Alkalina AA battery Power source thst operates the door lock
8Double lock button
(Close button)
Cna be used to lock the door so that it can not
be opened from the outside.
Locking door from inside and outside
Indoor Outdoor
Press the [double lock] button
on the inside Touch the keypad
Internal double lock setting
Setting
How to release internally
It is a function that can not open a door with a password or a smart
key outside the door.
1. While the door is locked, press and hold the [double lock]
button for 3 seconds
If you press and hold the [DUAL LOCK] button for
3 seconds, the setting is completed with sound.
2. Press the [double lock] button
inside to dismiss double lock setting
Deactivation from outdoor unit
1. Enter Password 2. Press [#], [9] button
Press [#] then press [9],
internal double lock is off
with beep sound
Touch the number
plate and enter your
password
Multi-level volume control / Selectable silence function
Light-up buttons for visibility
High-voltage protection/Fire protection/Anti-hack system
Remote control using ZIGBEE
Durable Door lock
Metal body
Additional number entry for secure password
Multiple passwords can be registered
Emergency power function (9V battery)
Simple registration
Outbody Inbody Mortise & Stricker Screw Installation
instruction
User manual
8 Batteries Construction diagram 4 Smart key Outdoor shaft
How to register fingerprint
1. Press
[registration] button
2. Press [4]button in the number
plate of outdoor side
3. Contact fingerprint to be registered to fingerprint input unit
Beep
Open the battery cover and
press [registration]button
After contacting the fingerprint to the fingerprint
input part four times, register the registration
by pressing the [register] button on the room body.
1. Up to 100 fingerprints can be registered.
2. If registration is not in progress for 20 seconds, registration will be canceled.
Reference
How to delete fingerprint, smart key
2. Press number in the number plate
3. Press [#]button
Press and hold the [#] button for 5 seconds to delete
the registered fingerprint or smart key
- Delete fingerprint: No 9.
- Delete smart key: No 7.
1. Press
[registration] button
Beep
Open the battery cover and
press [registration]button
1. Pull the indoors handle
Sort Specifications
Password 4-12 digits (Up to 4 can be registered)
RF key It can register within 30
Fingerprint It can register within 100
Rated voltage DC 6V LR6 1.5V AA sized alkaline batteries 8
Emergency power DC 9V Alkaline batteries 8 (Separate purchase)
Type of product
High temperature
sensing Temperature sensor type 60℃ ± 10℃
Out body AL,ZN,ABS,PC
In body AL,ZN,ABS,PC
Opening method
Fire-proof, Temperature-sensitive form, None-key, Primary keylock / F-T-NK-M
material
No Name Specifications
1 Number plate
Enter the number when registering or changing password.
2 Battery warning light Turns on with an audible alarm at low voltage.
3 Outdoor handle It is Used to open or close doors from outdoors.
4Emergency
power terminal
In case the battery is completely discharged, you can
use 9V battery then, the power will be on.
5 Fingerprint input unit You can register your fingerprint, open the door by
using the fingerprint registered.
6 Smart key input unit
It is the place where smart keys are recognized to
open the door. You can open the door by registering
the smart key or touching the registered smart key.
1. Press
[registration] button
2. Press [2]button in the number
plate of outdoor side
Beep
Open the battery cover and
press [registration]button
3. Contact smart key to smart key input unit
If you touch the smart key to be registered one by one,
you will hear a confirmation sound every time you touch it.
Registration is completed by clicking the [Registration]
button on the indoor side body.
1. When registering a new smart key, the existing smart key is automatically
deleted.
Reference
Cautions
1. When adding the smart key, please repeat the above item 3 before the
[Number plate lamp] turns off.
2. Up to 30 smart keys can be registered.
How to register smart key
Open the door with smart key
1. Contact smart key to smart key input unit
Method 3
When the registered [Smart Key] is touched to the
smart key input part, a confirmation tone is heard
and it opens when you open the door.
Deadbolt Jam alert
Volume Adjustment
Deadbolt of indoor unit must be come out from mortise before setting
How to
1. Enter Password 2. Press [#] button
Touch the number
plate and enter
your password
3. Press [3] or [6] to adjust volume
[3] for volume up
[6] for volume down
1. Available total 8 levels of volume sound
2. If sound pause mode, numbers are only flicking without sound
Reference
When deadbolt is jammed during door open/close, alert sound of
bee bee bee bee” rings 3 times.
1.If no sound deactivation or door lock malfunction, product installed position
has to be adjusted. Please contact your local installer or service provider.
Caution
Door Open Alert during automatic lock setting
Battery Replacement Alert
1. Lifetime of battery can be varied according to manufacturers, date of production,
working condition. (Expected lifetime : 10 months assuming no wireless operation,
AA type alkaline 8ea, 10 times per one day use)
2. If battery liquid leaks out, product can be damaged. Regular checking is
recommended – every 6 months.
3. Battery lifetime might be shortened if wireless module is activated.
Caution
To inform door open status during automatics lock
setting, alert sound rings 2 times with each 15 seconds
interval if door opened.
Registration authentication setting
1. Enter password
2. Press [#] button twice, press [8] button.
Touch the number plate and enter your password
Registration authentication Mode on/off
1. If registration authentication mode is activated, first authentication by
existing password should be done for the next step.
* Registration authentication is not activated if factory setting.
* To deactivate registration authentication, repeat the same procedure
for activation
Reference
Burglar Alert
Summary of how to use
Self-Diagnosis Table by each LED number flicking
To see the status of product by means of checking flicking number
1. Press [Registration] button.
BEEP
Open the battery cover and
press [Registration] button for 5 secs
3. Press [#] button for 2 secs.
Factory default mode is completed with beep sound.
High Temperture Alarm
Once extremely high temperature is detected (60℃± 10℃), locker is automatically
released to open the door with huge sound to secure user
’
s safety.
9V emergency battery
(sold separately)
Sound Pause Mode
Sound is back to the original volume if pause mode is operated once
Reference
Temporary silence function (1 time) regardless latest volume setting
How to
1. Touch number plate and press [#]
2. Press [*] after password or, contact smart key/ fingerprint
to open the door.
CDL-210P_CAN
If door to be opened by abnormal operation such
as door gap break through, burglar alert rings
with more than 80db noisy sound.
How to deactivate burglar or temperature alert
Remove batteries or [password + *], [contact fingerprint] , [smart key touch]
* if temperature is too high, no deactivation.
If battery alert light is on on number plate or beep sounds ring, battery has to
be replaced. All batteries must be replaced with new one at once.
Press [Password] and [ * ] to open the door while contacting
terminals of 9V battery to emergency power outlet.
When door can not be opened due to fully discharged battery.
1. Contact the terminals of 9V battery to emergency power outlet
- Malfunction of fingerprint module
ACTION SELF-DIAGNOSIS
Flicking ALL LEDs - Anti-mischief alert and 1 minute pause
Flicking LED number 2 - Error on password
Flicking LED number 3
- Full of registered password, fingerprint
- No fingerprint registered
Flicking LED number 4 - Deadbolt Jam
Flicking LED number 5 - Burglar Alert
Flicking LED number 6 - Unregistered password
Flicking LED number 7 - Already registered address
Flicking LED number 8 - Fire Alarm
Flicking LED number 9 - Dual lock from Indoor unit
Flicking LED number 0
Regulatory Compliance
This equipment has been tested and found to comply with the limits for a Class B digital device,
pursuant to Part 15 of the FCC Rules.These limits are designed to provide reasonableprotection
against harmful interference in a residential installation. This equipment generates, uses, and
can radiate radio frequency energy and, if not installed and used in accordance with the
instructions, may cause harmful interference to radio communications.
However, there is no guarantee that interference will not occur in a particularinstallation. If this
equipment does cause harmful interference to radio or televisionreception, which can be
determined by turning the equipment off and on, the user is encouragedto try to correct the
interference by one or more of the following
measures:
•Reorient or relocate the receiving antenna.
•Increase the separation between the equipment and receiver.
•Connect the equipment into an outlet ona circuit different from that to which
the receiver is connected.
•Consultthe dealer or an experiencedradio/TV technician for help.
to the following two conditions:
( 1 ) this device may not cause interference, and ( 2 ) this device must accept any interference,
including interference that may cause undesired operation of the device.
This device complies with ISED radiation exposure limits set forth for an uncontrolled
environment and meets the ISED radio frequency (RF) Exposure Guidelines. It is desirable that
it should be installed and operated keeping the radiator at least 20 cm or more away from
person’s body.
This product complieswith standardsestablishedby the followingregulatory bodies:
• Federal Communications Commission(FCC)
• Industry Canada
IMPORTANT! Changesor modifications not expressly approved by the manufacturer
could void the user’s authority to operate the equipment.
FCC Radiation Exposure Statement
The equipment complies with FCC Radiation exposure limits set forth for uncontrolled
environment. This equipment should be installed and operated with minimum distance 20 cm
Industry Canada
This device complies with Industry Canada licence exempt RSS standard(s). Operation is subject
Canada, avis d’Industrie Canada (IC)
Cet appareilest conforme aux normes RSS exemptes de licenced’Industrie Canada.
Son utilisation est soumise aux deux conditions.
suivantes : (1) cet appareiln’engendre pas d’interférences, et (2) cet appareildoit tolérer tout
type d’interférences, notamment les interférences pouvant provoquerune utilisation non désirée
del’appareil.
Cet équipement est conforme aux limites établies par Industrie Canadaen matière d’exposition
aux radiations dans un environnement non contrôlé. Cet équipement doit être installé et utilisé
avec une distance minimale de 20 cm entre le radiateur et votre corps.between the radiator and
your body.
FCC
This device complies with Part 15 of the FCC Rules.Operationis subject to the followingtwo
conditions:
1) this device may not cause harmful interference, and
2) this device must acceptany interference received,includinginterference that may cause
undesired operation.
Function D efaul t
Fingerprint registration [Registration] ⇒ [4] ⇒ Fingerprint registration 4 times ⇒
[Registration]
Delete all fingerprints [Registration] ⇒ [9] ⇒ [#] More than 5 seconds
Password registration/change 1234 [Registration] ⇒ [1] ⇒ Password to register ⇒ [*] ⇒ [*]
Smart key registration
[Registration] ⇒ [2] ⇒ Smart key touch to smart key input unit ⇒
[Registration]
Delete all card
[Registration] ⇒ [7] ⇒ [#] button More than 5 seconds
Open the door indoors Pull the doorlock handle
Close the door indoors Press the [Doublel Lock]
Password: Touch the Number Plate ⇒ Password ⇒ [*]
Smart key: Smart key touch to smart key input unit
Close the door outdoors After closing the door, Touch the Number Plate
Set registration
authenitication mode Off Password ⇒ [#] [#] ⇒ [8]
Internal dual lock LED setting Password ⇒ [#] [#] ⇒ [5]
Double lock setting Off Hold the [Double lock] of indoor doorlock for 3 seconds
1. Pull the indoor doorlock handle
2. Press the [Double lock] of indoor doorlock
Password ⇒ [#] ⇒ [9]
Etiquette mode function [#] ⇒ Enter password ⇒ [*]
Volume up: Password ⇒ [#] ⇒ [3]
Volume down: Password ⇒ [#] ⇒ [6]
Indoor: Remove the battery
Outdoor: Password ⇒ [*]
* Without registered master password
Registration: [Registration] ⇒ [1] ⇒ [Double lock] ⇒ [#] 5times
⇒ [New master password] ⇒ [*]
* When there is a registered master password
Registration: [Registration] ⇒ [1] ⇒ [Double lock] ⇒ [#] 5times
⇒ [Master password] ⇒ [*] ⇒ [New master password] ⇒ [*]
Delete: [Registration] ⇒ [1] ⇒ [Double lock] ⇒ [#] 5times ⇒
[Master password/9635741] ⇒ [#] ⇒ [1] ⇒ [#]
* Without registered master password
Can't register
* When there is a registered master password
Registration: [Registration] ⇒ [1] ⇒ [Double lock] ⇒ [#] 5times
⇒ [Master password] ⇒ [*] ⇒ [New master card] ⇒ [*]
Delete: [Registration] ⇒ [1] ⇒ [Double lock] ⇒ [#] 5times ⇒
[Master password/9635741] ⇒ [#] ⇒ [2] ⇒ [#]
Delete all master passwords and
cards
Delete: [Registration] ⇒ [1] ⇒ [Double lock] ⇒ [#] 5times ⇒
[Master password/9635741] ⇒ [#] ⇒ [3] ⇒ [#]
Release internal Double lock
Register and delete master card
Buzzer volume setting
Release alram sound
Register and delete master
password
Open the door outdoors
Emergency Power
1. Press [registration] button
for 5 seconds
2. Press [1]button twce
then press [*]
Beep
Open the battery cover and
press [registration]button
1. Press [registration] button
for 5 seconds
2. Press [0]button twce
then press [*]
Beep
Open the battery cover and
press [registration]button
How to register/delete ZIGBEE
Register
Delete
Factory Reset Mode
2. Input “123578951”
when number plate lights on

Other Commax Door Lock manuals

Commax CDL-88P User manual

Commax

Commax CDL-88P User manual

Commax CDL-30LRC User manual

Commax

Commax CDL-30LRC User manual

Commax CDL-100WL User manual

Commax

Commax CDL-100WL User manual

Commax CDL-800WL User manual

Commax

Commax CDL-800WL User manual

Commax CDL-1AR User manual

Commax

Commax CDL-1AR User manual

Commax CDL-200L User manual

Commax

Commax CDL-200L User manual

Commax CDL-200P User manual

Commax

Commax CDL-200P User manual

Popular Door Lock manuals by other brands

SDC 1511S Nstallation instructions

SDC

SDC 1511S Nstallation instructions

Esco systeQ-M-SL-ESC Installation, operation and maintenance instructions

Esco

Esco systeQ-M-SL-ESC Installation, operation and maintenance instructions

Locksmart LOCKSMART ABODE User guide, installation & maintenance

Locksmart

Locksmart LOCKSMART ABODE User guide, installation & maintenance

Centurion Code lock YL-99 Programming and installation instructions

Centurion

Centurion Code lock YL-99 Programming and installation instructions

eufy Security T8501 user manual

eufy Security

eufy Security T8501 user manual

GIESSE UNICA CREMONE instructions

GIESSE

GIESSE UNICA CREMONE instructions

alpro AL2400-LP manual

alpro

alpro AL2400-LP manual

Kaba SIMPLEX 900 Series installation instructions

Kaba

Kaba SIMPLEX 900 Series installation instructions

Assa Abloy Corbin Russwin Access 600 CL33600 TCRNE1... installation instructions

Assa Abloy

Assa Abloy Corbin Russwin Access 600 CL33600 TCRNE1... installation instructions

Weiser Smartcode 10 Programming and troubleshooting guide

Weiser

Weiser Smartcode 10 Programming and troubleshooting guide

Roca SLUG 96 quick start guide

Roca

Roca SLUG 96 quick start guide

SDC Z7870 installation instructions

SDC

SDC Z7870 installation instructions

Assa Abloy ASSA 88x Series manual

Assa Abloy

Assa Abloy ASSA 88x Series manual

Schlage Lock with Built-in Alarm user guide

Schlage

Schlage Lock with Built-in Alarm user guide

Itec iFP 03 instruction manual

Itec

Itec iFP 03 instruction manual

Lloyd's LC-1298 Quick installation guide

Lloyd's

Lloyd's LC-1298 Quick installation guide

Moe's SL0211-TY-US-R user manual

Moe's

Moe's SL0211-TY-US-R user manual

EZ-ON SHS-3120 Installation quick guide

EZ-ON

EZ-ON SHS-3120 Installation quick guide

manuals.online logo
manuals.online logoBrands
  • About & Mission
  • Contact us
  • Privacy Policy
  • Terms and Conditions

Copyright 2025 Manuals.Online. All Rights Reserved.