Compak PK 100 User manual

INSTRUCTION
MANUAL
COFFEE GRINDER
PK 100

ORIGINAL INSTRUCTIONS | Quality process Ref. 002/03 | v. 2019-07-12 | K07179
2

ORIGINAL INSTRUCTIONS | Quality process Ref. 002/03 | v. 2019-07-12 | K07179
3
CONTENTS
COFFEE GRINDER
PK 100
SAFETY 4
DESCRIPTION 6
INSTRUCTIONS 7
IDENTIFICATION 8
TECHNICAL CHARACTERISTICS 9
EXTERNAL COMPONENTS 11
INSTALLATION 12
OPERATION 14
CLEANING 20
MAINTENANCE 22
EC DECLARATION OF CONFORMITY 25

ORIGINAL INSTRUCTIONS | Quality process Ref. 002/03 | v. 2019-07-12 | K07179
4
1. SAFETY
This coffee grinder should
be used exclusively for the
functions for which it has
been designed: to grind coffee beans.
Do not use the mill to grind
other types of foods such as
nuts or to grind ner granulated
foods such as sugar and others
This device may be used by
children aged 8 years and
over, by people with reduced
physical, sensory or mental capacities
and by people without prior experience/
knowledge, provided they have
received supervision or instructions
on the safe use of the device and
understand the associated risks.
Children should not play with
the device.
Cleaning and maintenance of the
device should not be carried out
by children without supervision.
Avoid allowing liquids
to come into contact
with internal or external
surfaces while the appliance is switched
on or off, except for those parts
expressly mentioned in the “CLEANING”
section. If, for any reason, this happens,
unplug it immediately from the
mains and dry all surfaces carefully.
ADDITIONAL SAFETY MEASURES
BUILT-IN TO OUR GRINDERS:
• Special screw to keep the hopper
xed.
• Access restriction for the grinding
unit.

ORIGINAL INSTRUCTIONS | Quality process Ref. 002/03 | v. 2019-07-12 | K07179
5
f it is necessary to access the
interior, where the electrical
components are located please
go to the nearest technical service centre.
If any component should break
or any intervention is needed,
we recommend contacting the
technical service centres, which will carry
out the repair or replacement, guaranteeing
that safety standards are adhered to.
Only an authorised supplier
may replace the main cable of
any grinder.
NOTE: The manufacturer will not be liable for damages caused either by the improper
use of the device or by not following the stated safety measures.
1. SAFETY
USERS SHOULD PAY
SPECIAL ATTENTION TO
AND SCRUPULOUSLY OBEY
THE FOLLOWING SAFETY
INSTRUCTIONS
Any other use will be
considered improper
and dangerous.

ORIGINAL INSTRUCTIONS | Quality process Ref. 002/03 | v. 2019-07-12 | K07179
6
2. DESCRIPTION
The coffee grinder you have
purchased has been designed
using the most innovative
technological systems.
The result is a high quality product that
ensures the best results. Our products
are manufactured entirely by hand, one
at a time, following the most demanding
quality requirements.
In its manufacturing process, quality
materials (aluminium, steel, etc.) are
used, which are suitable for contact with
food.
For the best results from the grinders
described in this manual, the maximum
operating/resting times are:
Model
Work cycle
Operating Resting
PK 100 10sec 45sec
SOUND LEVEL
The sound level produced by this model is:
Sound level With coffee
PK 100 75dB

ORIGINAL INSTRUCTIONS | Quality process Ref. 002/03 | v. 2019-07-12 | K07179
7
3. INSTRUCTIONS
3.1. This manual provides the information
needed for correct installation, handling
and maintenance of the device and
emphasises the precautions
that must be borne in mind by
the operator.
To ensure you get the best out of coffee
grinders, it is essential to carefully follow
the instructions given in this manual.
If there is any kind of problem, contact the
nearest technical service. This manual
should be kept until the machine is
replaced and must always be available to
the operator.
3.2. This manual uses some special terms,
such as:
• Text in bold to highlight the importance
of some terms.
• Numbers in parentheses after a word,
which match the numbering of the
items in the image to the side or in the
image of the external components.
Information Warning
Example: ( ) - Single dose cupping
Icons:

ORIGINAL INSTRUCTIONS | Quality process Ref. 002/03 | v. 2019-07-12 | K07179
8
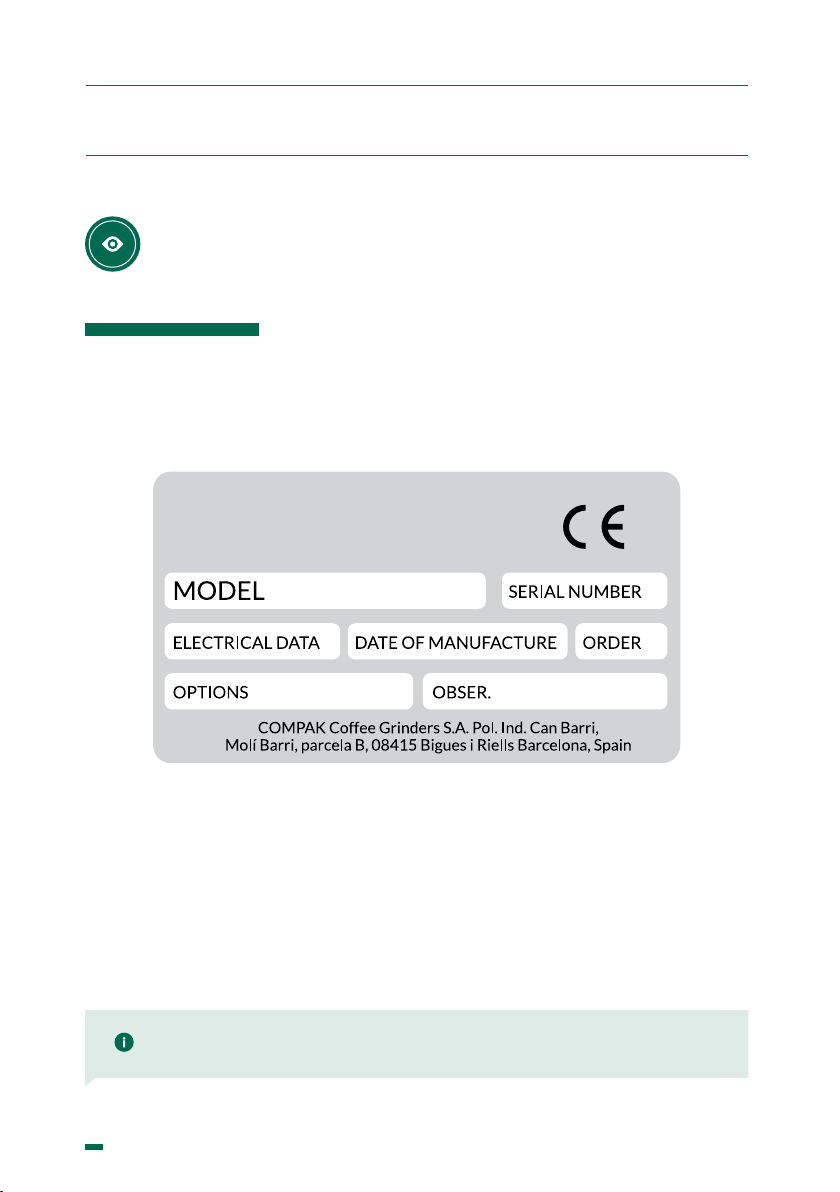
The technical characteristics
plate is indelibly marked with the
following information:
NOTE: The manufacturer reserves the right to change the machine components, according
to the requirements of each market, and also for technological advances.
4. IDENTIFICACIÓN

ORIGINAL INSTRUCTIONS | Quality process Ref. 002/03 | v. 2019-07-12 | K07179
9
5. TECHNICAL CHARACTERISTICS
5.1. SCOPE
The coffee grinders are intended for
businesses and communities where
ground coffee must be used, or in small
shops selling coffee..
This grinder should only be
used to grind coffee beans.
Any other use is considered improper and
dangerous.
NOTE: The manufacturer is not liable for damage to persons, goods or the machine itself,
if the safety regulations given in this manual are not followed, or the machine is used
incorrectly.

ORIGINAL INSTRUCTIONS | Quality process Ref. 002/03 | v. 2019-07-12 | K07179
10
5. TECHNICAL CHARACTERISTICS
5.2. TECHNICAL DATA
100 V
60 Hz
110 V
60 Hz
220 V
60 Hz
230 V
50 Hz
240 V
50 Hz
Electrical
Power 500 500 500 500 500 (W)
Rotational
velocity 1,100 1,100 900 900 900 rpm
Ø
Flat
Burrs
Espresso
Grinding
Filter
Grinding
Time for
one dose
(5,5gr)
Espresso
98 3.86 350 0,77 600 1,32 1
mm in G/min lb/min G/min lb/min sec
Time for one
dose
(10gr) Filtro
Single dose cupping
capacity
Net
weight
Height
Width
Depth
1 55 0,12 25,4 55
622
252
328
sec G lb Kg lb mm

ORIGINAL INSTRUCTIONS | Quality process Ref. 002/03 | v. 2019-07-12 | K07179
11
6. COMPONENTES EXTERNOS
1Single dose
cupping
2Flap handle
3Upper body
6Coffee bag
clamp
11 Lower body
12 Power
switch
4
Front
control
knob
5
Grinding
ON/OFF
switch
7
Adjustable
coffee outlet
8Fixing
screw
9
10
Portalter
spring
clamp
Holder

ORIGINAL INSTRUCTIONS | Quality process Ref. 002/03 | v. 2019-07-12 | K07179
12
7. INSTALLATION
7.2. IMPORTANT WARNINGS
The operator must be a responsible
adult. Never a child nor someone without
the ability to accept that responsibility.
When handling the grinder, the following
precautions should be obeyed:
• Feet must not be bare.
• Hands and feet must be dry.
• Do not get the machine wet.
• Do not expose the machine to
direct sunlight or other atmospheric
agents.
• Never insert any object into the
coffee inlet or outlet while the
appliance is running. (Please
remember that when the grinder
stops, the milling cutters will keep
turning for a short while).
• When unplugging the grinder,
always pull on the plug and never
the power cable to avoid a possible
short circuit.
7.1. LEGAL NOTICES
The installer must read this
instruction manual carefully before
installing the machine.
The installation of the device must be
carried out by
qualied and authorised
personnel, obeying all the
current safety and hygiene regulations.

ORIGINAL INSTRUCTIONS | Quality process Ref. 002/03 | v. 2019-07-12 | K07179
13
7. INSTALLATION
7.4. INSTALLING THE COFFEE GRINDER
Before connecting the coffee grinder, check
the following:
• The characteristics on the data plate
match those of the electrical mains
network.
• The electrical connection plug
matches the socket into which it is to
be plugged.
• Ensure that the electrical power of
the facility is adequate for the power
consumed by the appliance.
• The point of connection to the
electrical mains network must
be protected with the appropriate
electrical protection device.
• The equipment must be correctly
connected to a ground connection
according to the current safety
regulations.
Height 627
24.7 mm
in
Width 257
10.12 mm
in
Depth 333
13,11 mm
in
7.3. WHERE TO USE IT
The appliance must be installed on a
solid. Flat surface.
The minimum size for the
working space,to ensureyouget
the best performance from the
machine, must be the following:

ORIGINAL INSTRUCTIONS | Quality process Ref. 002/03 | v. 2019-07-12 | K07179
14
8. OPERATION
8.1.POWER SWITCH
The power switch ( ) has 2 positions, ON
– OFF
ON : Equipment on
OFF : Equipment oFF
8.2.POSITIONING THE HOPPER AND/OR
SINGLE DOSE CUPPING
Unscrew the xing screw ( 8)(Fig. 3). Fit
the single dose cupping ( ) onto the upper
body, checking that the handle stays on the
right hand side ( 2) Push it downwards and
turn it clockwise until the hopper is tted
solidly against the upper body ( )(Fig. 4
y 5). Screw the hopper to the body with the
safety screw (Fig. 3).
Fig. 3
NOTE: The manufacturer reserves
the right to change the machine
components, according to the
requirements of each market,
and also for technological
advances.

ORIGINAL INSTRUCTIONS | Quality process Ref. 002/03 | v. 2019-07-12 | K07179
15
8. OPERATION
Fig. 4 Fig. 5

ORIGINAL INSTRUCTIONS | Quality process Ref. 002/03 | v. 2019-07-12 | K07179
16
8. OPERATION
NOTE: The amount of coffee ground in a given time will vary depending on the neness of the
grinding.
8.3. USE
The grinders are factory calibrated,
setting the optimum grinding ranges for
the ne-coarse range. To grind coffee:
Open the flap( ) and put in the amount
of coffee beans that you want to grind
and close the hopper lid ( ).
Press the coffee bag clamp ( ) and
place an empty bag, holder or cup around
the coffee outlet nozzle ( ), then
release the handle so that they stay xed.
Press the run button ( ) on the right
side of the front control knob ( ) and the
grinding process will begin.
Once the desired amount of coffee has
been ground, press the grind stop button(
). Remove the bag, holding it with one
hand and pressing the coffee bag clamp
handle ( ) downwards with the other to
release it.
Press the coffee bag clamp handle ()
hard 2 or 3 more times ( ) so that any
possible coffee residue that may be stuck
will fall down.
1 GRINDIN FINENESS
100 - 300 particles
French Press
500 - 800 particles
Filter, Percolator
1.000 - 3.000 particles
Drip
3.500 particles
Espresso
15.000 - 35.000 particles
Turkish
2
2
2

ORIGINAL INSTRUCTIONS | Quality process Ref. 002/03 | v. 2019-07-12 | K07179
17
8. OPERATION
Fig. 6

ORIGINAL INSTRUCTIONS | Quality process Ref. 002/03 | v. 2019-07-12 | K07179
18
8.4. ADJUSTMENT OF PORTAFILTER
HOLDER
The standard conguration is useful for
most portalter holders on the market.
However, depending on the geometry of
each lter holder, it can be adjusted as
follows for a good t:
1. L1. Release the portalter spring
clamp, for this, release the screw that
xes them to the holder with the help of
a star-head screwdriver (Fig.3).
2. The springs clamps have an A and a
B engraved on the inside.
3. Once the springs clamps have been
removed, mount them in the opposite
position to that they were in when
they arrived, i.e. the A where the B was
and the B where the A was to get the
adjustment so that the lter holder ts
and is held proper
NOTE: The PK holder is not adjustable.
For lter holders with diagonal wings, the
standard portalter spring clamp must be
replaced by the ones supplied separately.
Engraving
indicating
the position
Portalter spring clamp supplied as standard
Engraving
indicating
the position
Portalter spring
clamp supplied not
tted
8. OPERATION

ORIGINAL INSTRUCTIONS | Quality process Ref. 002/03 | v. 2019-07-12 | K07179
19
Screw
Portalter
spring clamp
Fig. 3
8. OPERATION

ORIGINAL INSTRUCTIONS | Quality process Ref. 002/03 | v. 2019-07-12 | K07179
20
9.1. GENERAL CLEANING
To guarantee proper operation of the
grinder, as well as good quality ground
coffee, it is necessary to periodically clean
the parts that come into contact with the
coffee.
• To clean the machine:
• Always turn off the grinder at the
power switch ( ).
• Unplug the equipment from the
mains network.
• Do not immerse the appliance
in water to clean it nor use high
pressure water.
9.2.CLEANING THE COFFEE BEAN
HOPPER
To clean the single dose cupping thoroughly
() rst, all the coffee in the hopper must
be used up. Remove the single dose
cupping as shown in section 8.
The cupping ( ) can be washed with
a damp cloth or with soap and water to
remove the oily residues produced by the
coffee, rinse it thoroughly and dry it.
9. CLEANING
To ret the coffee bean hopper ( ) onto
the grinder, follow the steps described
above in reverse.
9.3. CLEANING THE GRINDING
CHAMBER
We recommend cleaning the coffee
grinding chamber weekly with a
Compak cleaning product. This has the
advantage of eliminating the remains of
coffee and the oils, which can go off and
spoil the quality of the coffee. The steps
to follow are these
• Grind the coffee left inside the
grinding chamber
• Put 60 g of the cleaning product into
the cupping ( ).
• Grind up all the Compak cleaning
product to a medium neness so it
works properly
• Clean the hopper ( ) and ll with
coffee.
• Throw away the rst 2-3 doses of
coffee and adjust the grinder to the
desired neness ( ).
After following these instructions, the
grinder will be clean and ready to work.
1
1
1
1
1
Table of contents
Other Compak Coffee Grinder manuals

Compak
Compak E6 OD User manual

Compak
Compak BOLT User manual

Compak
Compak A-8 Automatic User manual

Compak
Compak K3 TOUCH User manual

Compak
Compak E5 OD User manual

Compak
Compak RETAIL R80 User manual

Compak
Compak K3 TOUCH User manual

Compak
Compak FRESH ON DEMAND User manual

Compak
Compak RETAIL R140 User manual

Compak
Compak PKE User manual

Compak
Compak F10 Conic OD User manual

Compak
Compak F10 Conic OD User manual

Compak
Compak A-8 Automatic User manual

Compak
Compak PK 100 SHOP User manual

Compak
Compak PKF User manual

Compak
Compak K3 TOUCH User manual

Compak
Compak K6 SILENZIO User manual

Compak
Compak E6 OD User manual

Compak
Compak K-5 User manual

Compak
Compak PKE E6 User manual