Compak RETAIL R80 User manual

06/95/EC of 12/12/2006 on the
harmonization of the laws of Member
States relating to electrical equipment
designed for use within certain voltage
limits.
02/96/EC of 27/01/2003 on the
approximation of the laws of the
Member States on waste electrical and
electronic equipment (WEEE).
Environment
Do not throw the
appliance away with
the normal household
waste; hand it in at an
official recycling collection point. By
doing this, you will help to pre-serve
the environment.
The Legal Representative
In accordance with European commu-
nity directives, quality certificates have
been applied. All materials have been
adapted and technical reports are
available at our offices.
04/108/EC on the approximation of
the laws of the Member States relating
to electromagnetic compatibility.
98/37/EC amending Directive 89/392/
EC on the approximation of the laws
of the Member States relating to
machinery.
REG. 1935/2004 amending Directive
89/109/CE on the approximation of
the laws of the Member States relat-
ing to material and objects destinated
to make contact with nutritional pro-
ducts.
03/108/EC amending Directive
2002/96/EC on waste electrical and
electronic equipment (WEEE).
R-80
R-100
R-120
R-140
molinos de café
moulins à café
kaffeemühlen
macinadosatori
moinhos de café
к о ф е м о л к и
μαδοι αδσησ καε
coffee grinders
Instructions Manual
R-80 / R-100 / R-120 / R-140
12 Declaration of EC Conformity

Index
1 - Description
2 - Instructions manual
3 - Identification
4 - Technical features
5 - External components
6 - Installation
7 - Operation
8 - Bag shaker extension
9 - Cleaning
10 - Maintenance
11 - Safety measures
12 - EC Conformity
Grinder description PROC-CAL/002/03
This coffee grinder has been designed using the latest computer and engineering
technology.The result is a high quality product offering maximum guarantees with
regard to both grinding and dispensing. It has been manufactured using high quality
materials (aluminum, steel, etc.) ideal for use with foodstuffs. For optimal operation
of the grinder described in this manual, maximum work duty cycles should be:
Instruction manual
R-80
FUNCTION STOP
continuous
CYCLE
1
2
2.1. The purpose of this manual is to provide the necessary information for the
correct installation, handling and maintenance of the machine, and emphasize the
precautions that should be taken into consideration by the operator. To ensure
the best use of the coffee grinder, it is essential to carefully follow the instructions
included in this manual. In the event of a problem, please contact your local
technical service.The manual should be kept during the time you have the machine
and should always be available to the operator.
2.2. Different terms are used in the manual, such as:
– Characters in bold type, to emphasize importance.
– Numbers in brackets following a word, to indicate the position of the item
shown in the adjoining drawing or external components diagram.
Example: (1) Hopper lid.
- Icons (information, warning)
Information Warning
R-100
R-120
R-140
continuous
continuous
60 min 10 min
------
------
------
Version May 2008
!
i

Identification
3Technical characteristics
4
The following information is printed indelibly on the technical features
plate:
NOTE: The manufacturer reserves the right to modify the
components of the machine according to the requirements of specific
markets or due to the results of technological advances.
4.1. Scope of application
The coffee grinders are intended for use on commercial premises and
facilities or in small stores where ground coffee is required.The grinder
must only be used to grind coffee beans. Any use other than this will be
considered improper and dangerous.
*Production is based on a medium-roasted coffee and an espresso grind.
MODEL
SERIAL NUMBER
ELECTRICAL DATA DATE OF MANUFACTURE
OPTIONS
TEL. FAX:
i
i
*NOTE:The manufacturer is not responsible for any damage caused to
people, objects or the machine itself that results from improper use or
failure to comply with the safety guidelines described in this manual.
MODEL R-80 R-100 R-120 R-140
Ø Burrs (in / mm) 3.2 / 80 4 /100 4.7 /120 5.5 / 140
Production (lb/h - Kg/h)* 0.85 / 0.4 1.5 / 0.7 2.4 / 1.1 6.5 / 3
Hopper capacity (lb / kg) 2.2 / 1 2.2 / 1 4.75 / 2.15 4.75 / 2.15
Net weight (lb / kg) 50 / 22.5 52 / 23.5 94 / 42.5 104 / 47
Height x width x depth 23.3x8x12 / 23.3x8x12 / 29.3x10x15 / 29.3x10x15 /
(in / mm) 592x203x380 592x203x380 744x254x380 744x254x380
500/320
500/320
470/230
4 2 0 / 2 0 0
- - - - - -
------
motor power
(W in/out) motor power
(W in/out)
MODEL R-80 R-100 R-120 R-140
motor power
(W in/out)
RPM RPM RPM RPM
230-50Hz
240-50Hz
220-60Hz
110-60Hz
380-50Hz/3~
208-60Hz/3~
700/450
7 0 0 / 4 5 0
650/360
5 2 0 / 3 0 0
- - - - - -
------
1000/650
1000/650
1050/650
1 0 0 0 / 6 0 0
1 0 0 0 / 7 0 0
1000/700
------
------
------
------
1600/1100
1600/1100
1400
1400
1100
1100
------
------
1400
1400
1050
1100
------
------
1400
1400
1130
1130
1400
1650
------
------
------
------
1400
1620

!
i
i
External components
56Installation
6.1. General warnings
The installer should read this instruction manual carefully before installing
the machine.The machine must be installed by qualified, authorized staff,
respecting the applicable safety and hygiene guidelines.
6.2. Important warnings
The operator must be a responsible adult and under no circumstances a
minor or a person unable to deal with said responsibility.
When handling the grinder, the following precautions must be taken into
consideration:
• Do not handle with bare feet
• Hands or feet must not be wet
• Do not submerge the machine in water
• Do not expose the machine to sunlight or other
atmospheric conditions
• Never insert any object into the coffee input or output openings
when the machine is turned on. (Please bear in mind that when the
grinder stops, the burrs continue to turn for a few seconds.)
• To disconnect the grinder, always pull out the plug and never the
electrical cable, to avoid the possibility of a short circuit.
6.3. Putting the grinder into place
The grinder should be installed on a smooth flat surface. In order to
guarantee the optimum performance of the appliance, the minimum
dimensions of the work place should be as follows:
Height (in / mm) Width (in / mm) Depth (in / mm)
R-80 / R-100 29.3 / 750 9.4 / 240 13.7 / 350
R-120 / R-140 35.1 / 900 14.8 / 380 16.8 / 450
12
11
8
7
6
5
4
3
2
1Hopper lid
Coffee hopper
Upper body
Front dial setting
Grinding start/stop
button
Bag support handle
Coffee discharge tube
Bag shaker
10 Coffee collection tray
Lower body
Main on-off switch
9Bag shaker extension

i
7Operation
6.4. Installation of the coffee grinder
Before connecting the coffee grinder, check the following:
• The data on the features label coincides with those of the power supply.
• That the plug coincides with that of the wall plug. (*)
• That the electrical current is appropriate for the machine.
• That the connection point to the power supply network is protected
with appropriate fuses.
• That the equipment is properly connected to a grounded socket in
accordance with the applicable safety guidelines.
Prepare the hopper :
Remove the upper body (3) by unscrewing the two screws on the back-
side of the grinder. Fig. 3.
Place the hopper (2) on the upper body and make sure that the hinge of the
hopper lid (1) lines up with the backside of the grinder. Push down and turn
clockwise until the hopper clicks into place on the upper body (3). Fig. 4
Turn the upper body around and fix the hopper to the grinder body with
the safety screw that comes along with the grinder. Fig. 5.
Place the upper body with the attached
hopper on the lower part of the grinder
(11), line it up and move it forward. Replace
the 2 back screws. Fig. 6.
NOTE: The manufacturer cannot
accept responsibility for any damage
casued by improper use of the
machine.
i
!
The coffee grinder should be used in areas with a room temperature below 30/35ºC (86/95ºF) and should
not be installed in places (SUCH AS INDUSTRIAL KITCHENS) where cleaning with water jets is used.
(*)The three-phase models come with a plug connector with a phase reversal
device in order to invert the rotation direction of the grinder, if necessary.
In order for a correct grind, the burrs have to turn in a counter-clockwise
direction. When plugging in a three-phase grinder for the first time, check
that the burrs turn in the right direction by opening the cover and looking
into the hopper.
If the direction of the burrs is not correct, unplug the grinder and, with
the help of a flat-head screwdriver, turn the phase reversal device 180º as
soon shown in Figure 1.When you plug the grinder in again, it should turn
counter-clockwise.
Please check that the
three-phase factory insta-
llation is correct.
Make sure our socket is
EN60529andhas3F+N+T
and the distribution of
the connection should be
as in Figure 2.
Obtain 380V 50Hz or
220V 60 Hz between
phases (F) and 230V 50Hz
or 110V 60Hz between
Phase and Neutral (F-N).
Fig. 1 Fig. 2
Fig. 3 Fig. 4
Fig. 5 Fig. 6

100-300 particles
French Press,
500-800 particles
Filter
1,000-3,000 particles
Drip
3,500 particles
Espresso
15,000-35,000 particles
Turkish
u
u
u
u
u
Fig. 7
Without
extension With
extension
8Bag shaker extension
NOTE: The amount of coffee ground will depend on the chosen
grinding point.
Grinders are set in the factory, establishing the optimum settings for
each type of coffee.To grind coffee:
Open the hopper lid (1), fill the hopper (2) with coffee and close the lid.
Once the coffee is inside the hopper, it can not be removed.
Press the bag support handle (6) and put the empty bag around the
coffee discharge tube (7), then release the handle so the bag remains
fixed in place.
Push the grind button (5) on the right of the front setting dial (4) and the
grinding process will start. Once you have ground the desired quantity of
coffee, push the grinding stop button (5).
Remove the bag, holding it with one hand and with the other, push the
bag support handle down to release it. Push the handle two or three
more times against the outlet to remove any remaining traces of coffee
which may have stuck to the discharge tube.
The grinder comes with an extension to distance the bag shaker from the
machine, allowing the possibility to use bigger bags (>0.55 lbs for R-80
& R-100 and >1.1 lbs for R-120 & R-140) and therefore grinder larger
amounts coffee.
To put the extension in place, remove the screw (9) on the lower part
of the bag shaker as indicated in Figure 7 and put the adapter in place.
Reconnect the bag shaker using the same screw.
1 bean
9Cleaning
9.1. General Warnings
To guarantee the correct operation of the machine as well as the
quality of the ground coffee, periodically clean the parts that come into
contact with the coffee (at least once a week). Before performing any
type of maintenance work, the following indications must be taken into
consideration:
• Always turn off the machine using the general switch (12).
• Disconnect the machine from the power supply.
• Do not submerge the machine in water.
i
i

R-80
Kg/lb of ground coffee
8,000 Kg / 17,250 lb
R-100
R-120
R-140
Model
10,500 Kg / 23,000 lb
13,000 Kg / 28,750 lb
18,000 Kg / 40,250 lb
It is recommended to follow the cleaning instruction described in point
9.3 at least once a month.
9.4. Cleaning the outside of the grinder
To clean the outside, use a dry brush and then a cloth that has been
slightly dampened in soapy water.
NOTE: FAILURE to perform these cleaning operations will affect the
taste and aroma of the coffee.
10 Maintenance
10.1 General warnings
Before performing any type of maintenance work, the following indications
should be taken into consideration:
• Always turn off the machine using the ON-OFF switch (12).
• Disconnect the machine from the power supply.
In the event of a breakdown or malfunction, turn the machine off. Do
not try to repair it or intervene directly. Please call your local technical
service.
NOTE: Failure to respect this warning could endanger the safety of
both the machine and user.
10.2. Regular maintenance
To guarantee the efficiency and correct operation of the grinder, it
is essential to follow manufacturer instructions and ensure that all
maintenance work is carried out by qualified staff. Regular, programmed
inspections are recommended of the parts subject to wear and tear.
The usage level of the burrs should be systematically checked. The
perfect conditions of the burrs guarantees an even grind of the coffee
and an optimum quality of the product served. It also reduces electrical
consumption and the risk of the motor and burrs overheating.
NOTE: Based on extensive experience and a medium-hard coffee
blend, we recommend replacing the burrs according to the following
table:
9.2. Cleaning of the coffee bean hopper
Before cleaning, make sure that there are no beans left in the hopper.
Remove the hopper as explained in section 7. Clean it with a damp
cloth or soap and water to eliminate the oil residues from the coffee,
washing it carefully and then drying. Replace the hopper and turn it
clockwise back into position. Fig. 4.
9.3. Cleaning the coffee discharge tube
To clean the tube (7), use the brush that comes with the grinder and
insert it several times to remove any coffee remains.
i

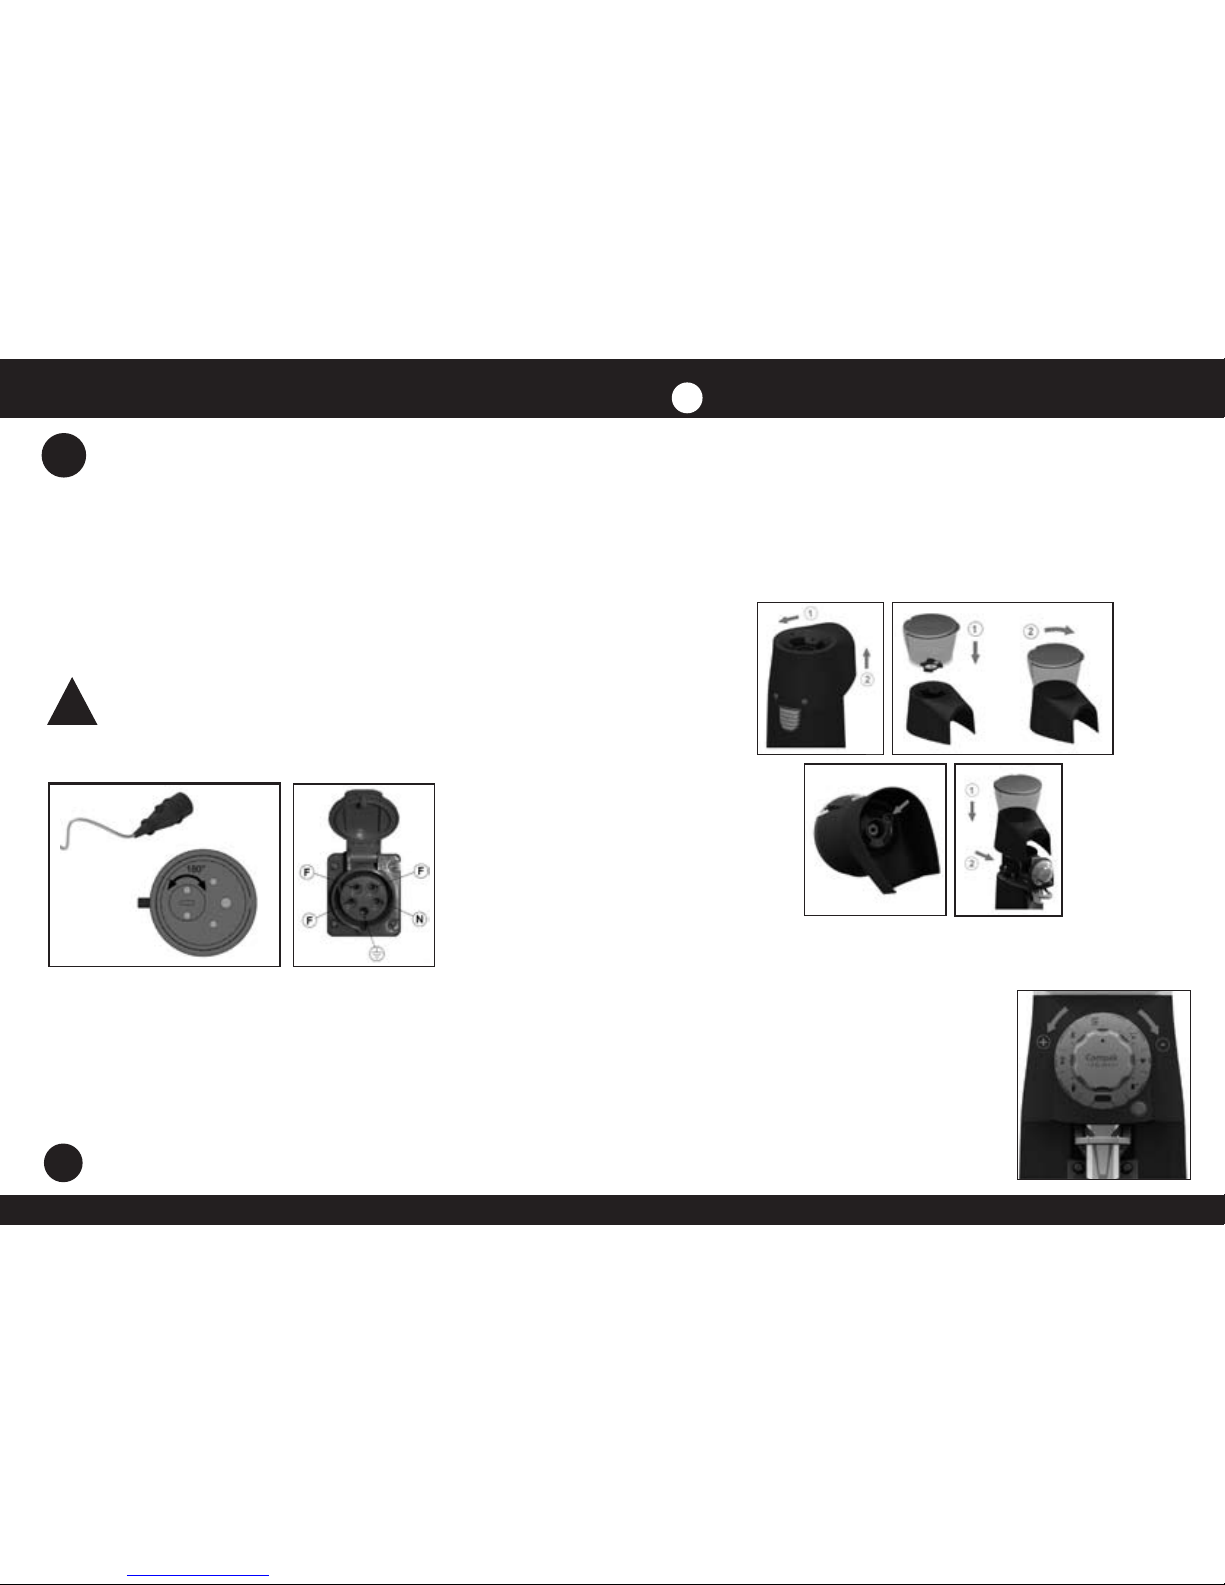
Replace the burrs by unscrewing them from their upper and lower
supports. During this operation, it is recommended to block the
rotation of the lower burrs with a flat-head screwdriver. Clean the
coffee remains from burr holders. Take out the used burrs and put in
the new ones. Assemble to setting screws (a) of the upper burr holder
to the grinding cup.
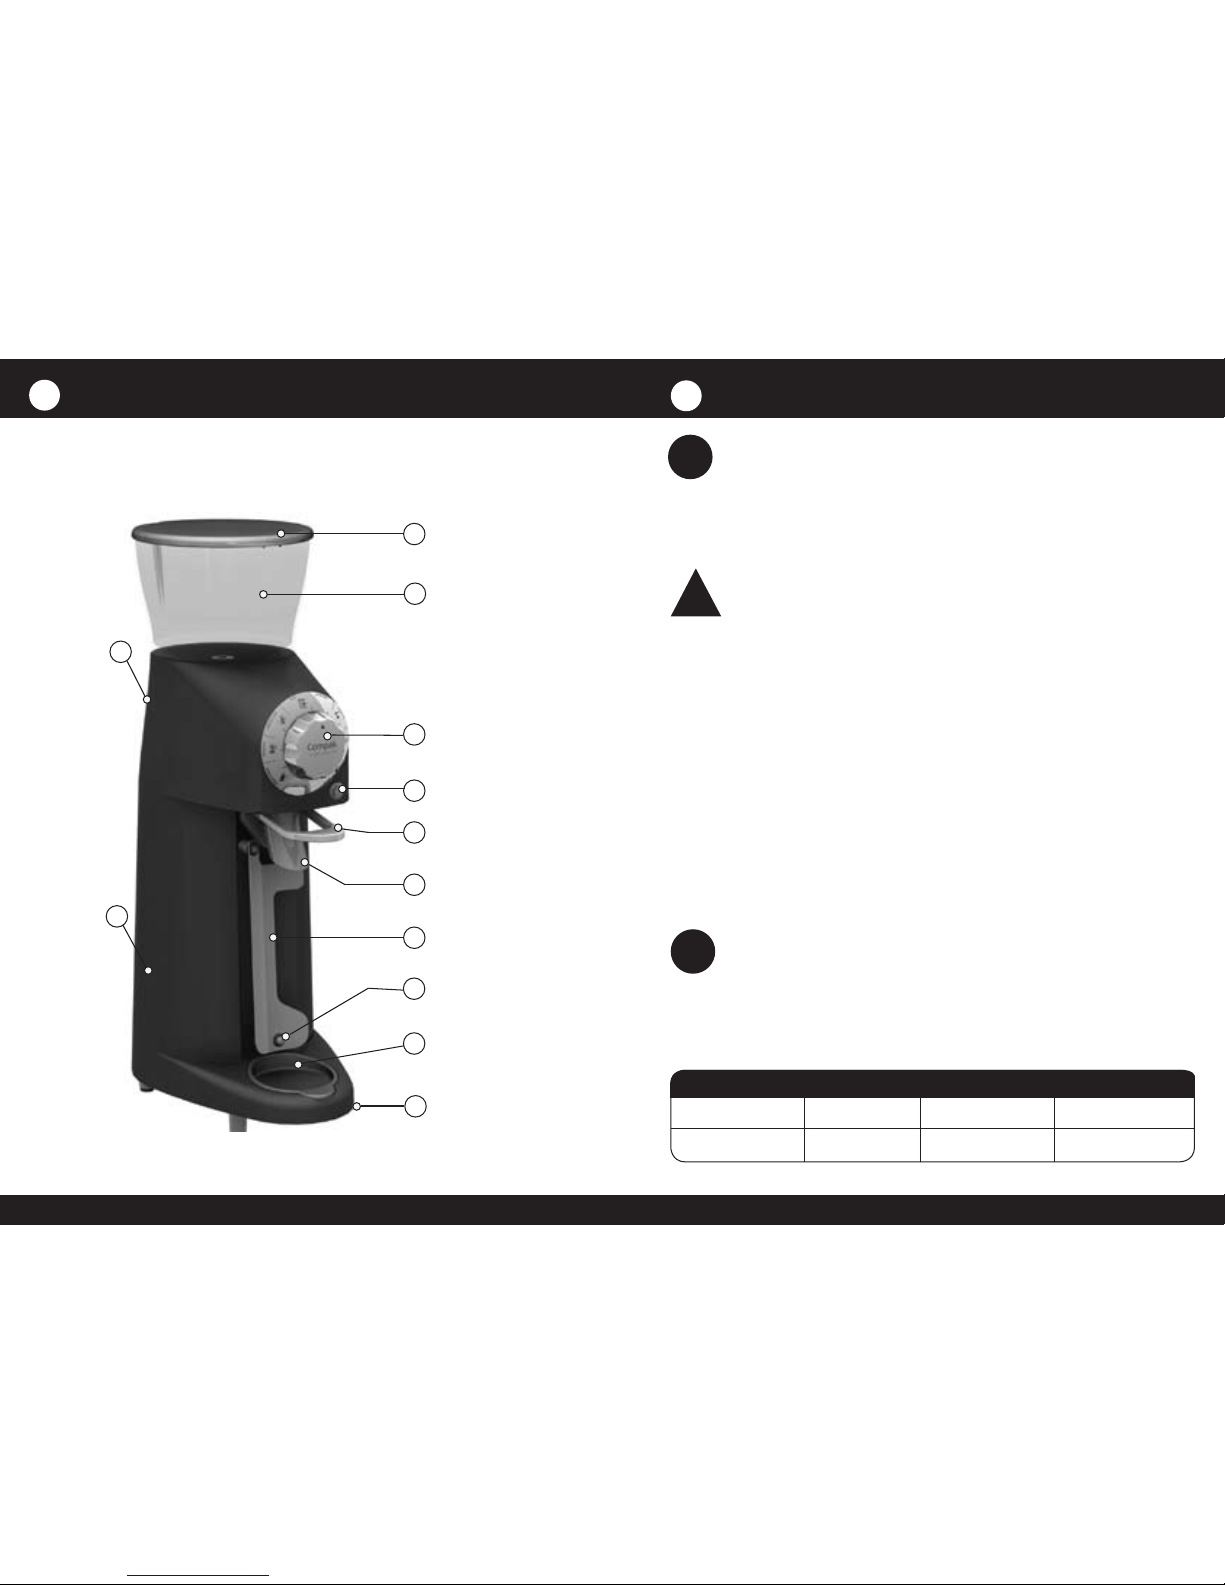
10.4. Reset the burrs to the 0 position
(the point in which the burrs no longer touch)
Turn the front dial (4) clockwise until the burrs are as close as possible
without touching. Loosen, with the help of the key wrench that comes
with the grinder, the screw (b), until the chain is released.Turn the front
dial (4) clockwise as far as possible.Tighten the screw (b). Assemble the
upper body (3), tightening the two rear screws and replace the hopper.
11 Safety measures
10.3. Grinding group maintenance
To effect grinding group maintenance work, the following instructions
should be followed:
Turn the front setting dial (4) all the way to the left.Turn the machine off,
using the ON-OFF switch (12). Disconnect the cable from the power
supply. Remove hopper (2) from upper body (3) according to section 7.
Dismantle upper body (3), by unscrewing the two rear screws.
Remove the 4 setting screws (a) of the upper burr holder from the
grinding cup (Allen wrench 4), according to Fig. 8.
NOTE: The manufacturer cannot accept responsibility for any damage
caused by improper use of the machine or failure to respect the safety
measures indicated.
Users are asked to pay careful attention to the following indications:
• The coffee grinder should only be used for grinding coffee beans.
• Do not use the machine to grind other types of foods such as nuts,
dried fruits or to fine-grind granulated foods such as sugar, etc.
• Do not allow minors or disabled people to use the machine.
• Any other use of the machine will be considered improper and
dangerous.
• Do not allow liquids to come into contact with the internal or external
surfaces of the machine at any time, except for those parts that have
been expressly referred to in section 9. If, for any reason, this should occur,
immediately disconnect the machine from the power supply and dry all
surfaces carefully. Should it be necessary to access the internal parts of the
machine, where the electrical components are located, take the machine
to your local technical service.
• In the event of any broken components or intervention, we recommend
that you contact your local technical service, who will repair or replace
the part, guaranteeing the maintenance of the safety standards.
• Replacement of the main power cable of any grinder model should only
be done by an authorized supplier.
!
i
(a)
(a)
(a)
(a)
(b)
Fig. 8
This manual suits for next models
4
Table of contents
Other Compak Coffee Grinder manuals

Compak
Compak FRESH ON DEMAND User manual

Compak
Compak E6 OD User manual

Compak
Compak E6 OD User manual

Compak
Compak RETAIL R140 User manual

Compak
Compak A-8 Automatic User manual

Compak
Compak K6 SILENZIO User manual

Compak
Compak F10 Conic OD User manual

Compak
Compak BOLT User manual

Compak
Compak PKF User manual

Compak
Compak K3 ELITE User manual

Compak
Compak PK 100 User manual

Compak
Compak PK 100 SHOP User manual

Compak
Compak PKE E6 User manual

Compak
Compak K-5 User manual

Compak
Compak PKF User manual

Compak
Compak K3 TOUCH User manual

Compak
Compak K3 TOUCH User manual

Compak
Compak E5 OD User manual

Compak
Compak K3 TOUCH User manual

Compak
Compak PKE User manual