manuals.online logo
Brands
  1. Home
  2. •
  3. Brands
  4. •
  5. Conceptronic
  6. •
  7. Adapter
  8. •
  9. Conceptronic CNB65V19 User manual

Conceptronic CNB65V19 User manual

NEDERLANDS

Conceptronic CNB65V19
1. Product overzicht
Nr. Beschrijving
A. AC lichtnetingang: Lichtnetaansluiting om het netsnoer op de
notebooklader aan te sluiten.
B. Notebookaansluiting: Aansluiting voor de meegeleverde
notebookaansluitingen.
WAARSCHUWING: Deze notebooklader is uitsluitend geschikt voor 19 volt notebooks! Als
uw notebook op een ander voltage werkt, kunt u uw notebook
beschadigen met deze lader!
2. Installatie en gebrui
k
Voordat u de notebooklader kunt gebruiken, moet u de juiste notebookaansluiting kiezen. De
notebooklader wordt geleverd met 9 verschillende aansluitingen.
Kies een van de 9 bij uw notebooklader meegeleverde notebookaansluitingen.
Zet de notebookaansluiting op de kabel van de notebooklader.
Sluit de kabel van de notebooklader via de geplaatste notebookaansluiting aan op de DC
gelijkstroomingang van uw notebook.
Sluit het netsnoer aan op de AC-ingang van de netlader en op een stopcontact.
Uw notebook krijgt nu stroom van de notebooklader en de batterij van uw notebook wordt
opgeladen.
Veel plezier met uw
Conceptronic universele notebooklader!
ENGLISH

Conceptronic CNB65V19
1. Product overview
Nr Description
A. AC input: AC input connection to connect the power cable to the
notebook adapter.
B. Tip connector: Connector for one of the notebook tips included with the
notebook adapter.
WARNING: This notebook adapter can only be used for 19V notebooks! If your notebook
uses a different voltage, you can damage your notebook with this notebook
adapter !
2. Installation & usage
Before you can use the notebook adapter, you need to select the correct notebook tip for your
notebook. There are 9 tips included with the notebook adapter.
Select one of the 9 tips included with your notebook adapter.
Connect the tip to the tip connector of the notebook adapter.
Connect the notebook adapter cable with the connected tip to the DC input of your
notebook.
Connect the power cable to the AC input of the notebook adapter and to a free wall outlet.
Your notebook is now powered by the notebook adapter and your notebook battery is being
charged.
Enjoy the use of your
Conceptronic universal notebook adapter!

Conceptronic CNB65V19
1. Descripción del producto
Nº
Descripción
A. Entrada de CA:
Conexión de
entrada de CA para conectar el cable de
alimentación al adaptador.
B. Conector para
clavija:
Conector para una de las clavijas incluidas con el adaptador.
ATENCIÓN: Este adaptador sólo puede utilizarse con portátiles de 19V! Si su portátil
utiliza un voltaje diferente, ¡podría dañarlo si utiliza este adaptador!
2. Instalación y utilización
Antes de poder utilizar el adaptador, debe seleccionar la clavija correspondiente con su
portátil. Con el adaptador para portátiles se incluyen 9 clavijas.
Seleccione una de las 9 clavijas incluidas con el adaptador para portátiles.
Conecte la clavija al conector para las clavijas del adaptador.
Conecte el cable del adaptador, con la clavija conectada, a la entrada de corriente continua
(DC) de su portátil.
Conecte el cable de alimentación a la entrada de corriente alterna (AC) del adaptador y a
una toma de corriente de la pared.
Su portátil se encontrará ahora conectado a la corriente mediante el adaptador y la batería del
portátil cargándose.
¡Disfrute del uso de su
adaptador universal para portátiles de Conceptronic!
DEUTSCH

Conceptronic CNB65V19
1. Einführung in das Produkt
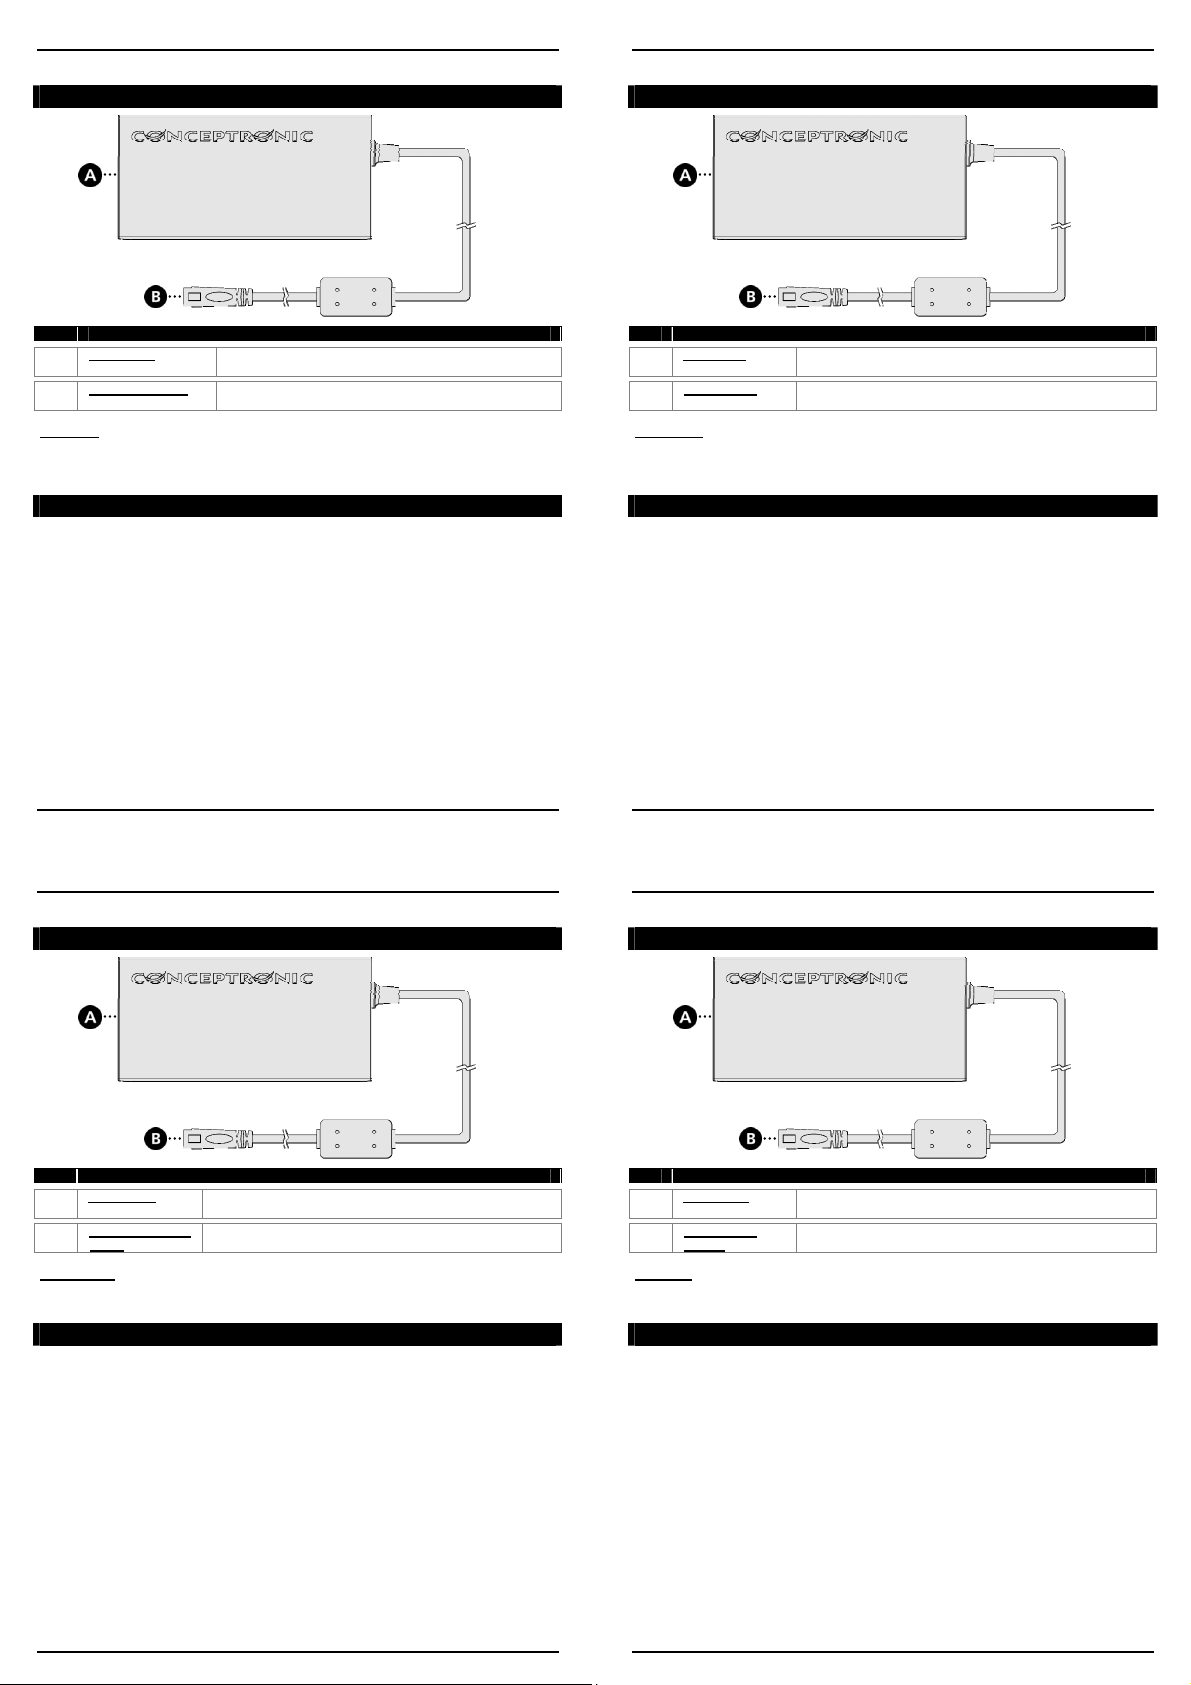
Nr. Beschreibung
A. AC-Eingang: AC-Eingang für den Anschluss des Stromkabels an den
Notebook-Adapter.
B. Aufsatzanschluss: Anschluss für einen der Notebook-Aufsätze, die im
Lieferumfang des Notebook-Adapters enthalten sind.
ACHTUNG: Dieser Notebook-Adapter kann ausschließlich für 19V-Notebooks verwendet
werden! Wenn Ihr Notebook eine andere Spannung hat, kann es beschädigt
werden, wenn Sie diesen Notebook-Adapter damit benutzen!
2. Installation und Bedienung
Bevor Sie den Notebook-Adapter verwenden können, müssen Sie den richtigen Notebook-
Aufsatz für Ihr Notebook auswählen. Im Lieferumfang des Notebook-Adapters sind 9 Aufsätze
enthalten.
Wählen Sie aus den 9 im Lieferumfang des Notebook-Adapters enthaltenen Aufsätzen den
richtigen für Ihr Notebook aus.
Schließen Sie den Aufsatz am Aufsatzanschluss des Notebook-Adapters an.
Schließen Sie das Kabel des Notebook-Adapters mit dem angeschlossenen Aufsatz am DC-
Eingang Ihres Notebooks an.
Schließen Sie das Stromkabel am AC-Eingang des Notebook-Adapters und an einer Steckdose
an.
Jetzt wird Ihr Notebook über den Notebook-Adapter mit Strom versorgt und der Akku des
Notebooks wird aufgeladen.
Viel Spaß mit Ihrem
Conceptronic Universal-Notebook-Adapter!
FRANCAIS

Conceptronic CNB65V19
1. Explication du produit
Nr
Description
A. Entrée AC :
Port d’entrée AC pour brancher le câble d’alimentation sur
l’adaptateur pour ordinateur portable.
B. Connecteur :
Connecteur pour l’un des embouts de l’ordinateur portable
inclus avec l’adaptateur pour ordinateur portable.
ATTENTION: Cet adaptateur pour ordinateur portable ne peut être utilisé qu’avec des
ordinateurs portables dont la tension est de 19 V ! Si votre ordinateur
portable utilise une tension différente, vous pouvez endommager votre
ordinateur portable avec cet adapateur pour ordinateur portable !
2. Installation & utilisation
Avant d’utiliser l’adaptateur pour ordinateur portable, vous devez choisir le bon embout de
l’ordinateur portable pour votre ordinateur portable. 9 embouts sont inclus avec l’adaptateur
pour ordinateur portable.
Choisissez l’un des 9 embouts inclus avec votre adaptateur pour ordinateur portable.
Joignez l’embout au connecteur de l’adaptateur pour ordinateur portable.
Reliez le câble de l’adaptateur pour ordinateur portable à l’embout branché sur l’entrée DC
de votre ordinateur portable.
Branchez le câble d’alimentation sur l’entrée AC de l’adaptateur pour ordinateur portable
et sur une prise murale libre.
Votre ordinateur portable est à présent branché grâce l’adaptateur pour ordinateur portable et
la batterie de votre ordinateur portable se recharge.
Amusez-vous bien avec votre adaptateur universel pour
ordinateur portable de Conceptronic !
ITALIANO

Conceptronic CNB65V19
1. Descrizione del prodotto
N. Descrizione
A. Ingresso AC: Ingresso AC per collegare il cavo di alimentazione
all’adattatore per notebook.
B.
Connettore per la
spina:
Connettore per una delle spine per notebook incluse
nell'adattatore per notebook.
ATTENZIONE: Questo adattatore per notebook si può usare solo con notebook 19V! Nel
caso in cui il vostro notebook usi una tensione diversa, questo adattatore
potrebbe guastarlo!
2. Installazione e uso
Prima di poter usare l’adattatore per notebook è necessario selezionare la spina adatta al
notebook utilizzato. Esistono 9 modelli diversi in dotazione con l'adattatore per notebook.
Selezionare una delle 9 spine in dotazione con l’adattatore per notebook.
Collegare la spina al connettore della spina dell’adattatore per notebook.
Collegare il cavo dell’adattatore per notebook, con la spina connessa, all'ingresso DC del
notebook.
Collegare il cavo di alimentazione all’ingresso AC dell’adattatore per notebook e a una presa
a muro disponibile.
Ora il notebook è alimentato mediante l’adattatore e la batteria del notebook si sta caricando.
Divertitevi a usare l’Adattatore universale per notebook di
Conceptronic!
PORTUGUES

Conceptronic CNB65V19
1. O produto
Nº
Descrição
A. Entrada CA: Ficha
de entrada CA para ligar o cabo de alimentação ao
transformador para computador portátil.
B. Ficha para as
pontas:
Ficha para usar uma das pontas incluídas com o
transformador de alimentação.
ATENÇÃO: Este transformador para computador portátil só pode ser usado com
computadores de 19 V! Caso o seu computador portátil use uma tensão
diferente, pode danificá-lo com este transformador!
2. Instalação e utilização
Antes de poder usar o transformador para computador portátil, deve seleccionar a ponta
correcta para o seu portátil. Incluem-se 9 pontas com o transformador para computador
portátil.
Escolha uma das 9 pontas de carregamento incluídas no seu transformador para computador
portátil.
Ligue a ponta à ficha para ponta de carregamento do transformador para portátil.
Ligue o cabo do transformador para portátil com a ponta de carregamento à entrada CC do
seu computador portátil.
Ligue o cabo de alimentação à entrada CA do transformador para portátil e a uma tomada
livre.
O seu computador portátil está agora a ser alimentado pelo transformador para portátil e a
bateria do seu computador está a ser carregada.
Divirta-se com o seu transformador universal para
computador portátil da Conceptronic!

Other Conceptronic Adapter manuals

Conceptronic CHD2SUSB3 User manual

Conceptronic

Conceptronic CHD2SUSB3 User manual

Conceptronic CNB90 User manual

Conceptronic

Conceptronic CNB90 User manual

Conceptronic CHD2SUSB3 User manual

Conceptronic

Conceptronic CHD2SUSB3 User manual

Conceptronic CBT40NANO User manual

Conceptronic

Conceptronic CBT40NANO User manual

Conceptronic Connectivity Series User manual

Conceptronic

Conceptronic Connectivity Series User manual

Conceptronic ABBY16B User manual

Conceptronic

Conceptronic ABBY16B User manual

Conceptronic 128U Manual

Conceptronic

Conceptronic 128U Manual

Conceptronic CNB90 User manual

Conceptronic

Conceptronic CNB90 User manual

Conceptronic CSATAi23U User manual

Conceptronic

Conceptronic CSATAi23U User manual

Conceptronic CNB120 User manual

Conceptronic

Conceptronic CNB120 User manual

Conceptronic CBT200NANO User manual

Conceptronic

Conceptronic CBT200NANO User manual

Conceptronic C150UAND User manual

Conceptronic

Conceptronic C150UAND User manual

Conceptronic CNB40V19 User manual

Conceptronic

Conceptronic CNB40V19 User manual

Conceptronic C54RU User manual

Conceptronic

Conceptronic C54RU User manual

Conceptronic CMEDHOST User manual

Conceptronic

Conceptronic CMEDHOST User manual

Conceptronic C54U User manual

Conceptronic

Conceptronic C54U User manual

Conceptronic CVOIPAU User manual

Conceptronic

Conceptronic CVOIPAU User manual

Conceptronic CNAPT40CAR User manual

Conceptronic

Conceptronic CNAPT40CAR User manual

Conceptronic CNB90V19T8 User manual

Conceptronic

Conceptronic CNB90V19T8 User manual

Conceptronic C150NANO User manual

Conceptronic

Conceptronic C150NANO User manual

Conceptronic CTVDIGU2 User manual

Conceptronic

Conceptronic CTVDIGU2 User manual

Conceptronic OZUL03BE User manual

Conceptronic

Conceptronic OZUL03BE User manual

Conceptronic EMRICK05B User manual

Conceptronic

Conceptronic EMRICK05B User manual

Conceptronic CNBS90CAR User manual

Conceptronic

Conceptronic CNBS90CAR User manual

Popular Adapter manuals by other brands

Renkforce 1588385 operating instructions

Renkforce

Renkforce 1588385 operating instructions

Philips SWA3034W/10 Specifications

Philips

Philips SWA3034W/10 Specifications

Belkin F5U103VEA user manual

Belkin

Belkin F5U103VEA user manual

ZyXEL Communications ZyXEL NWD2105 user guide

ZyXEL Communications

ZyXEL Communications ZyXEL NWD2105 user guide

Buffalo WLI-U2-AG108HP quick start guide

Buffalo

Buffalo WLI-U2-AG108HP quick start guide

AudioCodes MediaPack MP-202B Quick installation guide

AudioCodes

AudioCodes MediaPack MP-202B Quick installation guide

Philips SCU 3030NB Specifications

Philips

Philips SCU 3030NB Specifications

TP-Link TL-PA7010P Quick installation guide

TP-Link

TP-Link TL-PA7010P Quick installation guide

Belkin F5D4072 user manual

Belkin

Belkin F5D4072 user manual

SMART HOME LIGHTS 7201-16 user manual

SMART HOME LIGHTS

SMART HOME LIGHTS 7201-16 user manual

Philips CPWUA054 Instructions for use

Philips

Philips CPWUA054 Instructions for use

Linksys WUSB11 ver. 2.6 user guide

Linksys

Linksys WUSB11 ver. 2.6 user guide

AudioEngine W3 Setup guide

AudioEngine

AudioEngine W3 Setup guide

Custom Dynamics MPR-MICROAW-18ST installation instructions

Custom Dynamics

Custom Dynamics MPR-MICROAW-18ST installation instructions

Maxwell 25521B user manual

Maxwell

Maxwell 25521B user manual

Sena MESHPORT BLUE quick start guide

Sena

Sena MESHPORT BLUE quick start guide

Linksys WAPPOE user guide

Linksys

Linksys WAPPOE user guide

ZyXEL Communications PLA-401 - V3.0.5 Specifications

ZyXEL Communications

ZyXEL Communications PLA-401 - V3.0.5 Specifications

manuals.online logo
manuals.online logoBrands
  • About & Mission
  • Contact us
  • Privacy Policy
  • Terms and Conditions

Copyright 2025 Manuals.Online. All Rights Reserved.