Contec PM-60A User manual

1
CONTEC
PM-60
PM-60
PM-60
PM-60 A
A
A
A Pulse
Pulse
Pulse
Pulse Oximeter
Oximeter
Oximeter
Oximeter
Users
Users
Users
Users
’
’
’
’
Manual
Manual
Manual
Manual
CONTEC
The document including some secret information, belongs to Contec medical
systems co.
LTD.,
in which any information is not allowed to be transmitted, copied
,or disclosed to any other companies except the recipient ones, even not for other
commercial purposes.
Catalogue
Catalogue ………………………………………………………………………………………… ...2
1
1
1
1Preface
Preface
Preface
Preface …………………………………………………………………………………………
…………………………………………………………………………………………
…………………………………………………………………………………………
………………………………………………………………………………………… .3
.3
.3
.3

2
1 .1 Caution Proceeding ……………………………………………………………………… .3
1 .2 Manipulator Obligation ………………… ..........................................................................3
2
2
2
2 The
The
The
The Basics..................................................................................................................
Basics..................................................................................................................
Basics.................................................................................................................. .................3
.................3
.................3
.................3
2.1 Introduction..................................................................................................... ....................3
2.1.1 Intended Use ...................................................................................... ....................4
2.1.2 Contraindications ............................................................................... ....................4
2.1.3 Components ....................................................................................... ....................4
2.2 Features …………………………………………………………………………………… 4
3
3
3
3 M
M
M
M ain
ain
ain
ain Technical
Technical
Technical
Technical Index
Index
Index
Index ……………………………………………………………………
……………………………………………………………………
……………………………………………………………………
…………………………………………………………………… ...
...
...
... …
…
…
… ..4
..4
..4
..4
3.1 Performance Specifications ……………………………………………………………… ..4
3.2 Technical specifications …………………………………………………………… . …… 5
3.3 SPO2 ……………………………………………………………………………… ...........6
4
4
4
4Function
Function
Function
Function Instructions
Instructions
Instructions
Instructions …………………………………………………………………………
…………………………………………………………………………
…………………………………………………………………………
………………………………………………………………………… 6
6
6
6
4.1 Main interface …………………………………………………………………………… ..6
4.1.1 Composing parts ………………………………………………………………… .7
4.1.2 Function Button ………………………………………………………………… ..8
4.2 New patient information interface ……………………………………………………… ...8
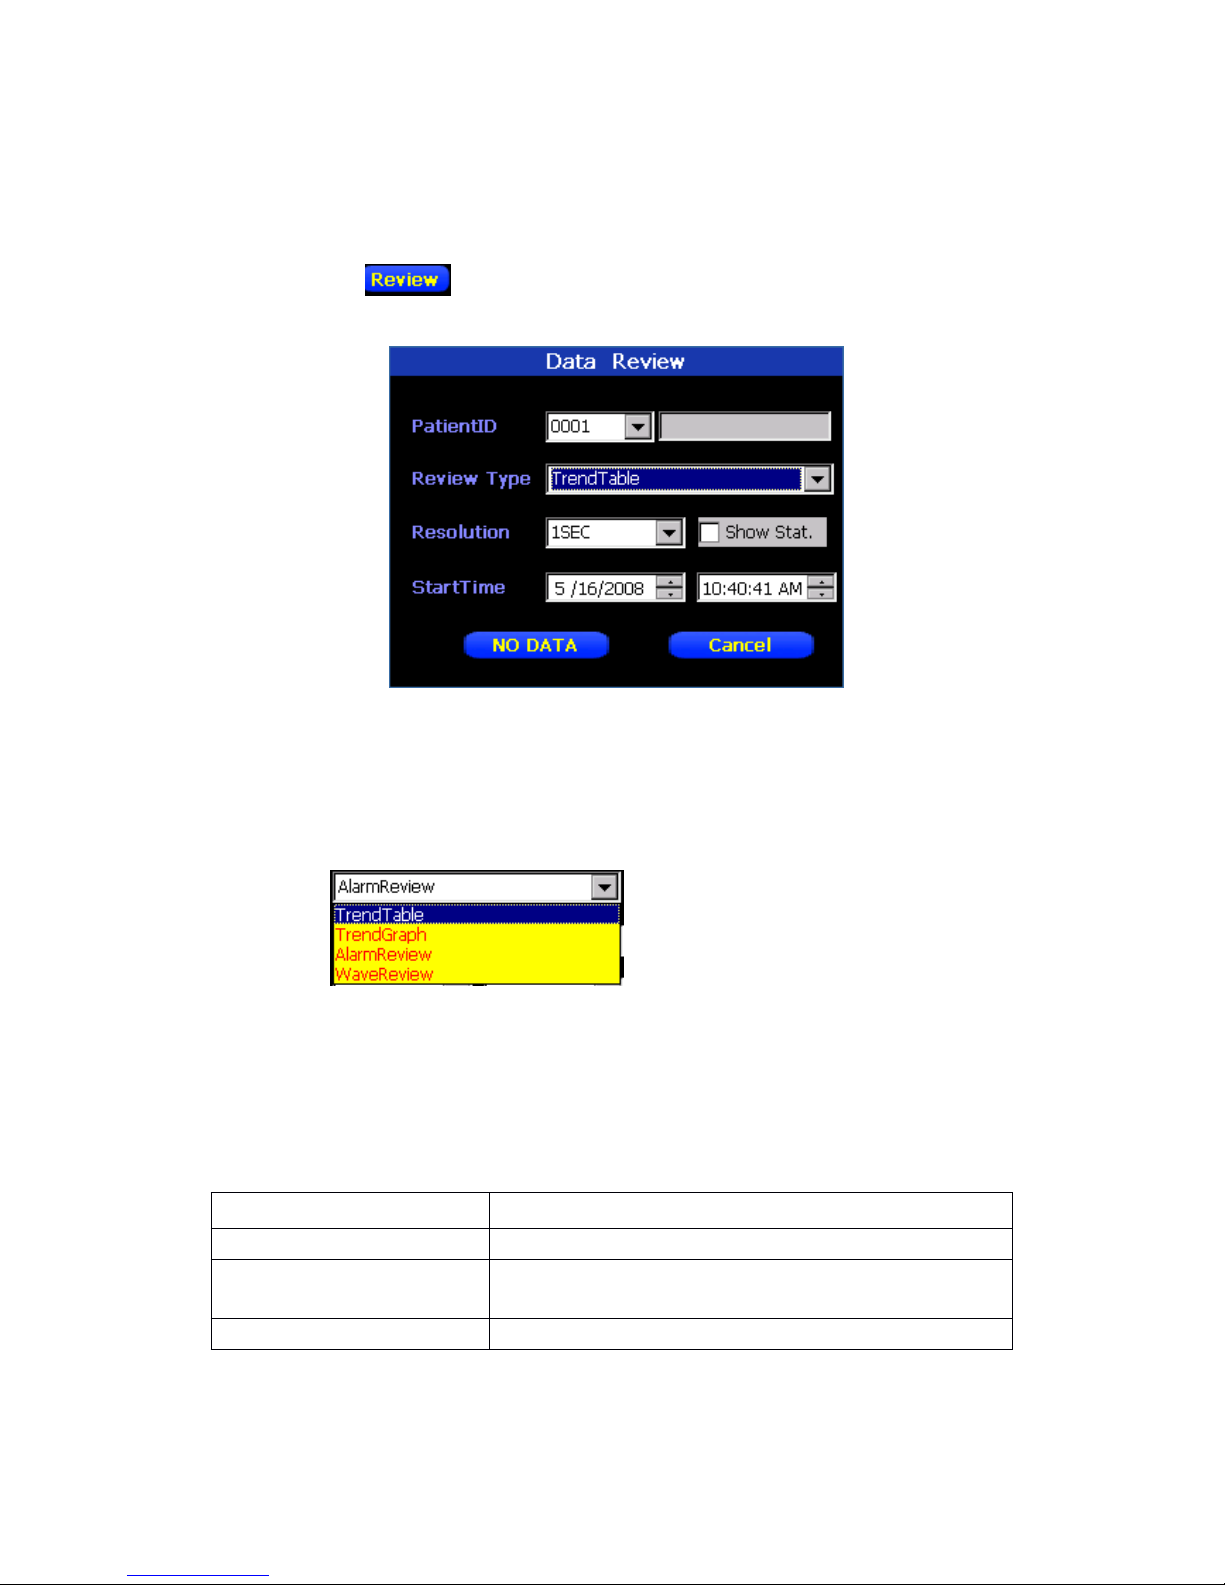
4.3 Data Review Interface ……………………………………………………………… . …… 9
4.3.1 Data Review Interface ………………………………………………………… ....9
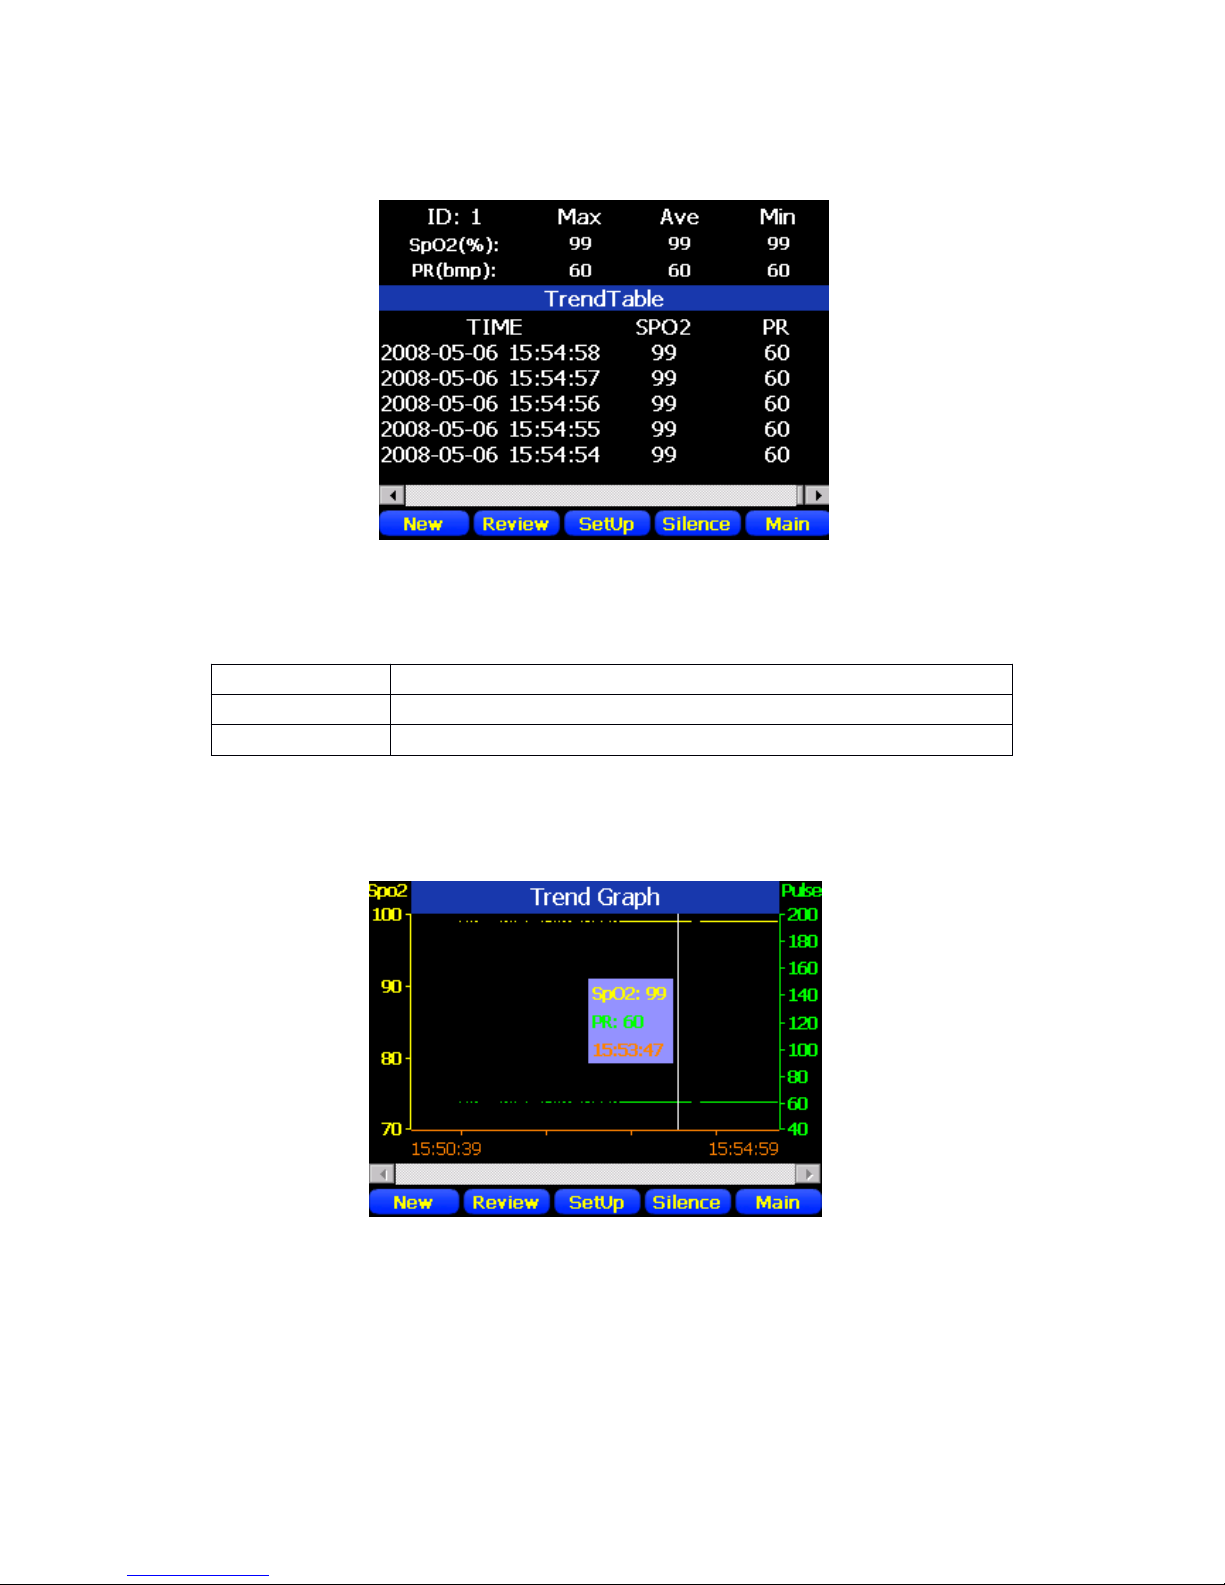
4.3.2 TrendTable Interface …………………………………………………………… .10
4.3.3 TrendGrape Interface …………………………………………………………… 10
4.3.4 AlarmReview and WaveReview Interface ……………………………………… 11
4.4 Setup Interface ………………………………………………………………………… ..
1
1
4.4.1 Setup Interface ………………………………………………… . ……………… .
1
1
4.4.2 System Setup ………………………………………………………… .. ……… ..13
5
5
5
5 Maintenance
Maintenance
Maintenance
Maintenance and
and
and
and Cleaning
Cleaning
Cleaning
Cleaning …………………………………………………………………
…………………………………………………………………
…………………………………………………………………
………………………………………………………………… ..14
..14
..14
..14
5.1 Safety Checks ……………………………………………………………………… ... … .15
5.2 Cleaning ………………………………………………………………………………… .15
5.3 Disinfecting ……………………………………………………………………………… 16
5.4 Disposal ………………………………………………………………………………… .16
6
6
6
6 Appendix
Appendix
Appendix
Appendix ……………………………………
……………………………………
……………………………………
…………………………………… ...
...
...
... …………………………
…………………………
…………………………
………………………… ...
...
...
... …………………
…………………
…………………
………………… .17
.17
.17
.17
6.1 Alarm characters specification ………………………………………………………… ...17
6.2 Usual metrical range …………………………………………………………………… ..17
1
1
1
1 Preface
Preface
Preface
Preface
This manual contains the instructions necessary to operate the product safely and

3
in accordance with its function and intended use. Observance of this manual is a
prerequisite for proper product performance and correct operation and ensures patient
and operator safety.
This manual is based on the maximum configuration and therefore some contents
may not apply to your product. If you have any question, please contact us.
This manual is an integral part of the product. It should always be kept close to
the equipment so that it can be obtained conveniently when needed.
This specification includes all the functions and operation flow, some usual
questions and detailed answers offered.
Please read the specification carefully before using this product to smooth your
usage .
Thanks for using PM-60A Pulse Oximeter products and look forward to your
valuable suggestions and advice.
PM-60A Website: http://www.contecmed.com.cn
1.1
1.1
1.1
1.1 Caution
Caution
Caution
Caution
Before usage, please be aware of safety and validity stated below :
�
The system should be used under doctors
’
guide.
�
�
�
�
The reliability of the product depends on whether the operation and
maintenance are properly done.
␇
␇
␇
␇Warning: system errors may arise if non-proper accessories are replaced;
therefore, any maintenance men who haven ’ t been trained in our company or
normal maintenance organization should not maintain this system.
1.2
1.2
1.2
1.2 Manipulator
Manipulator
Manipulator
Manipulator Obligation
Obligation
Obligation
Obligation
Caution: please read the user manual carefully before usage.
O
O
O
O bligations
bligations
bligations
bligations of
of
of
of Contec
Contec
Contec
Contec Medical
Medical
Medical
Medical System
System
System
System Co.
Co.
Co.
Co. LTD.
LTD.
LTD.
LTD.
1.Our company will resolve any software and hardware problems of the
product in one year after your purchase with the precondition of proper usage of it .
2.Responsible for user s' train ing .
3.Responsible for free update and life maintenance of the software.
4.Responsible for free maintenance of hardware after your purchase.
5. Not responsible for damage caused by improper usage or non-fixed
accessories usage.
2
2
2
2 The
The
The
The Basics
Basics
Basics
Basics
2.1
2.1
2.1
2.1 Introduction
Introduction
Introduction
Introduction
2.1.1
2.1.1
2.1.1
2.1.1 Intended
Intended
Intended
Intended Use
Use
Use
Use
The pulse oximeter is intended for continuously monitoring, spot checking,
displaying, storing and printing oxygen saturation and pulse rate of single adult,
pediatric and neonatal patient in hospital, emergency treatment and patient transport

4
as well as in home care environment.
WARNING
WARNING
WARNING
WARNING
This
This
This
This pulse
pulse
pulse
pulse oximeter
oximeter
oximeter
oximeter is
is
is
is intended
intended
intended
intended for
for
for
for use
use
use
use only
only
only
only by
by
by
by clinical
clinical
clinical
clinical professionals
professionals
professionals
professionals or
or
or
or
under
under
under
under their
their
their
their guidance.
guidance.
guidance.
guidance. It
It
It
It must
must
must
must only
only
only
only be
be
be
be used
used
used
used by
by
by
by persons
persons
persons
persons who
who
who
who have
have
have
have received
received
received
received
adequate
adequate
adequate
adequate training
training
training
training in
in
in
in its
its
its
its use.
use.
use.
use. Anyone
Anyone
Anyone
Anyone unauthorized
unauthorized
unauthorized
unauthorized or
or
or
or untrained
untrained
untrained
untrained must
must
must
must not
not
not
not perform
perform
perform
perform
any
any
any
any operation
operation
operation
operation on
on
on
on it.
it.
it.
it.
2.1.2
2.1.2
2.1.2
2.1.2 Contraindications
Contraindications
Contraindications
Contraindications
None.
2.1.3
2.1.3
2.1.3
2.1.3 Components
Components
Components
Components
This pulse oximeter consists of a main unit and a SpO2 sensor.
2.2
2.2
2.2
2.2 Features:
Features:
Features:
Features:
Regular Check Mode and Continuous Monitoring Mode
Data Graph and Trend Table Review
Rich Analysis report
Perfect mount solution
Sync with PC based Sofrware (WinXP and WinVista)
3
3
3
3 M
M
M
M ain
ain
ain
ain Technical
Technical
Technical
Technical I
I
I
I ndex
ndex
ndex
ndex
3.1
3.1
3.1
3.1 Performance
Performance
Performance
Performance Specifications
Specifications
Specifications
Specifications
Display: 3.5" Color TFT
Resolution: 320 x 240
Display Mode: Standard face, Waveform face, Display Direction
adjustable
Indicator: Power indicator light, Alarm sound, Pluse tone
Interface: One dual-purpose socket for connecting SPO2
sensors and communication cables
Power Supply: DC 5V, <300MA
Battery: Builtin Li-Polymer, 6 hours for charging, 9 hours
for continous working.
1 2 hours for standby mode
3.7v,1900mah
Trend Graph /Table : Resolution from 1s, 5s, 10s ,30s,1min,and so on .
S torage of latest 96 hours trend data. Second is
the unit.

5
History : Storage of latest 10000 case history by SD card.
Permit to review momentarily.
Alarm: Ajustable High and Low limits. Three level audible
and vis u al alarm , latest 50 alarm information and
w aveform displays 8 seconds which 4 seconds are
before a certain time when the alarm is turned on
and 4 seconds are after appointed time when the
alarm is turned on.
Wave: Storage of 24 hours waveform, and only the real-
time stored patients have waveform.
3.2
3.2
3.2
3.2 Technical
Technical
Technical
Technical specifications
specifications
specifications
specifications
Safety
Safety
Safety
Safety
Meet the requirment of IEC60601 series
Type of Protection: Class II with internal electirc power supply
Degree of Protection: BF
Dimention and Weight
Dimention: 92(W)x82(H)x22(D)mm
Weight: 136g(with battery)
Operation Environment:
Temperature: 0 ℃ ~ +40 ℃
Humidity: 15% ~ 95%
Storage Environment:
Temperature: -20 ℃ ~ +60 ℃
Humidity: 10% ~ 95%
Patient Range
Neonate ,Pediatric and Adult
3.3
3.3
3.3
3.3 SPO2
SPO2
SPO2
SPO2
Measurement Range: 0 ~ 100%
Resolution: 1%

6
Accuracy: ± 2%(70%~100%, Adult/Pediatric, non-motion)
± 3%(70%~100%, Neonate, non-motion)
0% ~ 69% unspecified
Alarm Range: 0% ~ 100%
Refreshing Rate: 1s
Pulse
Pulse
Pulse
Pulse Rate:
Rate:
Rate:
Rate:
Measurement Range: 25 ~ 250 bpm
Resolution: 1bpm
Accuracy: ± 3 bpm (non-motion)
Alarm Range: 25 ~ 250 bmp
Refreshing Rate: 1s
4 Function Instructions
4.1
4.1
4.1
4.1 Main
Main
Main
Main Interface
Interface
Interface
Interface
The system will enter automatically the main interface after first startup .
T
welve parts
make up of the main interface, as follows charts:
Model 4-1-1 main1 Mode1 4-1-2 main2
Notice
Notice
Notice
Notice :Between
:Between
:Between
:Between of
of
of
of the
the
the
the above
above
above
above figures,
figures,
figures,
figures, the
the
the
the Model
Model
Model
Model 4-1-1
4-1-1
4-1-1
4-1-1 shows
shows
shows
shows the
the
the
the layout
layout
layout
layout of
of
of
of the
the
the
the
wave
wave
wave
wave screen
screen
screen
screen and
and
and
and the
the
the
the Model
Model
Model
Model 4-1-2
4-1-2
4-1-2
4-1-2 shows
shows
shows
shows the
the
the
the layout
layout
layout
layout of
of
of
of the
the
the
the normal
normal
normal
normal screen.
screen.
screen.
screen.
4.1.1
4.1.1
4.1.1
4.1.1 Introduce
Introduce
Introduce
Introduce the
the
the
the composing
composing
composing
composing Parts
Parts
Parts
Parts as
as
as
as follows:
follows:
follows:
follows:

7
Model 4-1-3 Main
1. Patient ID Area:
This area shows the ID number of the patients monitoring currently.
2. Patient category Area:
This area shows the patient range.
Patients are classified as adult, pediatric and neonate.
3. System Time Area
4. Heart Rate Area:
Click the button can shield the sound of the heart murmur. The button and
the button flicker alternately after the sounds are turned off .
5. Battery symbol Area:
This area shows the electrical voltage of the battery.
6. Alarm Status Area:
indicates that alarm sounds are turned on;
indicates that alarm sounds are turned off.
7. SpO2 Area
8. PR Area
9. Physiological Alarm Area:
This area shows the physiological alarm message. When multiple messages come,
they will be displayed circularly.
10. Physiological Alarm Status Area:
Click the button to pause or reactivate the alarm sound.

8
indicates that alarm sounds are paused.
11. Waveform Area:
This area displays SPO2 real time waveform.
12. Function button Area
4.1.2
4.1.2
4.1.2
4.1.2 Function
Function
Function
Function button:
button:
button:
button:
Functions as follows:
4.2
4.2
4.2
4.2 New
New
New
New Patient
Patient
Patient
Patient Information
Information
Information
Information Interface
Interface
Interface
Interface
C lick the “ ” button of the main interface to enter the N ew patient case
history interface. New P atient information interface showed as followed:
M odel 4-2-1 New Patient
U sers
’
can set up and store the personal information of the patient monitoring
currently. After the patient information is stored, it will return to the main menu. The
“” button change into the " " button. T hen click the button can store the
E nter the new patient case history menu. P atient
’
s case history
should be set up and stored 10,000 at best .
E nter the data review menu. Review the monitoring data of
the current patient or the patients who had been stored
previously.
E nter the system setup menu.
A mend the system setup.
Press this button to make that alarm sounds are turned off.
The sounds of the heart murmur still are turned on.
Press this button to return to the main menu .

9
personal information of the patient monitoring currently into the SD card.
4.3
4.3
4.3
4.3 Data
Data
Data
Data Review
Review
Review
Review Interface
Interface
Interface
Interface
4.3.1
4.3.1
4.3.1
4.3.1 Data
Data
Data
Data Review
Review
Review
Review Interface
Interface
Interface
Interface
C lick the “ ” button of the main interface to enter the patient data review
interface. Data review interface showed as followed:
M odel 4-3-1 Data Review
U sers can review the monitoring data of the current patient
or
the patients who
had been stored previously by selecting "Patient ID".
R eview includes 4 kinds: "TrendTable", "TrendGraph", "AlarmReview" ,"WaveReview", as
followed:
N otice: the "Wave Review" function only be applicable for the patients
monitoring currently and not be applicable for the patients monitoring previously.
B y click S how Stat. I tem ,users can choose whether
or
not to show statistic in the TrendTable.
And the item is only applicable for TrendTable.
M enu : Functions listed in below chart:
4.3.2
4.3.2
4.3.2
4.3.2
TrendTable
TrendTable
TrendTable
TrendTable Interface
Interface
Interface
Interface
Patient ID
S elect the Patient ID that is needed to review
Review Type
S elect the category that is needed to review
Resolution
R eview Resolution only be applicable for "TrendTable"
and "TrendGraph" .
Start Time
S e t up the starting time of review

10
TrendTable
TrendTable
TrendTable
TrendTable Interface
Interface
Interface
Interface showed as followed:
M odel 4-3-2 TrendTable
The detailed information of the key as following:
4.3.3
4.3.3
4.3.3
4.3.3
TrendGraph
TrendGraph
TrendGraph
TrendGraph Interface
Interface
Interface
Interface
TrendGraph
TrendGraph
TrendGraph
TrendGraph Interface
Interface
Interface
Interface showed as followed:
M odel 4-3-3 TrendGraph
4.3.3. 1.
Click one point on the screen to descry the parameter value of Spo2 and PR at
a
certain time.
4.3.3. 2. TrendGraph can analysis the data.
It
does some basis statistical analysis as well as SpO2 and pulse events analysis.
Max :
The maximum of the Parameter data in the logical range
Min:
The m in imum of the Parameter data in the logical range
Ave:
The average of the Parameter data in the logical range

11
SpO2 desaturation event is defined as drop in SpO2 by at least N% for
a
minimum
duration of L seconds. N and L are configurable, and is defaulted to 4 and 10.
Pulse event is defined as change in pulse rate by at least N bpm( beats per minute)
for
a
minimum duration of L seconds. N and L are configurable, and defaulted to 6 and
8.
You
can set the analysis parameters in the "System Setup" Menu.
4.3.4
4.3.4
4.3.4
4.3.4 AlarmReview
AlarmReview
AlarmReview
AlarmReview and
and
and
and WaveReivew
WaveReivew
WaveReivew
WaveReivew Interface
Interface
Interface
Interface
AlarmReview
AlarmReview
AlarmReview
AlarmReview and
and
and
and WaveReivew
WaveReivew
WaveReivew
WaveReivew Interface
Interface
Interface
Interface showed as followed:
M odel 4-3-4 AlarmReview and WaveReivew
I n the AlarmReview waveform display district
,
w aveform displays 8 seconds
which 4 seconds are before
a
certain time when the alarm is turned on and 4 seconds
are after appointed time when the alarm is turned on.
T his alarm symbol includes following items:
“*” : low- level alarm
“** ” : mid-level alarm
“*** ” : high- level alarm
The waveform be displayed 1 6 seconds e very screen in the Wave Review
waveform display district .
4.4
4.4
4.4
4.4 Set
Set
Set
Set up
up
up
up Interface
Interface
Interface
Interface
4.4.1
4.4.1
4.4.1
4.4.1 Set
Set
Set
Set up
up
up
up Interface
Interface
Interface
Interface
C lick the “ ” button of the main interface to enter the Setup interface.

12
Setup interface showed as followed:
M odel 4-4-1 Setup
Instruction:
Instruction:
Instruction:
Instruction:
Monitoring
Monitoring
Monitoring
Monitoring setting
setting
setting
setting and
and
and
and producer
producer
producer
producer setting
setting
setting
setting Options
Options
Options
Options as
as
as
as follows
follows
follows
follows :
:
:
:
NOTICE:
NOTICE:
NOTICE:
NOTICE: If
If
If
If the
the
the
the time
time
time
time is
is
is
is changed,
changed,
changed,
changed, users
users
users
users should
should
should
should restart
restart
restart
restart the
the
the
the apparatus
apparatus
apparatus
apparatus by
by
by
by hand
hand
hand
hand to
to
to
to
ensure
ensure
ensure
ensure the
the
the
the accuracy
accuracy
accuracy
accuracy of
of
of
of the
the
the
the data
data
data
data storage
storage
storage
storage time.
time.
time.
time.
Item
Purpose
Producer
setting
Choosing scope
Spo2 ALM
T
urn on/off Spo2 alarm
OFF
OFF ON
Spo2 ALM
LVL
Spo2 alarm level
MID
LOW,
MID, HIGH
Spo2 ALM HI
Spo2 alarm high-level
99
0----100
Spo2 ALM LO
Spo2 alarm low-level
80
PR ALM
T
urn on/off PR alarm
OFF
OFF ON
PR ALM LVL
PR alarm level
MID
LOW,
MID, HIGH
PR ALM HI
PR alarm high-level
110
0-----300
PR ALM LO
PR alarm low-level
50
Alarm Pause
Alarm Pause Time
1MIN
1Min,2Min,3Min,Always
Display
D isplay mode
Mode1
Mode1, Mode2
System Time
S et system time
System Setup
E nter system setup menu
Pulse Sound
Turn on/off pulse sound
OFF ON
Demo
E nter Demo mode

13
4.4.2
4.4.2
4.4.2
4.4.2 System
System
System
System Setup
Setup
Setup
Setup
C lick the “ ” button of the Setup menu to enter the System Setup
menu interface. System Setup menu interface showed as followed:
M odel 4-4-2 System Setup
4.4.2.
4.4.2.
4.4.2.
4.4.2. 1
1
1
1.
.
.
.
Users can set system sounds and overtime of the backdrop lighting .
4.4.2.
4.4.2.
4.4.2.
4.4.2. 2.
2.
2.
2. SpO2 Parameters
Drop for Event (%): value, in %, to qualify as an SpO2 (Desaturation) Event.
Minimum Event Duration (sec): value, in seconds, of SpO2 decrease that qualifies
as an SpO2 (desaturation) event.
Desaturation Criteria Level (%): value, in %, below which the SpO2 level must
drop to be classified in
a
special category of statistics. This threshold is indicated on
the SpO2 graph by
a
red dotted line.
Pulse Rate Parameters
Rate Change For Event (bpm): value, in beats per minute, to qualify as
a
pulse rate
event.
Minimum Event Duration (sec): value, in seconds, of pulse rate change to qualify
as
a
pulse rate event.

14
4.
4.
4.
4. 4.2.
4.2.
4.2.
4.2. 3.
3.
3.
3.
Click “ OK ” to set new analysis parameters
or
click “ Cancel ” to leave them
unchanged.
All setting will turn back to manufacture's setting when Click “ ” button .
5 Maintenance and Cleaning
Use only the substances approved by us and methods listed in this chapter to
clean
or
disinfect your equipment. Warranty does not cover damage caused by
unapproved substances
or
methods.
We
make no claims regarding the efficacy of the listed chemicals
or
methods as
a
means for controlling infection. For the method to control infection, consult your
hospital
’
s Infection Control Officer
or
Epidemiologist.
Keep you equipment and accessories free of dust and dirt.
To
avoid damage to the
equipment, follow these rules:
�
Always dilute according the manufacturer
’
s instructions
or
use lowest possible
concentration.
�
Do not immerse part of the equipment into liquid.
�
Do not pour liquid onto the equipment
or
accessories.
�
Do not allow liquid to enter the case.
�
Never use abrasive materials (such as steel wool
or
silver polish),
or
erosive
cleaners (such as acetone
or
acetone-based cleaners).
WARNING
WARNING
WARNING
WARNING
�
�
�
�
Be
Be
Be
Be sure
sure
sure
sure to
to
to
to shut
shut
shut
shut down
down
down
down the
the
the
the system
system
system
system and
and
and
and disconnect
disconnect
disconnect
disconnect all
all
all
all power
power
power
power cables
cables
cables
cables from
from
from
from the
the
the
the
outlets
outlets
outlets
outlets before
before
before
before cleaning
cleaning
cleaning
cleaning the
the
the
the equipment.
equipment.
equipment.
equipment.
CAUTION
CAUTION
CAUTION
CAUTION
�
�
�
�
If
If
If
If you
you
you
you spill
spill
spill
spill liquid
liquid
liquid
liquid on
on
on
on the
the
the
the equipment
equipment
equipment
equipment or
or
or
or accessories,
accessories,
accessories,
accessories, contact
contact
contact
contact us
us
us
us or
or
or
or your
your
your
your
service
service
service
service personnel.
personnel.
personnel.
personnel.
NOTE:
NOTE:
NOTE:
NOTE:
�
�
�
�
To
To
To
To
clean
clean
clean
clean or
or
or
or disinfect
disinfect
disinfect
disinfect reusable
reusable
reusable
reusable accessories,
accessories,
accessories,
accessories, refer
refer
refer
refer to
to
to
to the
the
the
the instructions
instructions
instructions
instructions

15
delivered
delivered
delivered
delivered with
with
with
with the
the
the
the accessories.
accessories.
accessories.
accessories.
5
5
5
5 .1
.1
.1
.1 Safety
Safety
Safety
Safety Checks
Checks
Checks
Checks
Before every use,
or
after your pulse oximeter has been used for 6 to 12 months,
or
whenever your pulse oximeter is repaired
or
upgraded,
a
thorough inspection should
be performed by qualified service personnel to ensure the reliability.
Follow these guidelines when inspecting the equipment:
�Make sure that the environment and power supply meet the requirements.
�Inspect the equipment and its accessories for mechanical damage.
�Inspect all power cords for damage, and make sure that their insulation is in
good condition.
�Make sure that only specified accessories are applied.
�Inspect if the alarm system functions correctly.
�Make sure that the batteries meet the performance requirements.
�Make sure that the pulse oximeter is in good working condition.
In case of any damage
or
abnormity, do not use the pulse oximeter. Contact your
hospital
’
s biomedical engineers
or
your service personnel immediately.
5
5
5
5 .2
.2
.2
.2 Cleaning
Cleaning
Cleaning
Cleaning
Your
equipment should be cleaned on
a
regular basis. If there is heavy pollution
or
lots of dust and sand in your place, the equipment should be cleaned more frequently .
Before cleaning the equipment, consult your hospital
’
s regulations for cleaning the
equipment.
Recommended cleaning agents are:
�Mild soap (diluted)
�Ammonia (diluted)
�Sodium hypochlorite bleach (diluted)
�Hydrogen peroxide (3%)
�Ethanol (70%)

16
�Isopropanol (70%)
To
clean your equipment, follow these rules:
1. Shut down the pulse oximeter and disconnect it from the power line.
2. Clean the display screen using
a
soft, clean cloth dampened with
a
glass cleaner.
3. Clean the exterior surface of the equipment using
a
soft cloth dampened with the
cleaner.
4. Wipe off all the cleaning solution with
a
dry cloth after cleaning if necessary.
5. Dry your equipment in
a
ventilated, cool place.
5
5
5
5 .3
.3
.3
.3 Disinfecting
Disinfecting
Disinfecting
Disinfecting
Disinfection may cause damage to the equipment and is therefore not
recommended for this pulse oximeter unless otherwise indicated in your hospital
’
s
servicing schedule.
Clean the pulse oximeter before disinfecting it.
The recommended disinfectants include: ethanol 70%, isopropanol 70%,
glutaraldehyde-type 2% liquid disinfectants.
CAUTION
CAUTION
CAUTION
CAUTION
�
�
�
�Never
Never
Never
Never use
use
use
use EtO
EtO
EtO
EtO or
or
or
or formaldehyde
formaldehyde
formaldehyde
formaldehyde for
for
for
for disinfection.
disinfection.
disinfection.
disinfection.
5
5
5
5 .4
.4
.4
.4 Disposal
Disposal
Disposal
Disposal
Dispose of the pulse oximeter in accordance with local environment and waste
disposal regulations. For the disposal of SpO2 sensor, follow local regulations
regarding disposal of hospital waste.
6. Appendix
6.1.
6.1.
6.1.
6.1. Alarm
Alarm
Alarm
Alarm Characters
Characters
Characters
Characters Specification:
Specification:
Specification:
Specification:
Finger Out
SPO2 Sensor OFF

17
Battery
Too
Low
SPO2
Too
High
SPO2
Too
Low
PR
Too
High
PR
Too
Low
6.2.
6.2.
6.2.
6.2. Usual
Usual
Usual
Usual Metrical
Metrical
Metrical
Metrical Range:
Range:
Range:
Range:
SPO2 1-99
PR 1-250
Table of contents
Other Contec Medical Equipment manuals

Contec
Contec ESA0008 User manual

Contec
Contec CMS-50E User manual

Contec
Contec CMS800G User manual

Contec
Contec 300G User manual

Contec
Contec ABPM 50 Reference guide

Contec
Contec CMS50M User manual

Contec
Contec CMS50DL User manual

Contec
Contec SP10W User manual

Contec
Contec CMS8000 User manual

Contec
Contec CMS50DL User manual

Contec
Contec CMS50DA User manual

Contec
Contec CMS50D User manual

Contec
Contec MDD93EEC Instruction Manual

Contec
Contec CMS 50IW User manual

Contec
Contec CMS-50E User manual

Contec
Contec CMS50DL1 User manual

Contec
Contec CMS50D User manual

Contec
Contec CMS80A Instruction Manual

Contec
Contec ECG 100G User manual

Contec
Contec CMS60D User manual