manuals.online logo
Brands
  1. Home
  2. •
  3. Brands
  4. •
  5. Controlli
  6. •
  7. Controllers
  8. •
  9. Controlli MVH26 User manual

Controlli MVH26 User manual

ISO 9001
CONTROLLI
16010 SANT’OLCESE Genova - Italy
Tel.: +39 01073061 Fax: +39 0107306870/871
E-mail: [email protected] Web: www.controlli.eu
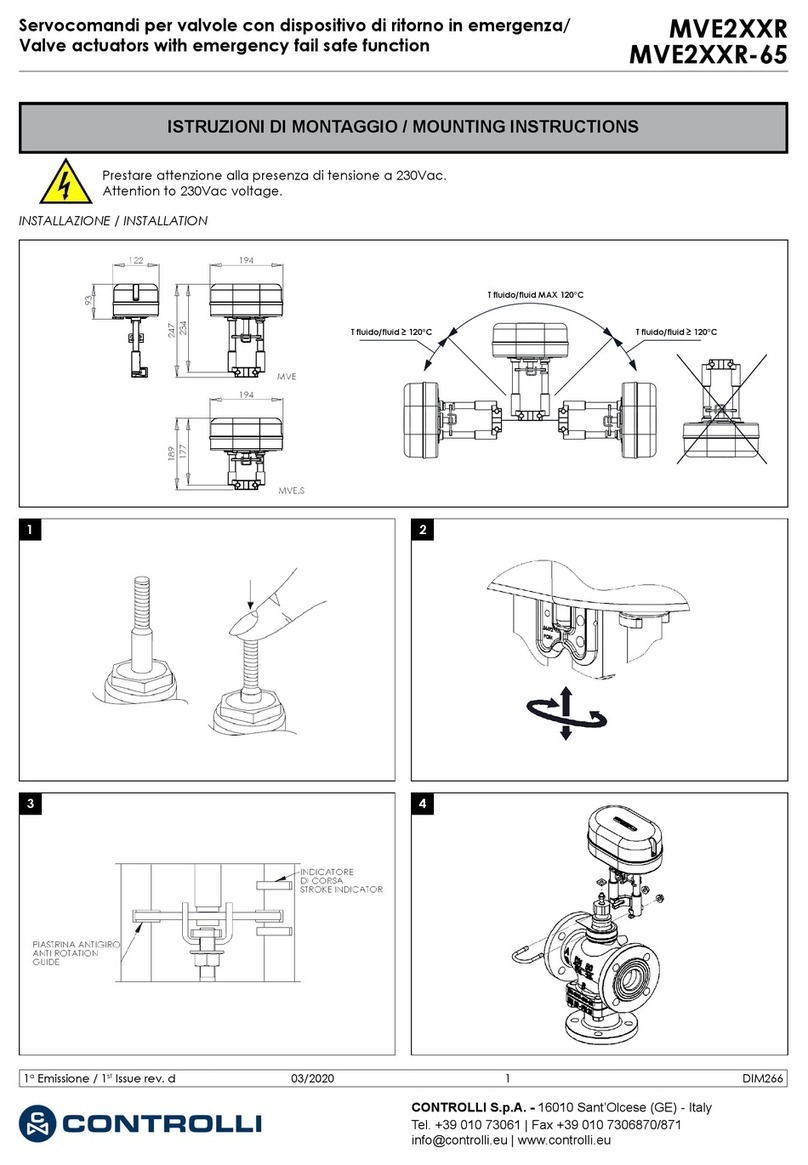
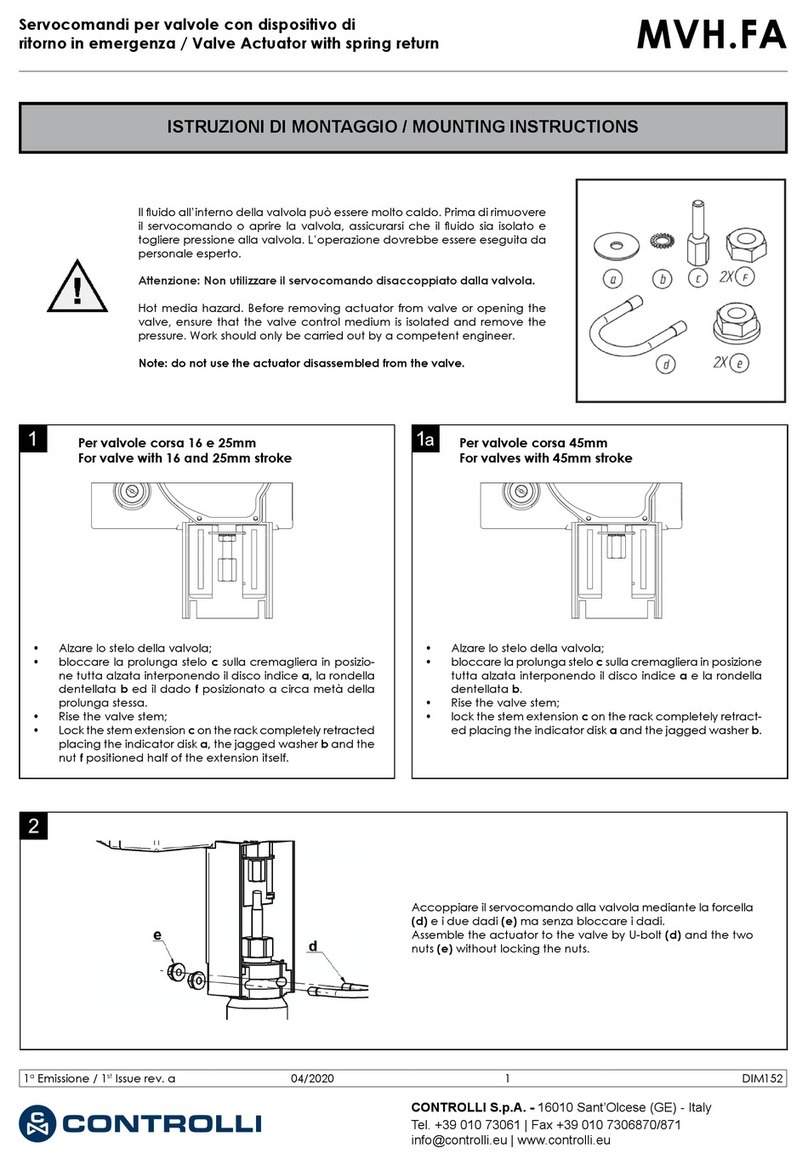
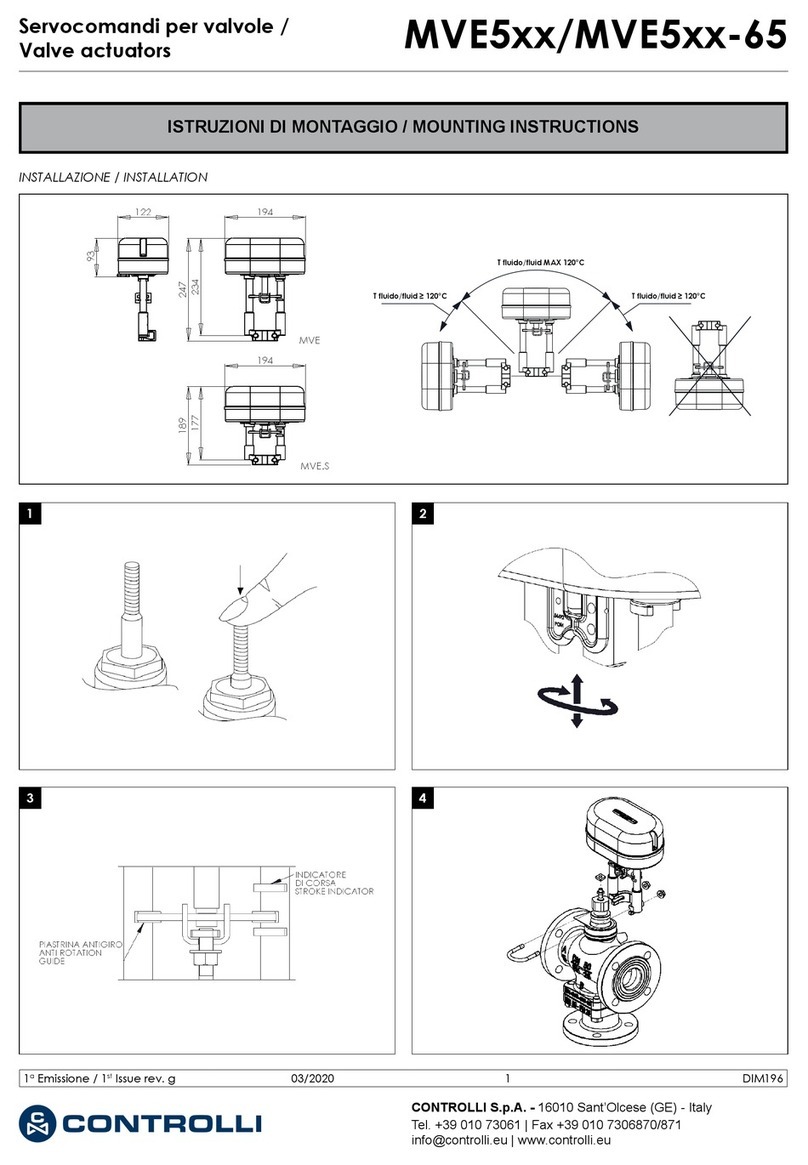
MOUNTING INSTRUCTIONS
Hot media hazard. Before removing actuator from valve or opening the valve, ensure that the valve control medium is
isolated and remove the pressure. Work must only be carried out by a competent engineer.
Attention: do not use the actuator disassembled from the valve.
1
MVH26/36/46/56 models
4
Byrotatingthemanualcontrolknob,
lower the stem extension until it
reaches the valve stem, then rotate
the actuator to screw the stem into
the extension.
Tighten the locknut on the stem and
lock the two nuts on the U-bolt.
3
Assemble the actuator to the valve by U-bolt and the
two nuts with the washer without locking the nuts.
2
Lock the stem extension c on the rack placing the
indicator disk a and the jagged washer b.
Valve Actuators MVH
1st Issue rev. e 01/12 1 DIM156e
1
MVH36A models
2
3
4
Lock the stem extension c on the rack placing the indicator
disk a and the jagged washer b.
Assemble the ac-
tuator to the valve
byU-boltandthetwo
nutswith the washer
without locking the
nuts.
-Lift the valve stem
- Remove the cover and rotate the pivot clockwise so that the rack comes out for
assembling it with the valve stem; the pivot can be locked by a spanner as shown
in the picture
- Rotate the actuator to screw the extension on the valve stem, so lock it tightening
the nut on the stem.
-Tighten the two nuts on the U-bolt to lock the actuator.
-Removethekeyfrom the pivot and mount the small cap.The pivot must be rotated
1/2 turn to assemble 45 mm stroke valves. It is necessary to rotate it with several
turns for valves having lower strokes; as an alternative, it is possible to insert the
nut in place of the jagged washer to lock the stem extension in a lower position.
Thus for assembling the valve rotating the pivot 1/2 turn.
1st Issue rev. e 01/12 2 DIM156e
MVH36C models
12
3
4
-Remove the cover
- Rotate the pivot 1/2 turn counter-clockwise and lock it
by a spanner as shown in the picture.
Lock the stem extension c on the rack placing the indicator
disk a and the jagged washer b.
-Lower the valve stem
-Screw the extension on
the valve stem until the
groove on the actuator base
matches with the one on the
valve, so lock the extension
tightening the nut on the
stem. Assemble the actuator to the valve by U-bolt and
the two nuts with the built-in washer.
1st Issue rev. e 01/12 3 DIM156e
Automatic control systems for:
air conditioning/heating/industrial thermal process.
ISO 9001
The performances stated in this sheet can be modified without any prior notice due to design improvements
ACTUATOR STROKE CALIBRATION (only for MVH36/56)
- Loosen the locking screws located on the cover and put it off.
- Using a screwdriver, turn counter-clockwise the right potentiometer and clockwise the left one up to their mechanical stop.
- Acting on the manual knob, as shown in fig. 5, bring the indicator disk to both stroke ends and position the related adjustable
indicators.
ELECTRICAL CONNECTIONS
Perform the connections in compliance with existing rules and using max 2,5 mm2cross section wires.
Follow the instructions by using wire terminals on power supply wires in order to prevent accidental contacts between cables at
different voltages in case of wrong installation. On the power supply line install a protection device compliant to existing rules with
a 125 mA intervention threshold and a minimum 3 mm contact opening. The device is not supplied with the product.
MVH26/46 MVH36/36A/36C/56
N3009
Neutral- Supply in N
Supply phase in Y1 (joint up)
Supply phase in Y2 (joint down)
Supply 24 V ~ + 10%
(1) For MVH36 model, connect the potentiometer central of the controller (165 Ohm) to Y terminal, the extremities to M and V+
terminals.
(2) The joint moves downwards when the jumper on SW3 is inA position and the control signal increases.
(3)Connect the position indicator with input current to S3 (or S2) and S1 terminals. Connect the position indicator with input voltage
to S3 (or S2) and M (max 2 mA) terminals. With joint up between M (S1) and S2 minimum voltage value; between M (S1) and
S3 maximum current (voltage) value.
(4) When the actuator is in upper position, the potentiometer has 0 Ohm between W3 and W2 and 1000 Ohm between W2 and
W1 and a variation of 22.2 Ohm for each mm. of stroke.
Supply
control
W1 Auxiliary
W2 Central potentiometer MVH
W3 26/46 (4)
L1 Phase
L2 Neutral
M Common
V+ +15V output (1)
Y Control signal (2)
S3 0...10V or 0..200uA
S2 10...0V or 200...0uA (3)
S1 Analogue common
1st Issue rev. e 01/12 4 DIM156e
This manual suits for next models

5

Other Controlli Controllers manuals

Controlli MVT5 Series User manual

Controlli

Controlli MVT5 Series User manual

Controlli MVE5 Series User manual

Controlli

Controlli MVE5 Series User manual

Controlli MDL46 User manual

Controlli

Controlli MDL46 User manual

Controlli MVE506 User manual

Controlli

Controlli MVE506 User manual

Controlli Energon NR9001 User manual

Controlli

Controlli Energon NR9001 User manual

Controlli MVE2-65 Series Owner's manual

Controlli

Controlli MVE2-65 Series Owner's manual

Controlli MVE2 Series User manual

Controlli

Controlli MVE2 Series User manual

Controlli MVE2 R Series User manual

Controlli

Controlli MVE2 R Series User manual

Controlli NC7311 User manual

Controlli

Controlli NC7311 User manual

Controlli MVH User manual

Controlli

Controlli MVH User manual

Controlli MVH56E User manual

Controlli

Controlli MVH56E User manual

Controlli Energon User manual

Controlli

Controlli Energon User manual

Controlli MVE5 Series User manual

Controlli

Controlli MVE5 Series User manual

Controlli W554C User manual

Controlli

Controlli W554C User manual

Controlli MVE5 Series User manual

Controlli

Controlli MVE5 Series User manual

Controlli MVE522 User manual

Controlli

Controlli MVE522 User manual

Controlli MVE2 Series User manual

Controlli

Controlli MVE2 Series User manual

Controlli MVE2R Series User manual

Controlli

Controlli MVE2R Series User manual

Controlli MVT5 Series User manual

Controlli

Controlli MVT5 Series User manual

Controlli MVE2 R-65 Series User manual

Controlli

Controlli MVE2 R-65 Series User manual

Controlli Energon NR9001 User manual

Controlli

Controlli Energon NR9001 User manual

Controlli MVH56EA User manual

Controlli

Controlli MVH56EA User manual

Controlli MVB User manual

Controlli

Controlli MVB User manual

Controlli MVE522-65 User manual

Controlli

Controlli MVE522-65 User manual

Popular Controllers manuals by other brands

Digital Dream DM500T3 user manual

Digital Dream

Digital Dream DM500T3 user manual

RHINO U240A user manual

RHINO

RHINO U240A user manual

REMKO EFS Series Operating and installation instructions

REMKO

REMKO EFS Series Operating and installation instructions

Whittaker C159980 Maintenance manual

Whittaker

Whittaker C159980 Maintenance manual

Peak Sensors VERTEX F4 instruction manual

Peak Sensors

Peak Sensors VERTEX F4 instruction manual

opto engineering LTDVE1CH-40F instruction manual

opto engineering

opto engineering LTDVE1CH-40F instruction manual

Ascon tecnologic TLB 55 Operating	 instruction

Ascon tecnologic

Ascon tecnologic TLB 55 Operating instruction

AudioCodes Mediant 9000 SBC Hardware installation manual

AudioCodes

AudioCodes Mediant 9000 SBC Hardware installation manual

Allen-Bradley Micro830 user manual

Allen-Bradley

Allen-Bradley Micro830 user manual

Motor Company Warehouse SDS075OC400V10 user guide

Motor Company Warehouse

Motor Company Warehouse SDS075OC400V10 user guide

THK US instruction manual

THK

THK US instruction manual

ILX Lightwave LDC-3916370 Series user guide

ILX Lightwave

ILX Lightwave LDC-3916370 Series user guide

BEA Hunter LO-LINX Wiring diagram

BEA

BEA Hunter LO-LINX Wiring diagram

IAI SCON-CGAL First step guide

IAI

IAI SCON-CGAL First step guide

DigiBird AVCNet-H user manual

DigiBird

DigiBird AVCNet-H user manual

RMG WAWLCI -TS user manual

RMG

RMG WAWLCI -TS user manual

Sumake SA-2473 Series manual

Sumake

Sumake SA-2473 Series manual

Carrier CPLOWAMB001A00 installation instructions

Carrier

Carrier CPLOWAMB001A00 installation instructions

manuals.online logo
manuals.online logoBrands
  • About & Mission
  • Contact us
  • Privacy Policy
  • Terms and Conditions

Copyright 2025 Manuals.Online. All Rights Reserved.