CORAB KRALING LUBKE Delta User manual

Montageanleitung Assembly instructions
Delta

D
GB
12
13
14
General safety instructions
Table assembly
Extending table assembly
4
5
6
Allgemeine Sicherheitshinweise
Montage Tisch
Montage Ausziehtisch
Delta
Montageanleitung
Delta
Assembly instructions

4
DMontage Tisch
ALLGEMEINE SICHERHEITSHINWEISE
Der Delta Tisch ist fest verleimt. Er ist nicht zerlegbar oder demontierbar.
Behandeln Sie den Tisch mit Sorgfalt. Setzen und stellen Sie sich nicht auf den Tisch. Der Delta
Tisch darf maximal bis 80kg belastet werden.
Beim Delta Tisch handelt es sich um einen Massivholztisch. Das Holz passt sich permanent der
Umgebungsfeuchte und dem Raumklima an. Wir empfehlen eine Raumtemperatur von 20° C und
50% relative Luftfeuchte. Weicht das Raumklima durch z.B. Witterungsänderungen oder Sommer/
Winter davon ab, kann es zu Oberflächenveränderungen kommen.
Durch unterschiedliches Schwinden bzw. Quellen des Holzes können die Beine ein wenig vor- bzw.
zurückspringen.
Lassen Sie keine Flüssigkeiten länger auf der Oberfläche stehen, sondern wischen Sie diese direkt
weg und putzen Sie die Oberfläche sofort trocken nach. Flüssigkeiten können auf der Oberfläche
Flecken oder Ringe hinterlassen, die nicht mehr weg zu bekommen sind.
Den Tisch innerhalb der ersten zwei Wochen nach der Auslieferung möglichst nur trocken reinigen
und nicht dekorieren. Die Oberfläche benötigt diese Zeit, um seine endgültige Härte und Wider-
standsfähigkeit zu erreichen und dunkelt nach.
Vermeiden Sie hohe Temperaturen, z.B. durch Kochgeschirr, Zigarettenglut oder Kerzenwachs.
Stauwärme unter elektrischen Geräten kann zu einer Rissbildung im Holz führen
(Tipp: Legen Sie Abstandhalter und/oder Glasplatten unter heiße Geräte oder Geschirr).
Halten Sie scharfe und spitze Gegenstände von der Oberfläche fern.
Verwenden Sie nach Möglichkeit keine Beläge, deren Unterseite gummiert oder latexiert ist. Diese
Beschichtungen können Substanzen enthalten, die nach einiger Zeit Flecken hinterlassen.
Benutzen Sie keinesfalls Microfasertücher zur Reinigung der Tische. Microfasertücher wirken wie
feinstes Schleifpapier und zerstören die Wachsoberfläche.

5
D
Bevor Sie den Tisch aufstellen, müssen sie die
mitgelieferten 4 Gummi-Gleiter montieren.
Entfernen Sie dafür die beiden Transportleisten
unter den Füssen und schrauben Sie die Gum-
mi-Gleiter mit den mitgelieferten Schrauben in
die dafür vorgesehenen Vertiefungen unter den
Füssen fest.
Stellen Sie jetzt den Tisch an die gewünschte
Stelle.
Montage Tisch
Gleiter
1

6
DMontage Ausziehtisch
HINWEISE
Stellen Sie nach der Erstmontage oder nach einem Umzug den ausziehbaren Delta Tisch immer
für 2 Wochen im ausgezogenen Zustand im Raum auf. Der Tisch akklimatisiert sich so an die neue
Umgebung und das Holz passt sich an das Raumklima an und setzt sich.
Sollte nach den 2 Wochen die Ausziehtischplatte nicht ganz bündig mit der Tischplatte sein, kön-
nen Sie die Ausziehtischplatte noch in der Höhe einstellen/nachjustieren. Verfahren Sie hier, wie
unter Punkt „Einstellen der Ausziehtischplatte“ weiter unten beschrieben ist.
Wird der Tisch meistens im eingezogenen Zustand benutzt, sind Farbunterschiede zwischen der
Tischplatte und der Ausziehtischplatte normal und stellen kein Reklamationsgrund dar.

7
D
Montage Ausziehtisch
Gleiter und Ausziehrollen
1
2
Bevor Sie den Tisch aufstellen, müssen sie die
mitgelieferten 2 Gummi-Gleiter und die beiden
Ausziehrollen montieren.
Entfernen Sie dafür die beiden Transportleisten
unter den Füssen und schrauben Sie als erstes
die 2 Gummi-Gleiter mit den mitgelieferten
Schrauben in die dafür vorgesehenen Vertiefun-
gen unter den Füssen fest.
Stecken Sie danach am Auszugsende die
beiden Gehäuse der Ausziehrollen in die
dafür vorgesehenen Ausfräsungen.
ACHTUNG: Achten Sie auf die Laufrich-
tung und richten Sie die Gehäuse passend
in Längsrichtung aus!
Schrauben Sie die Gehäuse jetzt mit den
mitgelieferten Schrauben fest.
Drücken Sie zum Schluss die Rollen in das
Gehäuse und prüfen Sie, ob sich die Rollen
drehen.
Stellen Sie nun den Tisch an die gewünschte
Stelle.
3

8
DMontage Ausziehtisch
Entfernung der Tranportsicherung
1
Der Delta Ausziehtisch ist werkseitig immer auf
der Unterseite des Tisches mit einer Transport-
sicherung gegen ein ungewolltes Ausfahren
gesichert.
Entfernen Sie diese Transportsicherung vor
dem ersten Ausziehen.
HINWEIS: Wollen Sie mit dem Tisch z.B. Um-
ziehen, fixieren Sie die Transportsicherung
wieder, damit beim Vertragen oder Verfahren
der Tisch nicht ungewollt ausfährt und dadurch
irreparabel beschädigt wird.
9
D
Montage Ausziehtisch
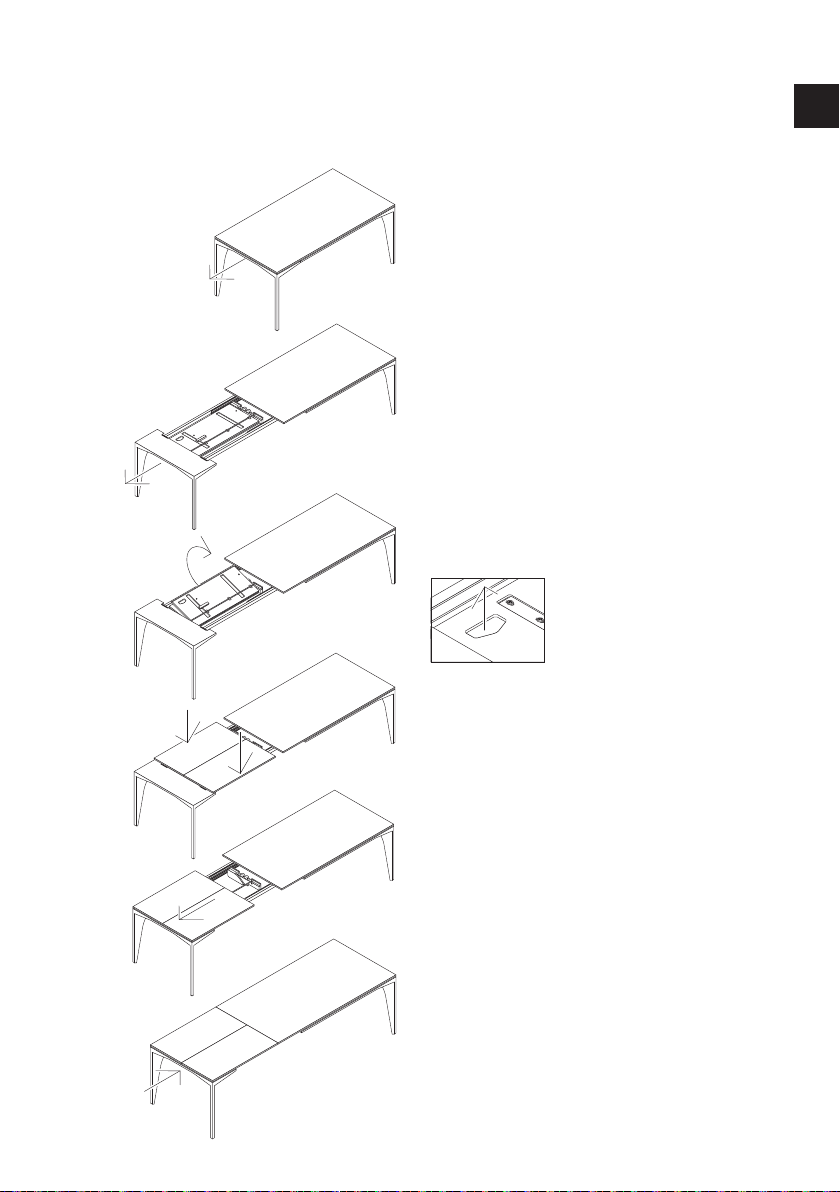
Ausziehen des Tisches
1
2
3
5
6
Stellen Sie sich an das Auszugsende des Delta
Tisches und greifen Sie auf der Unterseite des
Auszugsendes in die Griffmulde und ziehen Sie
die Auszugsmechanik bis zum Anschlag heraus.
Die Ausziehtischplatten kommen zum Vor-
schein.
Greifen Sie mit einer Hand in die Griffmulde
und drehen Sie die Ausziehtischplatte heraus.
Ziehen Sie nun mit beiden Händen die Aus-
ziehtischplatte bis zum Anschlag zu sich. Die
Tischplatte muss jetzt bündig mit der Stirnkan-
te/Beine des Tisches sein.
Schieben Sie zum Schluss das gesamte Aus-
zugsende inkl. der Ausziehplatte bis zum
Anschlag in Richtung der großen feststehenden
Tischplatte.
4

10
DMontage Ausziehtisch
Einfahren des ausgezogenen Tisches
1
2
3
5
6
Stellen Sie sich an das Auszugsende des Delta
Tisches und greifen Sie auf der Unterseite des
Auszugsendes in die Griffmulde und ziehen Sie
die Auszugsmechanik mit der Ausziehtischplat-
te bis zum Anschlag heraus.
Halten Sie mit einer Hand das Untergestell in
der Griffmulde weiter fest und schieben Sie mit
der anderen Hand die Ausziehtischplatte bis
zum Anschlag von sich weg.
Greifen Sie mit der rechten Hand in die Griff-
mulde auf der Unterseite der Ausziehtisch-
platte.
Drehen/klappen Sie die Ausziehtischplatte ein.
Schieben Sie zum Schluss das Auszugsende bis
zum Anschlag in Richtung der großen festste-
henden Tischplatte.
4

11
D
Montage Ausziehtisch
Einstellen der Ausziehtischplatte
1
2
Ist nach der 2-wöchigen Akklimatisierungszeit
oder durch einen starken Raumklimawechsel
die Ausziehtischplatte und die Tischplatte nicht
genau bündig, dann können Sie die Auszieh-
tischplatte noch einstellen bzw. nachjustieren.
Auf der Unterseite der Ausziehtischplatte
befinden sich 4 schwarze Stellschrauben/
Madenschrauben. Durch Drehen dieser Stell-
schrauben können Sie die Ausziehtischplatte
so einstellen (nach oben oder nach unten),
dass die beiden Tischplatten bündig sind.
Table of contents
Languages:
Other CORAB Indoor Furnishing manuals

CORAB
CORAB METRICA Avalanche User manual

CORAB
CORAB Cordia User manual

CORAB
CORAB Cordia Lounge User manual

CORAB
CORAB Level Table User manual

CORAB
CORAB Chart Series User manual

CORAB
CORAB Drop 7910 User manual

CORAB
CORAB Pilotis User manual

CORAB
CORAB Floater User manual

CORAB
CORAB Jalis User manual

CORAB
CORAB Floater User manual


Popular Indoor Furnishing manuals by other brands


Coaster
Coaster 4799N Assembly instructions

Stor-It-All
Stor-It-All WS39MP Assembly/installation instructions

Lexicon
Lexicon 194840161868 Assembly instruction

Next
Next AMELIA NEW 462947 Assembly instructions

impekk
impekk Manual II Assembly And Instructions

Elements
Elements Ember Nightstand CEB700NSE Assembly instructions


