CORNING ONE RAU5x User manual

Quick Installation Sheet | CMA-485-AEN | Page 1Corning Optical Communications
CMA-485-AEN
Five-Band Remote
Access Unit (RAU5x)
Quick Installation Sheet
1. The RAU5x must always be mounted parallel to the ceiling (horizontal) or wall (vertical) with a 1-in clearance
from the surface on the back and front to allow for proper cooling airow and for heat dissipation.
Le RAU5x doit toujours être montée parallèlement au plafond (horizontal) ou au mur (verticale). Assurez-vous
qu’il y a un espace de un pouce à l’avant et à l’arrière an de permettre un ux d’air de refroidissement et
dissipation de chaleur adéquat.
2. Required ambient temperature:
• Wall-mountable installations (vertical): 45˚C [113˚F]
• Ceiling-mountable installations (horizontal): 50˚C [122˚F]
3. The RAU5x unit is provided with a mounting bracket used for mounting on the wall or concrete ceilings
(including above acoustic ceiling mounts). Additional mounting accessory kits are available (ordered separately):
• BR-RAU5US-TOP: RAU5x bracket for oating ceilings tile, mid-mount installation
• BR-RAU5US-Wall: RAU5x remote bracket for wall-mountable installation; Supports up to two RAU5x units back-to-back
4. Add-on modules (i.e., RxU2325/GEM) are ordered separately and should be plugged into the RAU5x before
mounting the unit
5. A broadband antenna is required for RAU5x models ordered without a preassembled connected antenna.
6. External cavity lters are required for installations in which RAU5x modules supporting the corresponding CELL
and LTE bands are deployed alongside units supporting the Public Safety service. Installation instructions are
provided with each separately ordered lter (AK-CVT700; AK-CVT800).
GENERAL INFORMATION
This document provides instructions on how to mount the Corning®optical network evolution (ONE™) solutions RAU5x
unit and perform the required connections. The scope of this document includes connections to the RF expansion unit
(RxU2325) and Gigabit Ethernet module (GEM) (for installations including the plug-in add-on modules).

Quick Installation Sheet | CMA-485-AEN | Page 2Corning Optical Communications
1. PACKAGE CONTENTS
Check your package contents to verify that the items in the packing list are included. If any of the listed
items are missing, contact your Corning representative.
2. LOCATE THE REQUIRED
CONNECTION CABLES
Step 1: Locate the following connection cables
leading from the cable infrastructure:
• DC wiring:
- One pair for MAIN POWER connection
- One pair for SECONDARY POWER
connection (for installations with GEM
add-on)
• Fiber pairs
(Corning®SMF-28® ber or compatible):
- One ber pair for RAU5x module
- One ber pair for GEM (for installations
with GEM add-on)
• Grounding wire
• For RAU5x models not including external
antenna – RF jumper cables from installed
external antenna
Figure 1. Example of Mounting Bracket Installation and
Captive Screw Location (Bottom Right)
Item Description Quantity Image
Five-Band Remote Access Unit (RAU5x):
• RAU5XUS
• RAU5XUS-A*
*RAU5x model including assembled external broadband antenna
1
Mounting Bracket (preassembled on RAU5x underside)
Note: Mounting bracket includes holes in various sizes and locations
for exible installation options. Mounting screws not provided.
1
Safety Cable – preconnected to the RAU5x 1
Table 1. RAU5x Package Items

Quick Installation Sheet | CMA-485-AEN | Page 3Corning Optical Communications
3. INSTALL ADD-ON MODULES
For installations with RxU2325/GEM — plug-in the add-on
modules (ordered separately). Refer to quick installation
sheet provided with each module for instructions.
4. INSTALL THE MOUNTING BRACKET
(WALL/CONCRETE CEILING)
Notes: • When mounting the bracket on a wall,
the captive screw (indicated in Figure 1)
should always be positioned in the same
direction as the RAU5x connectors.
• In wall-mountable installations, the
connectors should face downwards.
• If installing above acoustic ceiling, allow
for at least 1-in above the acoustic ceiling
for airow cooling.
Step 1: Remove the mounting bracket from the
RAU5x underside and use to mark and drill
appropriate holes for mounting the bracket
on the wall or concrete ceiling. Refer to
Appendix for bracket dimensions.
Any of the applicable screw holes can be
used.
Step 2: Drill the appropriate screws (not provided)
through the bracket installation holes and
secure to surface. See Figure 2.
Consider the weight of the RAU5x when
determining mounting surface and
appropriate mounting screws:
RAU5x only (no external antenna or plug-in
modules): 10 lbs (4.5 kg)
RAU5x and GEM: 11.1 lbs (5.03 kg)
External Antenna: 3.7 lbs (1.7 kg)
RxU2325: 3.08 lbs (1.4 kg)
Figure 2. Example of (Concrete) Ceiling Installation of
Mounting Bracket (RAU5x with External Antenna)

Quick Installation Sheet | CMA-485-AEN | Page 4Corning Optical Communications
5. MOUNTING RAU5X ONTO BRACKET
Note: The RAU5x connectors should face the
bracket captive screw.
Referring to Figure 3, perform the following steps:
Step 1: Insert the four RAU5x pins into the wide
ends of the bracket keyholes.
Step 2: Make sure that the bracket captive screw ts
into the designated half-slot on the RAU5x.
Step 3: Lock RAU5x pins into the narrow ends of the
bracket keyholes.
Step 4: Close captive screw to secure RAU5x and
bracket assembly.
6. SECURE SAFETY CABLE TO GRID
OR CEILING
IMPORTANT!
Using the supplied security cable, attach the RAU5x to
a permanent structure within the ceiling (e.g., acoustic
ceiling grid or concrete ceiling above).
FIXEZ LE CÂBLE DE SÉCURITÉ À LA
GRILLE OU AU PLAFOND
IMPORTANT!
À l’aide du câble de sécurité fourni, xez la RAU5x à
une structure permanente avec le plafond (par exemple
plafond acoustique gris ou plafond en béton).
7. GROUND, F/O, AND RF CABLE
CONNECTIONS
Step 1: Route the cables located in Section 2.
Step 2: Connect the earth ground to the RAU5x
8-32 x 3/8 grounding screw (one-hole
grounding lug required). See Figure 4 for
example of RAU5x ground connection.
Step 3: Connect ber optic pair to RAU5x module
LC APC optic connector. See Figure 4.
Figure 3. Mounting RAU5x Onto Bracket
Figure 4. RAU5x Only —GND, F/O, and RF Cable
Connections

Quick Installation Sheet | CMA-485-AEN | Page 5Corning Optical Communications
7. GROUND, F/O, AND RF CABLE
CONNECTIONS (CONTINUED)
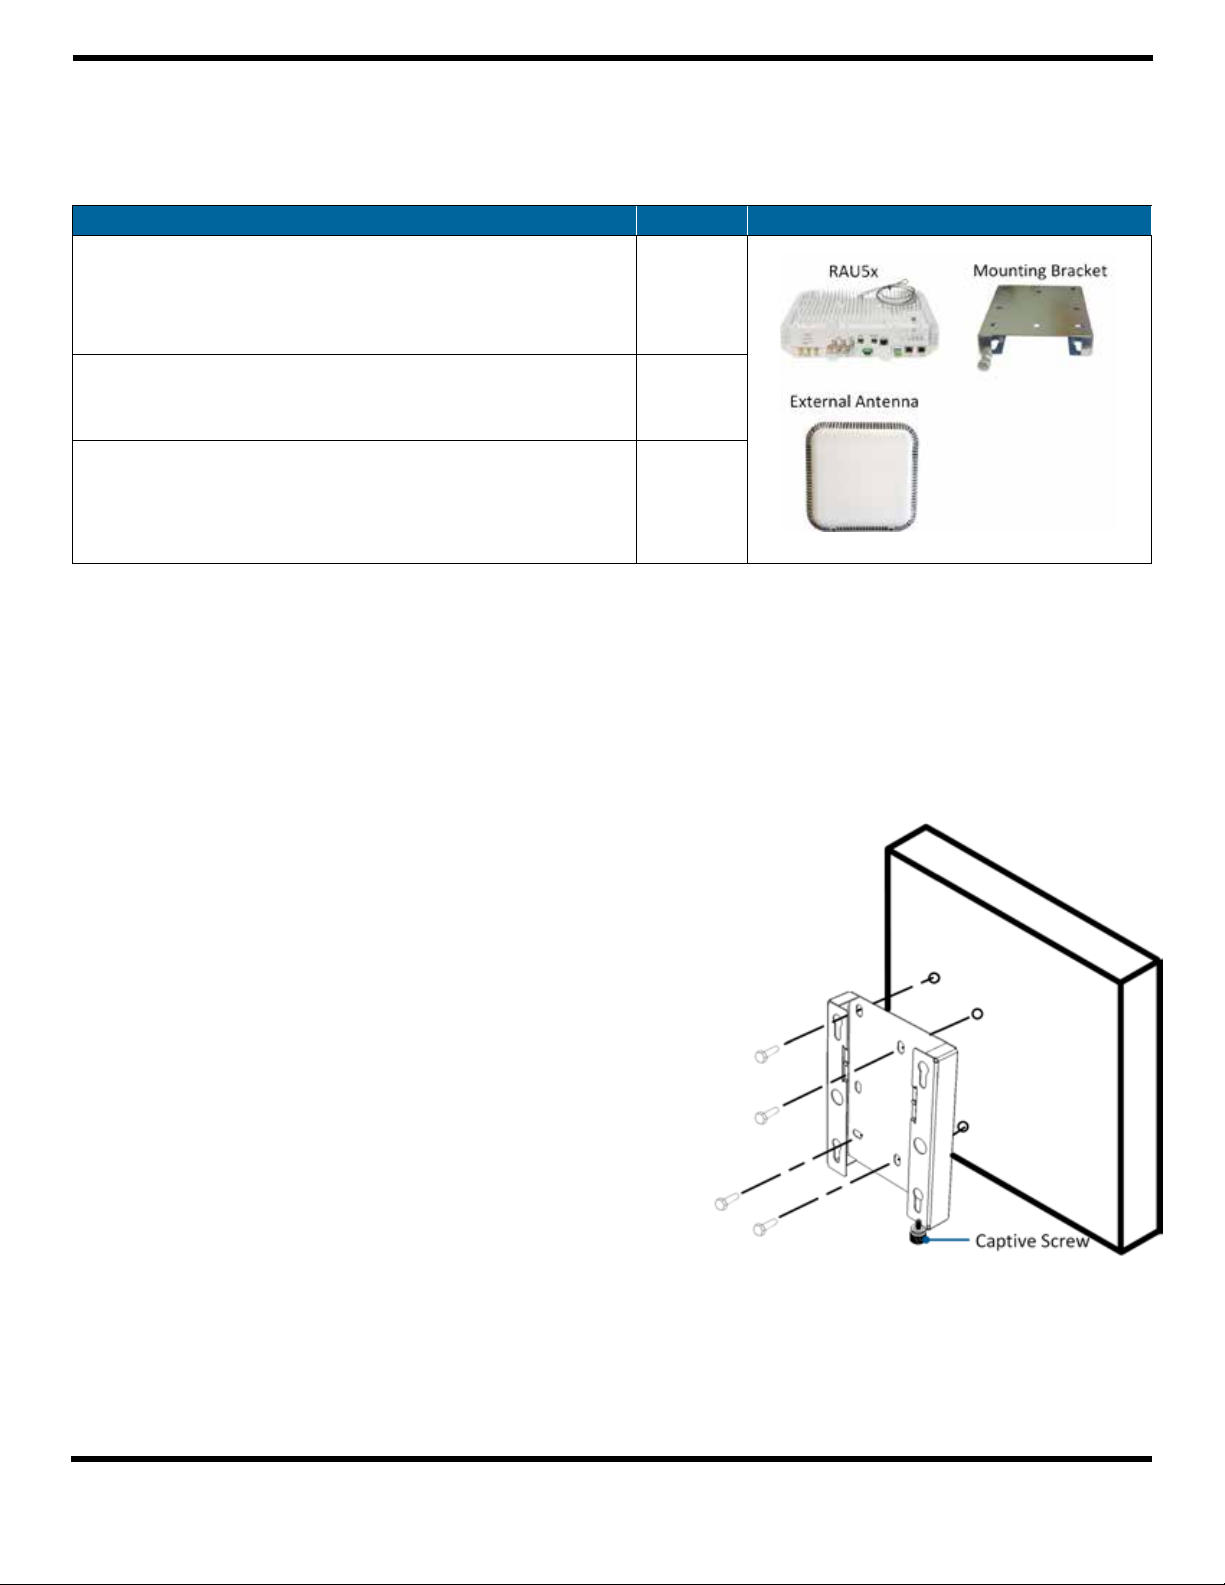
Step 4: RF connections:
*RAU5x only (without preassembled Corning
external antenna) — connect the RAU5x QMA
“‘Ext. Ant.” connector to an external antenna via
routed RF cable, as shown in Figure 4 .
*RAU5x+RxU2325 (without preassembled
Corning external antenna)— connect RxU2325
“ANT.” QMA connector to the external antenna via
routed RF cable, as shown in Figure 5.
Note: Supported external antenna types: vertical,
directional, or omni-directional antennas
*CELL and/or LTE external lters (if required by
site planner) — connect RAU5x UL/DL lter ports
to corresponding cavity lters.
Note: Refer to quick installation sheet
(CMA-366-AEN) provided with 700/800 cavity
lter or download from Corning Resource Center
(Product resources) site.
Figure 5. RAU5x+RxU2325 — GND, F/O, and RF Cable
Connections
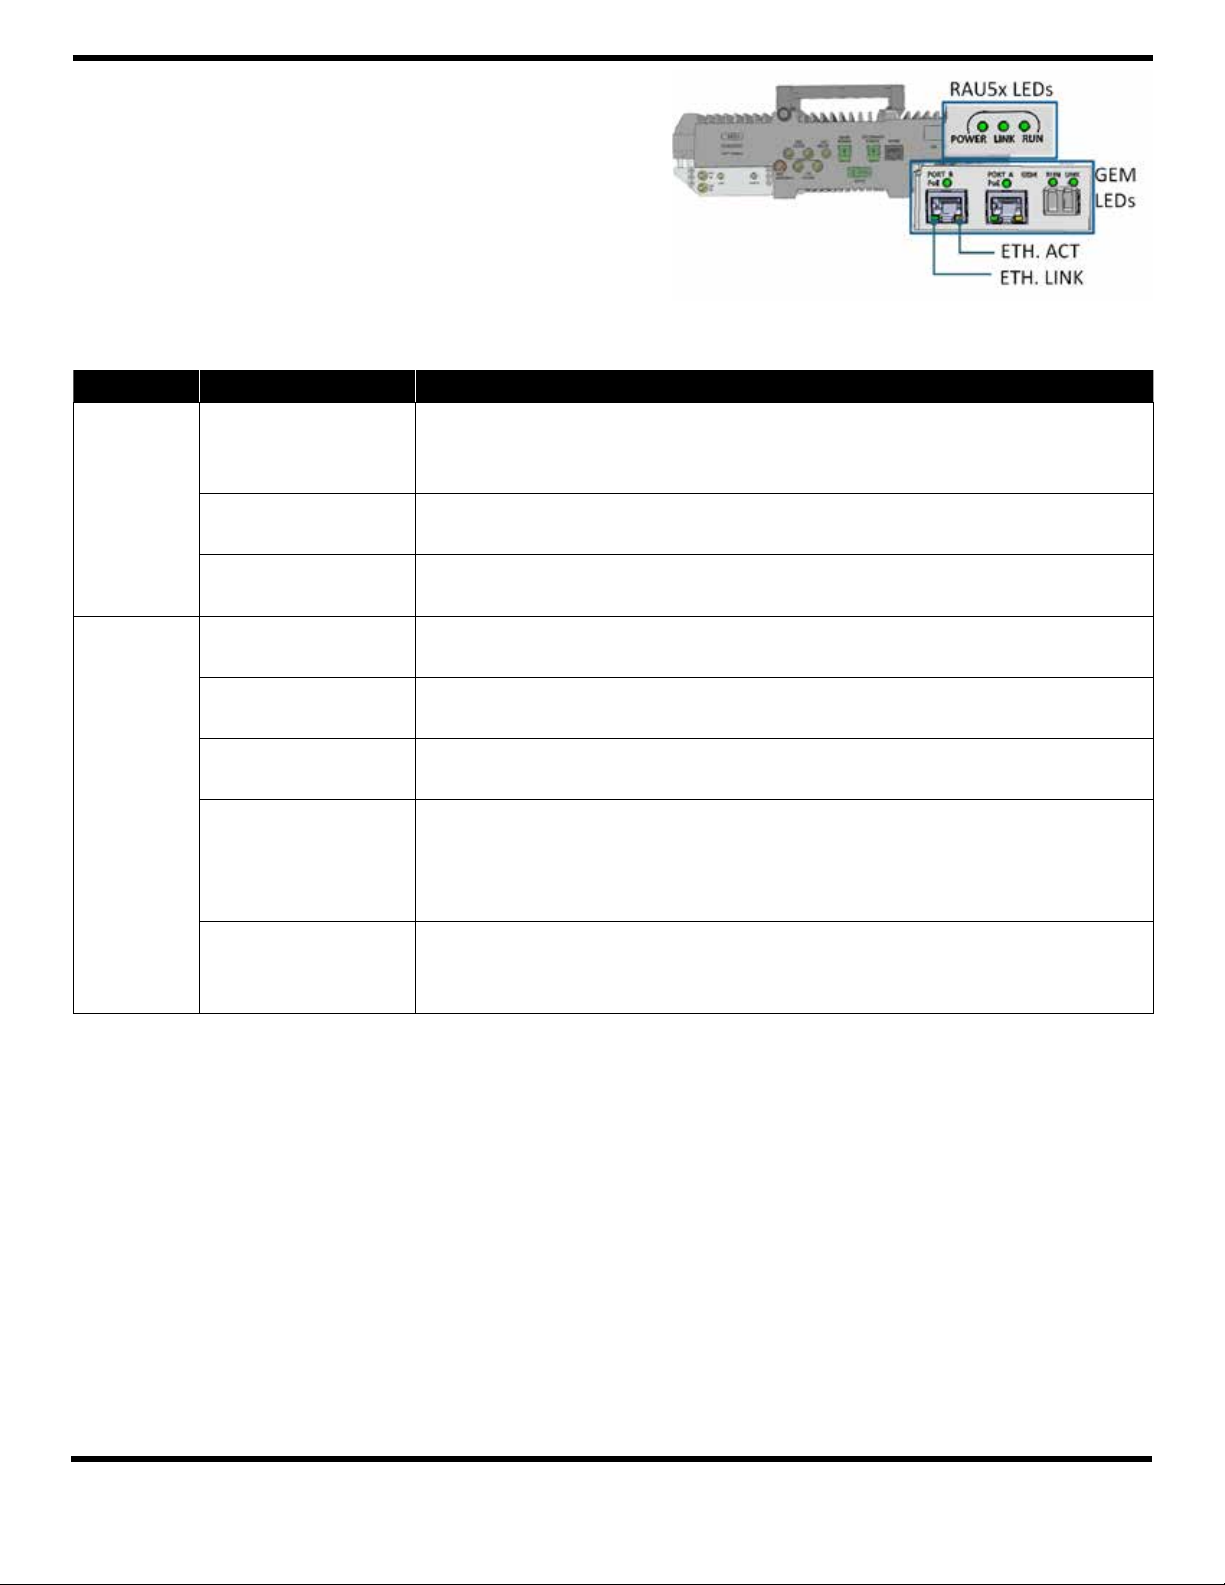
8. MAIN POWER CONNECTIONS
RAU5x MAIN POWER (for RAU5x/RAU5x+RxU2325) DC
input power connections (see Figure 6) – connect DC wire pair
to the terminal block connector:
• Power input range: 37 to 57 VDC
• Wire size: 12-30 AWG
• Maximum consumption::
- RAU5x: 44.5 V; 50 W
- RAU5x + RxU2325: 44.5 V; 76 W
CONNEXIONS “MAIN POWER”
Connexions d’alimentation d’entrée DC pour RAU5x “Main
Power” (pour RAU5x/RAU5x+RxU2325) — connecter la paire
de ls DC au bornier de connexion:
• Plage d’entrée de puissance : 37 à 57 VDC
• Taille de l: 12-30 AWG
• Consommation électrique maximale:
- RAU5x: 44.5 V; 50 W
- RAU5x + RxU2325: 44.5 V; 76 W
Figure 6. RAU5x Main Power DC Connections

Quick Installation Sheet | CMA-485-AEN | Page 6Corning Optical Communications
9. FOR CONFIGURATIONS WITH
GEM - CONNECTIONS
Step 1: Connect DC wire pair to the RAU5x
SECONDARY POWER DC input connector
(see Figure 7):
• Wire size: 12-30 AWG
• Maximum consumption:
- GEM: 4 W
- For 2 PoE ports of 802.3af: 46 V; 31 W
(Input range: 43-57 VDC)
- For 2 PoE ports of 802.3at: 52.5 V; 62 W
(Input range: 52-57 VDC)
Connectez la paire de ls DC au RAU5x
connecteur SECONDARY POWER
(voir Figure 7):
• Taille de l: 12-30 AWG
• Consommation électrique maximale:
- GEM: 4 W
- Pour deux PoE ports of 802.3af: 46 V;
31 W (plage d’entrée: 43-57 VDC)
- Pour deux PoE ports of 802.3at: 52.5 V;
62 W (plage d’entrée: 52-57 VDC)
Step 2: Fiber connections - connect ber to SFP
module ports as follows:
- If using ber terminated with LC APC
(green) – connect to pre-inserted APC to
UPC adapters
- If using ber terminated with LC UPC
connector (blue) – remove pre-inserted
APC to UPC adapters and connect
directly to SFP module ports
Step 3: Connect the A and B Ethernet ports to the PoE
clients using Ethernet cables.
Note: A and B Ethernet ports – 10/100/1000BASE-T
with 802.3 at compliant Power-over-Ethernet
(PoE+) PSE port.
Figure 7. RAU5x MAIN and SECONDARY DC Input
Connections
Figure 8. GEM Interface Connections

Quick Installation Sheet | CMA-485-AEN | Page 7Corning Optical Communications
Module LED Description
RAU5x LINK Steady Green – Optical link power to/from the RAU5x is normal
Blinking Green – Optical power from remote is lower than required
Off – No optical link detected
POWER Steady Green – Input power detected by RAU5x
Off – No power supplied to RAU5x
RUN Blinking Green – RAU5x boot-up sequence complete and module SW up and running
Off – No power supplied to the unit
GEM (GEM) RUN/STATUS Steady Green (with short blink every ~ 10 sec) – GEM On/Normal
Steady Yellow – GEM Fault
Ethernet LINK Steady Green – Link
Off – No link
Ethernet ACT Blinking Yellow – Activity
Off – No activity
(SFP) LINK Steady Green – Link
Blinking Green – Activity
Steady Yellow – Fault
Off – No link
(PortA/B) PoE Steady Green – PoE enabled
Steady Yellow – PoE fault
Off – PoE off
Table 2. Normal Operation LED Status Descriptions
Figure 9. RAU5x and GEM Status LEDs
10. VERIFY NORMAL OPERATION
Referring to Figure 9 and Table 2, verify normal
operation of RAU5x and GEM (if installed) modules.

Corning Optical Communications LLC • PO Box 489 • Hickory, NC 28603-0489 USA
800-743-2675 • FAX: 828-325-5060 • International: +1-828-901-5000 • www.corning.com/opcomm
Corning Optical Communications reserves the right to improve, enhance, and modify the features and specifications of Corning Optical Communications products without prior notification.
A complete listing of the trademarks of Corning Optical Communications is available at www.corning.com/opcomm/trademarks. All other trademarks are the properties of their respective owners.
Corning Optical Communications is ISO 9001 certified. © 2016, 2018 Corning Optical Communications. All rights reserved. CMA-485-AEN / March 2018
APPENDIX: RAU5X MOUNTING BRACKET DIMENSIONS
165.3 mm
162.5 mm
134.4 mm 134.4 mm
86.5 mm
13.4 mm
Table of contents
Other CORNING Measuring Instrument manuals

CORNING
CORNING 315 User manual

CORNING
CORNING ONE HEU User manual

CORNING
CORNING 430 pH Meter User manual

CORNING
CORNING ONE GX User manual

CORNING
CORNING ONE OIU User manual

CORNING
CORNING Lambda Plus User manual

CORNING
CORNING OV-1000 Service manual

CORNING
CORNING ONE MxU User manual

CORNING
CORNING MRU User manual

CORNING
CORNING 440 pH Meter User manual