Cosori C2126-PC User manual

Model No.: C2126-PC
Electric Pressure Cooker
COSORI SUPPORT:
Mon - Fri 9:00 AM - 5:00 PM PST
(888) 402-1684 | support@cosori.com

THANK YOU.
Thank you for purchasing the C2126-PC Electric Pressure Cooker
by Cosori. We are dedicated to providing our customers with quality
products to live life tastefully. Should you have any questions or
concerns about using your new product, feel free to reach out to our
you enjoy your new product!

3
Table of Contents
Safety Information
Product Diagram
Pressure Cooker
Control Panel
Button Controls
Before First Use
Setup
Water Test
Safely Releasing Pressure
Operation
Preparing To Cook
Preset Cooking Programs
Cooking Times
Glass Lid
Manual Cooking Programs
Care And Maintenance
Sealing Ring Installation
Troubleshooting
Warranty Information
Customer Support
Package Contents
1 x Electric Pressure Cooker
1 x Rice Spoon
1 x Ladle
1 x Measuring Cup
1 x Glass Lid
1 x Extra Sealing Ring
1 x Steaming Rack
1 x User Manual
Specifications
Power Supply: AC 120V/60Hz
Rated Power: 1000W
Capacity: 6 Qt.
Inner Pot Dimensions: 7.6 x 6 in. (19.3 x 15.2 cm)
Working Pressure: 5.8-10 PSI (40-70 kPa)
Keep Warm Temp.: 140-176°F (60-80°C)
4
7
7
8
9
10
10
10
11
12
12
12
13
14
14
16
17
18
19
21

4
SAFETY USE & CARE:
• DO NOT touch hot surfaces. Use handle and pot holders when
necessary.
• To protect against electrical shock, do not immerse cord, plugs, or the
unit in water or other liquid.
• Close supervision is necessary when this appliance is used by or near
children.
• Unplug from outlet when not in use and before cleaning. Allow it to cool
before putting on or taking o parts.
• DO NOT operate the pressure cooker if the cord or plug is damaged, if
the unit malfunctions, if the unit has been damaged in any manner. If the
unit is malfunctioning, please contact Customer Support.
• Using other accessories that are not compatible with the pressure cooker
is not recommended. Doing so may damage the unit or cause injury.
• The pressure cooker is intended for indoor use only.
• DO NOT place on or near a hot gas or electric burner and/or in a heated
oven.
• Use extreme caution when moving the pressure cooker if it contains hot
oil or other hot liquids.
• To disconnect the unit from a power source, press ‘Start/Cancel’, then
remove plug from the outlet.
• Always check the pressure release valve and oater valve for any clogging
before use.
• DO NOT place any object above the pressure release valve while the
steam is being released from the pressure cooker.
• DO NOT use the unit for anything other than its intended use.
• If you cook meat with a casing, such as sausage, swelling can occur when
cooked under pressure. Piercing the skin after cooking can lead to bursts
of hot liquid.
• DO NOT lean over the pressure cooker at any time while it is cooking.
• This pressure cooker should not be used for any medical purposes. It is
not designed to reach the required temperature for sterilization.
Safety Information
IMPORTANT SAFEGUARDS
Please read, understand, and comply with all the instructions provided in
this manual before using the device. Failure to comply with the instructions
given in this manual and/or using the device in ways other than the ones
mentioned in this manual may result in serious injury and/or damage to
the product.

5
• The sealing ring creates a pressure seal between the lid and the pot.
Keep the sealing ring completely clean and free from any cracks or
deterioration.
• DO NOT break the sealing ring. Do not replace it with other sealing rings
or use a tension belt to make the pressure cooker seal.
• It is extremely important to ll the pressure cooker with liquid prior to
operation. Never cook without liquid; doing so can cause the unit to
overheat and damage the safety mechanisms.
• When cooking frozen foods, especially meat and sh, always add an extra
5-10 minutes to the instructed cooking time. Also make sure to adjust
liquid ratios to account for frozen water/liquid.
• In case of overheating, never remove the pressure cooker from the heat
source. Instead, shut it o immediately and let it cool.
• Make sure all parts of the pressure release valve and oater valve are clean
and properly assembled.
• DO NOT alter the safety mechanisms or attempt to repair the
pressure cooker as this will void the warranty. Please refer to the Care
& Maintenance section on page 16 on how to maintain the pressure
cooker.
• DO NOT place the unit close to ammable materials, heating units, or wet
environments.
• Check and wash anti-clog lter and pressure release valve regularly to
avoid any blockage.
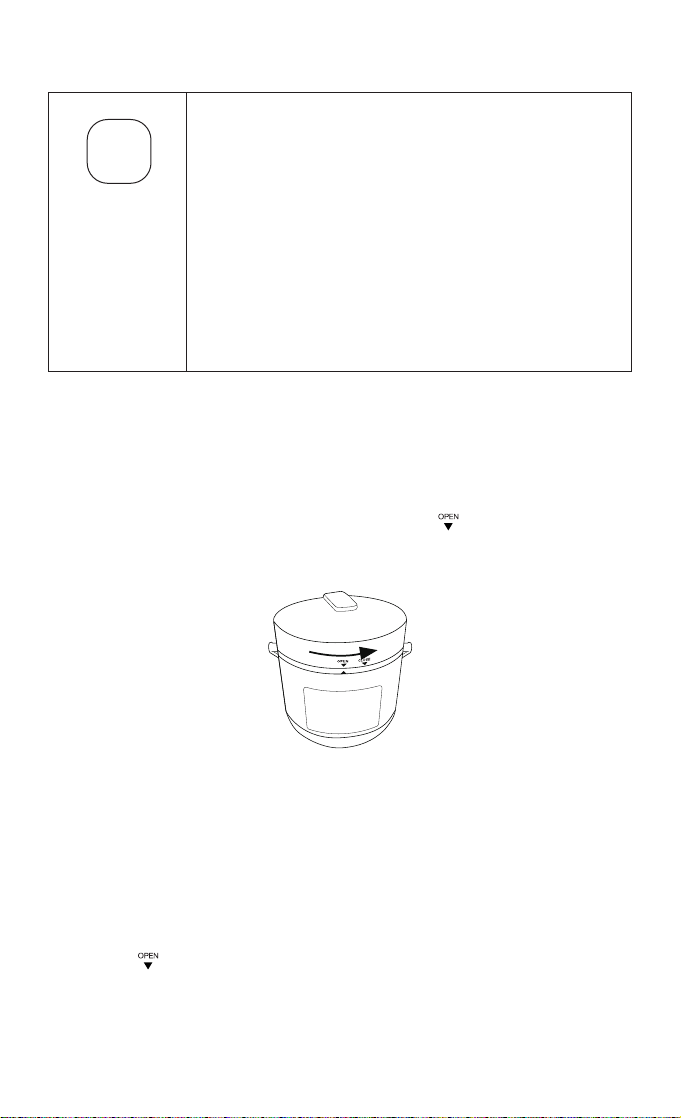
• DO NOT attempt to open the lid when the oat valve is down.
• DO NOT put anything on or use other objects to replace the pressure
release valve.
• Never use a towel to clog the gap between the lid and edge of the
housing.
• The bottom of the inner pot and heating plate should be kept clean. Do
not put the inner pot on other heat sources. Do not replace the inner pot
with other containers.
• Only use wood or plastic ladles or spoons to prevent the stainless steel
pot from being scratched.
• DO NOT attempt to move the pressure cooker while it is cooking; wait
until it cools down to move it. Only move the pressure cooker using the
included handle.
• DO NOT disassemble the unit on your own or try to replace with parts
from dierent brands.
• Make sure pressure completely discharges before opening the lid after
cooking has nished.
• Clean and properly place the water collection cup. Clean the lid before
each use.
• You may experience some smoke coming out the unit during the rst few
uses due to the initial heating of the materials; this is normal.

6
DO NOT use
any other lid.
When moving,
hold the
pressure cooker
by the handle.
Keep out of
reach of infants
and young
children.
DO NOT
touch the lid
or stainless
steel surface
while heating or
cooking.
SAVE THESE INSTRUCTIONS
• DO NOT let power cord hang over the edges of tables or counters, or
touch hot surfaces.
• A short power supply cord is provided to reduce injuries resulting from
entanglement and tripping. If an extension cord is used, the electrical
rating of the cord must be at least 120V/20A. The extension cord must be
arranged so that it will not hang over the edge of a table or counter where
it can be pulled or accidentally tripped over.

7
PresetTime
PressureTime
Yogurt
Rice
Less Normal More
Multigrain
Slow cook 1
2
3
6
5
4
Bake
TasteP re-Set Menu Warm Start/stop
Pressure
Steam
Saute
Canning
Poultry
Beans
Meat/Stew
Soup/Congee
e
n
M
e
n
u
M
e
n
u
1. Float valve
2. Pressure release valve
3. Pressure release button
4. Inner pot
5. Pressure cooker handle
6. Control panel
7. Pressure cooker housing
8. Float valve sealing ring
3
1
13 14
15
11 12
4
9
2
7
8
5
6
9. Sealing ring
10. Anti-clog lter
11. Measuring cup
12. Rice spoon
13. Soup ladle
14. Water collection cup
15. Tempered glass lid
10
Product Diagram
CUPm l
40
80
120
160
3
4
1
2
1
4

8
Control Panel
1
2
3
4
7 8 9 10 11
1. Digital display
2. Adjust indicator
3. Pressure level indicator
4. Pressure button
5. Decrease value
6. Increase value
7. Adjust button
8. Delay Time button
9. Menu button
10. Keep Warm button
11. Start/Cancel button
12. Cooking programs
65
1212

9
Button Controls
Starts or cancels any cooking process; also cancels any
selections that are made.
The warming function keeps food warm for up to 24 hours when
the unit is nished cooking. Press the ‘Keep Warm’ button,
then the ‘Start/Cancel’ button to turn on the Warm Mode. The
display will show “bb,” indicating that the unit is in the warming
mode.
NOTE:
• DO NOT cook foods using the warming mode.
• The pressure cooker will automatically switch to this mode when
cooking has nished.
Press the ‘Delay Time’ button to adjust the start time of your
cooking. Use the ‘+’ and ‘-’ buttons to set your desired time,
then use the ‘Menu’ button to select your cooking program.
Press ‘Start/Cancel’ when you are ready to start. The unit will
beep when it starts cooking. You can preset the pressure cooker
for up to 24 hours.
This function allows you to select a pre-programmed cooking
time for most cooking programs on the pressure cooker.
1. Select a cooking program by pressing the ‘Menu’ button.
The Adjust indicator will default to Normal time. (E.g.,
Select the Rice program and the display will show “00:10.”)
2. Press the ‘Adjust’ button to select Less, Normal, or More.
The appropriate light for each setting will light up, indicating
that the cooking time has been changed accordingly.
(E.g., For the Rice program Less is 7 minutes, Normal is 10
minutes, and More is 13 minutes.)
3. Close the lid and press the ‘Start/Cancel’ button.
4. See page 13 for cooking times for the pressure cooker’s
dierent cooking programs.
NOTE:
• The adjust function does not work with the Sauté and Yogurt
programs.
Press the ‘Menu’ button to cycle through the pressure cooker’s
dierent programs. See the Preset Cooking Modes section on
page 10 to set up the pressure cooker using the ‘Menu’ button.
Start
Cancel
Keep
Warm
Delay
Time
Adjust
Menu

10
Setup
Water Test
• Remove all plastic packaging from the outside of the pressure cooker.
• Grip the lid handle and twist it counterclockwise so that lines up with the mark at
the top of the control panel. Pull up on the handle to open the pressure cooker.
• Check that the silicone sealing ring is snugly t on the inside of the lid.
• Remove any accessories or plastic packaging inside the the pressure cooker.
• Wash the inner pot and all accessories with warm soapy water and dry all parts
thoroughly with a clean dry cloth.
The water test will help you get acquainted with how to operate the pressure cooker and
checks if the pressure cooker is operating properly.
1. If the lid is not already opened, grip the lid handle and twist it counterclockwise
so that lines up with the mark at the top of the control panel. Pull up on the
handle to open the pressure cooker.
2. Place the cleaned inner pot back into the pressure cooker. Pour 4 cups of water
into the inner pot.
Before First Use
The cooking program selected will determine the amount of
pressure used when cooking food. You can press the ‘Pressure’
button to cycle through the dierent pressure levels (1-6) for
your recipe. Some preset cooking programs already have a
default pressure level, but can be adjusted to meet your needs.
Please note that cooking with dierent pressure levels may yield
varying results for your recipe.
NOTE:
• The working pressure for level 1 is about 5.8 PSI (40 kPa), while the
pressure for level 6 is 10 PSI (70 kPa).
• It is recommended to cook tender foods such as vegetables on the
lower pressure settings.
• The actual working pressure may vary with the amount of food and
water being used.
Pressure
Button Controls (cont.)

11
3. To close the lid, place it back down onto the pressure cooker housing. Grip the
lid handle and twist it clockwise so that is aligned with at the top of the
control panel.
Safely Releasing Pressure
CAUTION:
• DO NOT lean over the pressure cooker or place exposed skin over the pressure
release valve when releasing the pressure inside the pot.
• DO NOT open the lid until the pressure inside the pot has been completely released.
For your safety, the lid will remain locked until the oat valve drops down.
• DO NOT, under any circumstance, force the oat valve down while it is still up.
There are 2 ways to release the pressure inside the pot after cooking has nished.
Natural Release:
1. Allow the pressure cooker to rest for about 10–15 minutes.
2. After that time, press and hold the pressure release button to release any
remaining pressure.
3. Open the lid once the oat valve has gone down.
Quick Release:
1. Press and hold the pressure release button immediately after cooking has
nished.
2. Hold the pressure release button until the oat valve goes down.
3. Open the lid once the oat valve has gone down.
NOTE:
• The quick release method is not suitable for foods that have a large liquid volume or a high starch
content (e.g., soups, porridge, fruit jams). It is recommended to use the natural release method
when cooking liquids such foods. Immediately releasing pressure may result in food spraying out
through pressure release valve.
4. Plug in the pressure cooker and press ‘Menu’ until the Steam program has been
selected.
5. Press ‘Start/Cancel’ to start cooking. The display will show “00:05” to indicate
that the pressure cooker is heating up. Trace amounts of steam will release from
either valve until the oat valve pops up during this initial heating process. Once the
unit reaches optimal cooking pressure, it will beep once and the display will show
“P0:05.”
6. When the cooking program has nished, the pressure cooker will beep 5 times.
Press ‘Start/Cancel’ to set the pressure cooker to standby mode.

12
1. Open the lid and remove the inner pot from the pressure cooker.
2. Place your ingredients into the inner pot. Ingredients and water/liquid should not
exceed ⅘ height of the inner pot. If the ingredients expand easily in water, then the
total amount should not exceed ⅗ height of the inner pot.
3. Place the inner pot in the housing; be sure to wipe down the inner pot before
placing it back into the pressure cooker.
4. Close the lid and properly lock it into onto the pressure cooker. The mark on
the lid should now line up with at the top of the control panel, indicating that the
lid is locked into place.
5. Attach the water collection cup onto the back of the pressure cooker. Attach the
water collection cup onto the back of the pressure cooker by aligning the top of the
cup with the guides on the pressure cooker. Secure the cup by gently pressing until
it snaps into place.
Preset Cooking Programs
1. If the unit is not already plugged in, connect it to a power source. The unit will beep,
indicating it is in standby mode.
2. Press the ‘Menu’ button to select a preset cooking program on the pressure
cooker.
3. (Optional): Press ‘Adjust’ to select a pre-programmed cooking time or use ‘+’ or ‘-’
to manually set your cooking time. If desired, press ‘Delay Start’ and use ‘+’ or ‘-’
to delay the start time of your cooking.
4. Press the ‘Start/Cancel’ button to begin the cooking process. The display will show
the image below, indicating that the unit is pressurizing. Please note that it may
take 5-30 minutes to reach working pressure.
6. Plug the pressure cooker into a powered electrical outlet. The unit will beep and
the display will show “--:--” indicating that the unit is in standby mode.
Preparing to Cook
NOTE :
• Thoroughly wash the inner pot before each use.
• The minimum amount of ingredients needed to cook in the pressure cooker is ⅕ of the capacity
of the inner pot.
• The minimum amount of liquid needed for cooking is 1 cup (250 mL). This may vary depending on
the recipe you are following.
Operation

13
5. Press the ‘Start/Cancel’ button to start cooking. The unit will beep when it
reaches the optimal cooking pressure and the display will read “P0” along with the
programmed cooking time.
Adjust Setting
(hours:minutes)
Time
(hours:minutes)
Programs &
Functions
Default
Pressure
Level
Less Normal More Min. Max.
Rice 4 00:07 00:10 00:13 00:01 01:40
Yogurt N/A N/A 08:00 N/A 00:30 12:00
Soup/Porridge 6 00:15 00:25 00:50 00:01 01:40
Multigrain 6 00:35 00:40 00:45 00:01 01:40
Slow Cook N/A 08:00 06:00 04:00 01:00 12:00
Bake 4 00:30 00:40 00:50 00:01 01:40
Steam 6 00:03 00:05 00:07 00:01 01:40
Sauté N/A N/A 00:05 N/A 00:01 00:20
Reheat N/A 00:15 00:10 00:05 00:01 01:40
Poultry 5 00:15 00:20 00:25 00:01 01:40
Beans 6 00:15 00:20 00:25 00:01 01:40
Meat/Stew 6 00:20 00:40 00:50 00:01 01:40
Delay Time N/A N/A N/A 01:00 24:00
NOTE:
• The working pressure for level 1 is 5.8 PSI (40 kPa), while the pressure for level 6 is 10 PSI (70 kPa).
NOTE: Some steam may come out of the pressure release valve along with occasional
sputtering; this is normal.
6. When cooking has nished, the pressure cooker will beep 5 times and will
automatically go into the Warm Mode.
7. It is recommended to wait at least 10-15 minutes before opening the pressure
cooker. Refer to the Safely Releasing Pressure section on page 11 to safely
remove the pressure cooker lid after cooking.
Cooking Times

14
Sauté: This program allows you to sauté or simmer ingredients inside the inner pot.
1. Open the pressure cooker and detach the lid. Only use the glass lid for this feature.
2. Connect the pressure cooker to a power source.
3. Press the ‘Menu’ button until you reach Sauté. You can adjust the cooking time
anywhere from 1 to 20 minutes using the ‘+’ or ‘-’ buttons.
4. Press the ‘Start/Cancel’ button and place the ingredients you wish to sauté into
the inner pot.
5. The pressure cooker will beep 5 times the programmed cooking time has nished
counting down and will automatically switch to the Warm Mode. Carefully remove
your ingredients from the inner pot, or add additional ingredients if you are still
cooking.
6. Press the ‘Start/Cancel’ button to start cooking. The pressure cooker will beep
5 times when the programmed cooking time has nished counting down and will
automatically switch to the Warm Mode.
Manual Cooking Programs
Glass Lid
Slow Cook: This program allows you to use your pressure cooker like a traditional slow
cooker.
1. Open the pressure cooker and detach the lid. Place the inner pot into the pressure
cooker.
2. Connect the pressure cooker to a power source.
3. Place your ingredients in the inner pot and place the glass lid on top.
4. Press ‘Menu’ repeatedly until you reach Slow Cook.
5. Press the ‘Adjust’ to select a preset cooking time and temperature (see table
below).
The following cooking programs have no pressure applied when selected.
NOTE: ONLY use the glass lid when cooking using the Sauté and Slow Cook programs or the Warm
Mode. Do not use the glass lid for cooking with any other mode.
NOTE: After selecting ‘Slow Cook,’ you can also press the ‘+’ or ‘-’ buttons to manually adjust the
cooking time anywhere from 1 to 12 hours. Please note that the temperature cannot be adjusted
when manually setting the cooking time.
Operation (cont.)
The professional grade tempered glass lid is specically designed for use with the Cosori
Electric Pressure Cooker. Use the lid for cooking while using the Sauté program to
prevent any oil from splattering, or place the lid on the pressure cooker while using the
Slow Cook program. The lid can be used for food presentation even when keeping food
warm just before serving. It also features a steam-release vent and stainless steel rim
for maximum convenience and durability. It is dishwasher safe for easy cleanup.
Less Normal More
Time 8 hours 6 hours 4 hours
Temperature 193°F (89°C) 200°F (93°C) 204°F (95°C)

15
NOTE: After selecting ‘Reheat,’ you can also press the ‘+’ or ‘-’ buttons to manually adjust the
cooking time anywhere from 1 to 12 hours. Please note that the temperature cannot be adjusted
when manually setting the cooking time.
NOTE: If your yogurt is too thin, run it through a strainer before serving.
Reheat: This program allows you to reheat food inside the pressure cooker.
1. Connect the pressure cooker to a power source.
2. Press the ‘Menu’ button until you reach Reheat.
3. Press the ‘Adjust’ to select a preset cooking time and temperature (see table
below).
4. Press the ‘Start/Cancel’ button and place the food you want to reheat into the
inner pot.
5. The pressure cooker will beep 5 times the programmed cooking time has nished
counting down and will automatically switch to the Warm Mode. Carefully remove
your food from the inner pot.
Less Normal More
Time 15 minutes 10 minutes 5 minutes
Temperature 212°F (100°C) 248°F (120°C) 284°F (140°C)
Yogurt: This program allows you to hold milk at a stable temperature to create fresh
yogurt at home.
1. Pasteurizing the Milk
a. Place the inner pot into the housing. Pour the necessary amount of milk
according to your recipe into the inner pot.
b. Press ‘Menu’ repeatedly until you reach Sauté. Press ‘+’ to set the cooking time
to 10 minutes.
c. Press ‘Start/Cancel.’ Heat the milk until it reaches 180°F (95°C).
d. Once the milk reaches the proper temperature, press ‘Start/Cancel’ to turn o
the Sauté program.
e. Allow the milk to cool below 115°F (46°C).
2. Yogurt Incubation
a. Add in yogurt starter or fresh yogurt to your cooled milk.
b. Press the ‘Yogurt’ button and use ‘+’ and ‘-’ to select a cooking time anywhere
from 6 to 12 hours (the default time is 8 hours).
c. Press ‘Start/Cancel’ to start the incubation process.
d. When the Yogurt program is complete, the pressure cooker will beep 5 times and
go into standby mode.
3. Open the lid and serve your yogurt directly from the pressure cooker, or place your
yogurt into containers and chill in the refrigerator.

16
5. Thoroughly wash and rinse all parts of the lid including the pressure release valve,
anti-clog lter, and oat valve. Wipe dry with a clean cloth.
6. All parts inside the lid can be hand washed separately with water and should always be
checked to make sure they are not damaged or cracked.
7. The sealing ring can be removed from the lid. Wash the sealing ring with liquid
detergent and warm water, and dry it with a clean cloth. (Refer to the Sealing Ring
Installation section on how to remove and install the sealing ring.)
8. Use a sponge or non-metallic soft brush to clean the inner pot, then wipe the surface
with a clean cloth.
3. Remove the water collection cup. Rinse it out with clean water and wipe it dry with a
clean cloth. Place it back onto the side of the pressure cooker.
4. Detach the lid from the pressure cooker body by lifting up the hinge and then twisting
the lid to . Lift up the lid to remove it from the pressure cooker body.
1. Unplug the pressure cooker and allow it to completely cool before cleaning.
2. DO NOT immerse the base in water or spray any water in it. If necessary, wipe the
inside and outside of the base with a clean, damp cloth.
Care & Maintenance
PresetTime
PressureTime
Yogurt
Rice
LessNormalMore
Multigrain
Slowcook1
2
3
6
5
4
Bake
Taste Pre-SetMenuWarm
Start/stop
Pressure
Steam
Saute
Canning
Poultry
Beans
Meat/Stew
Soup/Congee
M
e
n
u
M
e
n
u

17
NOTE: Make sure the sealing ring is not cracked or damaged in any way.
Removal
1. Rotate lid counterclockwise as shown on page 10 to detach lid from pressure
cooker.
2. While holding the lid in place, gently pull out the sealing ring.
Installation
1. Line up sealing ring on top of metal ring.
2. Gently push down on sealing ring, ensuring that the metal ring is inside the ring’s
groove as shown above. Continue pushing the sealing ring all around until it is
secured by the metal ring.
3. Place lid back onto pressure cooker.
Sealing Ring Installation

18
Contact Customer Support if any of these errors occur
Code E1 E2 E3 E4
Error
Broken circuit
in sensor.
Short circuit in
sensor.
Unit is
overheating.
Signal switch
broken.
Troubleshooting
Problem Cause Solution
Diculty closing lid. Sealing ring may not be
placed correctly.
Correctly place the sealing
ring inside the lid.
Pressure release valve
may be blocking the push
rod.
Make sure the push rod at
the side of the lid is aligned
correctly to the base.
Diculty opening lid. Pressure release valve
may not be falling down
properly.
Push pressure release
button.
Pot may still be under
pressure.
Steam leaking from cooker
lid.
Some ingredients may be
stuck to sealing ring.
Clean sealing ring.
Sealing ring may be
broken.
Replace the sealing ring.
If necessary, purchase
additional sealing rings
from Amazon.com (search
for “Cosori 6 Quart Sealing
Ring”)
Steam leaking from oat
valve sealing ring.
Some ingredients may
stick to the anti -clog lter.
Clean the anti -clog lter.
Float valve sealing ring
may be broken.
Replace oat valve sealing
ring.
Floater does not rise up. There may not be
enough ingredients /
water to generate enough
pressure.
Add the minimum amount
of solid ingredients and
liquids to the inner pot.
Steam leaking from lid or
pressure release valve.
Unit may be defective.
Contact Customer
Support.

19
TERMS & POLICY
Cosori warrants all products to be of the highest quality in material, craftsmanship, and
service, eective from the date of purchase to the end of the warranty period.
Cosori will replace any product found to be defective due to manufacturer aws based
on eligibility. Refunds are available within the rst 30 days of purchase. Refunds are only
available to the original purchaser of the product. This warranty extends only to personal
use and does not extend to any product that has been used for commercial, rental, or
any other use in which the product is not intended for. There are no warranties other
than the warranties expressly set forth with each product.
This warranty is non-transferrable. Cosori is not responsible in any way for any damages,
losses, or inconveniences caused by equipment failure or by user negligence, abuse, or
use noncompliant with the user manual or any additional safety or use warnings included
in the product packaging and manual.
This warranty does not apply to the following:
• Damage due to abuse, accident, alteration, misuse, tampering or vandalism.
• Improper or inadequate maintenance.
• Damage in return transit.
• Unsupervised use by children under 18 years of age.
Cosori and its subsidiaries assume no liability for damage caused by the use of the
product other than for its intended use or as instructed in the user manual. Some states
do not allow this exclusion or limitation of incidental or consequential losses so the
foregoing disclaimer may not apply to you. This warranty gives you specic legal rights
and you may also have other rights which may vary from state to state.
ALL EXPRESSED AND IMPLIED WARRANTIES, INCLUDING THE WARRANTY OF
MERCHANTABILITY, ARE LIMITED TO THE PERIOD OF THE LIMITED WARRANTY.
Warranty Information
Product Electronic Pressure Cooker
Model Number C2126-PC
Default Warranty Period 1 Year
For your own reference, we strongly recommend that you record your order number
and date of purchase.
Order Number
Date of Purchase

20
Warranty Information (cont.)
Additional 1-Year Warranty
You can extend your one-year warranty by an additional year. Log onto
www.cosori.com/warranty and enter your order number (e.g., from Amazon or Houzz)
to register your new product for the extended warranty.
If you are unable to provide the order number for your product, please email a copy of
Defective Products & Returns
Should your product prove defective within the specied warranty period, please
customer service team has approved your request, please return the unit with a copy of
the invoice or your order number.
Other manuals for C2126-PC
2
Table of contents
Other Cosori Electric Pressure Cooker manuals

Cosori
Cosori PREMIUM CP018-PC User manual

Cosori
Cosori CP016-PC User manual

Cosori
Cosori CMC-CO601-SUS User manual

Cosori
Cosori CMC-CO601-SUS User manual

Cosori
Cosori premium pressure cooker User manual

Cosori
Cosori CP016-PC User manual

Cosori
Cosori PREMIUM CP018-PC User manual

Cosori
Cosori CP016-PC User manual

Cosori
Cosori C3120-PC User manual

Cosori
Cosori CP016-PC User manual