Costway MU70002DE User manual

EN DE FR ES IT PL
THIS INSTRUCTION BOOKLET CONTAINS IMPORTANT SAFETY INFORMATION. PLEASE READ AND KEEP FOR FUTURE REFERENCE.
Follow Costway
Please give us a chance to make it right and do better!
Contact our friendly customer service department for help first.
Replacements for missing or damaged parts will be shipped ASAP!
Portable Electronic Piano
MU70002DE

Please read all instructions carefully and keep it for future reference.
WARNING
Attention: The Product is not suitable for the children under 3 years
Danger: Keep all small parts and packaging materials for this product away from babies and
children, otherwise they may pose a choking hazard.
General Warnings:
The product must be installed and used under the supervision of an adult.
Read through each step carefully and follow the proper order.
Remove all packaging, separate and count all parts and hardware.
Please ensure that all parts are correctly installed, incorrect installation can lead to a danger.
We recommend that, where possible, all items are assembled near to the area in which they
will be placed in use, to avoid moving the product unnecessarily once assembled.
Ensure a secure surface during construction, and place the product always on a flat, steady
and stable surface.
WARNING:
CHOKING HAZARD-Small parts.
Not for children under 3 years.
The following interface function diagram:
■ Charging Indicator
1. The charging indicator is red. When the piano is plugged into USB for
charging, the red light will turn on. When the battery is full the green light
turns on and the red light goes off.
When the power is high or full, it is normal for the charging indicator light to
flash or go out after charging through USB
2. Battery: High-capacity lithium battery, the charging time is about 4h,
please charge for more than 5h for the first use.
Charging adapter: 5V 2A
■ Protection Function
If the lithium battery voltage is too low(below 3.5v), the product will
automatically reset or can not started. The charging reminder is: While
playing the piano or music, it is automatically stop playing and restore the
initial setting state.
■ L-OUT/R-OUT
6.5mm professional equipment output interface, two independent L/R stereo
output.
02 03

■
Connect active speaker or audio power amplifier and headphones, enjoy the
double channel surround sound output.
Support three line earphone and external speaker, not support four line with
microphone earphone. Suggest using 3.5V stereo headphone plug.
■ MIC Function
Fixed reverb function is added to satisfy users' desire of playing and singing
at any time and anywhere.
■ MP3 Interface:
Connect to MP3 or other external audio sources, double channel surround
sound eftect
■ SUS: Sustain pedal, prolong the keys of the end of the time.
■ MICRO_USB: Charging interface and MIDI connection function.
■ MIDI Function:
1. Connect the computer with MICRO_USB data cable, and open the
corresponding software to use the MIDI function.
You can install software with MIDI transmission protocol (such as: Everyone
Piano) to use with your computer
Controlling external devices via piano
Play the keyboard, the piano will send the MIDI data to the external device
through the USB interface, then you will hear the sound from the BXIl and
the external device.
Controlling piano through external devices
Use USB cable to connect external equipment, Select the piano as the
external device's MIDI output method. The piano can be used as an external
sound source.
2. Bluetooth APP connection (Refer to the following section of Bluetooth
APP functions).
■ Two built-in quality external speakers:
The sound field effect of speakers can make the user intoxicated in the
wonderful music.
■ Sound effects: Two types of sound are built-in: Sustain / Vibrato
■ Digital tube: Displays the currently used functionality.
■ Demo: 20 Demo songs, press demo button to choose.
■ Chord:
When playing rhythm, press the chord function and then to press the
multi-fingering method Within the range of keys A1-F4 #, the corresponding
chord accompanying sound can be heard. Press the single finger chord
fingering, the chord of single-finger will be played.
Number
11
12
13
14
15
16
17
18
19
00
Demo songs
Milk Song
A comme Amour
Snowdreams
Clean sky
Edelweiss
Dance of fireflie
My Soul
Ballade pour Adeline
Laputa Castle in the Sky
Les premiers sourires
de vanessa
Number
01
02
03
04
05
06
07
080
09
10
Demo songs
Ode to Joy
Little Star
For Alice
Dancing girl
My Old Classmate
a decade
Clouds Chasing the Moon
Come into my dream
Bandari.Crystal.Lake
Green sleevess
04 05

Table of Single-finger chords (example) ■ Transpose +/-: The default is level 0, plus 6 levels, minus 6 levels.
Press the Transpose+ button to increase the knocking force of the keys;
Or pressthe Transpose- button to reduce the knocking force of the keys.
■ Vol +/-: It starts at level 14, largest level is 17, minimum is 0.
■ Tempo+/-
The default speed is 120, the maximum can be adjusted to 300, the minimum
can be reduced to 30.
Different DEMO songs show different speeds. The actual speed shall prevail.
■ Tone+/-
Press Tone+ or Tone- to select tone. 128 kinds of tone, please refer to the List
Of Tones for detalls.
■ Rhy+/-
Press Rhy+ Or Rhy- to select rhythm. 128 kinds of rhythm, please reter to the
List Of Rhythms for details.
■ OKON:
Press the OKON button to enter the teaching mode automatically. Demo song
accompaniment will play in a continues loop and wait for the user to will
play. Touch any key to play the mairn theme of the demo song, Press the
OKON button again to select the loop. Press Start/Stop button to make the
demo Song accompaniment stop playing.
■ Metronome
Press the Metronome function to make a beat sound, and the metronome will
play at the current speed. Press Start/Stop function to trun off the metronome.
■ Recording Function:
Press this button to enter the rečording mode and make the sound of the
metronome. At this point, press any key to start recording. The maximum
number of recordings is 700.
06 07

88 keys drum kit corresponding table
When the recording is full, the metronome sound stops. You cannot continue
to record any note. When you are recording, you can play it by pressing the
‘Play’ buton at any time.
Each time you press this button, the last memory will be cleared and the
recording mode will be re-entered.
2. Press the 'Play' button for the first time to play the recorded notes, and
press the Play button for the second time to stop playing.
3. Press the "Play' buton to exit the recording mode.
4. If no notes have has been recorded before, there is no action will occur
when you press ‘Play’ button.
■ Drum Kit
Press this button to get the drum's tone on the corresponding keys.
08 09

Bluetooth APP functions:
iPhone connection:
POPiano connection:
1. Search and download POPiano APP from App store of the iPhone.
2.Open the POPiano App after turning on the bluetooth of the iPhone, select
any song. and choose to start playing after entering.
3.Click on the upper right of the iPhone screen , and then you can
choose: connect to the piano through:
Blue Tooth - Confirmed, next-confirm to connect to the piano.
4. After confiming bluetooth connection, the icon is displayed as blue check
mark .
GarageBand connection:
1. Open GaragcBand App.
2. Turn on bluetooth on your phone
3.Open GarageBand App and click the Settings icon in the upper right corner
of the screen.
4. Connect ihe piano's bluetooth through the:
Song Settings - Advanced - Bluetooth MIDI Devices.
Perfect Piano and PianoBar connection:
1. Download the Perfect Piano App and PianoBar
2. Turn on bluetooth on your phone.
3. First connect the GarageBand App. When they are connected successfully,
then open the Perfect Piano App and PianoBar can be used directly.
Android phone connection:
POPiano connection:
1. Search and download POPiano APP from App store of the mobile phone.
2. Tun on the bluetooth function, some phones need to turn on the phone
location function.
3. Open the POPiano App to select any song, and choose to start playing after
entering.
4. Click on the upper right of the moblle phone screen and then you can
choose: connect to the piano through: BlueTooth Confirmed, next confirm to
connect to the piano.
5. After confirming bluetooth connection, the icon is displayed as blue check
mark .
10 11

Bitte geben Sie uns eine Chance,
es zu korrigieren und besser zu machen!
Wenden Sie sich zunächst an unseren freundlichen Kundendienst.
Ersatz für fehlende oder beschädigte Teile wird so schnell wie möglich versendet!
DAS HANDBUCH ENTHÄLT WICHTIGE SICHERHEITSHINWEISE. BITTE LESEN UND BEWAHREN SIE FÜR DIE ZUKÜNFTIGE VERWENDUNG AUF.
Folgen Costway
HANDBUCH
EN DE FR ES IT PL
Welcome to visit our website and purchase our quality products!
We would like to extend our hearelt thanks to
all of our customers for taking me to assemble
this product and giving us valuable feedbacks.
With your inspiring rating, COSTWAY will be more consistent to offer you
EASY SHOPPING EXPERIENCE, GOOD PRODUCTS and EFFICIENT SERVICE!
US office: Fontana, California
UK office: Ipswich
Reward Points
Exclusive Customer Service
Personalized Recommendaons
Permanent Shopping Cart
Order History
Handrolle Klavaciertastatur
MU70002DE
12 13

Bitte lesen Sie alle Anweisungen sorgfältig durch und Bewahren Sie die Anweisungen zur
zukünftigen Verwendung auf.
Warnung!
Achtung: Das Produkt ist nicht geeignet für Kinder unter 3 Jahren.
Gefahr: Halten Sie alle kleinen Teile und Verpackungsmaterialien fern von Babys und Kindern,
da Erstickungsgefahr besteht.
Warnhinweise:
Das Produkt muss unter Aufsicht eines Erwachsenen installiert und verwendet werden.
Lesen Sie jeden Schritt sorgfältig durch und befolgen Sie die richtige Reihenfolge.
Entfernen Sie alle Verpackungen, separieren und zählen Sie alle Teile und Hardware vor der
Montage oder Verwendung.
Bitte beachten Sie darauf, alle Teile richtig anzubringen, eine falsche Montage kann zu einer
Gefährdung führen.
Wir empfehlen, wenn möglich, alle Artikel in der Nähe des Einsatzortes zu montieren, um
eine unnötige Bewegung der Artikel zu vermeiden.
Achten Sie auf einen sicheren Untergrund während des Aufbaus stellen, und stellen Sie
das Produkt immer auf eine glatte, flache und stabile Oberfläche.
ACHTUNG:
Nicht für Kinder unter 36 Monaten
geeignet. Enthält Kleinteile, die
verschluckt werden können.
( Erstickungsgefahr!)
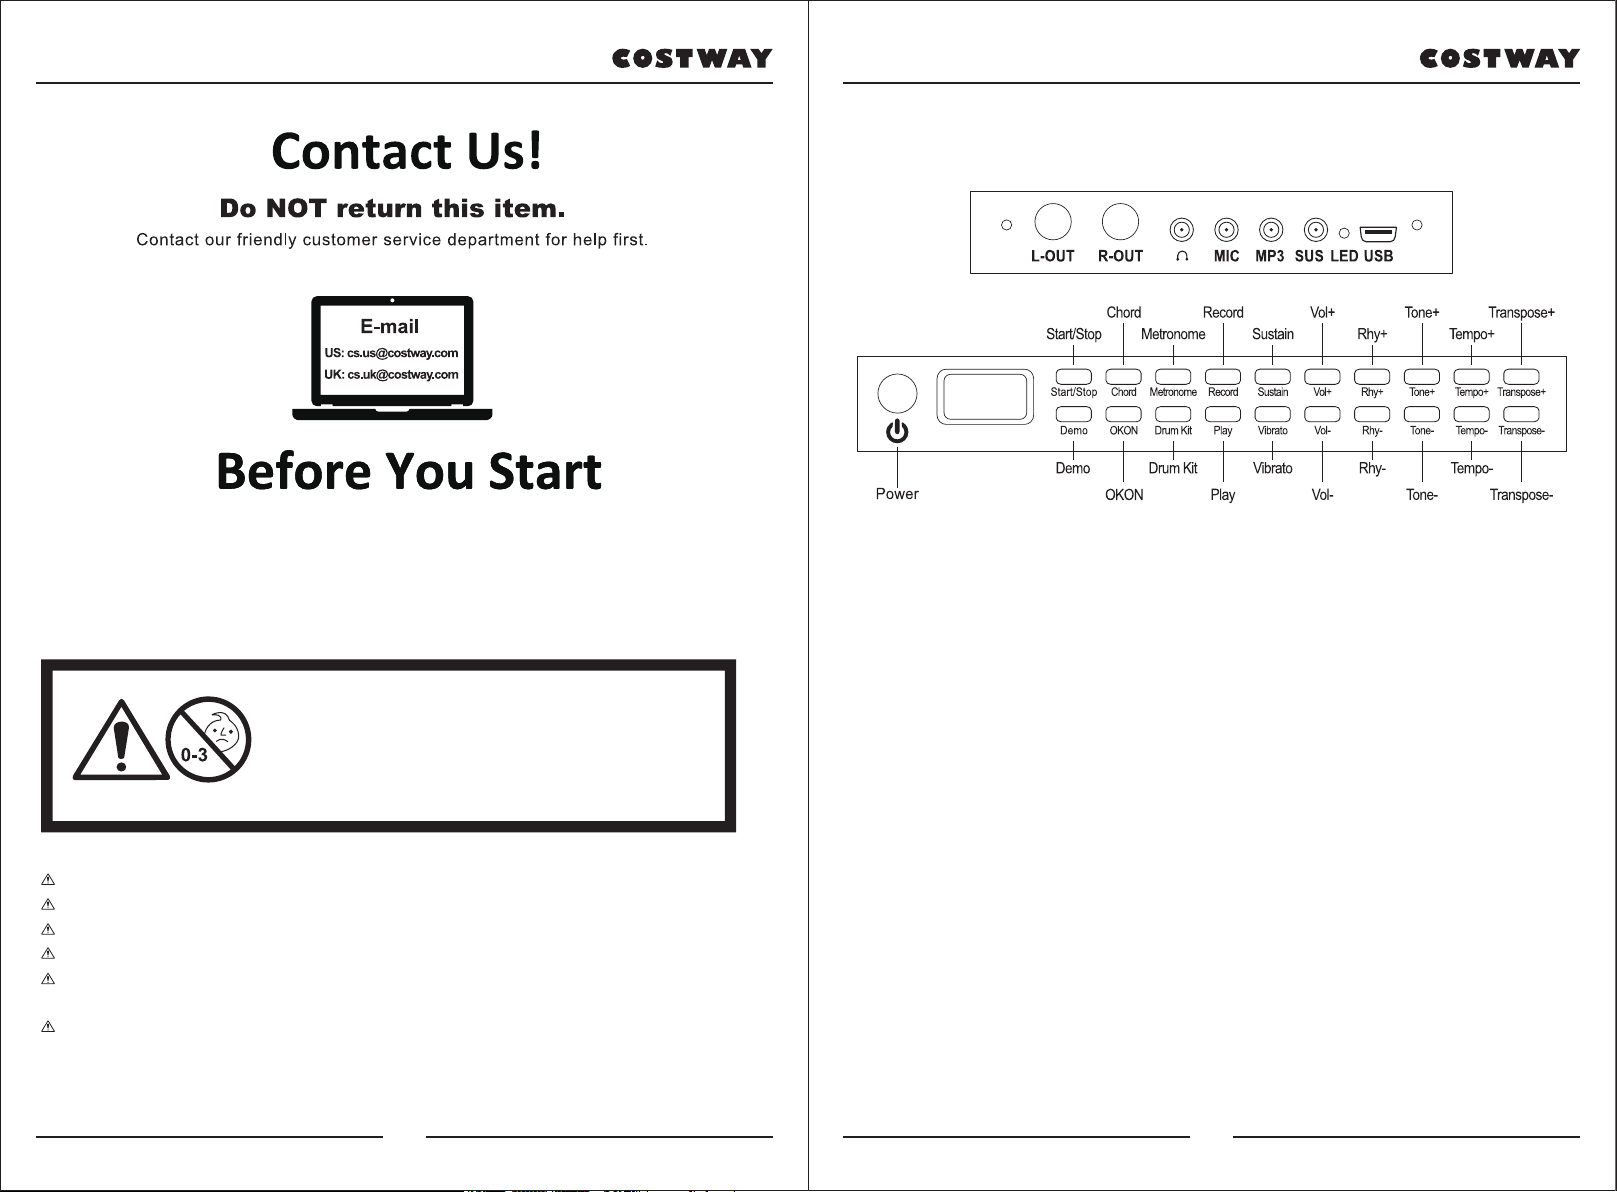
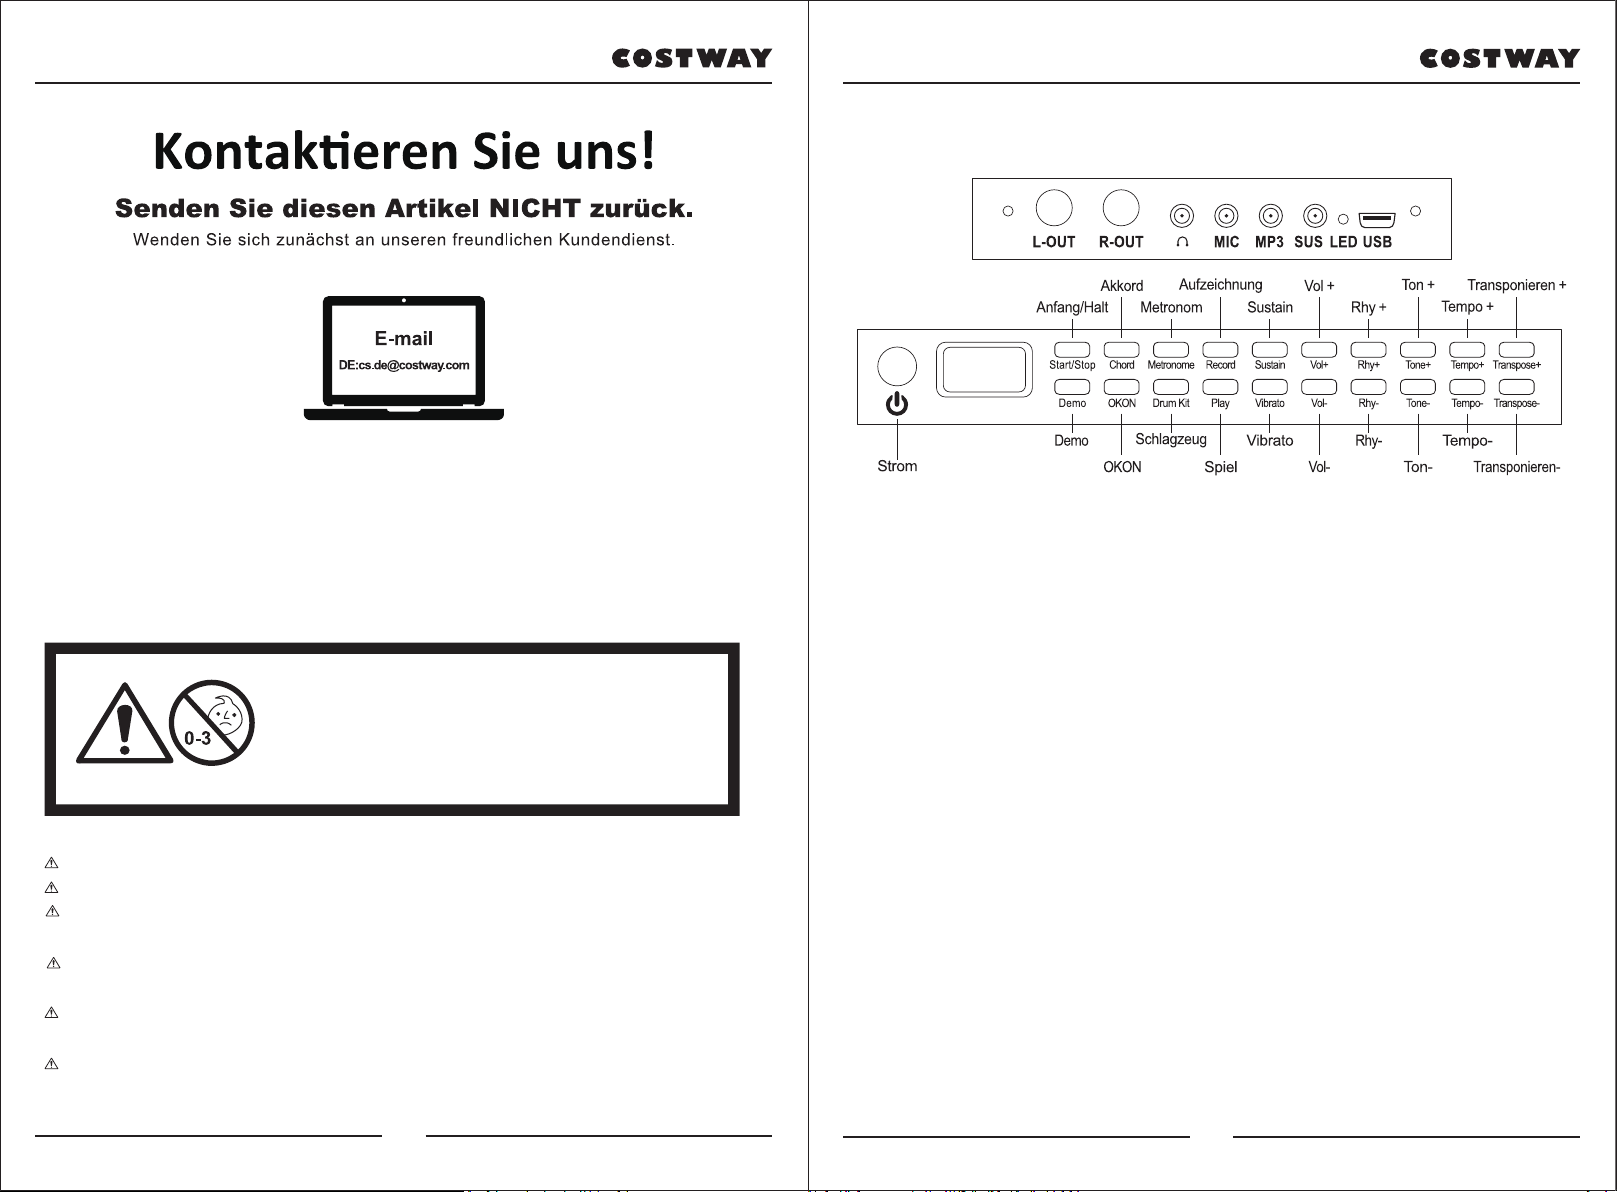
Vor dem Beginnen
Die folgende Schnittstelle ist Funktionsdiagramm:
■ Ladeindikator
Charging Indicator
1. The charging indicator is red. When the piano is plugged into USB for
charging, the red light will turn on. When the battery is full the green light
turns on and the red light goes off.
When the power is high or full, it is normal for the charging indicator light to
flash or go out after charging through USB
2. Akku: Lithium-Akku mit hoher Kapazität. Die Ladezeit beträgt ca. 4
Stunden. Bitte laden Sie den Akku zum ersten Mal länger als 5 Stunden auf.
Ladeadapter: 5V 2A
■ Schutzfunktion
Wenn die Lithiumbatteriespannung zu niedrig ist (unter 3,5), wird das
Produkt automatisch zurückgesetzt oder kann nicht gestartet werden. Die
Ladeerinnerung lautet: Beim Spielen des Klaviers oder der Musik wird die
Wiedergabe automatisch gestoppt und der anfängliche Einstellungsstatus
wiederhergestellt.
■ L-OUT/R-OUT
6,5 mm professionelle Geräteausgangsschnittstelle, zwei unabhängige
L/R-Stereoausgänge.
14 15

Nummer
11
12
13
14
15
16
17
18
19
00
Demo Lied
Milk Song
A comme Amour
Snowdreams
Clean sky
Edelweiss
Dance of fireflie
My Soul
Ballade pour Adeline
Laputa Castle in the Sky
Les premiers sourires
de vanessa
Nummer
01
02
03
04
05
06
07
080
09
10
Demo Lied
Ode to joy
Little star
For Alice
Dancing girl
My Old Classmate
a decade
Clouds chasing the Moon
Come into my dream
Bandari. Crystal.Lake
Green sleevess
■
Es kann mit Aktivlautsprecher oder Audio-Leistungsverstärker und
Kopfhörern verbunden werden, genießen Sie die zweikanalige
Surround-Sound-Ausgabe.
Unterstützt drei Line-Kopfhörer und externe Lautsprecher, unterstützt auch
vier Line-Kopghörer mit Mikrofon.
■ MIC-Funktion
Eine feste Halfunktion wurde hinzugefügt, um den Wunsch der Benutzer zu
befriedigen, jederzeit und überall zu spielen und zu singen.
■ Mp3-Funktion
Schließen Sie an Mp3 oder andere externe Audioquellen einen
Zweikanal-Surround-Sound-Effekt an.
■ SUS: Sustain-Pedal, verlängern Sie die Endzeit des Tastentons.
■ MICRO USB: Ladeschnittstelle und MIDI-Anschlussfunktion.
■ MIDI Funktion
1. Schließen Sie den Computer mit einem MiICRO USB-Datenkabel an und
öffnen Sie die entsprechende Software, um die Midi-Funktion zu verwenden.
2. Bluetooth-APP-Verbindung (siehe letzte Seite)..
■ Zwei eingebaute externe Qualitätslautsprecher:
Der Schallfeldeffekt von Lautsprechern kann den Benutzer von der
wunderbaren Musik berauschen.
■ Soundeffekte: Es sind zwei Arten von Sound integriert: Sustain/Vibration.
■ Digitale Röhre: Zeigt die aktuell verwendete Funktionalität an.
■ Demo: 20 Demo-Songs, drücken Sie die Demo-Taste, um zu wählen.
■ Akkord:
Drücken Sie beim Spielen des Rhythmus die Akkordfunktion und dann, um
die Mehrfingermethode im Bereich der Tasten A1-F4 # zu drücken, den
entsprechenden Akkord, der zum Sound gehört. Wenn Sie den
Einzelfinger-Akkordgriff drücken, wird der Akkord des Einzelfingers
gespielt.
Drücken Sie die Akkordtaste erneut und schlie ßen Sie die Akkordfunktion.
16 17

Tabelle der Einfingerakkorde (Beispiel) ■ Transponieren+/-
Standardmäßig wird auf Stufe 0 begonnen, plus 6 Ebenen, minus 6 Ebenen.
Drücken Sie die Taste Transponieren +, um die Klopfkraft der Tasten zu
erhöhen; oder drücken Sie die Taste Transponiern-, um die Klopfkraft der
Tasten zu verringern.
■ Vol +/-: Es beginnt bei Stufe 14, die größte Stufe ist 17, das Minimum ist 0.
■ Tempo+/-:
Die Standardgeschwindigkeit ist 120, das Maximum kann auf 300 eingestellt
werden, das Minimum kann auf 30 reduziert werden.
Unterschiedliche DEMO-Songs zeigen unterschiedliche Geschwindigkeiten.
Die tatsächliche Geschwindigkeit ist maßgebend.
■ Tone +/-
Drücken Sie Tone + oder Tone-, um den Ton auszuwählen. 128 verschiedene
Töne finden Sie im Anhang.
■ Rhy+/-
Drücken Sie Rhy + oder Rhy-, um den Rhythmus auszuwählen.
128 Rhythmusarten finden Sie im Anhang.
■ OKON:
Drücken Sie die OKON-Taste, um den Lernmodus automatisch aufzurufen.
Die Demo-Song-Begleitung wird in einer Endlosschleife abgespielt und
wartet, bis der Benutzer sie abgespielt hat. Berühren Sie eine beliebige Taste,
um das Hauptthema des Demo-Songs abzuspielen.
Drücken Sie die OKON-Taste erneut, um die Schleife auszuwählen. Drücken
Sie Start/Stop um die Wiedergabe der Demo-Song-Begleitung anzuhalten.
■ Metronome:
Drücken Sie die Metronom-Funktion, um einen Beat-Sound zu erzeugen. Das
Metronom wird mit der aktuellen Geschwindigkeit abgespielt. Drückern Sie
Start / Stop, um das Metronom auszuschalten.
18 19

■ Aufnahmefunktion
1. Drücken Sie diese Taste, um den Aufnahmemodus aufzurufen und den Ton
des Metronoms zu erzeugen. Drücken Sie zu diesem Zeitpunkt eine beliebige
Taste, um die Aufnahme zu starten.
Die maximale Anzahl von Aufnahmen 700. Wenn die Aufnahme voll ist,
stoppt der Metronomton.
Sie können keine Noten mehr aufnehmen. Während der Aufnahme können
Sie diese jederzeit durch Drücken der Wiedergabetaste wiedergeben. Bei
jedem Drücken dieser Taste wird der letzte Speicher gelőscht und der
Aufnahmemodus wird eneut aufgerufen.
2. Drücken Sie zum ersten Mal die Wiedergabetaste, um die aufgenommenen
Noten abzuspielen und zum zweiten Mal die Wiedergabetaste, um die
Wiedergabe zu beenden.
3. Drücken Sie die Wiedergabetaste, um den Aufnahmemodus zu beenden.
4. Wenn zuvor noch kein Wert aufgezeichnet wurde, wird beim Drücken der
Wiedergabetaste keine Aktion ausgeführt.
■ Schlagzeug
Drücken Sie diese Taste, um den Ton der Trommel auf den entsprechenden
Tasten abzurufen.
88 Tasten Drum-Kit entsprechende Tabell
20 21

Android-Handy Verbindung:
PoPiano Verbindung:
1. Scannen Sie den QR-Code, um die POPiano-App herunterzuladen.
2. Schalten Sie die Bluetooth-Funktion ein. Einige Telefone müssen die
Telefonortungsfunktion einschalten.
3. Offnen Sie die POPiano-App, um einen beliebigen Titel auszuwählen, und
starten Sie die Wiedergabe nach der Eingabe.
4. Klicken Sie oben rechts auf dem Bildschirm des Mobiltelefons auf
und wählen Sie Verbindung zum Klavier herstellen über:
blauer Zahn - Bestätigt als nächstes - Bestätigen Sie, um die Verbindung zum
Klavier herzustellen.
5. Nachdem Sie die Bluetooth-Verbindung bestätigt haben, wird das Symbol
als blaues Häkchen angezeigt.
Bluetooth APP Funktionen:
iPhone-Verbindung:
POPiano-Verbindung:
1. Scannen Sie den QR-Code, um die POPiano-App herunterzuladen.
2. Offnen Sie die POPiano-App, nachdem Sie das Bluetooth des iPhones
aktiviert haben, wählen Sie einen beliebigen Titel aus und starten Sie die
Wiedergabe nach der Eingabe.
3. Klicken Sie oben rechts auf dem iPhone-Bildschirm auf und wählen
Sie: Verbindung mit dem Klavier herstellen über:
Blue Tooth-Confimed, als nächstes bestätigen Sie, um eine Verbindung mit
dem Klavier herzustellen.
4. Nachdem Sie die Bluetooth-Verbindung bestätigt haben, wird das Symbol
als blaues Häkchen angezeigt.
Garage Band Verbindung:
1. Offnen Sie die Garage Band App.
2. Schalten Sie Bluetooth an Ihrem Telefon ein.
3. Offnen Sie die GarageBand App und klicken Sie auf das Symbol
Einstellungen in der oberen rechten Ecke des Bildschirms.
4. Verbinden Sie das Bluetooth des Pianos über:
Song Settings-Advanced-Bluetooth MIDI Devices.
Perfekte Verbindung zwischen Piano und Piano Bar:
1. Laden Sie die Perfect Piano App und die Piano Bar herunter.
2. Schalten Sie Bluetooth oder Ihr Telefon ein.
3. Verbinden Sie zuerst die Garage Band App. Wenn die Verbindung
erfolgreich hergestellt wurde, öffnen Sie die Perfect Piano App und PianoBar
kann direkt verwendet werden.
22 23

CE MANUEL D’INSTRUCTIONS CONTIENT DES INFORMATIONS IMPORTANTES SUR LASÉCURITÉ. VEUILLEZ LIRE ET CONSERVER POUR LA RÉFÉRENCE FUTURE.
MANUEL DE L’UTILISATEUR
VEUILLEZ NOUS DONNER UNE
OCCASION DE L’AMELIORER ET FAIRE MIEUX!
Contactez d’abord notre service à la clientèle amical pour l’aide.
Les replacements pour les pièces manquantes ou endommagées
seront envoyés le plus vite possible!
Suivez Costway
EN DE FR ES IT PL
Ihre Vorschläge und Kommentare für COSTWAY sind wirklich wichg für uns!
Wir möchten uns bei allen Kunden herzlich bedanken,
dass sie sich die Zeit genommen haben, dieses Produkt
zusammenzubauen und uns wertvolle Bewertung
zukommen zu lassen.
Mit Ihrer inspirierenden Bewertung wird COSTWAY konsistenter sein, um Ihnen
EIN SCHÖNES EINKAUFSERLEBNIS, GUTE PRODUKTE und EFFIZIENTEN SERVICE zu bieten!
DE office:FDS GmbH,Neuer Höltigbaum 36,22143 Hamburg,Deutschland
Belohnungspunkte
Exklusiver Kundendienst
Personalisierte Empfehlungen
Permanenter Einkaufswagen
Bestellverlauf
5 Sterne Bewertung
Piano Numérique
MU70002DE
24 25

Veuillez lire attentivement toutes les instructions et les conserver pour la référence ultérieure.
Avertissement
Attention : Le produit ne convient pas aux enfants de moins de 3 ans.
Danger : Gardez toutes les petites pièces et les matériaux d’emballage de ce produit hors de
la portée des bébés et des enfants pour éviter un risque d’étouffement.
Avertissements Généraux:
Le produit doit être installé et utilisé sous la surveillance d’un adulte.
Lisez attentivement chaque étape et suivez l’ordre correct.
Retirez tous les emballages, séparez et comptez toutes les pièces et le matériel.
Veuillez vous assurer que toutes les pièces sont correctement installées, une installation
incorrecte peut entraîner un danger.
Nous recommandons que, dans la mesure du possible, tous les articles soient assemblés à
proximité de la zone dans laquelle ils seront utilisés, afin d’éviter de déplacer inutilement le
produit une fois assemblé.
Assurez-vous que la surface est solide pendant l’assemblage et placez toujours le produit
sur une surface plane et stable.
AVERTISSEMENT:
RISQUE D’ÉTOUFFEMENT
– Les petites pièces.Ne convient pas
aux enfants de moins de 3 ans.
Le schéma fonctionnel d’interface :
Veuillez charger ce piano avant de l’utiliser.
■ Indicateur de charge
1. L’indicateur de charge est rouge. Lorsque le piano est branché sur le port
USB pour être chargé, le voyant rouge s’allume. Lorsque la batterie est
pleine, le voyant vert s’allume et le voyant rouge s’éteint.
Lorsque la puissance est élevée ou pleine, il est normal que le témoin de
charge clignote ou s’éteigne après le chargement par USB
2. Batterie : Batterie au lithium de haute capacité, le temps de charge est
d’environ 4h, veuillez charger plus de 5 h pour la première fois.
3. Adaptateur de charge : 5V 2A
■ Fonction de protection:
Si la tension de la pile au lithium est trop faible (inférieure à 3,5V), le produit
se réinitialise automatiquement ou ne peut pas démarrer. Veuillez le recharger
à temps.
Le rappel de charge est : Pendant que vous jouez du piano ou de la musique,
il s’arrête automatiquement et rétablit l’état de réglage initial.
■ L-OUT/R-OUT
Interface de sortie d’équipement professionnel 6,5 mm, deux sorties stéréo
L/R indépendantes.
Marche/Arrêt
Alimentation
Démo
OKON
Batterie Vibrato Rythme - Tempo -
Jouer Vol - Timbre - Transposition -
Accord Enregistrement Vol+ Timbre + Transposition +
Métronome Sustain Rythme + Tempo +
26 27

N°
11
12
13
14
15
16
17
18
19
00
Démo
Milk Song
A comme Amour
Snowdreams
Clean sky
Edelweiss
Dance of fireflie
My Soul
Ballade pour Adeline
Laputa Castle in the Sky
Les premiers sourires
de vanessa
N°
01
02
03
04
05
06
07
080
09
10
Démo
Ode to joy
Little star
For Alice
Dancing girl
My Old Classmate
a decade
Clouds chasing the Moon
Come into my dream
Bandari. Crystal.Lake
Green sleevess
■
Il peut être connecté à un haut-parleur actif ou à un amplificateur de
puissance audio et à un casque, et profitez de la sortie de son multicanal à
double canal.
Supporte un écouteur à trois lignes et un haut-parleur externe, mais pas un
écouteur à quatre lignes avec microphone. Il est conseillé d'utiliser une prise
stéréo 3,5 V pour le casque.
■ Fonction MIC
Une fonction de réverbération fixe est ajoutée pour satisfaire le désir de
l’utilisateur de jouer et de chanter à tout moment et en tout lieu.
■ Interface MP3
Connexion au MP3 ou à d’autres sources audio externes, effet de son
multicanal à double canal.
■ SUS: Pédale de sustain, prolonge la durée de fin du son des touches.
■ MICRO_USB: Interface de chargement et fonction de connexion MIDI.
■ MIDI
1. Connectez l’ordinateur avec le câble de données MICRO_USB, et ouvrez
le logiciel correspondant pour utiliser la fonction MIDI.
Vous pouvez installer un logiciel avec un protocole de transmission MIDI (tel
que : Everyone Piano) pour l’utiliser avec votre ordinateur.
Contrôle des périphériques externes via le piano
Jouez au clavier, le piano enverra les données MIDI à l’appareil externe via
l’interface USB, puis vous entendrez le son du BXII et de l’appareil externe.
Contrôle de piano par les périphériques externes
Utilisez un câble USB pour connecter un équipement externe, sélectionnez le
piano comme méthode de sortie MIDI de l’appareil externe. Le piano peut
être utilisé comme source sonore externe.
2. Connexion de Bluetooth APP.
■ Chord (Accord) :
Lorsque vous jouez un rythme, appuyez sur la fonction d’accord, puis sur la
méthode multi-doigts dans la plage des touches A1-F4#, l’accord
correspondant accompagnant le son peut être entendu. Si vous appuyez sur le
doigté d’accord à un seul doigt, l’accord d’un seul doigt sera joué.
■ Deux haut-parleurs externes de qualité intégrés :
L’effet de champ sonore des haut-parleurs
■ Effets sonores: Deux types de sons sont intégrés : Sustain/Vibrato.
■ Tube numérique: Affiche la fonctionnalité actuellement utilisée.
■ Démo: 20 Démos, appuyez sur le bouton démo pour choisir.
28 29

Tableau des accords à un seul doigt (exemple) ■ Transpose+/-: La valeur par défaut est de commencer au niveau est de 0, la
plage est entre -6 à +6.
Appuyez sur le bouton Transpose + pour augmenter la force de frappe des
touches ; ou appuyez sur le bouton Transpose - pour réduire la force de frappe
des touches.
■ Vol +/ -: Il commence au niveau 14, le plus grand niveau est 17, le
minimum est 0.
■ Tempo+/-:
La vitesse par défaut est de 120, le maximum peut être ajusté à 300, le
minimum peut être réduit à 30.
Les différentes chansons de la DEMO présentent des vitesses différentes. La
vitesse réelle prévaut.
■ Tone+/-
Appuyez sur « Tone+ » ou « Tone- » pour sélectionner le timbre. 128 types de
timbre, veuillez vous référer à la pièce jointe pour plus de détails.
■ Rhy+/-:
Appuyez sur « Rhy+ » ou « Rhy- » pour sélectionner le rythme. 128 types de
rythmes, veuillez vous référer à la pièce jointe pour plus de détails.
■ OKON:
Appuyez sur le bouton « OKON » pour passer automatiquement en mode
d’enseignement. L’accompagnement de la chanson de démonstration se fait
en boucle et attend que l’utilisateur la joue. Appuyez sur n’importe quelle
touche pour jouer le thème principal de la chanson de démonstration.
Appuyez à nouveau sur le bouton « OKON » pour sélectionner la boucle.
Appuyez sur le bouton « Start/Stop » pour arrêter la lecture de
l’accompagnement de la chanson de démonstration.
30 31

■ Métronome:
Appuyez sur la fonction « Métronome » pour faire entendre un battement, et
le métronome jouera à la vitesse actuelle. Appuyez sur le bouton « Start/Stop
» pour arrêter le métronome.
■ Fonction d’enregistrement :
1. Appuyez sur ce bouton pour entrer dans le mode d’enregistrement et faire
le son du métronome. À ce stade, appuyez sur n’importe quelle touche pour
commencer l’enregistrement. Le nombre maximum d’enregistrements est de
700. Lorsque l’enregistrement est complet, le son du métronome s’arrête.
Vous ne pouvez pas continuer à enregistrer une note. Lorsque vous
enregistrez, vous pouvez la jouer en appuyant sur le bouton « Play » à tout
moment. Chaque fois que vous appuyez sur ce bouton, la dernière mémoire
sera effacée et le mode d’enregistrement sera rétabli.
2. Appuyez sur le bouton « Play » une première fois pour jouer les notes
enregistrées, et une deuxième fois pour arrêter la lecture.
3. Appuyez sur le bouton « Play » pour quitter le mode d’enregistrement.
4. Si aucune note n’a été enregistrée auparavant, aucune action ne sera
effectuée lorsque vous appuierez sur le bouton « Play ».
■ Batterie :
Appuyez sur ce bouton pour obtenir la tonalité du tambour sur les touches
correspondantes.
Tableau correspondant à la batterie de 88 touches
32 33

Connexion de téléphonique Android :
Connexion de POPiano
1. Recherchez et téléchargez l’APP POPiano sur l’App store du téléphone
portable.
2. Activez la fonction bluetooth, certains téléphones doivent activer la
fonction de localisation du téléphone.
3. Ouvrez l’application POPiano pour sélectionner n’importe quelle chanson,
et choisissez de commencer à jouer après avoir entré.
4. Cliquez en haut à droite de l'écran du téléphone portable , et ensuite
vous pouvez choisir : se connecter au piano par :
BlueTooth - Confirmé, ensuite - confirmer pour se connecter au piano.
5. Après confirmation de la connexion bluetooth, l’icône est affichée sous
forme de coche bleue .
Fonctions pour APP Bluetooth:
Connexion d’iPhone ::
1. Recherchez et téléchargez l’APP « POPiano » sur l’App store de l’iPhone.
2. Ouvrez l’application « POPiano » après avoir allumé le Bluetooth de
l’iPhone, sélectionnez une chanson et choisissez de commencer à jouer après
avoir entré.
3. Cliquez en haut à droite de l’écran de l’iPhone , et ensuite vous
pouvez choisir : se connecter au piano par :
BlueTooth - Confirmé, ensuite - confirmer pour se connecter au piano.
4. Après confirmation de la connexion bluetooth, l’icône est affichée comme
cela .
Connexion GarageBand
1. Ouvrez l’application GarageBand,
2. Activez le bluetooth sur votre téléphone.
3. Ouvrez l’application GarageBand et cliquez sur l’icône Paramètres dans le
coin supérieur droit de l’écran.
4. Connectez le bluetooth du piano à travers les étapes :
Réglages de la chanson - Avancé - Périphériques MIDI Bluetooth.
Connexion pour Perfect Piano et PianoBar
1. Téléchargez l’application Perfect Piano et PianoBar.
2. Activez le bluetooth sur votre téléphone.
3. Connectez d’abord l’application GarageBand. Quand il est connecté avec
succès, puis ouvrez l’application Perfect Piano et PianoBar pour les utiliser
directement.
34 35

Bienvenue pour visiter notre site et acheter nos produits de qualité!
Nous tenons à vous présenter nos remerciements
sincères à tous nos clients qui prennent beaucoup
de temps pour assembler ce produit et nous donner
des commentaires précieux.
Avec votre évaluation inspirante, COSTWAY sera plus professionnel pour vous offrir une
BONNE EXPÉRIENCE D’ACHATS, de BONS PRODUITS et un SERCIVE EFFICACE !
FR office : 26 RUE DU VERTUQUET, 59960 NEUVILLE EN FERRAIN, FRANCE
Points de Récompense
Service à la Clientèle Exclusif
Recommandaons Personnalisées
Panier Permanent
Historique des Commandes
merci
MANUAL DEL USUARIO
ESTE MANUAL DE INSTRUCCIONES CONTIENE IMPORTANTES INFORMACIONES DE SEGURIDAD, POR FAVOR LO LEAY GUARDE PARA REFERENCIAS FUTURAS.
¡Por favor dénos la oportunidad de hacerlo bien y mejorar!
Primero póngase en contacto con nuestro amable departamento de
servicio al cliente para obtener ayuda. ¡Los reemplazos de piezas
faltas o dañadas se enviarán lo antes posible!
Siga Costway
EN DE FR ES IT PL
Piano Digital
MU70002DE
36 37

Lea todas las instrucciones detenidamente y guárdelas para futuras referencias.
¡Advertencia!
Atención: el producto no es adecuado para niños menores de 3 años
Peligro: Mantenga todas las piezas pequeñas y materiales de embalaje de este producto fuera del
alcance de bebés y niños, de lo contrario, pueden causar un peligro de asfixia.
Advertencias Generales:
El producto debe instalarse y usarse bajo la supervisión de un adulto.
Lea detenidamente cada paso y siga el orden correcto.
Quite todo el embalaje, separe y cuente todas las piezas y los accesorios.
Asegúrese de que todas las piezas estén instaladas correctamente, una instalación incorrecta
puede provocar un peligro.
Recomendamos que, cuando sea posible, todos los artículos se ensamblen cerca del área en
la que se colocarán en uso, para evitar mover el producto innecesariamente una vez ensamblado.
Asegúrese de que esté en una superficie segura durante la construcción, y coloque el
producto siempre sobre una superficie plana y estable.
ADVERTENCIA:
RIESGO DE ASFIXIA
- Piezas pequeñas.
No es adecuado para los niños
menores de 3 años.
ES
El diagrama de función de interfaz:
Cargue este piano antes de usarlo.
■ Indicador de Carga
1. El indicador de carga es rojo. Cuando el piano está conectado a USB para
cargarlo, la luz roja se encenderá. Cuando la batería está llena, la luz verde se
enciende y la luz roja se apaga.
Cuando la energía es alta o completa, es normal que la luz indicadora de
carga parpadee o se apague después de cargar a través de USB.
2. Batería: batería de litio de alta capacidad, el tiempo de carga es de
aproximadamente 4 horas, cargue por más de 5 horas para el primer uso.
Adaptador de carga: 5V 2A
■ Función de Protección:
Si el voltaje de la batería de litio es demasiado bajo (por debajo de 3,5 V), el
producto se reiniciará automáticamente o no podrá arrancar. Cárguelo a
tiempo.
El recordatorio de carga es: Mientras toca el piano o la música, se detendrá
automáticamente y restaurará el estado de configuración original.
■ L-OUT/R-OUT (Salida izquierda/Salida derecha)
Interfaz de salida de equipo profesional de 6,5 mm, dos salidas estéreo L / R
independientes.
38 39
Table of contents
Languages:
Other Costway Musical Instrument manuals

Costway
Costway SONART MU10053 User manual

Costway
Costway TM10021 User manual

Costway
Costway TM10027 User manual

Costway
Costway MU70017 User manual

Costway
Costway MU10054 User manual

Costway
Costway SONART MU70016DE User manual

Costway
Costway Sonart MU10082US User manual

Costway
Costway MU70017 User manual

Costway
Costway MU70009DE User manual

Costway
Costway Sonart MU10079US User manual