Costway MU70008DE User manual

Precautions Read it carefully before proceeding.
● Only apply the designated power supply adaptor. Change it whenever it shows
any wear and tear, or goes wrong.
● Neither disassemble the instrument nor make any change inside of it. In case
of any anomalous function, stop using immediately and have it repaired by the
qualified maintenance personnel.
● Make sure that the both are powered off when connecting the instrument with
other amplifiers.
● Don't leave the volume working in maximum or in uncomfortable stage for
long time.
● Keep the instrument away from the heats, which may result in the damage of
the components.
● Stop any liquid, or other particles getting into the instrument, which may
corrode the body or result in short circuit.
● Unplug the instrument before cleaning it and avoid using wet hands to plug or
unplug it.
● Clean the instrument with a piece of dry and soft cloth without paint, alcohol
or other chemical sovents.
●Turn off and unplug the instrument after performance or for a long time of
leaving it unused.
●Warning! Do not get it close to the ear! Misuse may cause damage to hearing.
● The supply terminals are not to be short-circuited.
●The packing has to be kept since it contains important information.
● To reduce the risk of fire or electric shock, do not expose this apparatus to rain
or moisture. The apparatus shall not be exposed to dripping or splashing and that
no objects filled with liquids, such as vases, shall be placed on the apparatus.
● Maximum Operating Temperature:40°C
● Direct plug-in adaptor is used as disconnect device, the disconnect device shall
remain readily operable.
● Do not install this equipment in a confined space such as a book case or
similar unit, and remain a well ventilation conditions. The ventilation should not
be impeded by covering the ventilation openings with items such as newspaper,
table-cloths, curtains etc.
Please read all instructions carefully and keep it for future reference.
WARNING
Attention: The Product is not suitable for the children under 3 years
Danger: Keep all small parts and packaging materials for this product away from babies and
children, otherwise they may pose a choking hazard.
General Warnings:
The product must be installed and used under the supervision of an adult.
Read through each step carefully and follow the proper order.
Remove all packaging, separate and count all parts and hardware.
Please ensure that all parts are correctly installed, incorrect installation can lead to a danger.
We recommend that, where possible, all items are assembled near to the area in which they
will be placed in use, to avoid moving the product unnecessarily once assembled.
Ensure a secure surface during construction, and place the product always on a flat, steady
and stable surface.
WARNING:
CHOKING HAZARD-Small parts.
Not for children under 3 years.
02 03

● Correct Disposal of this product. This marking indicates that this
product should not be disposed with other household wastes. To prevent
possible harm to the environment or human health from uncontrolled
waste disposal, recycle it responsibly to promote the sustainable reuse of
material resources. To return your used device, please use the return and
collection systems. They can take this product for environmental safe recycling.
Warning: Batteries shall not be exposed to excessive heat such as sunshine, fire
or the like.
Caution: Danger of explosion if battery is incorrectly replaced.Replace only
with the same or equivalent type.
Warning: Excessive sound pressure from earphones and headphones can cause
hearing loss.
Package Contents
* 61-Key Electric Keyboard Piano with LCD Display X 1 pc
* Keyboard Stand X 1 pc
* Stool X 1 pc
* Power Adaptor X 1 pc
* Headphone X 1 pc
* Microphone X 1 pc
* Music Stand X 1 pc
* Installation Manual X 1 pc
I. Panel Control and External Ports
● Top panel control
● External ports on the rear panel
1). Loudspeaker
2). Power
3). Fingered chord
4). Single chord
5). Record
6). Start/Stop
7). Program
8). Sync
9). Play
10). Fill-in
11). Keyboard Percussion
12). Sustain
13). Vibrato
14). LCD screen
15). One-Key
16). Followv
17). Ensemble
18). Timbre
19). Rhythm
20). Demo Song
21). Numbers
22). Master Volume
23). Accom volume
24). Tempo
25). Percussions
26). Chord Zone
27). AUDIO INPUT
28). MIC
29). PHONES/OUTPUT
30). DC 9V
04 05

● Mic Input and Audio Input
◆ Mic input: connect a microphone to the MIC port to sing while playing the
keyboard.
◆ The Keyboard is equipped with a stereo input function. Sound signals from
mobile phone, MP3 player, computer and other audio devices can be input into
the keyboard system for playing. Firstly turn off the Keyboard, then, connect one
end of audio cable to the output port of an audio device, and the other end to the
AUDIO INPUT port on the rear panel of the Keyboard, finally, power on the
keyboard.
III. Basic Performance Method
When [Power ON/OFF] is pressed, LCD screen will turn on and show the
current tone, tempo and other status. Then you may operate the Keyboard as
required.
● Master volume adjustment
Press [Master Vol +] or [Master Vol -] to turn up or turn down the master
volume. Press [Master Vol +] and [Master Vol -] simultaneously to reset to the
default value of "10".
By controlling the master volume the accomp volume can be controlled.
● Accompaniment volume adjustment
Press [Accom Vol +] or [Accom Vol -] to turn up or turn down the
accompaniment volume. Press the [Accom Vol +] and [Accom Vol -]
simultaneously to reset to the default value of"10".
● Timbre selection
The Keyboard provides 255 timbres, from "000" to "254" for your selection.
When the keyboard is powered on, the Timbre Selection function will be
enabled automatically, and "TONE" will show on the screen. In the absence of
screen content, press [Timbre] to enable the Timbre selection function.
The Timbre is defaulted to be "000", and it can be adjusted by pressing the
corresponding number buttons or pressing the "+"/"-"button.
II. Performance Preparation
● Battery mounting
6 AA batteries can be used as the power supply
for this keyboard. Open the cover of the battery jar
at the bottom of the keyboard, check whether the
positive and negative electrodes of the battery
conforms to the indications, mount the batteries
one by one, and then cover the battery jar.
※ Low voltage due to long time use will cause
low volume or timbre distortion. In this case,
replace the battery immediately so as not to
impact the performance effect. If the keyboard
will be left idle for a long time, please remove the batteries, so as to protect the
keyboard components from damage due to battery damp.
● AC/DC Power adaptor
A dedicated AC/DC power adapter shall be used. Connect the output end of the
adaptor to the power port on the rear panel of the keyboard, and then the other
end to the power socket.
※ (Note: the input voltage to the adaptor shall be compatible with the power
supply voltage)
● Audio Output/ External Headphone
◆ Audio output: firstly, power off the keyboard and the external audio devices,
secondly, connect one end of the audio cable to the PHONES/OUTPUT port on
the rear panel of the keyboard, and then connect the other end to the audio input
port of the audio devices.
◆ Headphone connection: When connecting a headphone to the
PHONES/OUTPUT port on the rear panel of the keyboard, the loudspeaker will
be disenabled automatically. In this way, you can perform without disturbing
others.
◆ Caution! When using headphone, maintain at an appropriate volume to protect
your hearing.
06 07

● Playing Percussion
This Keyboard provides 8 kinds of panel percussions. Press "Percussion" to play
the corresponding percussion. Percussion instruments can be added to enhance
the atmosphere as required.
This Keyboard provides 61 kinds of keyboard percussions. Press [Percussion] to
turn the keyboard into percussion keyboard, and each key corresponds to one
percussion instrument.
Press this button again to disenable the keyboard percussion function.
● Playing demonstration songs
This Keyboard has stored 24 demo songs from "000" to "023" for your selection.
Press [Demo Song], "sONG" will show on the screen, and demonstration songs
will play in order. During playing process, press [Demo Song] to play the next
demonstration song, and press Start/Stop] to stop playing.
During the playing process, you can press the number buttons or the "+"/"-"
buttons to select other demonstration song, and the selected demonstration song
will play repeatedly.
IV. Auto Rhythm
● Rhythm selection
This Keyboard provides 255 rhythms from "000" to "254" for your selection,
and the rhythm is defaulted to be "000". Press [Rhythm], "RHYM" will show on
the screen. Then press the number buttons or the"+"/"-" buttons to select other
rhythms.
● Rhythm control
1. Enable rhythm
◆ Press [start/stop] to start accomp rhythm
◆ Under the enabled state, Press [Sync], "SY N" will show on the screen. Then
play any key in the chord key zone (the 1st-1 9th key, from left), the accomp
rhythm will be activated.
2. Interlude
After the accomp rhythm is activated, press [Fill-in] to have a temporary rhythm
playing during the accomp rhythm.
3. Stop rhythm
◆ During the accomp rhythm, press [Start/Stop] to stop the accomp rhythm.
● Tempo adjustment
The tempo is defaulted to be 120 tempo/min, press [Tempo +] or [Tempo -] to
increase or decrease the tempo speed. Press the two buttons simultaneously to
reset to the default value of 120 tempo/min.
V. Auto Bass Chord
● Single chord
Single chord Single Chord Fingering
08 09

● Vibrato function
Press the [Vibrato] button, "VIB" will show on the screen, and the sustain effect
will be activated. Press this button again, "VIB" will disappear from the screen,
and the vibrato effect will be disenabled.
VII. Recording and Rhythm Programming
● Recording
Press [Record] to enable the recording function, "REC" will show on the screen.
Under this mode all playing notes will be recorded. When the storage is full,
"REC" will flash on the screen, and recording will stop automatically.
◆ Press [Play] to playback the recorded notes, and "PLAY" will show on the
screen. On completion of playback, "REC" will show on the screen. You can
record a new rhythm, or you can press [Play] to playback the recorded rhythm.
◆ Press Start/stop] or press [Record again to disenable the recording function,
and all recorded rhythm will be removed.
● Rhythm programming
Press [Program] to enable the rhythm programming function, "PRG" will show
on the screen, and the keyboard percussion will be activated. Under this mode,
you can create custom rhythms by playing the corresponding percussion key.
◆ 32 percussions can be recorded at maximum, after that "PRG" will flash on the
screen, and programming will stop automatically.
◆ OPress [Play] to playback the programming rhythm.
◆ Press [Start/Stop] or press [Program] again to disenable the programing
function, and all recorded rhythm will be removed.
10 11

Assembly Instruction of Keyboard Stand
ATTENTION:ADULT ASSEMBLY REQUIRED HTYPESTAND
Find out the parts (D) and (E), align the holes on
the base of the part (D) with the holes on the part
(E).Use nut (I) and bolt (H) to connect the two
parts. Use correct tools to ensure a firm attachment.
Repeat this process for the other side.
Attach the part (B) to (D) and(C)
using the appropriate screw (F).
Repeat this process for the other
side.
Fasten screws (F) for adjusting the
suitable height of the keyboard
stand.
Attach two parts (B) to the part (A) using four
screws (F) to create the upper part assembly. Fasten
screws(G) for fixing the keyboard on stand.
VII. Three-step Intelligent Training
● Training : one key
Press [One Key] to enable the single key training function, "LEARN", "SONG"
and the song number will show on the screen, and then press "+"/"-" button to
select the song to be learned.
One key training aims at duration learning, and there is no requirement on pitch
or creativeness. This mode allows for mistakes when playing the keys, but the
keyboard still plays correct notes, and the screen will show the correct notes.
After one song is finished, repeat the current song to be learned.
Press [Start/Stop] or press the [One Key] button to disenable the training
function.
● Training ll: Follow
Press [Follow] to enable the follow function, "LEARN", "SONG" and the song
number will show on the screen, and then press "+"/"" buiton to select the song
to be learned.
With [Follow] training, you can learn by following the correctly playing notes.
You can also learn by following the notes show on the screen, it will wait for
you to play the correct note before it moves to the next one.
※ Notes: Under this state, the Keyboard plays only the correct notes, and gives
no response to the wrong notes.
Press [Start/Stop] or press [Follow] to disenable the training function.
● Training lll: Ensemble
Press [Ensemble] to enable the ensemble function, "LEARN", "SONG" and the
song number will show on the screen, and then press "+"/"-" button to select the
song to be learned.
Ensemble training aims at the correct and comprehensive learning of the song
duration and notes. The keynote will be shielded for ensemble, and you need to
play the correct note according to the correct duration of the song. If you fail to
play within 3 seconds, the keyboard will automatically play the correct note.
After one song is finished, repeat the current song to be learned.
Press the [Start/Stop] button or press [Ensemble] to disenable the training
function.
12 13

Vorsichtsmaßnahmen
Lesen Sie es sorgfältig durch, bevor Sie fortfahren
● Verwenden Sie nur das dafür vorgesehene Netzteil. Ändern Sie es, wenn es
Verschleiß aufweist oder schief geht.
● Zerlegen Sie das Instrument weder, noch nehmen Sie Änderungen daran vor.
Bei einer anomalen Funktion die Verwendung sofort einstellen und von
qualifiziertem Wartungspersonal reparieren lassen.
● Stellen Sie sicher, dass beide ausgeschaltet sind, wenn Sie das Instrument mit
anderen Verstärkern verbinden.
● Lassen Sie die Lautstärke nicht lange im Maximum oder in einem
unangenehmen Stadium.
● Halten Sie das Instrument von den Erhitzungen fern, da dies zu einer
Beschädigung der Komponenten führen kann.
●Verhindern Sie, dass Flüssigkeit oder andere Partikel in das Instrument
gelangen, die den Körper angreifen oder zu einem Kurzschluss führen können.
● Ziehen Sie vor dem Reinigen den Stecker aus der Steckdose und vermeiden
Sie das Ein- oder Ausstecken mit nassen Händen.
● Reinigen Sie das Instrument mit einem trockenen und weichen Tuch ohne
Farbe, Alkohol oder andere chemische Lösungsmittel.
● Schalten Sie das Instrument aus und ziehen Sie den Stecker aus der Steckdose,
nachdem Sie es aufgeführt haben oder es längere Zeit nicht benutzt haben.
●Warnung! Bringen Sie es nicht in die Nähe des Ohrs! Missbrauch kann zu
Hörschäden führen.
● Die Versorgungsklemmen dürfen nicht kurzgeschlossen werden.
● Die Verpackung muss aufbewahrt werden, da sie wichtige Informationen
enthält.
● Setzen Sie dieses Gerät weder Regen noch Feuchtigkeit aus, um die Gefahr
eines Brandes oder eines Stromschlags zu verringern. Das Gerät darf keinem
Tropfen oder Spritzen ausgesetzt sein und es dürfen keine mit Flüssigkeiten
gefüllten Gegenstände wie Vasen auf das Gerät gestellt werden.
● Maximale Betriebstemperatur: 40 ℃.
●Der direkte Steckadapter wird als Trennvorrichtung verwendet. Die
Trennvorrichtung muss weiterhin leicht funktionsfähig sein.
Bitte lesen Sie alle Anweisungen sorgfältig durch und Bewahren Sie die Anweisungen zur
zukünftigen Verwendung auf.
Warnung!
Achtung: Das Produkt ist nicht geeignet für Kinder unter 3 Jahren.
Gefahr: Halten Sie alle kleinen Teile und Verpackungsmaterialien fern von Babys und Kindern,
da Erstickungsgefahr besteht.
Warnhinweise:
Das Produkt muss unter Aufsicht eines Erwachsenen installiert und verwendet werden.
Lesen Sie jeden Schritt sorgfältig durch und befolgen Sie die richtige Reihenfolge.
Entfernen Sie alle Verpackungen, separieren und zählen Sie alle Teile und Hardware vor der
Montage oder Verwendung.
Bitte beachten Sie darauf, alle Teile richtig anzubringen, eine falsche Montage kann zu einer
Gefährdung führen.
Wir empfehlen, wenn möglich, alle Artikel in der Nähe des Einsatzortes zu montieren, um
eine unnötige Bewegung der Artikel zu vermeiden.
Achten Sie auf einen sicheren Untergrund während des Aufbaus stellen, und stellen Sie
das Produkt immer auf eine glatte, flache und stabile Oberfläche.
ACHTUNG:
Nicht für Kinder unter 36 Monaten
geeignet. Enthält Kleinteile, die
verschluckt werden können.
( Erstickungsgefahr!)
Vor dem Beginnen
16 17

I. Bedienfeld und externe Anschlüsse
●Steuerung des oberen Bedienfelds
●Externe Anschlüsse auf der Rückseite
1). Loudspeaker
2). Power
3). Fingered chord
4). Single chord
5). Record
6). Start/Stop
7). Program
8). Sync
9). Play
10). Fill-in
11). Keyboard Percussion
12). Sustain
13). Vibrato
14). LCD screen
15). One-Key
16). Followv
17). Ensemble
18). Timbre
19). Rhythm
20). Demo Song
21). Numbers
22). Master Volume
23). Accom volume
24). Tempo
25). Percussions
26). Chord Zone
27). AUDIO INPUT
28). MIC
29). PHONES/OUTPUT
30). DC 9V
● Installieren Sie dieses Gerät nicht auf engstem Raum, z. B. in einem
Bücherregal oder einem ähnlichen Gerät, und sorgen Sie für eine gute Belüftung.
Die Belüftung sollte nicht behindert werden, indem die Belüftungsöffnungen mit
Gegenständen wie Zeitung, Tischdecken, Vorhängen usw. abgedeckt werden.
● Richtige Entsorgung dieses Produkts. Diese Kennzeichnung weist
darauf hin, dass dieses Produkt nicht mit anderen Haushaltsabfällen
entsorgt werden darf. Um mögliche Schäden für die Umwelt oder die
menschliche Gesundheit durch unkontrollierte Abfallentsorgung zu vermeiden,
recyceln Sie diese verantwortungsbewusst, um die nachhaltige
Wiederverwendung materieller Ressourcen zu fördern. Um Ihr gebrauchtes
Gerät zurückzugeben, verwenden Sie bitte die Rückgabe- und Sammelsysteme.
Sie können dieses Produkt für ein umweltfreundliches Recycling verwenden.
Warnung: Batterien dürfen keiner übermäßigen Hitze wie Sonnenschein, Feuer
oder dergleichen ausgesetzt werden.
Achtung: Explosionsgefahr bei falschem Batteriewechsel. Nur durch den
gleichen oder einen gleichwertigen Typ ersetzen.
Warnung: Übermäßiger Schalldruck von Kopfhörern und Kopfhörern kann zu
Hörverlust führen.
Packungsinhalt
* E-Keyboard mit 61 Tasten und LCD-Display x1
* Tastaturständer x1
* Hocker x1
* Netzteil x1
* Kopfhörer x1
* Mikrofon x1
* Notenständer x1
* Installationsanleitung x1
18 19

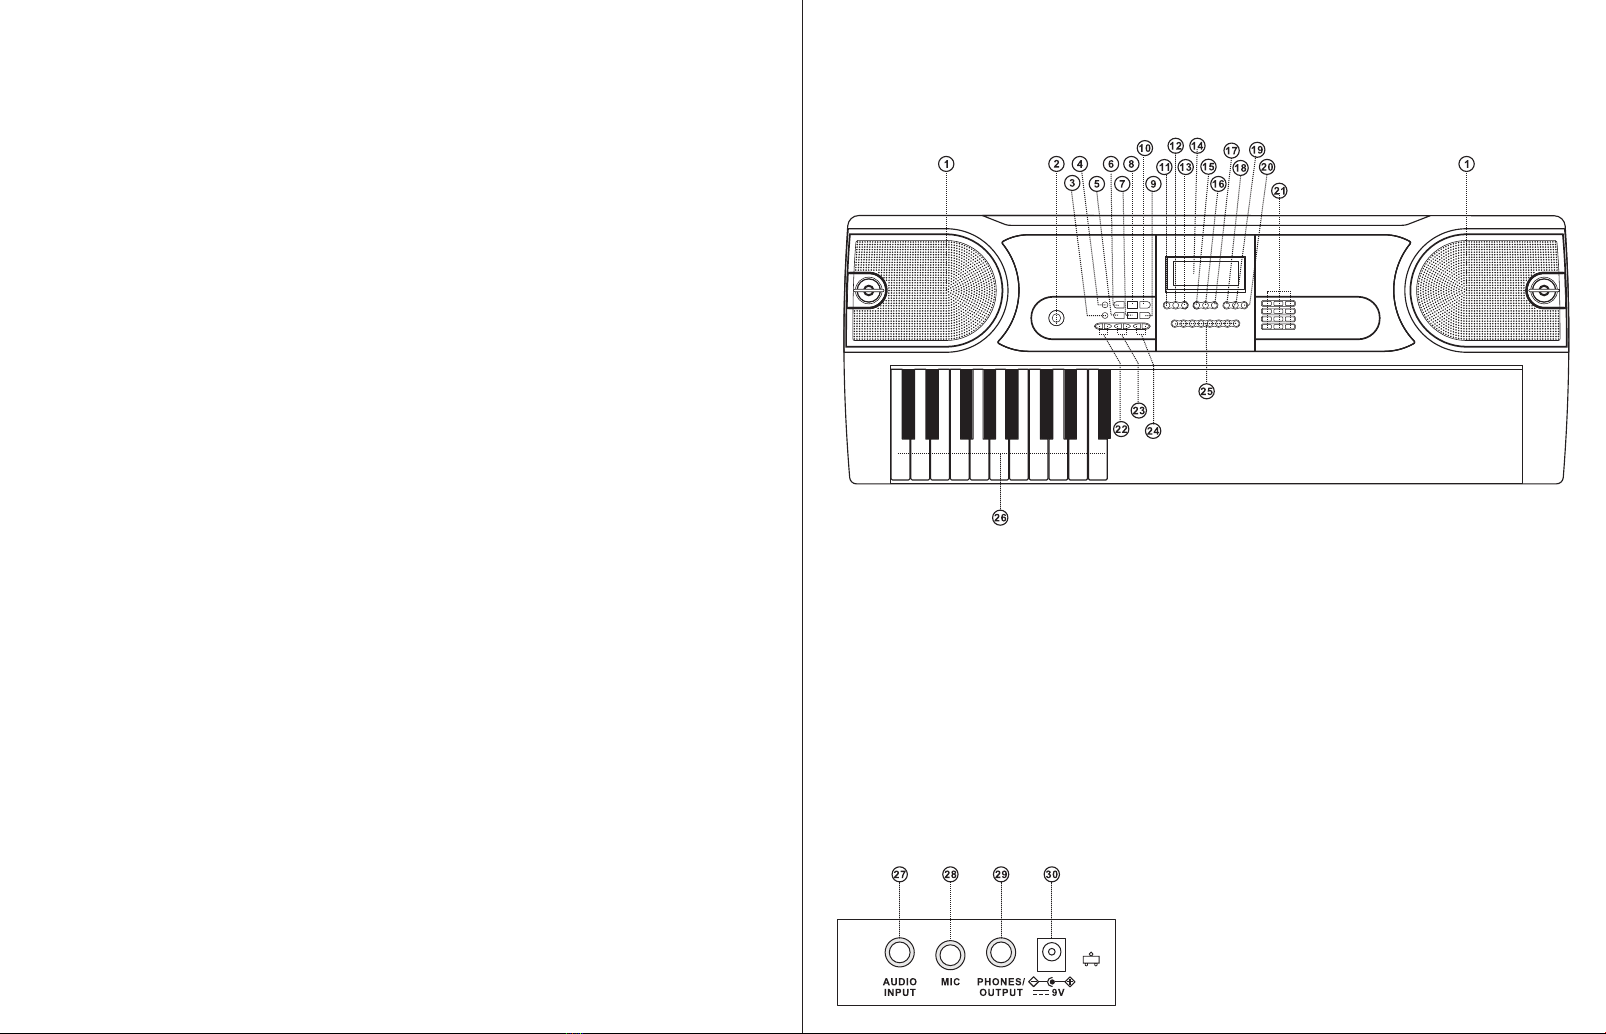
● Mikrofoneingang und Audioeingang
◆Mikrofoneingang: Schließen Sie ein Mikrofon an den MIC-Anschluss an, um
zu singen und zu spielen.
◆Die Tastatur verfügt über die Stereo-Eingangsfunktion. Tonsignale von
Mobiltelefonen, MP3-Playern, Computern und anderen Audiogeräten können
zum Spielen in das Tastatursystem eingegeben werden. Schalten Sie zuerst die
Tastatur aus, schließen Sie dann ein Ende des Audiokabels an den
Ausgangsanschluss eines Audiogeräts und das andere Ende an den AUDIO
INPUT-Anschluss auf der Rückseite der Tastatur an und schalten Sie schließlich
die Tastatur ein.
III. Methode des Grundspiels
Drücken Sie [Power On/ Off]. Das LCD-Display wird eingeschaltet und zeigt
das aktuelle Timbre, Tempo und den anderen Status an. Anschließend können
Sie die Tastatur nach Bedarf bedienen.
● Master-Lautstärkeregelung
Drücken Sie [Master Vol +] oder [Master Vol -], um die Master-Lautstärke zu
erhöhen oder zu verringern. Drücken Sie gleichzeitig [Master Vol +] und
[Master Vol -], um den Standardwert von „10“ zurückzusetzen. Durch Steuern
der Hauptlautstärke kann die Begleitlautstärke gesteuert werden.
● Einstellung der Begleitlautstärke
Drücken Sie [Accom Vol +] oder [Accom Vol -], um die Begleitlautstärke zu
erhöhen oder zu verringern. Drücken Sie gleichzeitig [Accom Vol +] und
[Accom Vol -], um den Standardwert von „10“ zurückzusetzen.
● Klangfarbenauswahl
Die Tastatur bietet 255 Klangfarben von „000“ bis „254“ zur Auswahl. Wenn
die Tastatur eingeschaltet ist, wird die Timbre-Auswahlfunktion automatisch
aktiviert und „TONE“ wird auf dem Bildschirm angezeigt. Wenn kein
Bildschirminhalt vorhanden ist, drücken Sie [Timbre], um die
Timbre-Auswahlfunktion zu aktivieren. Das Timbre ist standardmäßig „000"
und kann durch Drücken der entsprechenden Zifferntasten oder Drücken der
Taste „+“ /„-“ eingestellt werden.
II. Leistungsvorbereitung
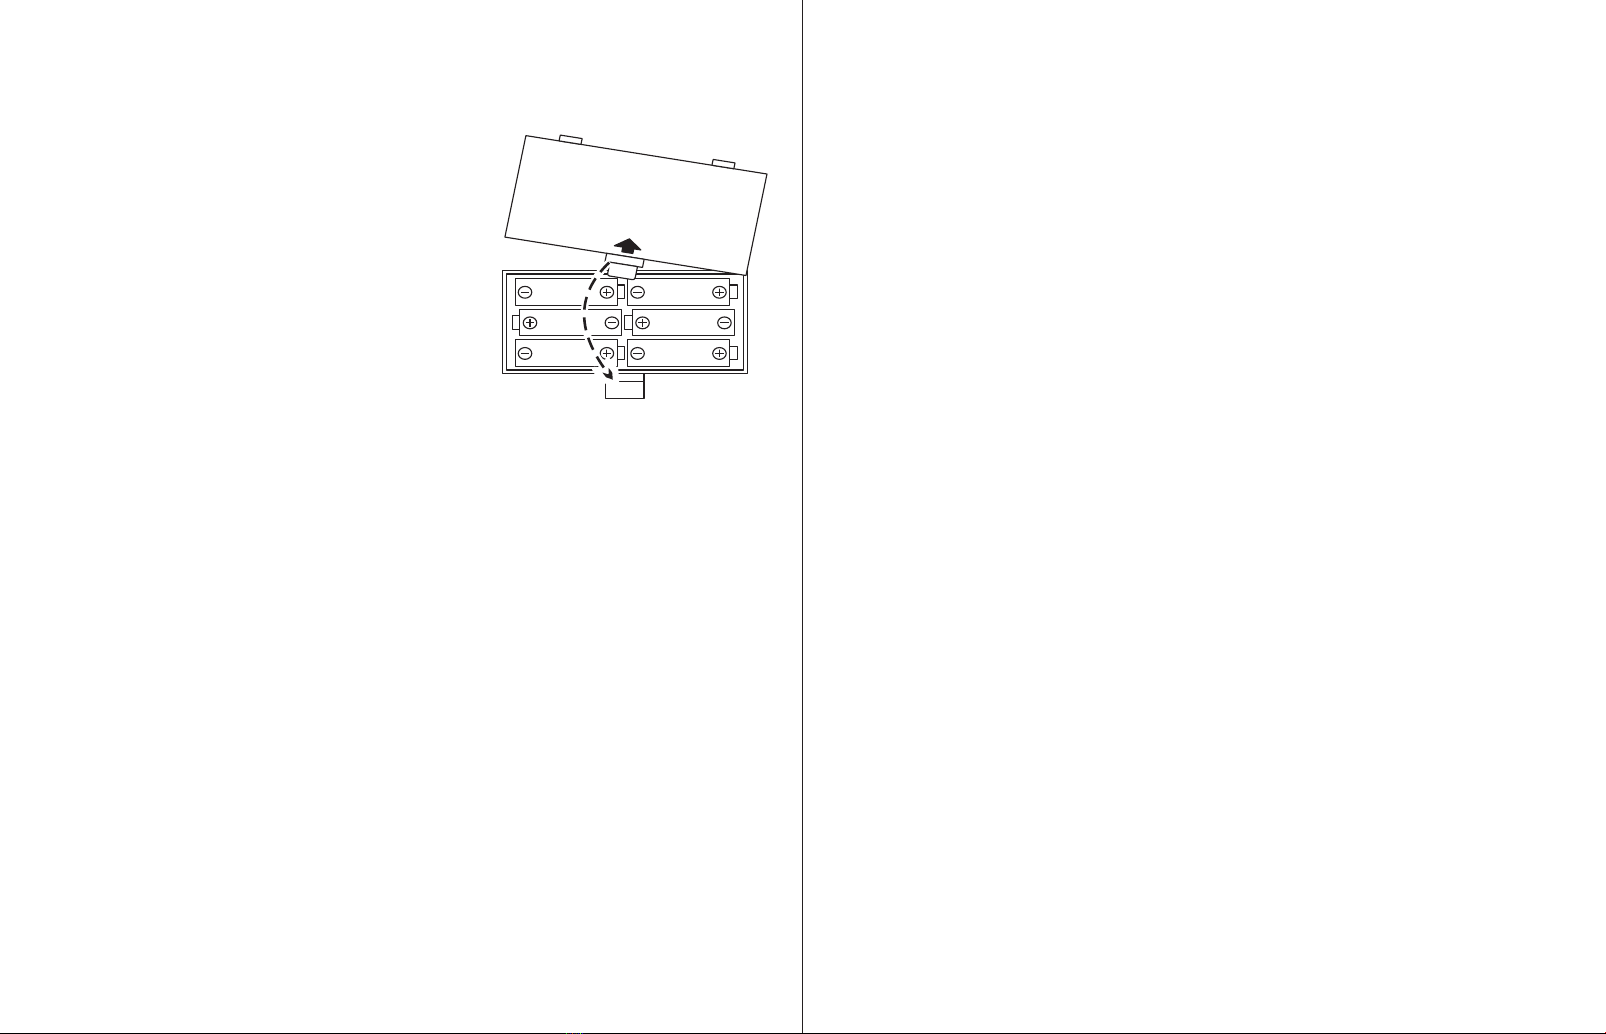
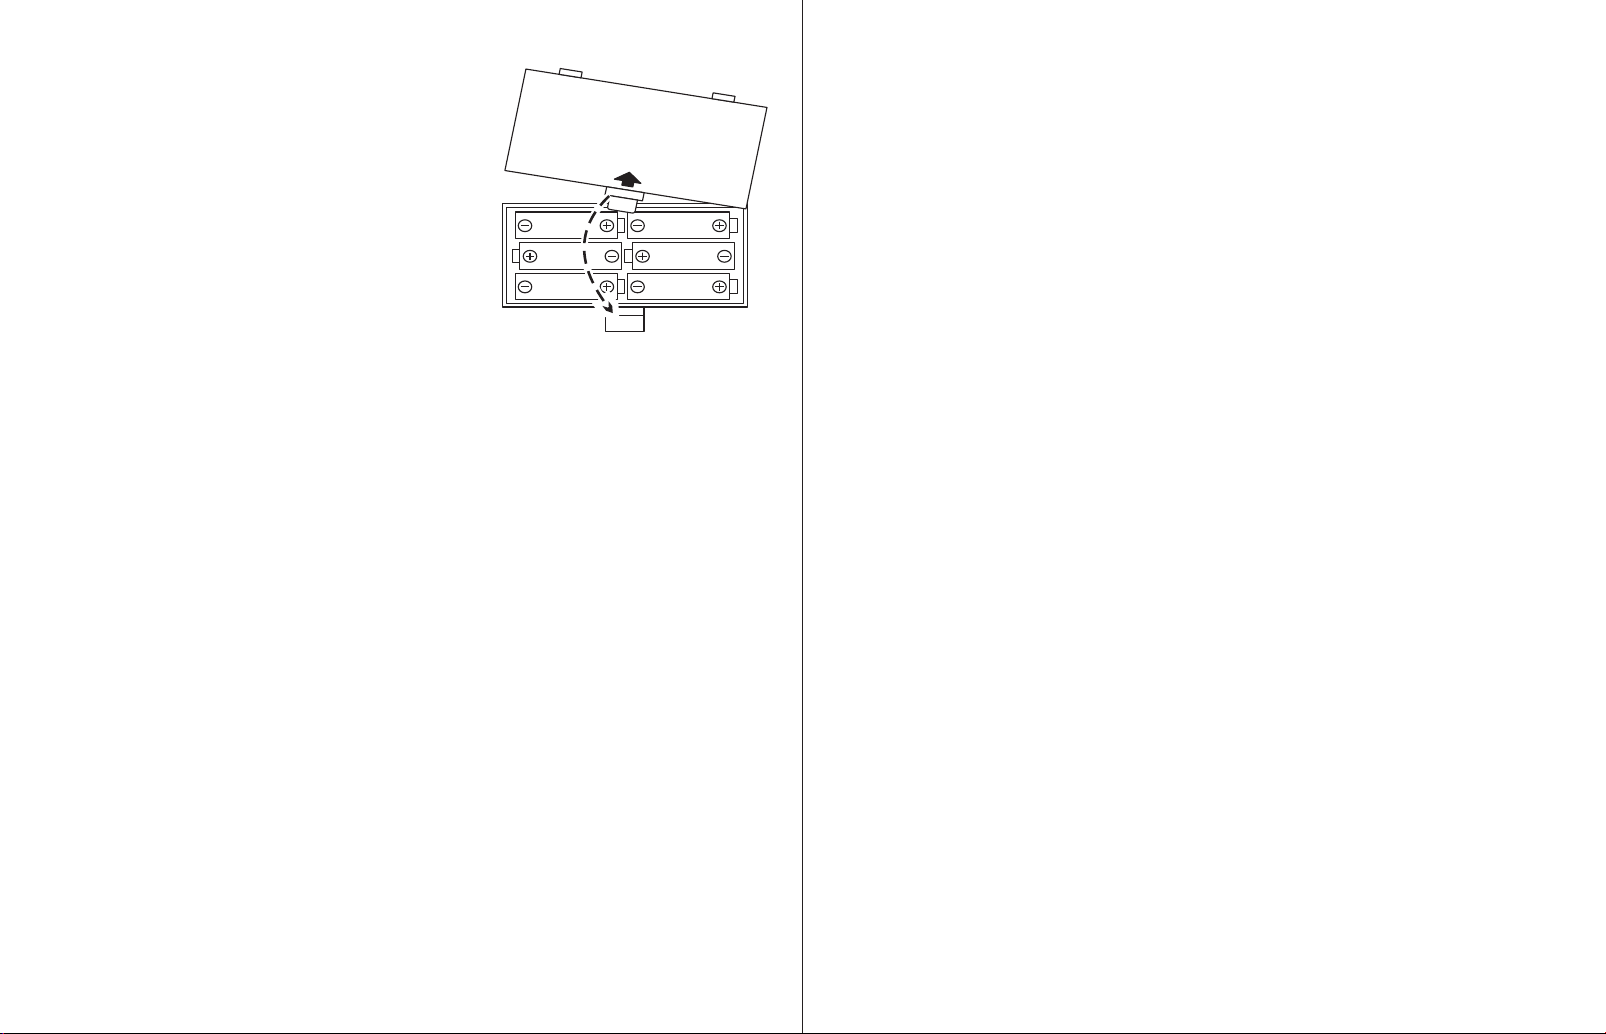
● Batteriemontage
Als Stromversorgung für diese Tastatur können 6
AA-Batterien verwendet werden. Öffnen Sie die
Abdeckung des Batteriefachs unten an der
Tastatur, prüfen Sie, ob die positiven und
negativen Elektroden der Batterie den Angaben
entsprechen, montieren Sie die Batterien
nacheinander und decken Sie das Batteriefach ab.
※Niedrige Spannung aufgrund längerer
Verwendung führt zu geringer Lautstärke oder
Timbre-Verzerrung. Tauschen Sie in diesem Fall den Akku sofort aus, um den
Leistungseffekt nicht zu beeinträchtigen. Wenn die Tastatur längere Zeit nicht
benutzt wird, entfernen Sie bitte die Batterien, um die Tastaturkomponenten vor
Beschädigungen durch Batteriefeuchtigkeit zu schützen.
● AC/DC-Netzteil
Es ist ein spezielles AC/DC-Netzteil zu verwenden. Verbinden Sie das
Ausgangsende des Adapters mit dem Stromanschluss auf der Rückseite der
Tastatur und das andere Ende mit der Steckdose.
※(Hinweis: Die Eingangsspannung des Adapters muss mit der
Versorgungsspannung kompatibel sein.)
● Audioausgang/externer Kopfhörer
◆Audioausgang: Schalten Sie zum einen die Tastatur und die externen
Audiogeräte aus, zum anderen verbinden Sie ein Ende des Audiokabels mit dem
PHONES / OUTPUT-Anschluss auf der Rückseite der Tastatur und das andere
Ende mit dem Audioeingang von die Audiogeräte.
◆Kopfhöreranschluss: Wenn Sie einen Kopfhörer an den PHONES /
OUTPUT-Anschluss auf der Rückseite der Tastatur anschließen, wird der
Lautsprecher automatisch deaktiviert. Auf diese Weise können Sie auf der
Tastatur spielen, ohne andere zu stören.
◆Hinweis! Wenn Sie den Kopfhörer verwenden, drehen Sie ihn nicht auf und
halten Sie die Lautstärke längere Zeit auf dem Maximum, da dies zu Hörverlust
führen kann.
20 21

2. Zwischenspiel
Nachdem der Begleitrhythmus aktiviert wurde, drücken Sie [Fill-in], um einen
temporären Rhythmus während des Begleitrhythmus abzuspielen.
3. Rhythmus Stoppen
◆ Drücken Sie während des Begleitrhythmus [Start / Stop], um den
Begleitrhythmus zu stoppen.
● Tempoeinstellung
Das Tempo ist standardmäßig 120 Tempo/min. Drücken Sie [Tempo +] oder
[Tempo-], um die Tempo-Geschwindigkeit zu erhöhen oder zu verringern.
Drücken Sie die beiden Tasten gleichzeitig, um den Standardwert von 120
Tempo/min wiederherzustellen.
V. Automatiches Bassakkord
● Einzelakkord
Einzelakkord Einzelakkord-Fingersatz
● Percussion spielen
Diese Tastatur bietet 8 Arten von Panel-Percussions. Drücken Sie "Percussion",
um die entsprechende Percussion abzuspielen. Schlaginstrumente können
hinzugefügt werden, um die Atmosphäre nach Bedarf zu verbessern.
Diese Tastatur bietet 61 Arten von Tastaturpercussions. Drücken Sie
[Percussion], um die Tastatur in eine Percussion-Tastatur zu verwandeln. Jede
Taste entspricht einem Percussion-Instrument. Drücken Sie diese Taste erneut,
um die Keyboard-Percussion-Funktion zu deaktivieren.
● Demonstrationslieder spielen
Dieses Keyboard hat 24 Demo-Songs von „000“ bis „023“ zur Auswahl
gespeichert. Drücken Sie [Demo-Song], „SONG“ wird auf dem Bildschirm
angezeigt und die Demo-Songs werden der Reihe nach abgespielt. Drücken Sie
während des Wiedergabevorgangs [Demo Song], um den nächsten
Demonstrationssong abzuspielen, und drücken Sie [Start / Stop], um die
Wiedergabe zu beenden.
Während des Wiedergabevorgangs können Sie die Zifferntasten oder die Tasten
„+“ / „-“ drücken, um ein anderes Demonstrationslied auszuwählen. Das
ausgewählte Demonstrationslied wird wiederholt abgespielt.
IV. Automatischer Rhythmus
● Rhythmusauswahl
Diese Tastatur bietet 255 Rhythmen von „000“ bis „254“ für Ihre Auswahl, und
der Rhythmus ist standardmäßig „000“. Drücken Sie [Rhythmus], „RHYM“
wird auf dem Bildschirm angezeigt. Drücken Sie dann die Zifferntasten oder die
Tasten „+“ /„-“, um andere Rhythmen auszuwählen.
● Rhythmuskontrolle
1. Rhythmus aktivieren
◆ Drücken Sie [Start/Stop], um den Begleitrhythmus zu starten.
◆ Drücken Sie im aktivierten Zustand [Sync]. „SYN“ wird auf dem Bildschirm
angezeigt. Spielen Sie dann eine beliebige Taste in der Akkordtastenzone (1.-19.
Taste von links). Der Begleitrhythmus wird aktiviert.
22 23

● Vibrato-Funktion
Drücken Sie [VIBRATO], „VIB“ wird auf dem Display angezeigt und der
Vibrato-Effekt wird aktiviert. Drücken Sie diese Taste erneut, „VIB“
verschwindet vom Bildschirm und der Vibrato-Effekt wird deaktiviert.
VII. Aufnahme und Rhythmusprogrammierung
● Aufzeichnung
Drücken Sie [REC], um die Aufnahmefunktion zu aktivieren. „REC“ wird auf
dem Display angezeigt. In diesem Modus werden alle gespielten Noten
aufgezeichnet. Wenn der Speicher voll ist, blinkt „REC“ auf dem Display und
die Aufnahme wird automatisch gestoppt.
◆Drücken Sie [PLAY], um die aufgenommenen Noten wiederzugeben, und
„PLAY“ wird auf dem Display angezeigt. Nach Abschluss der Wiedergabe
wechselt es in den Aufnahmemodus und „REC“ wird auf dem Display
angezeigt. Sie können eine neue Note aufnehmen oder [PLAY] drücken, um die
aufgenommene Note wiederzugeben.
◆Drücken Sie [Start/Stop] oder erneut [REC], um die Aufnahmefunktion zu
deaktivieren, und alle aufgenommenen Rhythmen werden entfernt.
● Rhythmusprogrammierung
Drücken Sie [PROG], um die Rhythmusprogrammierungsfunktion zu aktivieren.
„PRG“ wird auf dem Display angezeigt und die Tastaturpercussion wird
aktiviert. In diesem Modus können Sie benutzerdefinierte Rhythmen erstellen,
indem Sie die entsprechende Percussion-Taste spielen.
◆Es können maximal 32 Percussions aufgezeichnet werden. Danach blinkt
„PRG“ auf dem Display und die Programmierung wird automatisch gestoppt.
◆Drücken Sie [PLAY], um den Programmierrhythmus abzuspielen.
◆Drücken Sie [START / STOP] oder erneut [PROG], um die
Programmierfunktion zu deaktivieren, und alle aufgenommenen Rhythmen
werden entfernt.
Einzelakkord-Fingersatz (C-Dur)
(Der C-Dur-Fingerakkord-Fingersatz ist wie in der folgenden Abbildung
gezeigt, und der Rest kann analog erhalten werden.)
Drücken Sie unter der Bedingung, dass der Rhythmus aktiviert ist, [Single
Chord]. Nachdem die „SIN“ auf dem Bildschirm angezeigt wird, können Sie
einen einzelnen Akkord auf den Tasten in der Akkordzone der Tastatur spielen.
Drücken Sie erneut [Single], „SIN“ verschwindet vom Bildschirm und die
Einzelakkord-Funktion wird deaktiviert.
● Multi-Finger-Akkorde
Drücken Sie in dem Zustand, in dem der Rhythmus aktiviert ist, [Fingered].
Nachdem das „FIN“ auf dem Bildschirm angezeigt wird, können Sie einen
Fingerakkord auf den Tasten in der Akkordzone der Tastatur spielen.
Drücken Sie erneut [Fingered Chord], „FIN“ verschwindet vom Bildschirm und
die Fingered Chord-Funktion wird deaktiviert.
VI. Effektkontrolle
● Sustain-Funktion
Drücken Sie [SUSTAIN], „SUS“ wird auf dem Display angezeigt und der
Sustain-Effekt wird aktiviert. Drücken Sie diese Taste erneut, „SUS“
verschwindet vom Bildschirm und der Sustain-Effekt wird deaktiviert.
24 25

Montageanleitung des Tastaturständers
ACHTUNG: MONTAGE FÜR ERWACHSENE ERFORDERLICH
H-TYP-STÄNDER
Finden Sie die Teile (D) und (E) heraus und richten
Sie die Löcher an der Basis des Teils (D) an den
Löchern am Teil (E) aus. Verwenden Sie die Mutter
(I) und die Schraube (H), um die Teo-Teile zu
verbinden. Verwenden Sie die richtigen Werkzeuge,
um eine feste Befestigung zu gewährleisten.
Wiederholen Sie diesen Vorgang für die andere Seite.
Befestigen Sie das Teil (B) mit der
entsprechenden Schraube (F) an (D)
und (C). Wiederholen Sie diesen
Vorgang für die andere Seite.
Stellen Sie die entsprechende Höhe
der Tastaturhalterung ein und
ziehen Sie die Schraube (F) fest.
Befestigen Sie zwei Teile (B) mit vier Schrauben
(F) am Teil (A), um die obere Teilbaugruppe zu
erstellen. Befestigen Sie die Schrauben (G) zur
Befestigung der Tastatur am Ständer.
VIII. Dreistufiges intelligente Ausbildung
● Ausbildung I: ein Schlüssel
Drücken Sie [One Key], um die Ein-Tasten-Trainingsfunktion zu aktivieren.
„LEARN“, „SONG“ und die Song-Nummer werden auf dem Bildschirm
angezeigt. Drücken Sie dann die Taste „+“ / „-“, um den zu lernenden Song
auszuwählen. Ein Schlüsseltraining zielt auf Dauerunterricht ab, und es gibt
keine Anforderungen an Tonhöhe oder Kreativität. Dieser Modus lässt Fehler
beim Spielen der Tasten zu, aber die Tastatur spielt immer noch die richtigen
Noten und der Bildschirm zeigt die richtigen Noten an.
Wenn ein Lied fertig ist, wiederholen Sie das aktuell zu lernende Lied.
Drücken Sie [Start/Stop] oder drücken Sie die [One Key] -Taste, um die
Trainingsfunktion zu deaktivieren.
● Ausbildung II: Follow
Drücken Sie [Follow], um die Follow-Funktion zu aktivieren. "LEARN",
"SONG" und die Song-Nummer werden auf dem Bildschirm angezeigt. Drücken
Sie dann die Taste "+" / "-", um den zu lernenden Song auszuwählen.
Mit dem [Follow] -Training können Sie lernen, indem Sie den korrekt gespielten
Noten folgen. Sie können auch lernen, indem Sie den auf dem Bildschirm
angezeigten Noten folgen. Sie warten darauf, dass Sie die richtige Note spielen,
bevor Sie zur nächsten übergehen.
Noten: In diesem Zustand spielt die Tastatur nur die richtigen Noten und gibt
keine Antwort auf die falschen Noten.
Drücken Sie [Start/Stop] oder [Follow], um die Trainingsfunktion zu
deaktivieren.
● Ausbildung III: Ensemble
Drücken Sie [Ensemble], um die Ensemble-Funktion zu aktivieren. „LEARN“,
„SONG“ und die Song-Nummer werden auf dem Bildschirm angezeigt. Drücken
Sie dann die Taste „+“ / „-“, um den zu lernenden Song auszuwählen.
Das Ensemble-Training zielt darauf ab, die Dauer und die Noten des Songs
richtig und umfassend zu lernen. Die Keynote wird für das Ensemble
abgeschirmt, und Sie müssen die richtige Note entsprechend der richtigen Dauer
des Songs spielen. Wenn Sie nicht innerhalb von 3 Sekunden spielen, spielt die
Tastatur automatisch die richtige Note.
Wenn ein Lied fertig ist, wiederholen Sie das aktuell zu lernende Lied.
Drücken Sie die [Start/Stop] -Taste oder [Ensemble], um die Trainingsfunktion
zu deaktivieren.
26 27

Veuillez lire attentivement toutes les instructions et les conserver pour la référence ultérieure.
Avertissement
Attention : Le produit ne convient pas aux enfants de moins de 3 ans.
Danger : Gardez toutes les petites pièces et les matériaux d’emballage de ce produit hors de
la portée des bébés et des enfants pour éviter un risque d’étouffement.
Avertissements Généraux:
Le produit doit être installé et utilisé sous la surveillance d’un adulte.
Lisez attentivement chaque étape et suivez l’ordre correct.
Retirez tous les emballages, séparez et comptez toutes les pièces et le matériel.
Veuillez vous assurer que toutes les pièces sont correctement installées, une installation
incorrecte peut entraîner un danger.
Nous recommandons que, dans la mesure du possible, tous les articles soient assemblés à
proximité de la zone dans laquelle ils seront utilisés, afin d’éviter de déplacer inutilement le
produit une fois assemblé.
Assurez-vous que la surface est solide pendant l’assemblage et placez toujours le produit
sur une surface plane et stable.
AVERTISSEMENT:
RISQUE D’ÉTOUFFEMENT
–Les petites pièces.Ne convient pas
aux enfants de moins de 3 ans.
Précautions
Lisez attentivement avant de poursuivre.
● N'utilisez que l’adaptateur d’alimentation électrique désigné. Changez-le
chaque fois qu'il présente une usure ou qu’il se dérègle.
● Ne démontez pas l’instrument et ne faites pas de changement à l'intérieur de
celui-ci. En cas d'anomalie de fonctionnement, arrêtez immédiatement
l'utilisation et faites-le réparer par le personnel d'entretien qualifié.
●Assurez-vous que les deux sont hors tension lorsque vous connectez
l'instrument à d'autres amplificateurs.
● Ne laissez pas le volume fonctionner au maximum ou dans une phase
inconfortable pendant longtemps.
●Tenez l’instrument éloigné des sources de chaleur, ce qui pourrait
endommager les composants.
● Empêchez tout liquide ou toute autre particule de pénétrer dans l'instrument,
ce qui pourrait corroder le corps ou provoquer un court-circuit.
● Débranchez l'instrument avant de le nettoyer et évitez d'utiliser des mains
mouillées pour le brancher ou le débrancher.
● Nettoyez l'instrument avec un morceau de tissu sec et doux sans peinture,
alcool ou autres solvants chimiques.
● Éteignez et débranchez l'instrument après l'avoir utilisé ou pendant une longue
période sans l'avoir utilisé.
●Attention ! Ne l’approchez pas de l’oreille ! Une mauvaise utilisation peut
entraîner des dommages auditifs.
● Les bornes d'alimentation ne doivent pas être court-circuitées.
● L'emballage doit être conservé car il contient des informations importantes.
● Pour réduire le risque d'incendie ou de choc électrique, n'exposez pas cet
appareil à la pluie ou à l'humidité. L'appareil ne doit pas être exposé à des
gouttes ou à des éclaboussures et aucun objet rempli de liquide, tel qu'un vase,
ne doit être posé sur l'appareil.
●Température maximale de fonctionnement : 40°C
● L'adaptateur à enfichage direct est utilisé comme dispositif de déconnexion, le
dispositif de déconnexion doit rester facilement utilisable.
30 31

● N'installez pas cet équipement dans un espace confiné tel qu'une bibliothèque
ou une unité similaire, et veillez à ce qu'il soit bien ventilé. La ventilation ne doit
pas être entravée en couvrant les ouvertures de ventilation avec des articles tels
que du papier journal, des nappes, des rideaux, etc.
● Élimination correcte de ce produit. Ce symbole indique que ce produit
ne doit pas être éliminé avec les autres déchets ménagers. Afin de
prévenir tout dommage éventuel à l'environnement ou à la santé
humaine dû à une élimination incontrôlée des déchets, recyclez-le de manière
responsable afin de promouvoir la réutilisation durable des ressources
matérielles. Pour retourner votre appareil usagé, veuillez utiliser les systèmes de
retour et de collecte. Ils peuvent prendre ce produit pour un recyclage sans
danger pour l'environnement.
Avertissement : Les batteries ne doivent pas être exposées à une chaleur
excessive telle que le soleil, le feu ou autre.
Attention : Danger d'explosion si la batterie est mal remplacée. Remplacez-la
uniquement par une pile de type identique ou équivalent.
Avertissement : Une pression sonore excessive provenant des écouteurs et des
casques peut entraîner une perte d'audition.
Contenu du paquet
* Piano à clavier électrique de 61 touches avec écran LCD x 1
* Support de clavier x 1
* Tabouret x 1
* Adaptateur électrique x 1
* Casquex 1
* Microphone x 1
* Support musicalx 1
* Manuel d'installation x 1
I. Contrôle des panneaux et ports externes
● Panneau de contrôle supérieur
● Ports externes sur le panneau arrière
1). Loudspeaker
2). Power
3). Fingered chord
4). Single chord
5). Record
6). Start/Stop
7). Program
8). Sync
9). Play
10). Fill-in
11). Keyboard Percussion
12). Sustain
13). Vibrato
14). LCD screen
15). One-Key
16). Followv
17). Ensemble
18). Timbre
19). Rhythm
20). Demo Song
21). Numbers
22). Master Volume
23). Accom volume
24). Tempo
25). Percussions
26). Chord Zone
27). AUDIO INPUT
28). MIC
29). PHONES/OUTPUT
30). DC 9V
32 33

◆Le clavier est équipé d'une fonction d'entrée stéréo. Les signaux sonores d'un
téléphone portable, d'un lecteur MP3, d'un ordinateur et d'autres appareils audio
peuvent être entrés dans le système de clavier pour être joués. Il faut d'abord
éteindre le clavier, puis connecter une extrémité du câble audio au port de sortie
d'un appareil audio, et l'autre extrémité au port d’ENTRÉE AUDIO sur le
panneau arrière du clavier, enfin, mettre le clavier sous tension.
III. Méthode de représentation de base
Lorsque vous appuyez sur [Power ON/OFF], l’écran LCD s’allume et affiche le
timbre, le tempo et d’autres informations. Vous pouvez ensuite utiliser le clavier
selon vos besoins.
● Ajustement du volume principal
Appuyez sur [Master Vol +] ou [Master Vol -] pour augmenter ou diminuer le
volume principal. Appuyez simultanément sur [Master Vol +] et [Master Vol -]
pour revenir à la valeur par défaut de « 10 ». En contrôlant le volume principal,
le volume d’accompagnement peut être contrôlé.
● Ajustement du volume d'accompagnement
Appuyez sur [Accom Vol +] ou [Accom Vol -] pour augmenter ou diminuer le
volume de l'accompagnement. Appuyez simultanément sur [Accom Vol +] et
[Accom Vol -] pour rétablir la valeur par défaut de « 10 ».
● Sélection de timbre
Le clavier offre 255 timbres de « 000 » à « 254 » pour votre sélection. Lorsque
le clavier est allumé, la fonction de sélection des timbres est automatiquement
activée et « TONE » s’affiche à l'écran. En l'absence de contenu à l'écran,
appuyez sur [Timbre] pour activer la fonction de sélection de timbre.
Le timbre par défaut est « 000 », et il peut être ajusté en appuyant sur les touches
numériques correspondantes ou en appuyant sur la touche « + » / «- ».
● Jouer des percussions
Ce clavier offre 8 types de percussions de panneau. Appuyez sur « Percussion »
pour jouer la percussion correspondante. Des instruments de percussion peuvent
être ajoutés pour améliorer l’atmosphère selon les besoins.
Ce clavier propose 61 types de percussions de clavier. Appuyez sur [Percussion]
pour transformer le clavier en clavier de percussion, et chaque touche correspond
à un instrument de percussion.
Appuyez à nouveau sur ce bouton pour désactiver la fonction de percussion du
clavier.
II. Préparation
● Préparation
6 piles AA peuvent être utilisées comme source d'alimentation pour ce clavier.
Ouvrez le couvercle de piles situé au bas du
clavier, vérifiez si les polarités de la pile sont
conformes aux indications, mettez les piles une
par une, puis recouvrez le couvercle de piles.
# Une faible tension due à une utilisation
prolongée entraînera un faible volume ou une
distorsion du timbre. Dans ce cas, remplacez
immédiatement la pile afin de ne pas nuire à l'effet
de performance. Si le clavier reste inutilisé
pendant une longue période, veuillez retirer les
piles, afin de protéger les composants du clavier
contre les dommages dus à l'humidité des piles.
● Adaptateur secteur AC/DC
Un adaptateur électrique AC/DC spécifique doit être utilisé. Connectez
l'extrémité de sortie de l'adaptateur au port d'alimentation situé sur le panneau
arrière du clavier, puis l'autre extrémité à la prise d'alimentation.
# (Note : la tension d’entrée de l'adaptateur doit être compatible avec la tension
d'alimentation)
● Sortie audio / Casque d’écoute externe
◆Sortie audio : premièrement, éteignez le clavier et les appareils audio externes,
deuxièmement, connectez une extrémité du câble audio au port
PHONES/OUTPUT sur le panneau arrière du clavier, puis connectez l'autre
extrémité au port d'entrée audio des appareils audio.
◆Connexion d'un casque d'écoute : Lorsque vous connectez un casque au port
PHONES/OUTPUT sur le panneau arrière du clavier, le haut-parleur est
automatiquement désactivé. De cette façon, vous pouvez vous donner la
représentation sans déranger les autres.
◆Attention ! Lorsque vous utilisez un casque, maintenez un volume sonore
approprié pour protéger votre audition.
● Entrée micro et entrée audio
◆Entrée micro : connectez un micro au port MIC pour chanter tout en jouant du
clavier.
34 35

● Jouer des chansons de démonstration
Ce clavier a stocké 24 chansons de démonstration de « 000 » à « 023 » pour
votre sélection. Appuyez sur [Demo Song], « SONG » s’affichera à l'écran et les
chansons de démonstration seront jouées dans l'ordre. Pendant la lecture,
appuyez sur [Demo Song] pour jouer la chanson de démonstration suivante, et
appuyez sur [Start/Stop] pour arrêter la lecture.
Pendant la lecture, vous pouvez appuyer sur les touches numériques ou sur les
touches « + » / « - » pour sélectionner une autre chanson de démonstration, et la
chanson de démonstration sélectionnée sera jouée de manière répétée.
IV. Rythme automatique
● Sélection du rythme
Ce clavier propose 255 rythmes, de « 000 » à « 254 », pour votre sélection, et le
rythme est par défaut « 000 ». Appuyez sur [Rhythm], « RHYM » s’affiche à
l'écran. Appuyez ensuite sur les touches numériques ou sur les touches « + » / « -
» pour sélectionner d’autres rythmes.
● Contrôle du rythme
1. Activer le rythme
◆Appuyez sur [start/stop] pour lancer le rythme d’accompagnement.
◆Si vous appuyez sur [Sync] lorsque l’option est activée, « SYN » s’affiche à
l'écran. Ensuite, jouez n'importe quelle touche dans la zone des touches d'accord
(de la 1ère à la 19ème touche, en partant de la gauche), le rythme
d'accompagnement sera activé.
2. Interlude
Après avoir activé le rythme d'accompagnement, appuyez sur [Fill-in] pour faire
jouer un rythme temporaire pendant le rythme d'accompagnement.
3. Arrêt du rythme
◆Pendant le rythme d'accompagnement, appuyez sur [Start/Stop] pour arrêter le
rythme d'accompagnement.
● Réglage du tempo
Le tempo est réglé par défaut sur 120 tempo/min, appuyez sur [Tempo +] ou
[Tempo -] pour augmenter ou diminuer la vitesse du tempo. Appuyez sur les
deux boutons simultanément pour revenir à la valeur par défaut de 120
tempo/min.
V. Accord de basse automatique
● Single chord (Accord avec un doigt)
Accord avec un doigt
Doigté d’accord avec un doigt
36 37

Doigté d’accord avec les doigts (Do majeur)
(Le doigté de l’accord avec les doigts de la tonalité de Do majeur est celui de
la figure suivante, et le reste peut être obtenu par analogie)
Lorsque le rythme est activé, appuyez sur [Single Chord]. Une fois que le « SIN
» est affiché à l'écran, vous pouvez jouer un accord avec un doigt sur les touches
de la zone d'accords du clavier.
Appuyez à nouveau sur [Single], « SIN » disparaîtra de l'écran et la fonction d’ «
Accord avec un doigt » sera désactivée.
● Accord avec des doigts
Lorsque le rythme est activé, appuyez sur [Fingered]. Une fois que le « FIN » est
affiché à l’écran, vous pouvez jouer un « Accord avec des doigts » sur les
touches de la zone d’accord du clavier.
Appuyez à nouveau sur [Fingered Chord], « FIN » disparaîtra de l'écran et la
fonction d'accord avec les doigts sera désactivée.
VI. Contrôle des effets
● Fonction de Sustain
Appuyez sur [Sustain], « SUS » s’affiche à l'écran et l'effet sustain est activé.
Appuyez à nouveau sur ce bouton, « SUS » disparaîtra de l'écran, et l'effet de
sustain sera désactivé.
● Fonction de Vibrato
Appuyez sur le bouton [Vibrato], « VIB » apparaîtra à l’écran et l'effet de
Vibrato sera activé. Appuyez à nouveau sur ce bouton, « VIB » disparaîtra de
l'écran, et l'effet Vibrato sera désactivé.
VII. Enregistrement et programmation du rythme
● Enregistrement
Appuyez sur [Enregistrer] pour activer la fonction d’enregistrement, « REC »
s’affiche à l’écran. Dans ce mode, toutes les notes jouées seront enregistrées.
Lorsque la mémoire est pleine, « REC » clignote à l'écran et l'enregistrement
s'arrête automatiquement.
◆ Appuyez sur [Play] pour lire les notes enregistrées, et « PLAY » s'affiche à
l'écran. Une fois la lecture terminée, « REC » s'affiche à l'écran. Vous pouvez
enregistrer un nouveau rythme, ou vous pouvez appuyer sur [Play] pour lire le
rythme enregistré.
◆ Appuyez sur [Start/Stop] ou appuyez à nouveau sur [Record] pour désactiver
la fonction d’enregistrement, et tous les rythmes enregistrés seront supprimés.
● Programmation des rythmes
Appuyez sur [Program] pour activer la fonction de programmation du rythme, «
PRG » s’affichera à l’écran et les percussions du clavier seront activées. Dans ce
mode, vous pouvez créer des rythmes personnalisés en jouant la touche de
percussion correspondante.
◆ 32 percussions peuvent être enregistrées au maximum, puis « PRG » clignote à
l’écran, et la programmation s’arrêtera automatiquement.
◆ Appuyez sur [Play] pour lire le rythme de la programmation.
◆ Appuyez sur [Start/Stop] ou appuyez à nouveau sur [Program] pour désactiver
la fonction de programmation, et tous les rythmes enregistrés seront supprimés.
38 39

Instructions d’assemblage du support de clavier
ATTENTION: ASSEMBLAGE ADULTE REQUIS SUPPORT DE TYPE H
Trouvez les pièces (D) et (E), alignez les trous de la
base de la pièce (D) avec les trous de la pièce
(E) .Utilisez l’écrou (I) et le boulon (H) pour relier
les deux pièces. Utilisez des outils appropriés pour
assurer une fixation ferme. Répétez ce processus
pour l’autre côté.
Fixez les pièces (B) à (D) et (C) à
l’aide de la vis appropriée (F).
Répétez ce processus pour l’autre
côté.
Serrez les vis (F) pour régler la
hauteur appropriée du support de
clavier.
Fixez deux pièces (B) à la pièce (A) à l’aide de
quatre vis (F) pour créer l’assemblage de la partie
supérieure. Serrez les vis (G) pour fixer le clavier
sur le support.
VIII. Formation intelligente en trois étapes
● Formation I : une touche
Appuyez sur [One Key] pour activer la fonction d’apprentissage par touche
unique, « LEARN » (APPRENDRE), « SONG » (CHANSON) et le numéro de
la chanson s’affichera à l'écran, puis appuyez sur le bouton « + » / « - » pour
sélectionner la chanson à apprendre. La formation par touche unique vise à
apprendre sur la durée, et il n’y a aucune exigence en matière de tonalité ou de
créativité. Ce mode permet de faire des erreurs en jouant les touches, mais le
clavier joue toujours les bonnes notes, et l’écran affiche les bonnes notes.
Une fois qu’une chanson est terminée, répétez la chanson en cours à apprendre.
Appuyez sur [Start/Stop] ou sur le bouton [One Key] pour désactiver la fonction
d’apprentissage.
● Formation II : suivre
Appuyez sur [Follow] pour activer la fonction de suivi, « LEARN »
(APPRENDRE), « SONG » (CHANSON) et le numéro de la chanson s’affichera
à l'écran, puis appuyez sur le bouton « + » / « - » pour sélectionner la chanson à
apprendre. Avec la fonction [Follow], vous pouvez apprendre en suivant les
notes de jeu correctes. Vous pouvez également apprendre en suivant les notes
affichées à l'écran, il attendra que vous jouiez la bonne note avant de passer à la
suivante.
# Notes : Dans cet état, le clavier ne joue que les bonnes notes et ne donne
aucune réponse aux mauvaises notes.
Appuyez sur [Start/Stop] ou sur [Follow] pour désactiver la fonction
d’apprentissage.
● Formation III : Ensemble
Appuyez sur [Ensemble] pour activer la fonction d’ensemble, « LEARN »
(APPRENDRE), « SONG » (CHANSON) et le numéro de la chanson
s’afficheront à l'écran, puis appuyez sur le bouton « + » / « - » pour sélectionner
la chanson à apprendre.
La formation d’ensemble vise l’apprentissage correct et complet de la durée et
des notes de la chanson. La tonalité sera protégée pour l’ensemble et vous devrez
jouer la note correcte en fonction de la durée correcte de la chanson. Si vous ne
jouez pas dans les 3 secondes, le clavier jouera automatiquement la note
correcte.
Une fois qu'une chanson est terminée, répétez la chanson en cours pour
l’apprendre.
Appuyez sur le bouton [Start/Stop] ou sur [Ensemble] pour désactiver la
fonction d’apprentissage.
40 41

Precauciones
Léalo detenidamente antes de continuar.
●Aplique únicamente el adaptador de fuente de alimentación designado.
Cámbielo siempre que muestre algún desgaste y rotura, o vaya mal.
• No desmonte el instrumento ni realice cambios en su interior. En caso de
cualquier funcionamiento anómalo, deje de usarlo inmediatamente y haga que el
personal de mantenimiento calificado lo repare.
•Asegúrese de que ambos estén apagados cuando conecte el instrumento con
otros amplificadores.
• No deje el volumen funcionando al máximo o en una etapa incómoda durante
mucho tiempo.
• Mantenga el instrumento alejado de las fuentes de calor, que pueden dañar los
componentes.
• Evite que cualquier líquido u otra partícula ingrese al instrumento, lo que
podría corroer el cuerpo o causar un cortocircuito.
• Desenchufe el instrumento antes de limpiarlo y evite usar las manos mojadas
para enchufarlo o desenchufarlo.
• Limpie el instrumento con un paño seco y suave sin pintura, alcohol u otros
disolventes químicos.
•Apague y desenchufe el instrumento después de usarlo o durante un tiempo
prolongado sin usarlo.
• ¡Advertencia! ¡No lo acerque a las orejas! El uso inadecuado puede causar
daños auditivos.
• Los terminales de la fuente de alimentación no deben cortocircuitarse.
• El embalaje debe conservarse ya que contiene información importante.
• Para reducir el riesgo de incendio o descarga eléctrica, no exponga este aparato
a la lluvia ni a la humedad. El aparato no debe exponerse a goteos o salpicaduras
y no se deben colocar objetos con líquidos, como jarrones, sobre el aparato.
• La temperatura máxima de funcionamiento: 40 ℃
• El adaptador de enchufe directo se utiliza como dispositivo de desconexión, el
dispositivo de desconexión debe permanecer fácilmente operativo.
• No instale este equipo en un espacio confinado como una estantería o unidad
similar, y mantenga las condiciones de buena ventilación. La ventilación no debe
impedirse cubriendo las aberturas de ventilación con elementos como periódicos,
manteles, cortinas, etc.
Lea todas las instrucciones detenidamente y guárdelas para futuras referencias.
¡Advertencia!
Atención: el producto no es adecuado para niños menores de 3 años
Peligro: Mantenga todas las piezas pequeñas y materiales de embalaje de este producto fuera del
alcance de bebés y niños, de lo contrario, pueden causar un peligro de asfixia.
Advertencias Generales:
El producto debe instalarse y usarse bajo la supervisión de un adulto.
Lea detenidamente cada paso y siga el orden correcto.
Quite todo el embalaje, separe y cuente todas las piezas y los accesorios.
Asegúrese de que todas las piezas estén instaladas correctamente, una instalación incorrecta
puede provocar un peligro.
Recomendamos que, cuando sea posible, todos los artículos se ensamblen cerca del área en
la que se colocarán en uso, para evitar mover el producto innecesariamente una vez ensamblado.
Asegúrese de que esté en una superficie segura durante la construcción, y coloque el
producto siempre sobre una superficie plana y estable.
ADVERTENCIA:
RIESGO DE ASFIXIA
- Piezas pequeñas.
No es adecuado para los niños
menores de 3 años.
44 45

I. Control del Panel y Puertos Externos
●Panel de control superior
●Puertos externos en el panel trasero
1). Loudspeaker
2). Power
3). Fingered chord
4). Single chord
5). Record
6). Start/Stop
7). Program
8). Sync
9). Play
10). Fill-in
11). Keyboard Percussion
12). Sustain
13). Vibrato
14). LCD screen
15). One-Key
16). Follow
17). Ensemble
18). Timbre
19). Rhythm
20). Demo Song
21). Numbers
22). Master Volume
23). Accom volume
24). Tempo
25). Percussions
26). Chord Zone
27). AUDIO INPUT
28). MIC
29). PHONES/OUTPUT
30). DC 9V
● Eliminación correcta de este producto. Esta marca indica que este
producto no debe desecharse con otros residuos domésticos. Para evitar
posibles daños al medio ambiente o a la salud humana debido a la
eliminación incontrolada de residuos, recíclelos de manera responsable para
promover la reutilización sostenible de los recursos materiales. Para devolver su
dispositivo usado, utilice los sistemas de devolución y recogida. Pueden tomar
este producto para un reciclaje seguro para el medio ambiente.
Advertencia: Las baterías no deben exponerse a un calor excesivo, como la luz
solar, el fuego o los similares.
Precaución: Peligro de explosión si la batería se reemplaza incorrectamente.
Reemplace solo con el mismo tipo o equivalente.
Advertencia: La presión de sonido excesiva desde los auriculares y los cascos
puede causar la pérdida auditiva.
Contenidos del Paquete
* Piano de teclado eléctrico de 61 teclas con pantalla LCD x1
* Soporte para teclado x 1
* Taburete x 1
* Adaptador de corriente x 1
* Auriculares x1
* Micrófono x 1
* Soporte de música x 1
* Manual de instalación x 1
46 47
Table of contents
Languages:
Other Costway Musical Instrument manuals

Costway
Costway TM10027 User manual

Costway
Costway Sonart MU10082US User manual

Costway
Costway MU70009DE User manual

Costway
Costway MU10090 User manual

Costway
Costway MU70002DE User manual

Costway
Costway TM10021 User manual

Costway
Costway MU70009 User manual

Costway
Costway SONART MU70016DE User manual

Costway
Costway MU70017 User manual

Costway
Costway MU10054 User manual