Croplands AgriPak LA300 User manual

OPERATORS MANUAL
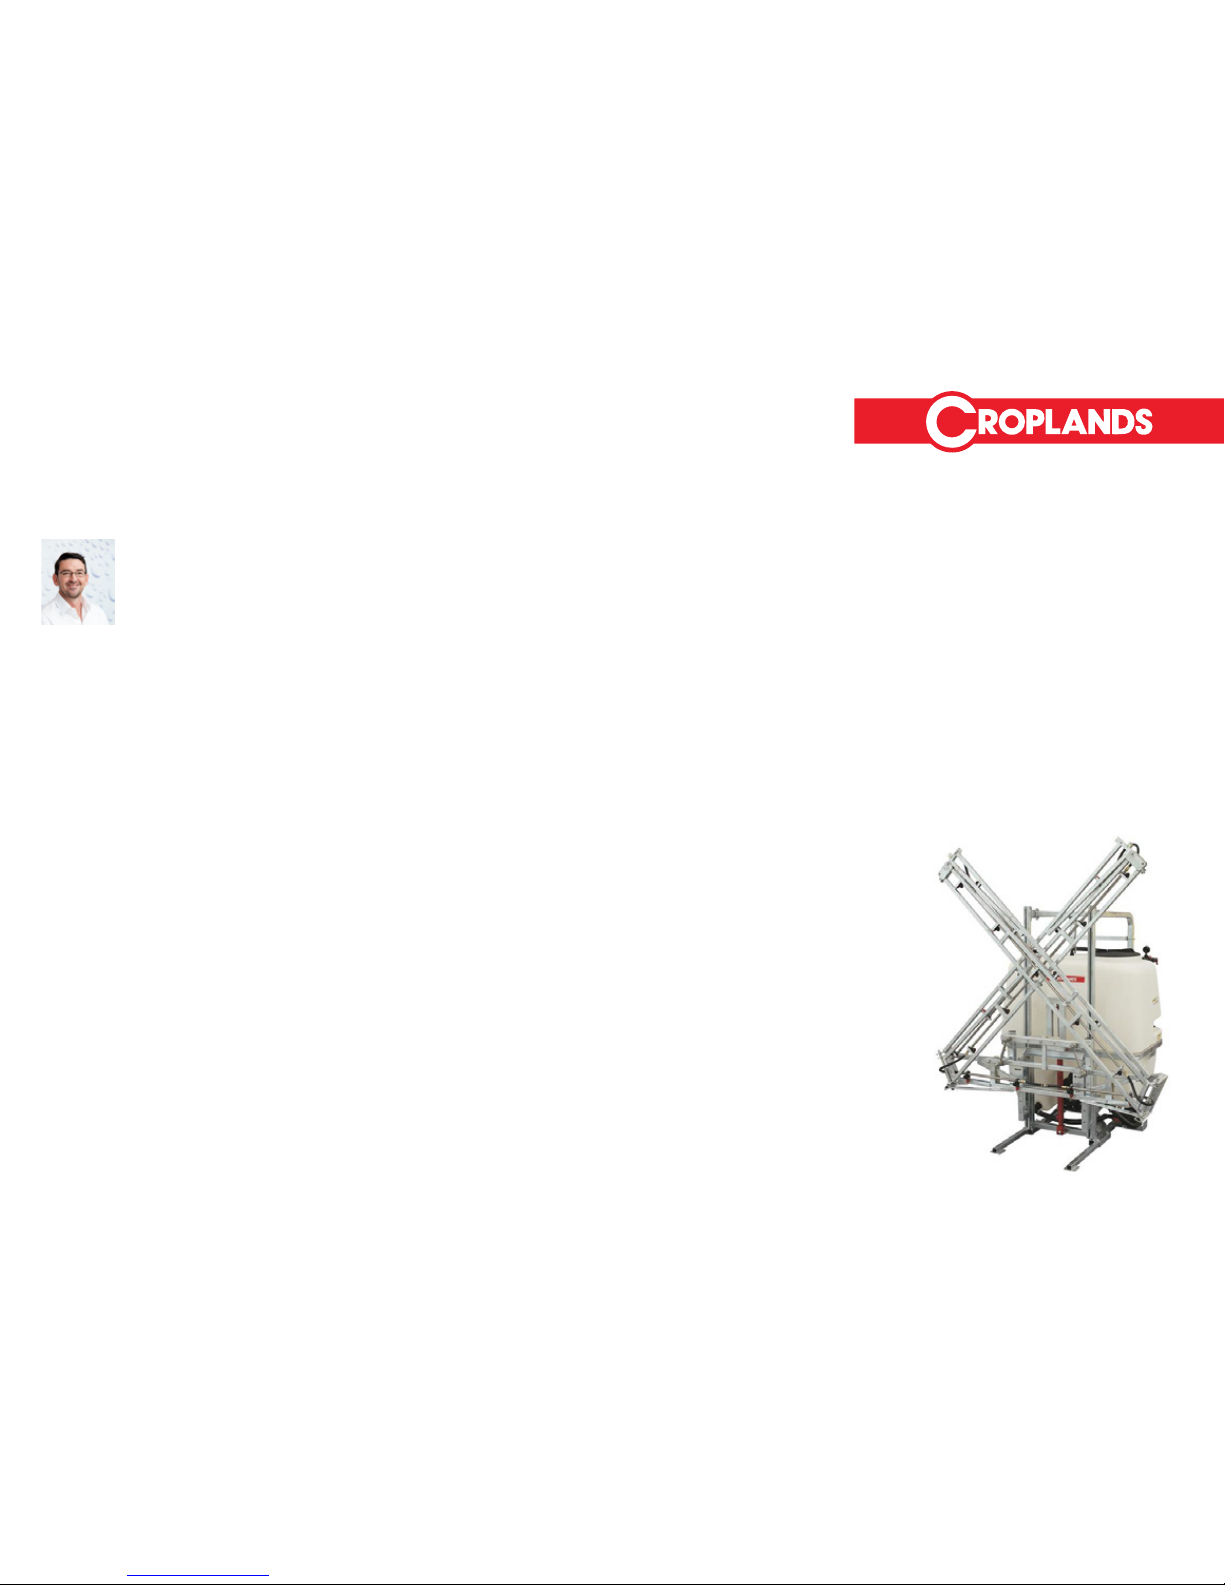
Croplands AgriPak
Linkage Sprayers
MODELS:
300 Litre
600 Litre
800 Litre
1000 Litre
09/07/2016
LP-OMLINK-B
2 3
18/09/2016
LP-OMLINK-B
WELCOME
Congratulations on the purchase
of your new Croplands sprayer.
Croplands are in the business
of building and selling spraying
equipment and have been since
1972 (over 40 years). We supply
sprayers to farmers, contractors, growers and others
involved in growing crops & controlling pests and
diseases.
Use the contact details listed on the back page to
contact our staff during business hours. After hours,
e-mail us and expect a reply the following morning.
We trust you will get years of good use from your
Croplands AgriPak Linkage Sprayer.
Yours sincerely,
Sean Mulvaney
General Manager.
CONTENTS
1. Warranty policy
2. Foreword
3. Safety information
4. Sprayer Specifications
5. Operation
a. Hook up and PTO information
b. Start up
c. Controller information
d. Boom spraying
e. Filtration system, spray gun operation
and hose reels
6. Spraying information
a. When & how to spray safely
b. Application rates, ground speed and boom
height settings
7. Daily start up and useful information
8. Lubrication & maintenance
9. Parts information
10. Contact details

4 5
18/09/2016
LP-OMLINK-B
SECTION 2: FOREWORD
Croplands Equipment is a subsidiary of Nufarm
Australia Ltd and operates as Croplands Equipment
Pty Ltd in Australia and Croplands Equipment Ltd in
New Zealand. Croplands are a leading importer,
manufacturer and supplier of spraying equipment.
This operator’s manual covers the Croplands’ range
of three-point linkage AgriPak sprayers with tank
capacities of 300 litres through to 1000 litres.
Manufactured to a high standard for use in
Agriculture and Horticulture, every effort has been
made to include all information needed for the safe
and effective operation of your AgriPak sprayer.
As the owner of a Croplands AgriPak sprayer,
please read this manual thoroughly to fully
familiarise yourself with all aspects of the safe and
correct operation of your sprayer. Maintenance
information and useful tips have been included. We
trust you will use these tips to get the best from your
sprayer.
Crolands has taken steps to ensure this operator’s manual is as current and as accurate as possible. Due to the
ever changing markets of cropping and farming, Croplands is constantly striving to be at the forefront of innovation
and technology. While the information in this manual is considered accurate at the time of writing, Croplands
reserves the right to change this information without notice. Croplands will not accept liability for any inaccuracy in
this publication, or changes forthwith.
Terminology
These terms/symbols used throughout this
manual:
About This Manual
This manual provides setting up information, safety
tips and operating & maintenance instructions for the
Croplands AgriPak Linkage Sprayer range.
Some model types have different options available.
Some features explained in this manual may not
be installed on your sprayer. Please pass on this
manual with the sprayer at the time of resale for
usage by the new owner.
Before Operating Your Sprayer
1. Before attempting to use your sprayer, make sure
you read the Operator’s Manual and properly
understand:
»All Safety Issues
»Operation, set up & pre-delivery instructions
»Calibration of the sprayer
»Sprayer Maintenance
2. Read and follow instructions on chemical
manufacturers’ labels.
3. Always wear applicable protective clothing.
NOTE
To convey useful operating information.
NOTE
For full conditions of warranty and
warranty policy, please see the
Warranty & Pre-Delivery booklet
provided with this sprayer.
CAUTION
To highlight potential injury or
machinery damage.
WARNING
To stress potential dangers and the
importance of personal safety.
DANGER
Probability of death or serious
injury if accident occurs.
WARNING
Read and understand this
operators’ manual before operating
the AgriPak Sprayer.
SECTION 1: WARRANTY POLICY
Refer to your Croplands Warranty and
Pre-delivery Booklet supplied with your
AgriPak sprayer. Always make contact with
your Croplands Dealer first and foremost for
warranty matters.

6 7
18/09/2016
LP-OMLINK-B
SECTION 3: SAFETY
INFORMATION
Rules for Safe AgriPak Sprayer Operation
»Always read your sprayer operator’s manual
thoroughly before operating. Accidents occur
every year because of careless use of farm
chemicals and farm machinery. You can avoid
these hazards by observing these safety
instructions.
»Dispose of all chemical containers as per
instructions on label. Failure to do so could result
in contaminating the environment with chemicals.
»Inspect hose and hose connections daily. Always
wear rubber gloves when tightening connections.
Damaged, loose or worn hoses could result in
operator being exposed to toxic chemicals, which
could result in serious illness or faulty sprayer
operation.
»Always use the proper application rate. To
assure proper application rate calibrate
sprayer correctly. The wrong application rate
of a pesticide or herbicide concentration that
is too high may expose the operator and the
environment to danger.
»Be sure to disconnect all power connections (if
applicable) before attempting welding repairs.
»Always wear relatively tight and belted clothing
to avoid entanglement in moving parts. Failure to
do so could result in serious injury.
»When working on your sprayer, always stay out
from under the sprayer unless it is resting on the
ground or supported on solid blocks. Hydraulics
or jacks could fail letting the sprayer fall. This
could result in pinning or crushing of personnel.
ALWAYS have the booms folded and in the
parking position when working on the sprayer.
»Check the entire sprayer, prior to each use, for
any loose bolts or mechanical connections. These
precautions can prevent injury to personnel and
damage to equipment.
»Use only genuine Croplands parts for any
necessary replacement. All parts are important
to the equipment design. Homemade parts
may look the same but might be dangerous in
operation.
»Follow the chemical manufacturers precautions
before cleaning the sprayer. Exposure to
chemicals could result in serious illness or death.
»Always wear gloves and wash the sprayer before
doing any disassembly repair work. Chemical
residues on the machine parts could contaminate
operator or service personnel causing serious
illness.
»Always relieve system pressure before doing
any work on the machine. Failure to do so could
cause operator to be exposed to high pressure
spray of chemical resulting in serious injury or
machine damage.
»Always be sure all guards are properly installed
on machine before operating. Failure to do so
could result in entanglement in moving parts
resulting in serious injury to operator.
»Always keep PTO guards in place. Failure to do
this might result in entanglement. This is a leading
cause of serious accidents & death on farms.
»Do not ride on machine when in motion. This is
an unsafe practice and can lead to serious injury
should the rider fall from the sprayer or tractor.
»Always stand well clear of sprayer when
operating. Any particle or spray drift is dangerous
and may be hazardous to humans.
»Do not disconnect any hoses nozzles or filters
while sprayer is operating. Disconnecting
components while under pressure will result in
uncontrolled spray discharge, which may be
hazardous.
»Should any welding be required on the steel
parts of the sprayer, always clean the linkage
sprayer and disconnect the power before doing
any repairs. Cover rubber hoses, and all other
flammable parts. Keep a fire extinguisher near
the sprayer when welding. Have good ventilation
when grinding or welding painted or galvanised
parts. Wear dust mask when grinding. Toxic dust
or gas can be produced.
SAFETY DECALS
WARNING
PTO shafts in particular are
extremely dangerous, ensure the
PTO is disengaged prior to doing any
adjustment or work on your sprayer.
Never operate the PTO if any person is
near the sprayer.

8 9
18/09/2016
LP-OMLINK-B
SAFETY WITH CHEMICALS
The Hazard
All agricultural chemicals or pesticides, as they are
commonly called, are biologically active. When
handled incorrectly or carelessly, they can be
dangerous to all living organisms such as humans,
birds, fish, bees, domestic animals and plants.
Method of Pesticide Entry
»Oral - Direct by drinking, splashing into mouth,
eating and smoking with contaminated hands,
eating sprayed produce, cleaning nozzles with
mouth.
»Inhalation - Nose, mouth, but predominately
the lungs.
»Dermal - Absorption through the skin. Increased
when skin is broken or perspiring.
»What protective clothing and equipment is
needed?
»Know the correct first aid/safety in case of
poisoning.
»Seek medical advice if chemicals affect health.
Mixing the Product
»Reduce or eliminate operator contact by using
closed loading systems such as chemical mixing
units, wettable powder mixtures or wettable
dispersible granules.
»Use the right protective clothing when handling
the concentrate. The user is at greatest risk when
handling chemical in concentrate form.
»Open bags carefully. Cut to open, do not tear.
»Do not stir chemicals with hands or arms.
»Choose the mixing site carefully & the fate of the
probable residues.
»Do not mix more spray solution than is needed
and avoid needless disposal of unwanted
chemicals.
Rate of Absorption
»While pesticides are absorbed more completely
orally and by inhalation, greater exposure and
more poisonings occur through skin (dermal)
contact. Ensure protective clothing is worn at all
times during chemical handling.
Hazard and Chance of Poisoning
»The hazard and chance of poisoning is much
higher when handling pesticides in concentrate
form than in the dilute form.
Safe Handling - Know your Pesticides:
»STOP!! Read the label
»Is it the right product?
»What is its poisons schedule or toxicity?
»What safety precautions are required?
»What is its persistence and withholding period?
»What is its mode of action?
»Will it be a hazard to neighbouring crops and
people?
Plan your Spray Route
»Observe weather conditions, especially wind
direction & speed.
»Try to travel across wind and into untreated crop.
»Prevent double or over spraying.
»Prevent or minimise drift onto other crops, workers,
etc.
Disposal of Unwanted Pesticides and
Containers
»Calibrate correctly to ensure you do not have a
large quantity of unwanted spray left over.
»Rinse empty containers and pour residue into the
spray tank.
»Dispose of containers in the correct manner and
where provided, use pesticide drum disposal
schemes.
Decontamination
»Change out of protective clothing and shower as
soon as possible after spraying.
»Wash before eating, drinking or smoking.
»Provide clean water at filling site and on sprayer
in case of field contamination.
»Wash and clean respirators regularly. Replace
respirator cartridges at recommended intervals.
Keep Sprayers and Safety Equipment in
Good Working Condition
»Replace hoses and fittings when they leak.
»Clean sprayer regularly.
»Replace respirator filters regularly.
»Do not use worn, faulty or contaminated safety
equipment.
Storage
»Store pesticides in a locked, well-ventilated store
– check your local regulations to ensure your
store complies.
»Do not pour pesticides into other containers;
especially not drink containers.
Pesticide Free Tractor Cabs
»Ensure the cab filter is adequate for the pesticide
used.
»Be careful not to contaminate the cabin
environment.
»Cabin filters alone are not adequate when the
operator is required to leave the cab to refill the
sprayer. Safety equipment used outside the cab
should not be stored in the cab.
WARNING
Every product for sale will have a detailed label with application instructions, rate
of application, safety information and withholding periods. Always follow these
instructions carefully.

10 11
18/09/2016
LP-OMLINK-B
SAFETY WITH CHEMICALS
CONTINUED
Protective Safety Equipment
»The amount and type of protective clothing
and equipment is determined by the type of
chemicals, degree and duration of exposure,
weather conditions and application equipment
used. Read and follow the direction on the label.
Over protection can be uncomfortable and
unnecessary. A respirator left hanging around
your neck is useless.
Measuring
»Croplands’ calibrated, easy-pour 1, 3 and 5 litre
measuring jugs and the 25 litre chemical mixing
bucket are practical, easy to clean, U.V. resistant
and chemical resistant.
Clothing
»Cover as much of the body as possible,
especially the neck, chest and forearms. Use
washable fabric overalls, disposable overalls or
preferably waterproof clothing especially when
coming in direct contact with pesticides. Wear
the trouser legs outside the boots.
Gloves and Boots
»Never use leather or cloth materials because they
absorb pesticides and provide a constant source
of contamination. Gloves should be un-lined for
this reason. Croplands Nitrile Chemical Handling
Gloves are recommended.
Head & Face
»Hard hats, washable hats, goggles, spray helmets
and face shields are important when handling
concentrates. Purchase Goggles that feature
sealed, anti-fog lenses for practical, comfortable
eye protection. Croplands Kasco Spray Hood is
fully approved for use with agrichemicals.
Respirators
»Choose the correct type and have the correct
cartridge fitted. Replace cartridges regularly and
write the date on each cartridge. Ensure there is
an adequate fit to the face. Croplands’ respirators
are recommended for most spraying applications.
Operator Safety
»When handling pesticides, always use elbow-
length gloves, long clothes and above all, a
respirator. If you and your clothing become
contaminated with spray, DO NOT WORK
ON. Stop work; remove clothing and wash
affected areas thoroughly with soap and water.
Put fresh clothing on before starting again. Ensure
that contaminated clothing is washed thoroughly
before being used again.
»Don’t guess when choosing protective equipment.
Feel free to call Croplands and make use of our
safety information.
Spraying Precautions
»Agricultural chemicals applied under
unfavourable weather conditions or from poorly
adjusted and operated equipment can cause
damage due to run-off and/or drift problems.
»Crops and pastures are more susceptible to
spray drift of herbicides while people, stock and
water supplies are generally more susceptible to
insecticide drift. Pollution, crop damage and the
potential health hazards are something agriculture
can ill afford. It is simply not acceptable, socially
or environmentally. Additionally, pesticide, which
drifts or runs off the target, reduces the efficiency
of the pesticide on the target. Spray failures are
a waste of money and effort. In most cases you
have a legal obligation to ensure damage to
crops outside your property does not occur.
1. Be SURE the equipment is functioning correctly.
Check that nozzles are in good condition. Check
all other aspects of machine operation are
correct.
2. Be SURE pesticides are mixed thoroughly and
according to the label.
3. Be SURE the recommended registered pesticide
is used for the job at hand.
4. Be SURE pesticides are applied at
recommended rates.
5. Be SURE only target plants are sprayed.
6. Be SURE to follow the safety precautions
on the label.
CAUTION
Always read the chemical label carefully.

12 13
18/09/2016
LP-OMLINK-B
SECTION 4: SPRAYER
SPECIFICATIONS
Product Identification
Whenever possible, use the serial number of the
AgriPak linkage sprayer when requesting service or
parts information.
Where a serial plate is not provided or is no longer
on the unit, use the part number from the bar code
affixed to this manual or the Warranty & Pre-delivery
booklet.
LA300 AgriPak LA600 AgriPak
»AR Triple-diaphragm positive displacement pump fitted
»Standard Pump capacity 80 litres/min
»Optional high-pressure AR30 and AR503 for vertiboom
»10 litre Hand Wash tank
»40 litre Fresh Water Flushing Tank
»Fully hot-dipped galvanised frame
»Easy access & fully protected suction filter
»ARUCM full-bypass 4 or 5 tap control unit fitted with
master on/off lever
»Isometric pressure gauge for accuracy in setting pressure
»Protected pump, rear mounted for excellent PTO angle
»Quality PTO shaft supplied
»Safety labels
»Translucent tank material for easy volume reference
»Easy-slide boom mounting
»Options for controllers, booms, hosereels, spray guns,
foam markers & GPS systems – refer Croplands Optima
Buyers Guide on-line
»AR Triple-diaphragm positive displacement pump
fitted
»Standard Pump capacity 80 litres/min
»Optional 140 L/min
»Optional high-pressure AR30 and AR503 for
vertiboom
»15 litre Hand Wash tank
»80 litre Fresh Water Flushing Tank
»Fully hot-dipped galvanised frame
»Easy access & fully protected suction filter
»ARUCM full-bypass 4 or 5 tap control unit fitted with
master on/off lever
»Isometric pressure gauge for accuracy in setting
pressure
»Protected pump, rear mounted for excellent PTO
angle
»Quality PTO shaft supplied
»Safety labels
»Translucent tank material for easy volume reference
»Easy-slide boom mounting
»Options for controllers, booms, hosereels, spray guns,
foam markers & GPS systems – refer Croplands
Optima Buyers Guide on-line
Pump model & Serial number
The Pump model & pump serial number is located
on the pump itself. The plate shows the name of
the manufacturer, type and model of the pump,
serial number, maximum working pressure and
oil requirements. For further information on parts
for your pump, refer to the parts section on the
Croplands website. Use the pump model as the
reference.
LA800 AgriPak LA1000 AgriPak
»AR Triple-diaphragm positive displacement pump fitted
»Standard Pump capacity 80 litres/min
»Optional 140 L/min
»15 litre Hand Wash tank
»80 litre Fresh Water Flushing Tank
»Fully hot-dipped galvanised frame
»Easy access & fully protected suction filter
»ARUCM full-bypass 4 or 5 tap control unit fitted with
master on/off lever
»Isometric pressure gauge for accuracy in setting pressure
»Protected pump, rear mounted for excellent PTO angle
»Quality PTO shaft supplied
»Safety labels
»Translucent tank material for easy volume reference
»Easy-slide boom mounting
»Options for controllers, booms, hosereels, spray guns,
foam markers & GPS systems – refer Croplands Optima
Buyers Guide on-line
»AR Triple-diaphragm positive displacement pump
fitted
»Standard Pump capacity 80 litres/min
»Optional 140 L/min
»15 litre Hand Wash tank
»Fully hot-dipped galvanised frame
»Easy access & fully protected suction filter
»ARUCM full-bypass 4 or 5 tap control unit fitted with
master on/off lever
»Isometric pressure gauge for accuracy in setting
pressure
»Protected pump, rear mounted for excellent PTO
angle
»Quality PTO shaft supplied
»Safety labels
»Translucent tank material for easy volume reference
»Multiple bolt holes for boom mounting
»Options for controllers, booms, hosereels, spray guns,
foam markers & GPS systems – refer Croplands
Optima Buyers Guide on-line
NOTE
For further information on Croplands
AgriPak sprayers,
see www.croplands .com.au

14 15
18/09/2016
LP-OMLINK-B
SECTION 4: SPRAYER
SPECIFICATIONS GENERAL
INFORMATION
Tanks
Croplands AgriPak tanks are constructed from a
UV stabilised, medium density polythene for low
distortion qualities and impact resistance. Tanks
come with capacities of 300, 600, 800 and 1000
litres. A screw down main lid is installed on all
models and comes standard with a basket strainer.
Agitation is provided by a constant bypass system
back to tank. A venture agitator is standard on some
models and optional on others.
Pumps
Croplands uses positive displacement oil-backed
diaphragm pumps. The size and output of pumps
vary depending on the machine specifications
ordered. The maximum operating pressure is shown
below at a PTO output of 540 rpm.
Do not exceed the maximum PTO output of
540rpm.
Drive
A 540 rpm PTO shaft with safety shields & safety
chains is provided with every AgriPak.
Controls
Standard Croplands linkage sprayers come with a
manual bypass control with a screw type pressure
regulator valve (PRV) that has been pressure
tested before leaving the factory. A glycerine
filled pressure gauge is fitted, with 2 – 6 control
outlets depending on sprayer model. If an electric
or automatic rate controlled is fitted, refer to the
separate manufacturer’s manual provided.
Filtration
Refer to the table below for filtration point
information. Other combinations are available to
order.
Pump models Max L/min Max Press.
AR45LFP 43.3 20 bar
AR80LFP 76.4 20 bar
AR140LFP 132.9 15 bar
AR30 35 40 bar
AR503 54.1 40 bar
Tank lid strainer 18 mesh
Suction filter 50 mesh
Boom nozzle strainers (if
fitted)
50 mesh
Optional in-line pressure
filter(s)
100 mesh
BOOM OPTIONS
Manual folding, cross-fold booms
MBX series
3, 4 & 6 metre cross-fold galvanised boom, stainless
steel boom tubes, AirMix™ nozzles & non-drip
nozzle bodies.
MAX series
8, 10 & 12 cross-fold metre galvanised boom,
stainless steel boom tubes, AirMix™ nozzles & non-
drip nozzle bodies. 8, 10 & 12 metre have flip-over
outer wings. Options include leveller and lift device.
Hydraulic crossover fold booms
GEX Series
Galvanised 6, 8 and 10 metre cross-fold with
hydraulic cylinders operating the inner arm fold.
Outer wings on the 8 & 10 metre are manually
folded.
Hydralink series
(Only suitable for use on the 1000 litre model) 12
& 15 metre hydraulic “X-fold” galvanised boom,
stainless steel boom tubes, AirMix™ nozzles & non-
drip nozzle bodies. Integral self-leveller with manual
lock fitted. Breakaway on outer arms as standard.
Under-tree and vine booms
MSC/MSCL-2 covered boom for vines or trees,
left, right, double sided & centre section covers
available.
Vertiboom
High pressure boom, with left/right upright boom
tubes and high pressure nozzles for use in small
horticultural vertical row crops such as berries.
Boom suitability AgriPak 300 AgriPak 600 AgriPak 800 AgriPak 1000
MBX Series √ √ √ X
MAX series MAX08 only √ √ √
GEX series X√ √ √
Hydralink series XXX√
MSCL covered boom √ √ √ X
Vertiboom (high pressure
horticultural use only)
√ √ X X
NOTE
For more information on booms and the
model fitted to your sprayer, please see
the Croplands Spray Boom Operator
and Parts Manual.

16 17
18/09/2016
LP-OMLINK-B
Hose reels & guns for hand spraying
For more information, refer your hose reel manual
or www.croplands.com.au
Chemical Mixing and induction hopper
For more information, refer your mixer manual or www.croplands.com.au
30 litre A5033301 version shown here.
Foam marker or GPS unit
For more information refer the manufacturers manual
or visit www.croplands.com.au
Optional step for 600, 800 and 1000 litre versions
MBX series booms
3, 4 and 6 metres available – for more information, refer your boom
manual or www.croplands.com.au
MAX series booms
8, 10 & 12 metres available – for more information, refer your boom
manual or www.croplands.com.au
MAX level
Hydraulic boom height adjuster or lift device
For remote lifting of the spray boom using tractor hydraulic remotes.
Shown is lift for LP-800 & MAX booms – for more information visit www.
croplands.com.au
GEX series booms
6, 8 & 10 metres available – for more information, refer your boom
manual or www.croplands.com.au
MHL series booms
12 & 15 metre as available (1000 litre AgriPak only) – for more
information, refer your boom manual or www.croplands.com.au
XP Boom kit
For use where a boom is impractical – for more information, refer your
boom manual or www.croplands.com.au
Vertiboom
For use in vertical row crops where high pressure is needed (AgriPak must
have a suitable pump fitted) – for more information, refer your boom
manual or www.croplands.com.au
OPTIONAL EQUIPMENT
SEPARATE MANUALS PROVIDED

18 19
18/09/2016
LP-OMLINK-B
SECTION 5: OPERATION HOOK
UP AND PTO INFORMATION.
Connecting to the tractor
Croplands AgriPak sprayers have models to suit
Categories I, II and III tractor linkage connections.
300, 600 & 800 litre models have Cat II for the
lower linkage arms, and Cat I for the top link with
sleeve if your tractor has Cat II.
The 1000 litre AgriPak sprayer has a clevis-type Cat II
& III hitch for the lower arms and Cat II for the top link.
Procedure
Lower the tractor linkage arms and attach the
sprayers lower hitch pins, using the suitable
category for your setup.
NOTE
Check all of the individual parts before
operation. Check the pump oil level
before operating the sprayer. You can
use SAE30 or SAE 20/40 multi grade
engine oil to top up the oil if needed.
CAUTION
Your Croplands sprayer dealer is
responsible for correctly setting and
installing the supplied PTO shaft for the
first time it is set up. This can involve cutting
the shaft to length to ensure correct, safe
operation. The above information is for
reference purposes only.
WARNING
Always ensure the tractor PTO is
disengaged before attempting to hook
up the PTO shaft!
Lift the tractor linkage up to the level you wish to
spray at. Now you can adjust the length of the
top linkage arm to level the sprayer. Clean off and
grease the PTO splines on the sprayer and tractor
stub shafts. Put the PTO shaft onto both splines
making sure the spring loaded locking pins click
into place and is completely secure on the splines.
Attach the PTO shaft safety chains ( attached on the
PTO guards) to the tractor & the pump PTO guard.
Raise and lower the sprayer to check that the tubes
of the PTO overlap by at least 1/3 of their length,
and not less than 150mm, in all operating positions.
Start up
After the pre-delivery checklist has been done and
your AgriPak linkage is hooked up correctly to your
tractor, it is advised that a water test be done to
check for leaks and to familiarise yourself with your
new sprayer. These checks have been conducted
in the factory; however there is a chance that transit
could have loosened some fittings. Running the
machine with fresh water is a good safe way to
calibrate and learn about your sprayer, and set your
sprayer up properly to maximise results in the field.
Fill the tank partially with water to allow testing of
the sprayer before you start your test or spraying
job.
The Suction filter is either fitted with a shut off valve
(yellow or red removable twist plug), or with a 3
way ball valve to shut off the flow in the suction line
before the filter. This allows you to clean the filter
mesh while there is fluid in the spray tank. Always
ensure this valve is correctly set prior to start up so
that liquid from the main tank can flow through the
pump and control unit.
To start the sprayer, ensure the PTO is set in 540
RPM mode.
Make sure the pressure
relief valve on the
control unit is backed
off anti-clockwise prior
to engaging the PTO.
Increase the tractor
PTO speed up to no
more than 540rpm.
WARNING
Double check this step as some tractors
have a 1000 RPM setting – this will
destroy the pump if engaged!
NOTE
You may not need to run the pump at 540
RPM to achieve the desired spray output.
In most cases a PTO speed of 400RPM or
thereabouts is sufficient.
Twist plug to shut off liquid flow.

20 21
18/09/2016
LP-OMLINK-B
The pump will draw liquid from the tank and bypass
this until such time as you open the manual taps and
flick the main lever on the manual control unit to the
open position. Refer to the section below AR UCM
controller operation.
Once the boom taps and master on/off lever on
the manual control unit are in the open position,
the nozzles should spray. Using the rotary pressure
relief valve knob, you can now adjust the pressure
to the recommended spraying pressure by rotating
the PRV knob. Anti-clockwise rotation will reduce
the pressure; clockwise rotation will increase the
pressure. Using the pressure gauge on the control
unit, you can determine the spraying pressure. For
most boom-spraying jobs, a pressure between 1
and 5 bar (30 to 70 psi) is the norm. The AirMix™
low-drift nozzles can be safely operated within a
1-6 bar pressure range, but note that the Spray
Quality will be influenced by your spraying pressure.
For more information on Spray Quality, you can
access the Croplands Buyers Guide on line
and check the chart for AirMix™ nozzles – this
information is in the nozzle section.
Most chemical labels advise the application
rate and spray quality for the product being
used. Youmay wish to discuss this with your local
agronomist if you are unsure.
If you have electric controls or an Auto-Rate spray
controller fitted to you AgriPak linkage sprayer,
please refer to the Croplands manual relevant to the
model you have purchased to learn how to use this
prior to start up. Croplands Technical support can
also be contacted should you need assistance (see
back page for contact details)
Flushing tank – standard on 300, 600 and
800 litre models
A 3-way ball valve is provided on the suction line to
allow the operator to select suction from either the
main spray tank, or the fresh-water flushing tank.
CAUTION
Never use the fresh water flushing or
handwash tank for chemical use. These
tanks are designed specifically for
holding fresh water for either flushing the
sprayer, or in the case of the hand-wash
tank, for the operator to use for cleaning
hands or the suction filter in the field.
To flush the sprayer in the field after spraying, shut
off the boom using the liquid controls, stop the PTO
and leave the boom in the unfolded operating
position. Using the ball valve, select the fresh water
flush tank. Climb back into the tractor cab, start the
PTO and open the manual or electric control to
allow fresh water to flow through the spraying circuit
and the nozzles. If you have remaining spray left in
the main tank, flush only for one to two minutes to
flush the pump and boom lines.
If you have finished your spraying job and the
main tank is empty, you can flush the system for 5
minutes, or until the flushing tank is empty, to ensure
the system is thoroughly flushed with fresh water. It
is recommended to do this in the field so that any
chemical residue is deposited in the area you have
been spraying to avoid continual deposits back at
the spray shed site.
A thorough tank clean once back at the shed is
recommended if you have finished your spray
job. Always drain the main tank when finished. To
avoid algae build up in the fresh water tanks, it is
recommended these also be drained and refilled
just prior to the next spraying job.
This will ensure your AgriPak sprayer is ready to go
prior to its next use. To clean the filters:
»Ensure the shut-off tap is in the “off” position, or
the shut off plug is removed from the filter housing
»Remove the filter element from the housing by
undoing the main filter housing nut
»Clean the filter element with fresh water (note,
if the suction filter does become blocked during
spraying, this can be cleaned in the field by using
the handwash tank
»If a pressure filter is fitted (normally if the sprayer
has electric controls fitted), also remove the filter
cartridge and clean with fresh water
»Inspect the nozzle filters, at least one from each
boom section, and if required, clean these in fresh
water. The nozzles filters are up inside the nozzle
body and can be accessed by removing the
nozzle cap. If care has been taken to have clean
water used for spraying, and the suction filter is
kept clean, the nozzle filters should not block.
After and extended time of non-use, it is
recommended you check the filters before your next
spray job. Often spiders or wasps can get into the
filter housing.
NOTE
Always use gloves when handling filters.
NOTE
Always clean the filters when your
spraying job is completed.

22 23
18/09/2016
LP-OMLINK-B
ARUCM Controller operation
A four or five outlet control unit is used (five outlet
where 3 boom sections & a hose reel is fitted) and
is standard. on all AgriPak linkage models. The
main on/off lever “A” will be used in most instances,
and when liquid supply to the boom or nozzles
is closed, all liquid will be bypassed to the tank.
System pressure is regulated by turning the red (or
on some valves black) knob “B” and by observing
the reading on the pressure gauge (D”). Turning the
knob clockwise increases the pressure and turning
anticlockwise decreases pressure. The pressure can
only be accurately set with the boom lines open
and the master lever open. Fluid is directed to the
boom lines or other spraying devices by the outlet
valves “C” which may be operated individually.
The outlet valves are marked with a “0” or a “1”
to indicate if they are on or off. If you wish to stop
spraying but leave the tractor PTO running, either
the master on/off lever or the individual taps can
be used. For a parts breakdown see the controller
manual provided.
Spray guns and hose reels (if fitted)
A variety of spray guns and hose reels are available
for use with Croplands AgriPak linkage sprayers.
A hose reel may be mounted to the side or rear
of the sprayer frame with the inlet end of the hose
connected to one outlet of the control unit. When
fitted, the standard reel contains 20 metres of 10mm
hose at a pressure rating of 20 Bar. The heavy duty
steel reel holds 30 metres of hose.
The heavy duty hose reel can hold up to 50 metres
of 10mm spray hose. For any unit has a 40-bar
pump and a hose reel fitted, the spray hose will
have the corresponding higher-rated pressure
hose fitted.
The spray lance gun fitted on the standard
Croplands hose reel is an RL10, rated up to 20 Bar
pressure. On the heavy duty reel, the standard spray
gun is a Turbo400 model rated to 50-bar pressure.
Other options include:
»TeeJet® range of spray guns
»Spot Gun 300
Talk to your dealer if you want a different spray gun
for a specific purpose. To operate the RL10 spray
lance or Turbo400 spray gun, start the sprayer and
have pressure available in the system. Ensure the
tap corresponding to the spray line going to the
gun is in the on position. Squeeze the main trigger
adjacent to the handle and aim the gun at the plant
to be sprayed. For the RL10, you can adjust the
spray pattern by rotating the nozzle on the end of
the lance. On the Turbo400 gun, adjust the spray
pattern with your thumb by pushing the orange side-
lever up or down. For a fine “fog” spray, the widest
angle should be selected using the side-lever, then
the orange end-cone should be adjusted to slide out
as far as possible on the gun barrel. This is ideal for
very fine spraying such as fungicide application in
nursery plants etc.
Spray Booms
A variety of booms may be used with Croplands
AgriPak linkage sprayers depending upon the
model and field application – see table on page
15-17 for this information. All have non-drip nozzle
bodies with AirMix™ flat fan nozzles. Booms are
part of the standard equipment on some models,
in some cases they may be installed by the dealer
or owner. On all types of boom, the setting of the
correct operating height is most important to achieve
a uniform spraying pattern. This needs to be at a
height above the target which will achieve 50%
overlap of the spray from adjacent nozzles.
WARNING
Safety information about Spray guns
and lances:
1. NEVER aim the spray gun at anyone
2. ALWAYS shut the system off when you
are not using the spray gun
3. ALWAYS ensure your spray application
is not drifting beyond the target
4. NEVER operate the gun beyond the
pressure capability of the system
Secure the gun on the spray unit and roll
up the hose when the job is finished.
NOTE
For more information on hose reels and
spray guns fitted to your sprayer, please
see the Croplands Reels & Spray Guns
Operator and Parts Manual.
NOTE
Section 6 will only be relevant if your
AgriPak Linkage sprayer is fitted with a
Croplands boom.
24 25
18/09/2016
LP-OMLINK-B
SECTION 6: SPRAYING
INFORMATION
This section also provides information
relevant to Calibrations in section 7
When to spray
Spraying results are best when the wind speed and
the temperature are low but the relative humidity
is reasonably high. An ideal time is at sun up or
nearing the end of the day when these conditions
are more likely to occur.
For more information, contact Croplands about our
SprayWise® program, or purchase a copy of the
SprayWise Application Guide from Croplands.
Also, the use of the WINDMATE™ Wind meter
would be of excellent value to anyone doing
regular spraying.
Field patterns
For the best coverage, spray two swath widths
around the outer perimeter of the field as shown
in the diagram. This establishes a good headland
and will give you adequate room to turn around.
Turn the booms off when you come back on to the
headland to prevent over spraying and wastage.
Using a guidance system such as GPS or foam
markers can prevent overlaps and ensure you get
better coverage.
Ground Speed
Modern tractors should have sufficient speed
accuracy for sprayers of this size. To check the
speed, fill the tank and open the boom to simulate
usual spraying conditions. See section 7 to learn
how calculate ground speed if your tractor does not
have a reliable speedometer.
For spraying with an AgriPak linkage sprayer, the
speed will you can safely & accurately spray at
will depend on the conditions, terrain, and product
being applied. In general, speeds of 5 to 15 km/hr
are most often within the range for linkage spraying.
Spray Quality
Spray quality is becoming extremely important for
the correct application of chemicals. Refer to your
advisor, local DPI or check the Croplands Buyers
Guide for more information. Many chemical labels
now specify the spray quality required for the
product being used. Loosely, spray quality falls into
a droplet range of:
»Ultra Coarse
»Extremely Coarse
»Very Coarse
»Coarse
»Medium
»Fine
»Very fine
Field patterns
CAUTION
Most spray applications will fall into the
Medium to Very Coarse range, depending
on the application. Talk to a qualified
Agronomist or Advisor if uncertain.
Nozzle spacing and height
Nozzles overlap should be 50% at the point of
contact with the spraying surface. Croplands booms
operate with a nozzle spacing of 500mm (50cm)
with nozzles slightly offset to avoid interference.
Nozzles are supplied with 110° angled patterns.
The recognized height to achieve the required
50% overlap is 400mm-500mm for 110° nozzles
(measured from the target to be sprayed).
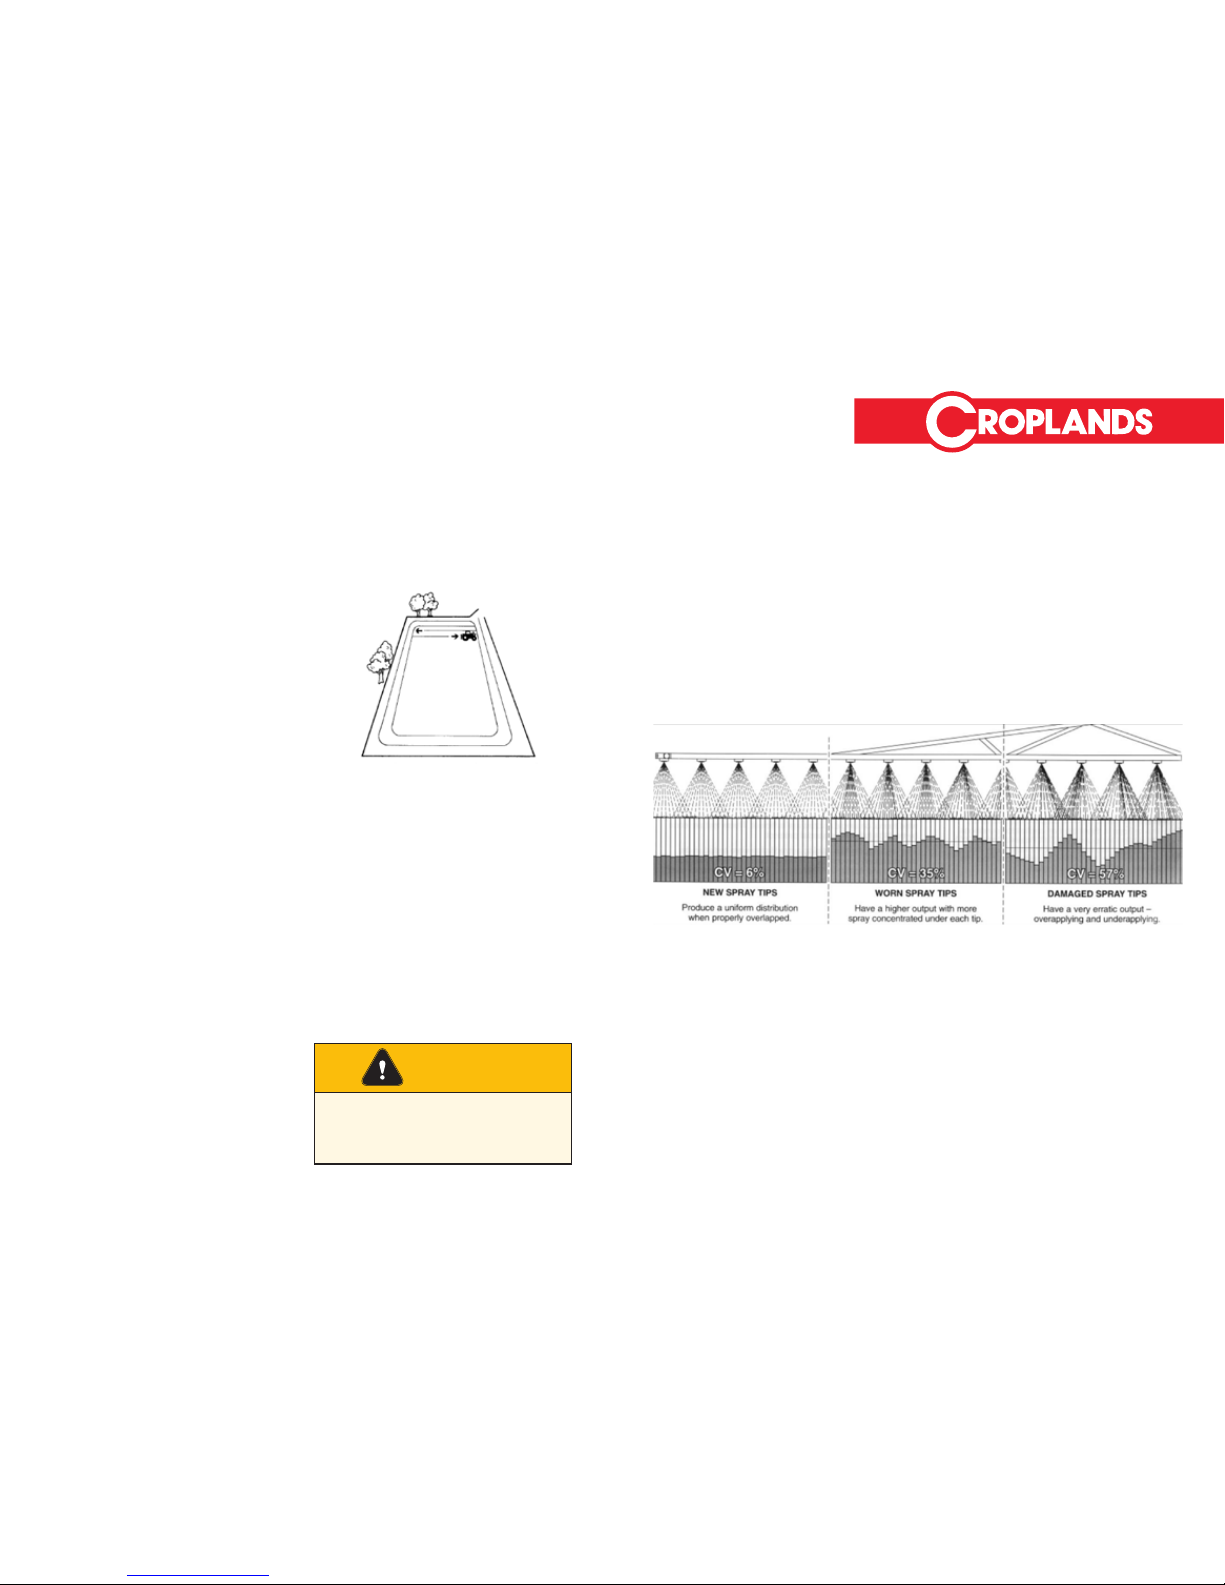
Spray pattern and uniformity
Your nozzle spray pattern, overlap and uniformity
need to be monitored and can be tested in the
following manner. Keep a spare new nozzle to with
which you can compare the other nozzles on your
unit. Place the new nozzle at a central point on the
boom and fill the tank with fresh, clean water and
switch the boom on. Examine the spray patterns
against a dark background and replace any that
show signs of damage or sufficient wear as shown
below.

26 27
18/09/2016
LP-OMLINK-B
BOOM SPRAYER
CALIBRATION
Each Croplands boom is fitted standard with non-
drip nozzle bodies so that when the liquid flow
is switched off, the bodies will not drip. Supplied
on all Croplands’ booms are AirMix air-induction
ultra-low drift nozzles - now an industry standard to
reduce the likelihood of spray drift.
The liquid flow to the boom can be stopped
& started as required (such as when turning at
headlands or where the operator does not want to
spray) by using the spray control unit provided on
the sprayer.
To ensure the right application of herbicide or crop
protection product is applied to the target crop, the
user should calibrate the AgriPak linkage sprayer
to ensure the correct application rate is used for the
chemical being used.
The information for the product to be applied (spray
target rate and spray quality) is usually supplied
by the chemical manufacturer on their product
label. Alternatively, a trained agronomist should be
consulted.
Part of the calibration process is to determine the
flow required to meet the required target spray rate,
and this information can be used to determine what
speed of travel will best suit your application and
what nozzle and spraying pressure to use.
Failure to calibrate a sprayer before operating may
result in ineffective or crop damage
Calibration
To accurately apply crop protection or herbicides
through a spray boom, the following procedure
should be undertaken.
1. Measure your speed of travel.
2. Check the nozzle spacing, and
3. Select an appropriate nozzle for the product
being applied, and check nozzle output in Litres
per minute (L/min), along with spraying pressure.
CAUTION
Check the current Croplands Optima
Buyers Guide for Nozzle information,
or purchase a copy of the Nufarm
Spraywise™ Spray Application Guide.
CAUTION
Do not operate a sprayer without
calibration or before calibration has
been completed.
WARNING
Always only use clean water when
calibrating or checking a sprayer. Never
calibrate with chemical present in the tank.
Failure to follow this instruction can lead to
poisoning and serious illness.
1. Speed of travel
Check your tractor speed. If you have an accurate
speedometer, this will suffice. If not, measure the
distance you have travelled in one minute in metres,
and divide this by 16.7:
»e.g. 120 metres travelled in one minute ÷ 16.7 =
7.18 km/hour.
»If this is impractical, measure the distance
travelled in 30 seconds, double it, and then
divide by 16.7.
»Repeat at least twice, from a running start, to
ensure accuracy.
2. Nozzle spacing
Standard nozzle spacing on a Croplands boom
is 50cm. This is also an industry standard for the
use of 110 degree nozzle tips as fitted standard to
Croplands booms.
3. Select Nozzle Type & Size
Select the Nozzle Type & Size according to:
»Chemical recommendations.
»Application rate required.
»Pressure setting.
»Swath width.
»Chosen speed of travel (Use actual speed of
travel, refer to step 2).
The right nozzle, application rate, spray quality
and nozzle pressure will best be advised by your
agronomist or consulting with the manufacturer
of the product you are applying. The Croplands
calibration guide covers these options in more
detail.
Included on page 29 is a basic nozzle chart to
show nozzle sizes, outputs and application rates at
varying speeds.
NOTE
Nozzle spray patterns and spray
angles should be visually checked for
accuracy and the nozzle replaced if not
spraying correctly.

2928
18/09/2016
LP-OMLINK-B
BROADCAST AND TURF APPLICATIONS
L/HA 50CM NOZZLE SPACING
Nozzle type Pressure bar Flow rate
l/min
5
kph
6
kph
7
kph
8
kph
10
kph
12
kph
16
kph
110-015 1.0 0.346 81.6 68.0 48.3 51.0 40.8 34.0 25.5
1.5 0.424 101 84.0 72.0 63.0 50.4 42.0 31. 5
2.0 0.490 115 96.0 82.3 72.0 5 7. 6 48.0 36.0
3.0 0.600 142 118 101 88.5 70.8 59.0 44.3
4.0 0.693 163 136 117 102 81.6 68.0 51.0
5.0 0.775 182 152 130 114 91.2 76.0 5 7. 0
6.0 0.849 199 166 142 125 99.6 83.0 62.3
110-02
STANDARD
1.0 0.462 110 92.0 78.9 69.0 55.2 46.0 34.5
1.5 0.566 134 112 96.0 84.0 6 7. 2 56.0 42.0
2.0 0.653 156 130 111 9 7. 5 78.0 65.0 48.8
3.0 0.800 190 158 135 119 94.8 79.0 59.3
4.0 0.924 218 182 156 137 109 91.0 68.3
5.0 1.033 245 204 175 153 122 102 76.5
6.0 1.131 269 224 192 168 134 112 84.0
110-025 1.0 0.577 137 114 9 7. 7 85.5 68.4 5 7. 0 42.8
1.5 0.707 168 140 120 105 84.0 70.0 52.5
2.0 0.816 194 162 139 122 9 7. 2 81.0 60.8
3.0 1.000 238 198 170 149 119 99.0 74.3
4.0 1.154 2 74 228 195 171 137 114 85.5
5.0 1.291 310 258 221 194 155 129 9 7. 0
6.0 1. 414 339 283 242 212 170 141 106
110-03 1.0 0.693 163 136 117 102 81.6 68.0 51.0
1.5 0.849 199 166 142 125 100 83.0 62.3
2.0 0.980 230 192 165 144 115 96.0 72.0
3.0 1.200 283 236 202 177 142 118 88.5
4.0 1.386 326 272 233 204 163 136 102
5.0 1.549 365 304 261 228 182 152 114
6.0 1.697 401 334 286 251 200 167 125
110-04 1.0 0.924 218 182 156 137 109 91.0 68.3
1.5 1.113 269 224 192 168 134 112 84.0
2.0 1.306 310 258 221 194 155 129 96.8
3.0 1.600 379 316 271 237 190 158 119
4.0 1.848 437 364 312 273 218 182 137
5.0 2.066 490 408 350 306 245 204 153
6.0 2.263 535 446 382 335 268 223 167
4. Select Nozzle Type & Size according to:
»Chemical recommendations
»Application rate required
»Pressure setting
»Swath width
»Chosen speed of travel. (Use actual speed of
travel, refer to step 2).
5. Fit the selected nozzles to the boom as per
the nozzle manufacturers specifications.
6. Check the nozzle accuracy as outlined
above in spraying information.
7. Add the correct amount of chemical to the
tank as per the directions on the chemical
label.
8. Adjust the boom height to suit your nozzles
as explained in the Nozzle section in
spraying information above.
9. Don’t forget to record your data for future
reference.
NOTE
To find more information on how to
calibrate a boom for varying application
rates:
»Refer to the Croplands web site at www.
croplands.com.au or
»Contact the Croplands Customer Service
or
»Technical Support: Phone 1300 650 724.

30 31
18/09/2016
LP-OMLINK-B
SECTION 7: DAILY START UP
AND USEFUL FORMULA
Daily start up procedure
A careful, common sense approach to water quality,
mixing of chemicals and care of filters, hoses and
tank will ensure trouble free spraying.
To ensure trouble free operation, follow the
procedure below at the start of each day:
1. Ensure that no solids enter the system to block or
damage pump or nozzles.
2. Check that suction line filter is clean and not
damaged. It should be checked & cleaned
regularly (see Page 21 for more information). Be
careful not to damage or deform the mesh or
O-Ring while cleaning and refitting the suction
line filter. If a filter screen is damaged, replace
with a new screen.
3. Put enough clean
water into the spray
tank to operate the
pump and hand gun
or boom (if fitted).
The tank can be
fully filled once your
start up check is
completed.
4. Activate the pump (see Page 19 for tips on
start up).
5. If fitted, adjust the pressure relief valve to obtain
the required pressure. Excess liquid will bypass
back to the tank. Once the pressure is set, it is
normal for minor fluctuations to show on the
pressure gauge when switching the hand gun or
boom on & off if you have these options fitted.
For more information on your pressure control unit,
refer to Page 22 or the separate manual supplied
for electric controls (if fitted).
6. Check that all hoses, hose clamps and
connections do not leak. Repair or replace
damaged components.
7. Read and follow the instructions on the chemical
manufacturers label before mixing and adding
chemicals to the spray tank. For safety information
refer to section 3 in this manual.
8. Add chemical to the tank and proceed with your
spraying application.
Operating Pointers
While spraying continually observe that:
1. Adequate operating pressure is being
maintained.
2. Your hand gun coverage is correct and constant
for effective cover and that your nozzle is
operating correctly (if you have a hose reel &
gun fitted).
3. Periodically check and clean filters – between
tanks is ideal
4. Your boom height is maintained at the correct
height above your target (if you have a boom
fitted).
5. Avoid going too slow because over application
will occur. Conversely, avoid going to fast
because under application will occur. Refer to
your calibration information.
CAUTION
Do not add chemicals to the spray tank
until the initial start-up or daily start-up
procedure has been carried out. This avoids
having a tank full of chemical mix and then
finding a sprayer problem
Useful Formula
1. Calculating the Tank Spray Area
Use this formula to calculate the area each tank full
of spray will cover.
Area Covered (ha)= Tank Volume (litres)
Spray Application Rate (L/ha)
eg. 300 (litres)
100 (L/ha)
= 3 hectares.
2. Calculating the Total Liquid Volum Required
Use this formula to calculate the amount of spray
liquidrequired to spray a given area.
Total Liquid Volume Required (litres)
= Area (ha) x Spray Application Rate (L/ha)
eg. 2 (Ha) x 100 (L/ha)
= 200 litres required

32 33
18/09/2016
LP-OMLINK-B
SECTION 8: LUBRICATION AND
MAINTENANCE
Daily Sprayer maintenance
In the first few days of sprayer usage, thoroughly
check the machine before starting each day of
spraying. Check all nuts and bolts and check
plumbing for leaks. Grease the PTO shaft at the time
intervals shown on the diagram below. The diagram
is only a guide, greasing may need to be more
frequent if spraying under extreme conditions.
Pump
Check the oil level on the pump sight gauge and
top up with SAE 20/40 multi grade engine oil if
needed.
Filters
It is important to clean filters daily as they can have
a major impact on your sprayer’s performance.
Wash them out with a soft brush and constantly
CAUTION
Do not leave water in the machine,
particularly in cooler climes as this can
freeze and ruin the pump.
WARNING
Make sure the tractor is switched off, the
machine is lowered to the ground and
the PTO drive shaft is disconnected.
check for holes or tears. Clean the suction filter
every time the tank is filled and at the end of the
days spraying. Make sure O rings are in good
condition and grease them with O ring grease in
necessary. Clean out nozzle filters if installed. See
page 22 for picture of filter screen.
Spray lines
Never leave chemicals
in the tank or the pump.
Rinse the tank out
completely with fresh
water and operate
machine to clear all spray
lines. Remove boom lines
caps if you have a boom
fitted and flush boom lines.
Annual sprayer maintenance
General sprayer care
When spraying season has finished, clean the
machine completely.
Check all electrical fuses as these can easily blow if
corroded in the off season.
Pump
Flush and drain the pump completely before
storage. Check the valves and diaphragms for wear
and damage before the start of the new season. Set
the air pressure in the chamber to around 10 – 20%
of the usual operating pressure. Drain the oil before
the commencement of the next season and replace
completely with new oil (SAE 20/40 multi grade
engine oil).
NOTES:
3534
18/09/2016
LP-OMLINK-B
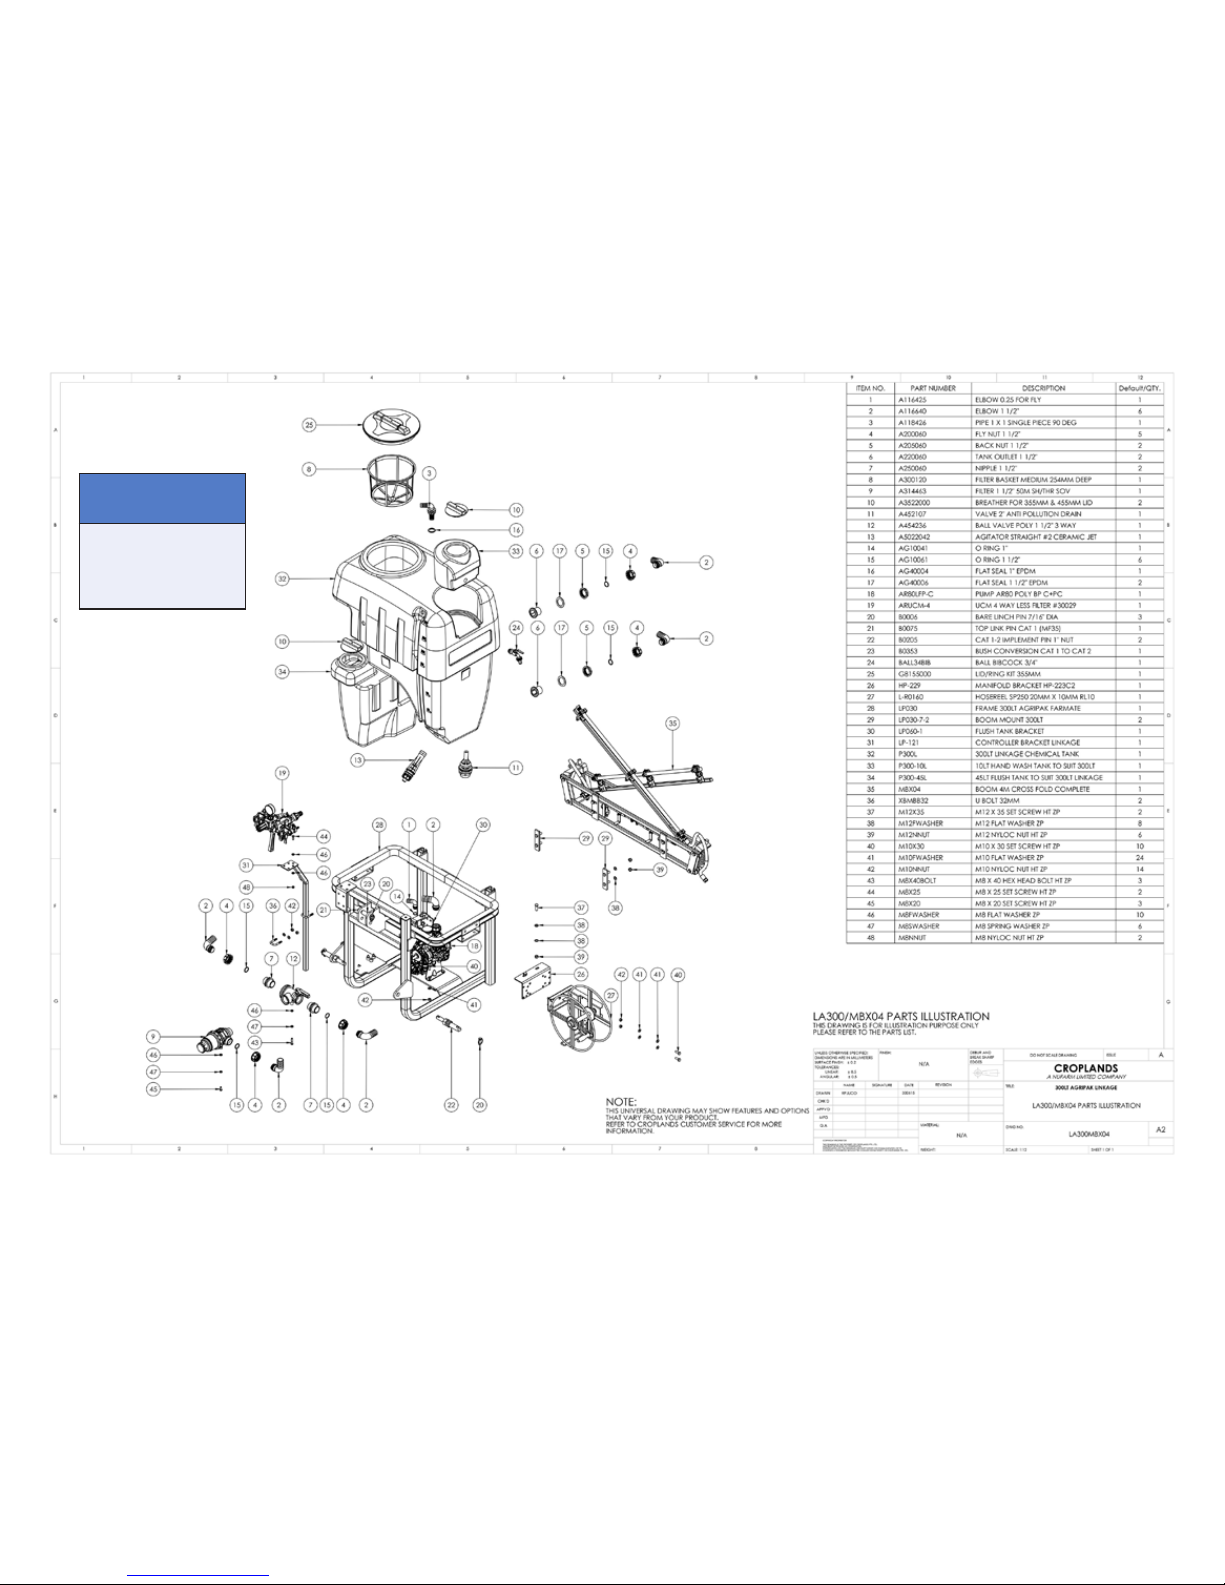
LA300 LINKAGE: 300 LITRE
WITH MBX04 BOOM &
HOSE REEL
NOTE
»This parts list is indicative
of this model sprayer. For
further parts information
refer to:
www.croplands.com.au

3736
18/09/2016
LP-OMLINK-B
LA600 LINKAGE:
600 LITRE WITH
AR80 PUMP
NOTE
»This parts list is indicative
of this model sprayer. For
further parts information
refer to:
www.croplands.com.au

3938
18/09/2016
LP-OMLINK-B
LA800 LINKAGE: 800 LITRE
WITH MAX10 BOOM,
LEVELLER, LIFT & HOPPER
NOTE
»This parts list is indicative
of this model sprayer. For
further parts information
refer to:
www.croplands.com.au
Other manuals for AgriPak LA300
1
This manual suits for next models
3
Table of contents
Other Croplands Paint Sprayer manuals

Croplands
Croplands Pinto 2000 User manual

Croplands
Croplands CROPPAK US200F User manual

Croplands
Croplands GEX Series User manual

Croplands
Croplands Quantum Mist Smart Spray QM-420 User manual

Croplands
Croplands PEGASUS WEED-IT 4000 User manual

Croplands
Croplands Quantum Mist Smart Spray QM-420 User manual

Croplands
Croplands MHL12 User manual

Croplands
Croplands RSRL3-100RC REEL User manual

Croplands
Croplands WEED-IT User manual


