manuals.online logo
Brands
  1. Home
  2. •
  3. Brands
  4. •
  5. Croydex
  6. •
  7. Indoor Furnishing
  8. •
  9. Croydex WC257122 User manual

Croydex WC257122 User manual

Thank you for purchasing this Croydex product. Please follow the fixing and care instructions to ensure
that your bathroom product is fitted safely and that it retains its high quality finish. Please retain this
leaflet for future reference.
This instruction leaflet applies to the following product:
WC257122 (White) Small Single Door Cabinet
Fixing Pack Contents
(a) 8 x Fixing screws
(b) 1 x Magnetic catch
(c) 2 x Magnetic catch screws
(d) 2 x Mirrored door pivot pins
(e) 8 x Screw caps
(f) 1 x Glue sachet
(g) 5 x Wooden dowels
(h) 4 x Shelf supports
(i) 2 x Wall fixing screws
(j) 2 x Wall plugs
(k) 2 x Washers
(l) 1 x Magnetic door plate
(m) 1 x Magnetic door plate screw
Tools Required
Drill; 6mm Masonry Drill Bit; 6mm Ceramic Drill Bit (optional); Cross Head Screwdriver; Large Flat Head
Screwdriver; Bradawl; Pencil, Spirit Level.
KEEP DIY TOOLS OUT OF THE REACH OF CHILDREN
Home Safety Advice
•It is recommended that two people fit the cabinet to ensure that it is fitted safely.
•Always take care when using an electric drill, particularly in the bathroom. Always check for
hidden cables and pipe work before drilling and take extreme care if there is any water in the
working area. It is advisable to use a residual current circuit breaker (RCCB).
•Always wear suitable eye protection when drilling.
•If the product is to be fitted on a ceramic tiled wall, a ceramic drill bit should be used. Always
ensure that the drill hole passes through the central tiled area rather than through the grouted
area. To prevent unnecessary damage to the tile, mask the area around the hole with tape
before drilling.
•Do not strike the product with hard or sharp objects.
•Do not overload the cabinet. Maximum safe working load is 10kg evenly distributed if mounted
on to a solid wall. If mounted on to a cavity wall reduce the load to 5kg evenly distributed.
Component Key
(a) Mirrored Door, (b) Strengthening Baton, (c) Backing Board, (d) Side Panel, (e) Side Panel,
(f)Top Panel, (g) Base Panel, (h) Shelf.
Assembly Instructions
Lay out all components so they are all clearly identifiable prior to assembly.
Remove excess adhesive with a damp cloth before it dries.
Support the door during assembly and do not allow the door to fall open, as this will damage the hinge.
Product Care
To retain the best quality finish, clean product regularly with a soft cloth and mild detergents. Do not use abrasive or chemical
cleaners, as these will damage the product.
Do not slam the door open against its mechanical limits, as this will damage the hinge.
For details of other items in the Croydex range please visit our website: www.croydex.com
Croydex Limited, Central Way, Andover, Hants, SP10 5AW, UK CAB 022 R06
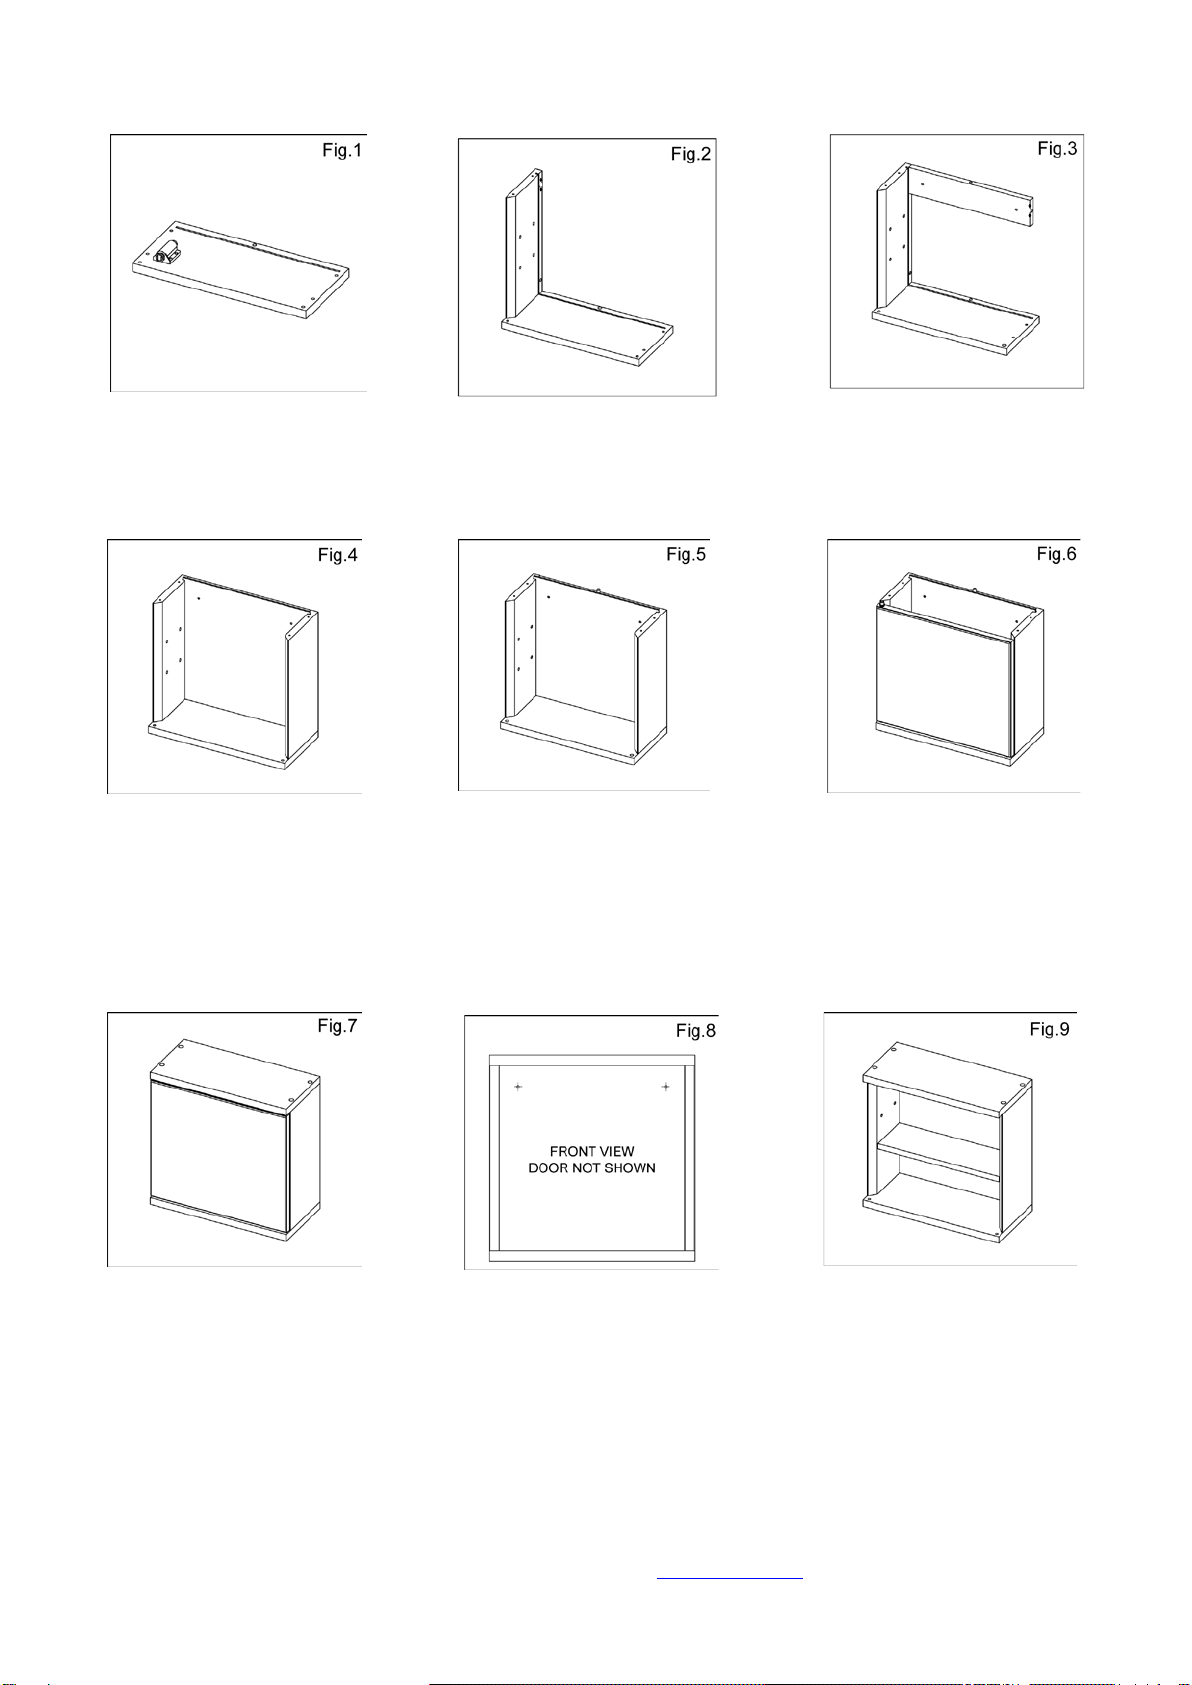
2. Secure side panel to base panel
using two fixing screws. (Screws
mounted from underside of base. To
improve strength place small amount
of glue on underside of side panel
before securing into position.)
6. Place one of the door pivot pins
into the hole recess situated on the
base. (Hinge grommets need to be
located in the recess of the top and
base panels before inserting the
pivot pin.) Locate mirrored door onto
pivot pin and place the remaining
pivot pin into the top of the door
before securing the top panel.
7. Place top panel onto cabinet
carcase ensuring all screw holes,
recesses, hinge grommets and
dowels are accurately aligned with
assembled cabinet. Secure top
panel to both side panels with the
four remaining fixing screws.
Important: Please allow the glue
to dry prior to fitting the cabinet.
9. Insert shelf supports into hole
recesses and ensure all supports
are aligned accurately. Place the
shelf in the cabinet and lower onto
the shelf supports. (Door not shown)
8. Hold the cabinet against the wall in its
desired location and check that it is straight
and level. Open the door(s) and mark the wall
using the holes in the back of the cabinet as a
guide. Drill 40mm deep holes in marked
positions using a 6mm masonry drill and insert
wall plugs. Align the holes in the back of the
cabinet with the wall plugs. Insert the screws
through the washers and holes in the back of
the cabinet and screw in position.
1. Mount the magnetic door catch onto
the top panel. Use all four magnetic
catch screws. Door catch must be fitted
to opposite side of door hinge. (The
magnetic door plate must be secured
to the back face of the mirrored door to
ensure that the catch works correctly)
3. Place two wooden dowels into
each end of the strengthening
baton. Align the dowels and locate
into side panel. (Wooden dowels
must be glued into position.)
4. Place the second side panel onto the
wooden dowels protruding from the
strengthening baton and secure side
panel to base panel using two fixing
screws. (To improve strength place small
amount of glue on underside of side panel
before securing into position. Mount
screws from underside of base.) Slide the
backing board into the two recesses
evident on the two sidewalls. Locate into
the base panel.
5. Place one wooden dowel into
the top of the hanging baton.
(Wooden dowel must be glued into
position.)

Other Croydex Indoor Furnishing manuals

Croydex QM261241 User manual

Croydex

Croydex QM261241 User manual

Croydex QA200021 User manual

Croydex

Croydex QA200021 User manual

Croydex WC216105 User manual

Croydex

Croydex WC216105 User manual

Croydex Flexi-Fix 1919 User manual

Croydex

Croydex Flexi-Fix 1919 User manual

Croydex Norton WS010322 User manual

Croydex

Croydex Norton WS010322 User manual

Croydex WS010522 User manual

Croydex

Croydex WS010522 User manual

Croydex WC450505 Manual

Croydex

Croydex WC450505 Manual

Croydex Triple Corner Basket Set User manual

Croydex

Croydex Triple Corner Basket Set User manual

Croydex AP400522 User manual

Croydex

Croydex AP400522 User manual

Croydex Chetsford Series User manual

Croydex

Croydex Chetsford Series User manual

Croydex WC9400 Series User manual

Croydex

Croydex WC9400 Series User manual

Croydex 5012044112446 User manual

Croydex

Croydex 5012044112446 User manual

Croydex MM720200E User manual

Croydex

Croydex MM720200E User manual

Croydex AD149341 Manual

Croydex

Croydex AD149341 Manual

Croydex PA155941 Manual

Croydex

Croydex PA155941 Manual

Croydex WC410122 User manual

Croydex

Croydex WC410122 User manual

Croydex Norton WC010322 Manual

Croydex

Croydex Norton WC010322 Manual

Croydex WS040478 User manual

Croydex

Croydex WS040478 User manual

Croydex SIMPLICITY WC257222 User manual

Croydex

Croydex SIMPLICITY WC257222 User manual

Croydex Boston WS010122 User manual

Croydex

Croydex Boston WS010122 User manual

Croydex WC101169 User manual

Croydex

Croydex WC101169 User manual

Croydex WC257122 User manual

Croydex

Croydex WC257122 User manual

Croydex Chetsford User manual

Croydex

Croydex Chetsford User manual

Croydex WC9300 Series User manual

Croydex

Croydex WC9300 Series User manual

Popular Indoor Furnishing manuals by other brands

Next ELLA ROBE 895780 Assembly instructions

Next

Next ELLA ROBE 895780 Assembly instructions

Askia Kameleon K1-Solid Back Assembly instructions

Askia

Askia Kameleon K1-Solid Back Assembly instructions

Criterion TUSCANY1500 Assembly & instruction manual

Criterion

Criterion TUSCANY1500 Assembly & instruction manual

Home Decorators Collection CGBW2628 Use and care guide

Home Decorators Collection

Home Decorators Collection CGBW2628 Use and care guide

Livarno Living 337269 Assembly instruction

Livarno Living

Livarno Living 337269 Assembly instruction

Linon Williams 826301AWHT01U manual

Linon

Linon Williams 826301AWHT01U manual

Notável Móveis NT 1050 Assembly instructions

Notável Móveis

Notável Móveis NT 1050 Assembly instructions

Rauch 46127.9020 Assembly instructions

Rauch

Rauch 46127.9020 Assembly instructions

modway MOD-6229 quick start guide

modway

modway MOD-6229 quick start guide

Riverside Furniture Sophie 50359 Assembly instructions

Riverside Furniture

Riverside Furniture Sophie 50359 Assembly instructions

Steelcase Protege 433 Assembly Directions

Steelcase

Steelcase Protege 433 Assembly Directions

J&K SVA24P Assembly instructions

J&K

J&K SVA24P Assembly instructions

Hay T12 instruction manual

Hay

Hay T12 instruction manual

Leisure Line Designer Series Assembly instructions

Leisure Line

Leisure Line Designer Series Assembly instructions

Oklahoma Sound TWPL Assembly instructions

Oklahoma Sound

Oklahoma Sound TWPL Assembly instructions

modway EEI-3683 Series manual

modway

modway EEI-3683 Series manual

AURAFINA V2421 Assembly guide

AURAFINA

AURAFINA V2421 Assembly guide

Next MALVERN 604104 Assembly instructions

Next

Next MALVERN 604104 Assembly instructions

manuals.online logo
manuals.online logoBrands
  • About & Mission
  • Contact us
  • Privacy Policy
  • Terms and Conditions

Copyright 2025 Manuals.Online. All Rights Reserved.