Cuckoo CAC-C1010FW User manual

AIR PURIFIER
USER MANUAL
CAC-C1010FW

Air Purification
This product filters out fine dust that is airborne using an True HEPA H14 filter mounted at the inlet
of the product.
Toxic Gas purification
Removes harmful gas and odors that are airborne to make sure your home is safe.
Fan Speed Control
Set your preferred fan speed.
Set Timer
Set a custom timer for your air purifier. Perfect for automatic On/Off function.
4-Level Automatic Pollution Detector Sensor
The product detects the pollution status of the air indoors in real time through the Pollution Sensor.
When Automatic Operation setting is selected, the product automatically controls the power output
according to the surrounding pollution degree to make the indoor environment pleasant.
Air Quality Display
The product automatically detects the cleanliness of the indoor air through the Pollution
Sensor and displays the cleanliness. Also, the light can be turned ON/OFF by using the Power-
Saving function.
Merits of Cuckoo Air Purifier
To our customers!
Thank you for choosing Cuckoo Air Purifier.
Please keep this User Manual (including the Warranty) for your reference.
This manual will guide you when you have any questions or when the product
does not work properly.

CONTENTS
Before Use
Merits of Cuckoo Air Purifier
Warnings for Safe Use
Name of Parts / Accessories
2
4~7
8~9
How to Use
Details to Check before Use
Names/Functions of the Control/Display Panel
Self Diagnostic Mode
Basic Operations
Operating Modes
Options
Other Settings
Cleaning and Maintenance Guide
How To Replace Filters
How to Install Wheels
10
11~13
14
15~16
17~21
22~23
24~27
28~30
31
32
Before Asking for
Support
Please check before asking for Support
33
Service Guide
Product Specifications and Inquiry about Malfunction
34

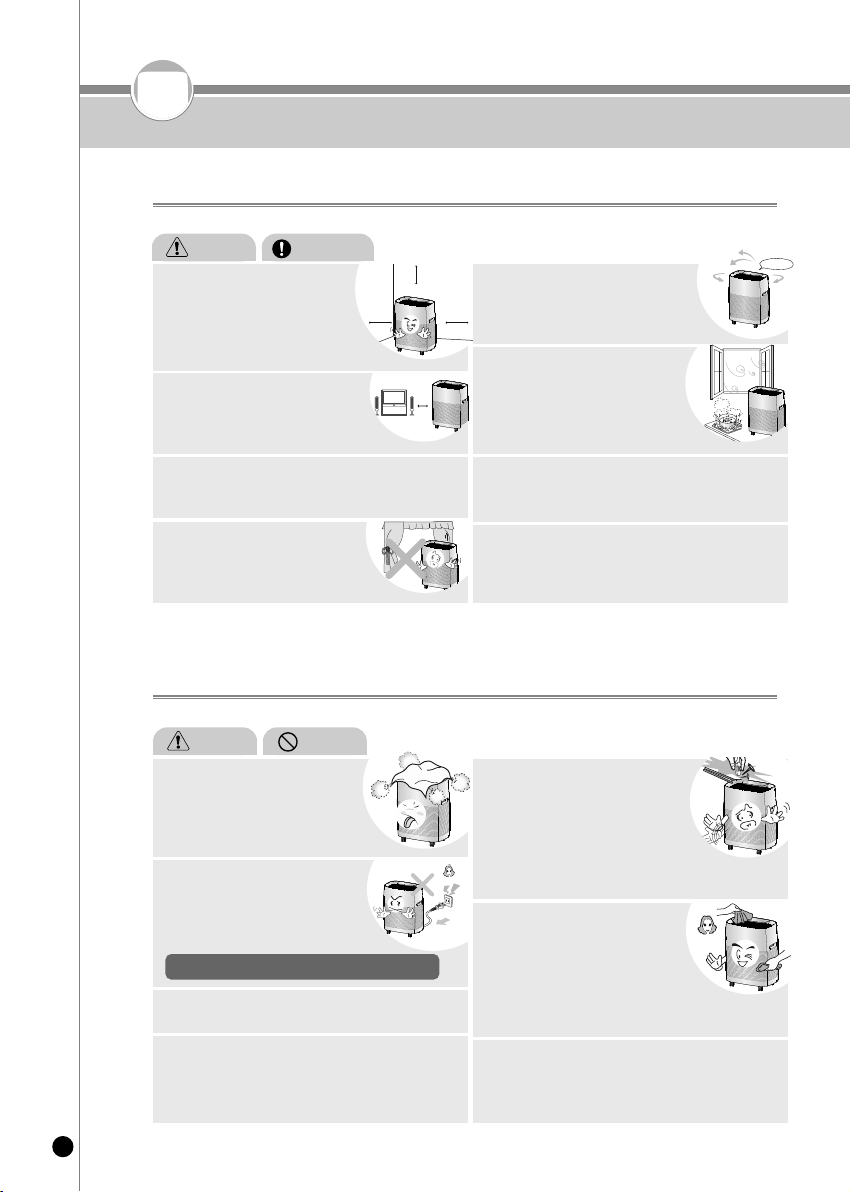
Wipe off any foreign substance on
the Power Plug with a dry cloth.
•This may cause electric shock or fire.
Please check the state of the power plug
frequently.
Use 120V power input only.
•This may cause electric shock or fire.
•The device will not operate properly.
•Please check the state of the power cord and
plug requently.
4
Warnings for Safe Use
•This symbol is to remind you to be cautious about a
potentially dangerous situation under special
circumstances.
•Please read the details carefully and follow the
instructions to avoid dangerous situations.
•This symbol is used to indicate actions that are
prohibited.
•This symbol is used to indicate ‘instruction’ actions.
Please comply with the ‘Warnings for Safe Use’ as they are provided to ensure safe and proper use of
the device and prevent accidents and dangerous situations.
The 'Warnings for Safe Use' section is divided into 'Warning' and 'Caution' which are defined as follows.
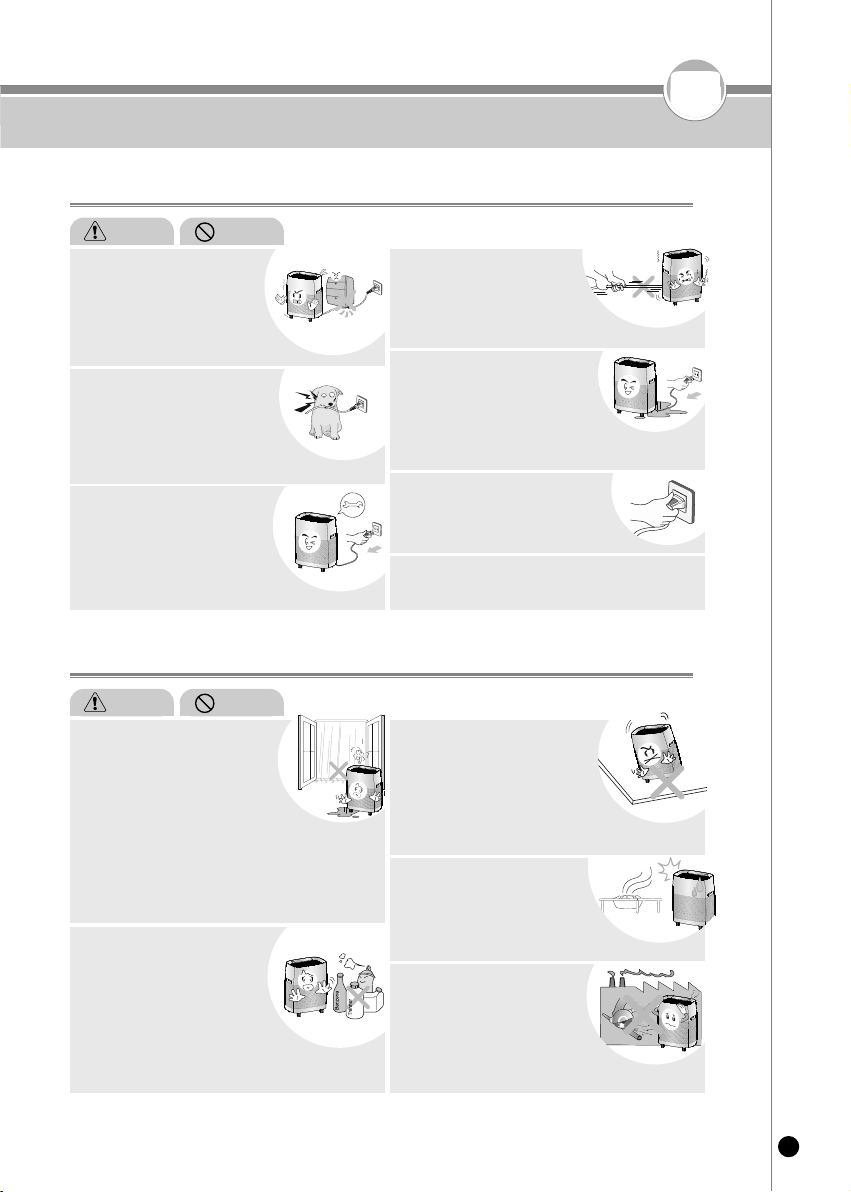
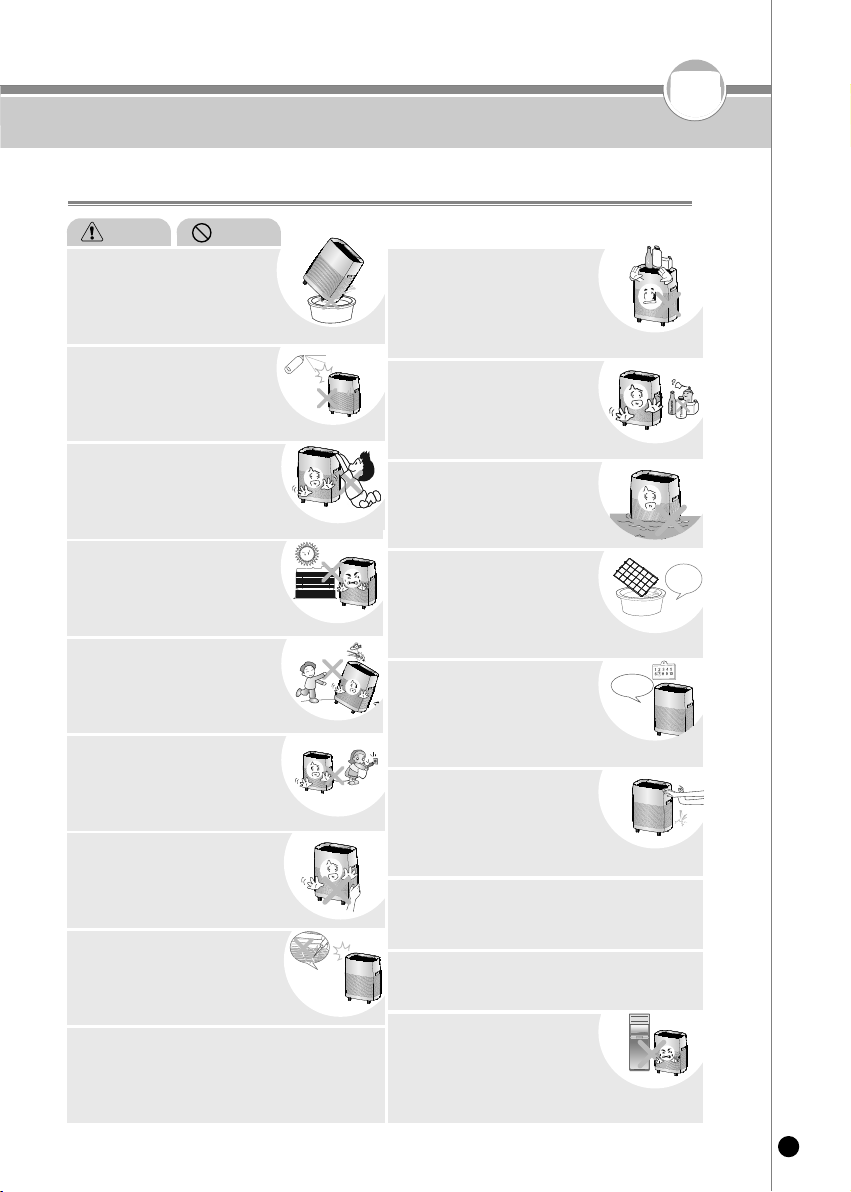
About Power Supply
Potentially dangerous situation that can cause
serious injuries or death if not avoided.
Potentially dangerous situation that can cause
minor injuries if not avoided.
Warning
Caution
In case of water leakage or cleaning, please unplug the
device first.
•There is a risk of electric shock or
malfunction. Please check the state of
the Power Plug and the power cord frequently.
Plug the power plug into a
120V outlet with at least a
rating of 10A and power surge
protection. Do not plug in
multiple devices into the same
power outlet or extension cord
simultaneously.
•When multiple devices are plugged into the same power outlet or if
the device is plugged into an inappropriate power input, it may
cause heating, fire and electric shock.
•If there is a foreign substance or water on the power plug, please
wipe it clean before plugging it into the socket.
•Use an extension cord of 10A or higher.
Do not bend, tie or pull the power
cord by force.
•This may cause electric shock or
fire due to a short circuit.
Please check the state of the
power cord frequently.
Warning Do not
•Force applied to the power cord may
cause electric shock or fire. Please check
the state of the power cord and plug frequently.
When putting in or pulling out the
Power Plug, first remove moisture
on your hands and then put in or
pull out the Power Plug by holding
the Power Plug.
•Unplugging the power plug with wet hands may cause electric
shock.
•Pulling the power cord by force can damage the cord and may
cause a short circuit or electric shock. Please check the state of the
power cord and plug frequently.
•If the sheath of the power cord is peeled off or chopped during
use due to negligence, it may cause fire or electric shock. Thus,
please check the state of the power cord, Power Plug and Power
Outlet frequently.
•To replace the damaged power cord or plug, please visit
CUCKOO website and contact Customer Service to prevent
dangerous situations.
•We strongly recommend that the damaged parts be repaired or
replaced.
•Otherwise, this may cause electric shock or fire due to a short
circuit.
Stop the use and contact
Customer Service when the
power cord or plug is damaged
or the power outlet is loose.
Do not pull the power cord
when unplugging the product.

5
Warnings for Safe Use
About Power Supply
Installation Guide
Do not put anything heavy
or the product on the power cord.
•This may cause a damage to the
power cord, leading to fire, electric shock,
orfall of the product.
Make sure the power cord is not
under a heavy object or near sharp
objects. Please ensure that it is not
damaged by your pet.
•If the power cord is damaged, it may cause electric shock or fire.
Please check the state of the power cord frequently.
Please turn off the product by pressing
the power button. Also, unplug the
product before inspection, repair or
replacement of its components.
•This may cause electric shock or
breakdown. Please check the state of the
power cord frequently.
Do not use the product outdoors
where the product may
contact direct sunlight, rain or
snow or places with moisture such
as a laundry room or a bathroom.
•This may cause fire or electric shock due to heating
and short circuit.
Do not place it in a bumpy or
slanted area. Do not place it on
a rug, cushion or laminated floor.
•This may cause malfunction, unwanted noise or injury.
Please check the state of the product frequently.
Do not keep or use insecticides,
combustible gas, inflammables,
or toxic substances near the
product.
•This may cause fire or a deformation or malfunction
of the product.
Do not use the product where
smell, smoke, or oil is generated
such as a restaurant or a barbecue
restaurant.
•This may cause a decrease in the performance.
Do not install the product in a place
with much oil or smoke for
industrial purposes or metallic dust.
•This may cause fire or a malfunction of the product.
Do not randomly connect or process the power cord.
•This may cause electric shock or fire.
Do not put in and pull out the
Power Plug continuously.
•This may cause electric shock or fire.
If the power supply area is wet,
unplug the product and let it dry
completely before use.
•This may cause electric shock or fire.
Please check the state of the Power Plug
and the power cord frequently.
When moving the product,
do not pull the power cord.
•It may cause a damage to the product,
electric shock, or fire.
Please check the state of the Power Cord frequently.
Warning Do not
Warning Do not

6
Warnings for Safe Use
Installation Guide
Air Circulation
Service Center
During Use
Service Center
www.CUCKOOAMERICA.com
20inch
24inch
20inch
Warning Caution
Warning Do not
Place the product at least 20inch away
on the sides and 24inch away on the
top from the wall and surrounding
objects.
•Keep these distances for optimal performance.
Please check if there is any obstacle
around the product to ensure good
air circulation.
Open the windows for ventilation
before using gas appliances,
combustibles and other inflammables.
•There is a risk of explosion or fire.
Do not use the product as a ventilating fan or hoods for
ranges in the kitchen.
•This may cause poor performance of the product and filters.
Do not use the product for anything other than its intended
purpose, e.g. preserving artworks, maintaining precision
instruments and plant and animal breeding.
•If you do not do so, it may cause electric shock or fire.
Place it at least 80inch away from
electronic products such as a TV.
•This cause a radio interference.
Do not use the product for removing toxic gas such
as carbon monoxide.
•This may cause a malfunction of the product.
Do not install or use the product
near a curtain.
•The Pollution Sensor may not work properly.
Do not put your finger or any
other foreign substances such as
a stick into the Air Inlet or the
Air Outlet.
•You may get injured by the fan rotating at
a high speed.
•This may cause a malfunction of the product.
Make sure to move the product by the handle.
Do not hold any part other than the handle when
moving the product.
•This may cause a damage or deformation of the prodduct.
Do not clean the interior of the
purifier yourself and please contact
Customer Service for technical
support.
•Otherwise it may cause malfunction of the
product or an electric shock.
Do not put an obstacle around
the Air Inlet or the Air Outlet of the
product.
•This may cause poor performance, abnormal
noise, or malfunction of the product.
If abnormal noise, smoke, or smell
occurs from the product, first pull out
the Power Plug, and then contact our
Customer Service Center.
•This may cause fire, burns, or injury.
Do not inject a toxic substance such as smoke of a cigarette
into the porous part on the side of the product, or poke with
a sharp object.
•This may cause a malfunction of the product, fire or electric shock.
Do not put heat of fire near the product.
•It may cause a malfunction or deformation of the product or fire.
80inch

7
Warning Do not
Warnings for Safe Use
During Use
Never soak the product in water.
•There is a risk of electric shock.
Replace with
genuine filter
Dry after
cleaning!!
Do not place a bowl with water,
drugs, foods, small metallic materials,
inflammables, etc. on top of the
product.
•When split, it may cause electric shock, fire, or a damage.
Do not clean the product in person
by spraying water or wiping out with
benzene, thinner, etc.
If it’s wet, contact our Customer
Service Center.
•There is a risk of malfunction or electric shock.
Wash the Pre-Filter with water on a
regular basis and dry it well before
use.
•Otherwise it may cause a reduced performance
of the product.
•Dry it in the shade.
Please replace the filters in a timely
manner.
•This may cause poor performance of the product.
Do not push nor lean on the product.
It may fall to the ground.
•This may cause an injury or malfunction of the product.
After cleaning, please make sure to put the parts in their
original position.
•Otherwise it may cause malfunction of the product.
Do not lay the product for use.
•This may cause malfunction of the product.
Do not put the product where the
wind of an air conditioner or a heater
reaches or near a window.
•This may cause malfunction of the sensors.
Do not sprinkle inflammables such as
an insecticide or an air freshener to
the Air Inlet.
•This may cause fire or poor performance of the product.
Do not stand on top of the product
nor put anything heavy.
•This may cause a malfunction of the product or
injury due to fall or damages.
Please avoid using it near a heating
device.
•This may cause fire or electric shock.
Keep out of the reach of children.
•Otherwise it may cause electric shock or injury.
Do not turn OFF by pulling the plug.
•This may cause an electric shock or malfunction
of the product.
Do not move the product while it is
working.
•This may cause fire or electric shock or
partial damage to the product.
When opening the Filter Cover,
please be careful not to let your body
or any other foreign material be stuck
in the product.
•This may cause an injury or malfunction of the product.
Be careful of any raised spot or obstruction on the floor
when moving the product that may cause a scratch or
damage to it.
•Although wheels are mounted on the bottom of the product for its
mobility, the product has fairly low floor for its design.

8
Name of Parts / Accessories
Control & Display Panel
Handle
Fine Dust Sensor
Air Outlet
Air Purifying Filter
Filter Cover
/ Air Inlet
Cleanliness Indicator
User Manual
User Manual
Accessories
Name of Parts
ServiceCard
Service Card Caster Set

9
Name of Parts
Air Filters
Filter Functions
▶Assembly sequence of Filters : True HEPA H14 Filter →Active Carbon Deodorization Filter →
Harmful Gas Easy Filter S →Pre-Filter
Pre-Filter Removes large dust, hair, pet fur, etc.
Harmful Gas
Easy Filter S
It removes sulfur oxides and nitrogen oxides quickly and effectively to
provide a more comfortable atmosphere.
Active Carbon
Deodorization Filter
Activated Carbon Deodorizing Filter removes odors, harmful gas,
cigarettes, animal fur, NO2.
True HEPA H14 Filter Filters mites, pollens, fine dust, and smoke.
※The picture may differ from the actual product.
Section Air Filter
Level 1
Level 2
Level 3
Level 4
Pre-Filter
Harmful Gas Easy Filter S
Active Carbon Deodorization Filter
True HEPA H14 Filter
Harmful Gas Easy Filter S
Pre-Filter True HEPA H14 Filter
Active Carbon Deodorization Filter

10
Details to Check before Use
Take out the filter and remove the vinyl wrapping.
▶Remove the vinyl wrapping from all filters except the Pre-filter, and then follow the filter assembly instructions.
▶Assembly sequence of Filters: True HEPA H14 Filter →Active Carbon Deodorization Filter →
Harmful Gas Easy Filter S →Pre-Filter
(Refer to the Air Purifying Filter System on page 9.)
2
Connecting the power
▶This product is exclusively for 120V.
Please connect the product to the exclusive Power Outlet.
4
Press the "On/Off" button to operate the unit. Also,
Press the "Mode" button to set the desired option.
※
Make sure the filter is assembled correctly before operating the
product.
5
Press the "On/Off" button to shut off the unit.
▶All the indicators on the Display Panel will be turned OFF.
6
Reassemble the Filter Cover onto the product.
▶Be careful not to get any of your body or foreign material
stuck in when reassembling the cover.
Please be careful when reassembling the product, may cause
injury or malfunction of the unit.
3
Open the filter cover.
▶Open the filter cover from the upper left part of the unit.
※
Do not forcefully remove from the bottom of the unit.
It may cause a damage to the product.
1
Caution: When the product is not in use, please unplug the unit.This product is exclusively for 120V,
60Hz. Put the Power Plug in the exclusive Power Outlet.
Caution

11
Names/Functions of the Control/Display Panel
Control Panel
• ON/OFF : To turn the unit on and off.
• MODE : Select the desired mode.
※
Each time the button is pressed, the mode changes in the order of AUTO, ROOM CARE, YELLOW DUST,
BABY, SLEEP and REPEAT.
• Fan Speed : Adjust the fan speed in the manual mode.
※
Each time the button is pressed, the speed setting changes in the order of BREEZE(Level 1),
LOW(Level 2), MEDIUM(Level 3) and HIGH(Level 4).
• TIMER : Preset AUTO ON/OFF and set time for REPEAT.
※
You can preset the timer and the time for repeated air purification from 1 to 12 hours in units of an hour.
• AIR STERILIZATION : Turn on and off the Plasma Ionizer.
※
Press the button, and the STERILIZATION button will be turned ON, and the Plasma Ionizer will start
working. If you press the button again, the button will be turned OFF, and the Plasma Ionizer will stop.
• TURBO : Select the TURBO mode.
※
To return to the previous mode, press the "Turbo Mode" button again.
• AIR CLEANLINESS : Check the ultrafine dust concentration in air.
※
When pressed, the fine dust concentration icon indicates for five seconds and displays the readings.
• 3 SEC SETTINGS : Set functions.
※
If you press the button for three seconds or longer continuously in the waiting mode, the product will
enter the Language Setting mode, and a Voice Guide will be provided.
※
In the Room Care Setting mode, each time the MODE button is pressed, you will enter the following setup
modes in order: Language Setting mode, Voice Volume, Filter Replacement Alarm, Sensor Sensitivity,
Screen Saver, Energy Eye and Turbo Operating Time.
▶Refer to How to Set Functions in pages 24~27.
• BUTTON LOCK : Locks the buttons.
※
To activate the "Button Lock" function hold down the "Time" button for 3 seconds or more. (The "time button"
will flicker 3 times when activated.)
※
In the lock mode, press the button for three seconds to unlock the buttons. (“UL _” flickers three times
on the display panel when the lock is released.)
※
When Button Lock is set, “ ” indicates, and “Loc” flickers three times on the display panel when any
button other than TIMER is pressed.
• Cleanliness Indicator : Displays cleanliness of air.
※
This indicator goes on when the AIR CLEANLINESS button is pressed for three seconds while the unit is
in operation and goes off when the button is pressed for another three seconds.

12
Names/Functions of the Control/Display Panel
Display Panel
• AUTO : This indicates the product is in automatic air purification mode.
• ROOM CARE : This indicates the product is in room care air purification mode
• YELLOW DUST : This indicates the product is in yellow dust air purification mode.
• BABY : This indicates the product is in air purification for baby mode.
• REPEAT : This indicates the product is in repeated air purification mode.
• SLEEP : This indicates the product is in air purification during sleep mode.
• VOICE( ) : This indicates the Voice function is on.
(The indicator goes off with the voice volume set to OFF.)
• AUTO ON : This indicates when the AUTO ON function is set.
• AUTO OFF : This indicates when the AUTO OFF function is set.
• CHANGE FILTER : This indicates it is the time for replacing the filters.
• BUTTON LOCK( ) : This indicates when the Button Lock function is set.
• 88 / Min / Hr / Level : This displays concentration of ultrafine dust, timer settings and fan
speed settings for modes.
• ON/OFF : This indicates operation of the product. It goes off when the product stops operating.
• MODE : This indicator goes on for three seconds when AUTO, ROOM CARE, YELLOW DUST,
BABY, SLEEP and REPEAT is selected.
• FAN SPEED : This indicates the manual operation function is on.
• TIMER : This indicator goes on when AUTO ON, AUTO OFF or REPEAT function is selected.
• STERILIZATION : This indicator will appear when the Plasma Ionizer is activated.
• TURBO : This indicates the product is in TURBO mode.
• AIR CLEANLINESS : This indicates for five seconds when AIR CLEANLINESS is selected.

13
Names/Functions of the Control/Display Panel
Cleanliness Indicator
• Cleanliness Indicator : This displays the cleanliness of Names/Functions of the Control/Display Panel air
with colors.
※If you do not operate the product in any way after connecting the Power Plug, no display will show.
Press the ON/OFF button to start operating the product.
※Make sure you hear a beeping noise when pressing the button. The Control & Display Panel may look
different from the actual appearance.
※Different fan speeds may affect the product performance for air purification.
※The indicator turns on automatically when SLEEP, BABY or MANUAL is selected.
※To display air cleanliness, press the AIR CLEANLINESS button for three seconds. The settings are
applied until the operation is shut.
※If multiple air cleaning products are being used in the same room, the ultrafine dust indicator readings
may not be accurate.
Pollution
Level
Level 1
(Clean) Level 2 Level 3 Level 4 Level 5 Level 6
(Pollution)
Air
Cleanliness
Indicator
Blue Teal Green Yellow Purple Red

14
Self Diagnostic Mode
When the unit is not working properly, the display panel will show an alert. If there is
an alert that will not disappear, please contact our customer service center.
This indicates a malfunction of the Fan Motor.
Contact our Customer Service Center.
This indicates a malfunction of the Filter Cover.
Remount the filter cover.
If the issue is not fixed, please contact our Customer Service Center.
This indicates a malfunction of the memory inside MICOM.
Contact our Customer Service Center.
Self Diagnostic Mode

15
Basic Operations
Basic Operation
❶
Insert the plug into a wall outlet.
▶The product will enter the waiting mode with a beeping sound.
※If the plug was pulled out while still in running, the unit operates in the mode set previously.
❷
Press the ON/OFF button.
▶ON/OFF and AUTO icons are lit up on the Display Panel, and the fan starts operating.
The 3-digit display shows the current fan speed.
※It runs in the previous operating mode. (Except TURBO)
※If the Filter Cover is not mounted, an error code will show on the 3-digit display.
❸ -1
Press MODE to select the desired operating mode.
▶Each time the button is pressed, the mode changes in the order of AUTO, ROOM CARE,
YELLOW DUST, BABY, SLEEP and REPEAT
❸ -2
Press FAN SPEED to select the desired fan speed.
▶Pressing FAN SPEED changes the operating mode to AUTO. Each time the button is
pressed, the speed setting changes in the order of BREEZE(Level 1), LOW(Level 2),
MEDIUM(Level 3) and HIGH(Level 4).
❸ -3
Press TIMER to set the duration for the unit to go off.
▶You can set the OFF timer while it’s running by pressing the TIMER button.
※It flickers for three seconds and then stays on when the timer is set.
※You can set the timer from 1 to 12 hours in units of an hour.
※Preset the time to be “- -”, and the AUTO OFF mode will be canceled.
❸ -4
Press STERILIZATION to activate the Plasma Ionizer.
▶If you press the button, the ion generation operation of the Plasma Ionizer will start and
the icon will be turned ON. To stop it, press the button while the Plasma Ionizer is in running.
※The Plasma Ionizer may make a crackling noise which is normal.
❸ -5
Press TURBO to change the operating mode.
▶Select this mode to speed up the air purification at the maximum fan speed.
※TURBO indicator is turned on when this mode is selected.
※To return to the previous operating mode, press the button again.
※TURBO mode is set to run for 30 minutes. After that, it returns to the previous operating mode.
❸ -6
Press AIR CLEANLINESS to gauge the ultra-fine dust concentration.
▶The product will enter the waiting mode with a beeping sound.
※
It shows the concentration readings on the front display panel for five seconds.

16
Basic Operations
Basic Operation
❸ -7
Press the AIR CLEANLINESS button for three seconds to select the cleanliness indicator.
▶Each time the button is pressed for three seconds, the cleanliness indicator is turned on
or off.
※TURBO indicator is turned on when this mode is selected.
※To return to the previous operating mode, press the button again.
※TURBO mode is set to run for 30 minutes. After that, it returns to the previous operating mode.
※The running time for TURBO mode can be changed in the settings.
❸ -8
To stop the unit, press the ON/OFF button again.
▶All the lights of the Display Panel and the Front Display Panel will be turned OFF,
and the product will enter waiting mode.

17
Operating Modes
Operating Modes
AUTO mode detects the air quality and will automatically
adjust the necessary fan speed.
Automatically adjusts to the surrounding
environment.
• In the standby mode, press the ON/OFF button once.
Initially, the unit will run in AUTO mode. If a different mode was selected it will maintain
your selected operating mode.
• It senses the air quality and adjusts the fan speed.
• Shows current fan speed and cleanliness of air during the operation.
• Press the AIR CLEANLINESS button for at least three seconds to turn on and off the
cleanliness indicator.
AUTO
• In AUTO mode, press the MODE button once.
• It auto controls the fan speed using preset levels.
• It shows the current fan speed and cleanliness of air during operation.
• Press the AIR CLEANLINESS button for at least three seconds to turn on
and off the cleanliness indicator.
Room Care Air Purification
※The control and display panel may appear differently than the image above.

18
Operating Modes
Operating Modes
• In AUTO mode, press the MODE button once.
• It auto controls the fan speed using the preset algorithms.
• It shows the current fan speed and cleanliness of air during operation.
• Press the AIR CLEANLINESS button for at least three seconds to turn on and off the
cleanliness indicator.
YELLOW DUST
• In AUTO mode, press the MODE button twice.
• It minimizes the air volume and operates the STERILIZATION function to help babies
sleep well.
• Initially, the display panel shows MODE indicator for five seconds, and then only BABY
stays on.
• The cleanliness indicator initially stays on for five seconds and then off.
• To turn on the cleanliness indicator, press the AIR CLEANLINESS button for three
seconds. It stays on until the power plug is pulled out.
BABY
※The control and display panel may appear differently than the image above.
Is a setting that automatically adjusts to eliminate yellow dust.
Is a setting for sterilizing the environment for infants at the lowest
noise level.

19
Operating Modes
Operating Modes
• In AUTO mode, press the MODE button four times.
• Minimizes air volume for a peaceful experience.
• Initially, the display panel shows MODE indicator for five seconds, and then only SLEEP
mode stays on.
• The cleanliness indicator initially stays on for five seconds and then off.
• To turn on the cleanliness indicator, press the AIR CLEANLINESS button for three
seconds. It stays on until the power plug is pulled out.
SLEEP
• In AUTO mode, press the MODE button three times.
• Press the TIMER button to set up the repeating time. (The timer can be set from 1 to 12
hours in units of an hour.)
• If no TIMER button is present, it repeats running and stopping.
• If a mode was set previously, it runs on the previous set time.
• It repeats running and stopping depending the set time.
• The operation is the same as in the AUTO mode.
REPEAT
※The control and display panel may appear differently than the image above.
ON OFF
Is a setting made for sleep, operating at a low sound level.
Once your timer is set, it will automatically repeat based on
the selected time.

20
Operating Modes
Operating Modes
• When the Energy Eye Night Sensor senses darkness during operation, all indicators
including the cleanliness indicator are turned off, and the Power Saving option on.
• The Power Saving goes off when it gets bright or a button is pressed.
※Please refer to Other Settings in page 25 for how to set the Energy Eye function.
ENERGY SAVE
• Press the FAN SPEED.
• Select FAN SPEED from Low, Medium, or High.
• The cleanliness indicator will remain on for five seconds and then it will shut off.
• To turn on the cleanliness indicator, press the AIR CLEANLINESS button for three
seconds.
It stays on until the power plug is pulled out.
MANUAL
※The control and display panel may appear differently than the image above.
Detects indoor lighting and adjusts accordingly.
Mode that operates by selecting the desired fan strength
Table of contents
Other Cuckoo Air Cleaner manuals

Cuckoo
Cuckoo CAC-G0910FW User manual

Cuckoo
Cuckoo CAC-D2020FW User manual

Cuckoo
Cuckoo CAC-F3010FW User manual

Cuckoo
Cuckoo CAC-AB0610FI User manual

Cuckoo
Cuckoo CAC-AF1110FW User manual

Cuckoo
Cuckoo AC-12ZH10F User manual

Cuckoo
Cuckoo CAC-I0510FW User manual

Cuckoo
Cuckoo CAC-J1510FW User manual

Cuckoo
Cuckoo CAC-K1910FW User manual