manuals.online logo
Brands
  1. Home
  2. •
  3. Brands
  4. •
  5. Cycle Torch
  6. •
  7. Bicycle Accessories
  8. •
  9. Cycle Torch GT 3000 User manual

Cycle Torch GT 3000 User manual

GT 3000
High Power light
Thank you for purchasing!
To insure maximum experience and safety, familiarize yourself with ALL aspects
of your new light and battery system. Follow battery charging instructions before
use as systems are shipped with partially charged batteries.
To insure maximum experience and safety, familiarize yourself with ALL aspects
of your new light and battery system. Follow battery charging instructions before
use as systems are shipped with partially charged batteries.
To insure maximum experience and safety, familiarize yourself with ALL aspects
of your new light and battery system.
1.Installation
2.Battery usage and charging
3.Light system operation
4.Warranty, support, customer service
Caution:
1.Always unplug the light from the battery when not in use.
2.Use only our supplied HYPER charger with the battery.
Failure to follow these cautions will void the warranty and can cause damage to
the system.
A lighting system can make riding safer and you more visible, but lights are no
substitute for common sense. Ride within your capability with consideration for
the riding environment.
Installation:
The high power light set comes with mounts for both handlebar and helmet.
There are different sizes of rings gaps to accommodate various of handlebars,
both for 3000 lumens front light and wireless controller. When mounting the
battery, locate a place that will keep it and the wires protected from kinking or
being pinched in the event of a crash or in any other situation.
The light system is designed to be mounted on a handlebar, on the enclosed
helmet or head mount. Both mounts will use one of the rubber rings. The battery
may also be mounted using the attached Velcro elastic strap. When mounting
the battery, ensure adequate length of cable so that there is full freedom of
movement of the mount and that is does not pull on the battery, light or their
connections or cause the wire to become pinched or stressed. When mounting
the light, run the cable over the handlebar first. Provide an extra half wrap of cable
in case the light is twisted around the handlebar. Excess wire may be wrapped
around the handlebar or secured within the Velcro elastic strap.
When using the helmet mount for the light, the battery is designed to be carried
in a jacket pocket or a back pack that you are wearing.
Caution:
Do not connect a helmet mounted light to a bike mounted battery.
Headlamp mount: The headlamp mount may be used for a variety of mounts
with the included long Velcro elastic straps. It is designed in such a way that the
light is easily removed using the rubber ring similar to mounting on the handlebar.
You may find it advantageous to use both a handlebar mounted light and a head
mounted light. The head mount provides the additional safety and flexibility to
point the light quickly in any direction your head points.
Aiming the light: When using any mounted light, ensure that the mounting
does not project the beam directly into the eyes of oncoming motorists or
cyclists.
A temperature protection circuit will stop the light from overheating, by stepping
the output down if the light is left on full with no airflow around it.
Helmet or head mount Bar mount
CAUTION:
1.Battery Charger is for use only with the included Li-ion battery pack.
Trying to charge other than the included battery pack may cause batteries
to catch fire, overheat leak or explode. Do not charge the battery with other
approved charger for this model.
2.Do not expose charger to rain or moisture.
3.Although the battery pack may be left on the charger longer than 24
hours without damaging the battery pack, if the battery is not going to be
used for an extended period, the battery life and capacity will be better
preserved by discharging the battery to approximately half of capacity and
then disconnecting and storing. Every 3 to 4 months connect battery to light
and use up the remaining capacity in the battery and then charge to 50%
capacity before continuing storage.
4.Disconnect the charger when not in use and before connecting or
removing batteries from charger.
Do not use charger or battery if, the wires or the batteries or charger have
become damaged.
Battery usage and charging:
Charge your battery pack immediately after use. Li-Pol batteries do not have a
“memory” and can be left at full charge, although battery life is extended if you
follow CAUTION step #3 above.
1. Plug the battery pack into the charger.
2. Connect the charger to the power outlet.
3. The LED on the charger will glow red when the battery is being charged and
turn to green when the battery is fully charged.
4. When the charger LED turns green, you may unplug the charger and then
remove the battery pack from the charger. Charging a fully discharged battery
may take up to 4-5 hours.
Light system operation:
Operation modes: The initial short press of the button will turn the light on High.
Each additional short press of the button switches the light from one mode to the
next, i.e. High, Medium, Low, Flash.
Turn light off: Press and hold the button for one to two seconds. If leaving the
light unattended, disconnect from the battery.
Also the light could be turned off via the remote control.
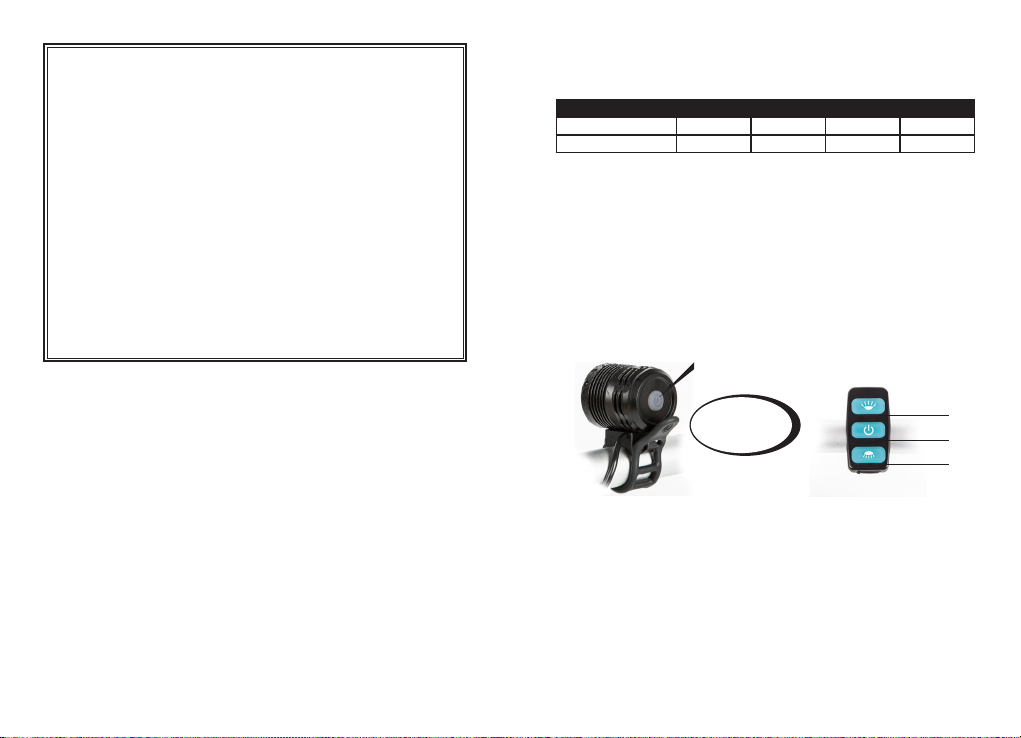
High Medium Low Flash
Approx Run Time 2.5 hours 5 hours 10 hours 10 hours
Approx Lumens 3000 1500 800 1500
Low battery level: The light operating button will turn red when the battery level
is low (<30% left) and the light will automatically turn off when the battery level is
too low. This system protects the battery from damage, but since it draws a small
amount of current, it can drain the battery beyond the minimum voltage for the
battery.
Therefore the light must be disconnected from battery when the
button glows red or within 5 minutes of glowing red. Do not wait until
the light goes completely out as this will greatly reduce the number of
charge cycles that the battery can be used and can render the battery
unusable.
Disconnect the battery when not in use or stored.
Remote control operation: (lamps can be used separately without controller,
refer to above):
Coding wireless remote controller: With the light attached to the battery
but turned off, press the button for 3 seconds and release. The indicator will red
flash. Press the wireless remote controller power button. The light indicator will
turn blue flash, the wireless remote controller coding well. If the light indicator still
red flash, light and remote connect failed, try again.
The controller can monitor the modes of light by pushing relevant buttons on it
when correctly connected.
1. When the controller is well connected with the lamp, press the upper button it
OPERATION BUTTON
ON/OFF
BATTERY LEVEL
MODES
MODES+
ON-OFF
MODES-


  
 




 


 


      
Φ






   
 



 

 

 
       ¡
¢£¢


Other Cycle Torch Bicycle Accessories manuals

Cycle Torch Cruiser User manual

Cycle Torch

Cycle Torch Cruiser User manual

Cycle Torch Front Bolt User manual

Cycle Torch

Cycle Torch Front Bolt User manual

Cycle Torch White LED Headlight & Red Tail Bolt COMBO User manual

Cycle Torch

Cycle Torch White LED Headlight & Red Tail Bolt COMBO User manual

Cycle Torch Tail Bolt User manual

Cycle Torch

Cycle Torch Tail Bolt User manual

Cycle Torch Shark 550R User manual

Cycle Torch

Cycle Torch Shark 550R User manual

Cycle Torch SHARK 300 User manual

Cycle Torch

Cycle Torch SHARK 300 User manual

Cycle Torch MicroBot User manual

Cycle Torch

Cycle Torch MicroBot User manual

Cycle Torch SHARK 300 User manual

Cycle Torch

Cycle Torch SHARK 300 User manual

Cycle Torch Night Owl 200 User manual

Cycle Torch

Cycle Torch Night Owl 200 User manual

Cycle Torch Fire stick User manual

Cycle Torch

Cycle Torch Fire stick User manual

Cycle Torch SHARK 500 User manual

Cycle Torch

Cycle Torch SHARK 500 User manual

Cycle Torch GT 800 User manual

Cycle Torch

Cycle Torch GT 800 User manual

Popular Bicycle Accessories manuals by other brands

NORAUTO DECK 200-2 user manual

NORAUTO

NORAUTO DECK 200-2 user manual

FiT DISPLAY COMPACT instruction manual

FiT

FiT DISPLAY COMPACT instruction manual

VDO Cyclecomputing R4GPS Short manual

VDO Cyclecomputing

VDO Cyclecomputing R4GPS Short manual

Fiamma RAIL PREMIUM Installation and usage instructions

Fiamma

Fiamma RAIL PREMIUM Installation and usage instructions

ROTOR BSA30 quick start guide

ROTOR

ROTOR BSA30 quick start guide

Insportline 24174 user manual

Insportline

Insportline 24174 user manual

Burley Moose Rack instructions

Burley

Burley Moose Rack instructions

DEEP EAST SUPPLY Weblazer user manual

DEEP EAST SUPPLY

DEEP EAST SUPPLY Weblazer user manual

DAPU C800 instructions

DAPU

DAPU C800 instructions

NC-17 Connect HR 4 Pulsgurt manual

NC-17

NC-17 Connect HR 4 Pulsgurt manual

Fluid 9341235252217 Owner's instruction & safety manual

Fluid

Fluid 9341235252217 Owner's instruction & safety manual

EUFAB 11526 manual

EUFAB

EUFAB 11526 manual

Sigma 1200 user guide

Sigma

Sigma 1200 user guide

Crivit 68643 instruction manual

Crivit

Crivit 68643 instruction manual

Hyena BS-A500 product manual

Hyena

Hyena BS-A500 product manual

Hamax Universal Carrier adapter user manual

Hamax

Hamax Universal Carrier adapter user manual

allen ASL5X-R user guide

allen

allen ASL5X-R user guide

Garneau BC-P3-GB instruction manual

Garneau

Garneau BC-P3-GB instruction manual

manuals.online logo
manuals.online logoBrands
  • About & Mission
  • Contact us
  • Privacy Policy
  • Terms and Conditions

Copyright 2025 Manuals.Online. All Rights Reserved.